Building a Deep Sky Astrophotography Kit

I am often asked for my opinion on the best route to take when building a deep-sky astrophotography kit for the first time. You need three main items: a camera, a telescope, and a mount.
A popular option for many night sky enthusiasts is to start with an interchangeable lens camera and a telescope, and I can understand why. Building a budget-friendly astrophotography setup around an entry-level DSLR or mirrorless camera can reap some impressive results.
Modern-day hobbyist/beginner interchangeable-lens cameras, such as the Canon EOS R10 or Nikon Z50 II, offer the least steep learning curve for deep-sky imaging in a very technical, sometimes overwhelming hobby.
Even if you decide to upgrade to a dedicated astronomy camera later, you’ll never regret purchasing a DSLR, as they have heaps of potential for all kinds of photography.

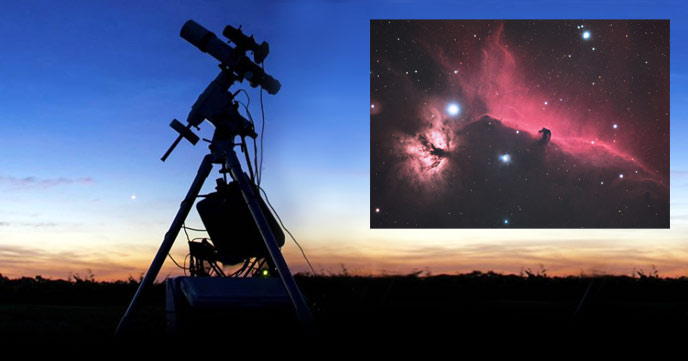
A beginner-friendly setup for astrophotography (DSLR and Telescope).
I started getting into astrophotography by taking long-exposure images of the night sky with my DSLR and a simple tripod. This evolved into capturing multiple hour-long images of deep-sky objects such as the Orion Nebula through a small refractor telescope.
A camera and a small telescope can capture incredible deep-sky objects in our night sky. It didn’t all come together in one day or even one year. If your fascination with astrophotography is as relentless as mine, deep-sky imaging will be a part of your life forever.
I would advise you to map out a clear vision of your goals and patiently work toward them. The most rewarding part of this hobby has been the steady progress I’ve made along the way. With that out of the way, here is some honest advice from someone in it for the long haul.

Related Article: Astrophotography Telescopes: What’s The Best Choice in 2025?
My Current Favorite Kit (Beginner-Friendly)
If you want to see the exact kit I am currently using in the backyard for deep-sky astrophotography, check out my latest setup (December 2025).
This is an extremely beginner-friendly wide-field astrophotography setup that is easy to set up quickly in the backyard. The key to this configuration is the ZWO ASI585MC Air, an all-in-one ‘smart camera’ that doesn’t require any additional hardware to operate.
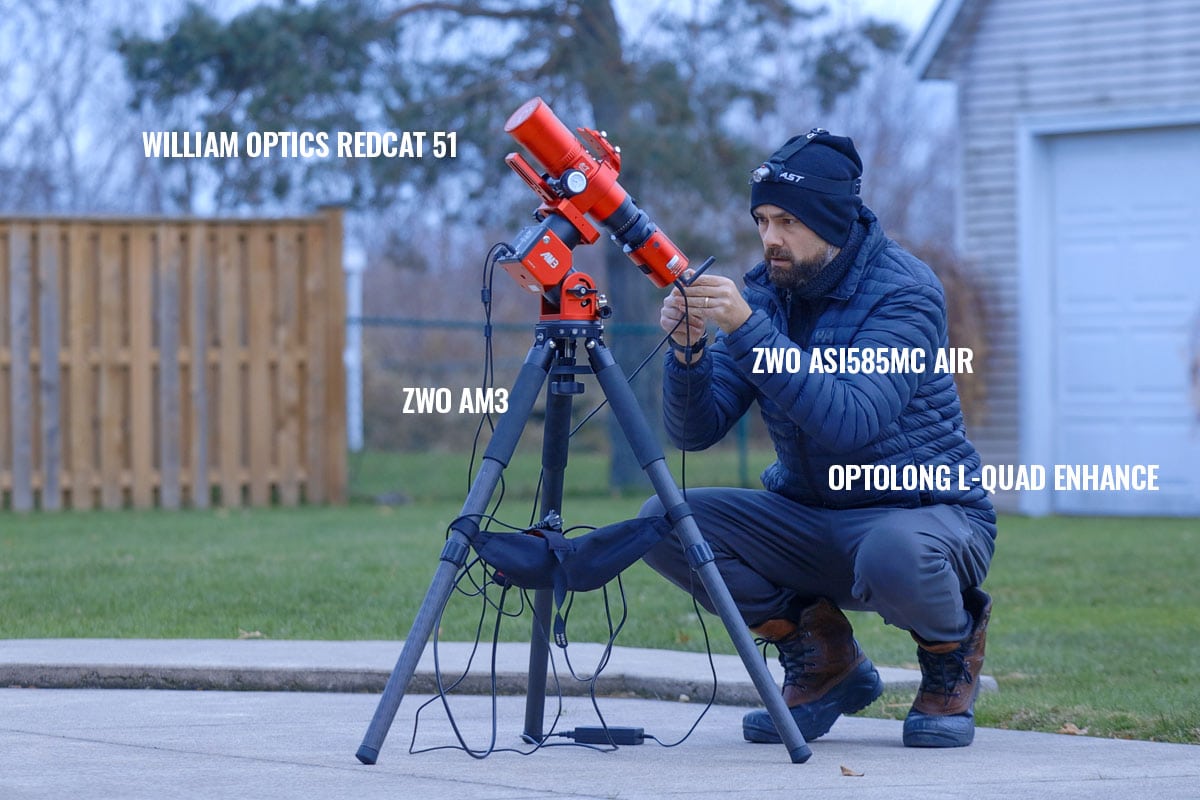
- Camera: ZWO ASI585MC Air
- Telescope: William Optics RedCat 51
- Mount: ZWO AM3
- Filter: Optolong L-Quad Enhance
A wide-field deep-sky setup like this is well suited for capturing large nebulae regions, and the larger galaxies such as Andromeda and the Triangulum Galaxy. While capturing images at a 250mm focal length has its advantages, smaller targets like planets and smaller galaxies will be out of reach.
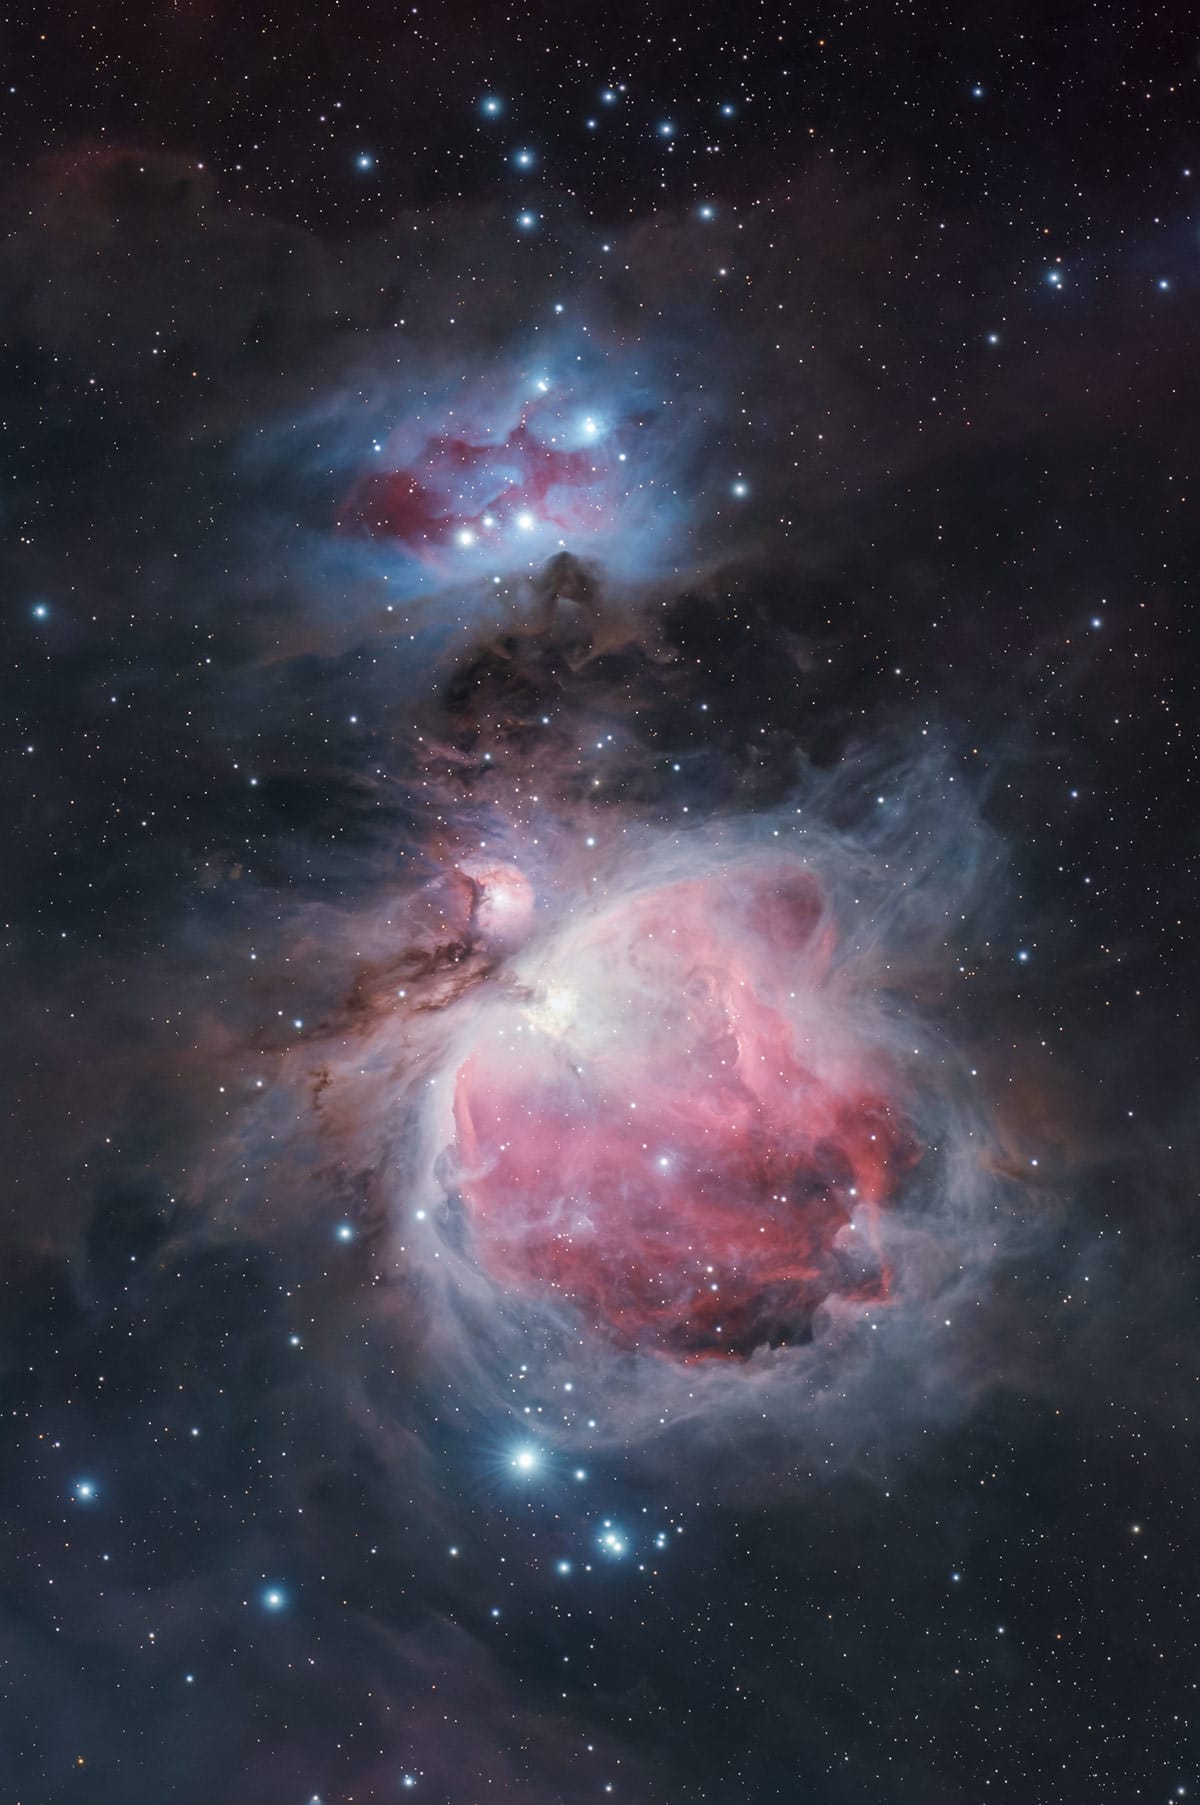
The Orion Nebula captured using the setup shown above. 175 x 120 seconds (2 Hours, 50 minutes total exposure).
Building a Starter Astrophotography Kit
In this post, I’ll give you my advice on building a deep-sky astrophotography kit that rewards you with the images you crave. This beginner-level kit will produce amazing images of galaxies and nebulae and provide a positive experience that will inspire you to keep going.
This is your chance to learn from my years of mistakes and jump straight into equipment that works. There are plenty of opinions on the best way to go about this, and I’d like to state that I can advise you on what has worked for me.
Researching exactly what you’ll need to photograph a deep-sky object can be confusing early on. My goal in this post is to make things as straightforward as possible and offer several different configurations to get you started. The tools you choose are interchangeable with these setups, but I hope you find it helpful to see an example combination.
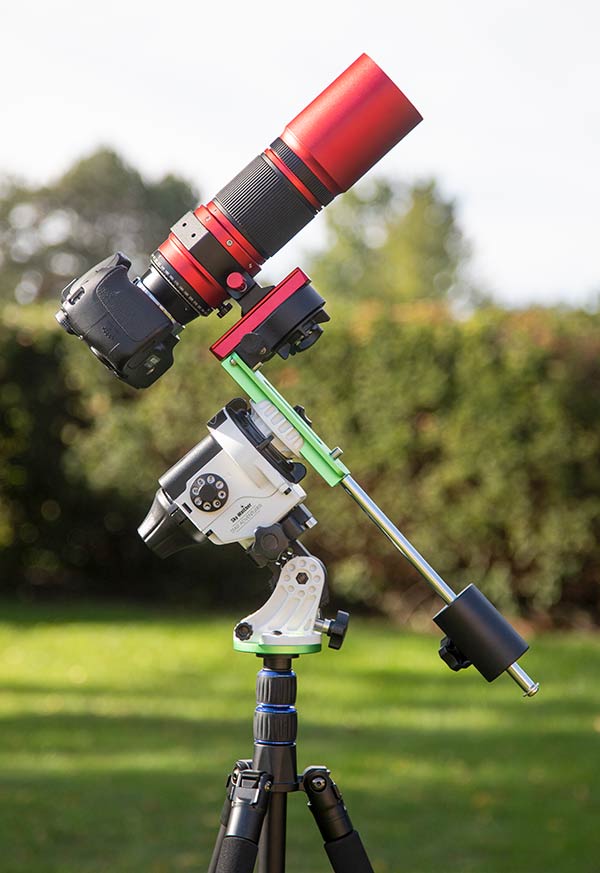
Below is an example of a highly portable, efficient equipment setup I have used to capture deep-sky targets, such as the Andromeda Galaxy. It is used on a portable star tracker that lets you capture long-exposure images of the night sky without star trails.
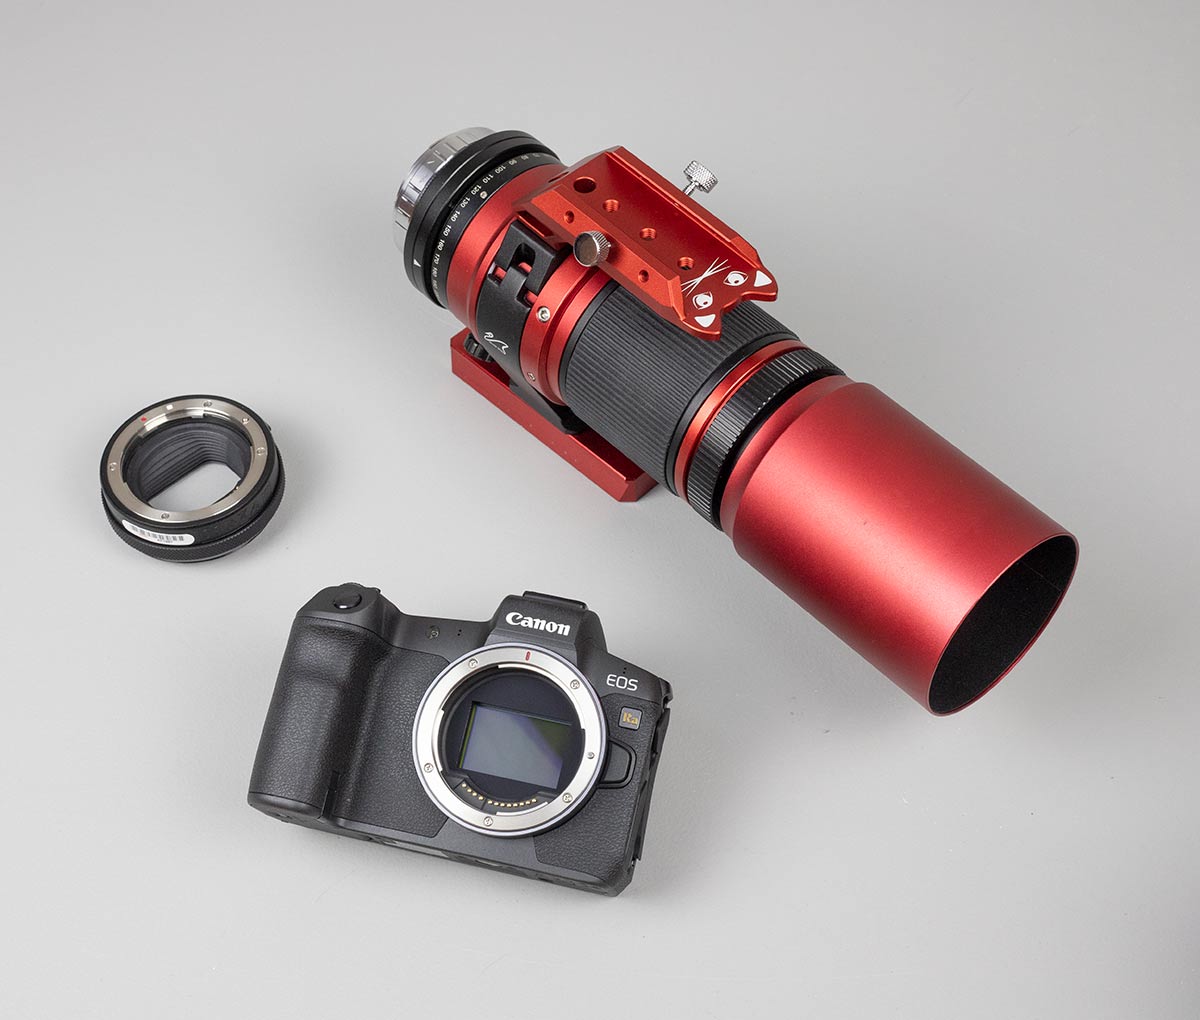
The William Optics RedCat 51 telescope and Canon EOS Ra mirrorless camera.
Starter Deep-Sky Astrophotography Kit
It’s hard to go wrong with the starter astrophotography kit shown below. Using a DSLR camera instead of a dedicated astronomy camera makes the entire system more user-friendly and portable.
Unlike a dedicated astronomy camera, which requires an additional power source and software, an interchangeable-lens camera can be controlled directly from the camera body. A simple remote shutter release cable is all you need to automate a series of images.
I have taken some tremendous deep-sky images using an astrophotography kit like this. Even if you upgrade your gear to something more advanced, you’ll always find reasons to continue using a versatile setup like this one.

The setup pictured above will need a few extras, including a tripod to mount the Sky-Watcher Star Adventurer. The telescope mentioned is a very compact, lightweight apochromatic refractor. A refractor telescope is the best choice for portable deep-sky astrophotography on a tracking mount like this.
My favorite tripod for the Star Adventurer 2i is a lightweight carbon-fiber model with a rotating base plate that can be removed entirely. This can make polar alignment much easier in the field.
The original Star Adventurer star tracker requires that you manually locate deep-sky objects in the night sky before capturing them. When starting with a system like this, I recommend sticking to the brightest nebulae and galaxies for a positive experience.
Finding dim, small objects becomes trickier when you have to locate them manually first. If you are looking for a “GoTo” solution to find and track objects (as well as autoguide in both RA and DEC), the newer Star Adventurer GTi is a better option.
Other Accessories to Consider:
- Light Pollution Filters to take better images from the city
- Sturdy Tripod to Mount the Star Tracker
- Small Guide Scope for Autoguiding
- Guide Camera for Autoguiding
- ZWO ASIAIR for Camera Control and Automation
Below is a recent picture of a highly portable deep-sky astrophotography setup on a star tracker (Sky-Watcher Star Adventurer GTi) with a ‘smart camera’ with built-in camera control (ZWO ASI2600MC Air).
![]()
A highly portable, compact, deep-sky astrophotography rig
The telescope pictured above is one of today’s many compact apochromatic (APO) refractor options. The Askar SQA55 has a focal length of 264mm at F/4.8, making it an excellent choice for wide-field nebulae projects.
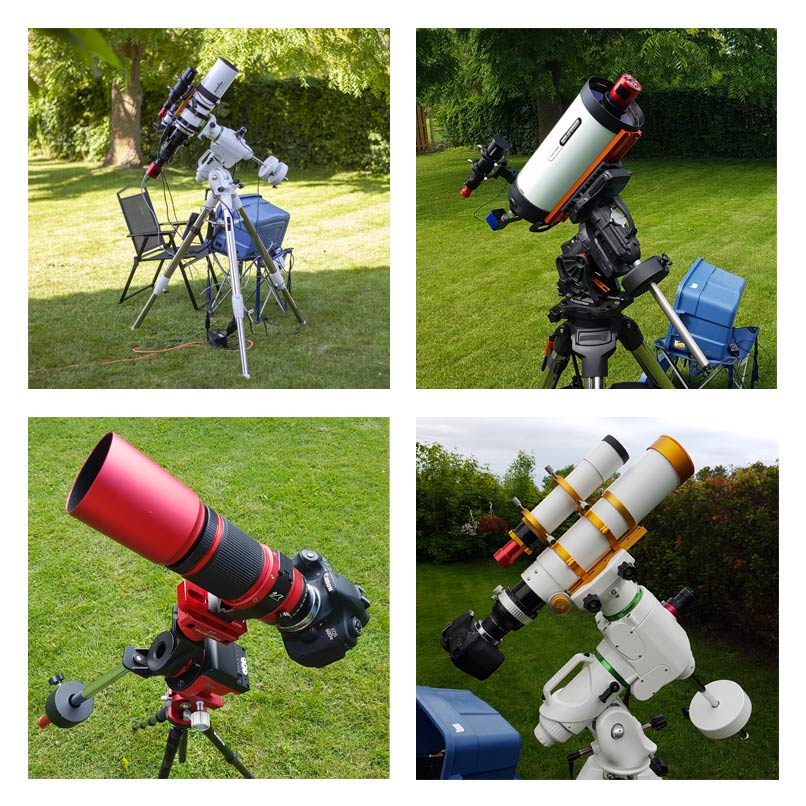
A compact APO is a suitable choice for attaching a camera, whether it is a DSLR, mirrorless, or dedicated astronomy camera. Other popular models in this category include the Askar FRA 500, the William Optics RedCat 61, and the William Optics GT71.

Popular compact apochromatic refractors for deep-sky astrophotography.
Example Images and Advice
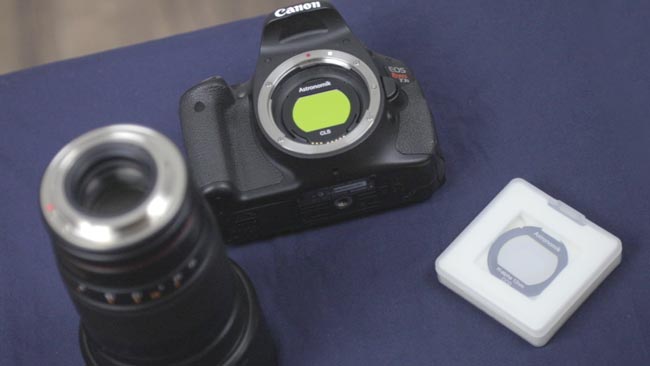
Here is a photo taken with the starter astrophotography kit listed above under the dark skies of the Black Forest Star Party in 2019. The camera used was a Canon EOS 60Da (more sensitive to the H-alpha wavelength), and an Optolong UV/IR cut filter was used to prevent star bloat.

Modifying your DSLR camera for astrophotography can help capture the red hues of certain deep-sky objects, but it is not crucial in the early stages. If you plan on shooting your images in the city, you’ll want to take a good look at the many light pollution filters available to amateur astrophotographers these days.
A telephoto camera lens is another option to consider, such as the Rokinon 135mm F/2. I have found this lens to be exceptionally sharp and to produce impressive wide-field astrophotography images.
Each setup will require different adapters and mounting hardware, so talk to your favorite telescope dealer to find out what you’ll need.
Mounting hardware and extension tubes are additional specifics you’ll need to confirm before getting everything up and running. Every setup will require its own set of necessary accessories to reach the finish line.
Here is another example of the type of image you could capture using this setup. The following photo was captured using a Canon EOS 60Da camera attached to a William Optics RedCat 51, riding on the Sky-Watcher Star Adventurer (Pro Pack) mount.
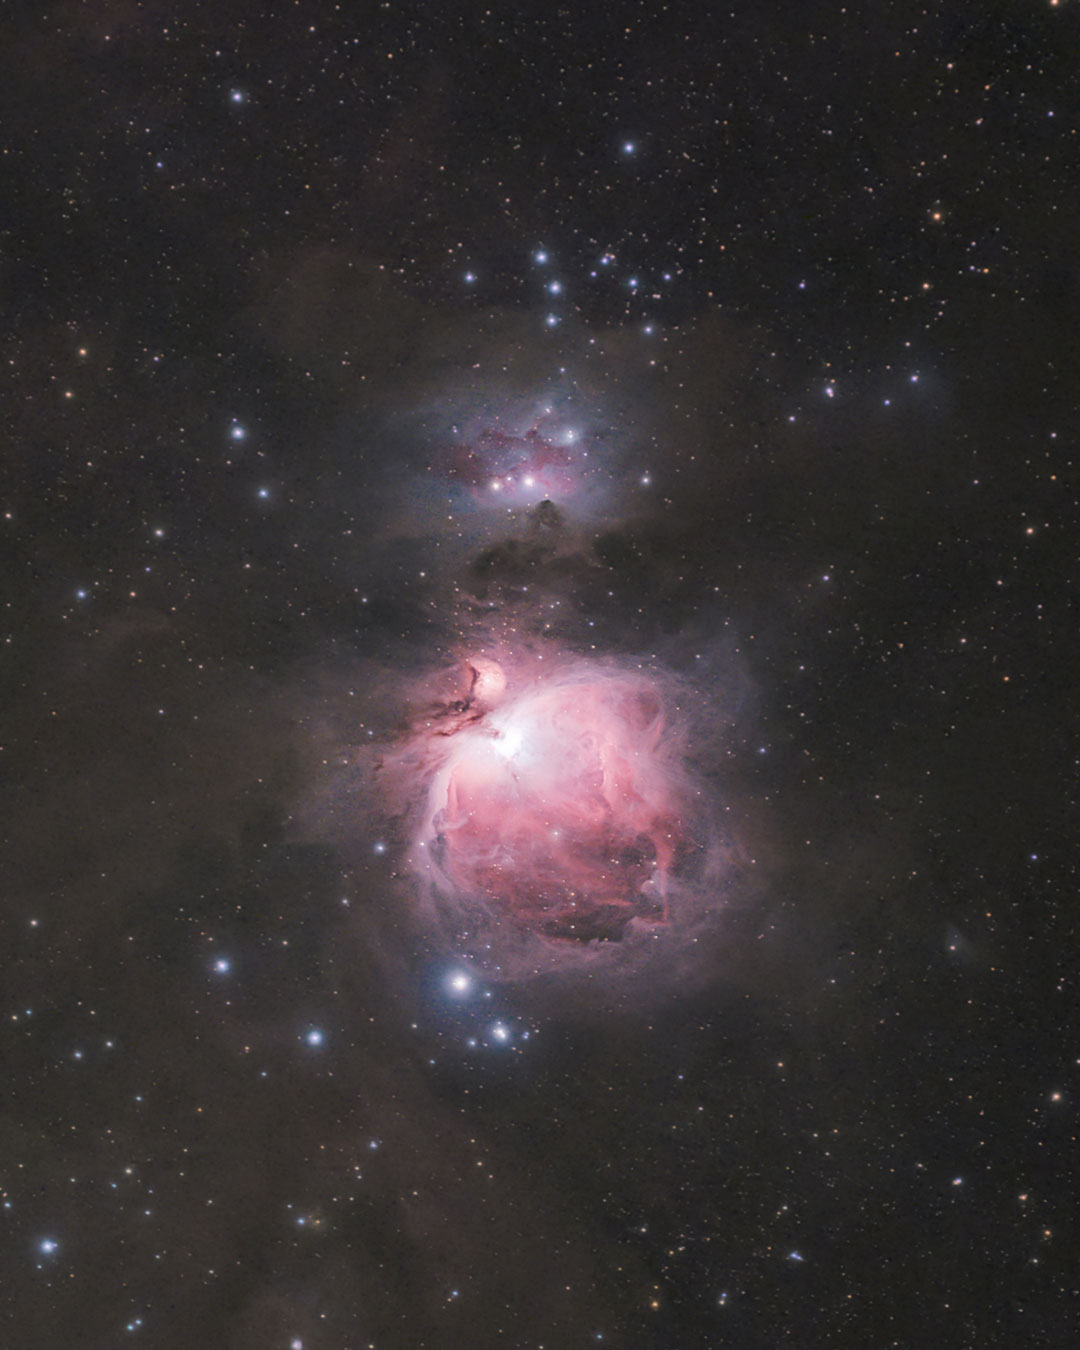
The Orion Nebula captured using a DSLR and compact refractor on the Star Adventurer Pro.
As you can see, you don’t need to have a large-aperture refractor telescope or a dedicated astronomy camera to take great deep-sky astrophotography images. Not only are portable travel rigs like this quick and easy to set up, but they are capable of producing amazing results.
The astrophotography setup used for the photo above is small enough to fit in your carry-on bag for an airplane. As a matter of fact, I brought a similar-sized setup with me to Costa Rica in 2019 to photograph the Carina Nebula!
A highly portable travel astrophotography kit for deep-sky imaging on the go.
Using a Refractor Telescope with a DSLR Camera
If you already own and enjoy a DSLR or mirrorless camera for daytime photography, chances are you’d also like to use it for deep-sky imaging. Dedicated astronomy cameras include helpful features such as a cooled sensor sensitive to the H-alpha wavelength of the visible spectrum, but a stock DSLR camera can still produce excellent images.
Once you learn how to focus your camera through a telescope, a refractor is capable of producing sharp images with a flat field. Compared to a telephoto camera lens, an apochromatic refractor designed for astrophotography will be easier to focus and mount to your star tracker or equatorial telescope mount.
My personal taste in deep-sky imaging leans heavily toward wide-field targets like The Pleiades, Andromeda Galaxy, and the North America Nebula. For this reason, I tend to recommend a telescope with a wide field of view (usually no more than 700mm). This can make aspects such as autoguiding accuracy and focus, as small movements are less critical at this magnification.

The Pleiades Star Cluster in Taurus using a compact refractor telescope and a DSLR camera.
For example, the Askar SQA55 has a focal length of 264mm. At this magnification, an entry-level DSLR camera at prime focus can capture large nebulae such as the Soul Nebula, the California Nebula, and the Rosette Nebula. A DSLR camera can be easily attached to the telescope using the included camera adapter.
Here is a look at the camera directly attached to the telescope using a T-ring adapter. For this camera (Canon EOS R), I also had to use a Canon EF-EOS R adapter for proper spacing and connection.

The Askar SQA55 with a Canon DSLR camera attached.
Many refractor telescopes will have a dedicated field flattener/reducer and adapter to properly expose your camera’s image sensor. A field flattener evens out the field of view, while a reducer (such as 0.8X) will reduce your telescope’s focal length and f-ratio by that value.
A standard T-Ring adapter screws into the camera body like a camera lens and can then be fastened to the telescope. In this configuration, the native focal length of the telescope provides the field of view you can expect to achieve with your camera.
Related Article: How Much Does a Telescope Cost?
Choosing a Telescope
I experienced a spike in my deep-sky astrophotography progress after purchasing my first “triplet” apochromatic refractor (‘APO’). A lightweight and compact APO is arguably the best possible choice for a beginner. The triplet lens design of these telescopes uses high-end optical elements to deliver the best possible color correction with minimal chromatic aberration.
Refractors are lightweight, portable, and do not require an equatorial mount with a hefty payload capacity to operate. In comparison, a Newtonian reflector will offer much more aperture at a lower price but will also be much more demanding in terms of maintenance and operation.
Entry-level equatorial telescope mounts, such as the Sky-Watcher HEQ5, can effortlessly carry the telescope and all the photography extras in this range. You cannot beat the portability and ease of use of this design.
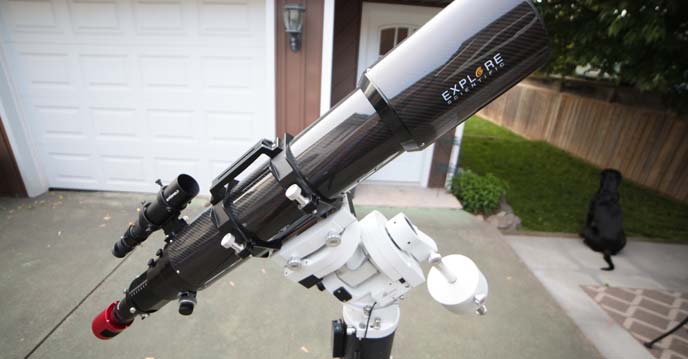
Here is a look at my first “successful” imaging rig. This little 80mm refractor captured many iconic targets from the Eagle Nebula to the North America Nebula. As you can see, the imaging equipment (including the autoguiding combo) is small and lightweight. This allows for better tracking and puts less stress on the mount.
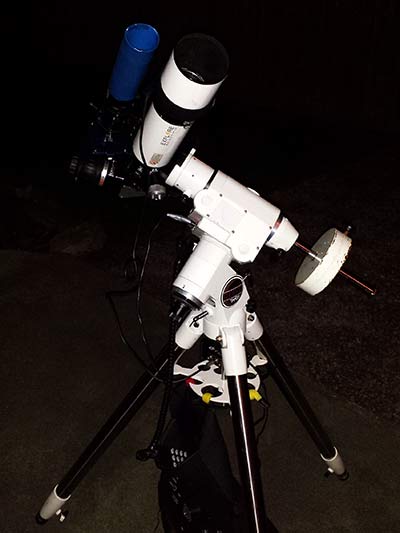
My first successful deep-sky imaging rig. Sky-Watcher HEQ5, Explore Scientific ED80 telescope.
When keeping your gear’s overall weight to a minimum, a small imaging refractor is the best option. Avoiding a heavy payload is crucial for deep-sky astrophotography. As a rule of thumb, you should keep the weight of your astrophotography gear to about half of the payload rating of your mount.
Here are some excellent choices to consider when choosing an imaging refractor.
William Optics RedCat 51
Diameter: 51mm
Focal Length: 250mm
Focal Ratio: f/4.5
Optical Design: Petzval APO

This little Petzval apochromatic refractor is one of the smallest telescopes I have ever used for astrophotography, and that’s great news if you own a small tracking mount. The little RedCat 51 weighs just over 3 lbs and is not a problem for portable equatorial mounts such as the iOptron SkyGuider Pro or the Sky-Watcher Star Adventurer.
At F/4.5, the 3.9-pound RedCat 51 does an admirable job of collecting light from your deep-sky target. You can expect to gather some impressive exposures in the 1-2 minute range on the brighter deep-sky objects at a massive 250mm field of view. Keep in mind that this focal length is not suitable for photographing planets in detail, as they are just too small at 250mm.
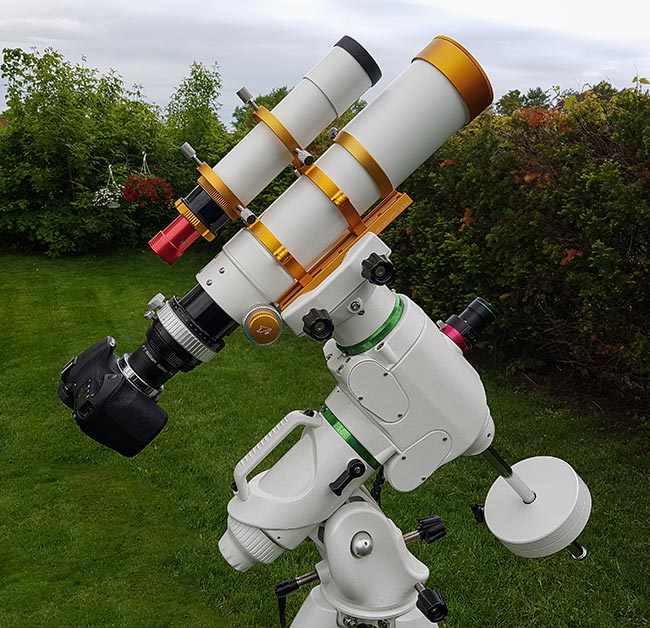
Askar 71F Flat-Field Refractor
- Optical Design: Flat-Field Apochromatic Refractor
- Glass Type: ED / Quadruplet APO
- Diameter: 71mm
- Focal Length: 490mm
- F/Ratio: f/6.9
- Tube Weight: 6.6 lbs
Recommended Field Flattener/Reducer: None required, built-in full-frame flattener
For many, the Askar 71F is their first ‘serious’ astrophotography telescope. Its compact size and wide field of view make it an excellent choice for those seeking a little more focal length in their travel setup.
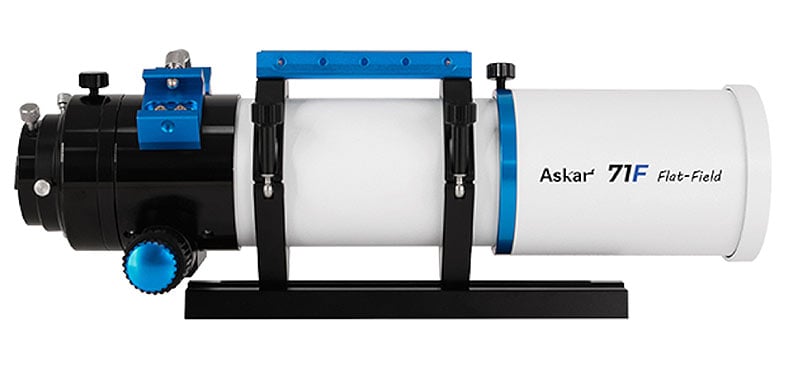
The optical design of this telescope makes it very sharp out of the box, without the need for an additional field flattener. The design is also ready for helpful accessories such as an electronic autofocuser like the ZWO EAF.
While I have yet to test the Askar 71F refractor myself, I had to highlight the incredible potential of this model. I have seen too many amazing example images taken with this affordable APO to ignore it.

AstroBin user ‘MrLA89‘ took this incredible image of the Horsehead and Flame nebulae using the Askar 71F refractor telescope riding on the Sky-Watcher Star Adventurer GTi.
Smart Telescopes
While smart telescopes did not exist when I started astrophotography, they are a valid option to consider in 2025. The ZWO Seestar S50 is capable of incredible deep-sky images without having to polar-align the mount or deal with many of the other steep learning-curve elements of astrophotography.
Smart telescopes are an excellent option for those looking to get their feet wet in astrophotography without committing to an advanced setup that may not get as much use. They have limitations (such as field rotation, a small field of view, and small image resolution), but they also make the process fun and easy for beginners.

The Seestar S50 remains a fantastic choice in 2025.
Smart telescopes like the Seestar S50 and DWARF 3 (both are relatively affordable) are great options for astronomy outreach events. They can produce an impressive live-view stack of the brighter deep-sky objects in the night sky.
The bottom line is that if you aren’t ready to take the traditional route of building a custom deep-sky astrophotography rig to achieve your intended results, other options are available.
Why Not Use a Camera Lens?
If you already own a quality telephoto lens in the 200-400mm range, by all means, give that a try first. There are many camera lenses suitable for deep-sky astrophotography and often offer faster f-ratios than a telescope would.
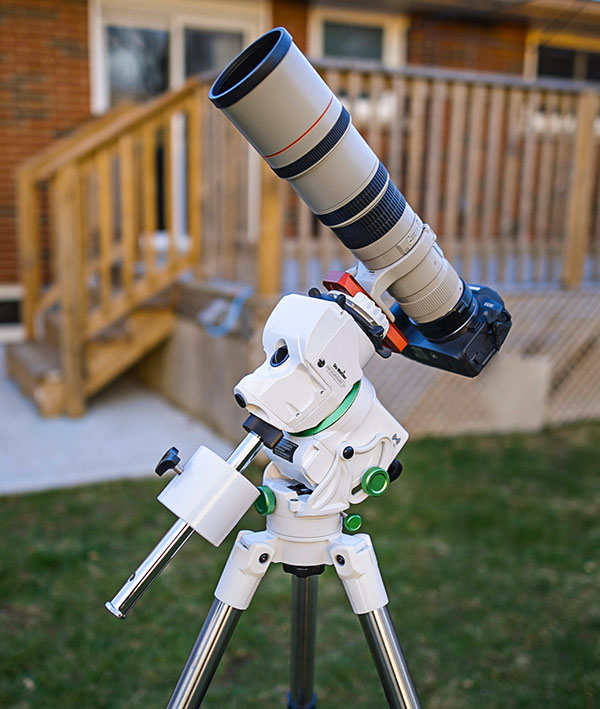
I have personally had success using a Canon EF 300mm F/4L lens for astrophotography. Here is a photo I took of the Orion Nebula with a rather short overall integration time from a Bortle Scale Class 8 backyard.
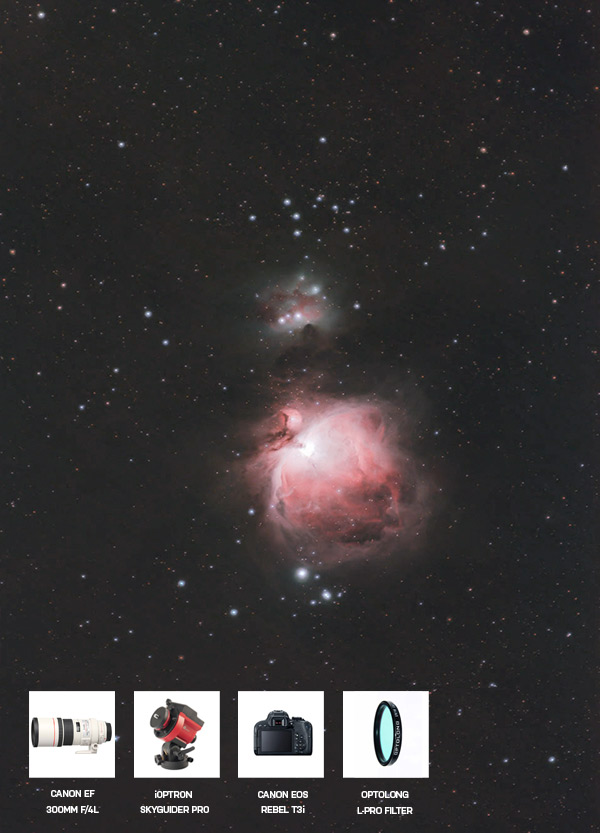
The only problem with using a telephoto camera lens in place of a telescope is that they are usually more expensive and can be difficult to focus (especially using a fast aperture setting).
Modern telephoto lenses include features such as image stabilization and advanced autofocus systems. While these impressive features are worth the money, they do not apply to long-exposure astrophotography.
However, you may already own some lenses for your camera that you use for regular daytime photography, and they can also be enjoyed for astro-imaging. I have built up quite a collection of Canon lenses over the years, and I enjoy using them when the situation calls for it.
A word of advice, though: Wide-angle lenses are much more suitable for photographing the night sky from a dark-sky location.
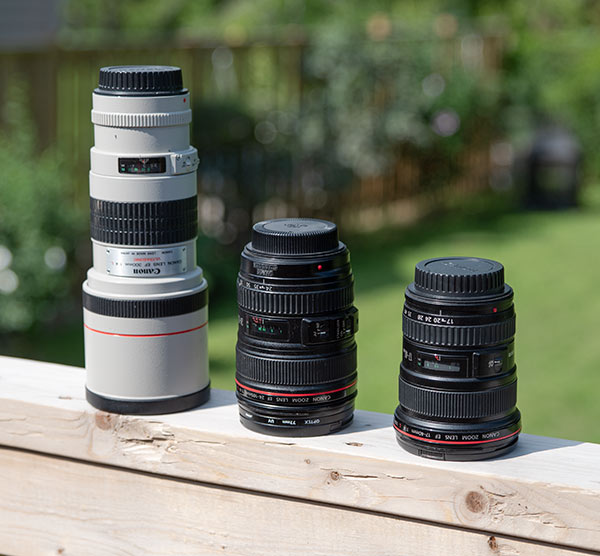
Here is a list of the camera lenses I have used for astrophotography, whether shooting a deep-sky object or a wide-angle view of the Milky Way.
- Rokinon 14mm F/2.8
- Canon EF 17-40mm F/4L USM
- Canon EF 50mm F/1.8 STM
- Canon EF 24-105mm F/4L USM
- Rokinon 135mm F/2.0
- Canon EF 300mm F/4L USM
- Canon EF 400mm F/5.6L
- Canon RF 70-200mm F/2.8
![]()
I used a Canon RF 70-200mm F/2.8 lens on a star tracker to take a wide-field image of the Orion Nebula and the surrounding area.
Recommended Astrophotography Mounts
Sky-Watcher Star Adventurer GTi
The Sky-Watcher Star Adventurer GTi is a portable star tracker mount that offers a reliable solution for astrophotography on the go. It makes shooting long exposure starscapes without star trailing possible and even features a built-in GoTo system that can point to objects in the night sky for you.
This portable mount can be used on a photography tripod and is less cumbersome than a traditional, large equatorial telescope mount. In a sea of competing portable sky tracker mounts, the Star Adventurer GTi stands out as one of the best options in its class. The ZWO AM5 is another option in this category, but it uses a different technology (harmonic drive).
Mount Specs:
Payload: 11 lbs
Mount Head Weight: 5.7 lbs
Power Requirement: 8 x AA Batteries
Built-in Polar Scope: Yes
Autoguider Port: Yes
The Sky-Watcher Star Adventurer is the GTi’s ‘younger sibling,’ and it is equally useful and enjoyable to use. The original Star Adventurer does not include the computerized GoTo system, so you will need to manually point to objects in the night sky.
ZWO AM5
The ZWO AM5 is an excellent option for small to medium-sized astrophotography setups. With several deep-sky astrophotography kits available to me on a clear night, I find myself reaching for the AM5 most often. It is easy to get up and running when combined with the ZWO ASIAIR.
The ZWO AM5 is a serious deep-sky imaging investment compared to a star tracker-grade mount. It can meet the high demands of years of outdoor use (in every season), and its maximum payload capacity is impressive even without using a counterweight.
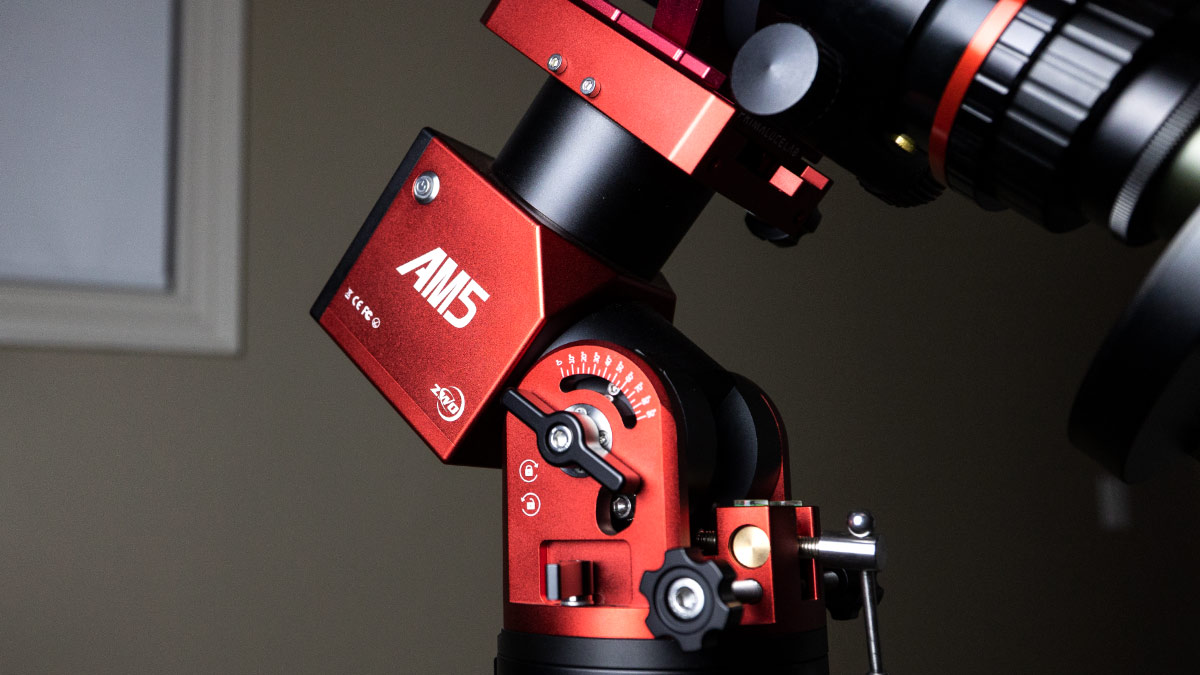
Among the many benefits of this mount are the ASCOM compatibility (Control via PC), wireless control via the ASIAIR, and its overall compact, lightweight profile. This harmonic drive mount is a popular choice for beginners to astrophotography and for good reason.
- Maximum Payload Capacity: 28 lbs (without counterweight)
- Telescope Connection: V and D-Style
- Power Requirement: 12-Volt DC
- Built-in Polar Scope: No
- Autoguider Port: Yes
Sky-Watcher EQ6-R Pro
The Sky-Watcher EQ6-R Pro has been a pleasure to use for many years and has never let me down. I enjoy this mount’s GoTo SynScan system and hand controller and have found the EQ6-R to be incredibly reliable in all weather conditions.
I have covered this mount extensively in my in-depth review of its features. At the end of the day, this equatorial telescope mount is the perfect balance between portability and function. Despite having larger telescope mounts at my disposal, the EQ6-R gets the most use thanks to its straightforward controls, modest size, and consistent performance.
The Sky-Watcher EQ6-R Pro with a Zenithstar 73 telescope attached.
Like the Orion Sky-Watcher HEQ5, this telescope mount can be controlled via your computer to locate and lock on to your target. I use the autoguider port with my ZWO ASI290mm Mini guide camera to take long exposure images of up to 10 minutes with sharp, pinpoint stars.
I recommend adding the QHY PoleMaster electronic polar scope to make polar alignment of the mount even easier. Polar alignment of this mount manually is not a big deal, but the PoleMaster will save you some time on your knees looking through the polar scope.
- Payload Capacity: 45 lbs
Power Requirement: 12-Volt, 4-Amp - Telescope Connection: Dual (V-Style and Losmandy)
- Drive Type: Belt
- PEC: Yes
- Built-in Polar Scope: Yes
- Autoguider Port: Yes
Intermediate Deep-Sky Astrophotography Kit
I have chosen the items in this kit because they fit the profile of an intermediate-level deep-sky astrophotography rig and because I have used and enjoyed them personally. The ZWO AM5 harmonic drive mount is an absolute game-changer in terms of creating a painless imaging experience. This tracking telescope mount can handle an impressive 28 pounds of gear without the use of a counterweight.
An APS-C-sized color CMOS dedicated astronomy camera was selected for this intermediate-level astrophotography kit. The ZWO ASI2600MC Air is identical to the ‘Pro’ version, but it includes a handy built-in ASIAIR wifi controller and an autoguiding sensor.

Additional items to consider for a setup like this include a quality carbon fiber tripod (the mount featured is offered in a package that includes one), an autoguiding setup, and an ASIAIR Plus WiFi controller. For this setup, I’d recommend a small guide scope in the 50mm range and a ZWO ASI120MM mini guide camera.
This is the exact autoguiding system I use on several deep-sky astrophotography setups, and it has served me well for many years. The autoguiding itself is handled by the ASIAIR, and the ASI120mm does a great job through a 50mm guide scope (200mm focal length) when your primary telescope is in the 250-1000mm range.

The ZWO ASI1200mm mini is an affordable guide camera that pairs well with a 50mm guide scope.
Filters for Astrophotography
If you’re looking to invest in a DSLR or mirrorless camera for astrophotography, you’ll need to consider the adapters and/or flattener/reducers that will sit between the camera body and the telescope. You’ll also need to think about the filters that you plan to use, whether it’s a broadband light pollution filter or a narrowband.
Light pollution filters can make a surprisingly big difference to the data you collect from the city. They selectively ignore the most common wavelengths of light associated with the unwanted glare of a city sky.
The two main filter choices for DSLR and Mirrorless astrophotography shooters are the clip-in versions that are specific to your camera body and 2″ round-mounted versions that thread into the adapter or flattener of your telescope. I prefer the 2″ (48mm) variety as they can also be used with a dedicated astronomy camera in the future. However, clip-on body-mounted filters have the advantage of being compatible with a camera lens attached.
Some of my favorite filters include the Optolong L-eXtreme dual-bandpass filter and the Optolong L-Quad Enhance broadband light pollution filter. The astrophotography filter you choose will depend on your imaging conditions and the types of objects you like to photograph.
I suggest reviewing images of objects you plan to shoot on Astrobin, and reviewing which filter was used to produce the result.
Stock vs. a “Modified” Camera
You may want to purchase a camera that has been professionally modified for astrophotography (by removing/replacing the stock IR cut filter) or even invest in an astrophotography camera such as the Canon EOS Ra or the Nikon D810a. If you are on a tight budget, I recommend having a look at the astronomy classifieds. You may be able to find an affordable used Canon Rebel DSLR or even a used Canon EOS 60Da.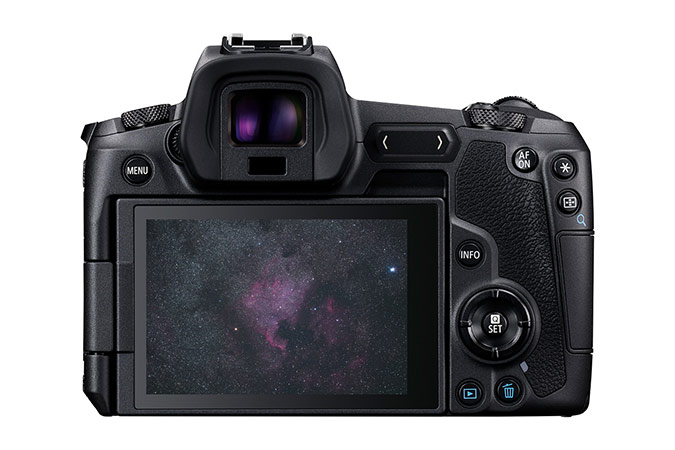
The Canon EOS Ra (2019).
You can purchase pre-modified DSLR/mirrorless cameras, such as the Canon EOS R8, from Agena Astro. This is a great option because you don’t have to worry about sending your camera out to a third-party service or the stress of making the modification yourself.
As for dedicated astronomy cameras, they are now significantly more affordable and available than in the early days of CCD astrophotography. A one-shot color or monochrome CMOS dedicated astronomy camera makes a lot of sense for most amateurs.
Dedicated Astronomy Cameras
Unlike a traditional daytime DSLR or Mirrorless camera, dedicated astronomy cameras have the advantage of a cooled sensor and are sensitive to the important 656nm wavelength of the visible spectrum.
They lack a display screen for immediate image review or an out-of-the-box way to attach a camera lens. You must use camera control software on your computer or a dedicated device (such as the ASIAIR) to run an imaging session.
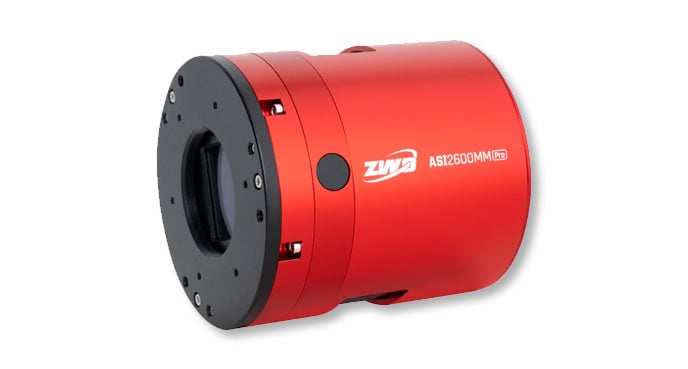
Some of the most popular choices in the color camera category (that I have had the pleasure of testing) are the ZWO ASI2400MC Pro and the ZWO ASI2600MM Pro. There are several factors to consider when investing in your first astrophotography camera, but I suggest choosing one that is used by a large community.
This way, you’ll ensure that the camera is well supported by third-party camera control applications, and that plenty of information, troubleshooting tips, and reviews will be available online.

The ZWO ASI2600MC Air is an interesting option thanks to its duo-sensor design and built-in ASIAIR wifi controller.
Recommended Cameras
If you would like to learn about the different types of astrophotography cameras available and what I recommend for a beginner, please look at the following post: Astrophotography Cameras: The Best Choice for a Beginner.
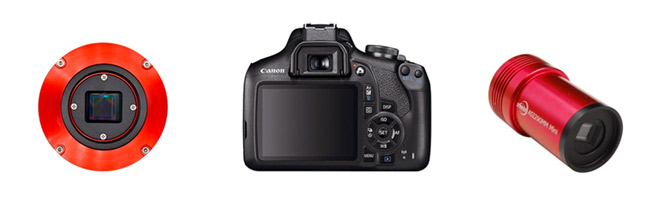
I think of the main types of astrophotography cameras in three categories. Each specializes in a particular area, though nearly all types of astrophotography can be done by all three.
- DSLR/Mirrorless: Best with Lenses, Star Trackers, Nightscapes, Milky Way Photography
- Dedicated Astronomy Camera: Best with Telescopes, EQ mounts, Deep-Sky Imaging, Narrowband Imaging
- Planetary Cameras: Best with Large Telescopes, Planets, and Solar System Photography
As this article focuses on deep-sky astrophotography, I have not recommended any planetary photography cameras. However, in my brief experiences photographing planets, I enjoyed the ZWO ASI290MM Mini as it has a highly sensitive monochrome CMOS sensor with a high frame rate.
Canon EOS Rebel T7
It should come as no surprise that the first camera I recommend for deep-sky astrophotography is the latest Canon Rebel Series DSLR. There are many amazing examples of deep-sky imaging using a Nikon or Sony camera body, but I can only suggest what’s worked exceptionally well for me personally.
These cameras can be modified for astrophotography by removing the stock IR cut filter, allowing the red colors in many deep-sky objects to reach the sensor. You can purchase modified DSLR and Mirrorless cameras from certain vendors, such as Agena Astro.

The camera can be connected to a telescope by using a T-ring adapter. This is known as “prime focus” astrophotography, and the telescope will be used as a camera lens at its fixed focal length. A field flattener/reducer may be recommended for your telescope, which will both create an even field in your images and/or reduce the focal ratio of your telescope.
The Canon EOS Rebel Series DSLRs are considered “Crop-sensor” cameras, with a smaller sensor than a full-frame camera. If you do opt for a full-frame DSLR, I would recommend the Canon EOS R mirrorless camera.
Popular entry-level mirrorless cameras worth considering
If you prefer a mirrorless camera body over a traditional DSLR, there are several models worth considering.
The Canon EOS R50 is compact, easy to use, and offers modern autofocus with a 24.2 MP APS-C sensor. Nikon’s mirrorless options, such as the Nikon Z50II, deliver a good balance of image quality, usability, and affordability for those new to interchangeable-lens shooting.
The Sony α7 IV remains a solid entry point, with strong autofocus performance and good low-light handling, making it useful for nightscapes or wide-field astrophotography.
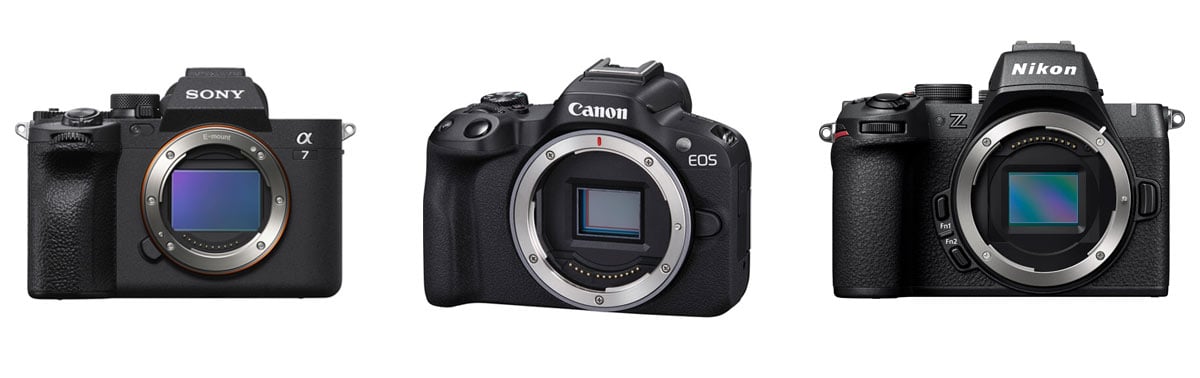
Popular mirrorless cameras from Sony, Canon, and Nikon.
Each of these offers a good balance of price, portability, and image quality, making them excellent “first mirrorless bodies” for someone transitioning from DSLR or starting fresh. Paired with a decent lens or a small APO refractor, they give new astrophotographers a capable platform for learning the ropes.
ZWO ASI533MC Pro
The ZWO ASI533MC Pro is a one-shot-color dedicated astronomy camera with a 1″ square (11.1mm x 11.1mm) sensor and 3008 x 3008-pixel resolution. Dedicated astronomy cameras like the ASI533MC Pro have a built-in thermoelectric cooler that requires a 12V power source to run. This allows the camera sensor to reach as low as -35 °C below the ambient temperature.
Compared to a DSLR or mirrorless camera, a cooled astronomy camera will record much less noise during a long exposure image. This results in a stronger signal-to-noise ratio and, usually, a better image overall once stacked.

The ASI533MC Pro must be controlled using software on your computer, such as N.I.N.A., or a Wi-Fi controller device like the ZWO ASIAIR. Here, you can choose a gain setting, exposure length, and more.
Here is a look at one of the images I captured using the ASI533MC Pro with an Optolong L-eNhance filter from my backyard. I used a Starizona APEX 0.65 reducer to widen the field of view through my Esprit 100 with this camera attached. The final image includes 30 x 5 minutes at Unity Gain.
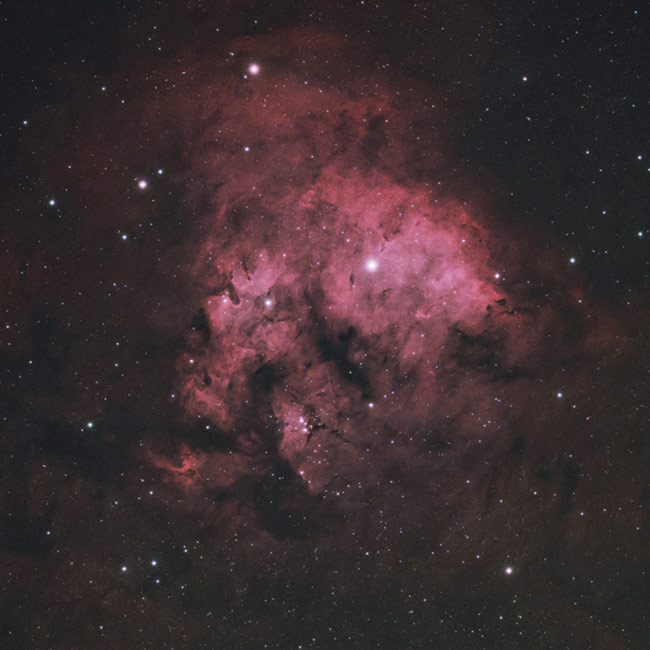
NGC 7822. ZWO ASI533MC Pro and Sky-Watcher Esprit 100.
ZWO ASI2600MM Pro
I began using the ZWO ASI2600MM Pro in early 2021 and immediately fell in love with the incredibly high-resolution monochrome images (26 MP) I was capturing. I find that I get the most use out of this camera when creating narrowband images in Ha, OIII, and SII.
This camera has a large APS-C-sized sensor, which is much larger than the sensors in most beginner-level astronomy cameras like the ASI533MC Pro.
One of my first projects with the ZWO ASI2600MM Pro was the Tulip Nebula in Cygnus. I created the images by capturing several hours of exposure time using 3nm narrowband filters (Chroma). The resulting image is one of the best astrophotos I have ever taken.
To use a monochrome CMOS camera like this effectively, you must invest in a filter wheel to easily switch between color and narrowband filters, depending on the project.

The Tulip Nebula captured using the ZWO ASI2600MM Pro and the Apertura CarbonStar 200 reflector telescope.
Autoguiding
Autoguiding is a necessary step if you want to expand your imaging capabilities. Having the option to shoot long exposures (3 minutes or more) can have a major impact on your success.
A small autoguiding combo includes a guide scope and a camera that doesn’t add too much weight to your payload.
Adding a small guide scope and camera (Off-Axis Guiding) allows you to dither your images. This helps to create an image with an improved signal-to-noise ratio once stacked.
I have used a number of guide scopes and guide cameras over the years. My favorite guide cameras include the ZWO ASI120MM Mini and the ZWO ASI290MM Mini.

A lightweight astrophotography kit with a guide scope and guide camera attached.
Final Thoughts
It’s hard to advise someone on which astrophotography equipment to buy. I understand that it is an expensive hobby and will take time to build a complete setup for deep-sky imaging.
I haven’t mentioned many great pieces of gear in this post. I have only scratched the surface of the potential setups you could put together for successful deep-sky imaging from home.
I hope this post has provided you with several ideas and a clearer understanding of the gear mentioned in this article’s capabilities.
Recommending telescopes, cameras, and lenses for astrophotography seems to draw out a lot of opinions and criticism. In the end, you’ll have to make the final call on which gear is the best fit for your needs.
If I could offer one last piece of advice, it would be to avoid suggestions from those with extensive technical knowledge but no actual photos using the gear. I believe astrophotography is about taking pictures!
Is there a particularly amazing piece of gear I should have mentioned in this post? Let me know in the comments.
No matter which setup you decide on, I hope you keep your initial desire to capture the night sky burning brightly with each step.

Thanks for the post Trevor! I’ll be diving into Deep Sky Astro this year, and this post is exactly what I needed! Thanks!
Cheers from Norway!
This is an excellent article. Buy good equipment even if it’s used and learn to use it. This hobby is not cheap and takes time to really get good at it. So before buying the next great piece of software or hardware to improve your images, learn to use what you have and figure out why it’s not working. More than likely it’s the user, and boy does that sting the pride and the pocketbook.
Good images take lots of work and time!!
As always, well said Terry. We all experience setbacks and challenges, no matter what equipment we use. You can’t “buy your way” to the top, and its one of my favorite aspects of astrophotography:)
Thanks–very timely as I’m about to pull the trigger on a mount. One thing I’ve rarely seen addressed, though, is whether we should autoguide from the outset or start with shorter, unguided pix. That’s currently my plan, thinking I have plenty to learn already. Or am I just buying myself more frustration?
Hi Frank. I’d say start shooting unguided short exposures first without autoguiding. Experience the capture process, and of course, stacking and processing your results. The good news is, when you are ready to start autoguiding, it’s really not a complex as it may seem.
Very nice…I’ve picked up a few more things for my ED102. Still need to work on getting good polar alignment before I spend the money for a better camera. I’m just going to mess with my unmodified Canon 450 to learn the ropes. I have to admit that the Altair has a very attractive price. So much to learn….
Hi Jack – The 450D is such a sleeper of an astro-camera. I still use mine for certain projects after all these years. And yes, the Altair GPCAM2 AR 130 is a brilliant camera for the money – highly recommended and well received in the astro community!
I have exactly the same guide camera: an AR130 with an Orion 60 mm guide scope.
I have not been able to set it up for SharpCap allignment, nor PhD since I can’t even get the brightest star to show up.
I’ve tried every single setting: when focussed (by using the moon) even 5 second exposures show up tiny smudges.
I’m kinda lost here 🙁
Hi Wouter – If you have confirmed that your focus is correct on the moon, I’d check the exposure length setting in SharpCap and increase it. The same goes for PHD – and adjust the slider between the exposure setting and the brain icon. The GPCAM2 is HIGHLY sensitive so you should certainly see stars even in a short exposure through the 60mm if your focus is correct. It doesn’t take much to be out of focus. A few mm can be the difference between sharp stars and seeing nothing at all.
Double check your focus, sounds like its just a bit off, try tiny adjustments til stars are pinpricks. Goodluck and don’t give up
Hi Trevor! Another great article. I’ve learned a lot from your tutorials and reviews this past year as I’ve gotten deeper into this. The past few nights have been so cold where I am that it has me wondering. Is there a cutoff for you to go out and shoot? I’ve looked at operating temps for the equipment I have so I know lately it’s been borderline as far as that goes. It’s just been so clear out there the last few nights…any thoughts?
Hi Mark – great question. As far as the scope, mount, cameras are concerned – they’re pretty resilient, my limit is probably about -20C without the wind chill (And I’ve pushed that envelope this year!) – The problem is the cables and your computer. My laptop display starts to malfunction (faded screen, random line patterns) at about -15C or below. I wouldn’t recommend putting your electronics through this kind of abuse:( Maybe somewhere around -10C should be the cutoff point to be safe.
Excellent Post, very informative! One question from someone who doesn’t like spending too much money, especially in the beginning. Would there be any chance of capturing decent newbie images using a regular dslr telephoto zoom i have available, the Sigma 150-600mm f/5-6.3 ? Is it possible to mount it to any affordable tracking mount ? The lens + dslr weighs around 2.7 kg’s.
Hello Trevor, Loved this article. Thanks. I enjoy photography and got some gorgeous shots of the Milky Way last year on a photo safari in Africa. The sky was unbelievable – worth the cost of the trip. I’m interested in getting a telescope and mount for more fun. However, I live in a city of 50,000 – not too far away from big city (1,000,000). The light pollution is bad. I cannot take a long exposure shot from my back yard into the sky. If that’s the case, would it be a waste of $$ and time for me to get the necessary gear to be able to shoot deep sky objects?
Thanks
Not at all, Rob!
I am living in the middle of a White Zone, i.e. in the middle of Dallas, Texas. I would never have believed this myself, but you can take pretty stunning images of the universe even under the most adverse conditions. What helps tremendously is the ability to stack images, which helps subtracting out the background, and light pollution filters. Trevor is recommending some filters he found to work well for his location, I found the Celestron UHC/LPS filter ($79 at Amazon) to work great for my purposes.
I can guarantee you, you will enjoy this! But start small, with a travel mount and shorter focal lengths, and gain the experience. You will know when the time has come to move up to the next level.
Best of luck and lots of fun!
Jo
Great review, Trevor!
You got me going on this and because of your suggestions I do now use the ES102APO, which is a great telescope. I also use the Nikon D3300 for DSLR imaging and I want to echo the versatility of using a DSLR for other all day imaging purposes as well. That will ensure that you will never have wasted any money.
I also got the SkyGuiderPro, following your review of it, and it is a great little travel mount. However, I would suggest only using it with a light-weight DSLR, like the D3300 and the kit lenses that come with it. Since it has no GoTo capability, you have to frame often blindly, so small focal length imaging is the preferred way to go or you spend a lot of time doing test images and reframing.
Since the SkyGuiderPro does not come with a tripod, the total cost of it will be US$~500. For the same price one can get an iOptron SmartEQPro+, which comes with the tripod AND has GoTo capability. It has the same payload rating, but that mount can also be attached to an autoguider AND you can connect it through a handset to ASCOM compatible mount control software like Indi or APT. That makes this the perfect mount to learn all the necessary skills required before stepping up to a more expensive mount like you CEM60. Like the SkyGuiderPro, the SmartEQ can be battery operated, which is invaluable for a grab and go travel mount.
Those are my 2 cents worth to the topic.
I am looking forward to your new podcasts and YouTube videos every week.
Clear Skies!
Jo
Hi Trevor – I have thoroughly enjoyed many of your presentations on astrophotography, you provide a wealth of information for a novice as myself!
I do mainly nature photography, but am fascinated by the prospect of astrophotography. I took a few Milky Way shots using a Coolpix A (Dx format 18.5 F2.8) mirrorless on a mini tripod while in Hawaii several years ago – got hooked on the possibilities, then this week using started trying both the Coolpix A and my Nikon D750 (Fx) with 16-35 F4 on a tripod – experimenting with settings and capturing a few images of Orion’s belt and surrounding stars from my backyard in Ancaster ON this week. My question is whether the iOptron Skyguider Pro could handle the Meade Astrograph telescope you mention above, could it also handle with a Starwave guide scope. Would you recommend DSLR (Fx or Dx) or should I consider the Altair Hypercam? I am trying to stay as portable as possible and hope to visit local dark areas this spring/summer, so portability is key for me.
Thanks in advance for you advice.
Thanks for this useful intro – I’ve been following on YouTube for a while and found your work inspirational.
I’m coming to astrophotography from a wildlife photography background but as a parent of young children my time during daylight hours is going to be limited for the next decade! I have a Canon 6D (full frame), Canon 650D (APS-C) and some decent L lenses. I’ve taken some milky-way wide-angled shots but I’m wondering if I invest in a good astro equatorial mount which I can later add a telescope to, can I directly mount my 400mm f5.6 Canon L lens and take galaxy/nebula images? Is there some big difference between the Wildlife lenses and the refactor telescopes of similar focal length?
I assume I would be looking at taking relatively short exposures with that set-up as I wouldn’t have the benefit of autoguiding…
Thanks in advance for your advice.
Great review Trevor, and thanks for all the informative videos.
Do you think that an AVX mount will cause a lot of headaches for astrophotography? I see that you upgraded from a CG5, but didn’t go with an AVX or CGEM.
Over the last year I’ve been having a lot of fun exploring the nights skys, primarily visually, but I’m now starting to get into astrophotography. I have an AVX and an EdgeHD 8 with a .7 reducer. + a ASIZWO120mm guide camera. I’ve spent a couple nights trying to get guiding working with PHD2. Last night I was finally able to guide but the quality of the guiding was not so great. I got star trails with 2 min exposures. I’m hoping that the AVX is not going to be limiting.
I also have an AR127 achromatic, that I may use for imaging if the EdgeHD proves to be difficult.
Jamie
Hey, Trevor, thanks for all the great advice! I’m just putting together an AP setup and I’ve managed to secure an Advanced VX for a great price! now I need an OTA so I’ve been searching all over…
Do you think that a 6″ f/4 Newt Astrograph would be better or worse than the William Optics Z61 mentioned above?
Love your motive when approaching Astrophotography and hope to achieve anything close to your photos someday(I’m only 14 though so give me some time ; ) )
Hi I just grab a Celestron Regal 80mm scope. I wonder if it can be any use to see any star. The moon is fine, but is there filter to put in front that can open up possibility. Before going to a real telescope…?
Thanks in advance
Hi Trevor, please may i ask for your specs of your laptop you use for your astrophotography, hdd size, ram, and processor. or the model number of your laptop, i currently have a dual boot macbook pro, but dont really want this outside with the risk of moisture, just want to get a seperate dedicated laptop for imaging, Many Thanks.
Hi!
Im quite new to this hobby…
My current equipment is a skywatcher evostar 72ed refractor mounted on a star adventurer, using a unmodified Canon DSLR camera…
Im thinking of upgrading to a EQM-35 pro mount. Have you heard anything about that mount?
I will also need a guide scope and a guide camera. What do you think is the best way to go, either a computer controlled guide camera or a stand alone guide camera?
Hi David. The Evostar 72ED is nice. A great astrophotography scope for your DSLR. I have heard of the EQM-35. At a 22 lb payload capacity – the only thing I would say is to have a clear vision for your future imaging setup. If you plan on using larger telescopes down the road then you may want to get something a little beefier like the HEQ5 or NEQ6. Sky-Watcher makes great mounts in my experience. As for the autoguiding – I use (and love) the Starfield 50mm guide scope package. It’s computer controlled but very simple and easy: https://www.ontariotelescope.com/product.asp?itemid=1487&Affid=2
Hi Trevor, about one year ago I started with astrophotography and the milky way and startrails are developing quite well. Fortunatelly we have a dark sky reserve just 1,5 hours to drive so I can go spontaneously when sky is clear. Now I want to catch some nice pics even deeper and this led me into hours of spending time to search the Net for some good informations.
Now I found your Site and it is getting bright and clearer 🙂
Actually I use my Canon 60D and a Bresser traveling mount which not really works, so I will change to the Ioptron SGP and the William Zenithstar 61 you recommended. Well I guess when you once started, the wishlist is getting longer and more expensive, but the next thing will be the Canon R .
Thanks for your work and the help it gave and I will be a constant follower from now on 🙂
Hope my english is ok.
Greetings from Berlin
Claudia
Claudia, thank you so much for the kind words. I am very happy that you have entered the world of astrophotography and are continuing to make progress! The SkyGuider Pro and Zenithstar 61 combo is an excellent portable rig to get started in deep sky with. Clear skies!
Thanks for the great info you have on your site! I love your site! I am on a budget but really like to get into astrophotography. I am wondering why do you recommend a refactor vs a reflector? All I hear about that bigger apertures are better for deep sky photography. I have the nexstar 4se (100 mm), which gets decent pictures for say Orion Nebula. The mount however does not help in more than 30 seconds of exposure. I am thinking of moving to a new one but refactors seems like they dont provide the same bang for the big as reflectors. Please share your thoughts. From the little experience I have had, I feel a good mount is key to longer exposures which has been frustrating with the Nexstar 4SE. My guess is that smaller scopes would require a much more expensive mount due to longer exposure requirements. Please share your thoughts.
Hey, I’m looking to get into astrophotography and am trying to decide on a mount. The ioptron sky guider looks very tempting, especially for someone like me who may end up buying a telephoto lens to use with it. But what i really want to do is deep sky photos. Would the Sky Guider be good for that (assuming i also get a very sturdy tripod) or would you recommend an equatorial mount? I’m assuming you could mount a dslr to an equatorial mount. Thanks 🙂
Trevor,
Great article. May I ask what FF you would recommend for the ES ED102? Trying to build my kit up.
Thanks Ryan! The StarField 0.8X reducer/flattener is the one I use. Cheers
Thank you for the great post Trevor! Do you think the Meade 70mm Astrograph can be mounted on the Sky Guider Pro or do you think it would be too heavy?
Just received a Canon T7i and Rokinon 14mm wide angle for Christmas and did my first 20” exposure of the Orion Nebula from the backyard! Have you tried capturing lightning bolts with the Rokinon?
Thanks Trevor, your tutorials are a needle in a haystack! and we are thrilled with every new one that comes out.
I just pulled the trigger on my first Astrophotography gear that includes the RedCat 51 and the ZWO 30mm scope+ASI1200MM camera.
One piece of information I haven’t come across yet, so perhaps you could point me to a website tutorial, is how to best align the guide scope with the telescope.
All the best, I hope you are having good weather in Canada and wishes of a Happy New Year with nothing but Clear Skies.
Hi Trevor,
What tripod are you using sky adventurer pro mount?
I was gonna ask the same thing.. the tripod likely seems obvious after experience, but first time buyer – i see a few options to choose from – things like height, ball head (or do you prefer the ball head on top of the mount instead of below it..), are certain locking mechanisms better than others after some wear and tear.. other things i don’t even know to look out for.. Thanks for all the tips!
I’m about to purchase the heq5 and can’t figure out which refractor to get with it. After the mount i have about $1000 left to spend for the refractor and guide scope and other things I’ll need, i already have a canon t7 to start with. Was gonna go with the z61 but didn’t know if that would be silly to put on the heq5. Don’t even know if I’ll get a reply on this but any help appreciated
Mike – The William Optics Z61 is a solid choice. The new ones include the guide scope bracket I believe, which is a huge bonus (the early ones didn’t). You’ll still want to get the flattener for it, however, which bumps the cost up a bit. Hope this helps!
Trevor, Great article. I’ve always wanted to get into astrophotography and now that I’m retired I want to give it a spin. I currently have a Nikon D7100 and a Skywatcher Adventurer Pro with wedge and L-bracket. Based on your article I’m thinking the nightcat 51 would be a good starting choice due to weight and cost, instead of a telephoto lens. Do you agree with this. Thanks again for your insight. Wish I’d started this years ago but never too late…….
Hey Trevor!
Thabk you for always putting great info out. I find your website to be a main GoTo for my questions and things I am looking to understand better.
I am worse than a novice, with both visual telescope use AND astrophotography. But, the views I get through my telescope, and my really bad astro photos make me happy.
I have decided to spend more money on my gear, and get a tracking mount for just my camera. I am going to be travelling to several national parks this summer, and my LX85 mount is simply too heavy to take on hikes when I go backcountry camping.
I am leaning toward the Star Adventurer, but was hoping you could tell me if that would be a good or bad choice with my camera and lenses.
I have a modified Nikon D800, with 24-70 f2.8 and a 150-600 f5.6-6.3 lenses. The bigger lens and camera body come close to the 11lb payload, I believe.
Do you think this mount would work for me? Or would you have another recommendation?
Thank you so much for all of the information you put out there. You have been so very helpful to me, without ever knowing it!
What setup do you have for the radian raptor 61?
Hi Trevor
I need your advice.
I’ve tried to follow your suggestions as much as my pocket allows.
I have an Ioptron SkyGuider and an old Stellarvue 70 ED with a Hotech Flattener and a T3i with a CLS filter. My question is, will I get significant improvements by replacing the scope for an Asto-Tech 60ed ($399) or an Astro-tech 72 ed II ($489)? Do you think it would be worth it?
Thanks
Tiago
So, I am using a Nikon D500, and an old 300mm f4 Nikon lens, and getting decent results, but want to bring out more nebulosity, and bring down light pollution. How do I attach light pollution or H-alpha filters that are 1.25 or 2 inch diameter made for a telescope to this set up? I have not found any of these kind of filters that are in camera lens diameters. Nor have I seen one that will fit directly over a Nikon DX sensor.
Great article and good advice. However I would ditch the DSLR and get a mirrorless camera instead. DSLR’s are a thing of the past. An intermediate-time solution to make up for older sensors. Much like music CD’s they have outlived their usefulness.
Hi Trevor, at the young age of 53 decided to get into this great hobby. I am purchasing to get started as follows: Williams Optics Zenith Star 73III, with 50mm guide scope and Williams Optics Flattener. Question what heater should or would you recommend. Still on search for a mount, want to just buy once and be done but they can be pricey. Can you point me in right direction for a good mount that wont be a deep pocket. Anything else I should add to my rig? Thanks for your time
I am just starting out in astrophotography at a rather late age – 70-years. So, the big SkyWatcher EQ6R-PRO is out because I cannot handle the weight. After watching your video about the HEQ5 PRO that is probably the way I will/can go. I have not ordered a mount yet because I would rather talk directly with the people I am buying it from. That entails train travel, hotel reservations, etc. It would be nice to be able to acquire the new Sky-Watcher Star Adventurer GTi but that will be a long time coming before it is available where I live. Granted, everyone loves Canon cameras for whatever reason. I even own the EOS M6 II, but working with that and my Fuji X-E4 I have found the Fuji to be a much better camera image wise. And maybe a better tool for astrophotography work if you are like I am and do not own an ipad, smartphone, whatever else the kids use these days – my mobile phone is a 20-year old Samsung flip-phone without camera that works just fine. Today I received the dummy battery kit for the Fuji and I am in the middle of taking 25 eight-minute exposures using the Fujifilm X-E4 built in intervalometer. This is just a test of the camera and dummy battery – the camera is a little warm right now but there seems to be no problems other than the warmth. As I get more into this I will continue to watch your videos for ideas and information about new equipment and procedures. I do not know if I am still smart enough to grasp the complexities of all this new fangled electronic gear but as time goes on I will give it all a shot – maybe! After years of neglecting PhotoShop CS, CS2, and GIMP I am finally learning GIMP and it really is not that hard – so maybe . . ..
This is just a rambling post because I am so impressed with what all of you have accomplished and are still working on perfecting. I do know that I live in a Bortle 4 zone.
Hi,
Very informative, I love your youtube videos and website. They are so easy to follow and keep up with.
I’m a member of several forums but I feel that everybody is way too advanced, and their kind and thorough explanations leave me more confused than informed. I’m sure that I’ll catch up with them sooner than later, but not yet.
One question, you mention that you have a regular job.
Could you tape an episode on how you plan and manage your observations during weekdays?
Great article. It gives some good advice that covers many aspects. I’m just starting my journey into astrophotography and have some gear and looking to expand. Your coverage of the different setups will help me with my choices and gives me confidence in the gear I already have. Your attached images really support your advice. Thanks, Chris
Hi Trevor.
Thank you for a great article. I’ve used lots of your advice over the last 3 years I’ve been tinkering with the scopes.
I have a question. I see you’re using the ASI ZWO tony guide camera. Can you tell me what you used to get it to fit onto your regular guidescope? I’ll trade out my ES straight through guide scope as no one wants to help with building an adapter with me. Or hasn’t done it therefore it can’t be done.
Or is using an OAG a better idea?
I’m pretty new so I could use your expert opinion.
Thanks so much!
Thank you for the great article. I’m am new to all of this but it fasinates me. I can never make a decision on what equipment to get. I have 8 to 10k to invest in the equipment. Could I ask you for your recommendation on a complete setup with all the extras needed filters auto tracking, mounts telescope etc.
Thank you for your time.
Tom Carlson
Hi Trevor,
I have a sky watcher star adventurer 2i pro pack, a WO Zenithstar 73 III APO and for now a Canon 6D Mark II, I know that I’m pushing the limits of my star tracker with that telescope and camera combo. I saw ZWO announced a cooled camera that’s not so expensive and I’m considering buying it and I know it’s less heavy than the DSLR I have. I am not ready to upgrade the mount yet and I’m wondering if the tracker with the telescope and the zwo cooled camera would be enough for a beginner in deep sky astrophotography like me.
Thank you
Excellent article, covered a lot of possibilities and set up for anyone. Thanks.
I have one question that maybe you could cover later and that is the infield power equipment (battery supplies). Maybe that will inspire your followers to share what they use to power say: Skywatcher EQ6R Pro, ASIAIR plus, dew bands, ASI2600mc Pro, Guide camera, Autofocuser, for a full Winters Night (cold).