ZWO ASIAIR Review: My Astrophotography Control Hub
What Is the ZWO ASIAIR?
The ZWO ASIAIR is a compact WiFi-enabled astrophotography controller that lets you run your entire telescope setup from a smartphone or tablet.
It connects to compatible ZWO cameras, mounts, filter wheels, and focusers, then controls them through the ASIAIR mobile app. With one device, you can polar align, plate solve, autoguide, autofocus, capture deep-sky images, and automatically stack exposures without a laptop computer.
In short, the ASIAIR replaces a traditional astrophotography computer with a simple, all-in-one control system designed specifically for deep-sky imaging.
I have been using the ASIAIR for my astrophotography projects for the last 7 years. This little WiFi controller can do it all, from finding and framing targets using the Sky Atlas to autofocusing my telescope from indoors.
If you are looking to automate your deep-sky astrophotography and eliminate many of the frustrations of running multiple software programs, I highly recommend checking out the ASIAIR Plus.
In this article, I will provide an in-depth review with several images captured with the ASIAIR Plus. I have included tips on setting up your ASIAIR, the cable you need to control your telescope mount, the polar alignment process, and anything else you might want to know about this device.
Full disclosure: ZWO supplied me with a demo version of the ASIAIR Plus for testing in 2021, and I’ve been using it ever since. As always, these are my honest, real-world opinions, and ZWO has no control over what I say.
Using the ZWO ASIAIR Plus in 2026
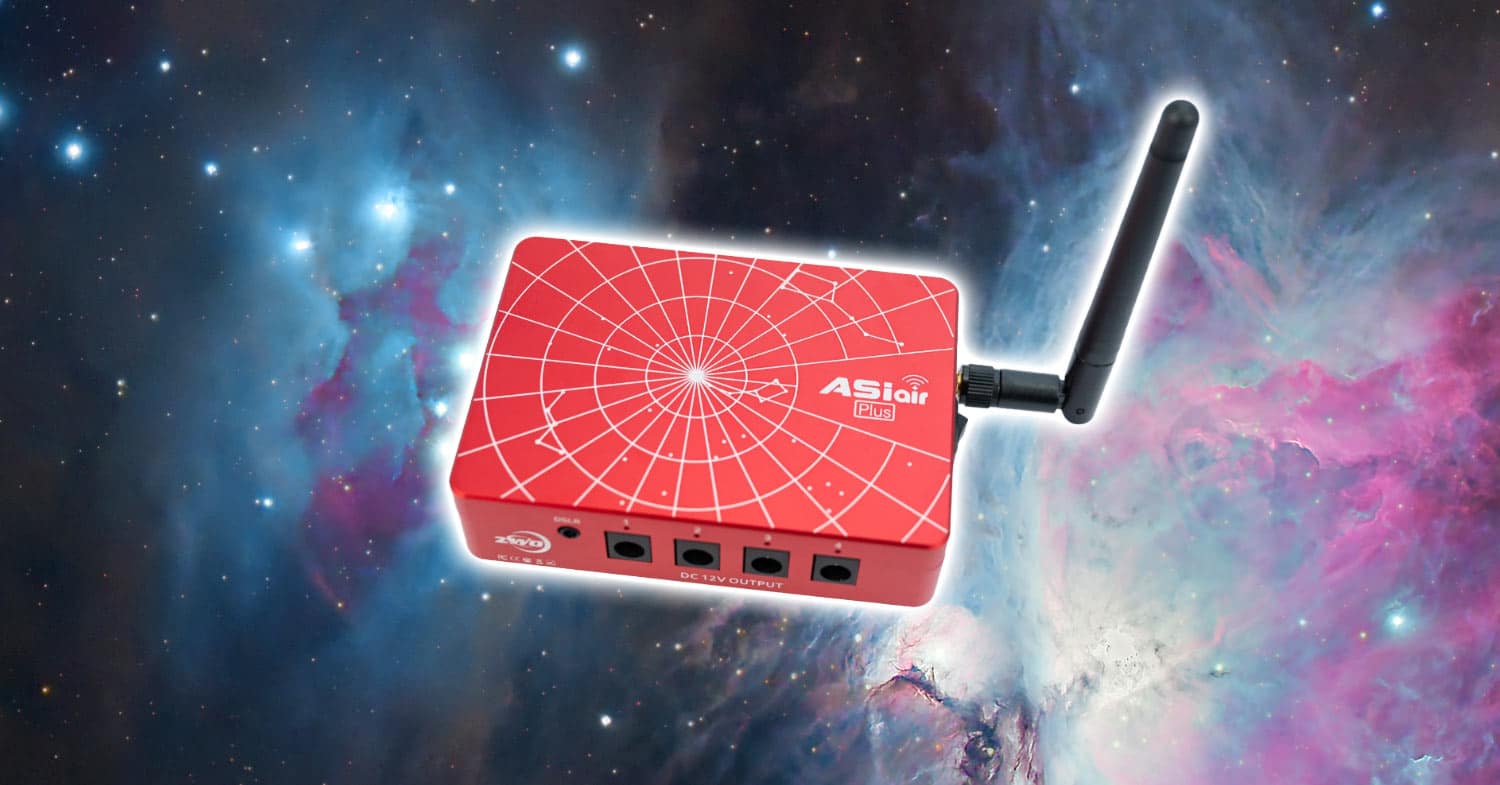
The ZWO ASIAIR Plus is the third generation of the popular ASIair wireless controller for astrophotography. This tiny red aluminum box aims to replace your laptop, imaging software, USB hubs, power supply, and even your Wi-Fi connection.
The goal of this WiFi device is to make it easier and more automated to collect images (and videos) of objects in space. You can control everything on your smartphone or tablet (iOS and Android) from inside the house (as long as you’re not too far away).
The “Plus” improves on several aspects of the previous “Pro” model, including 2.5X faster I/O and an enhanced antenna for a stronger Wi-Fi signal. If the idea of running a complete astrophotography session from your mobile phone while you stay warm inside the house excites you, read on.
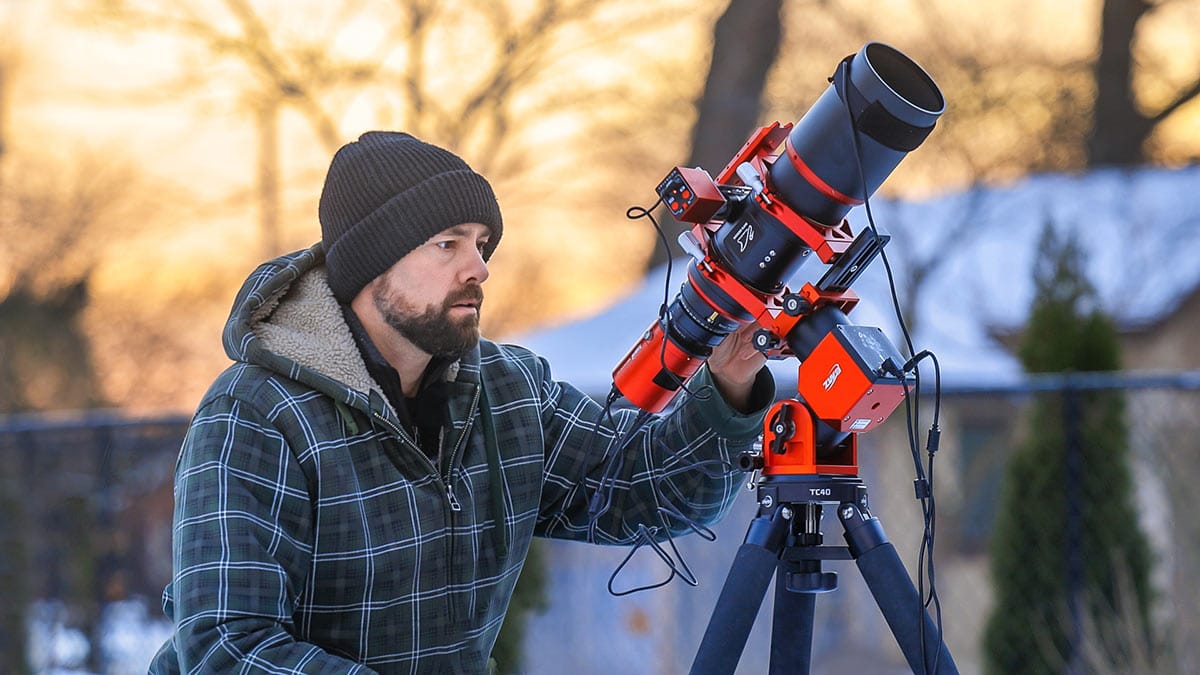
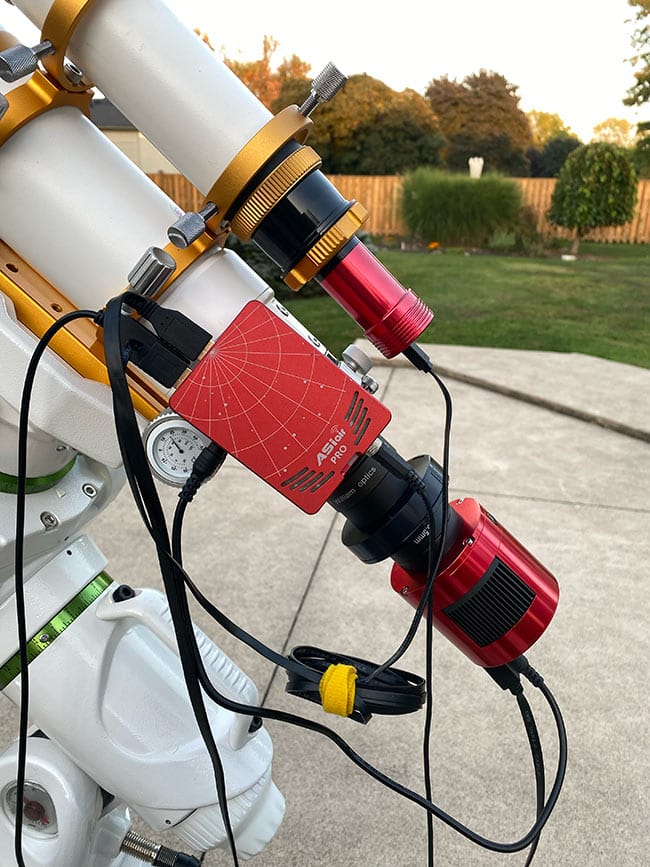
I use the ASIAIR Plus to run my deep-sky imaging setup that includes an electronic filter wheel and an autofocuser.
ZWO ASIAIR – Fast Facts
| Device Type | Dedicated astrophotography control computer |
| Primary Function | Controls your mount, camera, guiding, and imaging sessions |
| How You Control It | Wireless control via iOS or Android app |
| Replaces | Laptop + imaging software (NINA, PHD2, etc.) |
| Best For | Beginner to intermediate deep-sky astrophotographers |
| Camera Compatibility | ZWO cameras only (and many DSLR/Mirrorless) |
| Mount Compatibility | Most GoTo mounts with ASCOM/INDI support |
| Core Features | Polar alignment, plate solving, autoguiding, autofocus, live stacking, imaging plans |
| Internet Required? | No — creates its own WiFi network in the field |
Pros and Cons
- Pros: Removes laptop complexity, excellent app workflow, strong deep-sky automation (PA, plate solving, guiding, autofocus, sequencing).
- Pros: Clean cable management and integrated 12V outputs.
- Cons: Best experience is tied to ZWO cameras/accessories; less flexible than a Windows mini PC stack.
- Cons: Wi-Fi can still be the weakest link for some setups (travel router / Ethernet often helps).
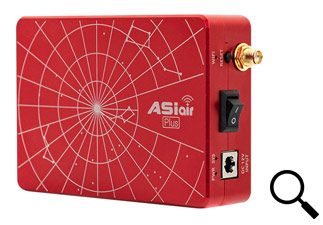
I should note that one of the most common ways I use the ASIAIR is with all-in-one smart cameras, such as the ZWO ASI2600MC Air. This model integrates the ASIAIR WiFi controller into the camera body, along with a secondary guiding sensor for a streamlined system.
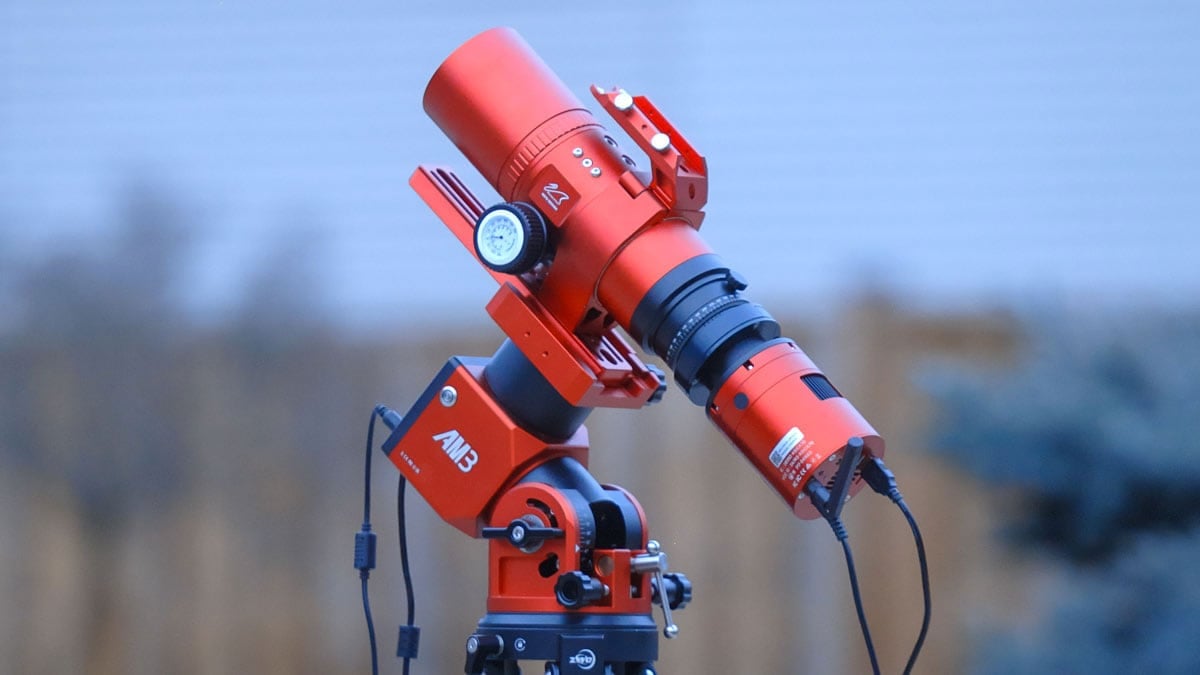
The ‘Air’ series of dedicated astronomy cameras feature a built-in ASIAIR WiFi controller (ZWO ASI585MC Air Shown)
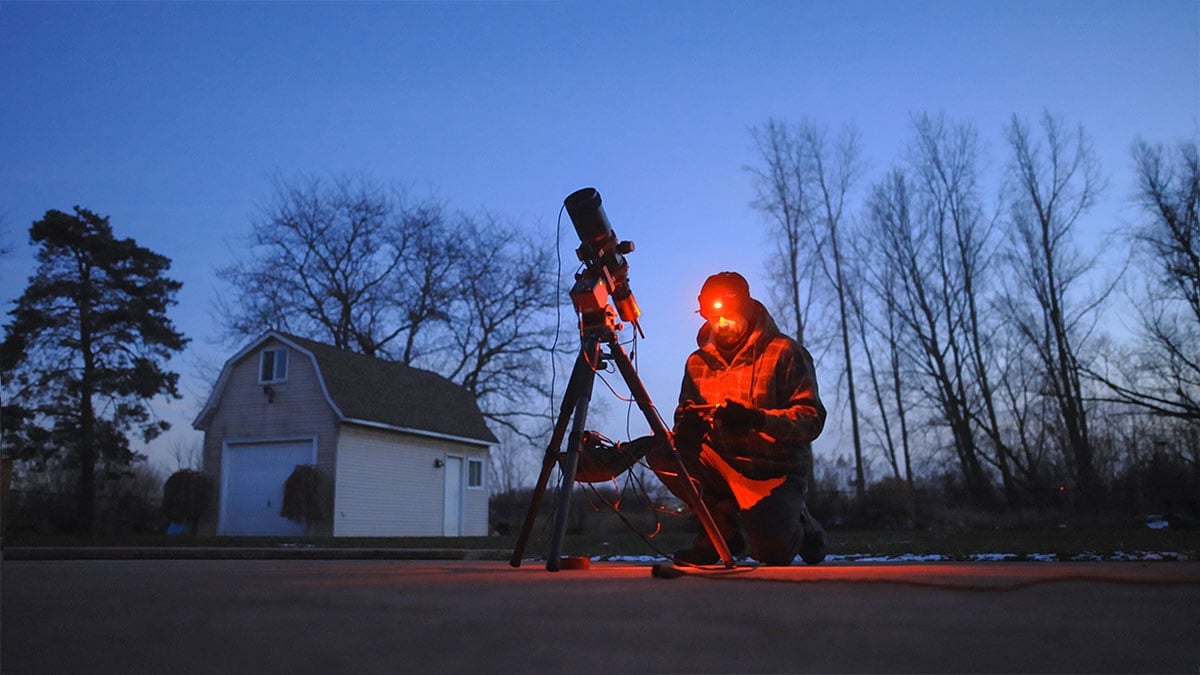
Using the ASIAIR Plus in the Field
There was a time when I briefly abandoned my laptop-based setup for the ASIAIR (version 1) and just as quickly went back to my “computer in a bucket” routine. Early versions were promising, but not quite polished enough for the way I image.
Fast forward to today, and the ASIAIR Plus is a very different experience.
The latest version addresses the exact issues that once pushed experienced users back to traditional laptop control: improved WiFi performance, better overall stability, faster processing, and a more refined app experience. After extensive testing in my own backyard imaging sessions, I can confidently say this device has matured.
The ASIAIR Plus is designed to replace a field laptop entirely when paired with a compatible ZWO camera and supported mount. For many astrophotographers, it simplifies setup dramatically: fewer cables, fewer software conflicts, and far less troubleshooting in the dark.
What once felt like an experiment now feels like a legitimate long-term solution, especially for portable setups and remote imaging sessions.
What the ZWO ASIAIR Plus Does
The ZWO ASIAIR Plus is a dedicated astrophotography control computer that runs your entire imaging session from a smartphone or tablet. It replaces the traditional field laptop and imaging software stack with a streamlined, purpose-built system.
At its core, the ASIAIR Plus handles every major stage of a deep-sky imaging session, from polar alignment to final image capture.
Main Features
- Deep-sky image capture and automated sequencing
- Plate solving for precise target framing
- Polar alignment assistant
- Autoguiding
- Focus assistant
- Multi-target imaging plans
- Live stacking
- Planetary video capture
- Exposure previews
Instead of running multiple programs on a laptop outside, the ASIAIR consolidates everything into one controlled environment. Once your equipment is connected, you can monitor and adjust your session wirelessly from indoors.
The device creates its own WiFi network, allowing your phone or tablet to connect directly to it. If the WiFi signal drops, your imaging session continues uninterrupted, and your images are safely stored on the device.
For beginner and intermediate astrophotographers especially, this simplified workflow removes much of the friction that traditionally comes with deep-sky imaging.
The Sky Atlas tool is extremely handy for previewing how your deep-sky target will fit in your telescope’s field of view.
Hardware and Connectivity
One of the biggest advantages of the ASIAIR Plus is that it acts as both a control computer and a powered USB hub. Instead of running multiple cables back to a laptop, everything connects directly to the ASIAIR mounted on your telescope.
Ports and Power Distribution
Here are the external connections available on the ASIAIR Plus:
- USB Type-C
- Micro SD slot
- 12V DC power outputs (4)
- Ethernet port (1)
- DSLR shutter release port
- USB 2.0 ports (2)
- USB 3.0 ports (2)
In practical terms, this allows you to power your main camera, guide camera, mount, dew heaters, and electronic focuser directly from the unit. For portable astrophotography setups, this dramatically reduces cable clutter and simplifies field deployment.
Ecosystem Integration
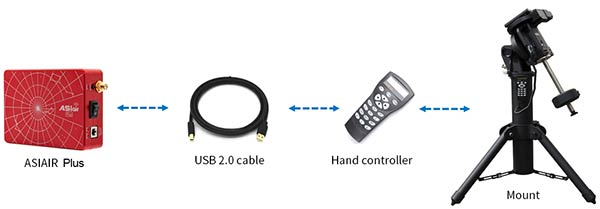
The ASIAIR app is tightly integrated with ZWO’s ecosystem of cameras, filter wheels, and focusers. It is also the most seamless way to control mounts like the ZWO AM5 (using a USB Type-B cable), creating a streamlined, fully integrated imaging system.
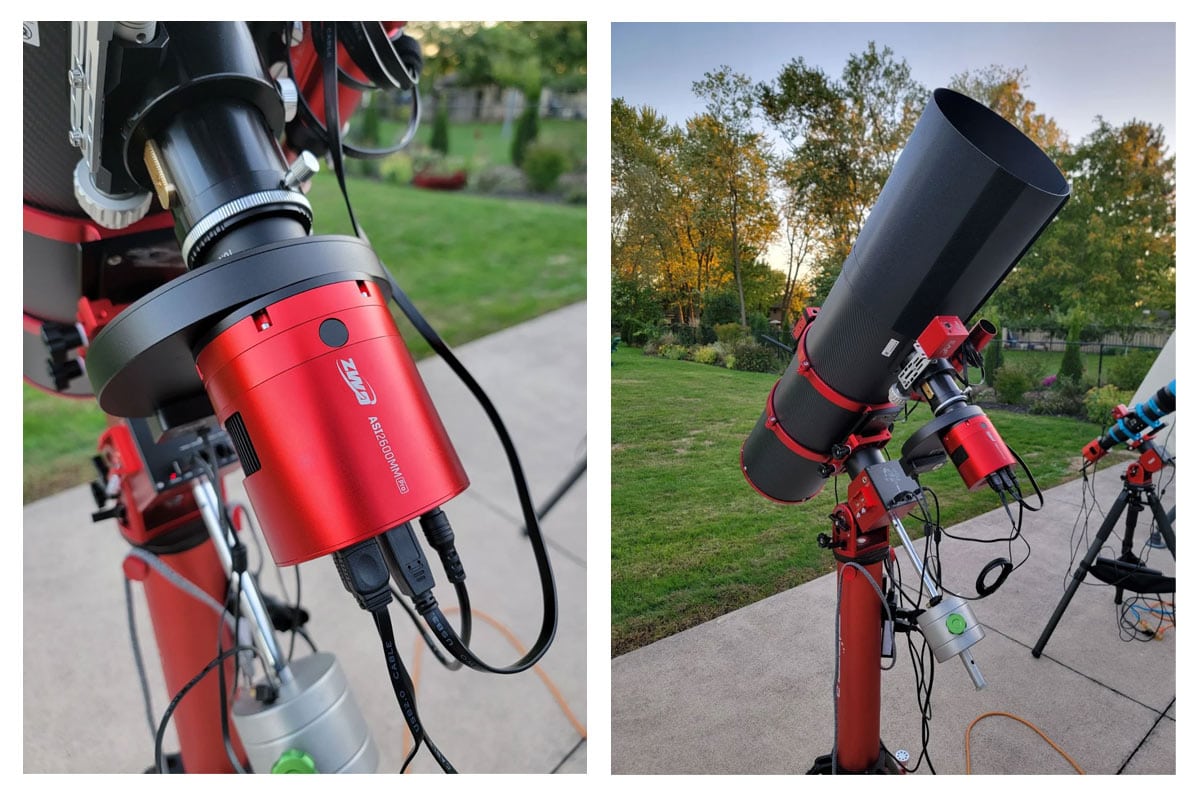
I personally use the ASIAIR Plus to run my ASI2600MM Pro along with a 7-position filter wheel, and the experience is smooth and reliable. At this point, it feels less like an accessory and more like the central nervous system of the entire setup.
While it simplifies beginner workflows, the ASIAIR Plus is capable enough for advanced deep-sky imaging sessions, including multi-night projects, automated meridian flips, and filter-based sequencing.
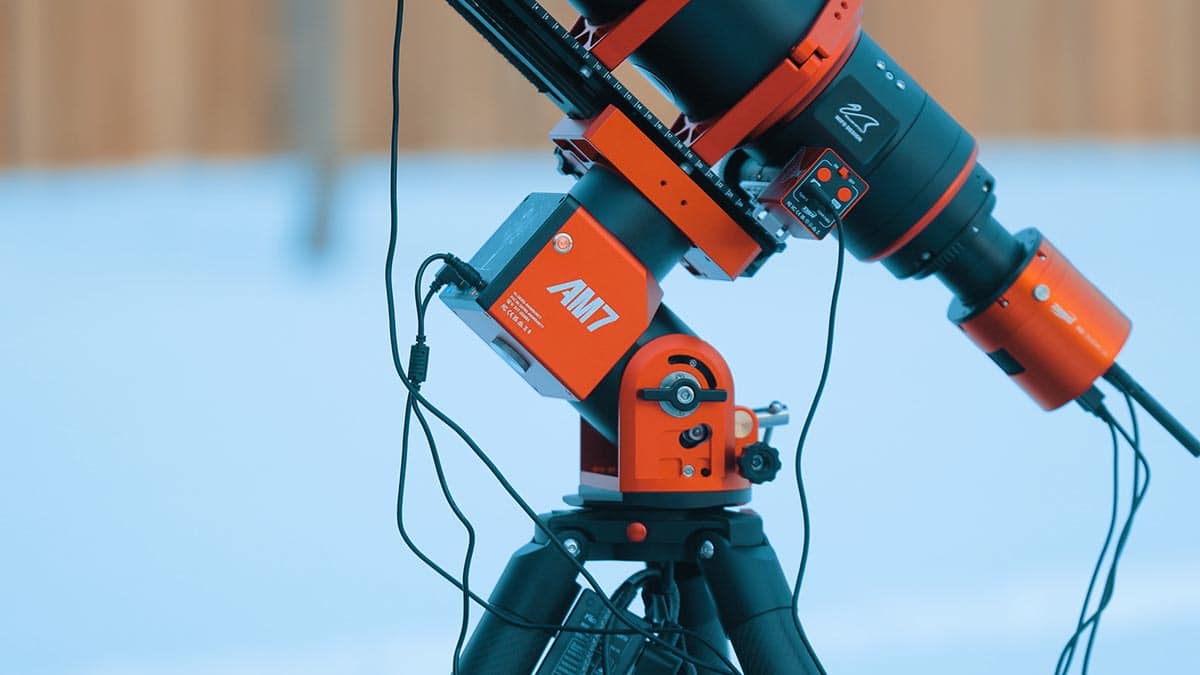
I connect the USB Type B cable from the ASIAIR to the front of the ZWO AM7 harmonic drive mount to enable mount control plate solving.
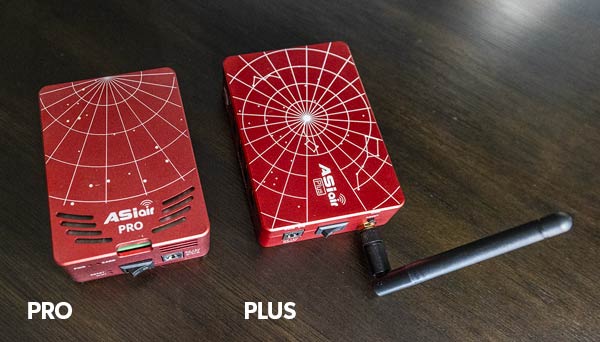
Differences Between ASIAIR Plus vs ASIAIR Pro
The biggest differences between the new ASIAIR Plus and ASIAIR Pro are the extended Wi-Fi range, faster I/O speeds (thanks to onboard eMMC storage), a new USB-C port, and real-time power-voltage monitoring in the mobile app.
You can always check the latest ASIAIR update by visiting the software section of the ZWO website. This includes the latest ASIAIR Android and iOS mobile apps. If you’re interested in seeing every update to the ASIAIR, you can also view the release log.
ASIAIR Update History
Over the years, the ASIAIR platform has received significant firmware and app updates that expanded its capabilities well beyond what was originally released. Below is a timeline of the most impactful updates that shaped the system into what it is today.
| Year | Major update | Why it mattered |
|---|---|---|
| 2018 | ASIAIR (original) released | Introduced app-based camera + mount control in a compact “all-in-one” field computer. |
| 2019 | Plate solving + GoTo / Sync workflow improved | Faster, more reliable target centering made setup and object acquisition dramatically easier. |
| 2020 | ASIAIR Pro released | More connectivity and stability improvements for guiding, imaging, and accessory control. |
| 2021 | ASIAIR Plus released | Better overall responsiveness and reliability, plus a smoother experience during long sessions. |
| 2022 | Polar alignment workflow upgrades | Quicker, more repeatable alignment with less trial-and-error at the mount. |
| 2023 | Mosaic and framing tools refined | Better planning and composition tools for wide-field targets and multi-panel captures. |
| 2024 | Session reliability + automation improvements | Fewer interruptions, more hands-off nights, and a smoother end-to-end imaging workflow. |
| 2025 | Ongoing quality-of-life updates | Continued refinements to the app experience, device support, and overall usability. |
The ASIAIR continues to add useful features that make astrophotography easier and more enjoyable. Needless to say, I am a big fan.
ASIAIR Plus in 2026: What’s New
- The 256GB ASIAIR Plus variant is now widely available for users who want to store multiple nights of data without constant offloading.
Why I Didn’t Switch to the ASIAIR Right Away
Over the past decade, astrophotography has evolved at an incredible pace. The ASIAIR is one of the clearest examples of that shift, a purpose-built device designed to simplify what used to require a laptop, multiple software programs, and a fair amount of troubleshooting.
There’s no question that the ASIAIR has helped usher in a new wave of astrophotographers by reducing the friction of setup and image acquisition. That alone is a significant achievement. So if the ASIAIR is so capable, why didn’t I jump on board immediately?
The honest answer is that it was solving problems I didn’t personally have. My all-weather laptop computer and familiar imaging software (APT) gave me complete control over my sessions. I was comfortable with my workflow, and I genuinely enjoy the process, cables, software, and all.
I routinely remote into my field computer from inside the house, so wireless telescope control wasn’t new to me. And truthfully, I still spend most of my time outside beside the mount anyway (not in the winter!)
But I also recognize that my approach isn’t for everyone. Many astrophotographers would rather spend their time capturing data than maintaining a computer, managing drivers, or troubleshooting software conflicts.
That’s where the ASIAIR Plus makes a compelling case. It streamlines the entire process into a single, stable environment designed specifically for deep-sky imaging.
After extended real-world use, I can better appreciate why so many imagers have adopted it as the centerpiece of their setup.
The ASIAIR App Experience
The real strength of the ZWO ASIAIR Plus isn’t just the hardware; it’s the mobile app. The software is what transforms the device from a simple controller into a fully integrated astrophotography platform.
The ASIAIR app combines polar alignment, plate solving, guiding, autofocus, imaging plans, and live stacking into a single streamlined interface. After using it extensively in my own backyard sessions, here are the features I rely on most.
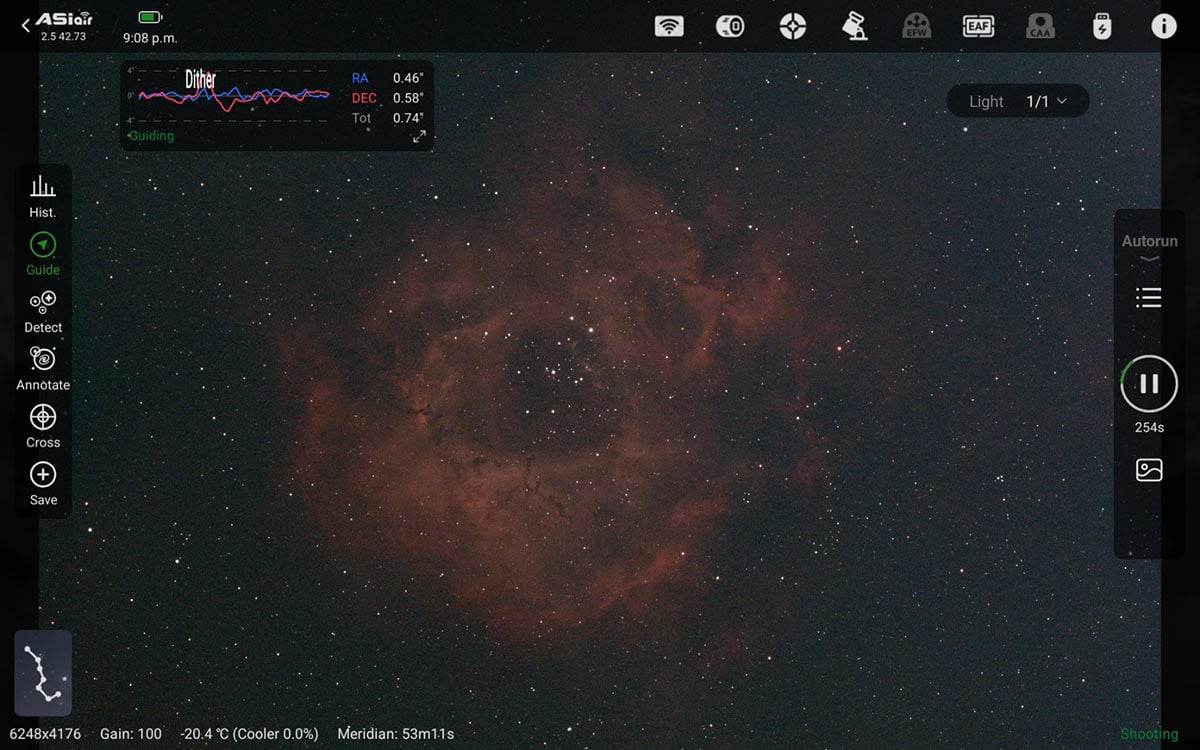
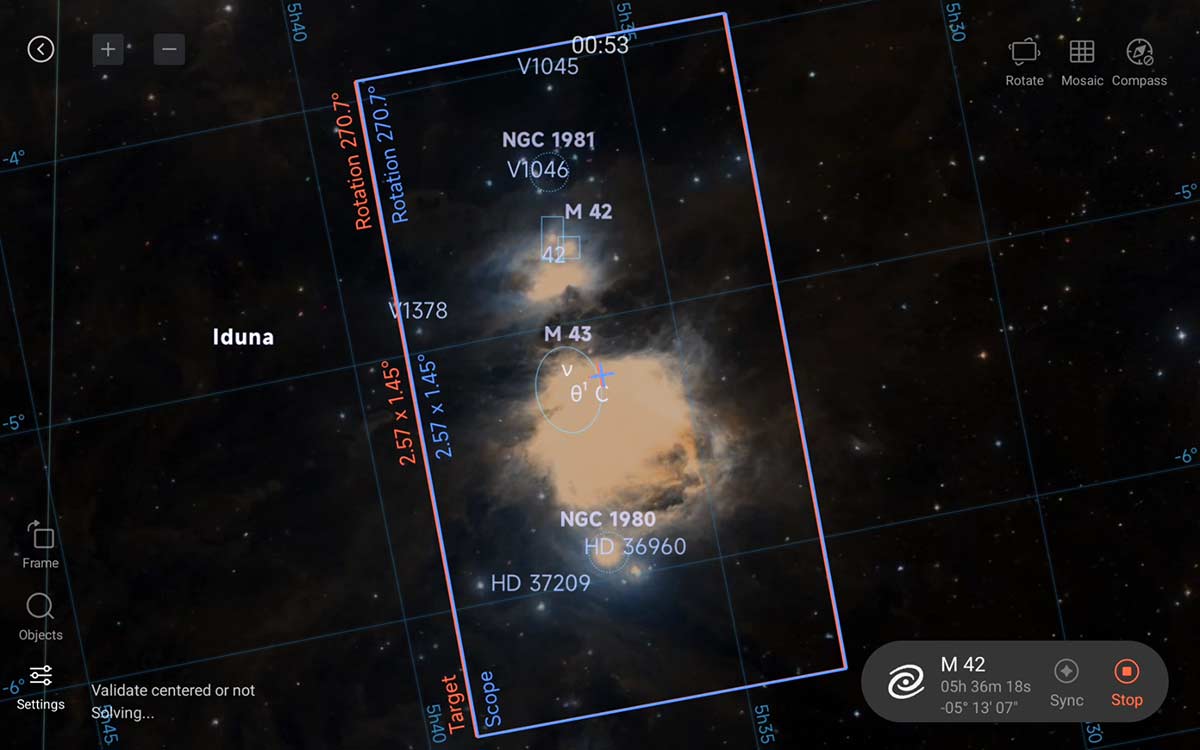
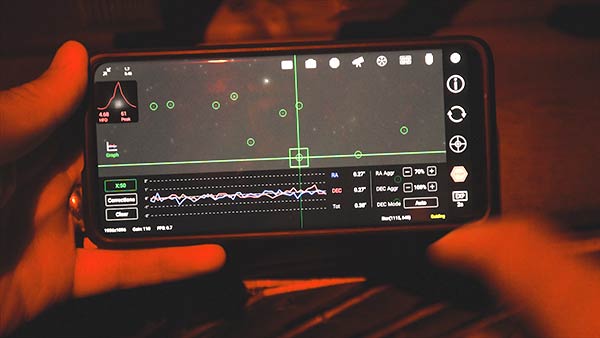
This is what my screen typically looks like during a deep-sky imaging session. Notice the guiding graph at the top left.
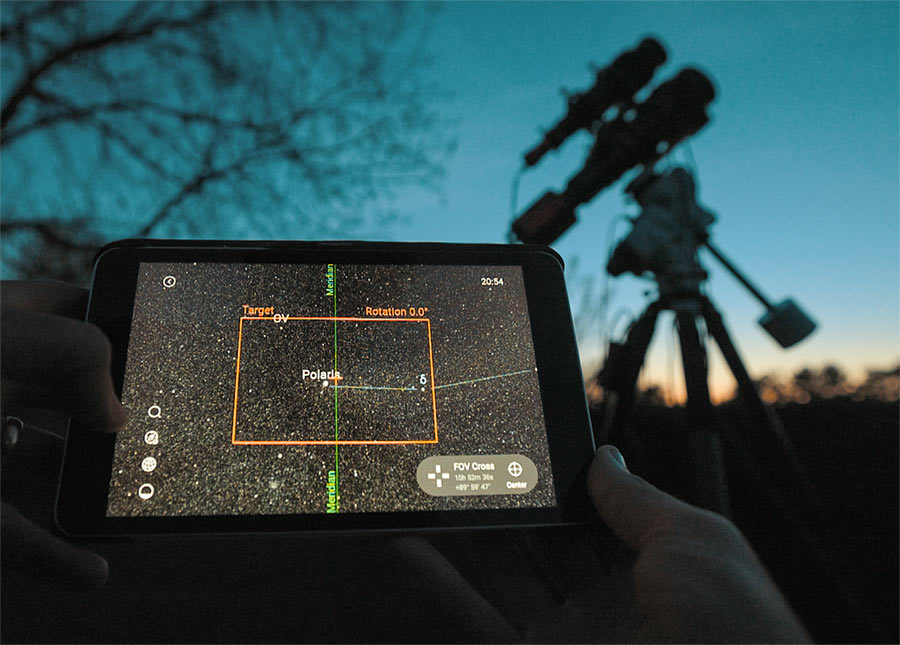
Polar Alignment Tool
The built-in polar alignment assistant is fast and remarkably accurate. After an initial plate solve, the app guides you through mount adjustments in real time, visually showing your alignment error.
For portable setups, this tool alone can reduce setup time dramatically. It eliminates the need for separate polar alignment software and makes achieving precise alignment straightforward, even for beginners.
Sky Atlas (Planetarium Mode)
The Sky Atlas mode functions as an integrated planetarium. You can browse deep-sky objects, frame your target, and slew the mount directly from the app.
Once a target is selected, the ASIAIR automatically plate solves and recenters it for accurate framing. This makes planning and executing multi-target nights extremely efficient.
Autofocus with the ZWO EAF
When paired with the ZWO Electronic Automatic Focuser (EAF), the ASIAIR provides a fully automated autofocus routine.
The system analyzes star size (HFR) across focus positions and automatically calculates the optimal focus. In my own imaging sessions, this ensures consistent sharpness throughout temperature changes and filter swaps.
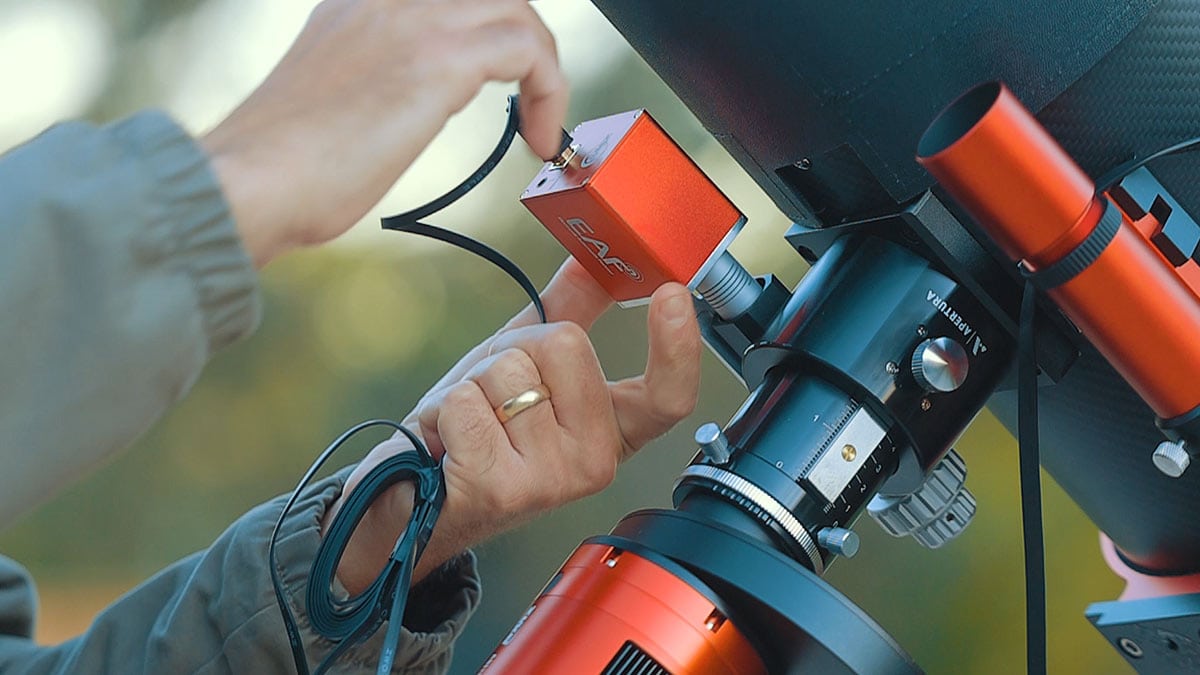
I installed an electronic autofocuser (ZWO EAF) on my primary astrophotography telescope to take advantage of the advanced focusing features of the ASIAIR.
Plan Mode and Autorun
Plan Mode is where the ASIAIR truly replaces a laptop-based workflow. You can build detailed imaging sequences that include exposure length, filter selection, number of frames, dithering intervals, and meridian flips.
Once started, the system runs autonomously. This allows you to step away from the telescope while maintaining full control from your phone or tablet.
For simpler sessions, Autorun mode provides a streamlined capture process without complex sequencing.
Live Stacking (EAA Mode)
The Live Stacking feature enables real-time image stacking for electronically assisted astronomy (EAA).
As exposures are captured, the app aligns and stacks them automatically, gradually improving signal-to-noise ratio on screen. This is especially enjoyable for outreach sessions or casual backyard observing when you want immediate visual feedback.
Autoguiding with Multi-Star Guiding and Dithering
The ASIAIR includes a built-in autoguiding module with multi-star guiding support. By tracking multiple guide stars instead of one, guiding accuracy and stability are improved.
Dithering can be enabled within imaging plans, automatically shifting the mount slightly between exposures to reduce pattern noise during stacking.
In practical use, the guiding system is stable and reliable, comparable to traditional laptop-based guiding software (like PHD2 guiding), but integrated seamlessly into the same interface as the rest of your imaging session.
How to Power the ASIAIR Plus
The ASIAIR Plus runs on 12V DC power. For astrophotographers who image out in the field using a portable battery, the ability to run on 12V DC is a great option over the power-hungry AC power that a laptop computer requires.
It has a standard DC 5.5 x 2.1mm female port for power input and requires 12 volts at 5 amps of power (12V/5A).
While imaging from home, I simply use a 12V 5A power adapter I purchased on Amazon. If you’re looking for a decent power supply for the ASIAIR Plus, this is the one I use.
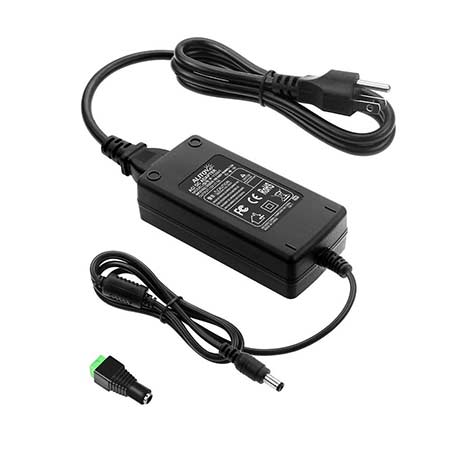
A power adapter is not included with the ASIAIR Plus. This is the one I purchased on Amazon.
If you prefer to use a DC power supply for astrophotography away from home, just make sure you buy a 12V 5A DC power supply with a 5.5 x 2.1mm male jack and a male cigarette lighter port on the other end.
Power Requirements (Important)
- Minimum power input: 12V @ 2A (ASIAIR Plus only)
- Recommended when using the 12V outputs: 12V @ 5A
- Plan extra headroom for a cooled main camera + dew control.
How to Set Up the ZWO ASIAIR Plus
Setting up the ASIAIR Plus for the first time is straightforward, especially compared to configuring a traditional laptop-based imaging system.
Once everything is mounted to your telescope, the setup process typically takes just a few minutes.
1. Connect Your Equipment
Before powering on the device, connect your primary camera, guide camera, mount, electronic focuser, filter wheel, and any USB storage device. The ASIAIR acts as both a control computer and a powered USB hub, so everything routes directly through it.
Taking a moment to organize cables here will make the rest of your session much smoother.
Ideally, you will attach the ASIAIR device to your telescope using a bracket mount. However, Velcro tape also works well in a pinch.
2. Power On and Connect to WiFi
When you power on the ASIAIR Plus, an indicator light confirms that it is running, and a new WiFi network appears on your phone or tablet.
Connect to this network just as you would a home router. You will likely see a “Connected without internet” warning; this is completely normal. The ASIAIR creates its own local network for device control in the field.
Importantly, if your WiFi connection drops during a session, your imaging run continues uninterrupted, and your images are safely saved to the device.
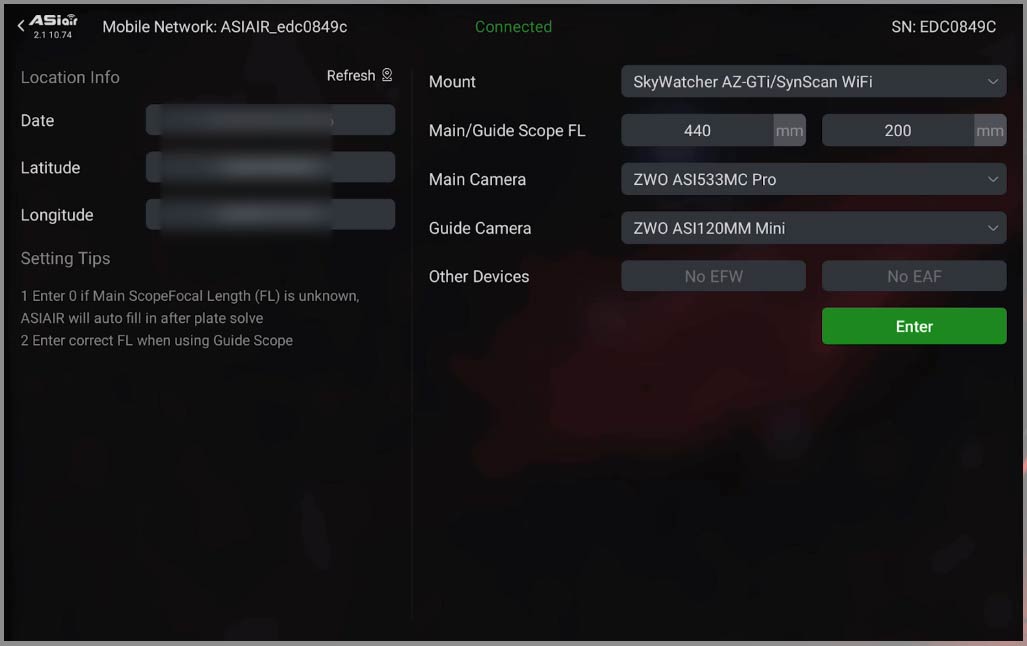
3. Enter Location and Equipment Details
During the initial setup, you’ll enter your observing location (latitude and longitude). This only needs to be done once unless you travel to a new site.
Next, select the equipment connected to the system. ASI cameras are detected automatically when plugged in and appear in the device list. You’ll also enter your telescope focal length and guide scope focal length, which ensures accurate plate solving and guiding calibration.
4. Configure Power Outputs
The ASIAIR Plus includes adjustable 12V DC power outputs. Within the app, you can monitor what is connected to each port and see the power draw in real time.
This makes it easy to manage dew heaters, cameras, and accessories without needing a separate power distribution box.
First-Time Experience
In my experience, the entire setup process, from powering on to being ready for polar alignment, is smooth and reliable. There are no drivers to install, no software conflicts to troubleshoot, and no operating system updates interrupting your session.
For portable astrophotography setups in particular, this simplicity is one of the ASIAIR’s biggest advantages.
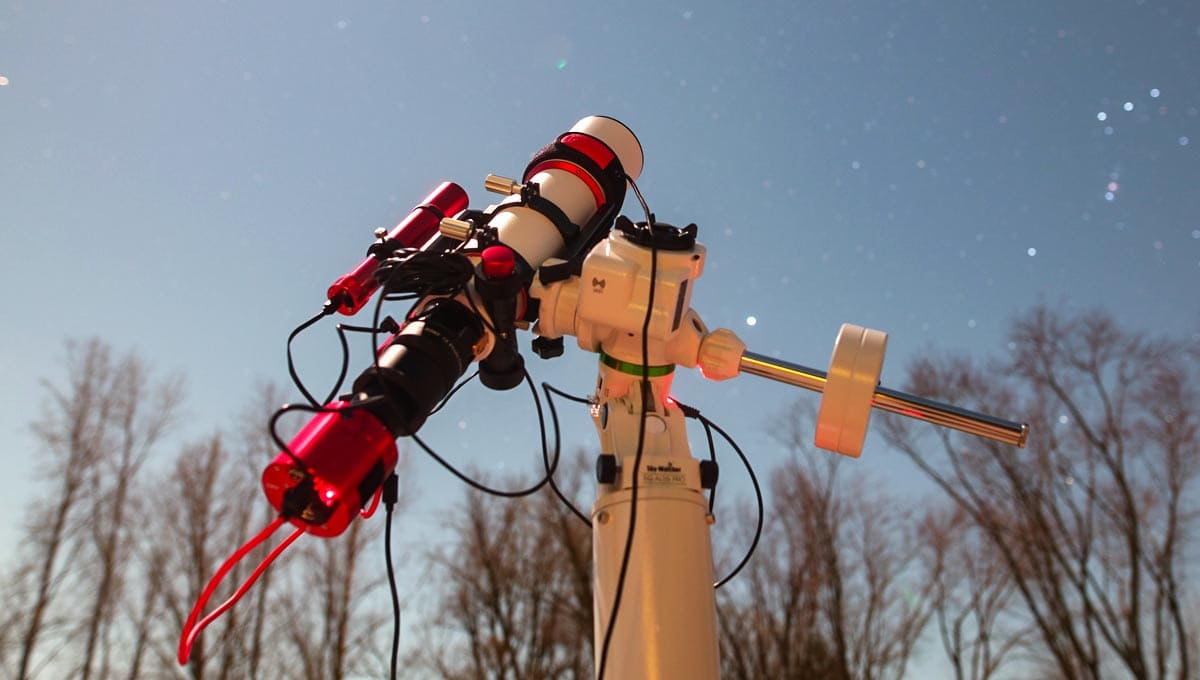
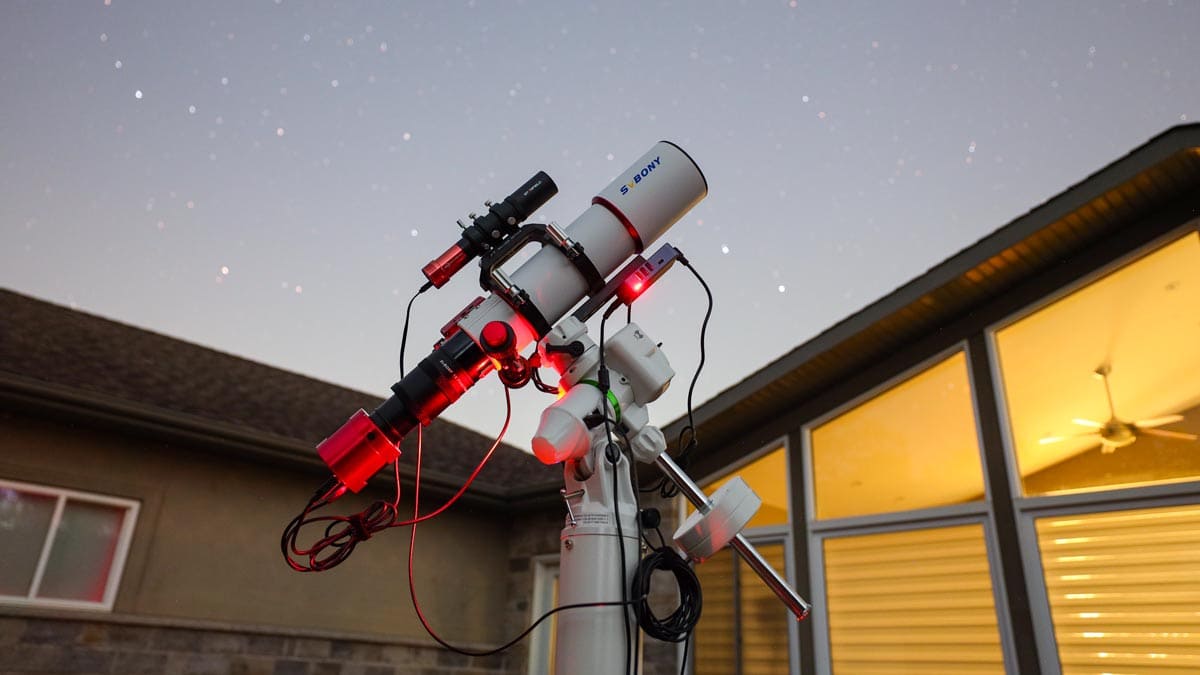
I use the ASIAIR to control my Sky-Watcher telescope mounts, including the budget-friendly EQ-AL55i pictured.
Focus and Framing
I enjoyed the focus and framing tool to confirm that my images were as sharp and centered as possible. The ASIAIR uses plate-solving to point my telescope wherever I need it to accurately.
I regularly use a Bahtinov mask to confirm critical focus of my camera and telescope, but the ASIAIR Plus includes an FWHM measurement for those also using an autofocuser.
The focus/framing mode is essentially a continuous loop of short-exposure images. This is a great time to tweak the final framing of your deep-sky target.

Controlling my deep-sky setup with the ASAIR mobile app on my tablet.
I have also used the ASIAIR to control my telescope autofocuser, and the V-curve routine is accurate and fast.
Telescope Mount Control
Once you have properly connected the ASIAIR Plus to your equatorial telescope mount, you can control your imaging sessions with accurate GoTo functionality.
The Sky Atlas feature within the ASIAIR mobile app is absolutely amazing. This allows me to choose any object in the night sky, and the telescope mount will automatically find it and center it.
The plate-solving capabilities of this system can save a lot of time and frustration. I especially enjoyed using this tool when controlling the Sky-Watcher Star Adventurer GTi, a highly portable GoTo Star tracker.
Owners of this portable mount will be happy to know that the ASIAIR is the perfect companion.
This level of control not only lets you choose the deep-sky objects you wish to photograph but also centers them in the field of view.
The latest update to the app even includes a mosaic-planning tool, which is great for creating large, high-resolution images.
For many folks, controlling your telescope mount with the ASIAIR Plus might be one of the biggest draws to the product.
Plate solving helps with everything from focusing (by automatically centering a bright star), to framing deep images for narrowband imaging.
Related Article: How to Connect the ASIAIR to Your Sky-Watcher Mount
Once you have successfully connected your telescope mount to the ASIAIR Plus, you can use the search tool to find and slew to deep-sky objects in the night sky.
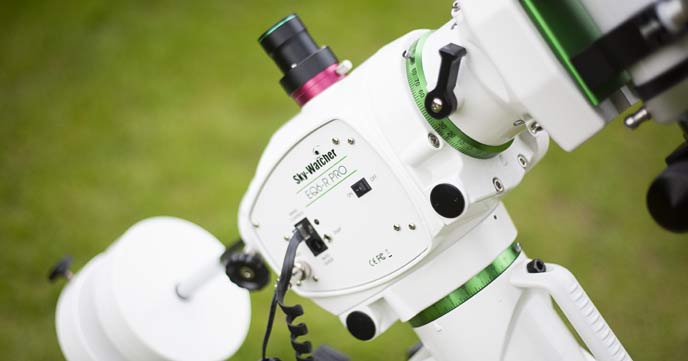
I have now controlled a handful of telescope mounts via the ASIAIR, including the popular Sky-Watcher EQ6-R Pro. I use an RJ45 cable to connect the Sky-Watcher EQ6-R Pro (shown below).
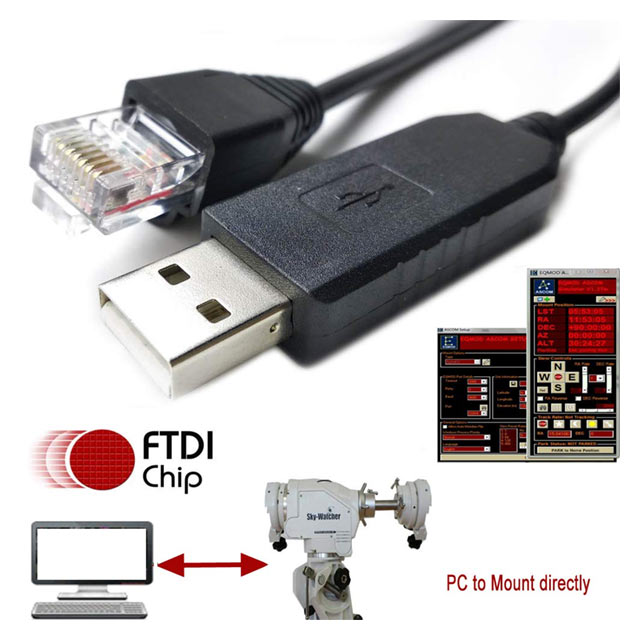
This is the RJ45 cable I use to control the Sky-Watcher EQ-6 Pro equatorial mount with the ASIAIR.
ASIAIR Polar Alignment
For those who appreciate electronically assisted polar alignment (similar to the QHY Polemaster experience), the ASIAIR Plus has its own built-in polar alignment feature.
You can see me using the polar alignment feature of the ASIAIR in my complete astrophotography routine video below.
The ZWO AM5 Harmonic Drive Mount does not have a polar scope for manual alignment, so using the polar alignment tool is the only option.
Many beginners struggle with polar alignment on an astrophotography mount, and I believe this is one of the main reasons the ASIAIR Plus and its predecessors are so popular.
Keep in mind that the polar alignment tool in the ASIAIR plus requires that you have a view within 30° of the celestial pole.
The entire process usually takes me about 5 minutes to complete, starting from scratch with the tripod roughly pointed north.
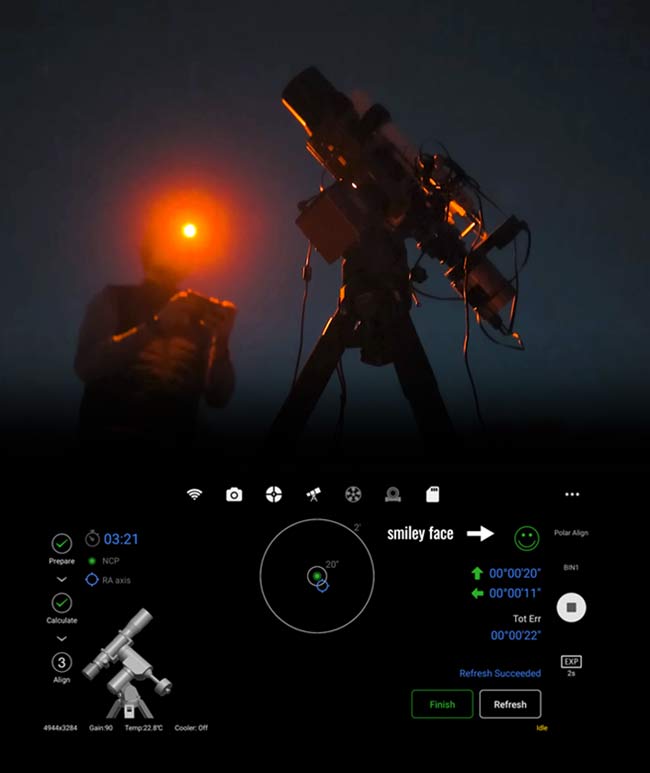
The polar alignment tool is straightforward and fun.
WiFi Range
The ASIAIR Plus improves on one of the biggest issues I had with the previous versions: the WiFi range.
The dual-band antenna now reaches about 20 meters (65 ft), which is more than enough for me to get things running and keep tabs on my imaging sequence anywhere in the house.
It’s a dual-band WiFi network (2.4G/5G). ZWO states that the 5Ghz WiFi is faster than 2.4Ghz, but the range is better using 2.4Ghz. I personally used the 2.4 GHz range and experienced very little lag in the system.
The system is also much more stable in terms of firmware, and it boasts a 52MB/second write speed that lets it handle today’s monster sensors and precious data coming through.
ZWO offers a WiFi range extender, but others have developed custom solutions that appear to work even better.
Station Mode
One thing I hadn’t utilized until recently was Station Mode on the ASIAIR. For anyone running the ASIAIR from their backyard, this is a game-changer.
By connecting the ASIAIR to my home Wi-Fi network, I could monitor my imaging session from anywhere in the house using my tablet. The WiFi range is now equal to the strength of my home WiFi network.
Before this, the Wi-Fi range wasn’t strong enough to reach my phone in the basement, but Station Mode solved that issue. This is a must-have setting for those running an ASIAIR from home.
Guiding
In my experience, the autoguiding feature of the ASIAIR Plus works flawlessly each and every time. Autoguiding is a non-issue for me, and the default settings always deliver excellent results.
The tool is extremely easy to navigate and run. Once your guide camera is connected and you have entered the focal length of your guide scope, expect a quick calibration run and reliable autoguiding throughout the night.
The guiding tool allows you to dither your images between each exposure, which (along with calibration frames) is extremely important for capturing quality data to integrate.
Always use the multi-star guiding feature when running your ASIAIR for the best possible guiding.
The Guiding Tool in action in the ASAIR mobile app.
Live Stack/EAA
It is possible to live stack your images using the ASIAIR Plus, and it’s a great option when doing astronomy outreach with the ASIAIR.
This is often referred to as electronically assisted astronomy (EAA), as it allows you to get a better look at your chosen deep-sky object by taking several short-exposure images.
While reviewing your live stack images, you can adjust the histogram to taste to better view the target. If you’re looking for a great demo of the live stacking tool, check out this video.
Running an Imaging Plan
I really enjoy the Autorun mode of the ASIAIR Plus. It makes the process of setting up and monitoring an imaging session crystal clear.
You can set a sequence of images to run automatically, whether they are your light frames (picture files) or calibration frames such as dark and flat frames.
All important information is displayed, from the light-frame exposure length to the binning mode.
You can review the images as they come in on the fly, or dive into the file folder system to browse everything captured so far.
When running an imaging plan on my smartphone, I usually retreat back into the house when everything is running.
I lose the WiFi connection when I do this, but it does not mean that the imaging session has stopped (using station mode avoids this altogether).
To check up on my imaging plan, I just go back into the garage (which is closer to my setup outside), and the WiFi connection is restored.
Ideally, the WiFi signal would be strong enough to maintain a connection no matter how far away from the ASIAIR I was.
Capturing Flat Frames
Capturing flat frames with the ASAIR is very easy and straightforward, as long as you have a reliable, constant light source, such as a light panel (shown below).
The software automatically calculates the ideal exposure time to create the perfect flat frame. I use an A4 Light Tracing PAD, and it works wonderfully.
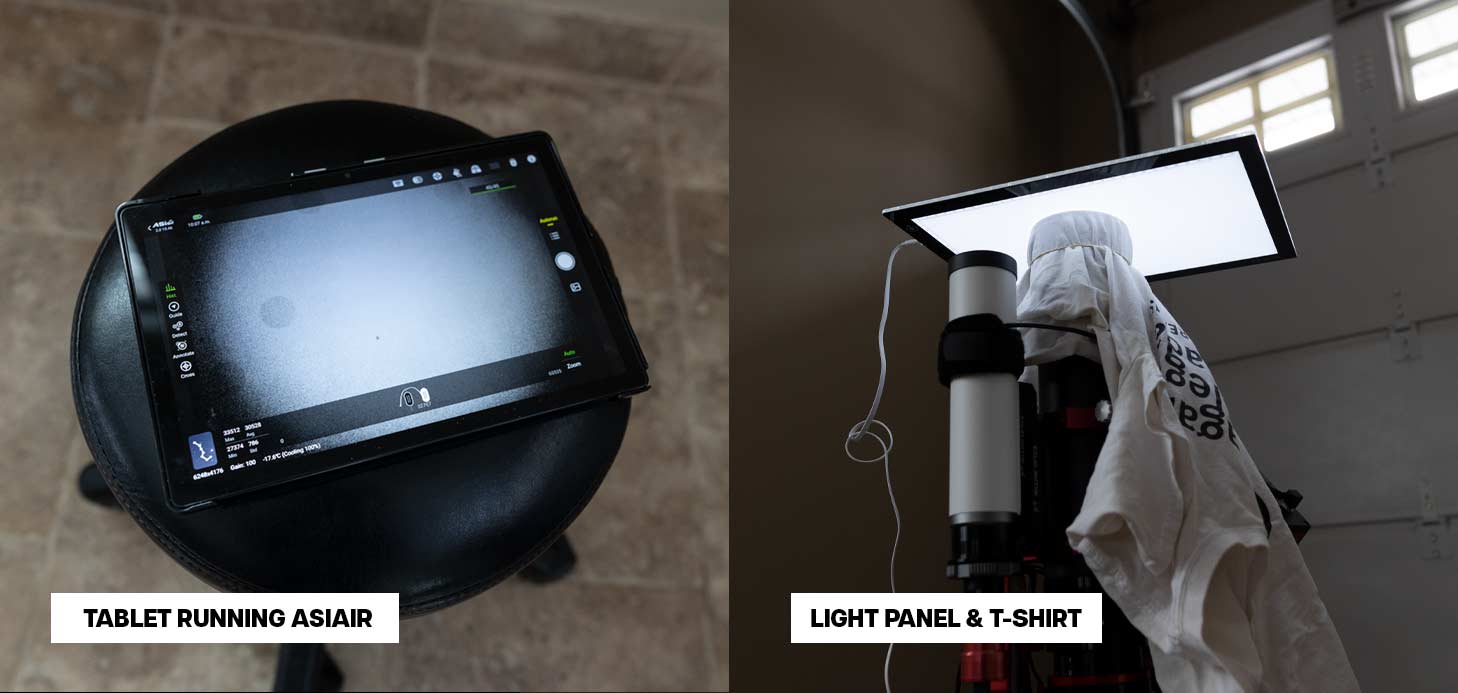
Creating flat frames using an inexpensive USB-powered light panel.
Keep in mind that if you want to edit the specifics (such as exposure time and dithering) of your Autorun plan, you must reset the plan.
There is no “Edit” option to interrupt the imaging sequence and change your settings. Rest assured, this will not discard the images you have already taken.
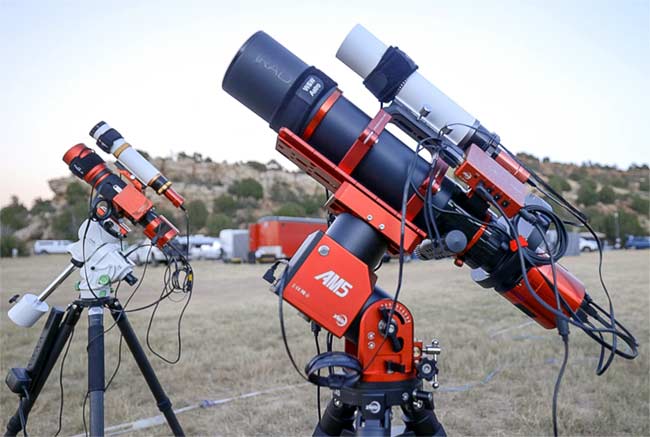
We successfully ran two ASIAIR rigs at the Okie-Tex Star Party in 2022.
My Image Results
When I first received the ASIAIR Plus, my initial tests were simple. I controlled the camera temperature indoors and captured a sequence of dark frames just to confirm everything was working as expected.
The FIT files transferred flawlessly to my USB 3.0 thumb drive, ready for processing the next morning. That smooth first experience gave me immediate confidence in the system.
From there, I moved outside for my first real imaging session. Framing and focusing a target with the ASIAIR Plus was (and still is) an absolute pleasure. The live-loop feedback on my phone made it easy to fine-tune focus and dial in precise framing without touching the telescope.
For that first test, I photographed the Lobster Claw Nebula in Cassiopeia, a large emission region surrounded by several other deep-sky gems. Pairing my full-frame ZWO ASI2400MC Pro with a wide-field telescope allowed me to capture an enormous swath of sky in a single frame.

The Lobster Claw Nebula, Bubble Nebula, and Cave Nebula.
At the time, I was impressed with how intuitive the interface felt. The layout made sense immediately, and the auto-stretch preview gave me a satisfying, real-time look at the data as it rolled in.
Being able to monitor guiding, exposure progress, and overall session status from my phone felt better than I expected.
Since that first night, the ASIAIR has become a central part of my imaging workflow. I’ve now captured hundreds of deep-sky images using the ASIAIR platform, from wide-field nebulae to detailed galaxy portraits.
It has proven to be incredibly reliable. What began as a promising first impression has evolved into a trusted, long-term imaging solution that I continue to use regularly in my backyard and on the road.
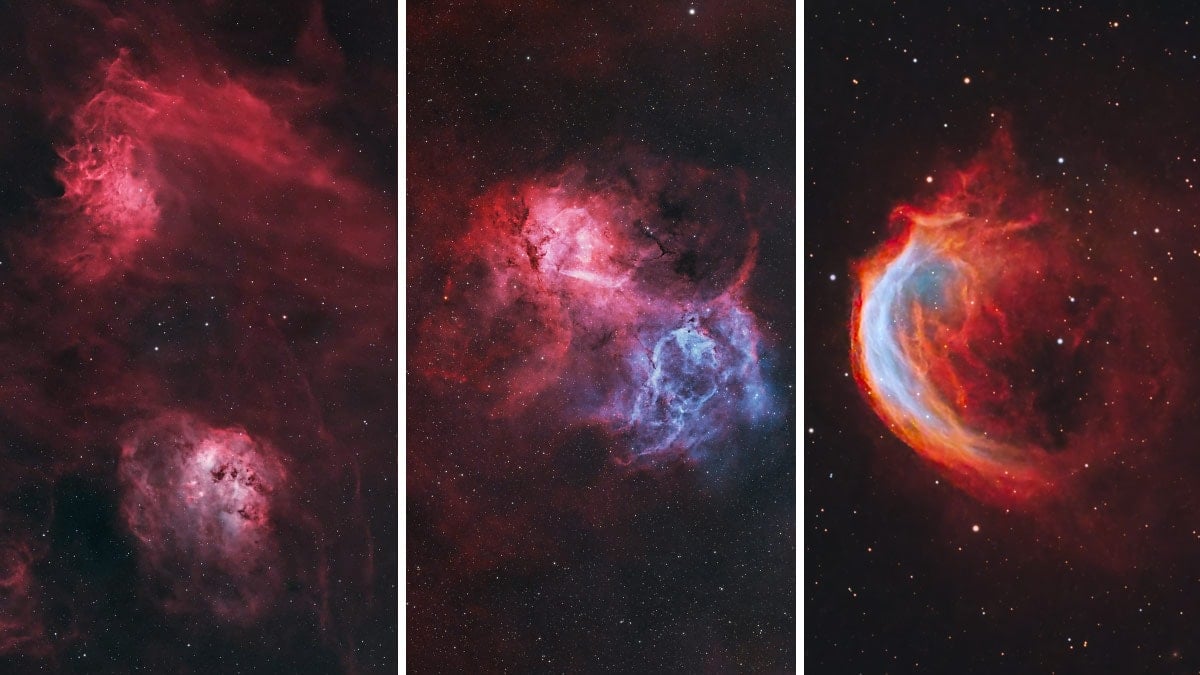
Some of my favorite images captured using the ZWO ASIAIR to control my equipment.
ASIAIR Mini
A new, smaller version of the ASIAIR was launched in October 2022: the ZWO ASIAIR Mini.
Just like the ASIAIR Plus, the fourth-generation ASIAIR Mini includes 4 USB ports, 4 power ports, and a WiFi antenna, but the USB ports are all 2.0.
I have not personally tested the Mini version, but it looks to be a solid choice for anyone looking to control a second astrophotography rig using the ASIAIR.
It is the smallest and most affordable option yet. I used the ASIAIR mini on my ‘budget astrophotography rig‘ build, and it was the perfect application for this little controller.

I used the ASIAIR mini to control nearly every aspect of this affordable deep-sky astrophotography setup featuring the SVBONY 80mm SV550 Triplet APO.
Supported DSLR and Mirrorless Cameras
The ZWO ASIAIR supports a wide range of modern DSLR and mirrorless cameras from Canon, Nikon, Sony, and select models from Fujifilm and others. In practice, most popular entry-level and mid-range DSLRs used for astrophotography are supported, as well as many newer mirrorless bodies.
![]()
Here are some of the most commonly used DSLR and mirrorless cameras that work with the ZWO ASIAIR. This is not a complete list.
Popular Canon DSLRs
- Canon EOS Rebel / xxxD series (T3i, T5i, T6i, T7i, etc.)
- Canon EOS 60D / 70D / 80D / 90D
- Canon EOS 6D / 6D Mark II
- Canon EOS 5D Mark III / Mark IV
Popular Canon Mirrorless
- Canon EOS R / Ra
- Canon EOS R5 / R6
Popular Nikon DSLRs
- Nikon D5300 / D5500 / D5600
- Nikon D7100 / D7200 / D7500
- Nikon D750 / D780
- Nikon D810 / D850
Popular Nikon Mirrorless
- Nikon Z5 / Z6 / Z6 II
- Nikon Z7 / Z7 II
Popular Sony Mirrorless
- Sony a6000–a6600 series
- Sony A7 II / A7 III / A7R II / A7R III
Important: Before buying an ASIAIR, always check ZWO’s latest compatibility list (at the bottom of the page), as support for newer cameras is added over time.
ASIAIR Alternatives
If you’re researching ASIAIR alternatives, there’s a good chance you’ve already bumped into the biggest drawback of the platform: it’s built around the ZWO ecosystem. I completely understand that being “locked in” to ZWO cameras and accessories is a deal breaker for some people.
These are the most common routes people take when they search for alternatives to ASIAIR:
-
Mini PC / laptop at the mount (Windows): The most flexible option. You can run popular astrophotography software and use a much wider range of gear, including Canon/Nikon/ Sony cameras and many dedicated astro cameras.
-
INDI-based controllers (Linux / Raspberry Pi): A common DIY-friendly path if you like tinkering and want broad hardware support. These setups can be powerful and affordable, but the learning curve is usually steeper than ASIAIR.
-
Dedicated standalone astrophotography controllers: There are several purpose-built controllers marketed as “ASIAIR competitors” that aim for the same all-in-one convenience. Many support more brands than ASIAIR, but struggle to deliver the experience the ASIAIR does.
If ZWO-only compatibility throws you off, the best ASIAIR alternative is usually the one that matches your priorities: maximum compatibility (mini PC), maximum control (DIY INDI setup), or “close to ASIAIR” convenience (a dedicated controller with broader support).
Final Thoughts
If you already have an original ASIAIR or ASIAIR Pro and you’re happy with it (and any workarounds you’ve used to extend the WiFi), I doubt you’ll feel an immediate need to upgrade.
But if you’re a “laptop guy” like me who’s been patiently waiting and watching the development of this product improve, now might be the time to finally dive in.
The WiFi range on the original was annoying, but the instability/bugginess scared me away. The latest ASIAIR update includes several new features that I am excited about, including image stacking, camera rotation assistance, and a slick new mosaic planner.
The point is, this device seems to just keep getting better.
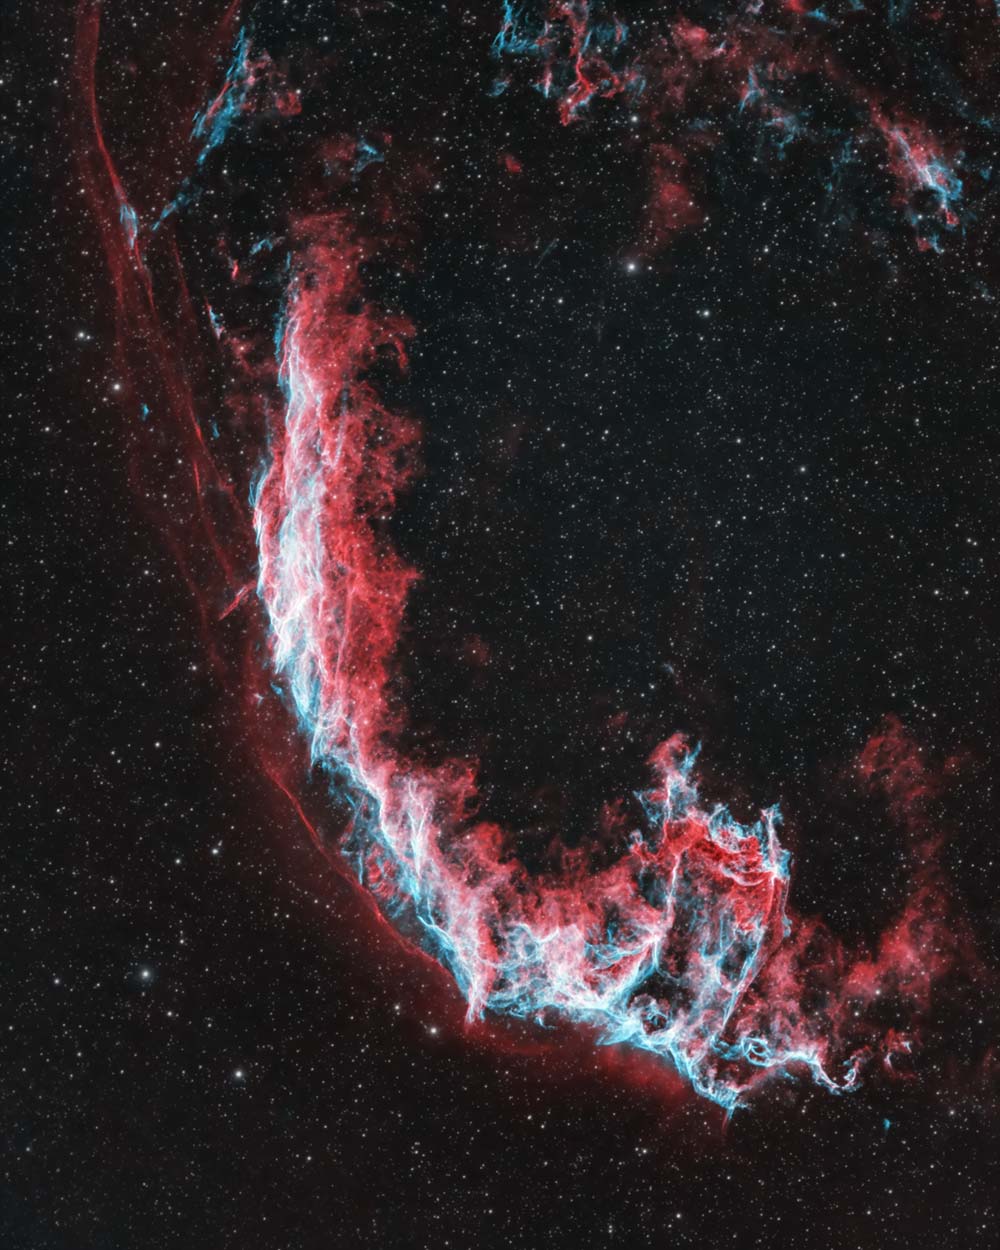
The Eastern Veil Nebula.
The ASIAIR Plus is a fantastic product, and I highly recommend it to anyone looking to streamline their astrophotography experience using a ZWO ASI astronomy camera.
I very rarely use my laptop computer for deep-sky imaging anymore. The ASIAIR can run a sophisticated imaging plan over multiple nights using a monochrome camera and several filters. For my current imaging stage, it is an excellent fit.
My mobile phone is always on hand, and I can check on my imaging plan inside the house via the WiFi connection. I’ll continue to use the ASIAIR Plus here in the backyard and may finally have to retire one of my faithful astro-laptop computers.
The ASIAIR Plus Costs $349 USD (Agena Astro)
 Trevor Jones is an astrophotographer and a valued member of the RASC. His passion is inspiring others to start their astrophotography journey on YouTube so they can appreciate the night sky as much as he does. His images have been featured in astronomy books & online publications, including the NASA Astronomy Picture of the Day (APOD).
Related Content
- The Best Smartphone Apps for Astronomy and Stargazing
- The Best Astrophotography Telescopes Available in 2026 (Complete Guide)
- The ZWO ASI2600MC Air Made My Life Easier: Here’s How


I love my ASIAIR Pro for controlling my portable rig. Like you said, no pressing need to upgrade to the Plus for me (yet).. but cracking product !
While I’ve been dabbling with ‘shooting space’ with my DSLR for nearly a decade, I moved into genuine astrophotography earlier this year and the ability to automate the process was the biggest factor in that decision. Laptops, cables, extension cords, multiple programs and the potential for error each element introduced made setup and success enough of a challenge to make nightly imaging impractical.
The ASIAir was an obvious choice when I put together my rig last February and has given me nothing but success since I started using it in March. 5 minute initializations are considered long and I generally take longer to uncover and power up than I do to PA. I use ethernet and connection has been flawless with blazing download speed.
I do my planning from bed using an iPad mini and am at a point where I don’t even review my first images. Set my plan and press run… That’s it. No more wasted nights because I just don’t want to hassle with setup, no ruined sessions because of cable snags, software failure or poor planning.
Meridian flips work perfectly, but I tend to shift to another target rather than lose imaging time. I’m currently collecting data on 3 targets each night and will process this weekend.
Astrophotography is nothing to lose sleep over
I’ve tried both Stellarmate and Astroberry, and had the same issue with both — extremely slow transfer of images from my EOS RP to the RPi, which introduces a 10-20 second delay in between exposures. So far, the reviewers are using dedicated astro cameras, which is great, since that’s clearly ZWO’s primary focus. But since they include support for DSLR’s, I’m very curious if the AIR+ suffers from the same problem. Have you tried it with your Ra yet, Trevor?
Interesting, Mike. Yeah, 10-20 seconds between exposures on your DLSR/Mirrorless is a problem. I have not tried the ASIAIR Plus with my Canon EOS Ra yet. I will add it to the list. Thank you for pointing this out!
Trevor, what did you find out with this? Did you experience any issues? I am about to buy the ASIAIR Plus, and run a Nikon DSLR….
Curious to know what version of Raspberry it is and if there is a header inside that an external antenna can be attached to. I have the ASI Air Pro OG and there doesn’t seem to be a WIFI header. Anyone feel like cracking the lid on the new version and posting a pic ?
Hey Trevor,
Great in depth writeup. I have used the ASIAir Pro for over a year now, I actually have two of them for each rig, and I love it. Does everything I need it to do and more. For me I dont see the range “issues” many people have experienced with the ASIAir Pro. I run a mesh network and my setup is 30 feet from my home running in station mode and I am two floors above, warm and cozy in my bed. For me, the ASI Air Plus is not worth an upgrade but if I did experience range issues, I would give it a go. Ill hold out for ASIAir Mega or Ultra whatever is next…
I think I recall a video posting from you a couple years ago where you were trying out the original ASIAir and I’m sure the Plus is a much welcomed improvement.
Clear Skies,
Sean
Hi Trevor
I would like to see this able to connect to my home wifi with the ability to transfer the images wirelessly. I do a lot of imaging when I am not at home and I connect remotely to the computer at the telescope. The other thing I would like to see is dome control. If ZWO would provide those 2 things I would probably purchase one.
Clear skies
Ron
I have been using my ASIAIR exclusively for the past year and a half. It has been a total game changer for me. Once you learn how to get everything connected, work out a power source, and get the portable router working in the case of the models before the plus, it really does everything I need. It is so much easier than using a windows based system or a laptop. Power draw is so low you can easily run everything off of relatively small and light weight lithium batteries. I am getting amazing guiding now on my CEM40. Often 0.2-.4 RMS error, so no problem getting 10 minute subs. Autofocus is super easy and reliable. It took a little bit of fiddling to get automatic meridian flips to work correctly. Now its very reliable. Big thing with this system is it is easy to totally automate, so now its easy to get long integration times, and be able to sleep at night. It just makes astrophotography way more fun for me. I totally recommend this system.
Would be nice to see a comparison to a laptop-based setup with NINA, especially with the flexibility of NINA’s advanced sequencing module and the availability of plugins.
Thanks Trevor. As ever, a very well-articulated and informative review that gets me close to upgrading my ‘laptop in a bucket’ set up, but not yet! I’m using NINA on a SCT with ZWO cameras with TeamViewer remote control software to run everything from indoors. As the results come through, I sometimes do need to edit my imaging plan on the fly as conditions change or my plan proves sub-optimal, so I love the ability to tweak things quickly in NINA without losing the underlying plan. NINA (and formerly for me APT) are such good tools that I’m reluctant to let go of this kind of functionality. I’ll watch with great interest to see how ASIAIR Plus develops, but for now it falls just a smidgeon short of what I need to control a difficult imaging session. I hugely appreciate what you’re doing for the community!
Thanks for the kind words Paul! I totally understand where you’re coming from. To be honest, I will ALWAYS have a laptop running one of the rigs – but not in certain situations anymore. For example, when traveling I usually stick to my Canon EOS Ra – but now I can bring a more robust rig without all the extra gear. I really need to explore NINA more, it looks like it has a number of extra features APT doesn’t.
The Asiair Plus has the same amount of RAM (4GB) as the previous model, but take three times longer to boot up. How does that fit with the EMC internal storage having a faster data rate?
Hey Trevor. I see you’re using the ASI2400MC Pro. How do you like it? I’ve been thinking of picking one up for myself. I heard the gigantic file size, with 24Megapix, causes some problems with processing. Any problems? You haven’t yet reviewed it I see.
Thanks
MC
Hi Michael. I really like the 2400MC Pro so far. The raw files are about 50 MB each. I haven’t had any issues transferring, stacking, processing the data so far. My image processing PC is quite powerful, though. (Acer Predator Gaming – Intel 8 CORE i7-9700K, 4TB+512GB SSD, 32GB DDR4, RTX 2080). I keep coming back to my Canon EOS Ra because once you get used to a full-frame astro-sensor, it’s hard to go back. Now, I have that in the 2400MC Pro – with cooling and all of the other benefits of a dedicated astronomy camera!
Hello Trevor,
Have you ever considered the Eagle 4 from Primalucelab?
The biggest advantage being to use your own software (APT, NINA, PHD etc).
You can also control this device from your laptop (and phone, Ipad etc)
Worthwhile to have a look.
Greetings from Holland!
Gerard.
Thanks Trevor. I have a MacBook pro with a bit less processing power (2.6 GHz 6-Core Intel Core i7,16 GB 2400 MHz DDR4), but I think it can handle it.
The ASIAir Plus only had 100 available for preorder (which are already filled) on the ZWO website. And it doesn’t look like they, or anyone else, is going to have any more of them for the foreseeable future…
Guess I’ll just have to stick with my Alienware Laptop for now… 🙁
I have both the ASIair Plus and ASIair Pro and was comparing the time it takes after the actual shooting to process the image and display it on the screen to my iPad. I captured the full res (Bin1) test images on an ASI2600MC-Pro (APS-C) to the internal eMMC storage on the Plus and to a USB-3 drive on the Pro. I used a stop watch to measure the time it took for the image to load from the ASIair to my iPad. I consistently got 1 second longer transfer rates with the Plus. I used the 5GHz setting for Wi-Fi with the internal antenna on both ASIair devices. I contacted ZWO asking about the difference but they have yet to respond.
Anyone else tested this? What were your results?
Does the plus still have problems with supporting CGX/L mounts via the direct USB mount port ( not the hand controller ).
I love the idea, but I would have to ditch a lot of gear and buy ZWO products to be compatible ( electronic focuser, etc )
Hi Trevor am thinking about getting this to go with my Star Adventurer and a Redcat 51, Canon R5, plus a mini guidescope and camera. What do you think about its usefulness in that set up? Will I still be able to get assisted polar alignment (the biggest challenge for me at the moment)?
Great review Trevor, I’ve not even begun buying astrophotography gear yet so this was very helpful. Seems like this gadget is a good start.
Thank you for all the help you provide for beginners to the more experienced, your YouTube videos and articles are vital incite into this stunning hobby. I have no idea of the technical terms yet, but you give us confidence that we can achieve similar amazing results.
I really appreciate your attention to detail and your honesty.
Thank you 🙏🏻
Hi! Just got my Plus a couple of days ago and unfortunately, it’s not Pi based anymore but Rockchip RK3568B2. Why unfortunately ? Because the OS is now in eMMC chip and even though there is a slot card, I don’t see a way to be able to boot from the SDCard if wanted (just to try out any other astro-linux based OS). The chip appears to have OTG functionality but it’s unclear if it was closed by ZWO or not. Didn’t try it yet on my mount (HEQ5 PRO) as with winter, every night is very cloudy.
Regards,
Viorel
I understand there are several versions of the ASI Air Plus, and the latest switched from Raspberry Pi to Rockchip. How can one tell what version they have?
what are you thoughts on using the ASIAir Plus for shooting video for planetary images. I know there is limited fps but I am not sure (I am still really new) how that affects the final results. I did get a very nice shot out of a 1 min video clip of the moon.
Hi Layne. I’ve never tried planetary imaging with the ASIAIR myself. I still prefer to use FireCapture for this type of imaging, but this requires setting up the laptop. I am sure the planetary imaging tools on the ASIAIR will continue to improve over time. I think it is a more capable feature of the software than many people realize!
I’m a bit confused. If I want to power the SW GTI mount via asiair plus. What cable do I exactly need? I keep hearing that it’s not advised to power the mount via Asiair plus but I’m also seeing that people are doing it with no problem, if it’s possible to power the mount via asiair plus then what cable would I need to do that ? Thanks
Hey Sameer – I’ve been told NOT to power the GTi (or any mount with the ASIAIR). BUT, if you want to, I think the main thing is to make sure that the power supply going to the ASIAIR has more than enough juice for everything. A 12V 10A power bar should be plenty to run the mount, camera, and anything else you have plugged in. I use the AA batteries or a SEPARATE power supply (12V 5A) to power the GTi, so… let me know how it goes!
I bought a dual 12v dc plug and two power cables. I use a small Jackery for power.
I was introduced to this product on the weekend and we imaged M8 using AP 130 Starfire and Canon Ra. WOW is the best way to describe the ease of this unit. My laptop and guide camera are both due for replacement and this and new camera will replace it for the same money.
Trevor, I have one question. I plan to buy the ASI Air Plus for imaging, but my question is, will it work with a CGX Mount?
Eladio Hurtado
The ASIair, with the promise of removing the laptop piece, is what I’ve been waiting for. I especially like the idea of polar alignment by using the image(s) from the scope vs the image from the mount. That removes the potential difference between the mount and scope.