How to Photograph the Milky Way: A Beginner’s Guide
To capture an image of the Milky Way, you’ll want to use a DSLR or Mirrorless camera and a lens in the 15-24mm range. Using the camera in ‘manual mode’, take a 30-second exposure with the ISO set to 1600.
Use the widest aperture of your lens (F/4 or lower) to let as much starlight as possible onto the sensor. As long as you are in a location dark enough for the Milky Way to be visible, you should be able to see the glow of our galaxy in your photo.
If you need more information about the best time of year to photograph the Milky Way and how to find it in the night sky, read on.
The Core of the Milky Way. Canon EOS Ra + Sigma 24mm F/1.4 lens (on a star tracker).

How to Photograph the Milky Way
Milky Way Photography is one of the most rewarding types of astrophotography, and it can be done with a simple DSLR camera and lens. With the right camera settings, you can capture a beautiful portrait of our night sky with the glowing core of our Milky Way.
The photo below is a single exposure taken with a mirrorless camera and a wide-angle lens. While this single image is impressive, we can extract even more detail using a process known as image stacking. Before we dive into the image processing side of things, I will explain how to find the Milky Way and the best camera settings to use to photograph it.
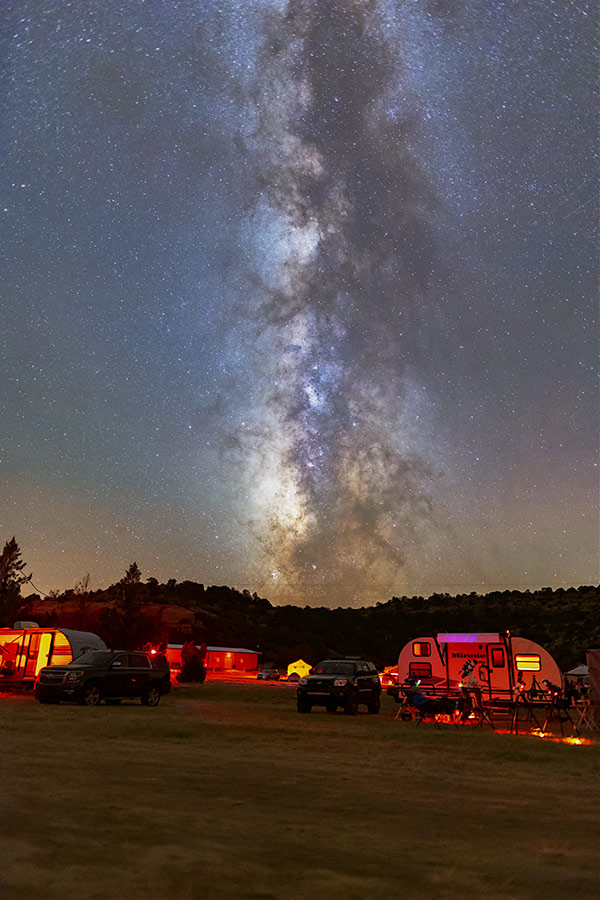
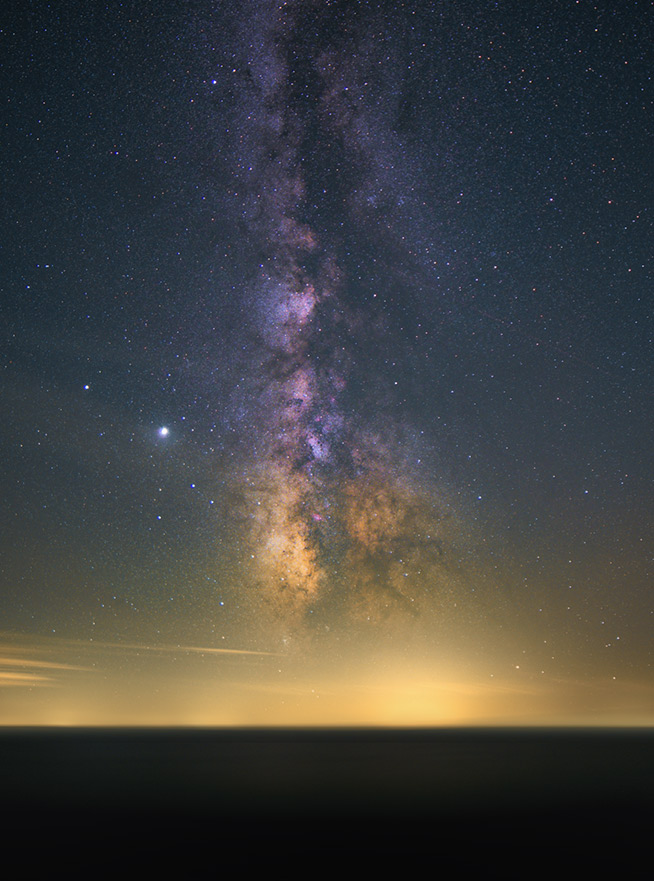
The Milky Way core rising over the Okie-Tex Star Party in Oklahoma, USA. Single 20-second exposure. ISO 3200.
The image above was captured with a regular DSLR/mirrorless camera and a wide-angle camera lens. A star tracker was not used, only a stationary tripod. If you already own a camera capable of long exposure images in manual mode, a great Milky Way photo is entirely possible. The key to this shot was that it was taken from an incredibly dark location (Bortle Class 1).
Subtle enhancements were made to the image in Adobe Photoshop, including a curves adjustment layer, a saturation boost, and a contrast adjustment. Many photographers use Adobe Photoshop or Lightroom to edit their Milky Way photos, and I have some powerful techniques for those of you who use these tools.
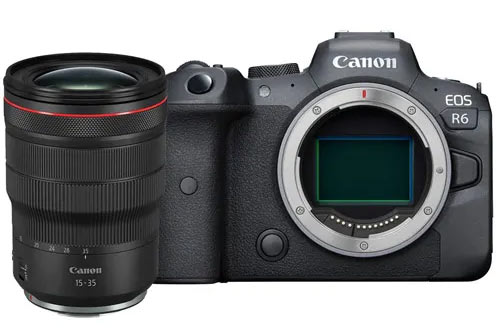
Canon EOS R6. Canon RF 15-35mm F/2.8 lens.
You do not need to use the latest mirrorless camera to photograph the Milky Way; even a 10-year-old entry-level DSLR can capture a beautiful shot. As is the case with most astrophotography projects, the approach is much more important than the equipment itself.

Quick Tips for Photographing the Milky Way
A good beginner starting point is a 15–25 second exposure at ISO 1600–6400 using f/2.8 or wider. A 30-second exposure can work with very wide lenses, especially if you are not inspecting the image at 100%, but many modern high-resolution cameras will show star trailing sooner. For sharper stars, use the NPF rule or take a quick test shot and zoom in to check the stars.
These are not hard-and-fast rules, of course. Like all experiences in astrophotography, subtle changes to your camera settings and approach can make a big difference. You can experiment with some key camera settings to find out what works best for your camera and lens.
A good starting point is to take 30-second exposures at ISO 1600, using an f-stop of F/2.8. By combining multiple images together (image stacking), you can create images of the Milky Way with an even stronger signal (the amount of light collected) and reduced noise. For the image below, I used a star tracker to match the rotation of the Earth and take a long exposure image without any star trailing.
The Milky Way Core rising in mid-July. Camera and Lens on Star Tracker.
What Part of the Milky Way Should You Photograph?
The Milky Way is the galaxy that contains our Solar System and the familiar constellations in our night sky. From our vantage point on Earth, we see the galactic plane of the Milky Way as a noticeable band of light stretching across the night sky.
When people talk about photographing the Milky Way, they usually refer to the dense core towards the constellation Sagittarius because it is the brightest part of our galaxy in the night sky.
Observers living in the Southern Hemisphere have the luxury of seeing this bright core high above their heads in the night sky. Don’t believe me? Look at the position of the Milky Way core in July from my location in Canada vs. Melbourne, Australia.
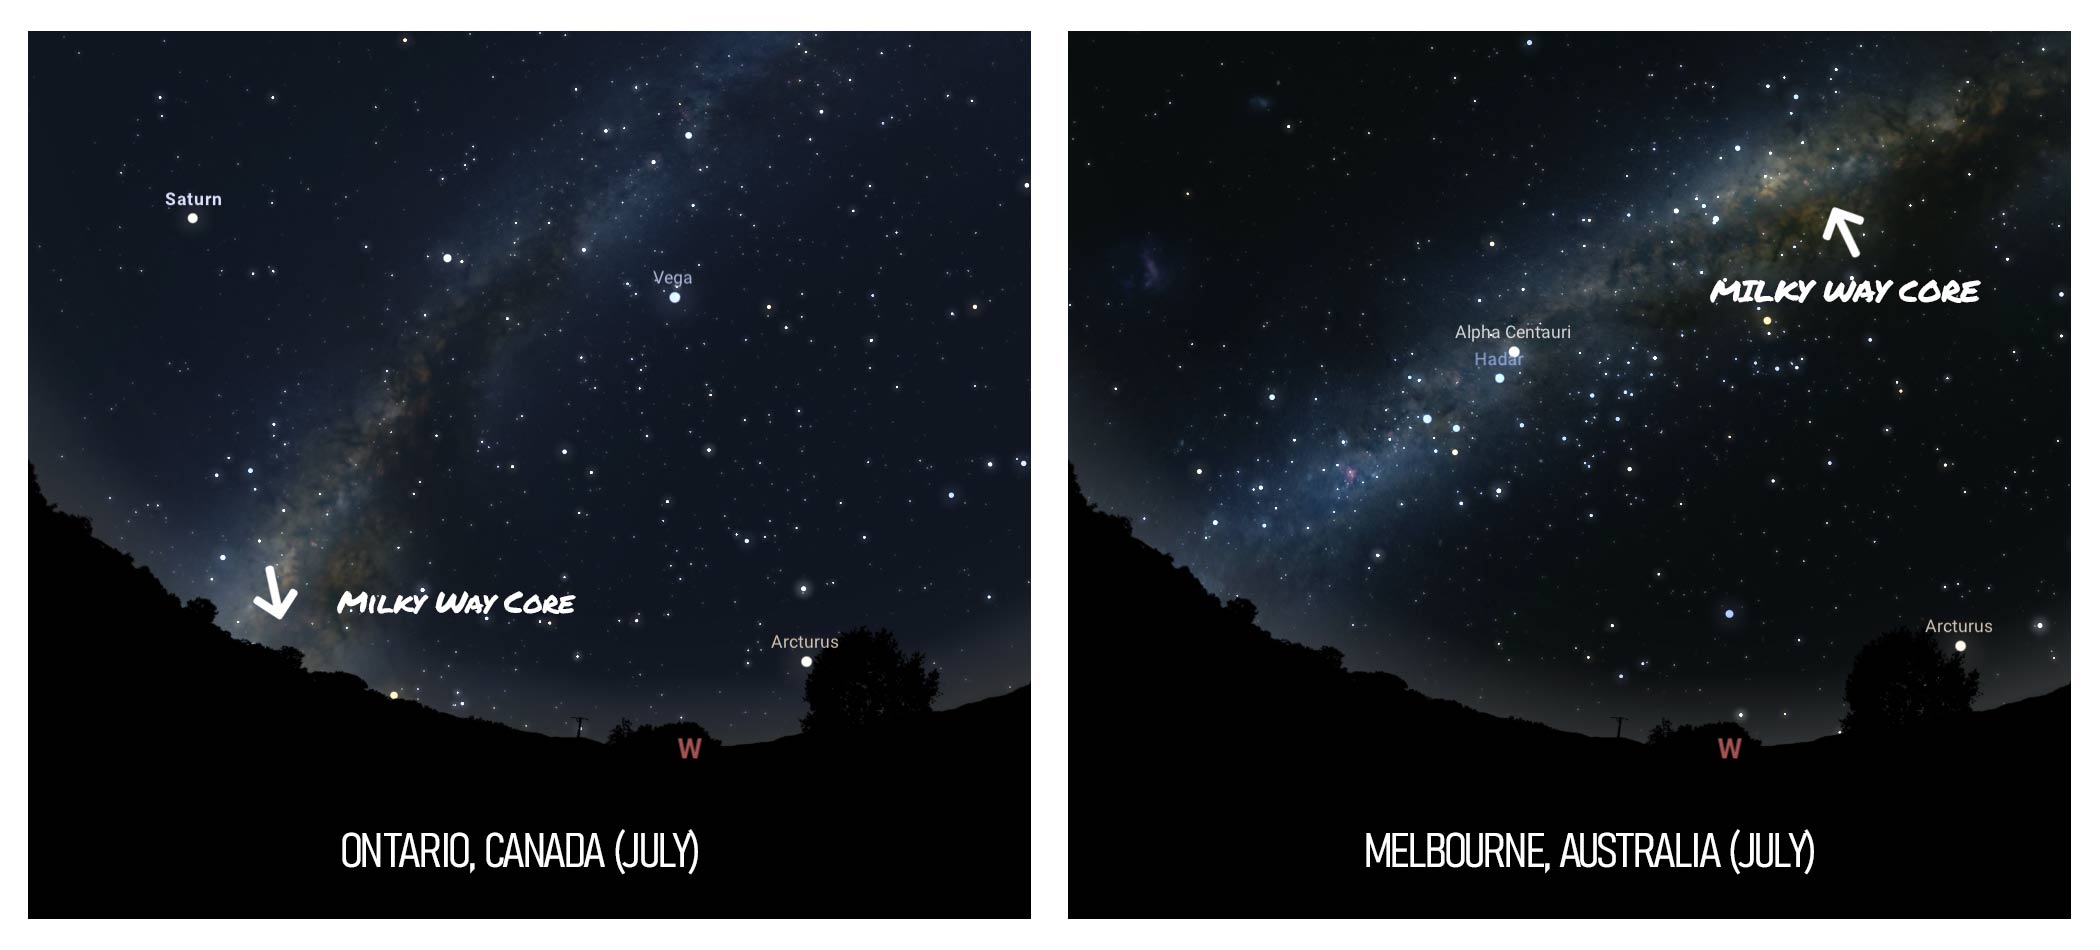
The Milky Way core from the Northern Hemisphere vs. the Southern Hemisphere.
The farther north your latitude, the less Milky Way core you will be able to see. If you have ever traveled south for vacation, you may have noticed that you can now see further south into the night sky, and even new stars and constellations.
The plane of the Milky Way stretches across the sky into northern constellations as well. This is not the core of the Milky Way galaxy, but it is still a noticeably dense region of stars that creates a faint band of light from a dark sky. The photo below shows the Cygnus region of the Milky Way, along with many other northern constellations such as Cepheus.

The “Backbone” of the Milky Way. Canon EOS Ra. Sigma 24mm F/1.4.
At wider focal lengths, the dense regions of stars in the Milky Way seem to merge into giant glowing patches, almost like a cloud of stars. If you were to look at these areas through a telescope, you would see that these glowing areas are filled with thousands of individual stars.
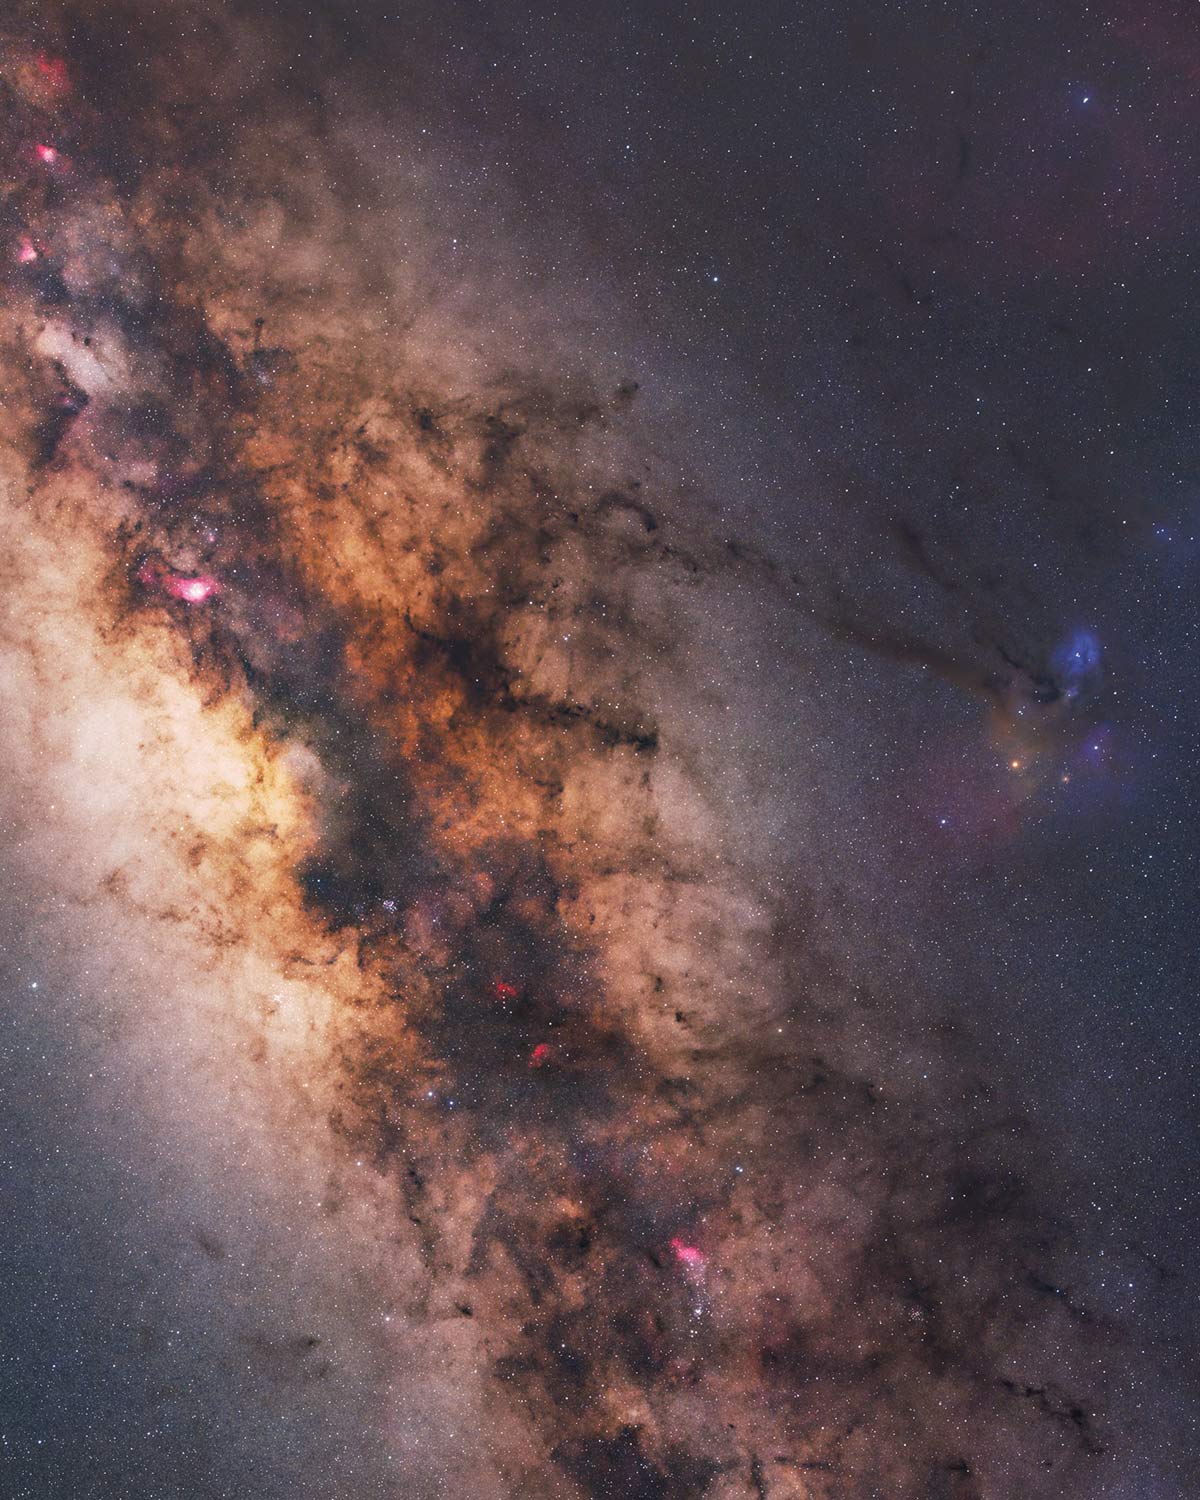
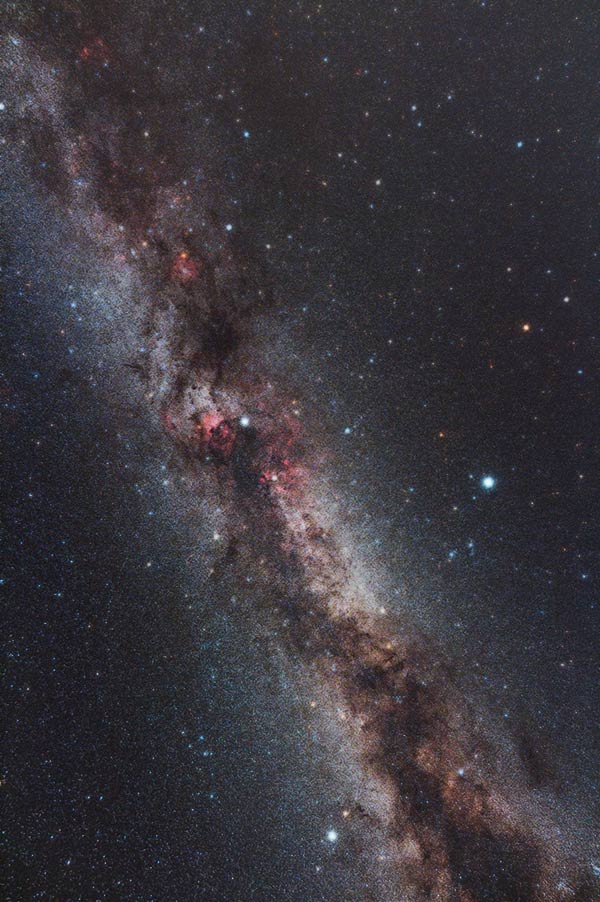
The following image was taken at a mid-range focal length of 135mm. From this view, you can start to see individual deep-sky objects like globular clusters and nebulae appear. You can also distinguish the areas of dark interstellar dust blocking bright starlight.

A close-up of the Milky Way core towards the constellation Scutum and Sagittarius.
If you are interested in photographing deep-sky objects at this range, I highly suggest looking into the Rokinon 135mm F/2 lens. This is one of the best lenses for astrophotography, thanks to its wide aperture, flat field, and overall sharpness. At this focal length, a star tracker is needed to capture long-exposure images.
How to Find the Milky Way Core for Your Photo
It might sound like a silly question, as our own Solar System is located inside the Milky Way galaxy. However, certain areas of the Milky Way are concentrated in the night sky at certain times of the year. In the northern hemisphere, the summer is the best time to see and photograph the Milky Way.
The galactic core is the most interesting area of the galactic plane, and what most photographers aspire to capture. In the northern hemisphere, you’ll find the galactic Core in the southern direction of the sky moving east to west from May-September.
Knowing where and when to look will help you to plan your photo session. I use an astronomy app for my Android smartphone called Stellarium, which will tell you exactly where everything in the night sky will be on any given night. Stellarium is a handy mobile planetarium that is easy to use.
Whether you are planning a Milky Way shot or a deep-sky imaging project, a stargazing app with a planetarium mode allows you to look ahead in time, to see the best nights to see the Milky Way from any location on Earth. I regularly use Stellarium to plan my astrophotography sessions.
Another tool to help you plan your next Milky Way photography session is PhotoPills. You can use the handy planner feature to see exactly where the Milky Way will be from a specific location on the map. This is a must-have mobile app for nightscape photographers, as it can help you get creative with compositions that include surrounding natural landscapes.
The Milky Way. Canon EOS Ra with a Sigma 24mm F/1.4 Lens.
Milky Way Photography Basics
If you have ever tried to photograph the Milky Way with your DSLR camera before, you’ll know that you can record much more light in an image than your eyes can see. Anyone can capture an incredibly detailed portrait of the Milky Way galaxy, with the right equipment.
All you need is a DSLR or mirrorless camera capable of shooting in manual mode, and a basic camera lens. An entry-level DSLR camera and kit lens (like this Canon Rebel Camera Kit) is a great starting point.
A basic camera kit will let you explore long-exposure astrophotography and experience the incredible amount of light you can capture in the night sky. Many of the same camera settings and techniques used for Milky Way Photography can be used for other types of astrophotography, including deep-sky imaging.
Before I go any further, I want to properly set your expectations. My first images of the Milky Way did not look like this, largely because I was shooting under heavily light-polluted skies in the city. The photo above leveraged 4 strategies to create an impressive photo. Don’t worry, I will cover all of these strategies in detail in the article.
Keys To an Extraordinary Milky Way Photo:
- Use a Star Tracker
- Use a Large Aperture Lens
- Take Long Exposure Images
- ‘Stack’ a Series of Images

The Milky Way captured using a Canon Rebel DSLR and a Rokinon 14mm F/2.8 lens.
The Best Time to Photograph the Milky Way
From mid-northern latitudes, the best time to photograph the Milky Way core is between May and September. For the best possible shot, you’ll want to take your photo well away from the city light pollution.
The bright lights of the city will wash out the night sky, and only the brightest stars will be visible. To guide you where to go, you can use an online light pollution map to find the darkest possible skies within driving distance.
You will also want to wait until the weeks surrounding the new moon phase, so the bright moon doesn’t interfere with the faint starlight of the Milky Way. It’s possible to see the Milky Way during moon phases when the Moon has set or hasn’t come up yet, but a new moon is ideal.

Related Article: Milky Way Photography Calendar (Month by Month)
If light pollution and moonlight weren’t enough of a challenge, the weather has to cooperate as well. You will need clear skies and good transparency for a great Milky Way photo, though some passing clouds may add depth to certain compositions.
After taking your photo of the Milky Way, you may also notice a strange green glow near the horizon. This phenomenon is known in astronomy as ‘airglow‘, and it can often create an even more beautiful night sky scene.
A Milky Way Landscape with green airglow near the horizon. Single Untracked Exposure.
A single exposure of the night sky can look mesmerizing on the back of your camera’s display screen, but a closer look on your computer may not be so pretty. You may see a lot of noise in the image, which degrades overall image quality and limits the amount of editing you can make to your photo.
To offset these issues, amateur astrophotographers take a series of image exposures and stack them together. This process is known as image stacking, and it can significantly improve the overall signal-to-noise ratio of the image. Before I explain how to easily stack images using various software, let’s take a look at some recommended gear for capturing a quality shot.
Essential Milky Way Photography Gear
DSLR/Mirrorless Camera
A DSLR or Mirrorless camera with full manual control and interchangeable lenses will have a sensor capable of high-resolution Milky Way photos. Yes, you can capture the Milky Way with your smartphone in night mode (or astrophotography mode), but the images will not look anywhere near as good as those taken with a DSLR.
Almost any DSLR camera can capture the night sky with a long exposure, but older models may make the experience more difficult and produce noisier images. I currently shoot with a Canon EOS Ra camera, but any modern DSLR or Mirrorless camera body will do. The camera’s make (Canon, Sony, Nikon, etc.) is not important.
Camera Lens
It may surprise you to hear that a camera lens is the best way to capture the Milky Way, not a telescope. The high magnification focal lengths of a telescope are great for zooming in on deep-sky objects, but to reveal the beautiful structure of the Milky Way, you need to shoot wide.
A good camera lens for Milky Way photography will have a large aperture that allows plenty of light to reach the sensor in a short period of time. Low-light performance is a critically important feature of the lens when shooting at night. A ‘fast’ camera lens (F/2.8 or lower is ideal) will give you more options in terms of exposure time and ISO settings.
Related Article: The Best Lens for Milky Way Photography
Tripod
A high-quality, sturdy tripod is absolutely essential for any type of astrophotography. You do not want to mount your camera and lens to a flimsy tripod that could easily get knocked over in the dark. Invest in a quality carbon fiber tripod that is strong and lightweight, and you will use it for years.
You will need to attach your camera and lens to the tripod so that it remains still while taking your picture. Any movement will result in a ruined exposure, so make sure that the tripod is firmly planted into the ground. You may want to hang your camera bag underneath the center column for added stability.
Star Tracker
A star tracker is not necessary for Milky Way Photography, but it will expand the number of options you have when it comes to camera settings. You are no longer limited by a maximum exposure time before you start to see movement in the stars. Once the tracker is polar aligned and balanced, you can reliably take images of up to 2 minutes with sharp stars across the field.
You can think of a star tracker as a battery-powered, mini equatorial tracking mount. They compensate for the apparent rotation of the night sky and allow you to take long exposure images free of star trailing. The star tracker I have used most and recommend for Milky Way photography is the Sky-Watcher Star Adventurer.
When you no longer have to worry about rotation in your image, you can use a lower ISO setting and a higher f-ratio (often resulting in a sharper image with less noise). The length of the exposure can collect more light using less aggressive settings. The following equipment profile is the exact one I have used for many Milky Way photos.
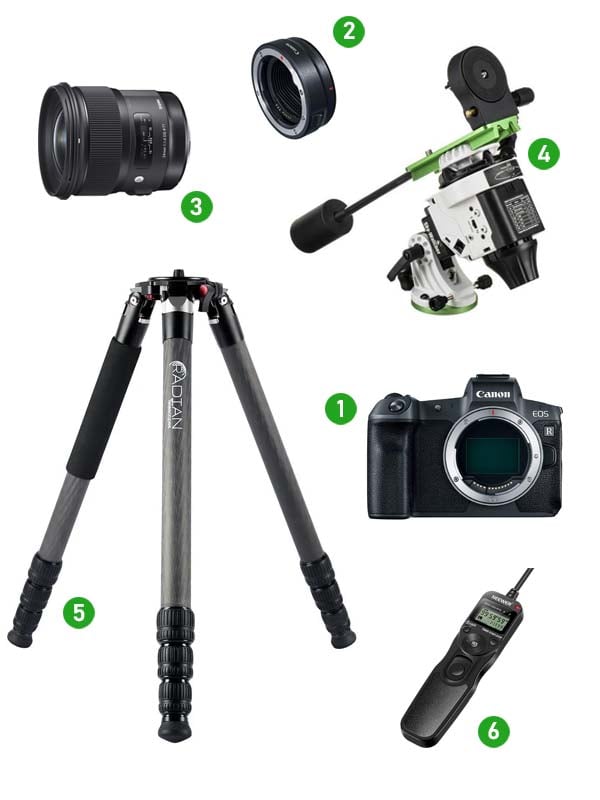
Example Milky Way Photography Setup
- Camera: Canon EOS R
- Adapter: Canon EF-EOS R Adapter
- Lens: Sigma 24mm F/1.4
- Star Tracker: Sky-Watcher Star Adventurer
- Tripod: Carbon Fiber Tripod (Similar)
- Remote Shutter: Shutter Release Cable (Intervalometer)
The biggest advantage a tracking camera mount has over a stationary tripod is the ability to shoot exposures well past 30 seconds. When the star tracker is properly polar-aligned, images of 2 minutes or longer are possible (depending on your focal length).
Even a 60-second image captured under a dark moonless sky will reveal individual nebulae and star clusters within the Milky Way galaxy. Certain Messier objects, such as M8, M17, and M20, become obvious glowing pink regions of Sagittarius near the core.
Best Camera Lens for Milky Way Photography
I have used many camera lenses for Milky Way and nightscape photography over the years, and these are some of my all-time favorites. I primarily shoot with Canon camera bodies, so you may need to find a comparable lens for your specific model.
Sigma 24mm F/1.4
In my experience, the Sigma 24mm F/1.4 is one of the best camera lenses for Milky Way photography. This lens is considered to be wide-angle, although 24mm is not nearly wide enough on a crop-sensor DSLR camera body.
This lens is best enjoyed with a full-frame camera. This will provide a practical field of view to capture the entire Milky Way core stretching across the sky and much more.

Sigma 24mm F/1.4 Camera Lens.
It’s a premium-quality prime lens from Sigma (part of their Art Series), and its performance is exceptional in low-light situations. If you dabble in video work at night (as I do on my YouTube channel), this lens will become your new favorite.
You can read my full review of this lens used for the purpose of astrophotography.
Rokinon 14mm F/2.8
Another excellent choice is the Rokinon (or Samyang) 14mm F/2.8. This is a fan favorite in the astrophotography community, primarily due to its impressive performance for the price.
You will not find a cheaper ultra-wide angle lens for astrophotography than this. The model I have is fully manual, meaning even the aperture control is done by “clicking” the lens into your desired f-stop.
This lens offers a jaw-dropping 115° field of view on a full-frame camera, allowing you to capture incredible panorama-style images of the night sky.
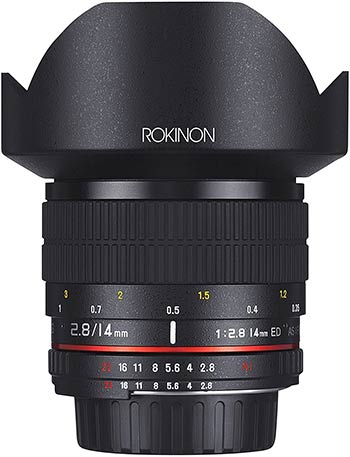
Rokinon 14mm F/2.8 Lens.
Below, is a photo of the Milky Way towards the constellation Cygnus and the ‘Great Rift’. I used the Rokinon 14mm F/2.8 lens on a Canon EOS Rebel T3i camera (tracked and stacked) for this photo. This area of the Milky Way is less dense than the core, but it contains some of my favorite deep-sky objects within it.
The Cygnus area of the Milky Way and the Great Rift.
The Great Rift is a dark band that appears to obscure the center of our galaxy when seen from Earth. It is comprised of molecular dust clouds that sit between our Solar System and the Sagittarius arm of the galaxy. It forms a dark lane that divides the bright band of the Milky Way.
Recommended Filter
For most beginners, I recommend skipping a filter for Milky Way photography and spending that effort on finding darker skies instead. A broadband light pollution filter can help in some suburban conditions, but it can also affect star color and is not a replacement for a dark, moonless location.
The Optolong L-Pro is a broadband light pollution filter, which means that it aims to collect natural star colors that make a great Milky Way photo. In my experience, it does a great job of reducing the artificial glow of the city, without disrupting the natural color balance of your image.

The Optolong L-Pro filter is suitable for Milky Way photography.
The 2″ model shown above can be threaded into the optical train of a camera and telescope configuration, but not with a DSLR camera and lens.
There is also a version for full-frame DSLR cameras (this one is for full-frame Canon DSLRs) that sits inside the camera body. A broadband clip-in filter is worth considering if you plan on capturing Milky Way images in areas with light-polluted skies.
When shooting the Milky Way from a dark sky location, you do not have to use a light pollution filter. This is the ideal scenario, as you will be able to record the natural colors of the stars in the sky without introducing any odd color casts to the image.
Taking Your First Milky Way Photo
If you’re at a dark sky location during the new moon phase, in the summer, with clear skies in the forecast, it’s time to take your first Milky Way photo. This is an exciting experience, and you’ll want to make the most of these precious nights when everything comes together.
Before setting up your camera and tripod, check your astronomy app to confirm the location of the Milky Way core (or whichever section of the Milky Way you want to capture). Visit your intended setup location during the day (or at least dusk) to make sure that there are no obstructions on the horizon and no surprise sources of artificial light that could ruin your shot.
Here are the steps I take when prepping for a Milky Way photo:
- Choose an ISO setting based on your shooting environment. The ISO will need to be much higher than you would normally use during a daytime photo. For moderate light pollution, use 1600 to 3200. Pay attention to the histogram and expose it to the right. It’s a balancing act between noise and the amount of light collected. However, with enough image frames, even a noisy image can be smoothed out after stacking.
- Use your camera’s widest aperture or close to it. Generally, you’ll want to let in as much light as possible in the shortest amount of time. Fast camera lenses of f/2.8 or below may need to be stopped down a bit for better star quality.
- Point your camera towards the brightest star in the night sky you can see. In the summer, this will likely be Vega. Using manual focus, zoom in on the star using 10X live view. Slowly adjust the focus on your camera lens until this star is sharp at 10X view, and leave it in this position. You may want to ‘tape’ this position down using electrical tape.
- Set your camera’s drive mode to a 2 or 10-second delay. Better yet, use a remote shutter release cable. Even the slightest movement created by pressing the shutter button can be enough to shake the stars in your image. Also, make sure your tripod head is locked securely. A sliding tripod head in any direction will show itself immediately in the form of elongated stars.
- Start with a 30-second exposure. This will maximize the light collected in each individual frame. Yes, the stars may begin to trail (depending on your focal length), but this will only be evident when zoomed in 100%.

The photo above uses 60 x 120-second (2-minute) exposures at ISO 1600 with my Canon EOS Rebel T3i. The lens was at its native focal length of 14mm, and the aperture was set to F/3.2 for a sharper image.
Stopping down the f-ratio of your camera lens is a commonly used astrophotography tip used to create images with sharper stars. This technique sacrifices some light-gathering ability for improved clarity and smaller stars. This is one of the many reasons a star tracker provides more options than a stationary mount. You are able to offset the slower f-ratio with longer subs.
With 2 hours of total integration time, I was able to produce a final high-resolution photo of the Milky Way with reduced noise and much more detail. Here are the exact camera settings used for the photo above:
Milky Way Camera Settings
-
- Exposure: 120 seconds
- ISO: 1600
- F-Stop: F/3.2
- White Balance: Auto
- Number of Frames: 60
If you are not using a tracking mount, similar camera settings will still work, but you may need to increase the overall exposure time to produce similar results. Using a lower f-ratio (such as F/2.8 or below) can help produce a brighter image in a shorter period of time.
The white balance settings on your camera are not as important as you may think. The key is to shoot in RAW file format so that you’re able to adjust individual parameters such as white balance during post-processing.
Image Stacking and Processing
Stacking several long images together using special astrophotography software will yield the best results. The integration process can improve the signal-to-noise ratio of your final photo.
There are many choices when stacking astrophotography image exposures, but I recommend Sequator for beginners. To learn how the software works, watch my Sequator tutorial on YouTube.
Sequator has a handy “Freeze Ground” feature that allows you to stack tracked images of the night sky with a stationary foreground. This feature works surprisingly well, and you may find this method to be sufficient for your wide-angle nightscapes.
Stacking Software for Milky Way Photography
Here are some of the many image stacking software choices available for astrophotography.
The stacking process registers each image so that the stars align with each other. Subtracting dark frames from your final image is also a key step toward quality data.
In this situation, stacking the frames manually in Photoshop can do a better job than DeepSkyStacker. This is because the foreground objects in the image will throw the registration process off in DSS. However, an image of the Milky Way with no foreground landscape will stack just fine in DeepSkyStacker.
You can manually stack your images together using Adobe Photoshop, resulting in a smoother image with less noise. This is especially effective when shooting Milky Way photos using a high ISO sensitivity, as digital noise can really start to show itself.
Related: How to manually stack your astrophotos in Photoshop
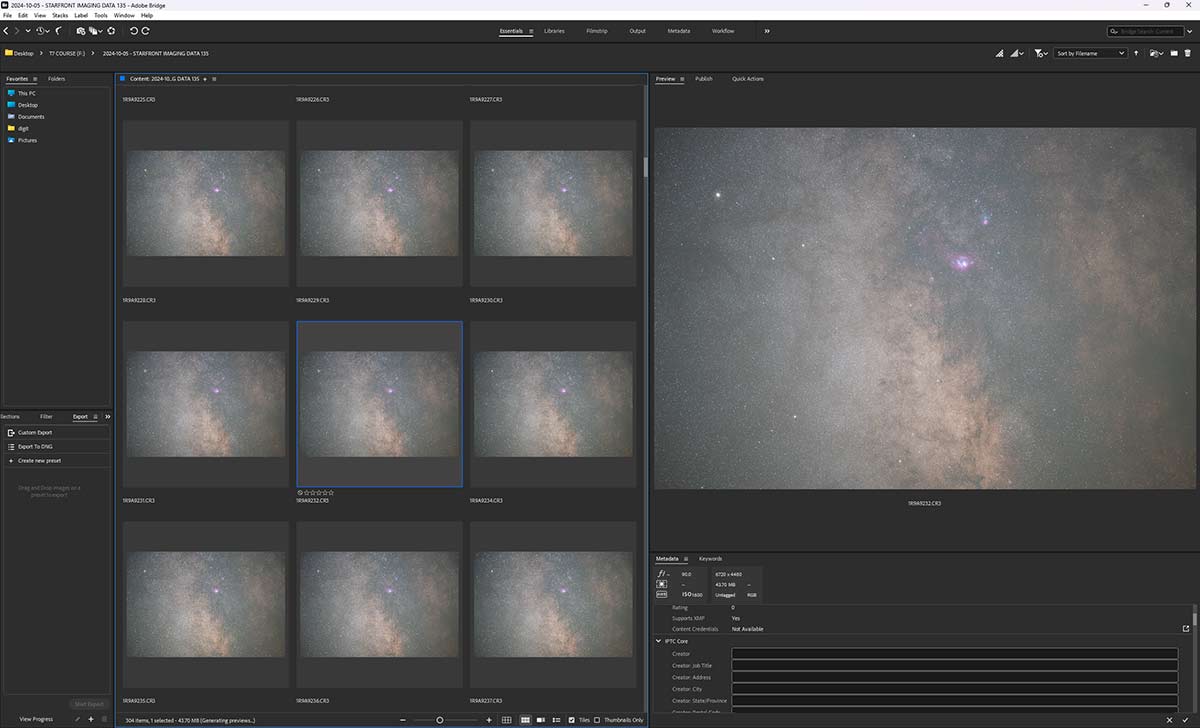
I use Adobe Bridge to assess my individual image exposures before stacking.
How To Edit Your Milky Way Photo
For images of the night sky, the preview you see on your camera’s display screen is only the beginning. Your photo’s true colors and beauty are waiting for you to extract them in your image processing software.
By capturing your images in RAW format, you can make powerful edits during post-processing. You never want to shoot astrophotography images in JPEG format, as you are compressing details in the image and losing the ability to fully edit the data.
Adobe Camera RAW (found within Adobe Photoshop) is one of my favorite tools for processing Milky Way Photography images, and it can handle everything from noise reduction to specific color adjustments (color mixer). This tool is one of the best ways to pre-process your Milky Way photos before stacking or editing your final image. This software supports many different cameras and allows you to import images into various Adobe applications from Photoshop to Elements.
Key areas to address in ACR:
- Adjust White Balance – less brown, more blue
- Apply Noise Reduction Filter (modest)
- Increase Saturation
- Reduce Chromatic Aberration (color-fringing)
- Correct Vignetting Issues
The above list is a small sampling of the actions applied to the Milky Way images on this page. For a really powerful image, try running third-party action sets on your image, such as the Astronomy Tools Action Set.
Some of the most effective actions using the package listed above are “make stars smaller” and “local contrast adjustment”. Below, you’ll find a video on image processing in which I process the data from a stacked image in Photoshop.
You may also want to use modern noise reduction tools such as Adobe Lightroom/Camera Raw Denoise, DxO PureRAW, or Topaz Photo AI. Use these tools carefully, as aggressive noise reduction can smear faint star detail and make the Milky Way look unnatural.
Including Foreground Details
Sometimes, you will want to capture foreground details in your Milky Way photo to show the surrounding landscape below the night sky. In a single exposure taken on a stationary tripod, this is not an issue because the ground is not moving. However, when using a star tracker to capture images, the Earth will show movement as early as 30 seconds, creating a blurry portion of your image.
This creates a challenging scenario for amateur astrophotographers who want to create an image with a stack of tracked shots and terrestrial details that are not blurred. The solution is to create a composite image that combines a separate shot (or stack) of sharp, foreground landscape details with a tracked set of images of the Milky Way.
To accomplish this, it is very important to blend the images together naturally, avoiding any hard edges between the night sky and the Earth below. I find that the best way to do this is to use a feathered mask in Photoshop, with the useful refinement options found in the Select and Mask tool. The image below shows what this mask would look like in an image of the Milky Way with trees beneath it.

Blending images together (using masks) to create a Milky Way composite.
Essentially, you want to take a clean shot of the foreground to replace the blurry version in your night sky stack. The more exposures used for your Milky Way sky, the greater the blurring effect will be on the ground (because more time has passed). You may want to limit your integrated exposure time to about 30 minutes or less to make blending the images together easier.
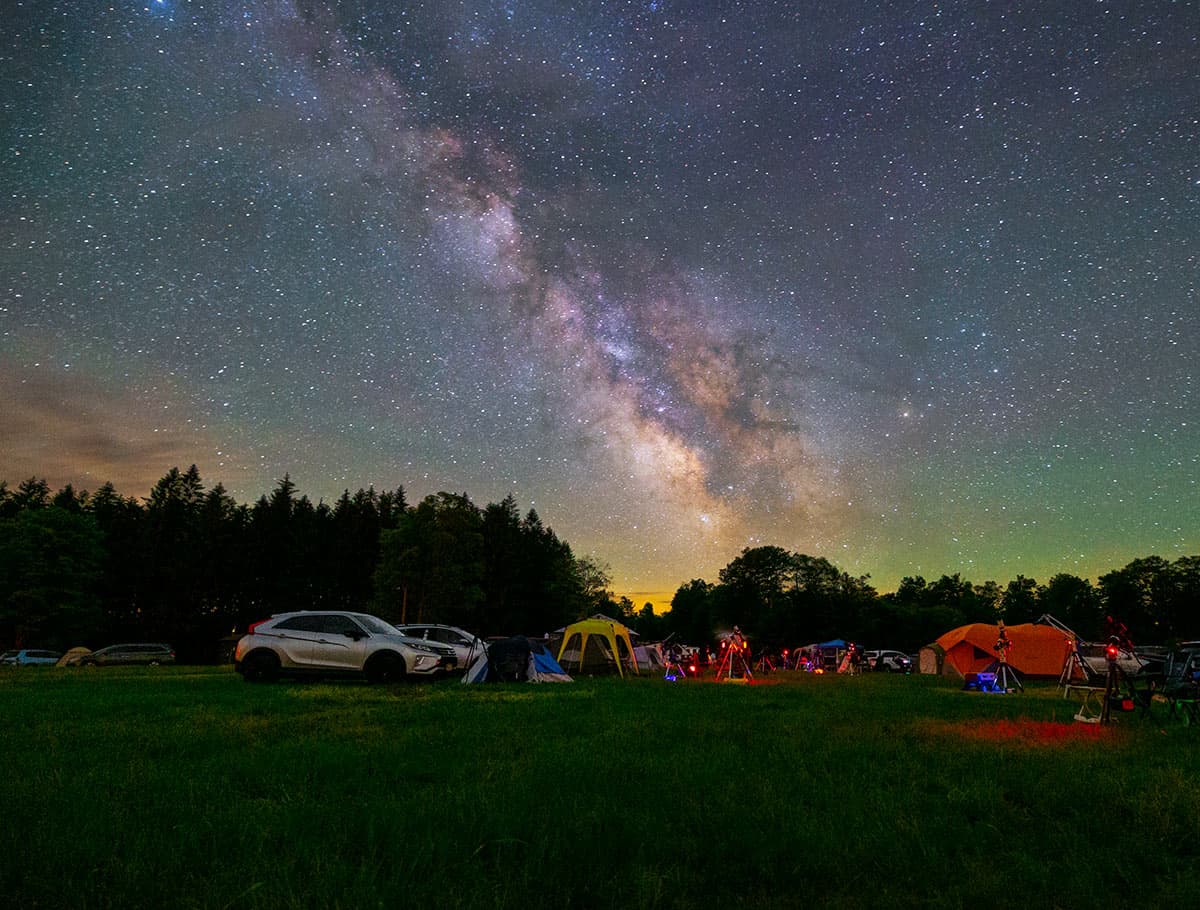
The following graphic presents some aggressive Milky Way camera settings using an astro-modified mirrorless camera (Canon EOS Ra). These are the exact settings used to take a picture of the Milky Way core rising over our campsite in July 2021.
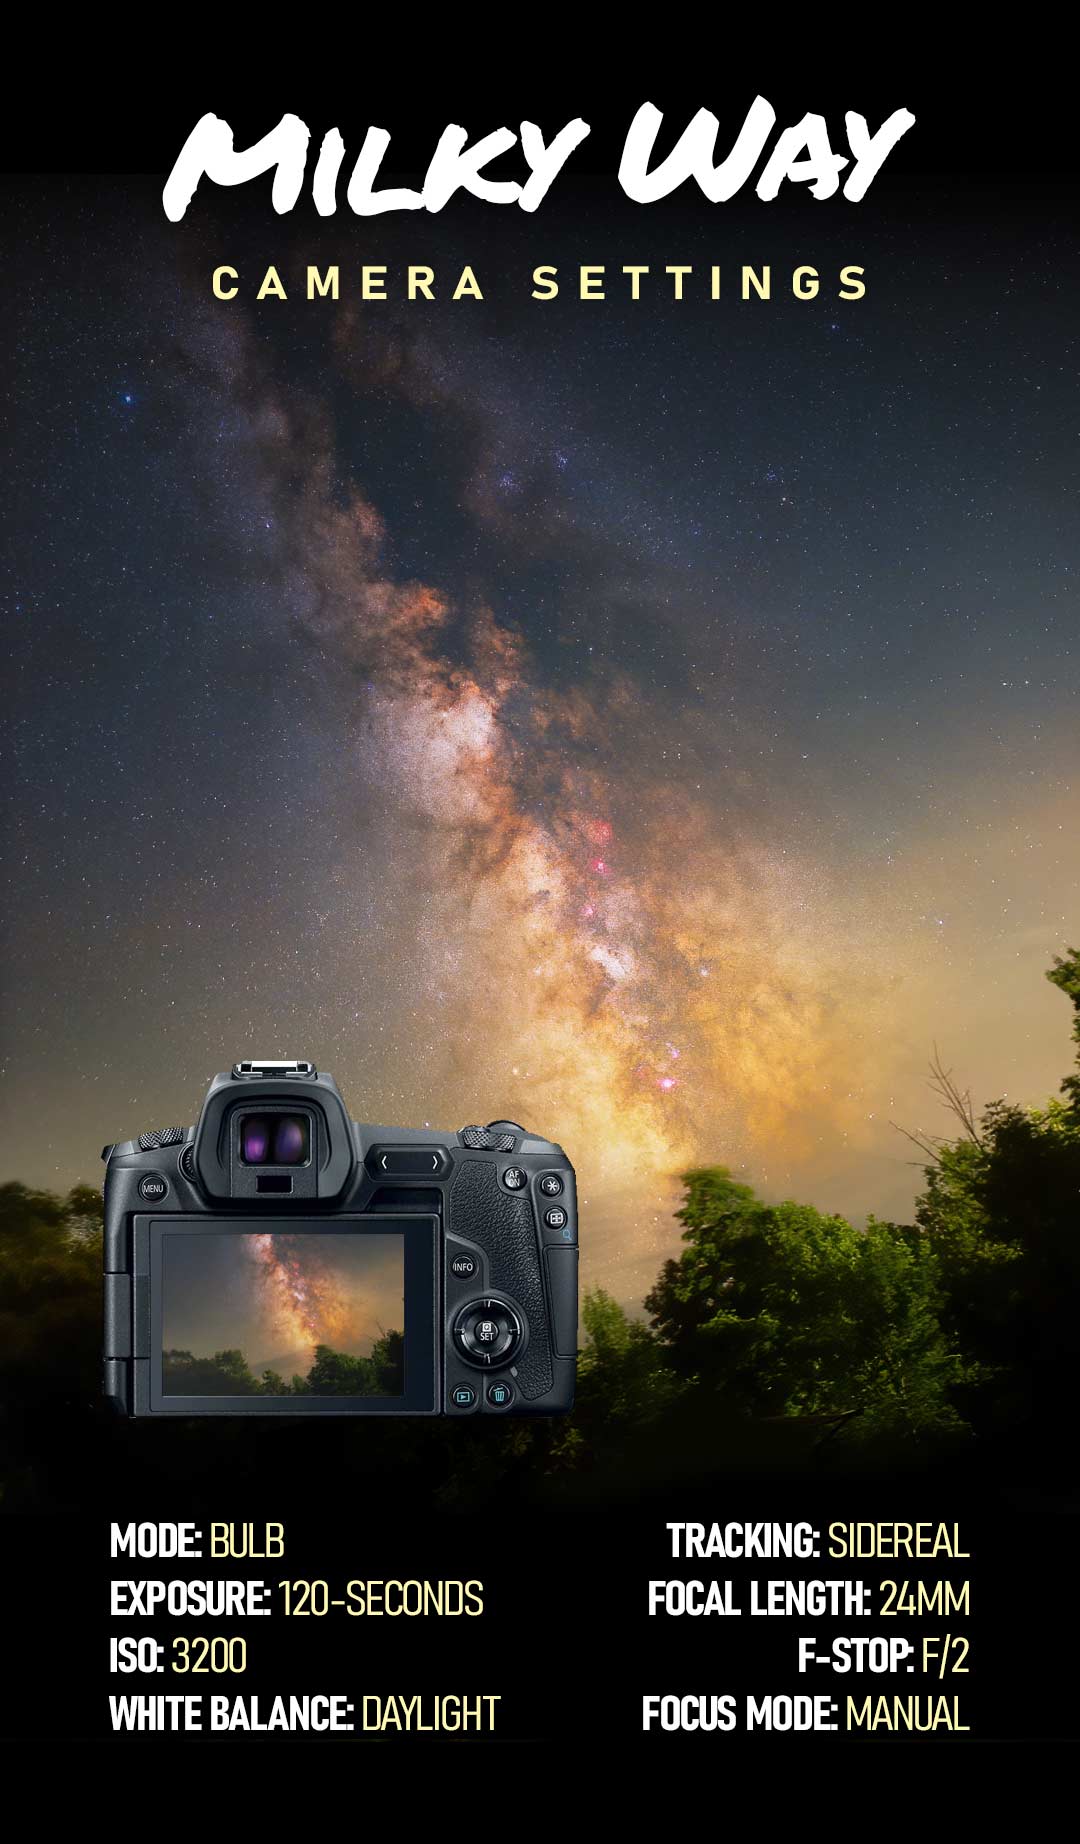
Keys to a great Milky Way image:
- Use a wide-angle camera lens to capture a large portion of the Milky Way (17mm or wider is best)
- Use a higher ISO setting than you would normally use during the day to collect more signal
- Use your camera’s lowest f-stop to collect as much light as possible in a single exposure
- Shoot in RAW mode to adjust variables such as white balance in post-processing
- Pay close attention to the histogram and “expose to the right.”
- Focus using your DSLR’s live view function on a bright star at 10X magnification
- Set your camera’s drive mode to a 2 or 10-second delay to avoid camera shake
- Use a star tracker that has been properly polar-aligned to take longer exposures
- Use a remote shutter release cable to automate an imaging sequence
- Fasten your DSLR camera securely into place on your tripod or star tracker
- Take multiple long-exposure images to stack and improve the signal-to-noise ratio
- Shoot dark frames of the same temperature and exposure length to subtract during the stacking process
Download My Image Processing Guide
If you would like to learn about every astrophotography image processing technique I use in DeepSkyStacker and Photoshop, you can download my premium guide. The PDF download includes over 100 pages of the specific steps I use to process all my images. The guide is available here.
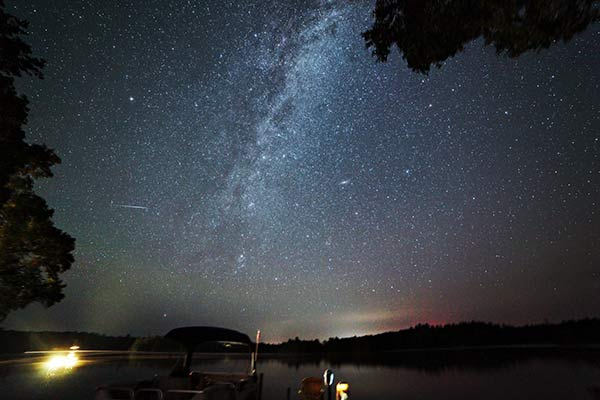
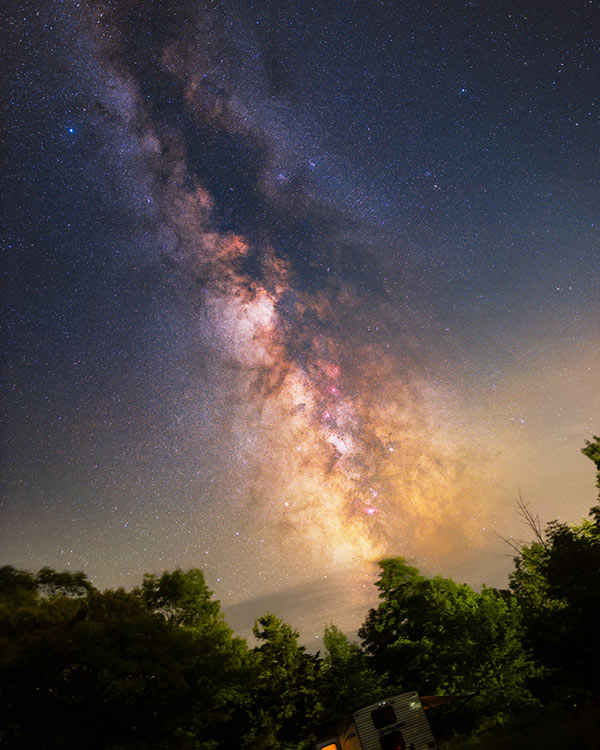
The Milky Way from Northern Ontario during the Perseid Meteor Shower.