How to Take Dark Frames for Astrophotography
Capturing dark frames is an essential part of the deep sky astrophotography process when using a DSLR camera. I’ve been photographing objects in space with a camera and telescope for many years, and dark frame subtraction remains an important part of my acquisition process today.
Essentially, applying dark frames to your final astrophotography image reduces noise. You will benefit from an improved signal-to-noise ratio, resulting in a higher-quality image with more detail.
Fortunately, learning how to capture successful dark frames is actually relatively easy. If you’re completely new to deep sky astrophotography, have a look at my top tips for beginners.

Each one of these images used dark frames for an improved SNR
How to take dark frames for astrophotography
When shooting long-exposure astrophotography images with a DSLR camera, you can expect the internal sensor to become quite warm. As an example, the ambient temperature of a cold winter night in my backyard can be -5 degrees, but the camera sensor in my DSLR will warm up to 15 degrees Celsius or more.
Thermal camera noise shows up as unwanted artifacts and grain that reduce the quality and aesthetics of your images. Beginners are often faced with the realization that their single image frame cannot be processed or stretched without pulling these unwanted qualities forward.
This one of the many reasons amateur astrophotographers like myself capture several exposures and stack them together. If you’re shooting images using a DSLR camera, you’ll likely need to apply dark calibration frames to each and every one of your astrophotography image projects.
Learning how to capture proper dark frames is something you must learn early on when you dive into the hobby of deep-sky astrophotography. Much like collecting flat frames and bias frames, they are a critical stage of the acquisition process if you’re looking to improve the quality of your images.
When used correctly, dark frames reduce the amount of noise in your final astrophotography image.
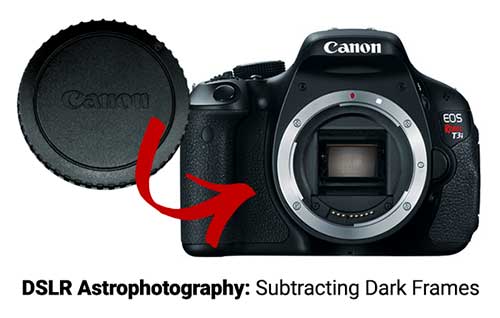
To utilize the power of dark frames in your images, you’ll need to apply these support files to your final image using software like DeepSkyStacker. It’s simply a matter of loading the files into the software using the correct settings, and it will apply them your image data appropriately.
The difference between an image that has subtracted dark frames and one that hasn’t can be significant. The sky will be much smoother, with an improved signal-to-noise ratio.
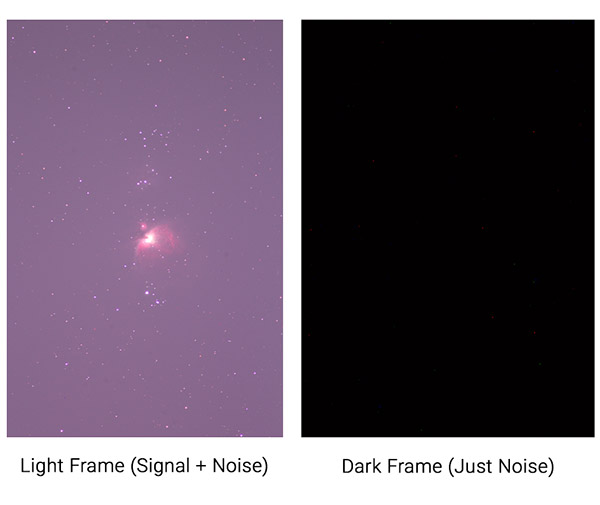
Signal is the actual light emitted from an object in space, such as a nebula or galaxy. At the same time, noise is the unwanted electronic variation in color and brightness produced by the camera sensor.
How Calibration Frames Work
Basically, a dark frame only captures the random electronic thermal noise from your camera sensor. If you expose an image for a period of time with the lens cap on, only noise is recorded without any signal.
The circuitry in your digital camera produces an unwanted signal that can degrade the quality of your image. Subtracting dark frames can help reduce this effect.
Dark frame subtraction helps minimize the noise in your long-exposure images caused by the sensor. An average of dark frames can be subtracted from your final image, as the fixed-pattern noise and amp glow will be isolated in a master dark.
Software like DeepSkyStacker, Astro Pixel Processor, and PixInsight will subtract the noise pattern from your final astro image as best as possible.
The image stacking process alone (light frames) removes random camera noise, but applying dark frames takes it one step further. Applying all recommended calibration frames to your deep-sky images can improve the SNR (signal-to-noise ratio) and overall image quality.
This principle applies to all cameras used for astrophotography, whether they’re interchangeable-lens cameras or cooled dedicated astronomy cameras.

Calibration frames used in astrophotography
One of the best ways I have seen the process described was on this post in the Cloudy Nights forum:
“Dark frames will subtract the dark current accumulated in each pixel well from the total well contents. Luckily, those pixel wells have repeatable levels of dark current accumulation at the same temperature, so if we take a dark frame at that temperature, we can get a reading of the dark current for each pixel well and subtract that.”
How to Take Dark Frames
The key thing to remember about taking dark frames is that the images must be the same exposure length, temperature, and ISO as your light frames (the picture files).
This means that if your light frames on a particular deep sky object were shot using ISO 1600, for 3 minutes each, with a temperature outside of 5 degrees Celsius, your dark frames will need to match these settings and conditions, except the lens cap will be on.
Example Settings for Dark Frames with a DSLR:
- File Format: RAW
- Camera Mode: Manual/Bulb
- ISO: 1600
- Exposure: 180 seconds
- White Balance: Auto
- Temperature: Same as Light Frames (within 3-4 degrees)
Dust cap covering the telescope/camera lens.
To automate a sequence of dark frames, you can use a camera capture software such as BackyardEOS, Astro Photography Tool, or simply use a remote shutter release cable. The third option is often the most convenient if you’re shooting with a portable setup without autoguiding.
It sounds a little silly when you think of it, and it’s even harder to explain to your neighbor watching you take pictures with the lens cap on your telescope.
Related Post: Astrophotography Resources
Recommended Techniques
A popular technique is to simply put the dust cap on your telescope after you are done collecting images for the night. This is the method I use most often, as the camera still has the settings applied from the light frames captured moments earlier.
As long as the temperature has not changed and it is still dark out, you can now start collecting dark frames using the same camera settings you used for your light frames. Another benefit is that your camera is also ready to take flat frames when the sun comes up.
Some people prefer to remove the camera from their telescope and fasten a cap over the camera body to take dark frames. This method is convenient because you can begin tearing down your deep-sky imaging gear while the darks are being captured.
I’ve spent many cold nights waiting for a sequence of 15 dark frames to be captured so I can put my equipment away!
It’s worth noting that you’ll want to make sure that no stray light is entering the viewfinder on the camera. You need complete darkness for a successful dark frame.

When using a dedicated astronomy camera or CCD camera to take dark frames, you can leverage the convenience of a filter wheel to automate the process. For example, when shooting LRGB images using my Xagyl 5-position filter wheel, one of the filter positions is a “dark” filter. I can include a set of dark frame images at the end of my sequence using the same gain and offset settings as my lights.
How Many Should You Take?
I have had success using anywhere from 10 to 15 dark frames for an imaging project. Others prefer to use up to 50 dark frames on an image, but I suspect they are using files from an existing dark frame library. Adding more calibration frames will add time to the integration process in DeepSkyStacker.
The DeepSkyStacker help section states that using a minimum of 20 frames is ideal, and using 50 – 100 frames will create nearly noise-free master dark frames.
If you have the time, take 20+ dark frames; it’s a good idea. Just aim to use at least 15 as a minimum. These days, no matter which camera I am using, I capture 15 dark frames for each and every project.
If your astrophotography image includes data shot over several nights, you’ll need to make sure you use matching darks for each data set. If the imaging conditions and camera settings have not changed, you may be able to utilize an old set of darks.
To see the EXIF data in your images containing useful information, such as temperature and exposure length, you can use a software tool like Adobe Bridge to evaluate this information. There are also many free options available to view the EXIF data in your photos.
Building a Dark Frame Library
Experienced amateur astrophotographers will often build a library of dark frames. This involves capturing dark frames at various ISO’s and temperatures so that you have an archive of darks to use for future projects.
This will save you from having to collect new dark frames each night. Although this method could potentially save a lot of time and effort, I still prefer to shoot new dark frames after each and every imaging session.
Smart telescopes like the Seestar S50 can automatically take and apply dark frames for you to produce a cleaner image. Dark frames can also be used in smartphone astrophotography to improve the signal-to-noise ratio.
What about Dithering?
Subtracting dark frames from your image data isn’t the only way to reduce noise. There are several additional steps you can take to reduce the noise generated by a digital camera sensor. One of the most powerful and effective ways to reduce noise is to dither your images.
Dithering involves shifting the image frame slightly between shots. This randomization of the pixel data helps to cancel out the noise pattern from your sensor. Hot and cold pixels, fixed pattern noise, and even satellite and airplane trails are removed in the stacking process.
For the image below, I manually dithered the images by changing the position of my telescope mount slightly between each frame. The final image uses 18 x 30-second exposures at ISO 6400, and 10 dark frames to calibrate the noise out. Between the dark frames and dithering, I was able to reduce an impressive amount of noise present in this short integration.
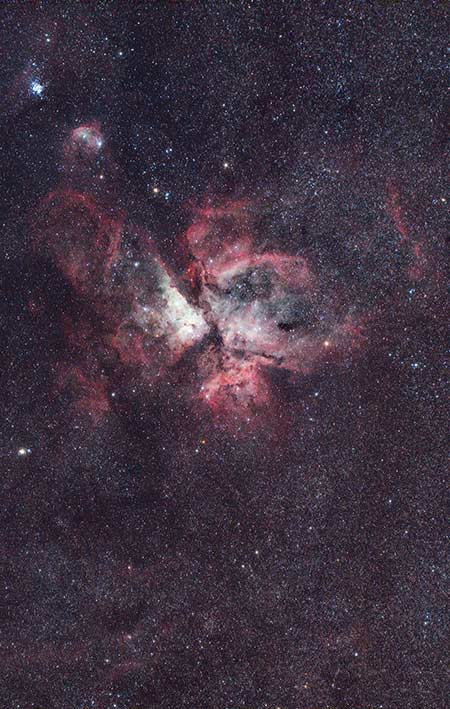
The Carina Nebula. 10 dark frames were subtracted for improved SNR.
Software is used to automate the dithering process, such as PHD2 guiding and Astro Photography Tool.
When dithering is turned on, the program will take a few seconds between each light frame to nudge the telescope mount slightly. For a complete list of the software applications I use for astrophotography, please see the resources page.
Bottom Line
Dark frame subtraction is a useful technique you can use to minimize the noise in your long-exposure images. The fixed-pattern noise created by your camera sensor is isolated and removed from your final astro image.
By subtracting the average of dark frames from your dataset, you can create high-quality images that are much easier to process. I hope you have learned to create successful dark frames and will continue to advance your progress in DSLR astrophotography.
For a complete overview of the process of astrophotography and the different types of imaging possible, have a look at my getting started in astrophotography guide. Be sure to also check out my Image Processing Guide, which includes 100+ pages for beginners looking to process their astrophotos using Adobe Photoshop.
Related Posts:
- The Best Astrophotography Image Stacking Software Options Available
- Topaz Labs DeNoise AI – Astrophotography Plugin
- How to Manually Stack Exposures in Adobe Photoshop