ZWO Seestar S50 In Depth Review

Since I originally published this review, the ZWO Seestar S50 has continued to improve through software updates, making it a more capable smart telescope than it was at launch. It includes newer features such as 4K imaging, EQ mode support with longer enhanced exposures, and remote telescope network control.
That means the Seestar S50 is still very relevant today, but it also needs to be judged in a different context, especially with newer options in the lineup like the Seestar S30 Pro. At a current price of $549 USD, the Seestar S50 is one of the most affordable and easiest ways to capture the Sun, Moon, and deep-sky objects.
In this updated review, I’ll explain what has changed, and whether I think it remains the best choice for beginner-friendly astrophotography in 2026.

The Seestar is available for $549 (USD) at Agena Astro.
Fast Facts (2026 Update)
- Still actively supported: The Seestar app is Version 3.1.2 (March 2026)
- Optical design: 50mm aperture, 250mm focal length, f/5.
- Sensor: Sony IMX462 CMOS.
- Native resolution: 1920 × 1080
- Battery: 6000mAh built-in battery.
- New Features: 4K imaging, EQ mode support, remote Telescope Network control, Expert Mode, ASCOM compatibility
- Best for: The Moon, the Sun, bright nebulae, galaxies, and beginners who want a simple all-in-one astrophotography experience.
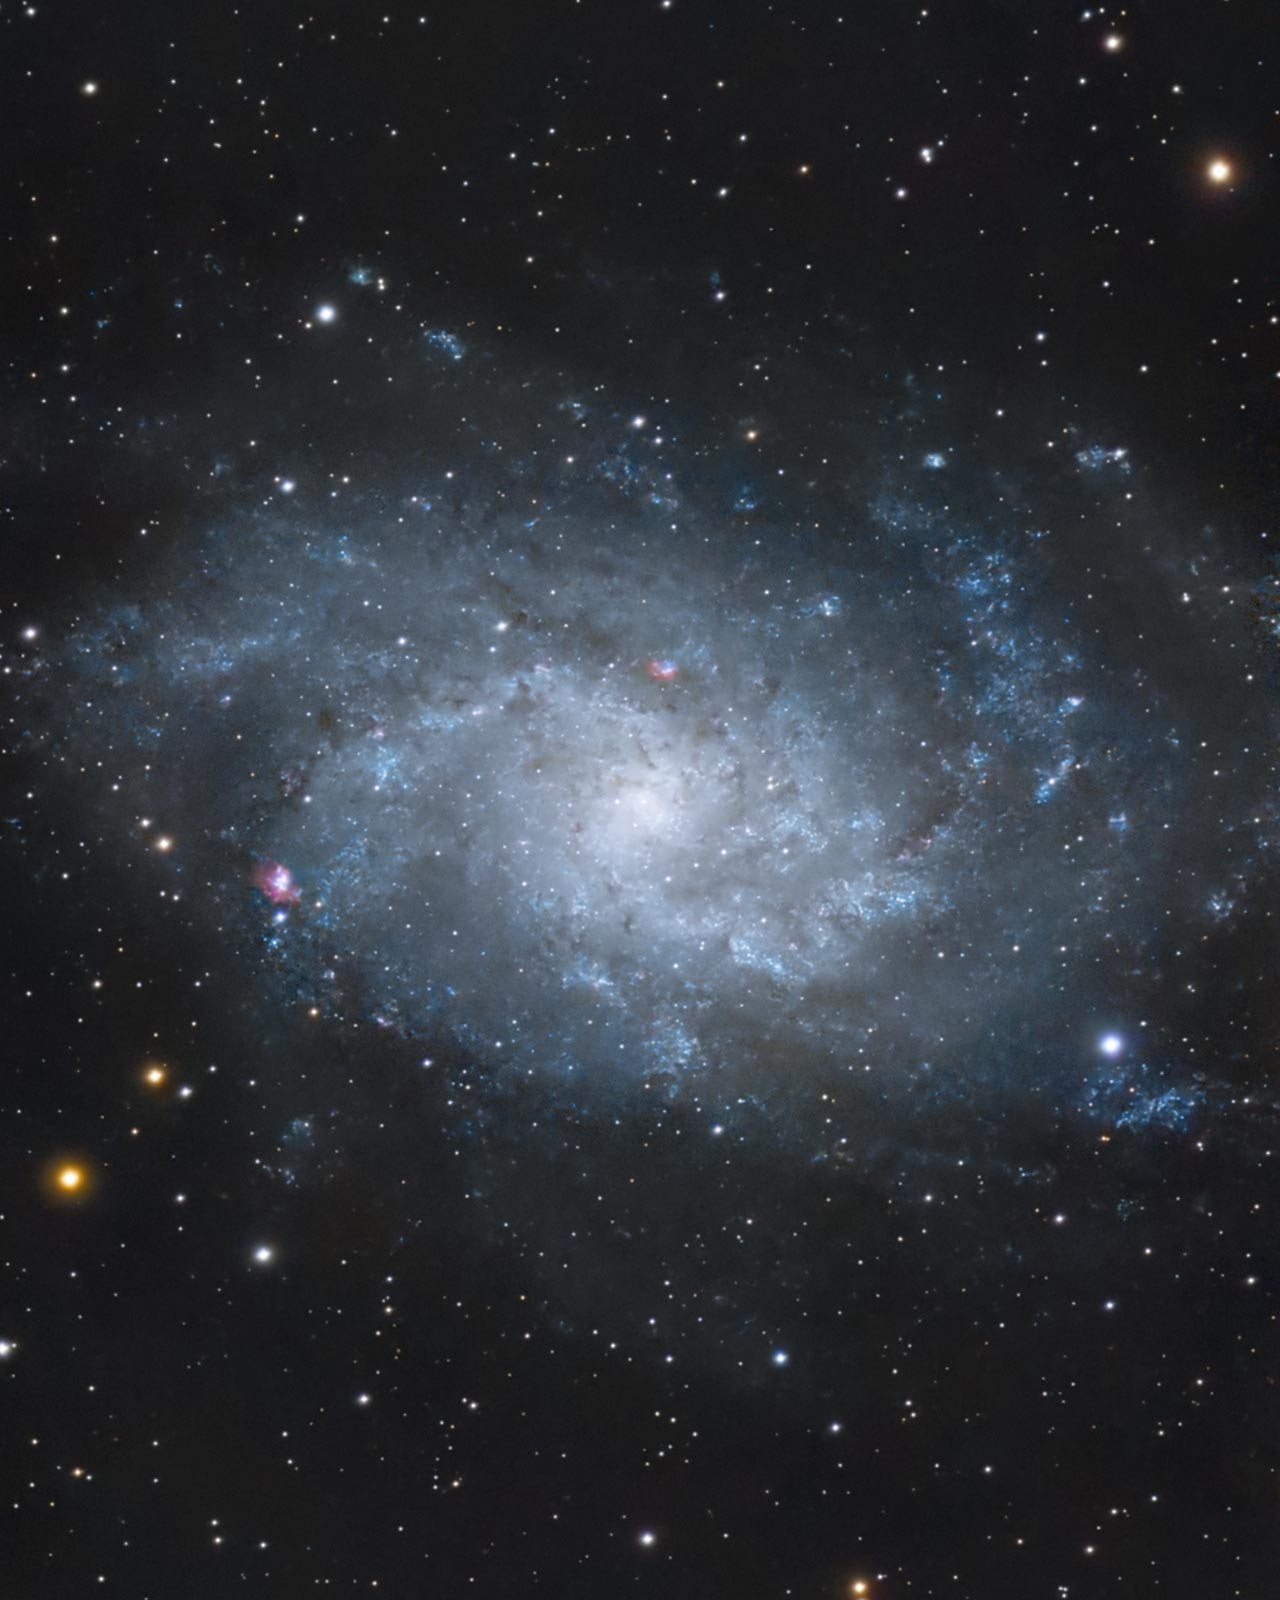
I took this photo of the Triangulum galaxy with the Seestar S50 at a dark-sky location (Bortle 3). I took over 500 x 10-second exposures in the standard Alt-Az tracking mode (Not EQ).
An Astrophotographer’s Seestar S50 Review
While the debate continues as to whether or not images captured by the Seestar are considered to be ‘astrophotography’ by its traditional measure, you can’t argue with the fact that the Seestar delivers results at an impressive price point.
I must admit that it doesn’t feel like I really did anything when I captured the images on this page—unless you count placing the device on the ground and pressing a few buttons on the mobile app.
However, the same could be said about highly automated astrophotography setups and personal observatories. I think the point is that everyone has their own preferred level of interaction with their equipment when taking photos.
The Seestar S50 is great for exploring, outreach, and enjoying astronomy with your friends and family. It is not meant for serious deep-sky astrophotography projects that you intend to submit to competitions or print in large format.
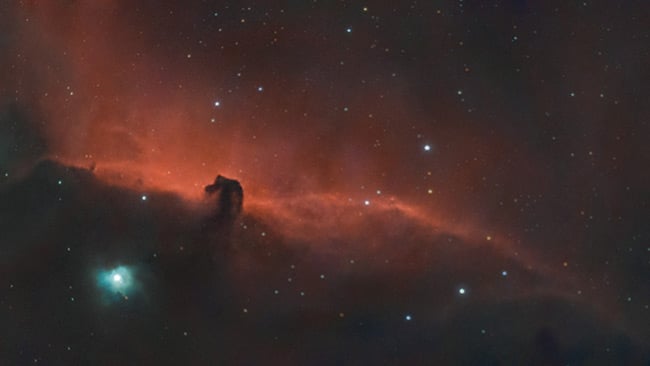
The Horsehead Nebula by Brian Fulda. Seestar S50. Stacked in AstroPixelProcessor and processed in Photoshop.
Who the Seestar S50 is for:
- Beginners looking to photograph the Moon, Sun, and Deep-Sky Objects
- People who want an easy way to locate and view objects in the night sky using EAA
- People interested in astronomy who don’t have the time or resources to dive into astrophotography
- People interested in facilitating astronomy outreach and education
Who it is NOT for:
- People who want to take detailed close-ups of planets and dim deep-sky objects
- Experienced astrophotographers who already have sophisticated camera and telescope systems
- People who want to construct a custom imaging setup catered to their specific needs
-
People most interested in planetary imaging of solar system targets such as Jupiter and Saturn.
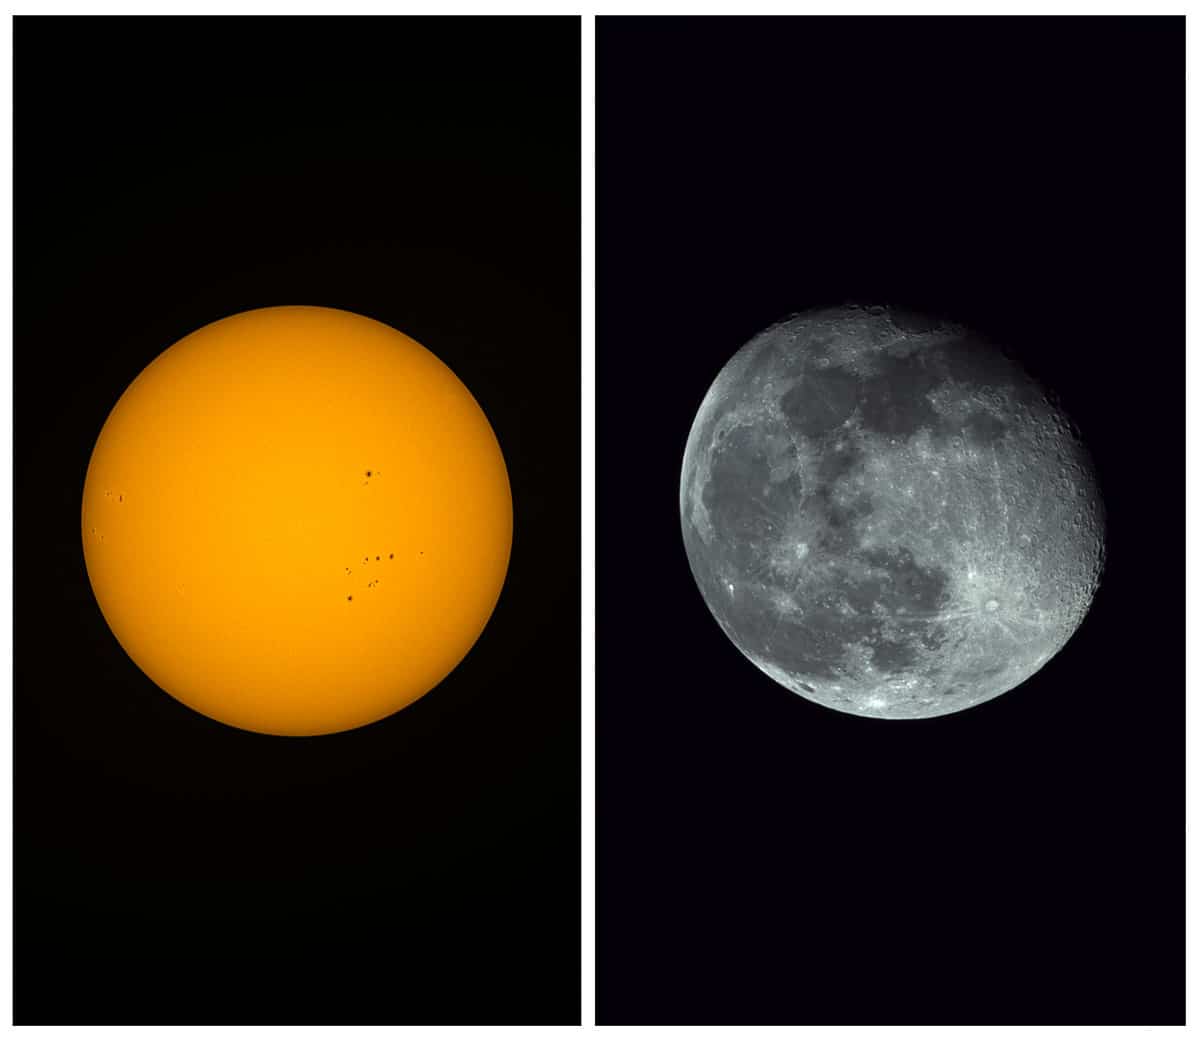
The Sun and Moon captured using the Seestar S50 smart telescope. Slight edits in Adobe Photoshop to the original images.
The Smart Telescope vs Traditional Telescope Debate
There are two very different ways to enjoy the night sky. A traditional telescope is usually an eyepiece-first experience where you’re seeing the object in real time. A smart telescope is more like an automated imaging system that captures frames and shows you a stacked image on your phone or tablet.
If you love the classic observing experience (and you don’t mind learning a bit), a traditional scope is hard to beat. You’ll be choosing eyepieces, finding targets, and getting that satisfying moment when Saturn snaps into focus in the eyepiece. It’s simple, flexible, and doesn’t rely on an app to be fun.
If you want quick, shareable results with fewer steps, a smart telescope is built for that. The app guides you, the scope tracks and plate-solves automatically, and live stacking can reveal deep-sky detail even from light-polluted skies. Just keep in mind it’s a screen-based experience, not true visual observing.

Related Article: Smart Telescope vs Traditional Telescope: Which is Better?
What’s Inside the Seestar S50?
Inside the Seestar unit is a 50mm triplet apochromatic refractor telescope, a dedicated astronomy camera, a light pollution filter, a built-in dew heater, and a tracking GoTo mount. Yes, it’s an alt-az mount, but it works.
The internal light pollution filter, a dual-band filter (similar to the L-eNhance), can be turned on or off depending on the project. By default, the light pollution filter will be automatically applied when you capture most nebulae in the night sky.
The addition of this light pollution filter makes the unit a lot more suitable for astrophotography in the city (I live in a Bortle 6). If you want to capture a more natural-looking image or a broadband subject like a galaxy or star cluster, you can turn it off.
I was also thrilled to see that the telescope includes an integrated dew heater and is rated to operate down to -10°C (14°F). This simple addition is the difference between a full night of imaging and packing up from my location.
You can think of the ZWO Seestar S50 as an ultra-compact, portable observatory that automatically finds, tracks, and photographs objects in the night sky. It really is an ingenious device that exemplifies the smart telescope idea.
Camera and Telescope Specifications
The Telescope
The 50mm triplet apochromatic refractor telescope inside the Seestar has a focal length of 250mm and a focal ratio of f/5. Typically, a 250mm field of view covers a large area of sky, but in combination with the small camera sensor on the Seestar, it is actually quite narrow.
It is interesting to compare this to a stand-alone triplet apochromatic refractor telescope. I couldn’t help but compare the telescope in the Seestar S50 with a William Optics RedCat 51, a 51mm aperture APO with a focal length of 250mm.
Although the RedCat 51 (a Petzval design) is superior optically, it costs significantly more than the entire Seestar package. The value of the Seestar becomes clear when you break down each component of its compact design.
The Camera
The one-shot color astronomy camera inside the unit uses the same CMOS sensor found in the ZWO ASI462MC. This camera captures images and videos that are 1936 x 1096 pixels in size, which equates to about 2 megapixels in total.
Due to the sensor’s shape and size, it creates images in a long, vertical format, about the same size and resolution as a typical phone screen. While this aspect ratio may take some getting used to, the format lends itself well to sharing and viewing images on social media.
One of the biggest limiting factors of the Seestar is its narrow field of view. While I understand why they chose the IMX462 image sensor, I often found myself wanting a larger field of view.
This is especially apparent when capturing large objects like the Andromeda Galaxy. With an imaging window of about 1 degree, you will only be able to capture a section of the galaxy at once.
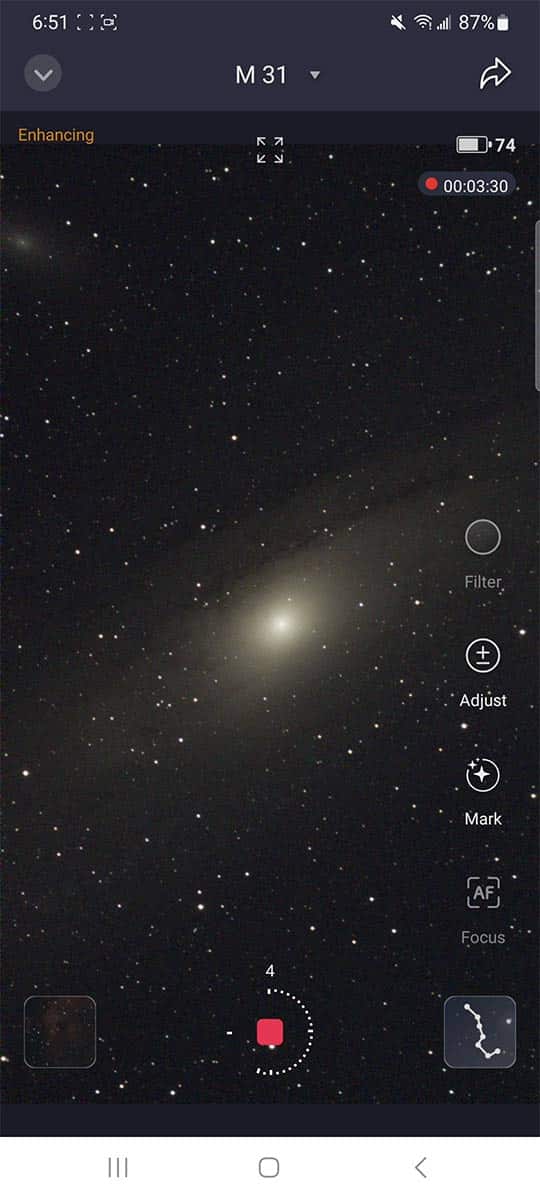
The Andromeda Galaxy being captured by the Seestar S50.
The Tracking Mount
The Seestar S50 uses an altitude-azimuth (alt-az) style mount to move the telescope around and track objects in the night sky. While an equatorial telescope mount is typically needed for long-exposure astrophotography, an alt-az mount like this can still be used, provided shorter exposure times are used.
You do not need to polar align (or ‘star align’ the mount on the Seestar S50 to start taking pictures. The mount uses plate solving to automatically determine its position in the night sky.
As long as the included tripod and mount are level, the GPS setting is enabled, and it is dark enough to capture stars in the sky, the Seestar will accurately determine its position.
Seestar S50 Specs:
- Mount Type: Alt-Az
- Sensor: IMX462
- Resolution: 1920 × 1080 pixels
- Aperture: 50mm
- Focal Ratio: f/5
- Focal Length: 250mm
- Optical Lens: Apochromatic Triplet
- Net Weight: 2.5kg
- Internal Storage: 64 GB
- Transition mode: Bluetooth 5.0, WiFi 5G, 2.4G
- WiFi Range: 15 Feet
- Working Temperature: 0 – 40°C (32 – 104°F)
- Power Input: USB Type-C
- Slew Rate: 1X – 1440X
- Zero Position: Mechanical
- Battery Capacity: 6000mAh
You can review the official Seestar S50 manual provided by ZWO in PDF format.
What’s Included in the Box?
The Seestar S50 weighs 6.6 pounds (3 kg) and comes in an impressive, compact foam carry case. Everything, including the small carbon fiber tripod, fits neatly inside the protective foam case.
The little tripod includes 3/8″ threads and can be extended to a maximum height of 363mm. The tripod legs are quite short, so unless you place it on a table, the unit will be close to the ground when you set it up outside.
While the tripod is small, it is also very stable. A quality, collapsible, lightweight carbon fiber tripod like this adds even more value to the package.
You can also thread the Seestar S50 onto a larger tripod, as long as it has a 3/8″ thread to attach the unit.
- Seestar S50 Telescope Unit
- Mini Carbon-Fiber Tripod (3/8″ thread)
- USB-A to USB-C Charging Cable
- 580-630 nm Solar Filter
- Quick Start Guide

The foam storage case fits all of the components tightly and securely.
Because there is no hand controller or way to operate the unit directly, you need to download the Seestar mobile app and connect to the device via Wi-Fi.

Seestar Mobile App & Sky Atlas
To control the Seestar S50 and download your images, you will have to download the dedicated Seestar app for your Android or Apple device. You can use your smartphone or tablet to control the Seestar.
- Seestar App for Android in the Google Play Store
- Seestar App for iPhone in the Apple App Store
The Seestar app features a star map (Sky Atlas) with an extensive database of celestial objects, including a ‘tonight’s best’ list.
The sky map is a joy to use and makes it very easy for a first-timer to select a deep-sky target and point to it.
I was amazed at how fast the Seestar found my target (the Orion Nebula) during my first light.
After allowing your location settings, you will see some helpful astronomical weather information, including the moon’s current phase and sunrise/sunset times.
Next, you have the option to select your primary observation mode:
Stargazing Mode
The stargazing mode is where most users will spend the majority of their time. This mode is where you can see a live view of the night sky wherever the Seestar is pointed, and is where you go to start taking and stacking deep-sky images.
The telescope automatically plate-solves the image to determine the layout of the night sky based on your location and provides recommended targets for you to capture. You can press the record (capture) button to start collecting and stacking images, and you will see your image on the screen get better and better.
Dark skies will help you capture the best possible images. They allow you to collect a stronger signal without losing the faint details that are washed out in a city sky. Keep the Seestar’s short focal length in mind when selecting a target.
Solar Mode
With the included solar filter in place, you can use the Seestar S50 to capture detailed views, images, and video of the Sun, including sunspots. I initially ran into some trouble with the Seestar not being able to find the Sun on its own.
After manually pointing the Seestar in the general direction of the Sun, it managed to find it and center it on its own. Finding the Sun with a solar telescope with such a narrow field of view can be tricky.

Using the Seestar S50 in ‘Solar Mode’ with the solar filter in front of the lens.
The included certified solar filter fits perfectly on the objective lens of the Seestar and can help you take pictures of the Sun in white light (not in h-alpha).
Many people successfully recorded the total solar eclipse on April 8th, 2024, using the Seestar S50.
Lunar Mode
The Seestar S50 can take fantastic images and videos of the Moon. For the best possible results, you will want to capture video files in .AVI file format and use planetary image stacking software to select and stack the best frames.
The telescope’s focal length and the CMOS sensor used are well-suited for lunar photography. Because the device can be set up quickly, I can capture the full moon (and many other phases) during a brief cloud break.
Scenery Mode
This mode is used for daytime photography and video of terrestrial objects, such as wildlife or landscapes. While this feature is unlikely to be the main reason most people buy the Seestar, I think you will be surprised at how fun it is to use.
Having precise control over a lens at a focal length of 250mm (with autofocusing) is a lot of fun. I enjoy using the Seestar in scenery mode to watch the bird feeder in our backyard during the winter.
Using the S50 to Capture a Lunar Eclipse
The Seestar S50 can capture a lunar eclipse beautifully, but you’ll need to adjust settings as the Moon darkens. During the bright partial phases, use short exposures and low gain.
As totality approaches and the Moon turns red, switch to manual exposure and gradually increase exposure time and gain to compensate for the dramatic drop in brightness. Avoid leaving it in full auto mode, as it may struggle with the rapidly changing light levels.
Since the Seestar is designed for deep-sky stacking, turn off stacking features when photographing the Moon. Single exposures or short video clips will preserve sharper lunar detail.
Use RAW capture (FITS format) for better flexibility in processing, especially to preserve subtle red and orange tones during totality. Check focus as temperatures drop, and plan to shoot consistently throughout the event to document the full progression.
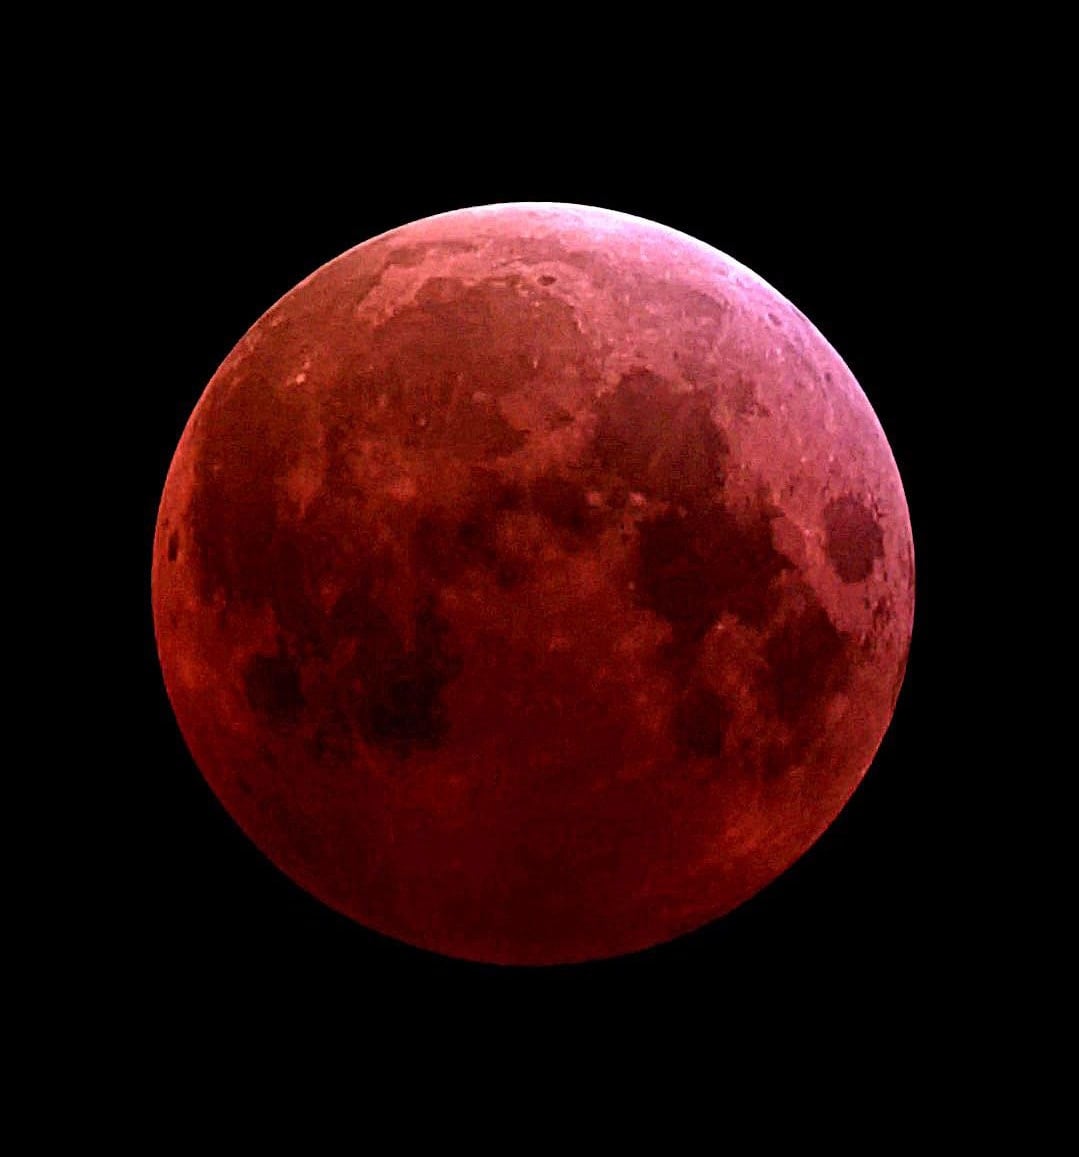
The ‘blood moon’ total lunar eclipse captured by user Cycling_Man in the r/seestar Reddit group.
Seestar S50 Setup
The internal battery can be charged using the included USB-C to USB-A cable plugged into a power charger (like the one you use to charge your smartphone). Once fully charged, it lists a battery life of up to 6 hours.
You can also keep the Seestar topped up by plugging the USB-C cable into a USB power bank. The power bank will charge the battery while it is in use. When it is fully charged, the unit will display four red lights.
To get started:
The first step is to connect the telescope to the tripod securely (using the 3/8″ thread) and set the Seestar S50 up outside. Ensure the tripod is level to ensure the Seestar S50 will work correctly.
- Activate: Press the power button for 2 seconds. The voice prompt will let you know once it’s powered on. Tap connect.
- Connect: Select the device you are connecting to and follow the prompts to complete the connection.
- Open App: After connecting, the app will connect to the internet and activate the device.
- Connect to WiFi: Select the unit you want to connect from the WiFi connection screen. The listed WiFi range is 5 meters, and from that distance, the connection has been very stable for me.
- Observation mode: Choose your observation mode from stargazing, solar, lunar, or scenery.
If you want to take images, select stargazing mode and continue:
- Stargazing mode: Choose your target, and the telescope will automatically point to it.
- Light pollution filter: If you are imaging from the city, it is recommended that you turn on the light pollution filter.
- Anti-dew: If you are in a humid climate where dew on the telescope might be a problem, turn on the anti-dew function.
- Autofocus: Tap the screen to activate autofocus.
- Select target: Select and mark your target and complete a brightness adjustment.
How to Use EQ Mode
The Seestar S50 includes an Equatorial Mode that improves long-exposure tracking by compensating for the rotation of the night sky. It’s especially useful when capturing faint nebulae or galaxies, where stacking many short exposures can benefit from more accurate alignment.
To use it, place the S50 on a sturdy tripod and level it as precisely as possible. In the Seestar app, open the Settings menu and enable EQ Mode. The telescope will prompt you to perform a quick calibration, which involves pointing at a star field so the software can determine its orientation.
Once the calibration completes (usually in under a minute) the S50 adjusts its internal tracking to follow the sky more smoothly. You can then begin imaging as usual, with improved star shapes and reduced field rotation during longer capture sessions. This mode isn’t required for every target, but it’s a helpful tool when you want the cleanest possible data.
Astrophotography with the Seestar S50
Using the stargazing mode, you can take images of deep-sky objects using the same techniques astrophotographers use to create deep images. The Seestar will automatically take and apply dark frames to your image, which is an important calibration step to improve the final image.
For example, if you’ve selected the Orion Nebula as your target, the camera will continuously capture and stack 10-second images, and the picture will improve over time. After about 10 minutes of imaging, you should see a major improvement of the nebula on the screen.
Some people will enjoy using the Seestar S50 simply for EAA, or electronically assisted astronomy. This involves pointing the telescope at various targets in the night sky and enjoying the near real-time view of the object through photography.
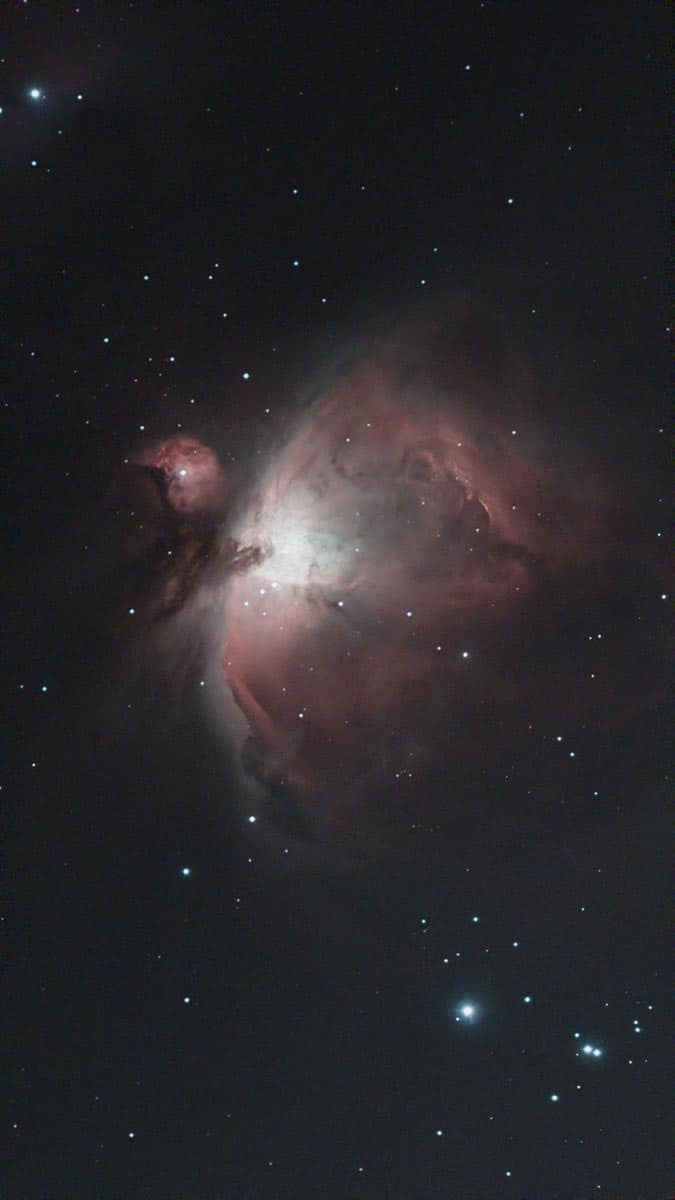
The Orion Nebula using the Seestar S50. Slight edits in Adobe Photoshop to the original stacked image.
For those who want more control over the final image, you can also save the individual sub-frames to stack and process yourself. YouTuber Cuiv the Lazy Geek did an interesting experiment where he stacked 5 hours’ worth of exposure time to create an impressive image of the Pacman Nebula.
In solar and lunar observation modes, you can record videos in MP4 and AVI format and process them using a planetary image stacking tool like Autostakkert or Registax. This process involves selecting a percentage of the best image frames captured to create a sharper overall image of the Moon or Sun.
How Long are the Exposures?
The default exposure time for deep-sky imaging with the Seestar is 10 seconds. This exposure length is set to maximize light collection while avoiding field rotation.
You can increase the exposure time to 20 or 30 seconds in the Advanced Feature menu under the Enhanced EXP section. If you have chosen this setting, the Seestar will take a new set of dark frames before capturing your next target.
I don’t recommend using the 30-second exposure feature, as you will likely see many more frames discarded (due to star trailing) and not included in the stack. The Pompey Observatory YouTube channel published useful example images of this scenario.
For the best results, I recommend using the default 10-second exposure time and collecting light on your subject for at least 30 minutes. My best deep-sky images were created when I collected over an hour of total exposure time.
Mosaic Mode
In the fall of 2024, the latest update introduced a new mosaic mode. This can be utilized when you want to capture a larger target that does not fit inside the default field of view of the Seestar.
To initialize the mosaic mode, click the three dots (more settings) at the top right-hand side of the screen while in stargazing mode. Then, toggle the ‘star mosaic’ option to the ‘on’ position.
Now, you can choose your framing settings (mosaic range) by clicking the ‘framing’ button at the top of the screen. You can expand the framing up to 4X bigger than the original frame.
You can also rotate the frame to ensure your deep-sky object is well-placed within the field of view. Keep in mind that capturing a mosaic will take much longer than a traditional image on the Seestar.
What are the Best Targets to Try?
With a narrow field of view, a limited exposure length (10 seconds), and a small aperture, it should come as no surprise that the best deep-sky objects to observe and capture with the Seestar are ones that are very bright.
The Seestar excels at emission nebulae, supernova remnants, and globular clusters. Here is a short list of recommended deep-sky targets for the Seestar S50:
- Orion Nebula
- Dumbbell Nebula
- Lagoon Nebula
- Veil Nebula
- Pacman Nebula
- Hercules Globular Cluster
- Eagle Nebula
Accessing Seestar Images on Your Computer
To access and save the deep-sky images you have taken on the Seestar on your computer, you need to power on the seestar and connect it to your PC with the USB cable.
As long as the Seestar is powered on, your computer should recognize the Seestar as a new drive. Look for the ‘MyWorks folder’, as this is where the image files are stored.
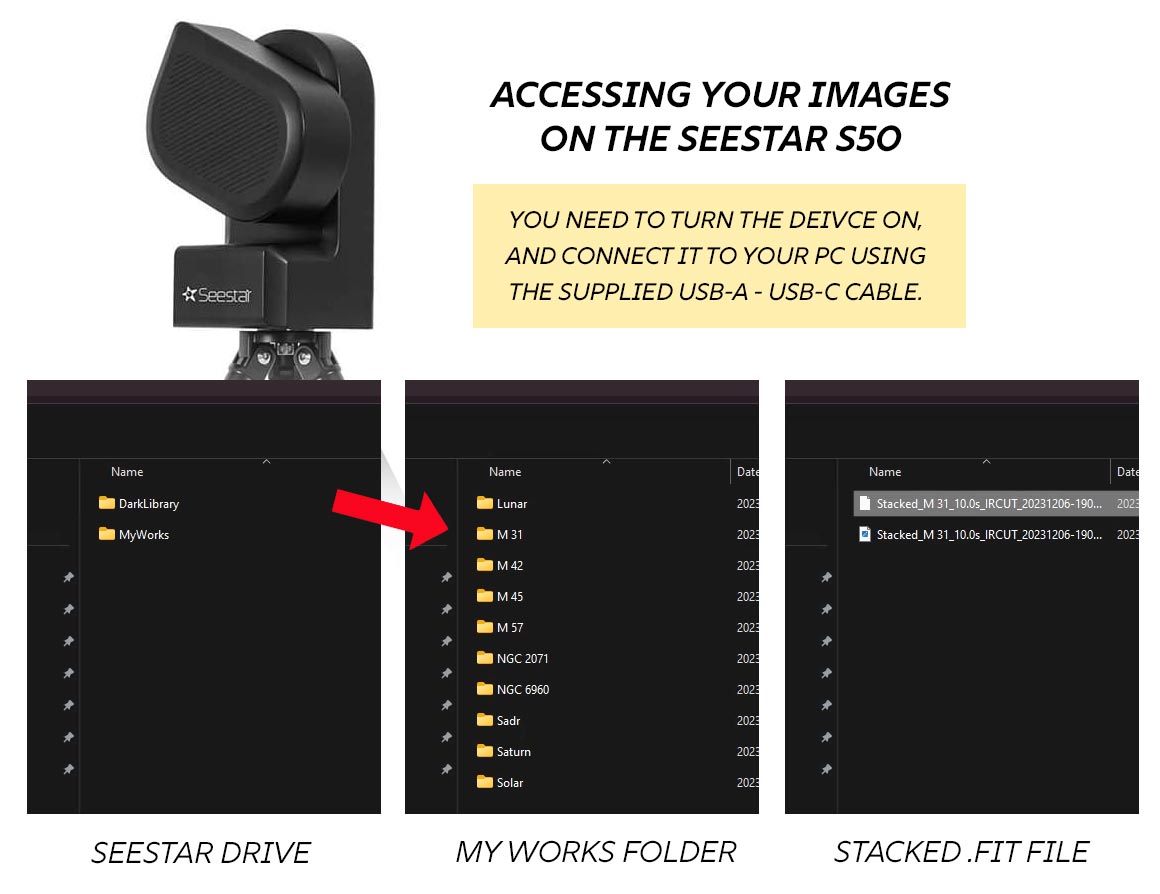
Here, you will see all of your projects in their own folders, named after the object you photographed. All projects are found here, from deep-sky nebulae to planets. The file you want to process is the stacked FIT file, not the tiny JPG preview file.
If you took videos of the moon or sun, you’ll see the AVI files here as well. I have not yet explored the option of saving the individual sub-frame exposures to stack myself. So, the image processing starts with stacked, calibrated master file to bring into your favorite image processing software such as PixInsight or Adobe Photoshop.
Keep in mind, to edit the photo using Adobe Photoshop, you will first need to convert the .FIT file format to a TIF file first. This can easily be done using a free tool like DeepSkyStacker.
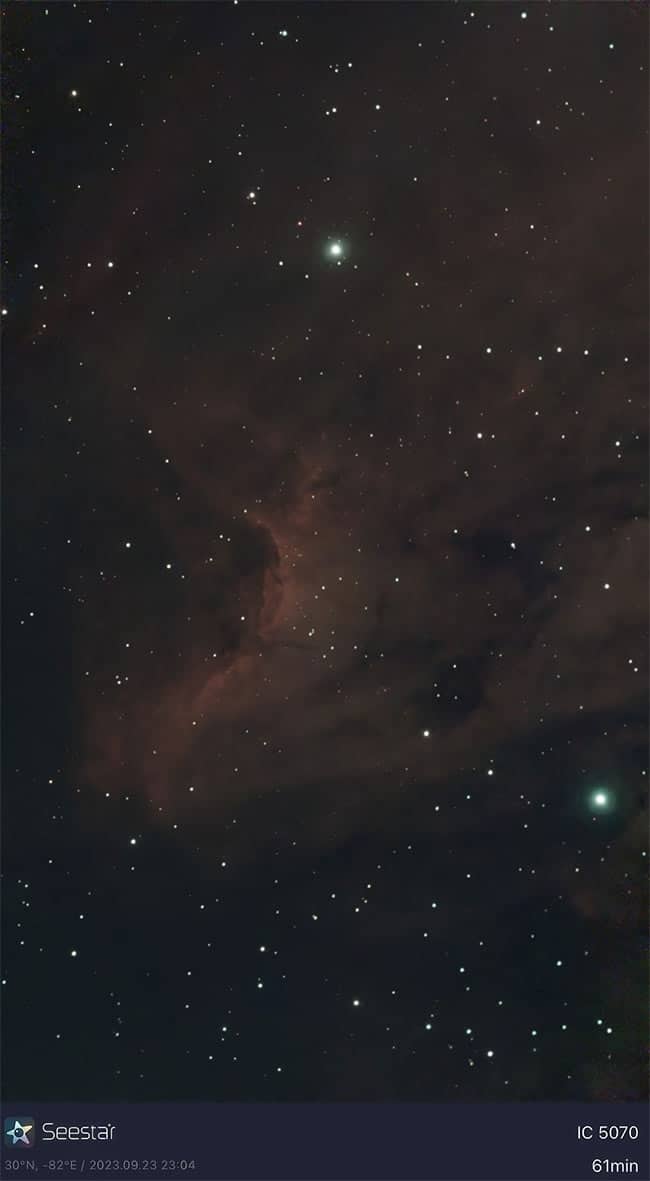
The Pelican Nebula in Cygnus by X User capnrob9756. Seestar S50 (stacking and processing using only the Seestar S50)
Station Mode
You can also access the Seestar S50’s internal storage by connecting to your home network using station mode. Once the device is connected to your home network, you can access the 64GB SD card by searching for the ‘\\Seestar’ folder from your network-connected computer.
Once you have accessed the Seestar folder on the network, you will find all your project folders in the MyWorks folder. This method does not require connecting the Seestar S50 to your computer using the USB-C cable.
Firmware & Performance Updates
The Seestar S50 continues to evolve through regular firmware updates that expand its capabilities and improve performance. Each new release brings meaningful enhancements, ranging from refined plate-solving accuracy and longer exposure options to expanded software compatibility and image-processing improvements.
These updates ensure that owners can maximize the benefits of their smart telescope over time, keeping the Seestar S50 at the forefront of portable astrophotography technology.
| Feature | Before (v1.9) | Now (v2.1 and later) |
|---|---|---|
| ASCOM Support | Not available | Full mount & camera control |
| Exposure Options | Up to 10s | Up to 60s in EQ mode |
Helpful Seestar S50 Accessories
Since the product was announced, several third-party accessories have been produced to help maximize the Seestar S50’s potential. Some of these items include 3D-printed Bahtinov masks and a lens cap to cover the telescope’s objective lens.
I found the autofocus feature on the Seestar to work exceptionally well, but others insist that a Bahtinov focusing mask is needed for precise focus. At $10, I think it’s a no-brainer for those who want to verify that the telescope has achieved critical focus.
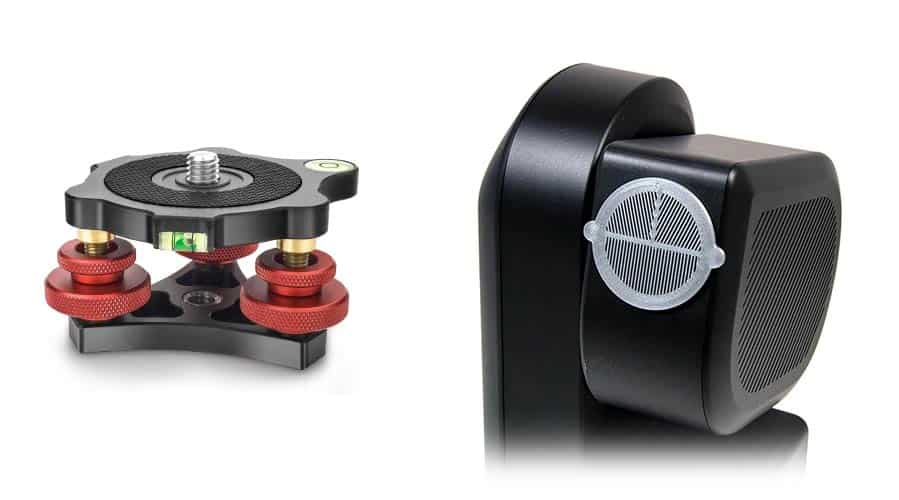
Others have mentioned that the use of a camera leveler with a 3/8″ thread is helpful to ensure that the Seestar S50 is perfectly level when in use. While I love the compact carbon fiber tripod that is included with the Seestar, it is very short, and some people have decided to upgrade to a taller model.
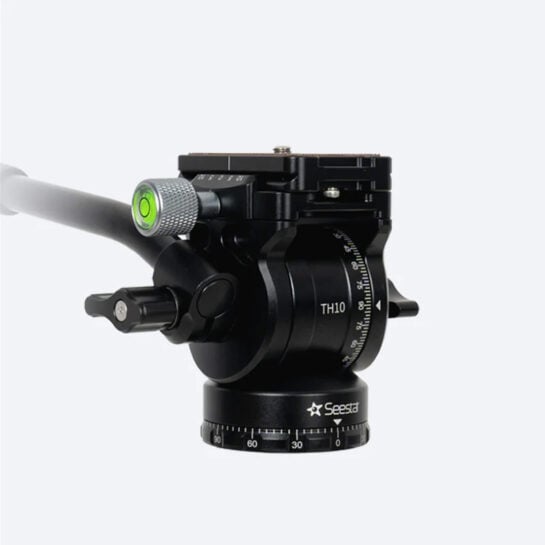
ZWO offers a fluid tripod head to utilize the EQ mode on the Seestar S50. The TH10 Fluid Head comes with a quick-release plate that supports both 3/8″ and 1/4″ screws, making setup easy with a wide variety of devices.
Limitations
While there are lots to praise about the Seestar S50, here are some of the limitations to consider:
- Given the size of the sensor, the images are pretty small, and the field of view will limit your projects. Also, the vertical image format might take some getting used to.
- If you’re using the Seestar S50 to explore the night sky and share photos, the relatively low-resolution image size (1920 x 1080) is perfectly fine. For serious astrophotography projects that you can print, you may want to stick to your dedicated astrophotography rig.
- The 50mm aperture isn’t big enough to capture detailed images of super-dim objects, and planets are really small at 250mm.
- The alt-az base is not equatorial. This means field rotation of anything over 30 seconds, or even sooner, will require you to work around this. That means no 5-minute subs on this device.
Remember, you can always try using the S50 in EQ Mode to increase your exposure times and avoid field rotation. For its size and affordable price, it offers a lot of value.

While the small sensor and Alt-Az base limit the Seestar S50’s capabilities, it makes up for these shortcomings with thoughtful strategies (like live-stacking and automatic frame rejection) to deliver the maximum potential of the unit.
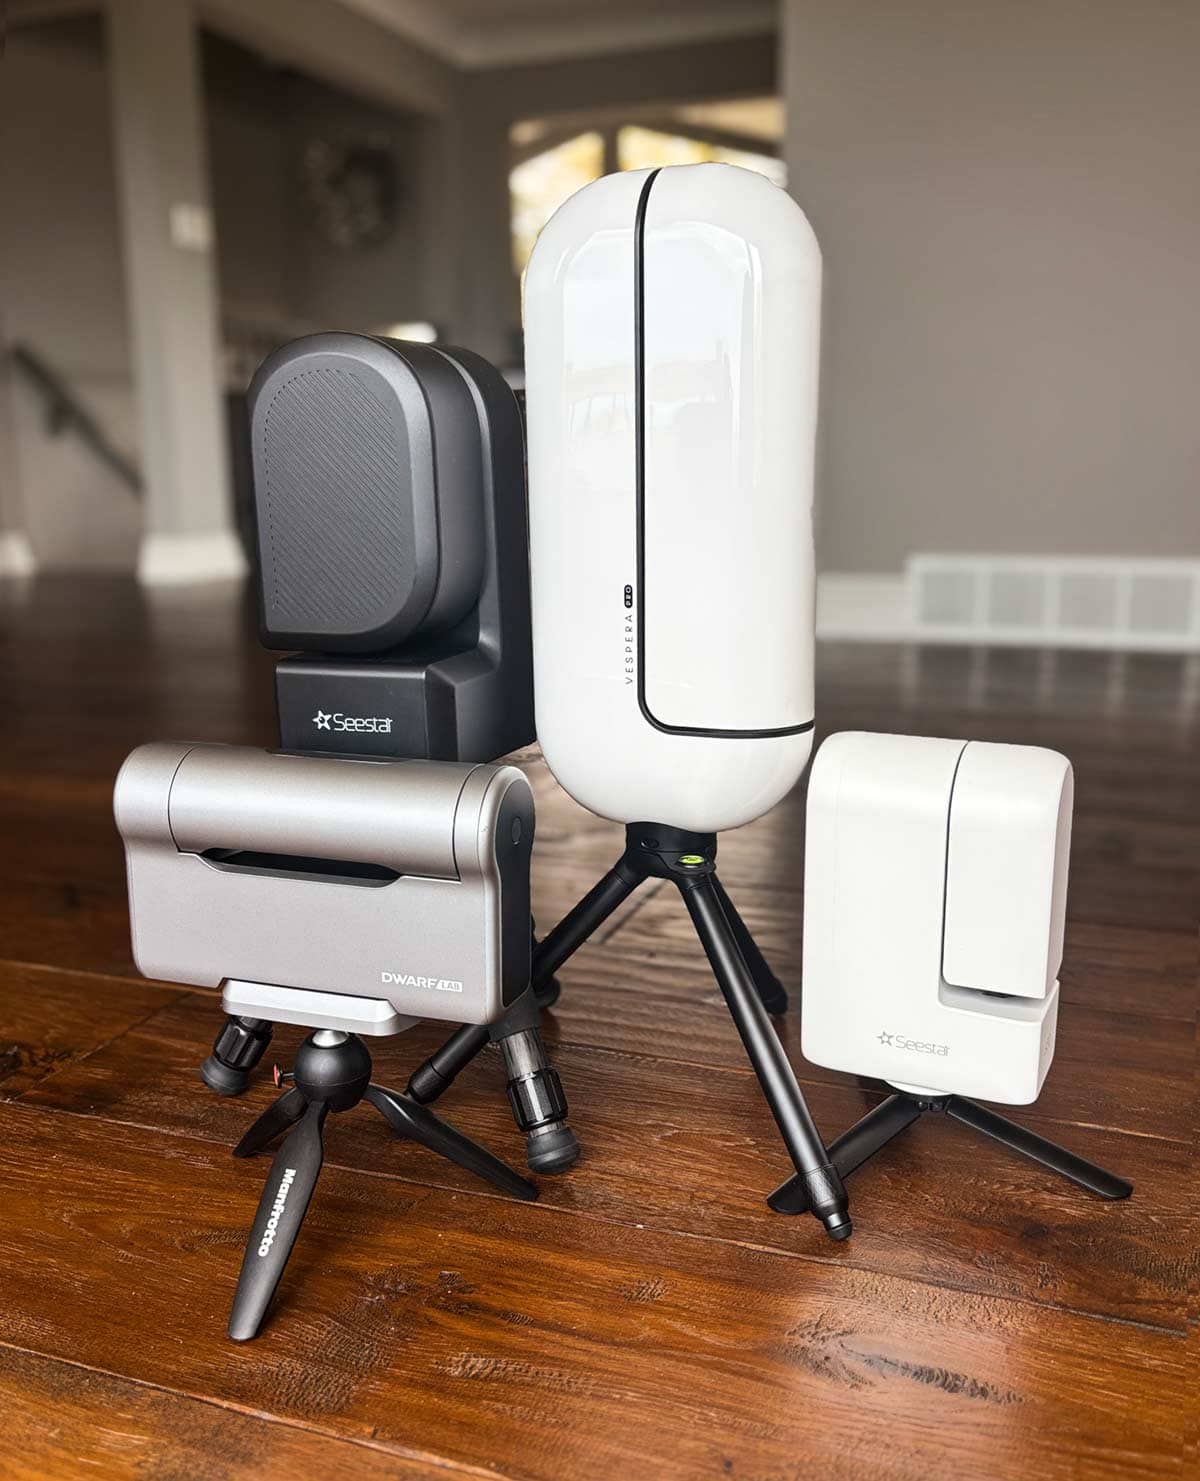
Seestar S50 vs DWARF 3 and Other Competitors
The Seestar S50 is an affordable smart telescope with attractive features in a small size. However, it is not the only option for those who want to explore amateur astronomy and share it with their family and friends. Here is a comparison chart of the most popular smart telescopes on the market.
| Seestar S50 | DWARF 3 | Celestron Origin Mark II | Vespera II | |
|---|---|---|---|---|
| Aperture | 50 mm | 35 mm | 152 mm (6″) | 50 mm |
| Focal Length | 250 mm | 150 mm | 335 mm | 250 mm |
| Focal Ratio | f/5 | f/4.3 | f/2.2 | f/5 |
| Sensor | Sony IMX462 | Sony IMX678 | Sony IMX678 | Sony IMX585 |
| Resolution | 1920 × 1080 | 3840 × 2160 | 3856 × 2180 | 3840 × 2160 |
| Battery Life | Up to 6 hours | Up to 4-6 hours | Up to 6 hours | Up to 4 hours |
| Weight | 7 lbs | 3 lbs | 41 lbs | 11 lbs |
| Price | $549 USD | $549 USD | $4,299 USD | $2,999 USD |
As you can see, the Celestron Origin Mark II offers a much larger 6″ aperture and longer focal length, but it also costs many times more than the Seestar S50. In this premium category, the Origin Mark II is a powerful option for those who want the best possible image quality and are willing to pay for it.
I tested the DWARF 3 smart telescope in the fall of 2024 and found it to be a worthy competitor to the Seestar S50.
After reviewing many smart telescopes, I still consider the S50 the standard by which new models are measured.
Conclusion
If you already have an astrophotography kit with a good telescope and an EQ tracking mount, you can probably take better pictures than with the Seestar S50.
Your astronomy camera alone probably costs twice, if not three times, as much as this entire package. But that’s not what the Seestar is all about.
It’s about allowing ANYONE to capture objects in the night sky without knowing what dithering or field rotation means. It’s about plunking the Seestar on the ground and tapping a few buttons to see a live view of the Orion Nebula or Andromeda Galaxy.
Whether you’re live stacking a nebula to share it with friends and family, or you’re going deep on a photography project that you’ll process carefully when it’s done, the Seestar S50 delivers the best parts of astrophotography in a fun and easy way.
These are two words that are rarely paired, but I think the Seestar S50 may have finally pulled it off. This little wonder lets amateur astronomers take great images in a short time. The ease of use, dedicated smartphone app, and low price made the Seestar one of the best-selling astronomy products ever – and for good reason.
To stay up to date with my latest astrophotography adventures, you can follow me on Instagram, Facebook, and X.
Trevor Jones is a deep-sky astrophotographer and a valued member of the RASC. His passion is to inspire others to start their astrophotography journey on his YouTube Channel, so they can appreciate the night sky as much as he does. His images have been featured in astronomy books and online publications, including the NASA Astronomy Picture of the Day (APOD).


Great review, thanks for sharing. I’ve been wondering whether to take the plunge as I want to take the odd photo of the sky when I’ve been observing but don’t have the time for dedicating to a full astrophotography set up. Think your review has given me my answer!
I am happy to hear this helped, Dan! I think it was compliment your observing time under the stars without adding unnecessary headaches.
Thanks for the very comprehensive review!
I just placed my order for the S50. I’ve been on the fence about ordering, your review helped convince me to pull the trigger. I’m looking forward to some deep sky photography, and plan on being in the path of totality for the solar eclipse on April 8th.
I am glad it helped, Mike. I will be using the Seestar for the total solar eclipse in April as well. Fingers crossed for good weather!
I have already bought it and enjoying it for last couple of weeks and was eagerly waiting for your review as I am following you for a long time and try to follow all your comments. You are like my Astro Idol hahaha. Thank you for sharing such detailed review and yes, this is one nice little machine who has wonders to share.
Thank you for the kind words, Mehdi. I continue to see better and better images surface online as users continue to maximize the Seestars performance. What ana amazing little ‘toy’ it is!
Trevor,
Your videos are excellent, but I wasn’t ready to take the plunge into “big time” astrophotography until I purchased a Seestar. This scope will be a gateway for new entrants into our hobby and turn many visual observers into imaging enthusiasts. I appreciated that an experienced pro like you did not denigrate the Seestar as a toy, but see it as a great entry point into Astro-imaging. Thanks for an honest review.
Thank you, Gary!
Love this comment!
The text is in Russian – turn on the translator!
Спасибо за обзор. Он так же помог мне решиться купить этот девайс (при наличии нескольких телескопов разных оптических систем). Надеюсь, что будет “супер-легким” сетапом, и окажет помощь в проводимых для людей уличных бесплатных наблюдений.
I am glad this review helped you make your decision! 🙂
Thank you for the very clear and understandable information on the See Star’s capabilities and limitations. I was hoping to be able to take and enlarge some of the photos. It sounds like this isn’t cabable with the See Star telescope? Is that correct? Thank you, KW
It is my pleasure, Ken. Correct – you could enlarge the photos in post, but the resolution will degrade as you get larger from the original 1936 x 1096 pixel image size. I think an 8 x 10 photo might look pretty good, but that’s as big about as big as I’d recommend for a 2 megapixel image!
enjoyed your review of the seestar s50 … you refer to connecting to a pc to process … will it also connect to a mac?
and once imaging has started, can you turn off your phone or tablet and it will still keep running (like the asiair mini)?
thanks
I had planned to get the GTi, Asiair plus and eventually the WO Redcat 51. But funds are tight and with this option I could get started now and wouldn’t need to wait. Thanks for the review Trevor. Looking forward to trying it out!
Thank you very much for your review.
Went to a stargazing evening where I saw the Seestar demonstrated by an experienced astronomer and was astonished at the simplicity and cost. Being a technophobe but very interested in the sky above I could never imagine being able to find and photograph heavenly bodies let alone afford all the gear!
Off to start a new hobby tomorrow!
Is there a way to increase the resolution on the images? Like put it in the Photoshop or something along those lines for large prints?
You can’t truly increase the resolution of any image in photoshop. You can do a ‘fake’ increase that will improve a print, but there is no way to take a 2mb image and have it print like was shot on a larger, higher quality sensor.
The SeeStar is based around most people looking at photos on a phone/tablet or monitor. It does a fabulous job as an all-in-one for the price.
I don’t see not being able to poster as a draw back. You have spend a lot more $$$ and a lot more time to produce images suitable for wall sized prints.
This lets one start astro imaging right away at a very affordable price. One can always improve their gear, and then get to large size prints.
It is not every day that one encounters a well-written, informative, and practical article with superb explanations that Youtube.com videos fail to follow. Trevor Jones, you possess a true old-school proven method of writing that makes one wonder, why aren’t you a New York Times best seller in astrophotography.
I can’t thank you enough for demystifying this amazing telescope for beginners like myself. If there is ever an advanced part 2, please let me know.
How many objects are contained in the Seestar list?
The Seestar S50’s catalog is actually pretty impressive. It comes with a database of over 4,000 celestial objects (including 276 recommended targets). The SkyAtlas feature lets you access over 90,000 deep-sky objects, which is wild. You can also search by NGC catalog numbers.
I am divided between S30 Pro and S50, which one do you think I should choose?
Because I mostly like to shoot large nebulae, the S30 Pro makes more sense with that wider field of view and larger sensor size. The secondary lens is pretty impressive too – go for the S30 Pro if its in your budget.
Hi, I have just got the s50 and love it! I already have a Manfrotto tripod with a fluid video head for my dslr, with an adapter for the thred, could I use this as a wedge fo EQ? Is it just about setting the angle? Thanks.