Equatorial Telescope Mounts: The Basics
Last Updated: August 30, 2025
Amateur astronomy enthusiasts and astrophotographers rely on an equatorial telescope mount to track the apparent movement of the night sky.
Whether you call it a computerized telescope or a tracking telescope, it’s actually the mount that does the tracking, not the telescope itself.
Many tracking telescope packages are available, from Alt-Az-based smart telescopes to giant GoTo mirror-based Dobsonian telescopes.
However, if your goal is to capture deep-sky astrophotography images with your camera, you’ll want to invest in a robust equatorial telescope mount.

Related Article: The Best Telescope Mounts for Astrophotography in 2025
Equatorial Tracking Telescope Mounts: The Basics
With a computerized mount that can track the motion of the stars, the telescope you attach to it is up to you. A GoTo telescope mount makes locating objects in the night sky easier and allows you to take long-exposure images (without star trailing).
An equatorial telescope mount (often referred to as a German equatorial mount, or “GEM”) that has been accurately polar-aligned with the Earth’s polar axis can follow a particular object in the night sky for an extended period.
Because the Earth rotates on its axis every 24 hours, the night sky appears to move slowly across the sky throughout the night. For telescope observers and astrophotographers, this presents a challenge in terms of staying “locked on” a target.
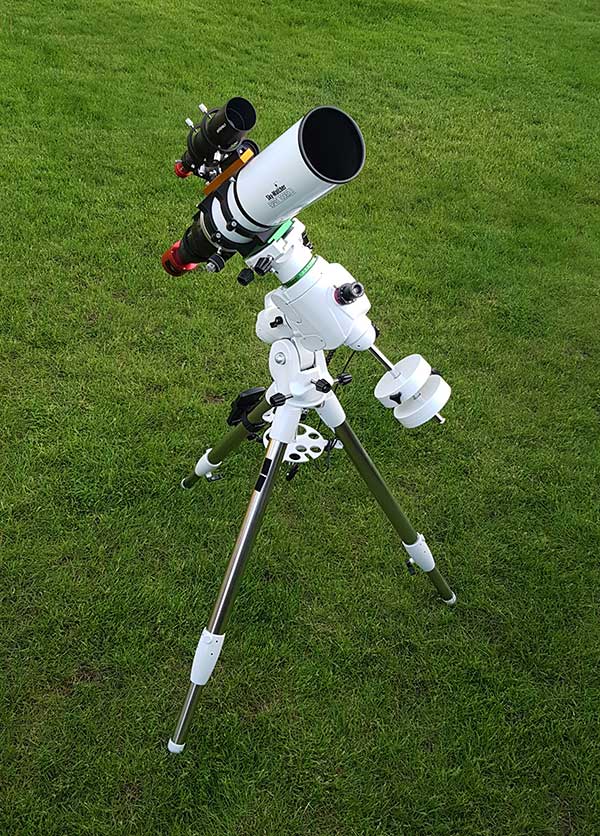
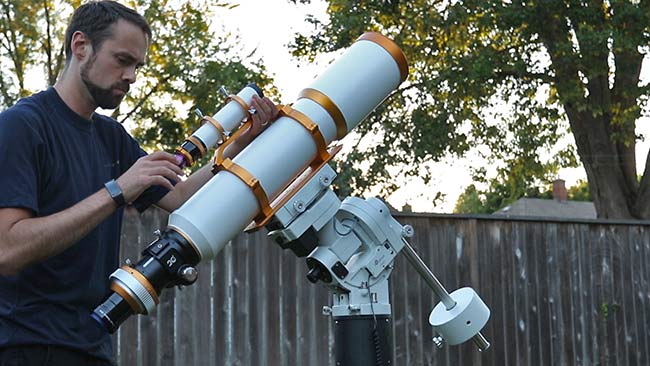
A basic deep-sky astrophotography setup using an equatorial telescope mount.
The Importance of Tracking
With a non-tracking telescope mount, such as a traditional Dobsonian design, objects at high magnification appear to drift gradually in the eyepiece.
If you have ever looked at the moon up close through a high-powered telescope without tracking, you’ll know exactly what I mean.
When observing solar system objects in space, such as planets or the moon, this is not much of a problem, as you can easily move the telescope slightly to ” keep up” with your subject.
While tracking is beneficial for stargazing and visual observing, it is not necessary to enjoy real-time views through your telescope eyepiece. If you want to take pictures, however, things get a little more complicated.
Astrophotography
The apparent movement of the night sky makes long-exposure astrophotography impossible at longer focal lengths.
The gradual movement can make your photograph blurry in as little as 1-2 seconds, depending on the focal length (magnification) used.
For this reason, astrophotographers must use a computerized equatorial telescope mount to take crisp images of objects in the night sky.
![]()
An example of a 3-minute exposure of the Lagoon Nebula through a telescope (250mm) with and without tracking.
Over the past decade, I have used over a dozen equatorial telescope mounts for astrophotography. My first ‘real’ astrophotography mount was a Sky-Watcher HEQ5 SynScan Pro, and my latest favorite is the ZWO AM5.
Manual Tracking vs. Motorized
A basic, lightweight equatorial mount and tripod can support and control your small telescope. A manual equatorial mount will give you dual slow-motion controls in the RA and DEC axes, which you control by slowly turning the knobs on the mount.
For example, the Orion EQ-1 equatorial telescope mount, pictured below, requires manual control of the mount’s axis to keep it aligned with your target. It is possible to add an electronic clock drive for motorized celestial tracking.
![]()
A mount like this is extremely affordable and can carry a small telescope of up to 7 lbs. I anticipate many aspiring amateur astrophotographers will quickly outgrow a non-motorized equatorial mount.
When you are ready to invest in a computerized equatorial telescope mount, you can always start small with a portable star tracker. This will allow for payloads up to about 11 pounds while maintaining portability.
Equatorial Mount vs. Alt-Az Mount
Astronomical telescopes can be mounted in two ways: EQ (equatorial) and Alt-Az (alt-azimuth).
Both of these mount designs are extremely popular in the amateur astronomy community, allowing the telescope to be freely pointed in two perpendicular directions (called axes).
Alt-Azimuth
The alt-azimuth mount design simply allows you to move the telescope at altitude (up and down) and azimuth (left to right).
The Alt-Az mount was designed for convenience and practicality, at the expense of precision tracking over long periods of time.

I use a Sky-Watcher FlexTube 350P Dobsonian with a GoTo Alt-Az base for visual astronomy and solar system photography.
Smart telescopes, such as the Dwarf 3 and Seestar S50, utilize computerized Alt-Az mount designs. While they can track and stack deep-sky objects via live stacking, the images suffer from field rotation over time.
While there are ways to increase exposure times and reduce field rotation by polar aligning an Alt-Az mount, 30 seconds is the longest practical exposure possible using this design.
Equatorial (EQ)
The German equatorial mount design has a right ascension (RA) axis, a declination axis (DEC), and a polar axis (the RA axis aligned with the celestial pole).
The DEC axis moves the telescope north and south, and the RA axis moves the telescope east and west. The polar axis of an equatorial telescope mount must be polar aligned for optimal performance.
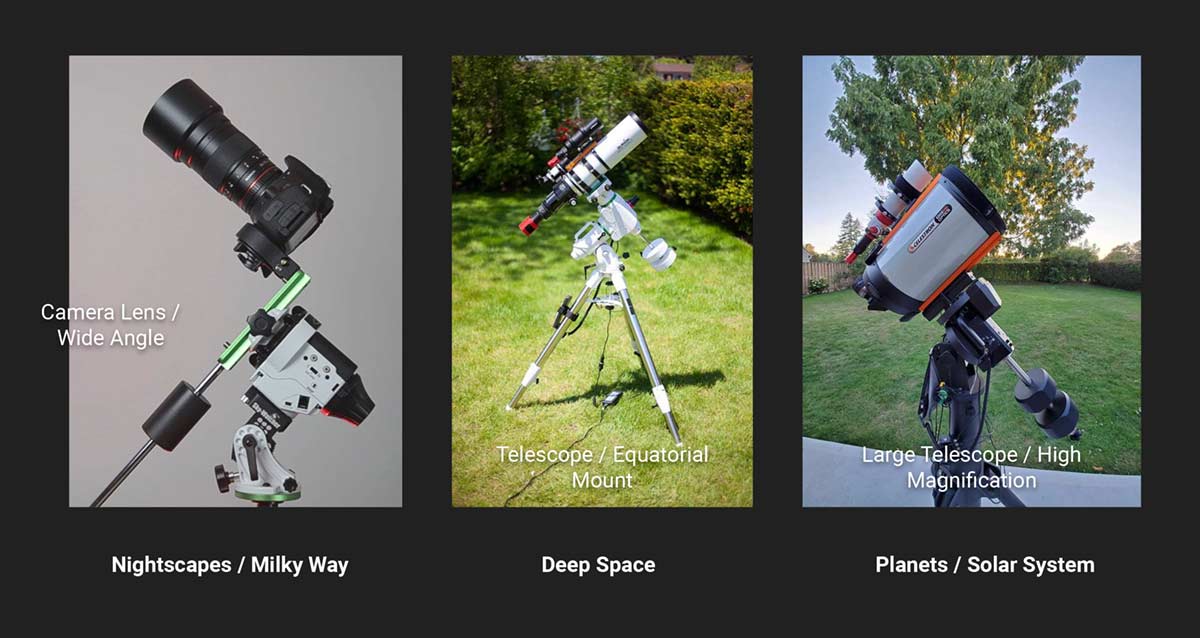
Here are three different examples of the equatorial telescope mounts I use, from a lightweight star tracker to a robust planetary imaging system.
When an equatorial telescope mount is aligned parallel to the Earth’s rotational axis, the sky’s apparent motion from east to west can be accurately followed (tracked).
The RA motor in an equatorial mount slowly moves in one motion to match this speed of motion for accurate long-exposure astroimaging.
Recommended Equatorial Mounts for Astrophotography
Here is a helpful list of mounts suitable for deep-sky astrophotography. All of these models are widely used in the astrophotography community and are behind some of the most beautiful images shared on Astrobin, Flickr, and Reddit.
Some of my favorite mounts for astrophotography are the ZWO AM5N and the Sky-Watcher EQ6-R Pro. For a comprehensive list of the models I have tested and recommend, please refer to my review of the best astrophotography mounts available in 2025.
Beginner-Level
Intermediate Level
Advanced
- Sky-Watcher EQ8-R Pro SynScan
- Software Bisque Paramount MYT Robotic Telescope System
- iOptron CEM120EC Equatorial Mount
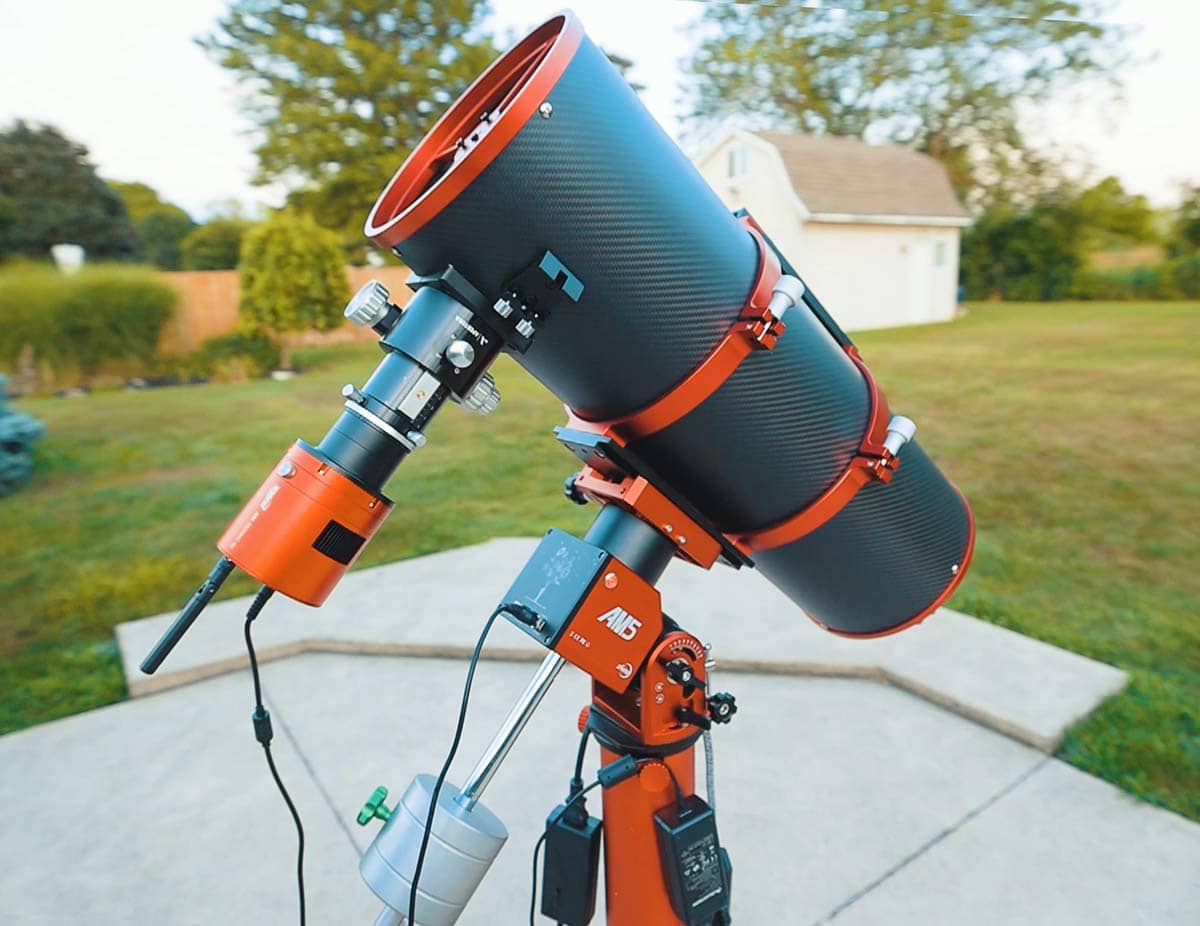
The ZWO AM5 is a versatile performer suitable for a wide range of telescopes. (Apertura CarbonStar 200 pictured).
How an Equatorial Telescope Mount Works
An equatorial mount has one rotational axis parallel to the Earth’s axis of rotation. This design allows the attached instrument (your camera or telescope) to stay fixed on a celestial object by driving one axis at a constant speed.
The equatorial axis is known as right ascension, while the perpendicular axis is referred to as declination. The right ascension axis (RA), rotates in one revolution every (approximately) 24 hours.
The mechanical design of an equatorial mount is better suited for astrophotography than an altazimuth mount (alt-az). The latter will rotate the object in the focal plane and generally have a harder time guiding the object.
For those interested in prime-focus astrophotography, a computerized equatorial telescope mount is essential. The internal motors allow the telescope mount to rotate at the sidereal rate (or “clock drive“) and match the exact speed of Earth’s rotation.
Right Ascension and Declination
If you have ever seen the terms “right ascension” (RA) or “declination” (DEC) before, you might be scratching your head as to what these terms are referring to.
An equatorial telescope mount operates on two axes, RA and DEC.
Right ascension is the axis that rotates around the north or south celestial pole, depending on which hemisphere you are located in. The telescope mount must be accurately polar aligned to match the rotation of the night sky in RA.
To balance the telescope correctly in the RA axis, a counterweight is required. Equatorial mounts typically include 1 or 2 counterweights as a standard package, depending on the mount’s payload capacity.
Balancing the telescope in the DEC axis is simply a matter of positioning the telescope at the proper distance on the DEC mount so that it’s balanced from the front of the telescope’s objective lens to the camera.
Setting Circles
Setting circles consist of two graduated discs attached to the equatorial mounts, which are aligned along the RA and DEC axes.
The RA (right ascension) disc is graduated into hours, minutes, and seconds, whereas the declination disc is graduated into angular measurements (degrees, arcminutes, and arcseconds).
Setting circles are used in an equatorial mount to find astronomical objects in the night sky by using their equatorial coordinates. These coordinates can be a useful way to pinpoint objects on the celestial sphere and are often used in star charts.
Because the RA coordinates are fixed on the celestial sphere, the RA disc can be driven using a clock drive running in sidereal time.
Today’s equatorial telescope mounts often use digital setting circles, consisting of two rotary encoders on both axis. They measure the angle that the telescope is pointing, displaying the coordinates in digital format.
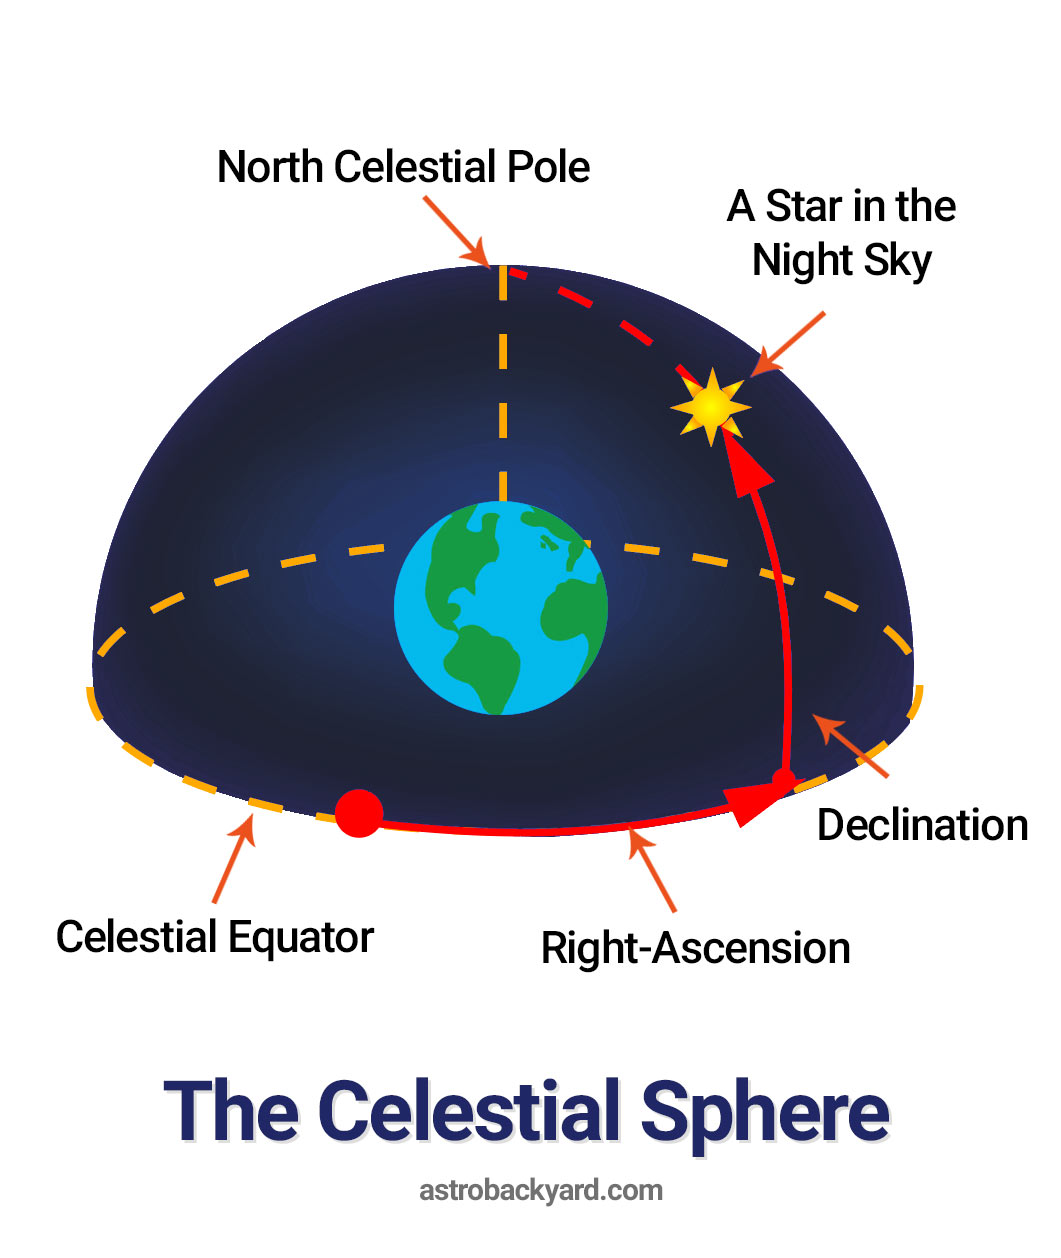
The Celestial Sphere
The celestial sphere is an imaginary sphere used for astronomy and navigation purposes. All of the objects in your current observable sky can be thought of as “projections” on the inside surface of the celestial sphere.
This is a practical method of plotting objects in space using the equatorial coordinate system.
The German Equatorial Mount
The primary structure of a GEM is a T-shape, with the right ascension axis positioned at the lower diagonal and the declination axis at the top.
The telescope is placed on the DEC axis, with a counterweight attached at a balanced position on the other end.
A GEM is the best possible choice for long-exposure astrophotography. In recent years, a new approach to the German equatorial mount design has emerged.
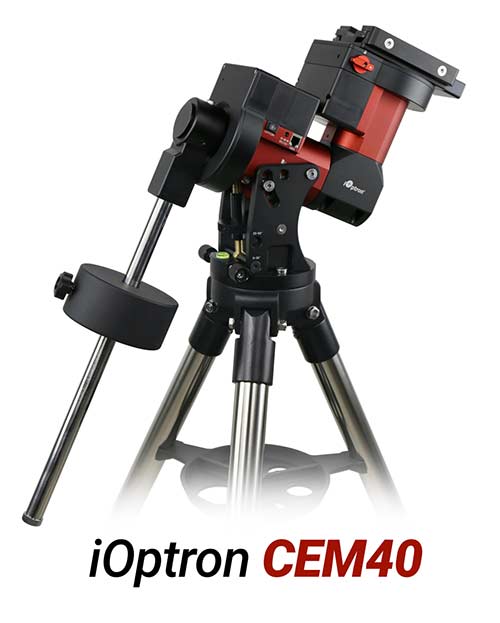
The image below shows a new center-balanced design from iOptron, the CEM40.
When the telescope is able to secure a target in place for hours at a time, you can then attach your camera and collect several long exposure images.
This is essentially what deep-sky astrophotography is all about, and almost every other aspect is geared towards improving this tracking accuracy with techniques such as autoguiding.
Equatorial telescope mounts come in various shapes and sizes, each with its own unique qualities in terms of maximum payload capacity and tracking performance.
Related Video:
A Stable Tripod Base
The equatorial (EQ) mount head is fastened to a tripod that elevates the telescope to a practical height for observations or photography. The tripod should be sturdy and level to provide a stable foundation.
In general, it is best to keep the tripod as low to the ground as possible to maximize stability.
Equatorial telescope mount tripods and piers come in several sizes and materials. Amateur astrophotographers go to great lengths to ensure that their equatorial telescope mount’s head is well-supported and secure.
My first computerized mount for astrophotography was a Celestron CG-5.
Polar Alignment
The polar alignment process involves identifying the latitude and longitude coordinates of your location, so that the angle of the polar alignment scope is pointed towards the North Celestial Pole (NCP) or South Celestial Pole (SCP).
The declination axis is the side-to-side movement of the equatorial mount, which allows the telescope to point in any direction in the night sky.
An equatorial telescope mount simultaneously balances the movement of the two axes.
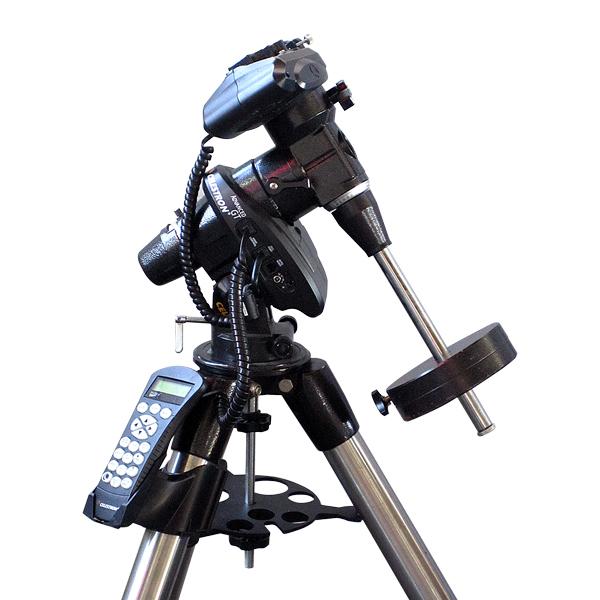
An iOptron CEM60 with a large refractor telescope mounted on top.
Many equatorial mounts include a polar finder scope with an illuminated reticle, providing a useful guide for aligning the polar axis.
Polar alignment is crucial for achieving accurate tracking and pointing. If the RA axis of the equatorial mount is not aligned with the celestial pole, its internal clock drive is not in sync with the rotation of the Earth.
There are a number of tools you can use to help polar align your equatorial mount, such as:
- PolarFinder Mobile App
- SharpCap Software Polar Alignment Feature
- iOptron PoleMaster Electronic Polar Finder
The Importance of Balance
Speaking of balance, the actual balancing of the weight on top of the mount (the payload) is extremely important.
An equatorial telescope mount requires an even balance in both axes to perform optimally. A payload that is too heavy on one side of either axis can result in poor tracking performance and squander the effectiveness of autoguiding.
In terms of astrophotography, the telescope and additional accessories such as camera gear must be balanced and organized.
Loose cables that could snag while slewing to a target or over time while tracking can ruin a long exposure image or damage the mount.
The same care must be given to the profile of the equipment mounted, as you want to avoid the telescope or camera from ever striking the legs of the tripod.
Certain telescope positions are more susceptible to this possibility than others, such as when the telescope is pointed upwards towards the zenith (the point of the celestial sphere directly overhead of the observer)
Computerized “GoTo” Telescope Mounts
A computerized equatorial telescope mount with GoTo capabilities allows you to select an object and automatically slew to it.
This is a powerfully handy feature to have, as you no longer need to spend time locating your target before making observations or taking pictures.
A computerized GoTo mount will have an object database that includes upwards of 40K objects in space, such as Solar System Objects, Messier objects, the New General Catalog (NGC), and more.
Naturally, to view these objects, they must be currently visible from your location.

Above: The Celestron CGX-L equatorial telescope mount with an 8″ RASA attached.
The Hand Controller
The onboard computer system on the telescope mount can be controlled using a hand controller or with your PC. You’ll find that each company has its own system, but they are all quite similar.
- Sky-Watcher: SynScan
- Celestron: NexStar
- iOptron: Go2Nova
The hand controller enables you to set various functions, including tracking speed, autoguide rate, latitude/longitude coordinates, and more.
To control a computerized telescope mount with your PC, you will need some additional software and drivers, such as ASCOM.

I prefer to use an EQMOD cable to control my Sky-Watcher telescope mounts with the ASIAIR WiFi controller and my tablet.
EQ Mount Alt-Az Adjustment Bolts
An accurate polar alignment is accomplished by adjusting the altazimuth and azimuth (alt-az) alignment bolts on the EQ mount head.
These bolts essentially move the polar alignment scope up and down, side to side, which allows you to align the RA axis with the North or South celestial pole.
You’ll find that the quality, control, and overall intuitiveness of the alt-az adjustment bolts on EQ mounts vary widely. Some astrophotographers even upgrade the knobs to those of a higher quality for better control.
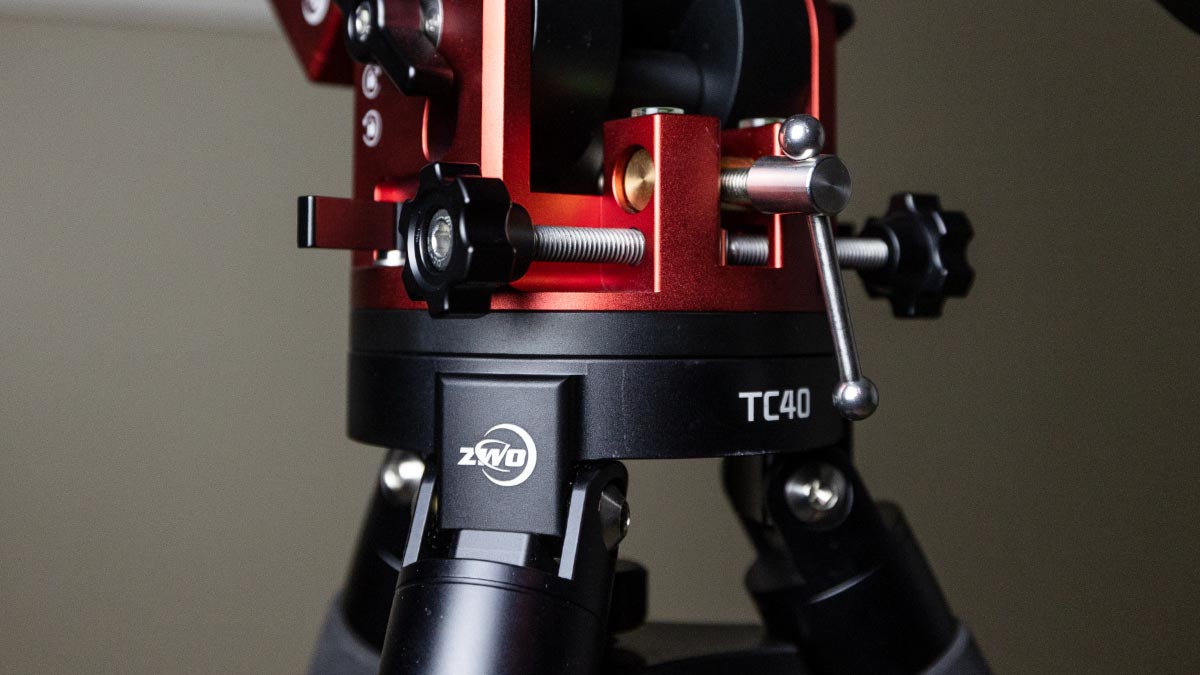
Smooth, sturdy Alt-Az adjustment bolts can make the polar alignment process much easier. (ZWO AM5 pictured).
Polar Alignment Tools
Tools like the QHY PoleMaster electronic polar finder offer a convenient way to fine-tune these adjustments. It utilizes a small camera positioned at the polar axis of your equatorial telescope mount to produce a real-time image of the area of sky surrounding the north or south celestial pole.
The ZWO ASIAIR features a polar alignment function to help you align the polar axis of your telescope mount with the celestial pole. This is done using a smartphone app on your mobile phone or a tablet.
Those who are in the northern hemisphere have the advantage of using the “north star”, Polaris, as a point of reference. In the Southern Hemisphere, polar alignment can be challenging, as there is no southern pole star to serve as a guide.
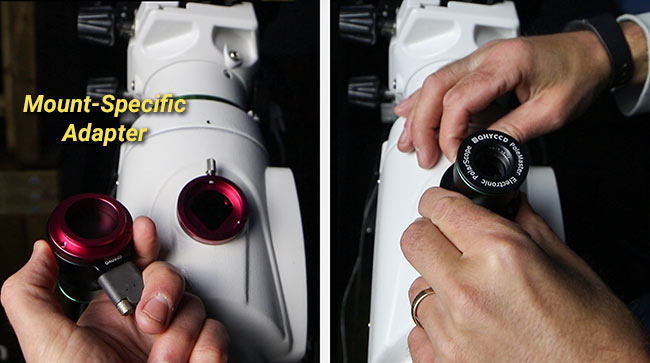
The QHY PoleMaster electronic polar scope requires an adapter to attach to the telescope mount.
Star Alignment
To ensure the pointing accuracy of the telescope is correct, a star alignment routine should be done after setting up the mount.
Equatorial mounts typically require a 2- or 3-star alignment routine to effectively “train” the mount, which is performed after a successful polar alignment.
A star alignment routine essentially instructs the telescope mount on the location of objects in the night sky in relation to each other, utilizing real-time user input. This process involves centering a bright, named star in the eyepiece and confirming this position on the mount.
A 3-star alignment can reduce cone error, as the mount has sufficient information to determine a precise position.
Plate-Solving
Plate-solving is a popular alternative to a star alignment routine used by amateur and professional astronomers and astrophotographers.
This method involves taking a picture of the night sky and identifying the star pattern from an existing database. The plate-solving software then communicates with the telescope mount to determine its current position, and maps out the rest of the sky.
Plate solving has several advantages over a manual star alignment routine, such as the ability to match an existing object frame from a previous imaging session or perform a meridian flip. It is also useful when creating large mosaics that involve careful planning of several overlapping images.
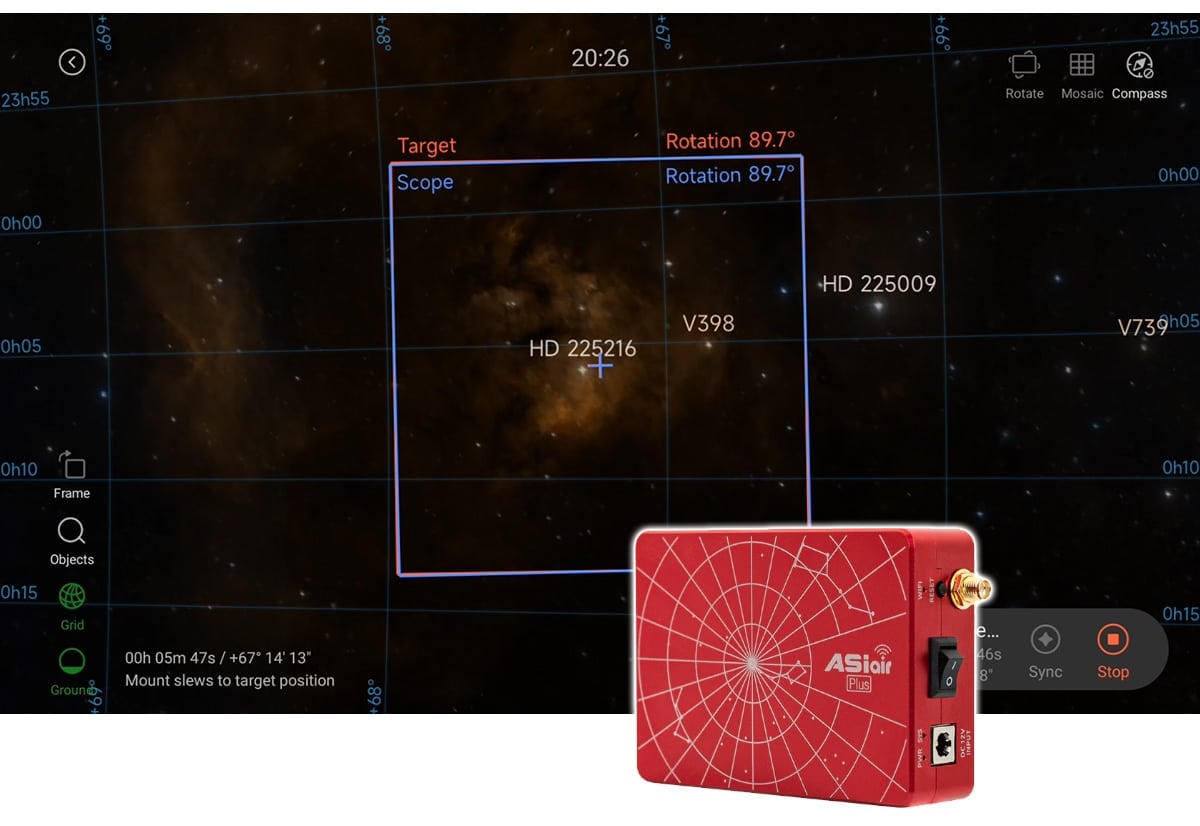
The ASIAIR ‘Sky Atlas’ uses plate solving to find and center your astronomical target. This is the same system used by the Seestar S50 smart telescope.

Trevor Jones is an astrophotographer and a valued member of the RASC. His passion is inspiring others to start their astrophotography journey on YouTube so they can enjoy the night sky as much as he does. His images can be seen in astronomy books & online publications, including the NASA Astronomy Picture of the Day.