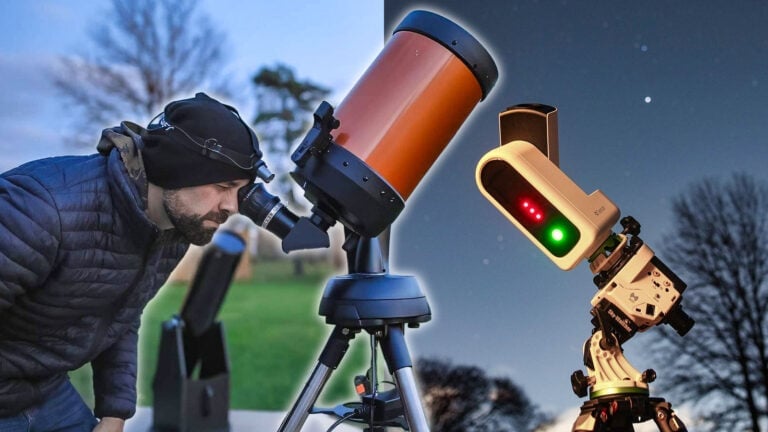
Celestron RASA 8 F/2 Review
The Celestron RASA 8 F/2 Astrograph is a modern astrophotography telescope with an optical design that allows you to collect deep sky images using short exposure times. Based on the popular 11″ version, the 8” model is the most affordable RASA (Rowe-Ackermann Schmidt Astrograph) in Celestron’s lineup.
The RASA optical system presents a modern and practical approach to extremely fast deep sky astrophotography. I like to think of it as an evolved Schmidt camera for today’s amateur astrophotographer.
Related Post: 10 of the Best Astrophotography Telescopes in 2022
I should start off by saying that until now, I’ve never used an SCT (Schmidt-Cassegrain Telescope) in my life. I’ve always been a refractor guy. So my experiences with the RASA 8 F/2 will not only be a first in terms of this telescope design, but also the unique Rowe-Ackermann Schmidt Astrograph optical system.
The Celestron RASA 8 F/2 is not a visual telescope, it was designed exclusively for deep sky astrophotography. The size of the RASA 8 does not allow you to use it with a DSLR camera, as the camera body will obstruct too much of the corrector plate on the front of the telescope.

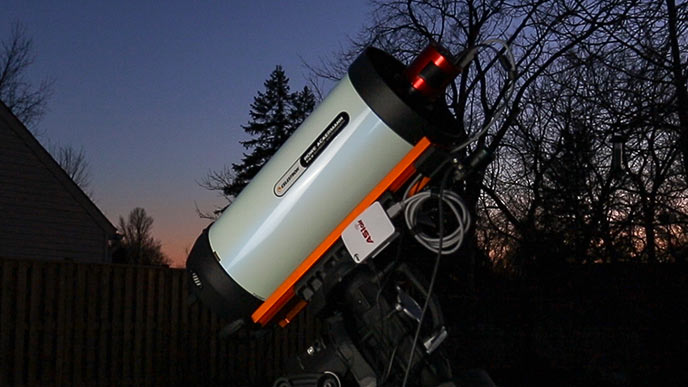
The 8″ Celestron Rowe-Ackermann Schmidt Astrograph.
That’s right, the RASA 8 F/2 requires that you mount the camera to the telescope’s objective end. A dedicated astronomy camera with a chip no bigger than APS-C is needed to enjoy the RASA 8.
The 8” model was designed to be used with modern CCD and CMOS dedicated astronomy cameras like the ZWO ASI294MC Pro, or ASI1600MM Pro. Full frame sensor cameras that are less than 4” in diameter will work, but performance will be poor at the edges of the field.
In this post, I’ll share my experiences using a telescope that is more than twice as fast (f-ratio of F/2) as any other telescope I’ve used for astrophotography. This 8-Inch Celestron Rowe-Ackermann F/2 Schmidt Astrograph was generously loaned to me from High Point Scientific for review.

Celestron RASA 8 F/2 Review
In this review, I’ll take the RASA out for a test drive in my backyard for some deep-sky imaging. I’ll explain how to fasten a camera to this telescope to utilize the unique RASA optical system that is based on the idea of Celestron’s original Schmidt camera.
I will be mounting the Celestron RASA 8 F/2 to a Celestron CGX-L computerized equatorial telescope mount, and connecting a one-shot-color astronomy camera, the ZWO ASI294MC Pro. The goal is to capture an impressive color deep-sky image using short exposures (60-seconds) without the use of autoguiding.
I have the Starizona filter drawer for ZWO cameras to house my 2″ light pollution and narrowband filters. This not only allows me to easily swap filters on the RASA, but also provides the right amount of spacing between the camera sensor and the objective of the telescope.
The RASA Backstory
The backstory of Celestron’s RASA telescope is very interesting and begins in the 1970’s with the introduction of Celestron’s Schmidt cameras for use with 35mm photographic film. Later on, the Faster camera was introduced that was created by removing the secondary mirror from a standard C8 SCT, and replacing it with a series of lenses on the corrector plate.
Originally, the SBIG PixCel 255 camera was the CCD camera used with the Fastar system. By 1999, this was replaced by the SBIG ST-237, with a whopping 640 x 480 array that covered 40 x 30 arcminutes of sky. By today’s standards, this is not very wide, but back then it was considered to be a rather wide-field image.
Celestron eventually discontinued Faster, and the idea was taken over by Starizona in the form of HyperStar. This product could now expose an impressive 27mm image circle, which was enough for the APS-C sized sensors found in a DSLR camera. Starizona provides conversion kits and camera adapters for many Celestron SCT telescopes from the C6 to the C14.
The Hyperstar system allowed amateur astrophotography enthusiasts to capture deep sky images in a short period of time thanks to the lightning-fast F/2 optics. Hyperstar paved the way for the RASA design as this add-on component introduced fast, short-exposure, wide-field imaging to the amateur astronomy world.
Thanks to David Rowe and Mark Ackermann, the amateur astrophotography community can enjoy the unique capabilities of the original Celestron Schmidt camera design in a practical astrograph.
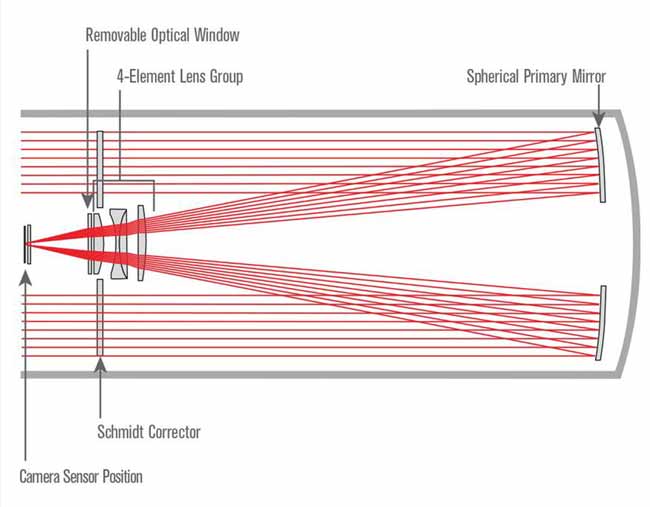
The optical design of the RASA OTA.
You can read the full story of how the RASA was developed by reading the white paper from Celestron. It is an interesting read, not only from the perspective of the unique optical design of the RASA but how optical designs affect astrophotography in general.
Why this is a Big Deal
As you may know, I have used apochromatic refractor telescopes over the past 8 years for deep sky astrophotography. I love that they are compact, lightweight, and capable of capturing incredibly sharp, flat, and well-corrected images.
One of the few downsides of this optical design is the f-ratio (focal ratio), which is considered “slow” when compared to systems such as an F/3.9 Newtonian or F/2 RASA. The telescope’s focal ratio determines its ability to collect light in a given amount of time.
This means that a “faster” f-ratio” of F/2 can gather light (signal) on a deep sky object much faster than a refractor telescope with a focal ratio of F/6. Mathematically, this speed is not linear, meaning that F/2 is not just 2X as fast F/4 – it’s MUCH faster than that! (I am not sure of the exact calculation).
The point is, the 8” RASA I have is the fastest telescope I’ve ever used for astrophotography, by a landslide. Nothing else even comes close.
In practical terms, I can expect to collect the same amount of signal in a 60-second exposure with the RASA 8 as I would in a 3 to 4-minute exposure using an F/7 refractor. I can do this without sacrificing a wide, flat field of view. The 400mm focal length of the RASA 8 F/2 provides a wide, optical aberration-free image.
At this focal length and proposed exposure times, tasks such as autoguiding become less important. A 60-second image is not nearly long enough to reveal subtle inaccuracies in the telescope mounts tracking abilities, especially when using a mount such as the Celestron CGX-L equipped with a QHY Polemaster.

Celestron RASA 8 Specifications:
Optical Design: Rowe-Ackermann Schmidt Astrograph
Aperture: 203mm (8″)
Focal Length: 400mm
Focal Ratio: F/2
Central obstruction diameter: 93mm (46% of aperture diameter)
Image Circle: 22mm (.86″) Ø, 3.15°
Useable field: 32mm (1.26″) Ø, 4.6°, only minimal performance loss at edge of FOV
Back focus with included camera adapter: 25mm (.98″)
Back focus from top of threaded collar: 29mm (1.14″)
Optical Tube: Aluminum
Optical Tube Length: 628mm (24.7″) length | 235mm (9.3″) diameter
Focuser: Ultra-Stable Focusing System
Optical Tube Weight: 17 lbs (7.7 kg)
Other Features: Air-cooling system, integrated filter mount
Included items: M42 camera adapter, C-thread camera adapter, fan battery pack
Dovetail: CGE Dovetail Bar
My Backyard Imaging Experience
On my first night out with the RASA 8, I photographed two (relatively small) deep-sky targets. The focal length of the RASA (400mm) is better suited for expansive nebulae such as the Lagoon Nebula and North America Nebula, but those targets do not rise high enough in the sky for imaging for another month or two.
My selected targets for testing the RASA were Thor’s Helmet, an emission nebula in the constellation Canis Major, and the Pinwheel Galaxy, a face-on spiral galaxy in Ursa Major. The moon was about 75% illuminated during my imaging session.
To filter out moonlight and city light pollution, I used two astrophotography filters to capture my targets:
- STC Astro Duo-Narrowband Filter (Ha + OIII)
- Optolong L-Pro Filter (Selective Broadband Color)
I also managed t capture the Sunflower Galaxy in Canes Venatici using the 8″ RASA. The following photo includes 120 x 60-second exposures using the ZWO ASI294MC Pro, with the Optolong L-Pro filter in front of the sensor. Small galaxies aren’t the wide-field RASA’s strong point, but hey, it’s galaxy season.
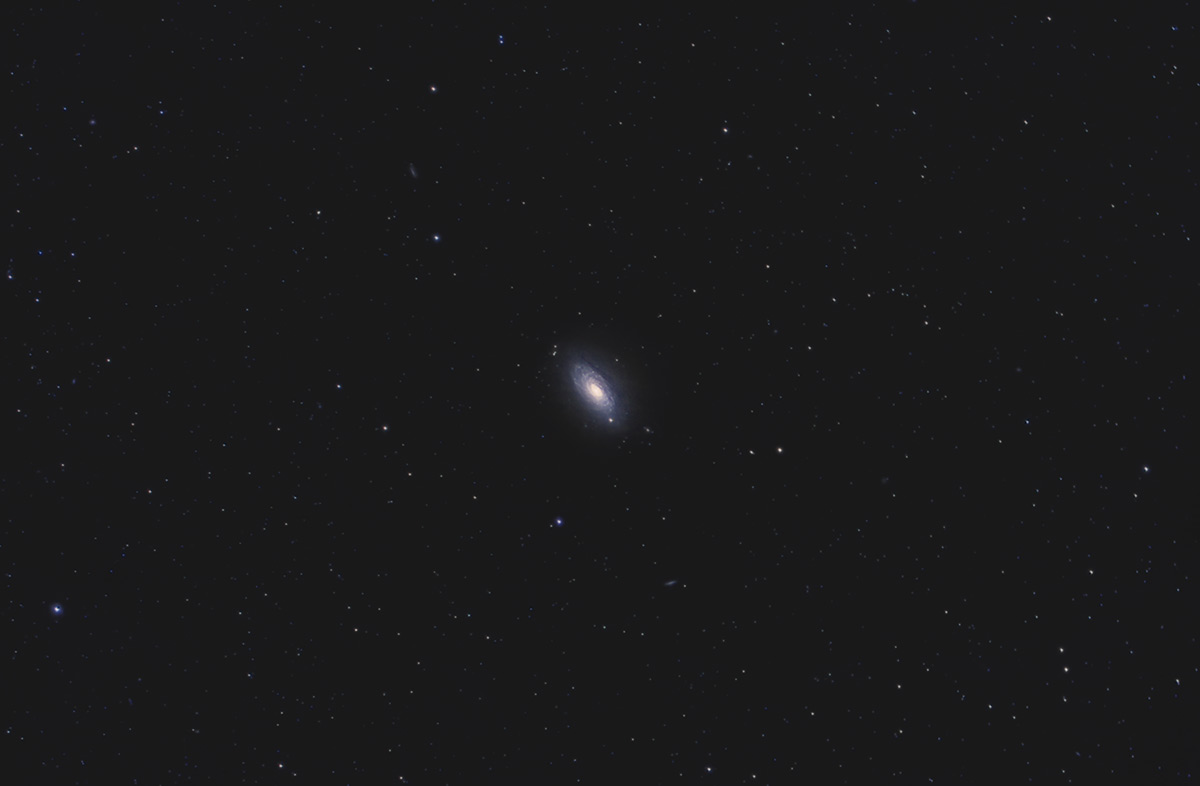
The Sunflower Galaxy. 120 x 60-seconds using the 8″ RASA.
Connecting a Camera to the RASA 8
Mounting my astrophotography camera to the front of the telescope was a bizarre experience. Those of you that have experienced the HyperStar system with an SCT in the past will find this to be a familiar experience, but it was brand new to me.
The Celestron M42 adapter and compression ring made it very easy to mount my ASI294MC Pro camera and Starizona filter drawer. This configuration provides the recommended 29mm of back focus spacing between the camera sensor the connection to the corrector plate on the RASA.
Starizona designed this filter drawer to cater to RASA owners looking for a solution to changing filters. You simply need to remove the compression ring from the corrector, release the adapter, and pull the filter drawer out to swap your 2” filter out.
This came in very handy as I went from photographing a narrowband emission nebula to a broadband galaxy on the same night. The RASA OTA package also includes a C-Thread camera adapter, and adapters for other camera types (including Sony mirrorless cameras) are available.

The Starizona Filter Slider for select ZWO cameras.
When deciding on a camera for the 8″ RASA, there are a few things to keep in mind. The first is the sensor size of the camera you plan to use with this telescope.
The optical design is optimized for use with sensors that have a diagonal size up to 22mm. It is possible to use larger sensors with the 8″ RASA, but field illumination at the corners of your image will be reduced.
The pixel size of your camera is also important, but luckily the RASA works effectively with a wide range of sensors. It is well suited for cameras housing smaller pixels thanks to its fast f-ratio and short focal length. For example, the ZWO ASI294MC Pro has a pixel size of 4.63µm, and I was very happy with the pixel scale of my images when viewed at 100%.

The backfocus distance (spacing) needed for the 8″ RASA.
Because the camera you choose will be mounted in front of the optics, it is wise to choose a camera body that blocks as little of the aperture as possible. The most suitable cameras for the RASA will have a cylindrical design with an outer diameter of less than 100mm.
The backfocus distance needed for this flat-field astrograph is 29mm from the top surface of the lens group cell. Apart from having bodies that obstruct too much of the aperture, DSLR cameras have a long backfocus distance as the sensor is deeply recessed in the camera body.
The Telescope Mount
I have mounted the 8-inch RASA to a Celestron CGX-L computerized telescope mount using the CGE dovetail rail on the telescope. This heavy-duty EQ mount has a payload capacity of 75 pounds, so it is completely overpowered (or over-mounted) for the lightweight (17 pound) 8-inch RASA tube. Over-mounting is never a bad thing, and the RASA looked absolutely great in an “All-Celestron” black and orange setup.
It’s easy to single out one particular piece of your gear to hold responsible for a successful imaging session, whether it’s the telescope, mount, or camera. In reality, it is the combination of everything working together in harmony, from the filter used to target selection.
The Celestron 8-inch RASA F/2 mounted to a Celestron CGX-L EQ mount.
The Celestron CGX-L has been an absolute pleasure to use since I first flipped the switch on. This should come as no surprise as this is a modern “flagship” telescope mount from one of the oldest telescope companies in the world.
From the moment I slewed to my first target using the 8-inch RASA on the CGX-L, I knew I was working with an imaging system that was going to be a lot of fun. Thor’s helmet appeared prominently in the center of the image frame in a 6-second live loop exposure.
The Imaging Sequence Plan
To showcase the extremely fast F/2 optics of the RASA, I restricted the exposure time of my individual light frames to 60-seconds. The nebula and galaxy targets I have chosen were well-exposed at this exposure length, and I processed data sets of 60-seconds images to create an impressive final image.
The 1-minute long exposures showed a lot of promise as I reviewed the auto-stretched debayered previews appearing on the ASIair mobile app.
Without providing the exact math behind the equation (which I am unable to calculate), I am capturing more than 3X as much signal (light) in each shot using the F/2 RASA over my F/7 apochromatic refractor.
The images were loaded into DeepSkyStacker for integration and calibration (I only used dark frames), to give me an image with a healthy sign-to-noise ratio for final processing in Photoshop.
No Autoguiding
I did not use any sort of autoguiding system for improved tracking accuracy on the Celestron CGX-L. However, I did capitalize on the precise alignment provided by the QHY PoleMaster before I started taking images.
The process involved using a specialized ADM adapter that fastened to the CGE dovetail rail of the RASA 8. The PoleMaster sat directly underneath the OTA, which positions it precisely in line with the RA axis of the telescope mount. I ran through the PoleMaster alignment routine on my PC for an accurate polar alignment before beginning my imaging session.

The QHY PoleMaster fastened to the CGE dovetail rail of the RASA.
At this focal length and these exposure times, autoguiding is not necessary. The telescope and camera were well balanced in both axis of the mount, and the spot-on polar alignment took care of the rest.
I still can’t get over the fact that I can get away with a 1-star alignment now that the PoleMaster has been installed.
If you’re looking to autoguide with the RASA 8 F/2, it’s important to note that the optical tube does not include a guide scope. However, it can be fitted with a bracket for this configuration thanks to the threaded mounting holes at the rear cell of the astrograph.
Running the Camera with an ASIair
What can I say, the ZWO ASIair makes it so much more enjoyable to run an imaging session. The wireless connection to the camera and straightforward controls of the mobile app let me do other things while the camera runs (like go in the house).
The software is stable and I can confidently record my images onto the micro USB card on the ASIair and transfer them over to my PC the next morning. I have found that the ASIair mobile app cools the camera to -30C much faster than Astro Photography Tool.
The debayered image previews the ASIair displays after each image is captured are a helpful reference of camera settings, tracking accuracy and image framing. I still prefer to use APT for my initial camera setup including focus and framing, but that’s because it’s already there to complete my polar alignment routine.
However, once those tasks are complete I can put my PC away and just keep my tablet on me to monitor the ASIair. From a cable management perspective, the ASIair is much more organized as the USB cable running from the camera connects to unit less than 2” away, and rides along with the telescope and mount.

Controlling the camera using the ZWO ASIair WiFi device and mobile app.
Cooling Fan and Dew Shield
The 8” RASA includes a connection for a cooling fan and power adapter at the base of the telescope. The cooling fan helps to reach thermal equilibrium with the outside air by pulling air through the mesh vents located near the rear of the telescope.
The greater the temperature difference is between the OTA and the outside air, the longer it will take to cool down.
It is recommended to use a dew shield with the RASA as the corrector plates are quite susceptible to dew accumulation. I don’t have a dew shield for this telescope yet, but it would be a wise addition for those nights where the temperature drops significantly.
Focusing the RASA
The focuser is unlike anything I’ve ever used before, and I really love it. Celestron calls it the “Ultra-Stable Focus System“, which minimized unwanted lateral movement of the primary mirror when focusing or slewing the telescope.
To focus the RASA, you just need to turn the little knob at the rear of the tube, which moves the entire primary mirror forward and backward. As you can imagine, focusing at F2 is tricky.
The focuser knob is smooth and responsive, without the need to lock anything down once you have found a tight focus on your stars. A single turn of the focus knob does not move the primary mirror much. This gives you a lot of precision when achieving the sharpest focus possible.
Celestron offers an optional focus motor specifically designed for this telescope, which is probably a smart upgrade if you are getting serious about focus. I found the stock focuser to work great so far.
My Results
The images below are the results of my limited exposure times using the RASA 8 and ASI294MC Pro from the city. To give you an idea of the amount of light pollution I shoot in, my skies are considered to be a Class 6 on the Bortle Scale (orange zone).
I am thrilled with my results. It felt like I was processing images that were captured using 5-minute exposures using a DSLR camera on my refractors.
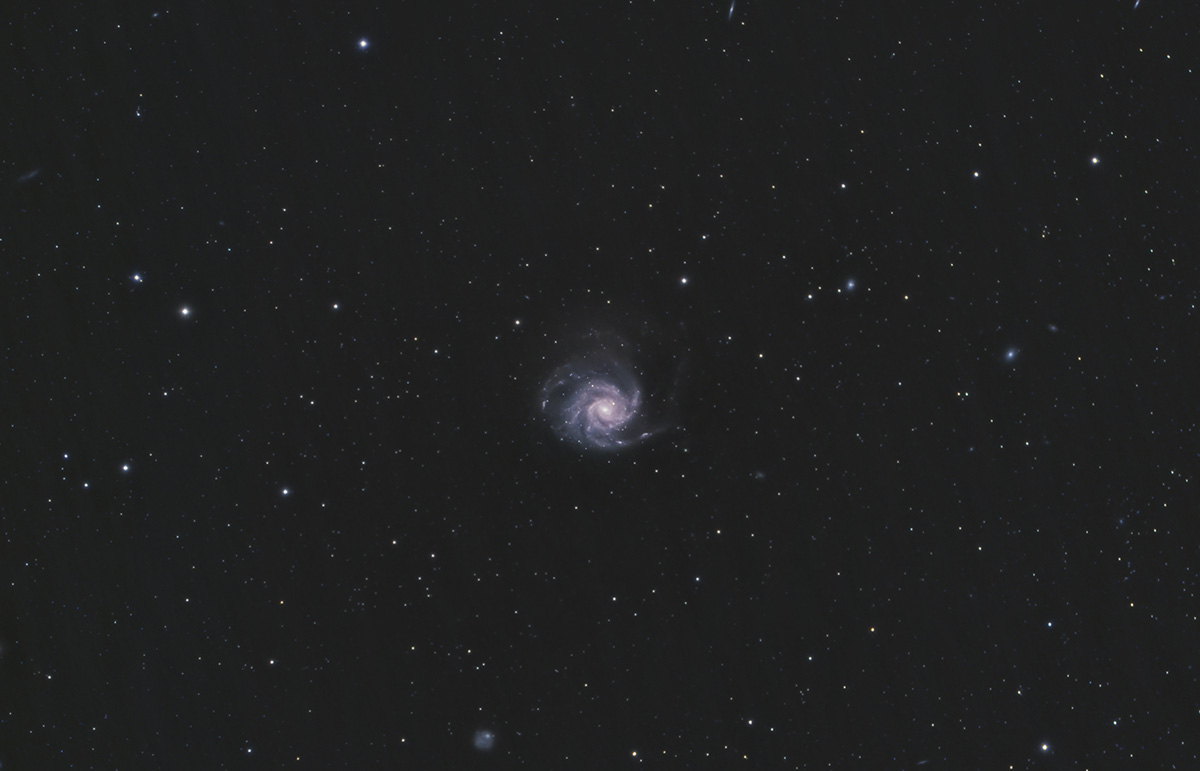
The Pinwheel Galaxy – 72 x 60-seconds.
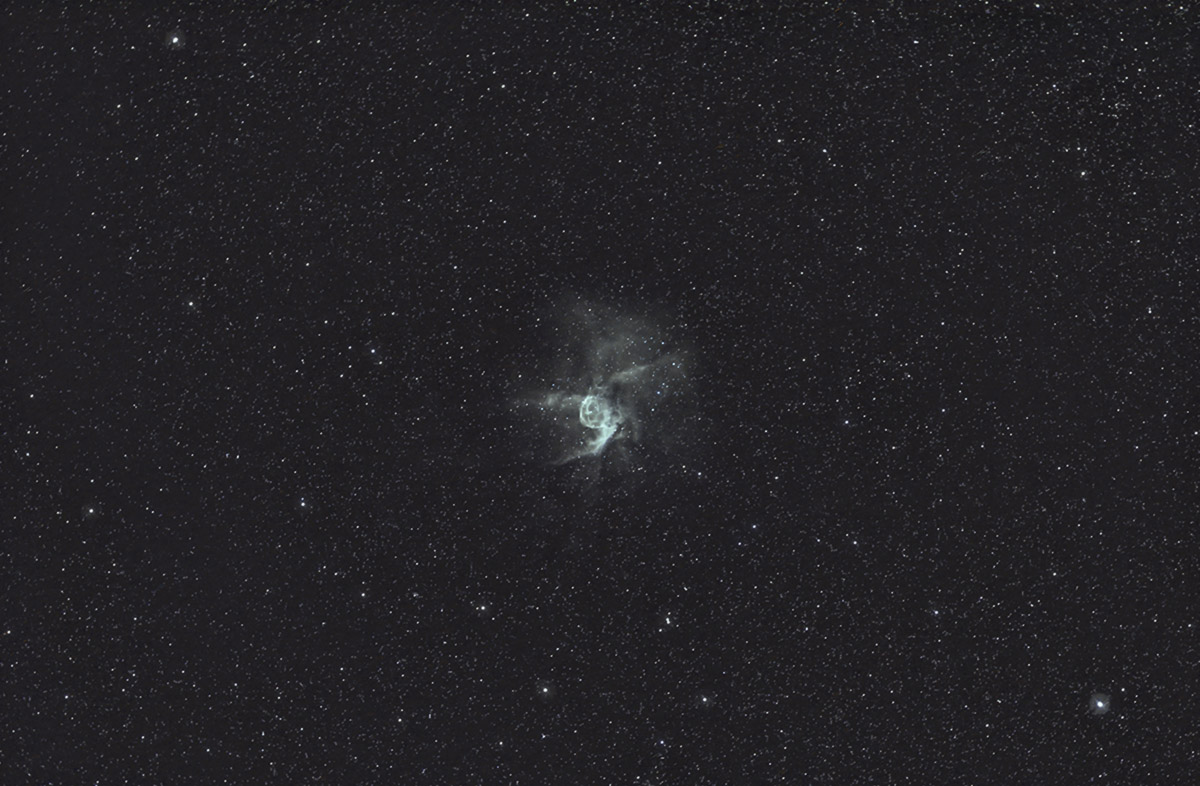
Thor’s Helmet – 138 x 60-seconds.
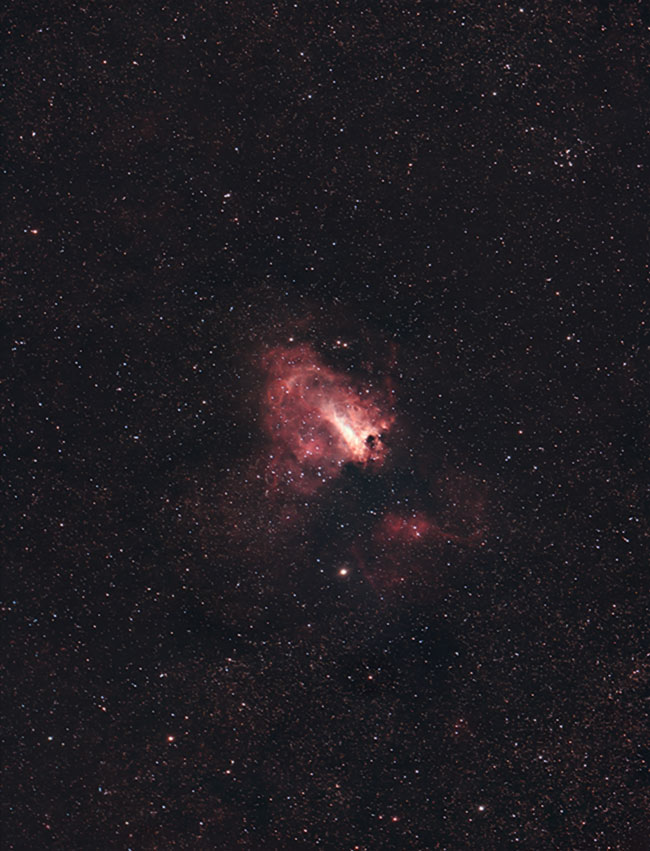
The Omega Nebula – 36 x 180-seconds.
Taking flat frames with the RASA
The unique camera configuration of the RASA had me a little confused about how to take flat frames with this telescope. My tried-and-true “white tee-shirt method” would not work for this setup because the camera protrudes past the objective of the telescope.
Luckily, a member of the Cloudy Nights forum ran into this very same issue, and shared the results of his experiment and potential solution. He created what he calls “night flats”, that use the glow of city light pollution to achieve a useful ADU value (brightness level) for a flat calibration frame.
The idea is to create a cardboard flat frame “cap” with a parchment paper insert to place on your dew shield. This diffuses the light of the night sky enough to create an evenly illuminated field. Since my backyard night sky glows with surrounding light pollution (Bortle Class 6), an exposure of about 10-15 seconds will collect enough light to create a useful flat frame.

A homemade flat panel for “night flats” by Cloudy Nights user APshooter.
Final Thoughts
The Celestron RASA 8 is suitable for those that want an ultra-fast astrograph with a wide, flat field of view. 400mm at a blazing fast F/2 is an amazing combination of speed and focal length.
If you’re into wide, flat field images of large deep-sky objects, these are useful specs. If you’re going after small galaxies, a traditional SCT or Ritchey-Chrétien Telescope are better choices, but your exposure times will need to be a lot longer, and autoguiding is a must.
I’ve used a ton of refractors and camera lenses at this focal length, but nothing that comes close to F/2. For comparison, one of my favorite APO refractors, the Sky-Watcher Esprit 100 is 550mm and F/5.5.
At F/2, 60-second exposures reveal as much detail as I’d expect to see in a 3-minute exposure or longer. A telescope’s focal ratio is the most important factor to consider when gauging its light gathering ability.
Between the one-shot-color camera, and the amount of detail recorded in a 60-second exposure, you can really maximize your output in a limited amount of time.
I’d love to see what the RASA can do when the Milky Way returns next month.

The simplicity of having one camera running, controlled by the wireless ASIair is a lot of fun. Being able to produce an impressive deep-sky image using 1-minute exposures is something I could get used to, especially on those nights when I only get a clear hour or two.
If you image with a DSLR or want to make visual observations, the RASA 8 F/2 isn’t for you. The size of the camera and sensor have to be a good match for the RASA to keep the central obstruction to under 93mm, and capture a well-illuminated field.
A filter drawer/adapter that provides the correct spacing between your camera and the optical window cell is an essential accessory, in my opinion, so make sure you’ve got that aspect covered.
Now, if you’ll excuse me I’m going to collect more time on the Pinwheel Galaxy. Until next time, clear skies.


Another great post and video Trevor! Thanks for keeping them coming. Greeting to Rudy!
My pleasure, Andy, thank you! I will give Rudy your message!
The light gathering capability is dependent to the square of the f stop. F/2 is actually 4 times faster than F/4
Well there you go! Thanks, Alex. 4X makes it easy to do the math then. Just think, a 5-minute exposure on the RASA is like a 20-minute sub on a fast F/4 lens! Wow.
Hopefully ASIair will do live stacking soon. That would be a game changer, much like this affordable RASA.
Another excellent review Trevor and thank you for all the effort you put into this site. Most inspiring!
I really appreciate that, Steve. Thank you!
Wow, look at Thiz Detail!
Stunning and Amazing, i like the Colour in Thors Helmet, never seen that before!
I think the choice between HyperStar and RASA is a tough one. HyperStar gives one more option to the already “jack-of-all-trades” SCT. In this case, though, since both systems share virtually all of the same drawbacks, the decision comes down to the support equipment. Since the RASA essentially takes a versatile SCT and converts it into a single-purpose instrument, now you’ll need to double up on mounts, focusers, guide cameras, and imaging cameras, to do any other type of imaging. Otherwise you’ll be swapping out OTA’s and all the other gear to use on your existing mount. Back in the day, the typical use for a Scmidt camera was to piggy-back it onto your SCT or other large scope. Thus you had only one mount and guiding system. The “camera” on the Schmidt was basically a curved film holder, so you didn’t have the additional expense of going out and purchasing another camera body. But with all of this doubling up of supporting equipment (because most people at some point like to use a telescope with an eyepiece and/or different imaging scales — lunar, solar, etc.) I think you’ll agree that the RASA really finds its home—just like the old days—permanently perched on the top/side of a larger telescope. I’m thinking like a small observatory that already has, say, a 20-inch f/8 Planewave on a direct-drive mounting. They’ve got their Leviathan to go after the small stuff, and now they can throw on the RASA for widefield and comets, and the RASA’s additional weight is barely felt by the Beast. Conversely, if you’re already an SCT person because of its versatility, and you like the idea of having one (expensive) mount, one (expensive) OTA, one motorized focuser, and one guiding system, you’ll prefer the (cost-effective) HyperStar. And don’t forget, HyperStar brings deep-sky shooting back to the table for alt-az scopes. Put a HyperStar on your CPC-800 or CPC-1100 and you don’t have to polar-align or use an autoguider. Stack up your hundreds of 15- to 30-second unguided exposures and let the software align and de-rotate all the subframes. This also produces built-in dithering. A lot of benefits to consider for a person like me who prefers hassle-free and fast imaging with quick and easy setups. Oh, yeah, and one more thing. An 11-inch or larger aperture OTA can accommodate a DSLR on the HyperStar. Imagine going to the dark-sky site with only a CPC-1100, the HyperStar, a PowerTank, and your DSLR. No laptop or guiders and no polar-alignment required. And while you’re waiting for the sky to get dark, you’re looking at Jupiter through an exquisite eyepiece on your 11-inch SCT at f/10. Truly the Jack of all Trades!
Great review. I personally don’t think I would ever buy a RASA because I already own a hyperstar but I was curious to see what you could get out of it. One quick question, is the STC duo-narrowband filter designed to work at this fast f/2 speed? I read some people say it wasn’t but some say it is. Thanks!!
One video outrivals the other 🙂
Regarding linear speed of focal ratios, at a given focal length it could be square like, say, 300mm aperture gathers 4 times more light than a 150mm does.
Anyway, more importantly, my two dogs bark “Hi” to Rudy.
Did you find the need to frequently refocus or collimate? I read that RASAs were very susceptible to ambient temperature fluctuations and thus may need to refocus every few minutes
Hey Darshan. I didn’t find that to be the case over the course of the 3 nights I used the RASA. I think a lot of that talk has to do with the level of focus precision those astrophotographers are trying to attain.
If you are monitoring the star sizes in real time using Half Flux Radius in SGP , I’m sure there was some “serious” fluctuation. But for my imaging purposes I found the frames to satisfy “my” standards for image sharpness, and retained it throughout the night.
The Celestron motorized focuser fr the RASA would be the best way to sort this out, and I am keen on testing that accessory out soon! Cheers!
Nice work – I have the 11″ RASA and I’ve attached a OAG and mini filter wheel. You can use a DSLR on the 8″ if you wanted to.
Thanks Ron! That 11″ is really nice. Celestron is pretty firm on their opinion about no DSLR’s on the 8″. Even if you can swallow the added obstruction, I imagine it would be tough to achieve the 29mm spacing with the deeply recessed sensor in a DSLR body.
Awesome video Trevor! One quick question, did you ever considered using the RASA on your Sky-Watcher EQ6-R Pro mount? Thanks!
Absolutely. The RASA OTA is 17.5 lbs, so child’s play for the EQ6-R. In fact, the CGX-L is way over-mounted for the RASA. Honestly I just wanted to see an all-Celestron rig put together!
Great review Trevor! I was curious how one goes about performing an alignment with the RASA on the CGXL since you have neither an eyepiece nor a finderscope. Did you use the ASIAIR to visualize the star for the star alignment?
Thank you Michael! I’ve used the camera in place on an eyepiece for star alignment for quite some time, so that was nothing new. The lack of finder scope wasn’t an issue thanks to the combination of the precise PoleMaster polar alignment and wide 400mm focal length of the RASA. This time I used APT to frame and focus, but the ASIair preview mode works well too!
As Alex noted; f/2 is 4 times faster than f/4. The ratio of the area is 2^2 vs 4^2 = 4:16 = 1:4 = 4x (f/2 having 4 times the area of f/4).
With regard to your f/7 apochromatic refractor, it’s 2^2 vs 7^2 = 4:49 = 12.25x as much light.
In theory then (assuming the camera is linear) a 60s exposure on a 400mm f/2 should collect as much light as a 12.25 minute exposure on a 400mm f/7.
Hi Trevor,
Thanks for the review! I have a question about spacers for two configurations with and without Starizona filter slider. Could you please describe exactly what you used in both stacks?
I’m having RASA 8 now and the filter slider I can’t get round stars in the corners with ASI1600mm Pro. CCDInspector reports FWHM ranging from 5 to 16. Also I tried with and without the clear window. I think the culprit is with the spacers.
Thank you!
Hello Trevor:
I am giving very serious consideration to purchasing the Celestron 11 inch RASA. I have watched many of your videos, which has inspired me to delve deeper into my photography and expand into Astro photography. I’m intrigued with the concept of controlling the scope with an iPad via the ZWO-ASI air. I am assuming you prefer controlling the scope in this fashion?
Seeing as I run all Mac, I understand that set up and polar alignment is going to be necessary to run windows so I’m also giving consideration to purchasing parallels and windows 10 to get this aspect of the job done. Do you see any problems in capturing on the iPad and then transferring the raw images into a third-party Software application, that runs within the virtual windows 10 environment on a Mac, for stacking and post processing? I would prefer the Adobe aspect of my pictures to be processed within the Mac environment, however I have no idea as to whether there will be hangups moving them from windows into Mac for use in Photoshop Lightroom bridge etc. I look forward to Your response and to future videos.
By the way we don’t live all that far from one another I’m just over the border outside of Rochester New York, I look forward to meeting you someday. Keep up the great work and clear skies buddy! 😁
Thanks for the review. I subscribed to your channel recently and it is really a great source of inspiration. I’ve dabbled in this hobby for years. I’m looking at either the RASA or the Esprit 100 for a wide field rig. Not sure if I would rather have the simplicity and elegance of the refrator vs the newish RASA and possible quirks that come from it. I wonder in the long run if the Esprit 100 would be more versatile. Plus I am into terrestrial photography as well. Any thoughts?
Thanks,
Gene
Gracias Trevor, podria hacerte una pregunta ? Recientmente compré un RASA 8, pero no compré el cajon de filtro starizona, podria usar mi camara ZWO 294 MC directamente ? Te escribo desde Argentina Gracias
Mr. Backyard, you have an uncanny knack for producing these great AP videos and reviews. Though jealous, I cannot say that you do not greatly deserve to be loaned the latest stuff with your abilities to showcase a telescope and or equipment. I have to give you credit.
I have always been a mirror guy, not a refractor guy. Though this is a pretty different animal, that familiar focus knob doesn’t inherently offend me as it seems to spook others.
Since I have all the trees, houses, light pollution, et al, that you enjoy, I am planning on making more trips out with a scope, so faster images when not able to go inside and watch a movie are important.
I’m shopping for the RASA 8 and its accessories.
I expect to have problems, and probably a few of them will be pretty frustrating. Well, that’s what this hobby is for.
From what I see online, the business of the camera on the “wrong end” just drives the refract guys nuts.
BTW, for the benefit of other clueless people like me interested in these cameras.
I called Starizona and the nice fellow I spoke with owns the ASI 294. He loves it, but he said that the 533, with its improved resolution, might be a very good match for the RASA 8, which Mr. Trevor recently reviewed. Likewise, the 533 DOES fit the critical filter drawer which Trevor explained in his RASA review. At the moment, the 533 was a little less expensive, which I then put towards the drawer.
I have paid the lowest price for each of my items, telescope, mount, camera, filter drawer. It adds up to a LOT, and I still do not have filters or something like the ASIair Pro. They are not cheap either.
A great scope if you are in a real hurry… But I have a gut feeling that a high end APO triplet of similar focal length would yield sharper, higher contrast images for a fraction of the cost and at a fraction of the weight, at a fraction of the size, on a lighter, more affordable lower payload mount… Tis a pity we don’t get to compare the results
I just started using an 8” RASA, ASIair and ASI294 MC PRO (on an AVX). I love using this combination to shoot larger deep sky objects. I have struggled however with the gain setting and exposure times, I seem to do better with sub unity gain settings. At a gain of 120(unity?) it over exposes with just a few second of exposure. What gain setting do you recommend?
Trevor
Great review. I think you helped make up my mind for me.
When taking your 60 second exposures, how often do you need to “re-center” the scope so that your target stays in the center of your shot?
Thanks again.
EG
Great shots on the RASA 8. I have recently got some images from mine last week. First light was on M81/M82 and M101. I use the ZWO ASI533MC pro camera and was a bit disappointed with the amount of color coming through on 60 subs for M81/M82. The level of detail was as good as I expected on 100 subs. On M101 a 120 second exposure did not allow for anything but a very dim object. I could barely make out the trailing arms. I only had 16 subs on that one but still nothing liek your shots. I used a 120 gain setting on this and wonder if that needs to be changed. Any advise would help. Thanks fo rthe great content.
I´m not Trevor but I think I can help as well. You definitely need more exposure time. Don´t think that after half an hour you can see anything. You should spend at least 2h oft exposure time even with the RASA. I have the 533mc to, and I use the standard Unity Gain setting. So don´t mess around with that either if you don´t know exactly what you are doing. There is no need to. The 533 is a very powerful Camera and you don´t have to tweak around. Spend one night with one target and you will see a huge difference. AP is not for people in a hurry its about patience. cheers and cs from Austria
This was a very useful article – I’m hoping to acquire a rasa 8” with a zwo 294mc soon and this has assisted me immensely in understanding the spacing requirements for the camera + best approach for capturing images. Thank you 🙏🏻
Great review, makes me want to get it.
I was having second thoughts when I read how it’s getting trashed on Cloudy Nights: “RASA 8: Completely useless”
https://www.cloudynights.com/topic/711386-rasa-8-completely-useless/?hl=%20celestron%20%20rasa%20%20astrograph
Thanks for the article. Wish your images were full res so I could inspect them.
Very good Article. Celestron have really good telescopes for astrophotography. Its a shame that this one is little pricey for me 🙂
The required exposure time using a telescope is directly proportional to the AREA of the field of view. Simplistically, this is governed by the ratio of focal length to the diameter of the objective = the ‘f’ number. An F2 telescope is 25 times faster than an F10 telescope. i.e. (10 / 2) squared. To be precise, you have to take account of any central obstruction, it’s the light gathering area that drives exposure time duration. There’s a couple of down sides to using fast telescopes. The required focusing precision is higher – being, roughly, inversely proportional to the ‘f’ number. So the focusing precision of an F2 telescope is 5 times more critical than is an F10 scope. Also the pixel size of an electronic camera needs to be five times smaller to obtain the same resolution using an F2 telescope over what an F10 will provide. Small pixels have smaller well depths (photon bucket size) which also tends to have consequences for the contrast resolution, whether or not a monochrome or colour camera is employed – because small buckets are unable to provide as much contrast range. Full 16 bit resolution requires a full well depth of more than 32768 electrons captured. Faster telescopes might appear to be more tolerant of pointing accuracy but after taking into account the smaller pixel size, pointing accuracy is driven by the resolution required. It’s not all bad news because the F2 telescope will achieve the required exposure in a 25th of the time required by an F10 scope. So an F10 100 second exposure will be done in 4 seconds using an F2 scope. It is 25 times easier to point a telescope accurately for 4 seconds than it is to point it accurately for 100 seconds. Hope this helps.
Picked up basically the same rug you tested (just eq6r pro instead). With 60 sec subs, what was your gain set at to not blow out your targets?
Nice! I used Unity Gain, which I believe is 120 on the ASI294MC Pro.
In chapter five of “The Deep-Sky Imaging Primer, 3e.”, Charles Bracken describes a property of an optical system called “etendue”, which is basically the per-pixel throughput of the system:
(p^2 * QE * (1 – CO^2) * T) / F^2
where p is pixel size, QE is the quantum efficiency of the sensor, CO is the central obstruction as % of diameter, T is the total transmission of the optics, and F is the focal ratio. This allows one to make apples-to-apples comparisons of alternative AP rigs; twice as much light means half as much exposure time.
Here’s a worked example for the 203mm f/2 RASA and ASI2600MC using 98% reflectivity for the objective and 96% transmissivity for each of its five lens elements:
(3.76)^2 * 0.8 * (1 – 0.46^2) * (0.98^2 * (0.96^2)^5) / 2^2 =
14.1376 * 0.8 * 0.7884 * 0.6385 / 4 = 1.4234
Compare to a 111mm f/4.8 W.O. Pleiades septuplet with the same camera:
14.1376 * 0.8 * 1 * (0.96^2)^7 / 4.8^2 =
14.1376 * 0.8 * 0.5647 / 23.04 = 0.2772
The refactor is over five times slower, but there are other factors to consider such as its larger image circle and suitability for narrow-band imaging.
Thanks for your review – I am considering buying a RASA.
I am going to add my nerdiness (of which I possess an impressive amount) to the maths comments below.
Exposure time doubles each time the f number increases by the square root of 2 (=1.4), and quadruple each time the f number doubles.
So this RASA at f/2 would be 16x faster than a refractor at f/8.
Others have explained this.
As far as I can see, others have not commented on the obstruction impact of a Schmidt arrangement.
This particular OTA has a central obstruction of 49% diameter. Is this good? Bad? Indifferent?
Well, it is certainly not good – it is an obstruction. Some more maths, and it gets nerdier, will help us decide if we care.
49% = 0.49
Our obstruction is 0.49^2 of the total area.
0.49^2=0.24=24%
For sake of discussion, let us call it 25%. We are losing a quarter of our light collection.
So now if we compare this f/2 RASA to an f/8 refractor, we first think f/2 is 16x faster than f/8.
Then we remember the 25% obstruction.
25% of 16 is 4.
So really, this f/2 RASA is only 12x faster than an f/8 refractor.
Is 12x worth having?
Hell yeah!
(assumptions being made that the efficiency of the mirrors in the RASA are equivalent to the efficiency of the lenses in the refractor. It is a fair assumption.)
(Also note that mirrors typically exhibit limited chromatic aberration, so have little need of IR/UV cut filters. But the corrector lenses may.)