How to take Flat Frames for Astrophotography
Learning how to take flat frames is essential for any deep-sky astrophotography enthusiast. Once you know what to look for, taking successful “flats” is easy with a DSLR, dedicated astronomy camera, or even a CCD camera. I often get this question from beginners who are just getting started in deep-sky astrophotography.
Early on, I was guilty of skipping calibration frames such as flats and bias frames. Now, I know that flat frames are as important as taking dark frames. The uneven field illumination and vignetting in my deep sky images were a real pain to correct in post-processing.
Like many aspects of deep-sky astrophotography, your method of taking flat frames will vary depending on the equipment you use. The method I have described for taking flats on this page is most useful for those shooting with a DSLR camera, such as the Canon EOS Rebel T3i (or any other DSLR or mirrorless camera).
This technique is affectionately known to the DSLR astrophotography community as, “the white t-shirt method”.

How to take Flat Frames for Astrophotography
This video tutorial will help you visualize the process of taking flat frames. I use what is known as the “White T-Shirt method,” outlined by the creator of DeepSkyStacker in the FAQ section. The telescope uses the T-shirt as a filter when pointed at a bright source of light, such as the dawn sky.
The idea is to evenly illuminate the field. The early morning sky is bright enough to create a successful flat frame, as long as you diffuse the light using a white t-shirt or similar translucent material.
The telescope used in this video was an Explore Scientific ED102. The modest aperture of this apochromatic refractor makes capturing flat frames easier, as there is less area to cover. Larger telescope objectives, such as a Newtonian Reflector, may find an artificial lighting solution more effective.
Flat frames are 1 of 3 important support (calibration) files amateur astrophotographers use to calibrate images. Each is often necessary to produce the best image from your raw data. The image below features the frames captured using a DSLR camera with a William Optics Zenithstar 61 telescope on the Heart Nebula.

The 3 calibration files used to create a successful deep sky image from your original light frames (pictures).
With a little practice and experimentation, taking flats will become a regular part of your astrophotography image-capturing workflow. Capturing proper calibration frames makes a world of difference when you are ready to process your final image.
The flat frames will calibrate out the harsh gradients in your image file and magically remove any dust spots on your camera sensor. Fixing these unpleasant characteristics and artifacts after the fact is not an enjoyable experience.
In the image of the Orion Nebula below, you’ll see all of the nasty dust spots on my camera sensor. These artifacts will commonly appear on my images that have not used flat frames to subtract them from the final stacked integration.

Flat frames can remove the dust spots in your image like the ones shown above.
Once you find a method that works well for your camera and imaging location, you can stick with it for all future projects.
The basics of flat frames

-
Shoot at the same ISO/Gain as your light frames
-
Keep the camera connected to the scope/lens
-
Maintain the same focus as light frames
-
Shoot a minimum of 15-20 flat frames
-
Temperature is not important (It is with a cooled CCD)
The flat frames are loaded into DeepSkyStacker (DSS) to calibrate the final image. DSS creates a master flat from the set of flat frames and corrects the uneven field of your final image. Without adding flats, your stacked image may show noticeable vignetting and many dust spots over the image.
There are many image stacking tools that can use flat frames to calibrate your final image. While DSS is often the easiest, I have also achieved positive results using Siril, PixInsight, and Astro Pixel Processor.
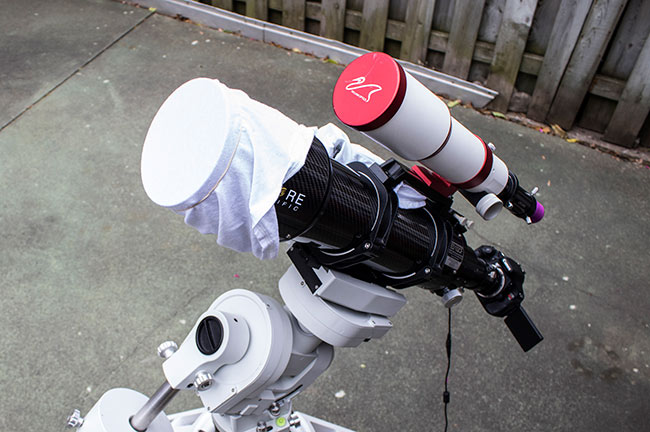
The White T-Shirt Method
My preferred method of capturing flats is to use the “white t-shirt” method. By stretching a plain white t-shirt over the telescope objective, you create an even flat field when pointed at a bright light source.

Stretch a plain white t-shirt over the objective of your telescope to diffuse a bright sky.
The intensity and consistency of the light source have a big impact on the quality of your flat frames. For example, shining a narrow beam of light from a flashlight at the telescope will not provide the even coverage of light needed for a flat frame.
A better option is to point the telescope at the early morning blue sky. This is much more evenly lit, with just the right level of brightness. The tough part is, you’ll need to leave your imaging gear out all night until morning. I realize that in many situations, this is just not possible.
Camera Settings
Luckily for DSLR astrophotography shooters, there is a camera mode that is ideal for shooting flats. This mode is called “AV,” or Aperture Priority mode. It means that the camera will decide on the correct shutter speed to expose the image properly.

With the right level of brightness and evenly lit filter (like a T-shirt), AV mode will take an excellent flat frame with the press of a button. Depending on your camera and telescope configuration, you should see some slight vignetting and dust particles in your flat frame.
When in doubt, have a look at the histogram. The flat frame below has the characteristics you are looking for. The histogram shows that the image is well exposed, and the dust particles from the camera sensor are evident.

An example of a well-exposed flat frame using a DSLR camera.
Exposure Time of a Flat Frame
There is no set exposure time for a flat frame, although if you use a DSLR, you may experience some familiar results using the white t-shirt method. For example, when shooting flats at ISO 800, the peak of the data hits the right side of the histogram at a lightning-fast 1/4000 shutter speed.
If the data clips the right side of the histogram, that’s a dead giveaway that your light source is too bright. The solution here is to dim your light source by adding another layer of t-shirt or to point somewhere less intense. (Example of this below)
How many flat frames do I need to take?
This depends on who you ask. Personally, I have found that 20 flat frames are enough to create a useful master flat file for DeepSkyStacker to calibrate your image. Since these are so quick to capture, there is no harm in collecting 20 or more frames for each session.
I have also heard that rotating the t-shirt between each flat can help create an even better master flat file. By evenly averaging out any of the subtle patterns picked up in the t-shirt fabric, you are covering all of your bases. I have never had to go to this length myself, but it is worth noting.
Taking Flats at Night
In these situations, you’ll need a reliable source of artificial lighting that evenly covers your entire telescope objective. A white T-shirt will still be used to further dim the brightness of your light source. You can double-up on T-shirt layers if needed.
A flat field panel works exceptionally well when capturing flat frames with my dedicated astronomy camera. The best part about using a flat field panel is that you can achieve consistent, reproducible results time and time again.

I use an LED light panel (tracing pad) to take flat frames with more control.
You can control the panel’s brightness depending on the model you choose. The model shown above is an inexpensive option that works well for astrophotography purposes. You can still use a white T-shirt to control the brightness if needed.
As seen in the photo below, pointing the telescope straight up will help you balance the lightbox and keep it flat against the objective.
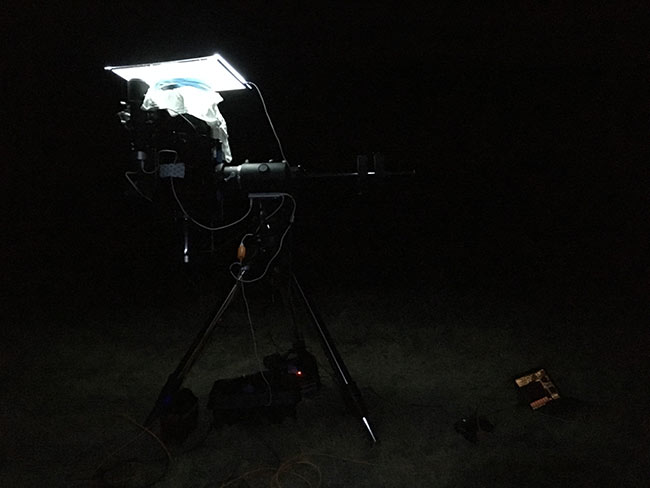
Using a tracing lightbox to capture flat frames at night. (Eric Cauble).
It’s important that the light source lays completely flat up against the telescope objective. Here are some examples of artificial light sources you can use to shoot flat frames:
- Laptop screen (all white, dimmed)
- Tablet screen (all white, dimmed)
- Dedicated astrophotography flat box
- Artist tracer box (dimmable)
Flat Frames with a Camera Lens?
If you are trying to take flat frames using a camera lens, and not a telescope, you may find it to be difficult to use the white t-shirt method. This is mainly due to the fact that you can easily knock the focus ring out of position when wrapping the t-shirt around the lens.
I have found that by using parchment paper, a white sheet of paper, or any other thin translucent film you can take successful flats with your DSLR and camera lens. Because you won’t be able to “wrap” the material around the edges of the lens to completely cover it, use gravity to your advantage.
Point your camera lens straight up, 90 degrees, and make sure that the material you use is heavy enough to lay flat on the objective of your camera lens. You may need to construct a homemade flat panel for your camera lens, that has added weight around the edges.
Taking Flat Frames with a Dedicated Astronomy Camera
If you’re using a dedicated astronomy camera like the ZWO ASI294MC Pro, you won’t have the convenience of an aperture priority (AV) mode on the camera dial. In these situations, the camera control software will need to handle flat frames.
I prefer to use Astro Photography Tool for this process, which includes a handy feature called CCD Flats Aid. This function will let you take a series of exposure using variations in the lengths of exposures. The target ADU will need to be set, and then it is simply a matter of reaching the desired ADU for your flat frames.
What is the ideal ADU value for your camera? Calculating this can take some time and experimentation to discover. The process will vary depending on the type of camera you are using, and the software you use to complete the task. Here is an interesting Cloudy Nights discussion on the topic from a group of amateur astrophotographers that are more technologically savvy than I.

Using the CCD Flats Aid in Astro Photography Tool.
Just like with the DSLR, the histogram tells the story. When you discover the appropriate exposure length, you can set your target ADU. Then, you can save this result for your next imaging session by choosing the “flats aid result” in the imaging sequence dialog box.
For reference, the ADU value of white is 65000, and black is 0. Ideally, you’ll want to record flat frames with an ADU of around 25000. This is not set in stone, but it is a great starting point to work with.
Set your minimum and maximum exposures to 0.5 seconds to 30 seconds. The CCD Flats Aid tool will vary the exposures between these 2 values until it finds one that produces an image with an ADU of about 25000. If you can’t reach your desired ADU, you can increase or decrease the intensity of the light source as needed (adding, removing t-shirts!).
Once you have discovered the exposure time that earns you a 25000 ADU, you can use those settings to run your flat frames plan in APT.
Taking Flat Frames with the ASIAIR
If you are using a camera controller like the ZWO ASIAIR Plus, taking flat frames couldn’t be easier. The smartphone app has a feature within the imaging plan mode to capture perfect flat frames, you just need to ensure that you have a constant, reliable light source.
You can use the white t-shirt method pointed at the pre-dawn sky or an inexpensive LED light panel like the one shown below. I still use a single layer of white t-shirt material to diffuse the light even further.
The software automatically calculates the ideal exposure time to create the perfect flat frame for each filter. This is the exact model I use (A4 Light Tracing PAD) and it works incredibly well.

Taking flat frames using an inexpensive USB-powered LED light pad.
Example of bad flat frames
There are some things to look for in your stacked integration that will indicate whether your flat frames were successful. In the following image, my flat frames were captured around 10:30 a.m., when the sun was very bright.
I used my standard white t-shirt method to take the images using Av mode on my DSLR camera. The first sign of trouble was that the exposures were 1/4000 of a second. This indicates that the field was very bright, and the camera chose to shoot the fastest possible exposure it could, rather than one that exposed the field evenly.
When I stacked the flats into my image in DeepSkyStacker, look at what it did to the final integration:

Because my flat frames did not evenly illuminate the field, the master flat file created removed signal in my image.
Luckily, my camera and telescope had not moved when I discovered the image, so I quickly went back outside to capture new flat frames. This time, I doubled up the white t-shirt to dim the image further. Also, I pointed the telescope to a more evenly lit area of the blue daytime sky. This created a flat frame exposure of 1/2500, which meant that the camera could now expose the field properly at ISO 1600.

The new flat frames were properly exposed and illuminated the field evenly. Problem solved.
What if I didn’t take flats?
If it’s too late to capture proper flats to match your light frames, you’re not completely ruined. There are ways to get around using flat frames such as using this gradient removal technique that involves creating a synthetic flat frame in Photoshop.
This will work in a jam and really helps fix the harsh gradients and vignetting. Unfortunately, its effect on dust and smudge removal is less effective.
Do yourself a favor, and make taking proper calibration frames a part of each and every imaging session.
