Astro Photography Tool for Camera Control
Quick note: I now use the ZWO ASIAIR to automate most of my capture process. That said, Astro Photography Tool (APT) remains a reliable astrophotography software for anyone who prefers a Windows laptop workflow with robust camera control and sequencing.
If you’re searching for an affordable and capable astro photography tool or capture software to run on a PC, APT remains a solid option.
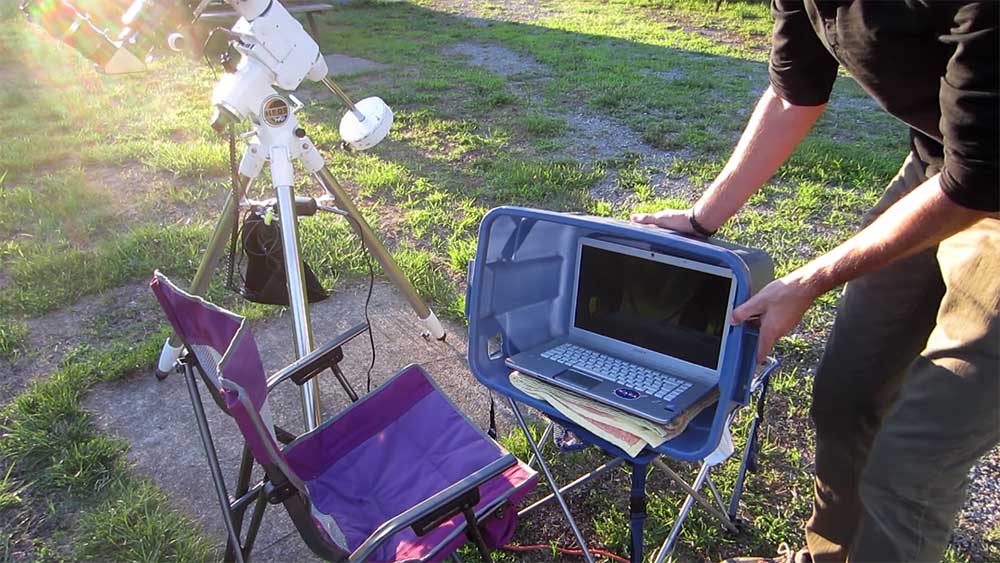
I originally installed Astro Photography Tool on my dedicated imaging laptop and liked it right away. The best way to learn any new APT astrophotography workflow is to use it under real skies, so I put APT to work on a clear night while planning and capturing my Whale Galaxy project.
Even though my current rigs lean on ASIAIR for automation, APT’s feature set (focusing aids, framing, plate solving, and step-by-step sequencing) still makes it a great laptop-based capture software for DSLR and CMOS users.
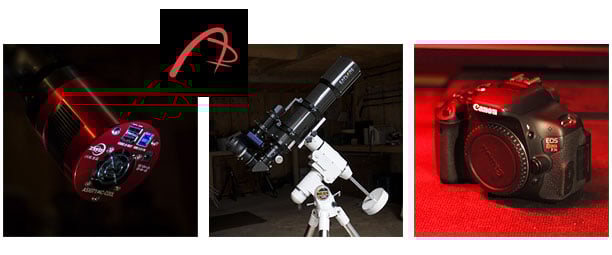
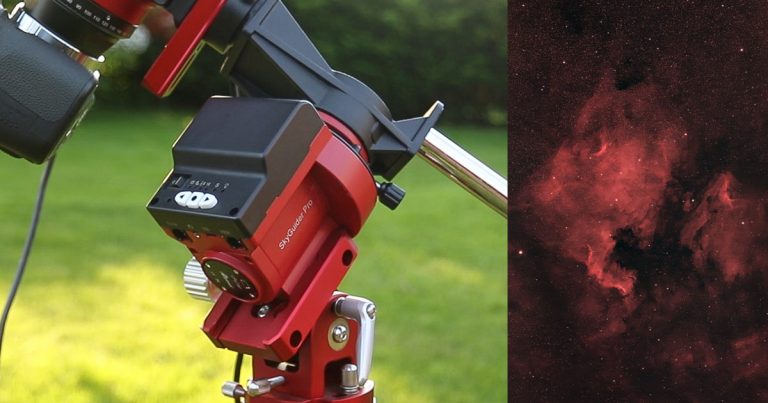
Years ago, APT also helped me document my transition from a DSLR to a cooled CMOS camera (like the ZWO ASI071MC-Cool).
Controlling a dedicated astronomy camera is quite different than a DSLR, and APT’s straightforward UI made that learning curve easier.
Although I now automate with ASIAIR, APT remains a dependable astrophotography tool for Windows users who want full control from a laptop.
Update: I created a new Astro Photography Tool tutorial video in 2019.
APT Key Resources:
- Download APT: https://astrophotography.app/index.php
- APT User Guide: https://astrophotography.app/usersguide/
- APT Forum: https://aptforum.com/phpbb/index.php
- Facebook Group: https://www.facebook.com/groups/1643360112557489/
Astro Photography Tool (APT) Overview
APT supports a wide range of cameras (Canon EOS, Nikon, and many CCD/CMOS astronomy cameras.
You can control focus, framing, plate solving, scheduling, and more. The interface is approachable for beginners, which isn’t always the case with astrophotography software.
Since its release in 2009, the developer has continually improved the application based on real-world feedback from backyard imaging. APT runs on Windows, and there’s an unlimited demo available, allowing you to test it before purchasing.
Why I Recommended APT
In my early tests, APT became my primary image acquisition tool on a laptop, replacing much of what I used to do in BackyardEOS.
I particularly liked how quickly I could set up exposure sequences, allowing me to spend more time collecting photons.
Today, my workflow is primarily automated by ASIAIR at the telescope, but if I switch to a PC-centric session (or need a feature that ASIAIR doesn’t cover), APT remains on the shortlist.
On my first night with APT, I captured light, dark, bias, and flat frames without a hitch. While Sequence Generator Pro is a powerful astrophotography tool, APT’s layout felt quicker for me to learn in the field. As you advance, features like PointCraft and the Collimation Aid are there when you need them.
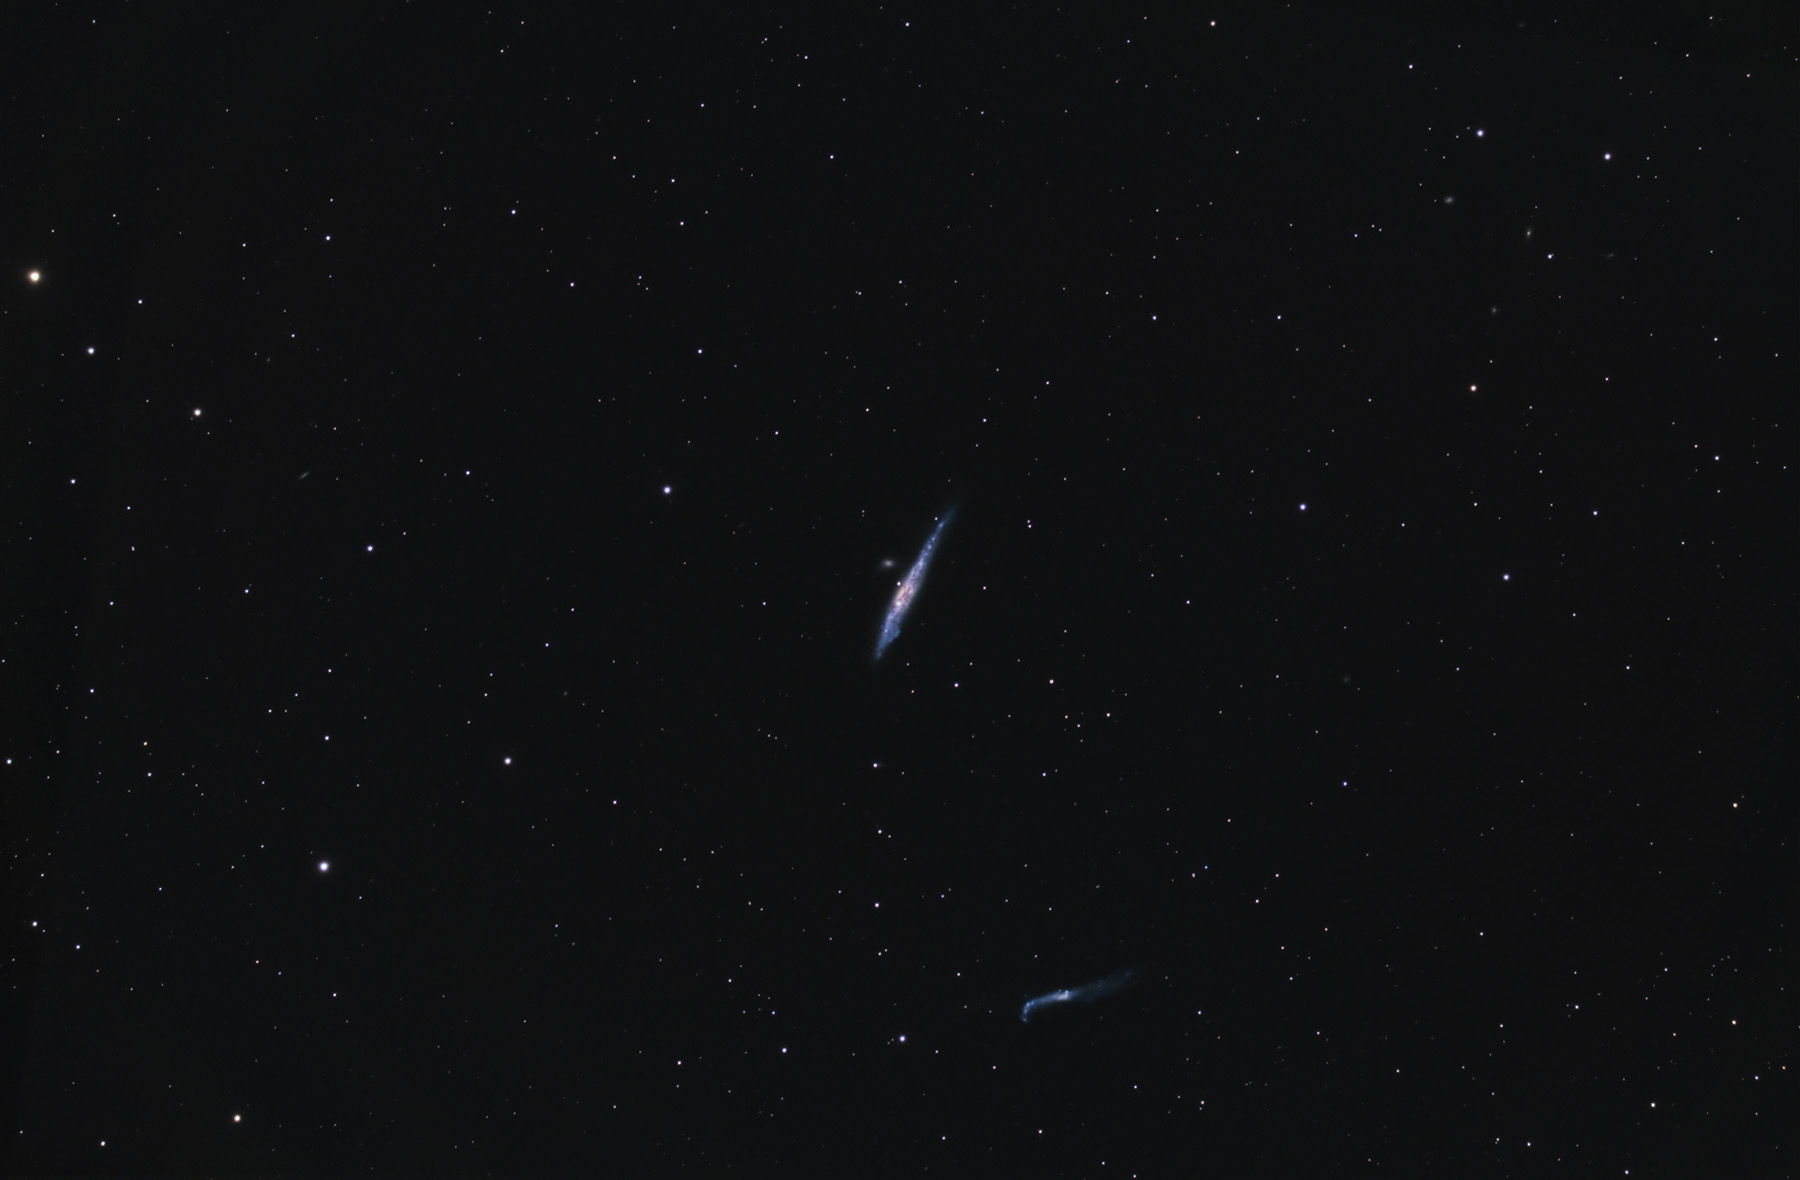
Read more about my Whale Galaxy session here: NGC 4631, The Whale Galaxy.
How to Connect Your Camera to APT
Set up your drivers well in advance of a clear night—know your exact camera model and install the correct ASCOM and manufacturer drivers.
For Canon/Nikon DSLRs, connect the camera to your laptop using a USB cable (e.g., a USB-A to Mini-B cable for older bodies, or a USB-C cable for newer models like the Canon EOS Ra).
Then open APT and click Connect (Shift-Click to choose the exact camera generation if needed). For dedicated CMOS cameras (e.g., the ZWO ASI533MC Pro), select CCD: ASCOM Camera in APT. Most color CMOS sensors use an RGGB Bayer pattern.

APT vs. Other Capture Software (ASIAIR & SGP)
ASIAIR: My current rigs mostly run on ASIAIR for hands-off, at-the-scope automation. If you prefer a mobile-first, dedicated controller for plate solving, autofocus, sequencing, and power management, ASIAIR is an excellent option.
If you prefer a Windows laptop and a traditional PC workflow, APT remains a capable astro photography tool for deep-sky imaging.
Sequence Generator Pro (SGP): SGP is extremely powerful—especially for permanent or semi-permanent observatories—but it felt heavier for my portable, night-to-night setup.
APT’s learning curve was shorter for me outdoors. Both apps support plate solving, mount/focuser control, and multi-device workflows; choose the one that best suits your environment and style.
Why Astrophotographers Use Camera Control Software
Camera control applications structure your session so you gather more light with fewer interruptions. Typical benefits include:
- Reliable camera control and sequencing
- Easy framing and target re-centering
- Accurate focus aids and temperature reads
- Image monitoring and file organization
- Support for guided dithering
Plate Solving in APT
APT’s PointCraft integrates plate solving to enhance pointing accuracy and synchronize your mount with your image. “Near” solving uses your approximate sky position; “Blind” solving figures it out for you.
To get started, install a solver such as PlateSolve2 by PlaneWave, along with the required star catalogs. For step-by-step details, see the official APT User Guide (PDF).
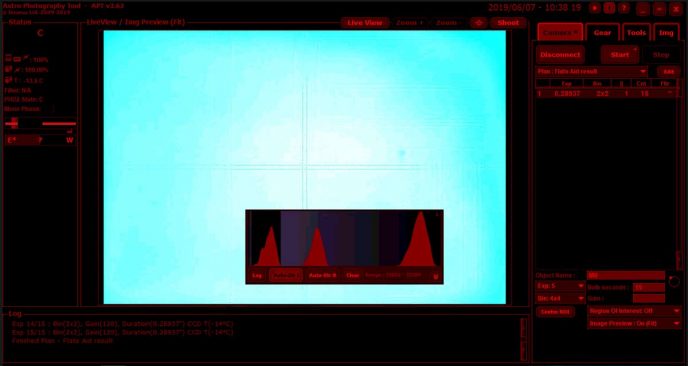
CCD Flats Aid
CCD Flats Aid steps through exposures to achieve a target ADU for consistent flat frames (I often aim for around 25,000 ADU on OSC cameras). Paired with a consistent flat field panel, it makes repeatable calibration much easier.
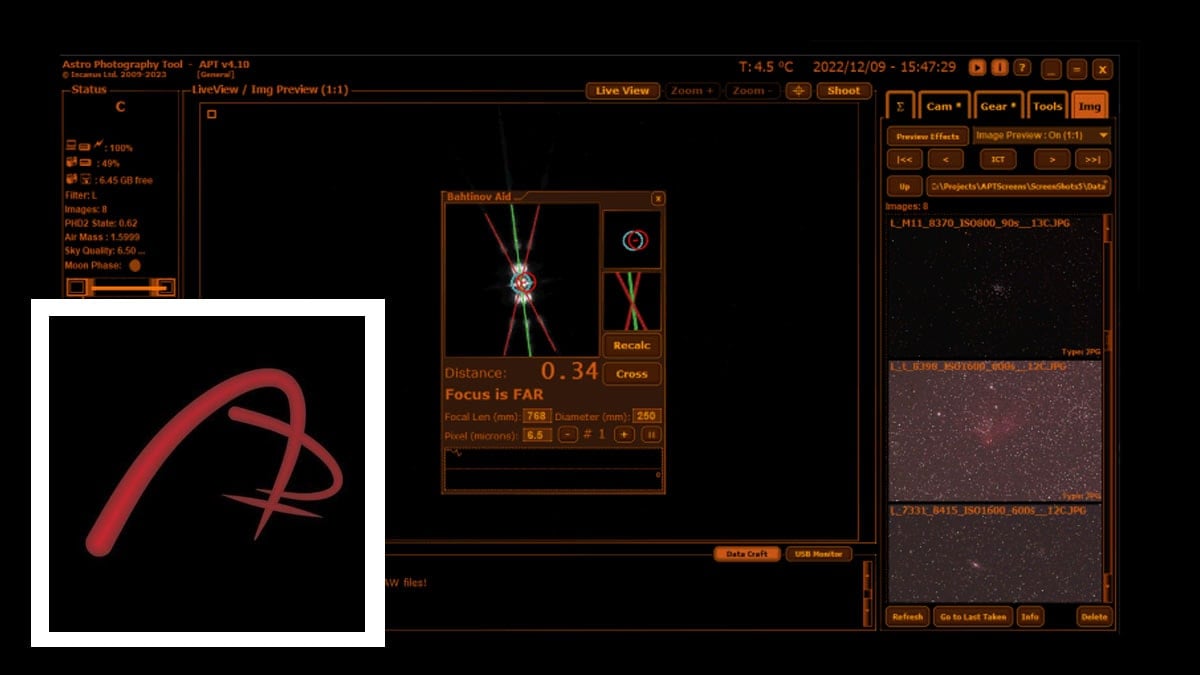
Bahtinov Aid
APT’s Bahtinov Aid leverages Bahtinov Grabber tech to make star focusing more precise with a Bahtinov mask. If you want a full field-to-final walkthrough, here’s my step-by-step deep-sky process:
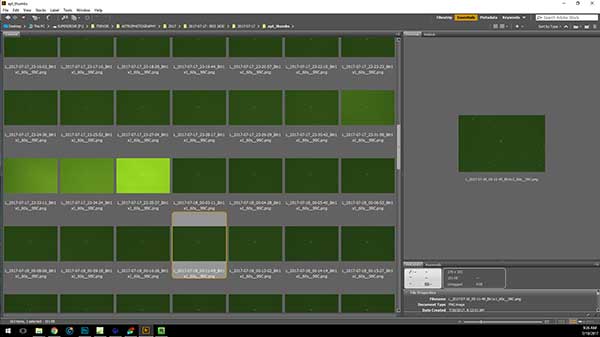
Working with FITS and Thumbnails
New to FITS files? APT automatically saves small PNG thumbnails alongside your FITS frames. They’re handy for a quick quality pass (I often cull in Adobe Bridge) before stacking in DeepSkyStacker.
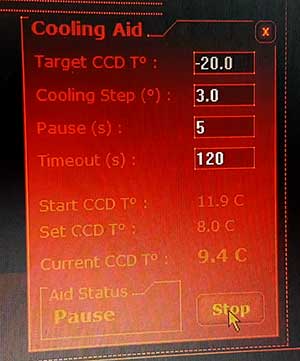
Sensor Temperature and Cooling
Uncooled DSLRs can run excessively hot in summer, which can lead to increased noise. After moving to a cooled CMOS (e.g., ASI071MC-Cool), thermal noise dropped dramatically. APT’s Cooling Aid even nudges you to step the cooler down gradually (e.g., ~3 °C intervals) to avoid thermal shock, and lets you lock a target temperature (I often run around −20 °C) to match dark frames precisely.
Supported DSLRs
Which DSLR cameras work with Astro Photography Tool? APT supports Canon EOS and Nikon DSLR/mirrorless bodies. For corner-case compatibility questions, check the APT forum. I was pleased to see my Canon EOS Ra supported right away.
Related Posts
- Astrophotography: NGC 4631 — The Whale Galaxy
- 8 Deep-Sky Targets for Galaxy Season
- The Crescent Nebula — captured using Astro Photography Tool

Congratulations on your new auto guiding set up, you deserve it. The information you share is insightful and your delivery is easy to understand. Also congrats on the number of people viewing your videos, FB page, and your Astro Backyard page as well. This speaks highly of your content, and your approach to astronomy, and your delivery method as well. I hope you will continue this for many years to come. May your skies be forever clear (unless you need the rain) and my you’re soon to be wife’s patients for you and your hobby never run out.
Thank you, Terry! As always, I appreciate your encouragement and I hope you continue to enjoy this ride along with me.
Tanks you for a lot of information! I tried the program but the camera didn’t connect becuase it is a sony camera.So ,can you recommend an other program witch compatible with sony cameras?
Hi Áron, APT doesn’t currently support Sony DSLR’s. I know that the developer plans on adding support for Nikon cameras soon. It doesn’t look like SGP supports Sony either, as Sony cameras do not have an API for tethering. Im sure a solution will surface for Sony users in the future. Good luck!
Thank you so much for yet another really well presented and informative video/review. The information from your tutorials and reviews has helped me to bring my love of astronomy, and my new found passion for astrophotography, to a much higher level than I ever hoped to achieve this soon. I was very close to hitting the frustration level maximum with my initial set up, but then by researching through your information invested in an Altair ED80 triplet apo and an Altair guidecam/finder set up with a trusty second hand Canon EOS 450D. I’m going to try out APT too, as it appears to be a very powerful yet easy to use piece of software. Thank you so much again for the time and effort you put in to helping the rest of us just starting out. Now I just need the skies to clear here in North Devon (UK).
You have duplicated a sentence in the above,text thought it worth pointing out so you can correct. It the the last line of this paragraph and first of the next.
One feature I appreciated right away, was the detailed tooltip popup windows. Literally, every button has an associated tooltip indicating what the button does, and when to use it. APT also presents helpful reminders at key moments, such as “remember to cover the telescope”, before you run a series of darks.
APT also presents helpful reminders at critical stages of your imaging session, such as “remember to cover the telescope”, before you run a series of darks. The developer clearly had the backyard astrophotography in mind when designing this software.
Thanks, Tim!
Hay Trevor I am close to getting started , wating on my laptop. So for camera control you would recomend this APT? what about PHD2 does this do somthing different, I just need to know which software I absolutely have to get on the laptop and which I need to have on the PC , I just got Photoshop CC , all new to me!
Hi Eddie. Yes, APT is excellent for controlling both DLSR’s and CCD cameras. PHD2 is used for autoguiding, and it’s free! PHD2 and APT will communicate with each other during an imaging session for dithering etc. So, you’ll run both programs at once. You won’t need PHD2 until you’ve got a guide scope and camera. Cheers!
HI Trevor,
i’m getting closer and closer to autoguiding . I currently have in place my laptop (windows 8), ASCOM, EQMOD (with EQDirect interface), Stellarium,……and just recently APT and PHD2. The guide scope and cam to come in the not too distant future.
My plan is to continue imaging unguided with my Orion Sirius mount and ES ED80 CF scope……but now using EQMOD with Stellarium for GoTo and APT for the camera control and Bahtinov aid while I am saving for the scope and cam. My request of you is to do make another video with a better review of APT as there was very little in the way of review in this video (at least it seems so to a newcomer like myself)………..I am certain that in the past year you have become quite well acquainted with APT and maybe you could make a more detailed review of its uses.
Thanks a bunch and love the chanel.
Hi Trevor,
I just bought a Canon XSi and it’s on its way. I would like to try the APT when it arrives, and I am wondering what kind of cable I will need for that. Will it be a long microUSB to USB cable to connect the camera to my laptop?
Thanks a lot in advance!
Hi James – congrats on the camera, great choice! The cable you want is USB A-Male to Mini B: https://goo.gl/zCnJGb
The ASI071 is not a CCD as you mention in your video, it’s a CMOS camera:
https://astronomy-imaging-camera.com/product/asi071mc-pro
Hi Trevor,
I’m just getting starter to astrophotography.Which softwares do i need to have on my laptop for astrophotography.For example Ascom,phd2,Apt?
Thanks a lot in advance!
Hi Chistakis! APT and PH2 are great choices for camera control and autoguiding (that’s what I use). I would also recommend DeepSkyStacker – it’s a free image stacking and calibration tool that I use of almost all of my images. You can find a big list of the software I recommend on the resources page here: https://astrobackyard.com/resources/
Please name a best, all round telescope you would recommend to any professional.
to do what? you need to have a task to perform? planets and moon? nebula? for looking at or taking pictures? Each question and answer changes the recommendation. Personally I recommend a 80mm or other small APO refractor. I started with a stellervue myself and though I have bought and sold 1/2 dozen other scopes and still own 4. I won’t part with the 80mm. Just to handy. BUT not great for planet viewing. But excellent for starting astro photography.
Excellent content and great to learn from your well-defined experiences, Trevor. Your presentations are so easy to follow – and it has to be with such a complex and technical subject.
You have many supporters down here in Australia.
I will be moving to India next year and plan to share your Channel with thousands over there.
Keep up the wonderful work.
Cheers.
Hi Trevor,
Great explanation as usual, thanks! I started reading your website and watching your channel about a year ago, when I started to think the possibility to take astro photos with the equipments I have – a mirrorless camera and few lenses. Since then, I slowly added a skyguider pro, lately some zwo guiding scope and camera for auto guiding… now the problem – dithering. Do you know typically, how long will it take to dither using PHD2 and skyguider pro with 200-300mm lens? I am asking because my camera is not supported by APT or other softwares but with PHD2 dither APP I might be able to set the time interval dither manually between each exposure. Thanks!
How do you arrive at an ADU of 25,000 for the ZWO ASI294 MC Pro? For the 14 bit ZWo ASI 294 MC Pro with a full well of 63,700e wouldn’t the ADU be:
63,700/2^14
=63,700/16384
=3.89
Then ADU = (63,700/3.89) x 70%
= 16,375 x 0.7
= 11,462
Everything except how to connect the camera to the computer!! I have practically searched the whole web, and for some reason this key detail is always left out.
Nathan, I have added new information to this article explaining how to connect your camera to the computer to use APT. Thank you for pointing this out, and clear skies!