Why I Bought the Canon EOS Ra

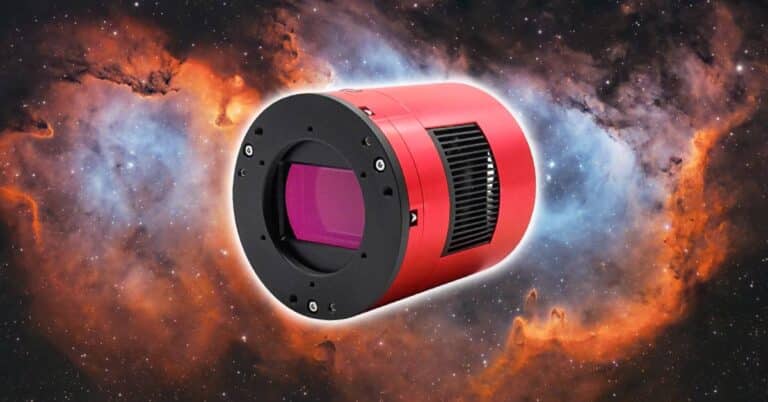
In early May 2020, I decided to purchase a Canon EOS Ra camera from B&H photo. This is Canon’s latest astrophotography camera, and it has some seriously impressive specs (like a full-frame 30.3 MP astro-modified sensor).
For a complete rundown of the Canon EOS Ra, you can read my full review from January of this year. Essentially, it is a clone of the popular Canon EOS R mirrorless camera, with a specialized IR cut filter optimized for astrophotography.
In this article, I want to discuss why I purchased the EOS Ra, and share my results from the backyard.
Is the Canon EOS Ra Worth it?
With a price tag of $2500 USD, you’ll want to think long and hard before taking the plunge on a niche camera like the EOS Ra.
After all, there are plenty of affordable options available in the DSLR line-up, although these are not sensitive to hydrogen-alpha like the Ra is.
You could modify your DSLR for astrophotography, but unless you’re comfortable dissembling your camera, that task is better left to the professionals.
I considered purchasing a professionally modified Canon EOS 6D Mark II as an upgrade to my Canon EOS Rebel T3i (and Canon EOS 60Da), but the price was not substantially less than a brand new EOS Ra.

I also wanted to “future-proof” myself to a degree, and be able to utilize Canon’s new RF lens mount lineup in the future.
The EOS R (and RP) were attractive options, but ultimately the ability to record deep-sky images (nebulae regions) sold me on the Ra version.
Another consideration was the ability to utilize the 4K video mode of the EOS Ra. The EOS R version will capture “normal” looking colors in the daytime, while the EOS Ra will have a red cast to them due to the modified IR cut filter.
The EOS R would be a better choice if the camera was primarily to be used for filming my YouTube videos, but this camera is destined for the stars.
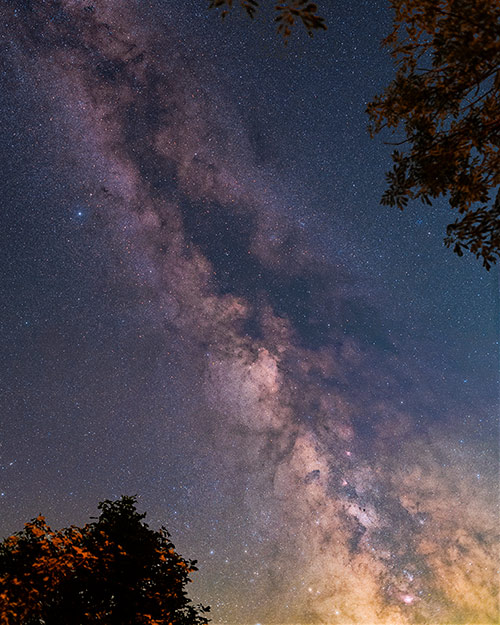
The Milky Way. Canon EOS Ra with a Sigma 24mm F/1.4 lens attached.
I can still use the EOS Ra during the day for photography and filming, but I will need to correct the white balance in post-production.
To be totally honest, I didn’t want to be left behind like I was with the EOS 60Da. This camera quickly sold out and was no longer available unless you could find one used.
I don’t think there will be any new Canon EOS Ra’s left by the end of the year, but we will see. As an example, finding a used Canon EOS 60Da is nearly impossible.
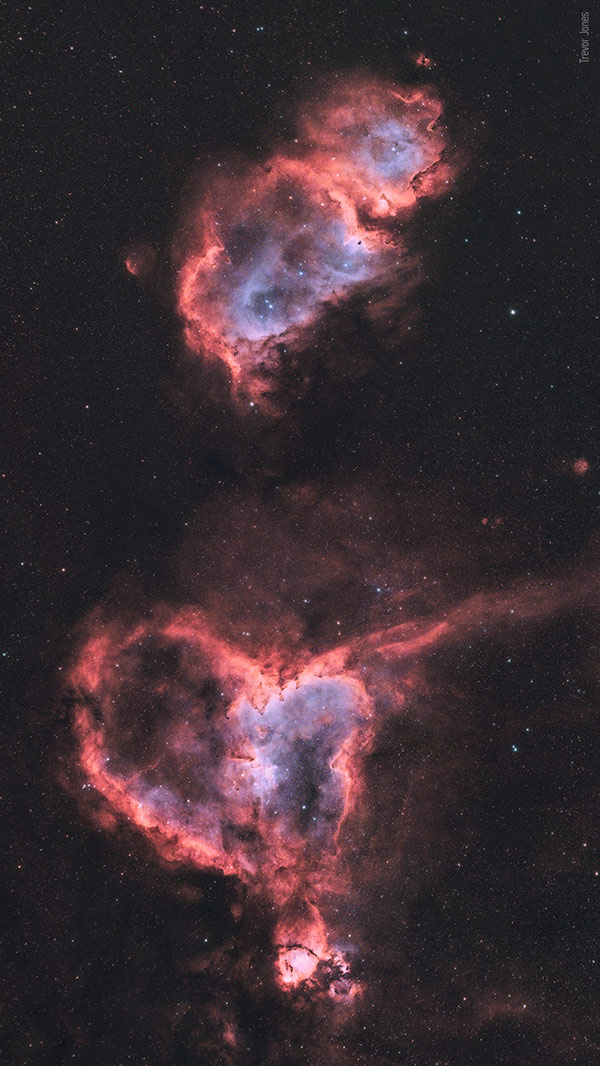
The Heart and Soul Nebula captured using the Canon EOS Ra and Radian Raptor 61 APO.
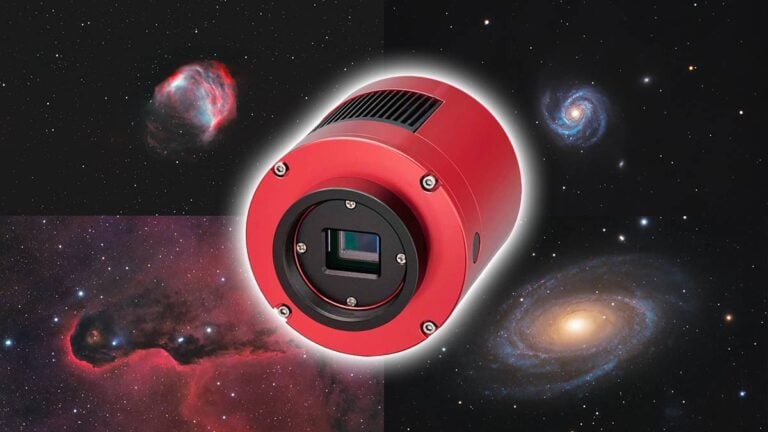
Compared to a Dedicated Astronomy Camera
Many of you may be in a situation where you are deciding whether to invest in the Canon EOS Ra or a dedicated astronomy camera. I currently shoot with all types of astrophotography cameras from a CMOS one-shot-color, to a monochrome CCD.
Each camera will have its own strengths and weaknesses, and much of the decision comes down to the user experience you are looking for.

For example, a nightscape photographer that is used to shooting with a DSLR or Mirrorless camera on the road will have a hard time justifying the purchase of a dedicated CMOS camera that requires a slew of new software and hardware to run.
Dedicated astronomy cameras have their place, and for many projects, I wouldn’t dream of using the Ra over my Starlight Xpress SX-42 or ZWO ASI533MC Pro.
Rather than a long list of strengths and weaknesses, I’ve highlighted the aspects of each camera (good and bad) that are unique to each one:
Canon EOS Ra
- Full-Frame Sensor
- Battery Powered
- Portable and Lightweight
- Native Lens Mount (RF and/or EF with adapter)
- No External Hardware Required to Take Pictures
- Produces RAW/Jpeg files Instantly
- Live View Display Screen
- Framing/Focusing Can Be Done On-Camera
- All Camera Settings Can Be Adjusted On-Camera
- No On-Board Cooling
Dedicated Astronomy Camera
- On-Board Cooling (TEC)
- Back-Illuminated Sensor
- Low Noise Images
- Designed for Long Exposure Imaging
- Calibration Frames Easier to Replicate/Produce
- Full-Frame Models (Eg. ZWO ASI 6200) Are Expensive
- Requires Additional Hardware/Software to Run (eg. PC, ASIair)
- No On-Camera Control (Live View, Camera Settings)
- Requires External Power Source
- Produces FIT files that Must be Converted to Edit
In the end, I would recommend a DSLR or Mirrorless camera to a nightscape photographer who uses lenses, and a dedicated astronomy camera to someone that primarily shoots through a telescope at home.
There is a third category of imager (that I am a part of), that enjoys the DSLR/Mirrorless experience too much to stop using them for all types of astrophotography.
Compared to the EOS 60Da?
The Canon EOS 60Da is a fantastic astrophotography camera. I’ve taken countless images through my telescope with the 60Da, and it is currently my best DSLR camera for astrophotography.

The Canon EOS 60Da DSLR.
Until the Ra came along in November 2019, the 60Da was Canon’s latest official camera for night sky imaging.
However, the features and specifications of this 2012 camera have become outdated, although many of them are largely ignored for long-exposure deep-sky imaging.
For astrophotography purposes, the biggest differences between the two cameras are the size of the sensor, and the lens mounting system.
- Canon EOS 60Da Sensor: 18 MP CMOS (APS-C)
- Canon EOS Ra Sensor: 30.2 MP CMOS (Full-Frame)
In the end, chances are that many owners of modified DSLR cameras will not feel the need to upgrade to the Canon EOS Ra.
Make no mistake, a talented amateur astrophotographer will be able to produce results as impressive as ones taken with the Ra using an affordable, astro-modified DSLR.
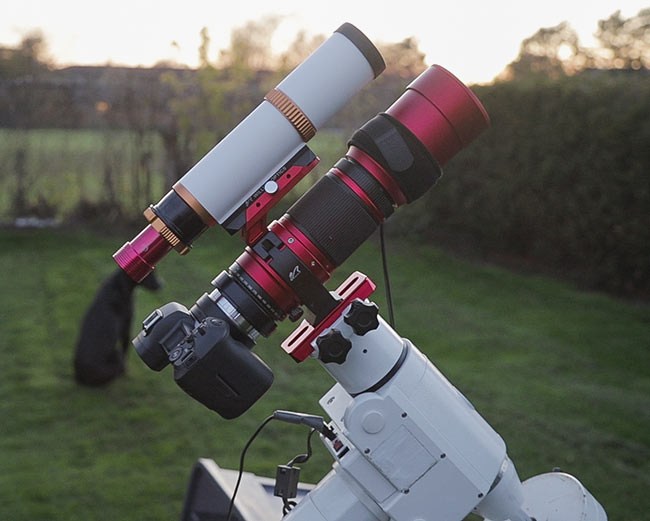
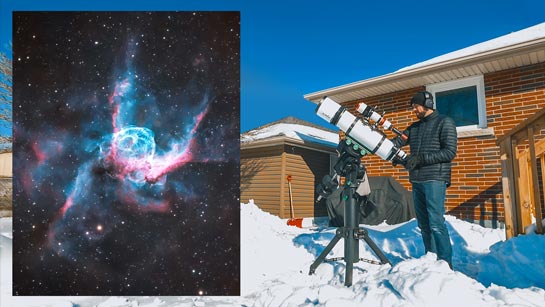
My wide-field deep-sky astrophotography setup.
Results Through a Telescope
I recently attached the Canon EOS Ra to my William Optics RedCat 51 refractor in the backyard. A wide-field instrument like this really utilizes the full-frame sensor of the camera.
I chose to photograph a “fool-proof” area of the night sky, the Sadr region. At a focal length of 250mm, several deep-sky nebulae objects are available.
The image below includes 15 x 5-minute exposures at ISO 3200. The images were stacked and registered in DeepSkyStacker, and processed in Adobe Photoshop 2020.
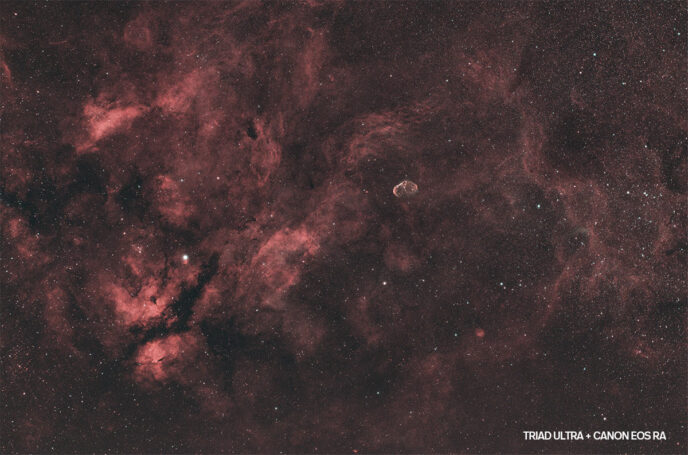
Nebulae in Cygnus. Triad Ultra Filter and Canon EOS Ra (Click for larger image).
The Radian Telescopes Triad Ultra filter is a superb match for the EOS Ra, and I plan I using it extensively with this camera this summer. It possesses the qualities of a narrowband filter, with the added ability to create “almost” natural-looking colors (with some color correcting in post).
When reviewing the data shot using the EOS Ra and Triad Ultra filter, the colors focus at the same point. I regularly process my images on a per-channel basis, and often have to control the star size in certain channels (usually blue).
That is not the case when shooting with this filter as each channel looks sharp in a single RGB image.

Photo Details:
- Total Exposure: 1 Hour, 15 Minutes
- Integration: 15 x 5-minutes @ ISO 3200
- Calibration Frames: 15 Darks, 15 Flats, 15 Bias
- Image Acquisition: Astro Photography Tool
- Pre-Processing: DeepSkyStacker
- Final Editing: Adobe Photoshop 2020
Equipment List:
- Camera: Canon EOS Ra
- Telescope: William Optics RedCat 51
- Filter: OPT Triad Ultra
- Filter Drawer: Starizona RedCat Filter Drawer
- Guide Scope: William Optics 50mm
- Guide Camera: ZWO ASI290mm
- Mount: Sky-Watcher HEQ5
- Dew Heater: Starfield USB
Tips for EOS Ra Owners
Astro Photography Tool really shines when you’re using a DSLR or mirrorless camera. The latest version recognizes the EOS Ra, and I can do important tasks like framing and focusing on my laptop.
Alternatively, you can use the beautiful articulating LCD screen on the Ra.
You may just choose to focus and frame your target directly on the camera rather than through software on your computer. Use the helpful 30x live view to really nail your focus.
I use a Canon EF to EOS R adapter (picture below) to connect my camera to the telescope. You will also need this to pair the EOS R with any existing Canon EF-mount lenses.

The Canon EF – EOS R lens mount adapter.
An important camera setting you’ll need to use when the Canon EOS Ra is attached to a telescope is to enable the “Release Shutter W/O Lens“. The camera doesn’t recognize your telescope as a lens, so you’ll need to set this to take a picture.
Another tip I should mention is that the camera comes with a USB Type-C to Type-C cable, so if you plan on connecting the camera to your laptop, you’ll need a USB Type-C to USB 2.0 cable or an adapter.
Lastly, you’ll want to use the Adobe DNG converter to create RAW files that your pre-processing software will recognize. At the time of writing, the RAW CR3 files the camera produces are not recognized by pre-processing software such as DeepSkyStacker.
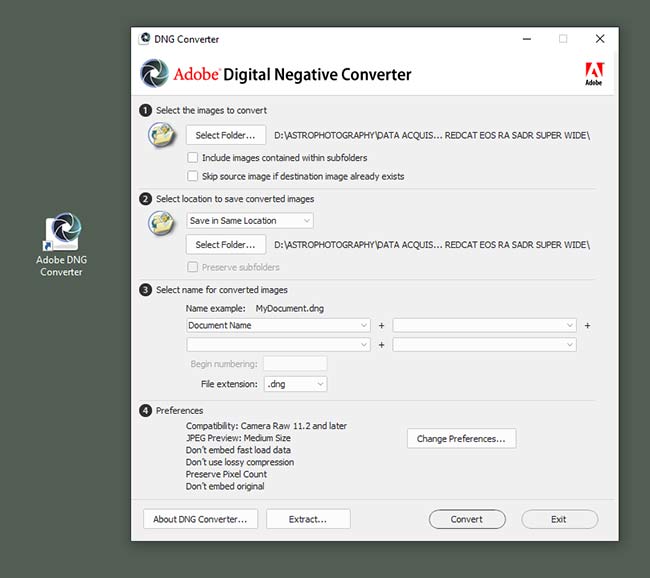
The Adobe DNG Converter software.
Final Thoughts
A lot of people seem to think that the EOS Ra is an odd choice considering the price tag and the fact that it’s not a dedicated Astro camera.
I totally get it, and I don’t think it is for everyone. Not even close. I think this camera was designed to meet the needs of a very specific type of amateur astrophotographer.
One that has progressed through this hobby using DSLR’S, lenses, and wide-field refractors.
With about 10 images using the Ra under my belt now, I can confidently tell you that this camera feels like it was designed just for me.


Thank you for the review Trevor! I also fear this camera will no longer be available by the end of the year and I keep showing my wife your videos with the Ra in the hopes that I can order one before they’re all gone. Keep up the great work!
Thanks, Jacob! I hope your plan works! 🙂 Clear skies
Thanks Trevor! Can you expound on the advantages and disadvantages of this camera vs full frame dedicated astro cameras? Ignoring the price, how user friendly is both systems and the image quality comparable?
Hey Trevor,
I have a 6d mk1 that I’m looking to use for astro imaging. I’ve done the sums and with a scope like the RedCat it appears it will be a fair bit undersampled. The number will be around 5.4…I know the aim is to be around 1-2. Should I consider a different scope?
I want something wide field as this is my first step in to imaging and would really like to use my 6d for now as it’s an awesome camera!
Many thanks
Ant
Hi Ant! Smart to look into that before investing in a camera. I don’t think it will be an issue for you – the images will be nice and sharp, and I doubt you will find them to be too sharp. The 6D Mk 1 is an excellent camera and a great match for the RedCat!
Hi Dan. That’s the big question everyone has. If you’re willing to fork out the $4k for a full-frame astronomy camera, I think it could produce “better” deep sky images just because of that cooling and optimized sensor. BUT the experience changes completely – relying on a new set of hardware/software to run. I prefer the hands-on, touch screen experience myself – but for people with a permanent observatory, it makes less sense!
Thanks for your reply Trevor! I have seen some great images on Astrobin with the RedCat and the 6d but I’m still unsure about pulling the trigger as I’ve got a 135mm Samyang and given the RedCat is 250mm FL it’s not a massive step up for quite a bit of cash. I’ve been considering the Z61 and also the Z73 which are around the RedCat price range including the field flattener.
I know clear skies are precious but if you have the time I’d be really interested to see how these scopes (which you have) perform with a full frame sensor on the same target…be a great video to watch for beginners like myself.
I’ve used the online FOV calculators to compare but nothing is better than seeing a real world image.
If that’s something you could do I’m sure it would help a lot of guys n gals out, myself included 🙂 Thanks Trevor…PS…give Rudy a pat for me he’s such a cool dog!
Ant
Hi Trevor – I am new to this (and tbh already a big fan of yours) and I recently got the triad ultra quadband filter you were using here for my SpaceCat. I am having problems to focus … I positioned the filter inside the scope and as it is rather dark to focus on the display of my 450D mod ed to full spectrum, I took a several 2 min test photos and I don’t find any position around the 250 mm mark where I can get a bright star sharp … I took away the bahtinov mask and nothing … I even took away the filter, focused successfully and when I install the filter – again all the stars are (considerably) unsharp – any idea what Im doing wrong?
I’ve been thinking of purchasing either an EOS R or Ra for a Sky-Watcher Quattro 250P mounted on a AZ-EQ5. The AZ-EQ5 is one of the few mounts I’ve come across that I like the feature set of, so far, that is able to work at all latitudes. I live at ~68.3N latitude. Yes above the arctic circle.
My plan is to purchase a setup that I can shoot the crab nebula, one of my favourite deep sky targets, and in the winter I have long hours of visibility of that target. December 6 – January 6 we have no sunrise, so providing it’s clear and not unbearably cold I should be able to get some dedicated time on the target. One worry that I have is batteries dying in the cold, both for the camera and powering the mount, plus a laptop if I choose to bring one. At least there would be no overheating of the laptop! Temps do go down to -30C, last winter we had 2+ months of temps around -30C.
I would appreciate your thoughts on my setup, and also wondering have you ever shot this far north, or conversely south in South America? Would you consider a trip up here in the winter to shoot if we ever get past this pandemic?
Trevor – just want to give you a big shout out for some of the most intuitive, entertaining and educational resources available to watch and read about astrophotography.
Your unquestioned knowledge and easygoing personality make you a staple on our tv as I rediscover my own interest in the hobby with my own wife supporting me in about the same underwhelming way yours does – but she supports me 100% even when her eyes glaze over – we’re both lucky dudes!
Keep this stuff coming, and congratulations on becoming a legend. Well done!
Jim – Your comment really made my day. I am so glad to hear that! Thank you very much!
Very informative talk about your camera choices and preferences, as some of us are pure novices. Thanks for the leadership and sharing.
Trevor,
Have you seen the RA’s red halo issue that is being reported on Cloudy Nights?
Youtube report with examples:
https://youtu.be/Z1w5rpOpzE4
I sure have! I sent Nico a few of my images to inspect. After stretching the images to dramatize the issue, he found some color around the bright stars in the corner.
Are you going to review the ASI2600MC Pro I’m getting mine this week sold my ASI294mc Pro 2600 is just under thee price of the RA.
https://www.facebook.com/photo?fbid=2597905657137297&set=pcb.2597906483803881
https://www.facebook.com/photo?fbid=2588045321456664&set=pcb.2588046411456555
https://www.facebook.com/photo?fbid=2584680845126445&set=pcb.2584679108459952
Hey Trevor,
I’d like to suggest a follow-up video on your experience with the Ra. Love your content and have watched I think every video. In turn I’ve learned a lot over the last year. Thank you and clear skies!
Ok so I went for an Ra, but I’m takin 180s at ISO1600 subs with a RedCat in Bortle6 skies and just getting complete white out – getting a little frustrated!
Hey Trevor,
I’m still a novice and have been reading your articles and watching your videos quite extensively, and in fact mirrored my current set up very similarly to the one you described here (no guide scope yet, maybe for Christmas!). One thing I found out is if you instead use the Baader Canon EOS R Wide (M48) T-ring instead of the Canon EOS R -> EF adapter + Canon EOS EF Wide (M48) T-ring, which on a whole is a lot cheaper, you unfortunately need to add spacers to achieve the required 55mm back focus for the SkyWatcher Field Flattener / Reducer. I just got my spacers (just needed 25mm worth since the camera has 20mm back focus already), just waiting for some clear skies to test it out, but hopefully this helps anyone frustrated that their field flattener isn’t working with the Canon EOS Ra like I was. Thanks again for writing such awesome articles, I feel like I’m learning quite a lot!
Hi,Nice to meet you. I am Japanese.
I have a SpaceCat51 and SkyGuiderPro system, and your video was very helpful.
I’m very interested in the EOS Ra and am considering buying one.
I would like to know, what kind of adapter do you use between the filter drawer and the EOS Ra?
Hello from Montreal,
I now upgraded my old Canon 50D to EOS R6. I would like to mount R6 on Celestron Focal Reducer. What adapter should I use and also reduce the vignetting ?
Thanks for your advice.