Photographing Thor’s Helmet from the City
In this post, I’ll walk you through my process of photographing a jaw-dropping nebula in the night sky known as Thor’s Helmet. As usual, there were a number of challenges in my way, but it wouldn’t be astrophotography without a little stress now would it?
I am using an imaging setup that I have used in a while, and I think you’ll get some great tips for your next project by following along. I sincerely enjoy sharing these nights of deep-sky astrophotography in the backyard with you, and I hope you enjoy the final image.
Astrophotography vs. Daily Life
I don’t know about you guys, but family commitments and plans with friends seem to always land on a clear night. Seriously, what’s with that?
Talk about feeling guilty. Of course I want to see my friends and family, but in the back of my mind, I’m going a little crazy thinking about those precious clear skies I am missing out on.
My solution is to work around these events, rather than skipping them. Don’t try to explain that you can’t come to the party because the latest astrospheric forecast looks promising.
For example, last week I had a family dinner (my mother-in-laws birthday), so I am prepared absolutely everything I could before we left. Ideally, I would be able to my astrophotography rig up and running the moment we got back home.
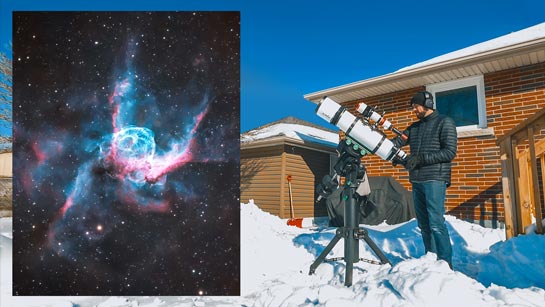
Even the target I selected was chosen with this dinner in mind. Thor’s Helmet was scheduled to appear above the roof of my house by about 8 pm.

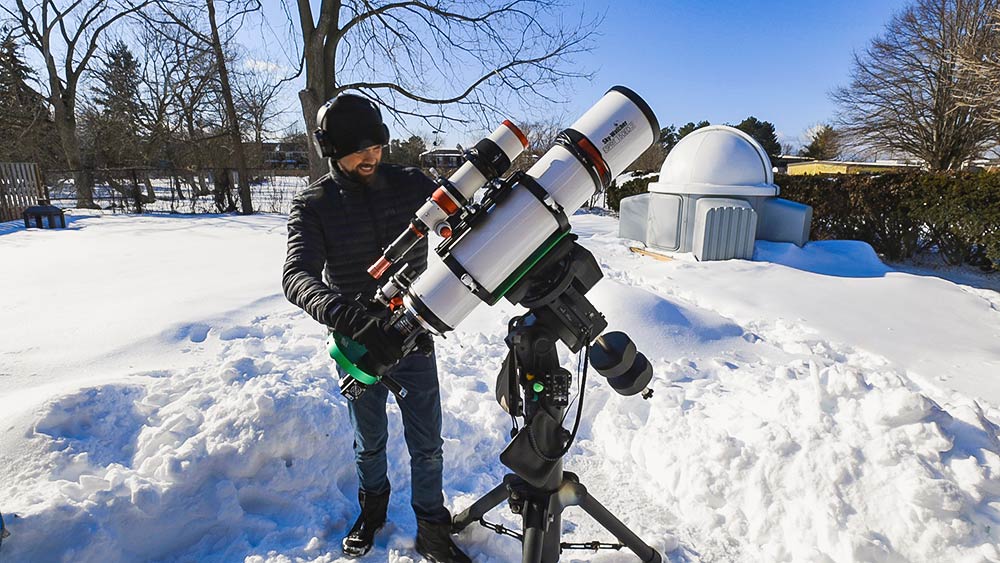
Setting up my telescope early to photograph a nebula later on.
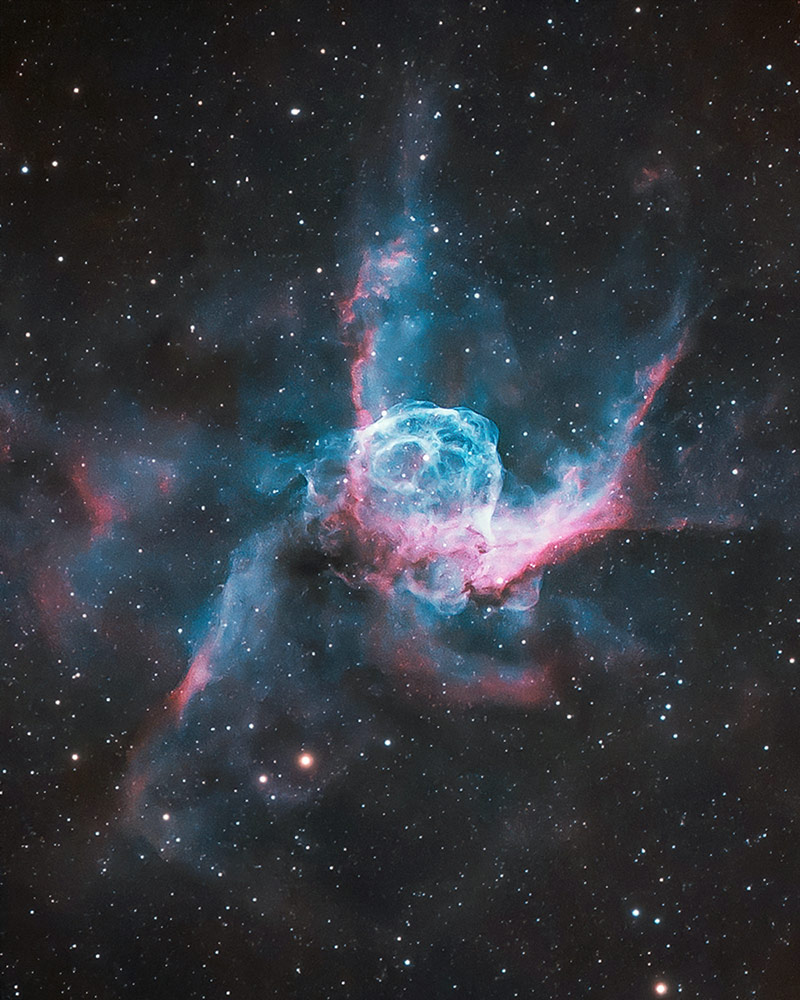
Thor’s Helmet Nebula
Have you ever photographed Thor’s Helmet before? It’s a real show stopper. It’s an excellent choice for a cold February night.
If you have already photographed the Orion Nebula, Horsehead Nebula, and the Rosette Nebula, maybe its time to give Thor’s Helmet a shot.
Because this emission nebula emits a healthy signal in the Hydrogen and Oxygen bandpasses, it’s a solid choice for a night when the moon is out.
If you’re in the northern hemisphere like me, you might need to get to a location with a low horizon to catch this one. This target sits below Sirius, which should give you an idea of its location.
Luckily, my view to the south isn’t too bad, and I am able to view and photograph Thor’s Helmet as it reaches about 30 degrees in apparent altitude at its peak.

The Canis Major constellation contains the brightest star in the sky, Sirius.
You’ll find this emission nebula in the constellation Canis Major, which is easy to point out thanks to the brightest star in the sky, Sirius, near the head of the “great dog”. This constellation follows alongside Orion and comes out a little later on through the night.
Another target you should look into for February as Orion heads on out is the Seagull Nebula. This one is in Monoceros, but it’s a lot larger. This nebula is a more practical choice for focal lengths in the 500mm and wider range.
Related: The Best Telescopes for Astrophotography
My Old Imaging Laptop
I used one of my aging laptop computers to run the imaging session. I purchased this computer refurbished on Amazon for less than $300 several years ago (2017).
This compact PC offers 11.5 inches of laggy, “still working on it” performance. It may not be the fastest machine on the planet, but it gets the job done.

My old Lenovo Thinkpad laptop computer.
Despite this computer’s humble specs, it has reliably run some of my best deep-sky astrophotography sessions for nearly 5 years.
I have plenty of other options to run my gear (such as wireless ZWO ASIAIR) but there is a reason I am using this old Lenovo Thinkpad.
It has all of the software and drivers installed for this camera, guide camera, and filter wheel installed. The process of getting my Starlight Xpress CCD camera recognized and operating smoothly took some trial and error, and I am not going through that again.
So, the Lenovo Thinkpad is officially my dedicated Starlight Xpress Trius 694 Mono laptop. Sometimes you need to sacrifice a little function and flare for the sure thing. I didn’t even update to the latest version of PHD2 guiding in case something went haywire.
Astrophotography Equipment Overview
The telescope is a Sky-Watcher Esprit 150. A triplet apochromatic refractor telescope with a whopping 6 inches of aperture. As you can imagine, I use this telescope for astrophotography whenever possible, which isn’t all the time due to its size and a narrower field of view.
You need a hefty equatorial telescope mount to carry a 32-pound telescope, and the Sky-Watcher EQ8-R Pro is up to the task. You may have noticed the smaller refractor telescope riding on top of the primary imaging scope, a William Optics Zenithstar 71mm.
This telescope is already mounted and balanced to the Esprit 150, but the autoguiding for this system was actually done using an off-axis guider through the primary imaging scope.
Here is a look at every item of the setup used for my photo of Thor’s Helmet:
- Camera and Filter Wheel: Starlight Xpress Trius 694 Mono
- Telescope: Sky-Watcher Esprit 150
- Filters: Astronomik 6nm Ha, 6nm OIII
- Telescope Mount: Sky-Watcher EQ8-R Pro
- Guide Camera: Starlight Xpress Lodestar X2
If you watch my videos on YouTube, you may have noticed this rig sitting outside in my backyard throughout the year. I put a Telegizmos 365 cover on it to protect it from the elements.
Wrapping up a setup like this for an extended period of time makes sense. It’s incredibly heavy, and not something you’d want to carry in and out of the garage very often.

Removing the Telegizmos 365 cover from my telescope.
I could have made my life a lot easier by just shooting this deep-sky object from my backyard observatory, but it doesn’t have the focal length I need for Thor’s Helmet. The Esprit 150 and SX-42 camera create the absolute perfect framing for this target.
Thor’s Helmet is quite small, and I recommend using at least 1000mm of focal length if possible. With that being said, I am using a reducer on this telescope, a dedicated 0.77X version designed specifically for the Esprit 150.
This reducer not only improves the image scale of my system to 1.1 arc-seconds per pixel but allows me to collect a little bit more light out of the F/7 scope (by converting it to F/5.6).
My Image Acquisition Plan
Thor’s Helmet is a perfect narrowband astrophotography project, particularly in H-alpha and OIII for a bi-color image. This palette creates a stunning purple and red version of this nebula and I absolutely love the look of it.
Since I had limited clear-sky time with more snow on the way, I decided to collect Hydrogen and Oxygen details during my session. The goal was to capture 2 hours of that all-important Ha signal and dedicate the remainder of the night to OIII.
As many of you already know, my backyard sky is listed as a Bortle Scale Class 7. Narrowband filters allow me to shoot through this unwanted glow.

Astrophotography from my light-polluted backyard in the city.
5-minute exposures seem to be the sweet spot with this camera, through the Astronomik 6nm narrowband filters in the filter wheel. I shot 6-minute sub-exposures with this system last time, but again, that reducer helps me collect more light and think 5 minutes will be just right.
Completing a narrowband image of Thor’s Helmet in one night is a little ambitious. Thankfully, I have photographed this nebula before and I can combine the data I captured back in 2020.
My Results
Here is a look at my stack of 5-minute sub-exposures taken through the Astronomik 6nm filter. The imaging stacking process (done in DeepSkyStacker) improves the signal-to-noise ratio of the final integrated image.
The images were dithered by 2 pixels between each frame, and this helped to smooth out the noise in the final stack. I captured 15 dark frames and applied them to the stack to help calibrate the hot pixels out as well.
Capturing flat frames would have removed the noticeable dust motes, but I skipped this step and was forced to manually remove them in the post-processing stages.
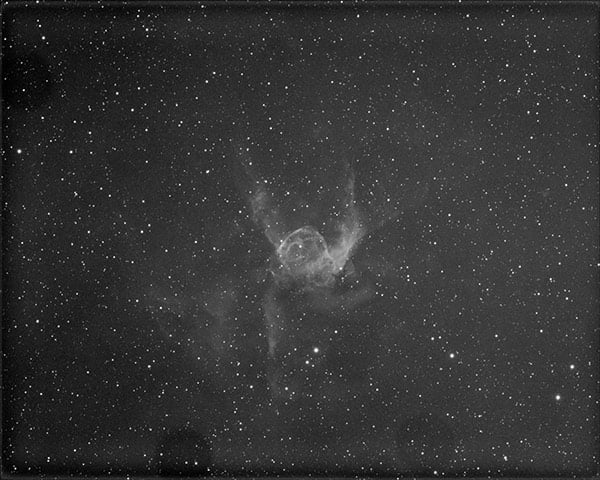
25 x 5-minutes in H-Alpha.
You can definitely see the structure and shape of Thor’s Helmet coming through in this image, but more data was needed to really showcase Thor’s Helmet in detail.
My images are at the full resolution (Bin 1 x 1), and on this camera that’s about 3000 pixels by 2000 pixels. This is quite a bit smaller than I am used to with some of the larger cameras, but seriously high-quality image data from this CCD sensor.
At 1.1 arc-seconds per pixel, the image is a little on the soft side (oversampled) but it’s nice to be able to carefully sharpen up the image in post just the way I want it.
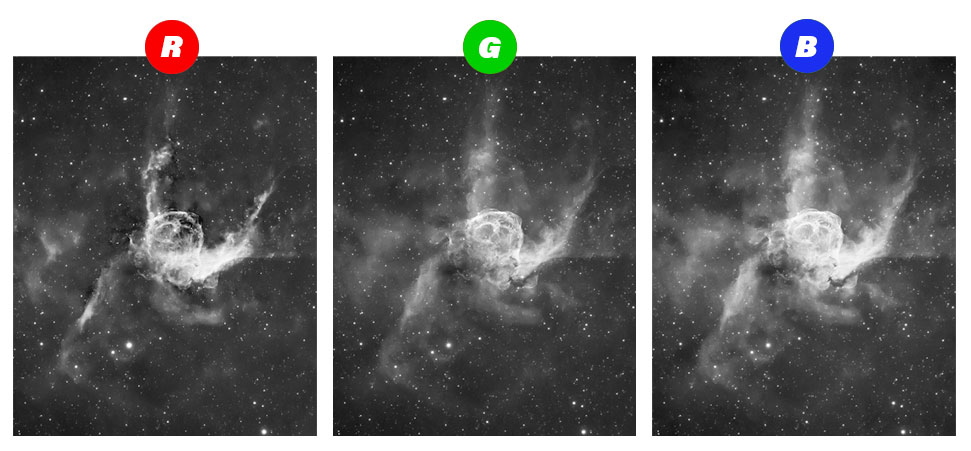
In the image above, you can see the data I have mapped to each RGB color channel in Adobe Photoshop. Because I only captured this nebula in 2 bandpasses (Ha and OIII), the final image is considered a “bi-color” image, as I did not collect any narrowband SII data.
To create my desired color palette (and strengthen the OIII) signal, I applied a subtle amount of Ha signal to the OIII (green and blue) channels. The image is scientifically less accurate, but I think it improved the overall aesthetics of the photo in general.
Related: My Astrophotography Image Processing Guide
Final Image Details
- Total Exposure: 5 hours, 35 minutes
- H-Alpha: 25 x 5-minutes, 22 x 6-minutes
- OIII: 13 x 6-minutes
- Calibration: 15 Dark Frames
- Image Acquisition: Astro Photography Tool
- Guiding: PHD2 Guiding
- Integration/Calibration: DeepSkyStacker
- Image Processing: PixInsight/Adobe Photoshop


Hi Trevor! Your site is such a great resource for beginners like myself. I have been exploring with my current setup (Nikon D750 with sky guider) and it has been a lot of fun. One thing I have been struggling with is light pollution (Bortle 8/9). I have read your reviews for filters and think that is the best way for me to go given it’s hard to get away living in the DC/Baltimore area to a darker site. My problem is that clip-in filters for Nikon full frame aren’t plentiful and cost a fair bit. I want to avoid buying clip-in filters for my DSLR knowing that I will eventually go to a telescope and then will be using 1.25″/2″ round filters. My question is, are there ways to use 1.25″/2″ filters with just my DSLR/lens so that I can then use them when I eventually graduate to a telescope? I don’t want to waste money on a clip-in filter when I will want to use a filter wheel with my telescope one day (and i’d rather not mix and match old clip-in filters i buy today with 2″ filters with a telescope later one).
Thanks so much for your site and for sharing your experience.
-Chris