Understand Binning in Astrophotography
If you are new to astrophotography, you have maybe heard about the term ‘binning‘ (or “pixel binning”) and wondered what it meant. Or maybe you have been doing astrophotography for a few years now but never explored the process of binning, and when/why you would use it.
In this post, I am going to explain binning, how it relates to different camera sensors, and some situations when you may want to try binning or avoid it altogether.

What is Binning?
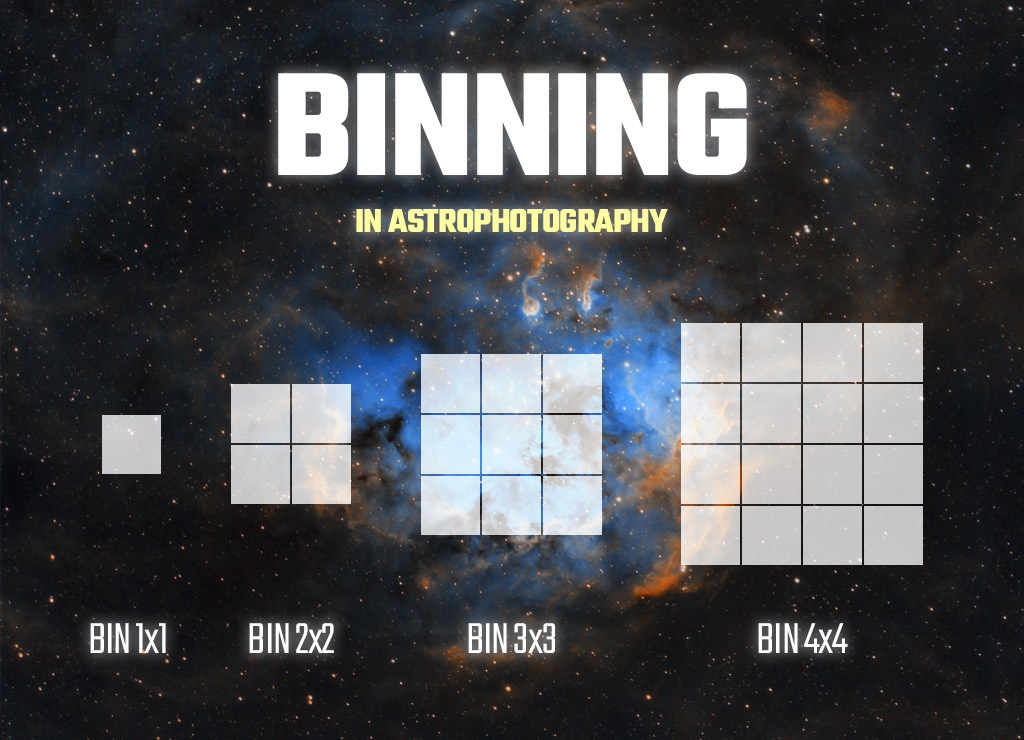
Binning is the process of combining nearby pixels into larger pixels, often in a square grid format (i.e. 2×2, 4×4, 8×8, etc.). Binning improves the signal-to-noise ratio (per shot), at the sacrifice of a lower resolution image.
The field of view you capture through your telescope (magnification) remains the same, but the image will be half the size (in pixels) when binned 2×2 vs. 1×1. Personally, I shoot nearly every astrophoto (with my CMOS astronomy camera) at Bin 1×1 for the highest resolution image possible.
I am able to realize the benefits of binning 2×2 by resampling the image during the post-processing stages of my imaging workflow. The file sizes of the subframes are larger (twice the size of a bin 2×2 image) but that is a small price to pay for a higher resolution.

Resampling an image in Adobe Photoshop by 50%.
Software tools such as PixInsight can also downsample your image to achieve a binning effect. The IntegerResample process found in PixInisght is a basic geometry tool that allows you to resize an image by an integer resampling factor.
The downsampling is applied using average, median, maximum, or minimum pixel binning operations. This tool allows you to upsample your image too, using a non-destructive process that performs a simple pixel replication without any interpolation.

The IntegerResample tool in PixInsight allows you to downsample an image using pixel binning.
Astrophotography image acquisition software such as N.I.N.A, Astro Photography Tool (APT), or the ASIAIR Plus allow you to control the bin mode of your camera. If you find that your images are smaller (in both file size and resolution) than you expected, be sure to check if the camera defaulted to the bin 2×2 mode.
Related Post: Astrophotography Resources
When you bin 2×2, you combine four smaller subpixels into one large superpixel. In this example, with four subpixels per one superpixel, your camera sensor will have four times fewer pixels, which will affect your image resolution.
When using a long focal length telescope, you may wish to improve the image scale (or sample rate) of your camera to better match your desired sample rate. As a general rule of thumb, an image scale of 2 arcseconds per pixel offers a nice balance between under/oversampling, and you may want to bin 2×2 to come closer to this value while imaging.

In the example image above, the bin 1×1 image has 2x the resolution of the smaller bin 2×2 image. This is the largest possible image size this camera can capture.
The Effects of Binning
Binning can allow for faster readout speeds, improved signal-to-noise ratio, and can be a helpful tool when framing and/or focusing your deep-sky target by controlling sensitivity.
For example, the larger superpixel created during the binning process will have the ability to gather light faster, which will help display your dim target in shorter exposures.
While there are benefits to binning, be aware that combining pixels to form larger pixels will reduce the spatial resolution of your overall image, as each of the smaller subpixels is able to capture more detail.
If we look at the bin 2×2 example again – in this particular situation, you double your signal-to-noise ratio but with four times fewer pixels, you end up with a quarter of the resolution.
Video:
Cuiv is a software engineer with a knack for explaining complex ideas in a digestible way. To better understand how binning works in astrophotography, and the differences between software and hardware binning, I highly suggest you watch his informative video on the subject.
Signal-to-Noise Ratio
As you know, the goal in astrophotography is to capture as much signal (i.e. data) as possible while limiting the amount of noise (other artifacts) in your image.
The signal-to-noise (SNR) ratio is the relationship between your signal and the amount of noise present in your image.
The higher the signal-to-noise ratio equals better data quality, while a lower signal-to-noise ratio means an increase in noise.

Read noise, which is one type of noise, is the result of your camera’s uncertainly when reading the values of your pixel data. During this process, the readout can vary from the captured signal rate.
This type of noise comes into play when we look at how binning is affected using different readout methods for certain camera types.
CCD Sensors vs. CMOS Sensors
There are different readout methods for CCD (Charged Coupled Device) and CMOS ( Complementary Metal Oxide Semiconductor) camera sensors, which will impact where binning takes place.
I use a Starlight Xpress CCD camera to photograph objects through my large refractor telescope, but I have never used it for imaging in bin 2×2 mode. However, I use bin 4×4 mode to frame and focus the camera when preparing to capture a new project.
On a CCD camera, the combination of the pixels happens in the analog domain before they are readout on the camera sensor (or chip).
This means that the readout noise is counted only once for the superpixel after the digitalization has taken place, and not for each individual subpixel. The result is a readout noise value that is 1/4 of the original.
This differs from a CMOS camera, where the combination of pixels is completed by the software after the analog system has been converted to digital. This means that the pixels cannot be combined into a superpixel before they are read out, which increases readout noise.

ZWO ASI2600MM Pro CMOS Camera
Understanding Image scale
Image scale comes into play when you want to maximize the effectiveness of a particular camera/telescope system in your unique imaging (sky) conditions. This number is measured in arcseconds per pixel, using the following equation: pixel size / focal length x 206.
According to many amateur astrophotographers, the desired number to hit is between 1-2 arc seconds per pixel, but this is very general and not to be strictly followed. An image under 1.0 may lead to bloated stars (undersampled) and over 2.0 may lead to blocky stars (oversampled).
For example, the camera and telescope in my backyard observatory have an image scale of 1.4 arc seconds per pixel, and this provides well-balanced, high-resolution images that suit my processing style.
My camera (ZWO ASI2600MM Pro) has a pixel size of 3.76 microns, and the telescope has a focal length of 550mm. If I were to bin the images 2×2, the effective pixel size of my camera would be 7.52 (3.76 x 2).
As you increase the focal length of your telescope, image scale and seeing conditions become much more important to monitor for the best results.
The reason image scale is important to consider before binning is because binning changes the effective pixel size of your camera, thus, changes your image scale. You may not even see the difference between an undersampled/oversampled image right away, until you zoom in on the image on a per/pixel level.
![]()
When Should You Use Binning?
I use software binning in a number of situations when using my CMOS dedicated astronomy cameras. When framing and focusing on my intended target, binning 2×2 will aid in the process by providing a preview image (short exposure) with a stronger signal-to-noise ratio.
This is also a handy option to consider if you are hosting an EAA (electronically assisted astronomy) session for friends and family. Your short image exposures will have more signal in them, which is great when showcasing the wonders of the night sky in a prompt and practical manner.
Now that you understand what binning is and its effects, let’s look at a few situations when you might want to try binning and when you should avoid it.
Situations when you might want to try binning:
- When you want to keep your sub-frame file sizes smaller
- To maximize the signal to noise ratio of a single exposure (great for live stacking, EAA)
- To improve the image scale of your camera/telescope and seeing conditions
Situations when you might not want to use binning:
- When you want to capture the highest resolution image possible
- When you prefer to resample (or resize) the image yourself during post-processing
- Your image scale is a good fit (at 1×1) for your seeing conditions and camera/telescope
When I first tested the ZWO ASI294MC Pro camera, I used the bin 2×2 mode exclusively. This was simply due to the fact that my aging laptop computer had trouble transferring the larger 1×1 sub-frame file sizes.
The images benefit from an improved signal-to-noise ratio (4 x times more signal per pixel), yet I was left with an image that was only 2072 x 1410 pixels in size. I now capture images in Bin 1×1 mode with this camera, even if the image scale is less ideal.
I always prefer to have as many pixels to play with during processing as possible. I can always resample the image by 50% if I want to.