Sky-Watcher EQ6-R Pro Review
The Sky-Watcher EQ6-R Pro is a computerized equatorial telescope mount with GoTo capabilities. This equatorial (EQ) mount is capable of providing precise, accurate tracking of the night sky, and is suitable for long-exposure astrophotography.
The core specifications of this equatorial mount include having a built-in ST-4 autoguider port, a payload capacity of 44 pounds, and a SynScan computer hand controller with an extensive database of objects.
I have been using the Sky-Watcher EQ6-R Pro telescope mount since October 2018, and have used it to capture several deep sky images of nebulae, galaxies, and star clusters in space. In this post, I’ll share some of my favorite features of this EQ mount that I have experienced over several imaging sessions in the backyard.

Some of my favorite photos captured using the EQ6-R Pro.
Whether you already own the EQ6-R Pro and are looking to tap into more of its features, or are trying to decide which equatorial mount is best for your visual observation or astrophotography goals, this article should offer up some useful input from someone who’s been in your shoes.
Related Video: My first run with the Sky-Watcher EQ6-R Pro in the backyard
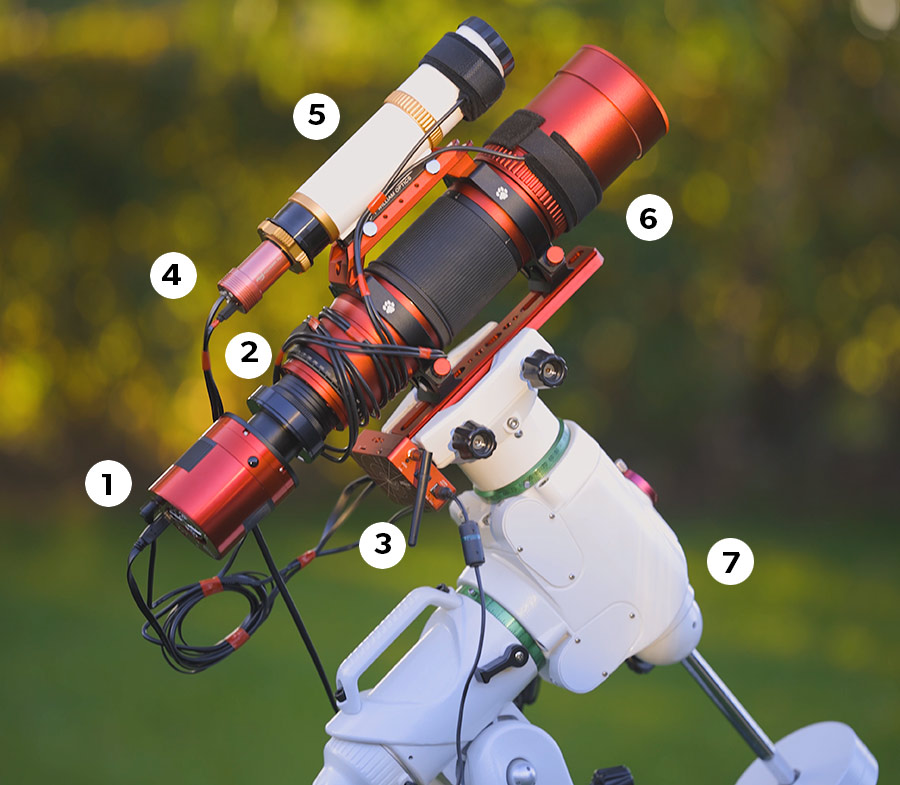
Recommended Setup for this mount
The following list of gear should give you a better idea of an ideal astrophotography configuration for the Sky-Watcher EQ6-R Pro.
I have included a link to purchase each item of the setup from Agena Astro.
- Camera: ZWO ASI2400MC Pro
- Telescope: Sky-Watcher Esprit 100
- Guide Scope: William Optics Uniguide 50
- Guide Camera: ZWO ASI120MM Mini
- Controller: ZWO ASIAIR Plus
Total Weight: 22 pounds
Sky-Watcher EQ6-R Pro Review
Before we dive into some of the interesting features you may not have known about, here is an overview of exactly what the “EQ6” is capable of. As a preface, it’s worth noting that I use this mount for astrophotography exclusively, and I am in the northern hemisphere.
For those in the southern hemisphere, the process is very similar all around, aside from polar aligning the mount with the south celestial pole (SCP).
Before stepping up to the EQ6-R, I used a number of intermediate-level astrophotography mounts, including the slightly smaller HEQ5 Pro SynScan model.
The Basics
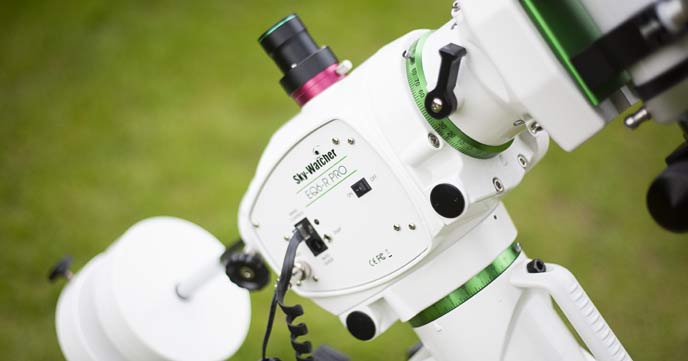
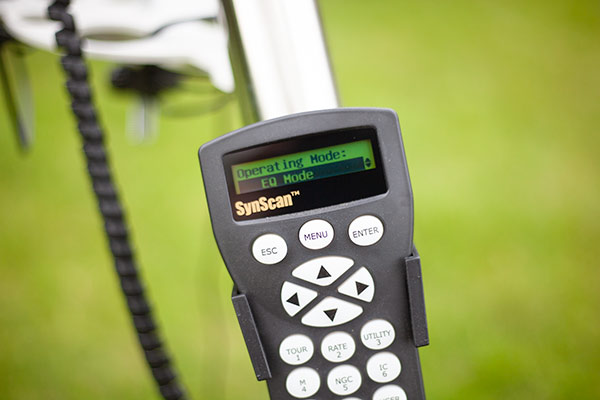
The EQ6-R Pro includes a SynScan hand controller with an LCD display that gives you control its features and basic functions. The left and right keys on the keypad control the Right Ascension (RA) axis, while the up and down arrows are used to control the Declination (DEC) axis.
You can control the slew speed by selecting the RATE shortcut button (2) on the keypad, as it is useful to make large movements at a high speed, and subtle adjustments using a slow speed. The Sky-Watcher EQ6-R Pro has 10 slew speeds for complete control over the movement of each axis.
Before powering up the EQ6-R, your telescope should be in the home position. This means that the EQ head is leveled on the tripod, and the RA axis is pointed towards the north celestial pole (NCP). The counterweight should be at its lowest position, and the telescope should be pointing towards the NCP. You can then turn on the mount and select the operation mode.
For those interested in astrophotography, you will only ever want to use the mount in EQ mode.
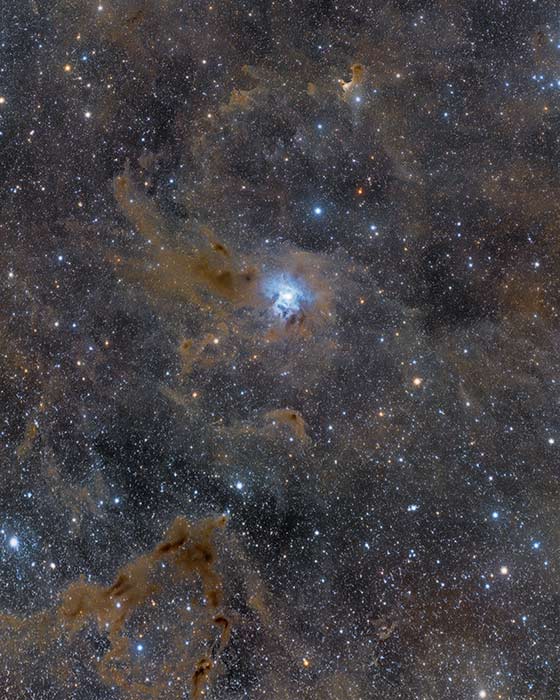
The Iris Nebula captured using the EQ6-R Pro and RedCat 71.
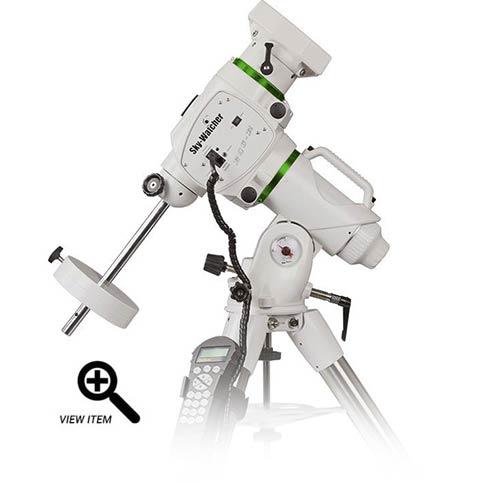
With the RA and DEC clutches locked, and counterweight(s) attached, you can mount your telescope on top of the EQ head. This is accomplished by fastening the mounting plate of your telescope to the saddle, which accepts both D and V-style mounting plates.
If you are looking for a nice upgrade, the Dual EQ6R-Pro XL collar was redesigned to fit the EQ6R-Pro and features two large locking hand knobs and spring-loaded jaws.

Getting Started
Once the SynScan system has initialized, you can enter in the geographic coordinates of your observing site.
This involves entering the latitude and longitude coordinates of your current location using the cursor on the LCD display and the keypad. Then, you will enter your current time zone, which for me, happens to be UTC -4 in southern Ontario.
You can also enter in your current elevation, which is used for atmospheric refraction compensation (generally, the higher your elevation, the better). Next is setting the current date and time, and whether you are currently on daylight savings time.
Once all of these important details have been entered (so the mount understands what is available in the sky from your location), you reach the mount alignment process, with the “Begin Alignment” dialog served up on the LCD screen.
The SynScan Hand Controller set to EQ Mode.
Use the “Park” Feature
This simple, yet useful feature automatically aligns your telescope mount in both axes at the beginning of your imaging session. It is not exclusive to the EQ6-R Pro, yet it is easy to miss if you don’t follow the instructions in the manual on your first few runs.
This feature is located under the “Utility Function” menu and asks you to turn off the mount after the park position has been confirmed. The next time you turn the mount on, you will see a dialog on the LCD display asking if you would like to start from the park position.
This is a handy feature that I did not personally take advantage of for the first few months of ownership with the mount. It is nice to confirm the home position when setting up, especially before beginning your polar alignment process.
The EQ6-R is Easy to Polar Align
Whether you use the built-in polar scope with the illuminated reticle or use a QHY PoleMaster device, polar aligning the EQ6-R is a breeze.
This is largely due to the fact that the EQ6-6 includes large, Alt/Az adjustment bolts with comfortable handles. Fine-tuning the polar axis of this equatorial telescope mount is made possible by these convenient controls.
The built-in polar finder scope with an illuminated reticle allows you to accurately polar align the mount without the need for additional software or accessories. You can either use a third-party mobile app like “Polar Finder” to find out the current position of Polaris or simply use the information displayed on the SynScan hand controller.
The SynScan hand controller displays the position of Polaris in the polar scopes’ field of view (FOV). You need to imagine the large circle in the FOV of the polar scope as a clock’s face with 12:00 sitting at the top.
Then, it’s simply a matter of adjusting the Alt/Az bolts of the mount to place Polaris in the “HH:MM” position provided.
Using a PoleMaster with the EQ6-R
If you don’t like getting underneath the polar scope for a real-time view of the NCP or SCP, the QHY PoleMaster is a great option. This electronic polar scope uses a small camera to display the region surrounding the north (or south) celestial pole.
Using the live feed through the camera, you can fine-tune your Alt/Az adjustments in a very precise manner. The PoleMaster requires the appropriate adapter (this is the one you need) to fasten it to the polar axis.
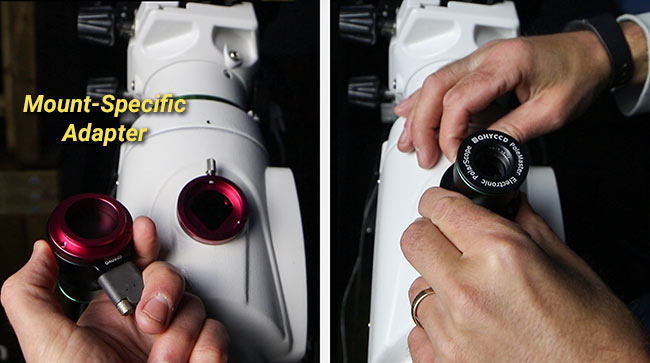
Fastening the PoleMaster to the EQ6-R using the necessary adapter.
You Can Improve the Alignment Accuracy
Before running a star alignment routine, make sure that your telescope is well-balanced, and that there are no loose cables that could get caught and snag on the mount.
The alignment routine involves choosing a bright, named star from the database and centering it in your telescope eyepiece or camera. The LCD screen displays “Choose 1st Star”, at which point you can cycle through the list to find a star that is not blocked by any obstructions from your location and press enter.
A word of caution here, once you hit enter, the mount will start to slew to the object immediately.
From here, it’s a matter of using the arrow buttons on the keypad to center the star. Remember, you can change the slew speed at any time by pushing the “Rate” button and setting the value higher or lower.
It is often useful to leverage a finder scope on your telescope when slewing to your first alignment star, as it has a much wider field of view than your primary telescope and makes finding the first star easier.
When running through a star alignment routine, it is important to consistently center the alignment star in the eyepiece or the camera’s FOV. It is beneficial to use a reticle eyepiece with a small FOV.
Personally, I use the camera’s FOV and center the star on my DSLR display (with grid enabled) or with a crosshair overlay in my camera control software (Astro Photography Tool).
You can run a 1-, 2-, or 3-star alignment to improve the telescope’s pointing accuracy. This is very important when photographing deep-sky objects that are nearly invisible until a long-exposure image is captured.
Avoid Errors due to Mechanical Backlash
You can improve your alignment accuracy by avoiding errors due to mechanical backlash. Backlash is present in all equatorial telescope mounts and does not affect your observing enjoyment or your long-exposure images when autoguiding is employed.
To avoid introducing backlash-induced alignment errors, center the alignment star, with the UP and RIGHT directions from the keypad. If you overshoot the star using this method, use LEFT and DOWN to bring the star back down the FOV and try again.
The Stepper Motors are Quiet
If you haven’t used this particular mount firsthand, you may be wondering what the EQ6-R sounds like while it is slewing. I have heard many astrophotography mounts over the years, and this one is impressively quiet.
This mount uses stepper motors with a 1.8° step angle and 64 microsteps. This technical design aspect results in a quieter mount than using servo motors.
This means that even at the maximum slew speed (9X), the mount emits a modest hum that will not wake up your neighbors. While the telescope mount is tracking, it is completely silent. It’s only when you move the RA or DEC axis at top speed that you hear a noise.
Compared to other equatorial telescope mounts I have used, the EQ6-R Pro’s audible sound is more than acceptable. When you are partaking in a hobby that takes place (alone) outside at night, avoiding loud or unusual noises when possible is always a good idea.
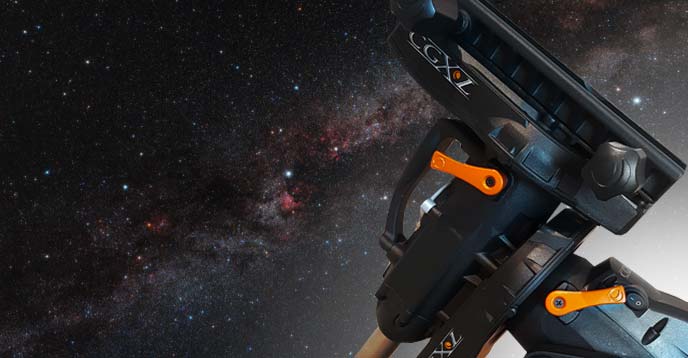
In contrast, the Celestron CGX-L computerized mount is noticeably loud while slewing at top speed. If this mount is being used in a closed observatory, it’s not an issue. However, I set up my equipment in a city neighborhood backyard. Depending on the time of night, I hesitate to slew to a new target because of this trait.
The Autoguiding Performance is Impressive
The Sky-Watcher EQ6-R Pro delivers impressive results when the built-in autoguider port is leveraged. Over the years, I have maximized the tracking capabilities of my astrophotography mounts by using an auxiliary guide scope and camera to autoguide using free software called PHD2 guiding.
The EQ6-R Pro allows you to set and change the default auto guide speed of the mount from 0.5X to 0.75X or 1.0X in the setup menu.
I have experimented with a guiding rate of 1.0X and saw little improvement in my guiding graph in PHD2 compared to the default speed of 0.5X. The point is, you can adjust this setting if the need arises, and it’s a feature I’ve only recently tapped into on the EQ6-R Pro.
For a real-life example of the autoguiding performance you can expect with this mount, have a look at the screenshot below. The guiding graph shows that my total RMS error is 0.63″. Generally, a total RMS error of under 1-second means that you can expect pinpoint stars in your long exposure images.
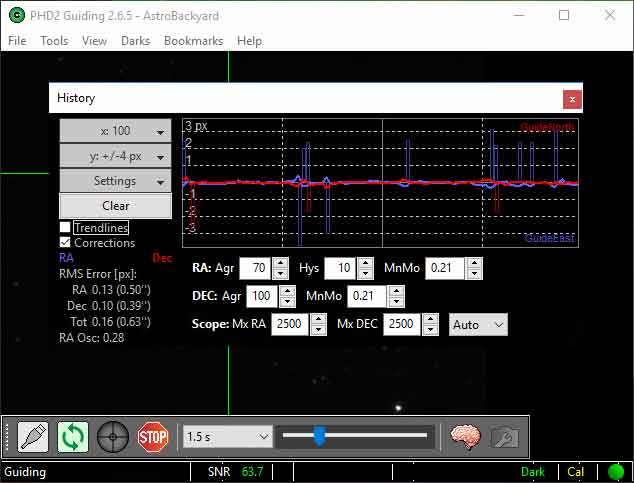
My autoguiding graph in PHD2 guiding using the Sky-Watcher EQ6-R Pro SynScan mount.
Running the Sky-Watcher EQ6-R Pro with an ASIAIR
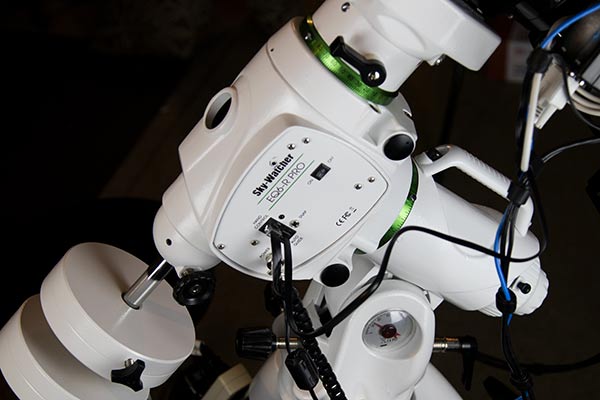
You can easily control the Sky-Watcher EQ6-R Pro astrophotography mount using an ASIAIR with the right connection. I use a Washinglee RJ45 Control Cable to connect my ASIAIR Plus to the Sky-Watcher EQ6-R Pro.
The USB end of the cable plugs directly into one of the USB ports on the ASIAIR, and the other end plugs into the hand controller port on the Sky-Watcher EQ6-R Pro mount.
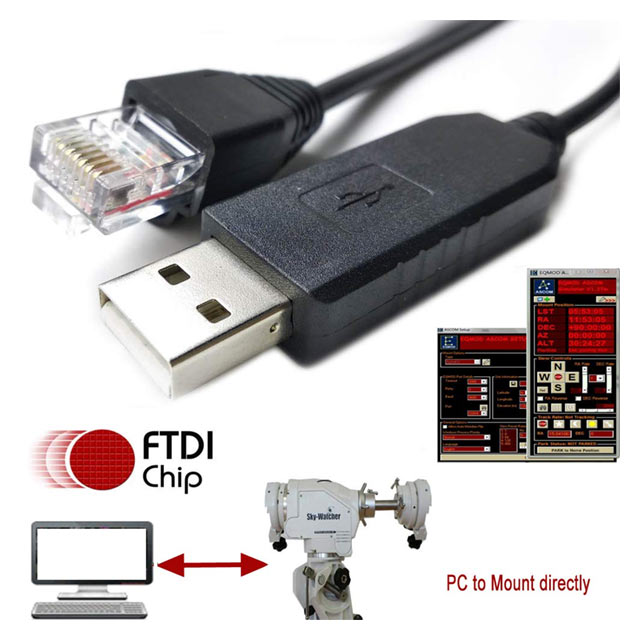
The cable you need to control the Sky-Watcher EQ6-R Pro mount with an ASIAIR.
This gives me complete control over the mount using the ASIAIR mobile app. I can use plate-solving with the SkyAtlas planetarium tool on the mobile app, which is much easier than doing a 3-star alignment, or manually framing up my astrophotography target.
You can select the deep-sky object in the sky you wish to capture, and the mount will automatically slew to it, and center it. For this to work properly, you need to make sure that you have input the correct focal length of your primary telescope and guide scope.
You can also now use pulse-guiding directly to the mount, rather than through the ST-4 cable. You will now use the autoguiding system within the ASIAIR rather than PHD2 guiding.
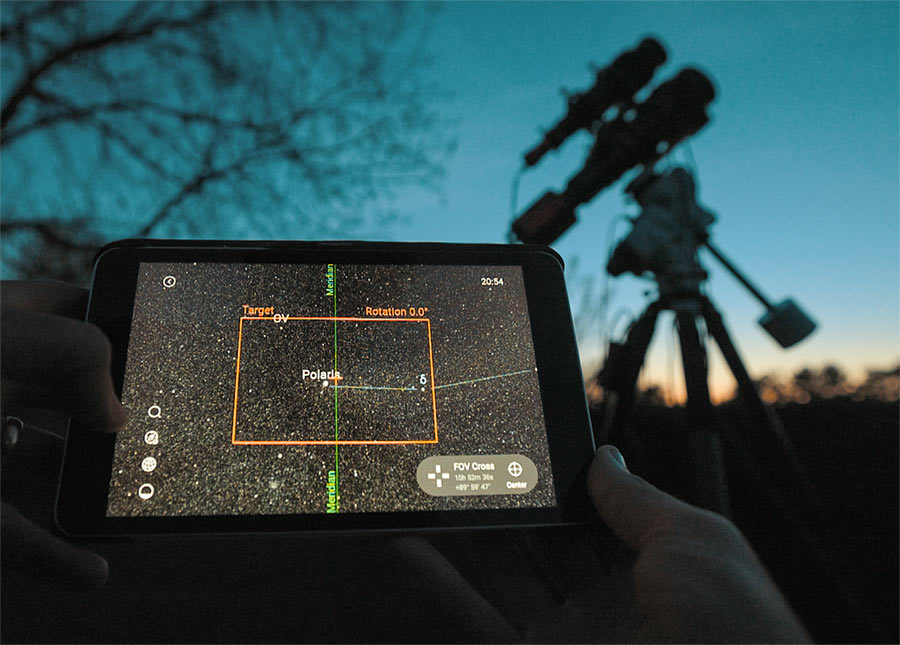
Controlling the EQ6-R Pro mount via the ASIAIR mobile app on my tablet.
This mount works exceptionally well with the ASIAIR, and you will likely ditch the hand controller for good after using it. I have used the ASIAIR to run all of Sky-Watcher mounts, from the Star Adventurer GTi to the massive CQ-350.
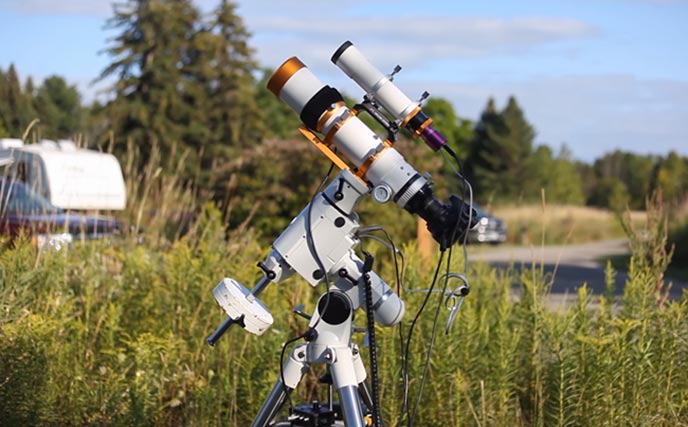
Even a large refractor telescope like the William Optics FLT 132 shown below is not a problem for the EQ6-R Pro with the appropriate counterweights. For a list of my favorite imaging scopes, see the best astrophotography telescopes available in 2026.
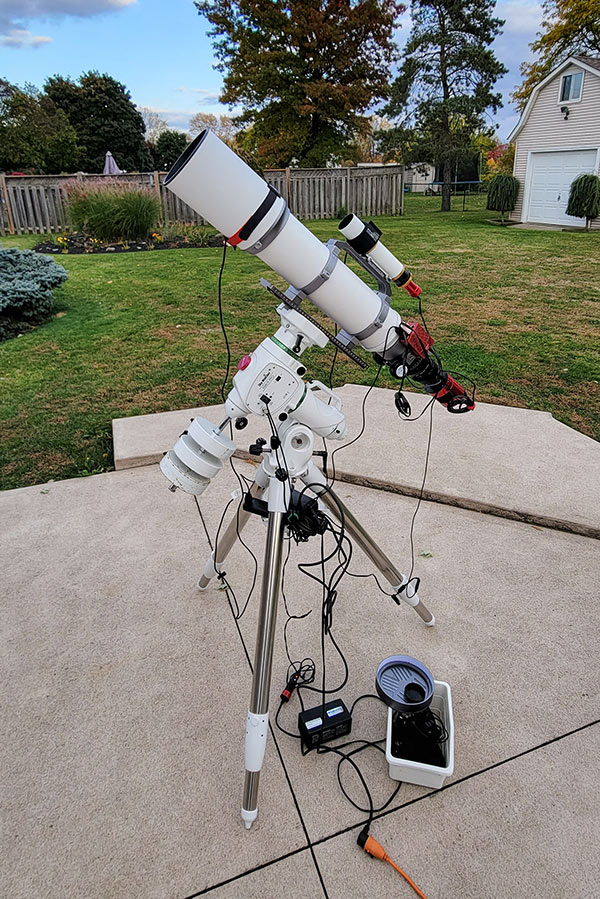
A William Optics FLT 132 riding on the Sky-Watcher EQ6-R Pro mount.
The Mount is Heavier Than it Looks
When it comes to equatorial mounts for astrophotography, being heavy is a good thing. However, I think some people who receive their EQ6-R for the first time may be a little surprised at how heavy the EQ6-R actually is (I was).
The weight of the EQ head is 38 lbs on its own, and the tripod adds another 16.5 lbs. Add in two 11-lb counterweights, and you’ve got a telescope rig that weighs 76.6 pounds and is not going anywhere for a while.
Luckily, the EQ head includes a useful carry handle that I have certainly put to good use. Also, the supplied counterweight bar is retractable, which makes transporting the mount out of the door of my garage a little easier.

I used to carry my Sky-Watcher HEQ5 Pro SynScan around the yard with the telescope and counterweight attached. It was heavy and awkward, but manageable.
This is not possible with the EQ6-R, which is understandable considering the increased payload capacity (44 lbs) of the mount. To transport the Sky-Watcher EQ6-R from my detached garage to the yard, I must remove the counterweights and the telescope first.
It’s possible to lift the tripod with the EQ head attached (54.5 lbs), but this is likely too heavy for most folks. The good news is that this heavy profile means that accidentally bumping the polar alignment out of position by kicking a tripod leg is unlikely. Smaller, ultra-portable mounts like the iOptron SkyGuider Pro do not share this quality.
You Don’t Need to “Mod” the Mount
If you’re a tinkerer, I get it. It may be tempting to you to open up the EQ mount head and take a look. I would advise against this personally, as you may do more harm than good.
I’ve seen a number of posts and videos discussing “belt-mods” and “hyper-tuning” Sky-Watcher NEQ6 and EQ6-R mounts. Personally, I wouldn’t recommend opening up the mount in hopes of tweaking performance, even if the underlying mechanics are straightforward to you.
In my experience, the Sky-Watcher EQ6-R can track accurately for 10-minute exposures (or longer) without any re-greasing or modifications to the worm gears when autoguiding is leveraged.
I suggest spending the time to get your balance and polar alignment spot-on before blaming the mount for bad tracking. It’s easy to get caught up in scrutinizing the mechanical backlash and periodic error present in the mount.
If you do dive into these advanced adjustments, you better be mechanically minded and ready to invest a “minimum of four hours” for a typical belt modification.
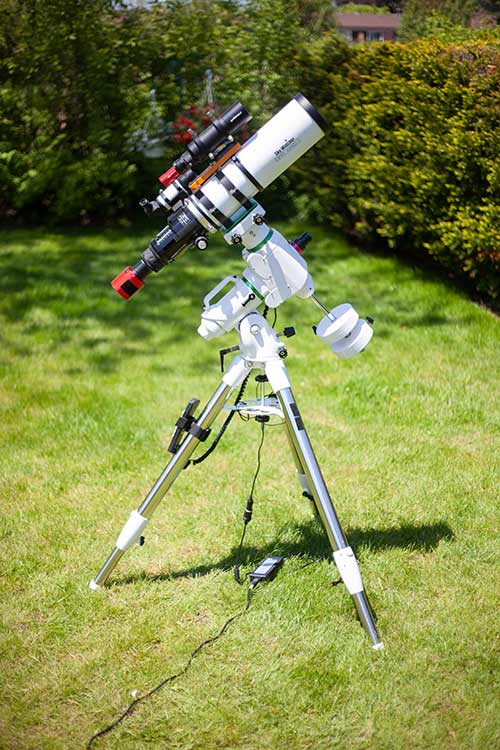
The EQ6-R with a Sky-Watcher Esprit 100 ED APO attached.
The SynScan Hand Controller gives you Extensive Options
The included SynScan hand controller includes an impressive 42,000+ object database, with almost every possible target you could ever want to observe or photograph.
The Messier object list is widely used by amateur astronomers in the Northern Hemisphere, while the NGC catalog is great for pointing the telescope at more obscure nebulae and star clusters.
The database also includes IC and Caldwell catalogs, which covers most of the noteworthy subjects in the night sky. I only wish the database included the Sharpless catalog for items such as the Tulip Nebula with no alternative designation.
To slew to these objects, it may be better to control the EQ6-R using your PC using a supplementary PC-Link cable along with the appropriate ASCOM drivers and software.
I use the hand controller to align and center my target. After a quick polar alignment routine using the QHY PoleMaster, the pointing accuracy of the mount is spot-on using just a 1-star alignment.
After you’re aligned and ready to observe or image an object in space, you can start by choosing a target using the “OBJECT” shortcut key, which contains the following object list:
- Named Stars
- Solar System
- NGC Catalog
- IC Catalog
- Messier Catalog
- Caldwell Catalog
- SAO Catalog
- Double Stars
- Variable Stars
- User Object
- Deep Sky Tour
The deep sky tour is a very cool feature for visual observation sessions. Imagine a star party or public outreach event where you want to have the best list of targets at the ready.
This feature generates a list of the most famous deep-sky objects that appear in the current night sky overhead. You simply go through the list and pick them off one by one.
The Periodic Error Correction (PEC) Feature
Periodic tracking error is present in all equatorial telescope mounts, and is due to the design of the internal gears. The Sky-Watcher EQ6-R includes a periodic error correction (PEC) function to help correct this.
The PEC training procedure requires that you first polar align and star align the telescope mount. Then, slew to a star close to the celestial equator, and center it in the telescope eyepiece or imaging camera.
Then, navigate to the Utility Function > PEC Training mode and press enter. From here you can select the speed you would like to use for PEC training. The Sky-Watcher SynScan manual suggests using 0.125X sidereal rate for wider FOV telescopes such as the Esprit 100 ED APO.
After selecting the speed using the “1” or “2” keys, the screen will then start to display the elapsed time of the PEC training routine. Now, your job is to keep the star centered in the FOV using the left and right direction keys on the hand controller.
Once the PEC training routine has completed, the elapsed time will stop. Noe, you can select “PEC+Sidereal” as a tracking speed in the Setup menu. It is recommended to wait for at least one PEC training reply cycle to complete before you start taking your images.
Sky-Watcher SynScan Specifications
- Object Catalog: Messier Catalog, NGC, SAO, Caldwell, Double Star, Variable Star, Named Star, Planets
- Pointing Accuracy: Up to 5 arc-minutes RMS
- Tracking Rate: Sidereal Rate, Solar Rate, Lunar Rate
- PEC: PPEC (permanent PEC)
- Database: 42,000+ Objects
- LCD: 18 Characters X 2 Lines (adjustable contrast and backlight)
- Keypad: Rubber with adjustable backlight
- GPS: SynScan GPS Modular (Optional)
- PC Connection: USB or RS-232X
- Power Output: Power Supply Voltage – 0.7V, Max. 100mA current output
Power Supply for the Sky-Watcher EQ6-R Pro
As one Cloudy Nights forum member put it, the Sky-Watcher EQ6-R Pro can get “cranky” if the right power supply is not used. I have experienced this issue myself, when I used an AC to DC power adapter that did not provide a minimum 4 amps of power.
These days, I use a 12V AC/DC adapter with 6 amps to power the EQ6-R when plugged in at home. Here is a picture of the exact AC/DC adapter I use with the EQ6-R, and here is a link to it on Amazon. Others have found the Pyramid PS9KX 5 Amp power supply to work well with this mount.

The AC/DC adapter I use to power the EQ6-R Pro mount from home.
I often plug the DC power port into my portable power station to take my deep-sky imaging setup on the road. I currently use an Anker 757 PowerHouse to run my imaging rig while camping off-grid.
Final Thoughts
As you may have noticed, there is a lot to cover when discussing all of the features of the Sky-Watcher EQ6-R Pro SynScan computerized telescope mount. The very first night I used the EQ6-R, I captured one of my favorite astrophotography images to date, and I knew I was in for a long relationship with this mount.
A reliable equatorial mount is the foundation of every great deep sky astrophotography kit, and the EQ6-R is a worthy investment for those looking for a stable, long-term solution for long-exposure imaging.
From my early days with the HEQ5 Pro to my latest session in the backyard with the EQ6, I’ve been extremely satisfied with the user experience and performance of Sky-Watcher’s affordable equatorial telescope mounts.

Pros:
- Fantastic Tracking when Autoguiding Used
- Quiet Stepper Motors even Slewing at 9X
- Easy to Polar Align
- Built-In PEC Training Feature
Cons:
- Heavier Than it Looks
- Intermediate Level Mount with Price to Match
- Power Supply must be Correct or will Act Up
My Current Sky-Watcher EQ6-R Pro Setup (2022)
- ZWO ASI2400MC Pro
- Optolong L-eXtreme Filter
- ZWO ASIAIR Plus
- ZWO ASI120MM Mini
- William Optics Uniguide 50
- William Optics RedCat 71
- Sky-Watcher EQ6-R Pro
What Others Have Said:
“This mount is simply amazing. It is robust and tracks very well. I was taking 5-minute subs with no star trails. It is built like a tank and handles my Meade 5″ refractor with ease. The stepper motors are quiet. It’s simply a joy to use and I highly recommend it. The price is well worth it” – James S. on HPS website
“This mount is a tank. I have been doing astrophotography for several years using a lighter weight mount but I was ready to setup up to a heavier payload mount and I am very pleased.” – Ray on HPS website


Useful Resources:
- Update the Firmware of your Sky-Watcher EQ6-R Pro SynScan (Sky-Watcher Website)
- The Complete User Manual (Sky-Watcher SynScan PDF)
Do you use the Sky-Watcher EQ6-R Pro for astrophotography? If so, let me know your experiences with it in the comments. To stay up to date with my latest adventures in the backyard, be sure to subscribe to my newsletter. Until next time, clear skies!

Great review! Quick question about power supplies–have you tried to run it with the Pocket Power Box? I bought a special cable from the PPB folks specifically for the EQ6 and was wondering if you’d heard anything. I’ll give it a go inside, but any feedback prior would eliminate the jitters of being a “pioneer”.
Hey Jack! No, I have not tried to run the mount using the PPB! I keep my devices running off of the powerbox separate. I am curious to know how the cable works out for you – the guys at Pegasus know their stuff so I wouldn’t worry! In fact, they’ve helped me with a number of power-related questions over the years:)
Great review Trevor. I too have this mount. I came from a AVX and the mount tracks much better( no more babysitting the mount). I truly love this mount and I do not plan on changing for years to come.
I got started on a skyguider pro, and ended up buying the eq6. It’s work setting up every time, but it produces almost guaranteed results Everytime.
Def get the polestar, it’s super quick getting aligned.
+1 for the handle as well.
The home Depot 35inch husky work cart fits the foam the mount comes in fyi. The cart has wheels and is easy to transport.
I plan on bringing the eq6 with me to a bortle 4 in NC. The cart is a life saver.
Great review Trevor. I’m looking to do the PEC training with my EQ6-R to improve my autoguiding. Are you able to use PHD2 to keep the star centered instead of doing it manually?
Thanks Mike. I just checked out the 35″ Husky Cart from Home Depot you mentioned – it looks like a great solution for traveling with the mount to star parties/dark sky locations etc. Thanks for sharing, and enjoy the EQ6-R!
Thank you for your input, Jimmy. I agree that this mount is built for the long haul. The fact that my old HEQ5 is still in tip-top shape goes to show how these Sky-Watcher mounts hold up over time. Cheers!
Kyle – WOW, great point. YES you can use PHD guiding for the PEC training instead of doing it manually like a caveman! lol. The manual says to be guiding for at least a minute before running the PEC training function. Glad you brought this up, thank you!
Hi Trevor,
How does the EQ6-R PRO compare to the Ioptron CEM60 that you have used a few months ago? I am in the process of upgrading my old HEQ5 pro and I am trying to decide between the EQ6-R PRO or an Ioptron CEM 40 or CEM 60.
Hi Trevor, awesome review. I have had the equivalent Orion Atlas Pro for a couple years now which I use for my mobile setup. The Sirius mount is on the permanent concrete pier – yes I am backwards. I love the mount. One thing I have done is polar alignment using the iteration method – without using Polaris. It actually worked really well however don’t normally do this as I was just curious to see if it would work. I find this mount easier to adjust than the Sirius thanks to the larger knobs. When I did a public observing session a couple weeks ago I found I needed the connector Jack recommends from Pegasus – I did not know they made one so I will check into it. Lastly, I ordered a Scopebuggy so I can wheel the setup around on my lawn without breaking down. I have not received it yet so I will have to keep you posted. Thanks for sharing your review. – Cheers
Trevor – No problem! Now get plate solving with that thing! Just need a USB cable between your PC and the hand controller, and the ASCOM driver installed. APT has a great plate solving routine. Saves time during star alignment and framing.
“The Sky-Watcher SynScan manual suggests using 0.125X sidereal rate for wider FOV telescopes”
I have been researching this mount a lot so I am happy to finally see your review of the mount. The time has come for me to just bite the bullet and get my rig set up but I am curious… my telescope is a 6″ RCP f/9 with 1350 mm focal length… which results in a VERY narrow field of view. Does the SynScan suggest a speed for PEC training for very narrow field of views?
In your opinion, if you had a choice between this mount or the iOptron CEM 60 pro… which one would you choose?
Hi Trevor! Ones again a great review! I have too like, Kurt Zeppetello, the equivalent Orion Atlas Pro. I am too very satisfied with the performance and results with this mount. I use it both with a Vixen reflector 8” and a Sky-watcher esprit 120mm. But, perfect balance is a must with my mount to get good performance.
Keep up you fantastic work!
Ps I love when you have Rudy in your videos 😁
Hi Trevor,
I like to follow up on David Hins’s post (May 29) on the comparison between the EQ6-R Pro and the iOptron CEM60. Can you give us some thoughts on that? I am also undecided right now. Important for me is overall weight, tracking accuracy and noise level. I will be putting a 5″ f/6 refractor, ZWO ASI294MC Pro, 60mm guide scope and ASI120MC-S guiding cam on it. None of these mounts should have any problem with this load both visually and for astrophotography I guess.
I have one.
Also when “overloaded” (Celestron 11 and GSO-RC6″ side by side) the autoguiding is perfect.
Hey Trevor! Fantastic and in depth review. I just decided on this same mount right before you did the review, so I know I will have no regrets with the choice. Looking forward to the nights ahead down here.
Quick question for traveling. You showed what you are using at the home site. What power option are you using whenever you travel out to a dark site?
Great call on the Husky tote as well Mike!
Hi Trevor,
Loved the review and after reading it and watching your You Tube channel I descided to puchase this mount. I would agree that it is heavy but for astrophotography “weight is your friend” unlike the other mounts I have used which were a bit on the light side for Astrophotography.
I have one question that I hope you can help me with. After setting up the mount I realised that unlike the other mounts that I had used the alt bolt did not work the same and I’m not sure if they should be as they are or is this a problem.
With my other mounts if you slacken off the front alt bolt you can move the scope up or down in alt with the rear bolt. With this mount you can raise the mount by using the rear bolt but it does not come back down when you slacken it off even when the counter weights and scope are attached. the only way to get the scope to come down is with the use of the front alt bolt. Is this correct or do you think it is a problem?.
All the best from Long Island
Les
Hi all. Complete newbie here. I have a Nikon 5600 with a 50mm f2. I was thinking that I could use it to take multiple exposures of large nebulous-type objects, glue them together with today’s modern software, etc. However I’d need a decent equatorial mount that tracks the night sky and having a built-in object database would be a great plus. And I think I’d probably get a APO Triplet Refractor telescope 2-3 years down the line. But I dont know what I need to mount a DSLR on a bare computer-based EQ mount and hold open the option to put a $1k APO Refractor on the same mount (plus a camera) in the future. Basically, I don’t want to spend $700 for a mount that I will need to replace down the line, but I also don’t know what adapters to buy to put a DSLR camera on a $1k German EQ mount without a Telescope or even a finder scope. Thanks.
All,
Great review Trevor. A couple of things to add. 🙂 I use the Pegasus Power Ultimate Power Box (UPB) and it works GREAT in taming cable issues. The newer V2 ups the ante with USB 3.0 ports but the original can also be used with a 4 Port USB 3.0 Hub. I use this one (recommended by Pegasus based on build quality) from Amazon:(https://amzn.to/3crTyg3)
I also use the Schumacher Power Supply with great success and has been rock solid, but it is rated as 6 Amps, not 10. I’m testing their 15 Amp one but it does have an active fan (so a little noisy). Once you start powering multiple items with the UPB e.g. slewing, camera, the power box itself, dew straps, etc. the amps do start to add up. 🙂 Will let folks know if the 15 does the trick!
Great lead on the Husky Cart.. Will have to check it out! GEOPTIK makes a carrying bag that uses the shipping foam but it seems to only be in European sellers. It’s model # is: 30B040.. but a cart with wheels would be great! 🙂
To Trevor’s point, the mount is very quiet and the tracking is stellar (no pun intended).. 🙂
Again thanks for a great review Trevor..
Hi Trevor
I’m real new at astrophotography, it a good amount of experience with general photography.
I have a Nikon D 500.
Do I have to get it modified like many of the Canon cameras or is it already “modified” allowing for H alpha imaging?
If not, can filters be used or does a “real” mod have to be done by s pro, meaning the D 500 will become strictly an Astro camera?
I just ordered this mount based on your use. It is a newer version with built in USB port. My poor AVX mount died so I went for an Upgrade.
I started with the star adventurer about a month ago and it had been working great for me. It got quite a bit of frost on it last night and tonight when I went to use it, it burnt itself up. I suspect moisture damage. I was happy that Amazon approved a return. Instead of another SA, I ordered the EQ6R. I know, probably a big jump extremely early, but I decided that a solid, well-recommended rig was the best to build upon. That being said, I’m looking forward to trying it out.
trevor,Ive got an orion Sirius eq-g v-4,after reading this review Im thinking of pulling the trigger on the eq6-r pro right now Im running an orion 80ed with acceptable results,for rank beginner,Id like to make the upgrade,one note? I have a pier I poured last summer,do you leave your mount outdoors? Ive heard a lot of folks do this with a tarp,How do you feel about this practice,I have doubts leaving 1.5K outdoors in the cold and most of all the humidity,I do enjoy your posts,Im in the process of mapping my dark sky camping sites for the summer,VW Westphalia,and Oregon,some great locations,thanks
I just bought one from High Point…as you know, they are on sale, plus they offered a code for an additional 2 percent off. Plus 1.5 percent cash back on my credit card, no tax, no shipping for this BEAST. 1298 dineros for something that would have been over 20 grand back in the 1980s.
Celestron is listed as the actual manufacturer of this beaut. Can it work with a StarSense camera?
Fantastic review, thank you for the time and sweat on this one. I am a owner of the good’old EQ6 but she is getting tired. I am considering to buy this EQ6R which is a kind of upgrade and correcting most of the flaws.
Other sections of your blog are also very clear and easy to understand. Well done !
Thanks Trevor, after reading your review mine was just delivered! We’ll see how she handles my 10″ Schmidt Newtonian….she’s about 35 lbs with the Moonlite focuser and 60mm Starfield guide scope / ZWO ASI120mm-S (also from seeing you use a similar combo)…I thought I have seen an 8″ reflector in one of your videos? Ever put it on the EQ6?
Really amazing and useful review, I would ship this mount to Iraq immediately after reading all of information above.
Thanks a lot.
Thanks for the great review! I was on the fence between this and another mount, and you tipped the scales 🙂
In the review, you discuss using your PC/Laptop with the mount for objects rather than the LCD hand controller, which I like personally.
My question is do you know if there is Mac OS software for this purpose, or is it PC / Windows specific? I know for astrophotography the majority of the software is Windows centric, but as a Mac user, I don’t currently own a Windows device, and that would further impact budget to buy a suitable laptop for the hobby … rather than using my existing Macbook Pro 🙁
Thanks again for an amazing writeup!
Hi Trevor, I bought it, partly based on your advice. Received it yesterday. I had used the LX-50 fork, and the CG-5GT prior. The build quality at the price point is very good–I think it will serve me well for years to come. I had some minor issues (mostly my own education), and support was emailing me back within a couple hours. Years ago when I started, there were no websites to help the amateur decide. I really appreciate yours and all the time you take to help others. Write a book–I will buy it. 😉 Wish you all the best in life.
Hi Trevor
you mention in the review a belt mod, I thought this mount was already belt driven so won’t require this mod?
Regards
Richard
1) The illuminator is so bright that I can’t see Polaris. I thought my EQ6R pro was broken until I looked in the polar scope with power off! For now, I have to align using power on/off/adjust…on/off/adjust…
I see this problem was discussed in 2007 in the Cloudynights forum…but the problem persists…? Or, is it a hidden dimmer someplace?
Any solution? Paint the LED with red nail polish? (Hopefully just transparent enough…)
2) I get 120 sec. perfect, round stars with 560mm lens. Will you still recommend the Polamaster for me? I have a QHY guidescope which I will try for the first time today. Hoping to get quite long exposures…
I use an angle finder so I can sit comfortably on a chair and do the alignment.
Dim the polar scope illumination using the handset. Just look at the handset manual if you need details. I dimmed mine to two bars on the handset. Much better.
Hello Trevor,
I just took delivery of my new EQ6R-Pro last night. I have been using a Star Adventurer until this point and had really good times with it. I spent most of the day yesterday installing the ASCOM platform on my computer and EQMOD so I can get around the hand controller and just use my computer. I ordered a polemaster the other day too and plan to use it with this mount and my Star Adventurer. I have a new Meade 70mm Astrograph I plan to try real soon. Anyways great review and thanks so much for all you do.
Looking at the EQ6 R PRO and AZ EQ6 I prefer the AZ version.
You can slew to objects manually and not lose alighment meaning faster alighments instead of the waiting.
Also the AZ has a better latitude adjustment abd clutch noobs and love like the captain style locking. Also if you do a mix of visual and astrophotography or imaging it converts to EQ or alt alz. I would buy it alone as the encoders mean you can Starhope, etc or quickly go to the moon manually and keeps tracking and alighment. This alone for me is a big selling point and would buy it for this feature
Trevor,
Thanks for all your informative videos.
I’ve been using the EQ6-R Pro for almost 2 years now. My only problem is when it gets cold (freezing or below), my guiding error goes from 0.5 to 1+. Could it be from grease hardening up or from backlash increasing when the metal gears shrink in the cold weather? Other than this, the EQ6-R Pro has been a very good mount. What are your thoughts on this ?
I recorded the PEC and use use ‘Sidereal + PEC’.
Monty
I live at 10 degrees north (Trinidad and Tobago). Can the R6 mount be successfully polar aligned at this latitude i.e. will the counterweight rod and counterweights clear the tripod legs. This factor, important at near equatorial latitudes, is almost always ignored in professional reviews.
Hi Trevor! I’m considering pairing this scope with the “Celestron 8′ EdgeHD”. Do you think that with this pairing, healthy results can be achieved with long exposures longer than 5 minutes? Thanks
Hi Ekrem – yes the EQ6 will be a great match for the EdgeHD 8! 5 minutes will be no problem with autoguiding.