Creating an Astrophotography Mosaic
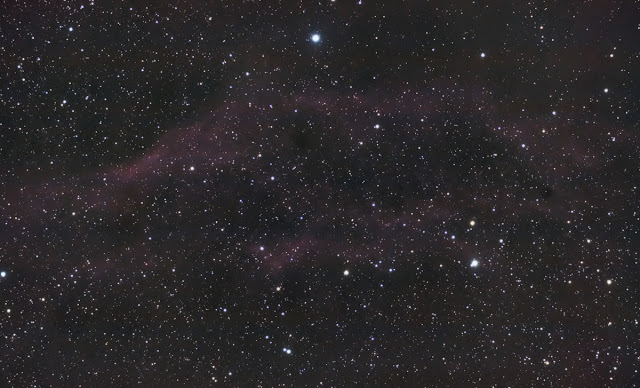
I have been spending a lot of time photographing the night sky towards the core of the Milky Way. My 80mm refractor has a focal length of 480mm, which magnifies many deep-sky objects in the area of Sagittarius.
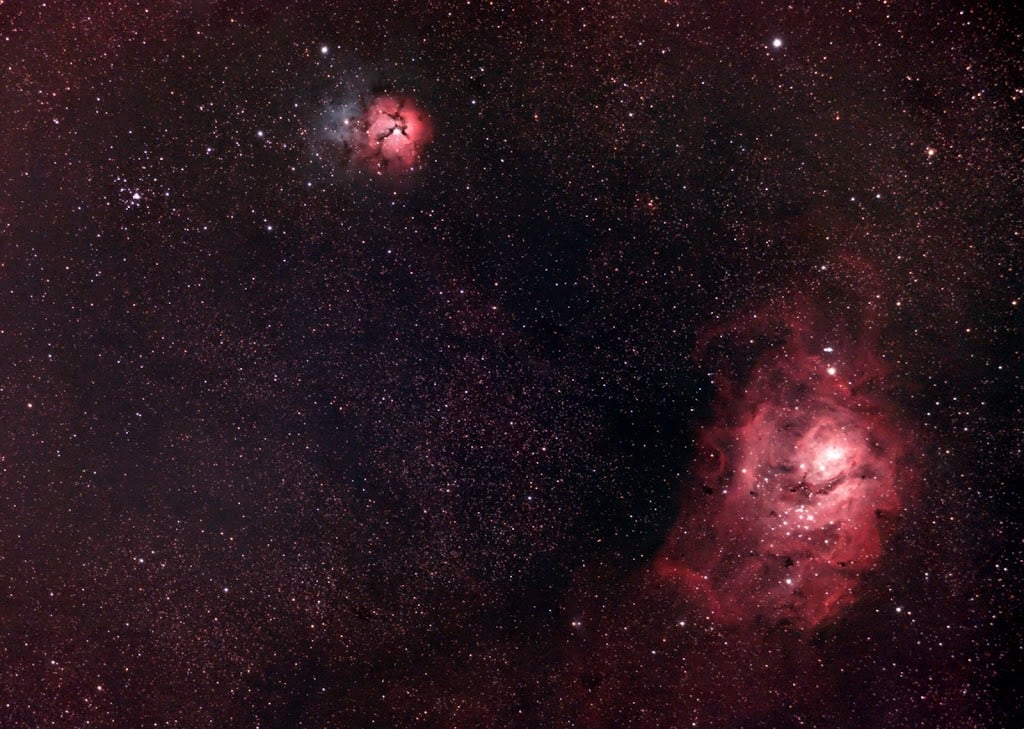
The Lagoon Nebula and the Trifid Nebula lie very close together in the night sky, as far as emission nebulae go. With the right camera sensor, and a wide-field imaging refractor (such as the Radian Raptor 61), you should be able to fit both objects within the same field-of-view.
When the photo below was taken, my framing was a little off. I could have fit both objects in a single image frame with my Canon EOS 60Da DSLR camera with the right orientation.

I had quite a difficult time aligning these images up, as I did it manually in Photoshop. The hardest part was the fact that both objects were processed separately, under very different shooting conditions.
I now know the importance of framing the objects in my field, especially when planning a mosaic. Creating a mosaic is a great way to photograph a large area of the night sky in detail.
They allow you to create beautiful, high-resolution images that look great when you zoom in. You can use your existing telescope (and camera) to photograph large nebulae and galaxies that are just too big to fit in a single frame.
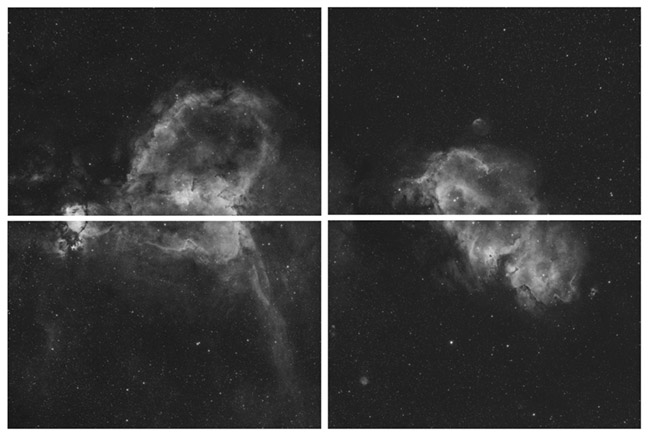
Large deep-sky objects such as the Heart and Soul Nebulae are often captured using the mosaic method.
Creating an Astrophotography Mosaic
At first, you might not understand why astrophotographers would spend so much time building an image piece-by-piece. After all, if you want to capture a large area of the night sky, you can simply use a shorter focal length,
The problem with that method is, the image will lack resolution and detail. The deep-sky objects may not appear sharp and well-defined up-close. If you plan to print a large format image, you may be underwhelmed with the overall quality of the image.
There are free mosaic tools to help you create your image including Image Composite Editor. This is a photo-stitching tool that allows you to “drag and drop” your images onto a single canvas, and it will automatically analyze and stitch them together.
Reasons To Create a Mosaic
- Capture a large field of view using a long focal length
- Create large images showcasing entire nebulae regions and areas of interest
- Create a high-resolution image suitable for large-format printing
- Create detailed portraits of the Moon’s surface
- Create a hybrid image by blending photos shot a different image scales
As you increase the overall size of your astrophotography mosaic by adding panels, you add resolution too. Many amateur astrophotographers state the overall megapixels of the image, which is the height (in pixels) multiplied by the width (in pixels) of the entire image.
For example, an image that is 6000 pixels wide by 4000 pixels tall is 24 megapixels (24MP).
Related: Get My Premium Astrophotography Image Processing Guide
How To Create an Astrophotography Mosaic
The act of creating a mosaic image in astrophotography involves capture multiple areas of the night sky and merging them into a single image. This is done when the field of view is too tight to capture an entire object (or interesting area of the sky), or when you want to capture a high level of detail over the entire image.
There are several fantastic examples of Mosaics on AstroBin. I must admit, I have not completed many astrophotography mosaics in my day. I usually opt to shoot large areas using a full-frame camera sensor (such as the Canon EOS Ra) and a wide-field optical instrument.
However, this will never achieve the level of detail and resolution a large mosaic image will. Amateur astrophotographers will often create mosaics of the moon, to reveal ultra-high-definition details of the lunar surface.
Acquiring the Image Panels
To create a successful mosaic image, you must carefully plan your imaging session to collect each panel of your intended image frame. Plate-solving will help with this, and there are several tools in software such as Sequence Generator Pro (SGP), and TheSky to help you with this.
Sequence Generator Pro includes a handy Framing and Mosaic Wizard that allows you to fetch the target area, define the camera scale and pixels, and more. The level of automation possible with this routine is remarkable.
The following video explains how to use the framing and mosaic tool in SGP in detail.
If you’re not using the framing and mosaic tool in Sequence Generator Pro to plan your mosaic projects, you can still apply the same techniques on your own.
When collecting your data, the key is to include an adequate amount of overlap area so that you can safely merge the panels together without creating visible “seams”. Most astrophotographers recommend at least a 10% overlap area to safely merge the images together without the worry of having to photograph a new panel.

Planning the panels of a large astrophotography mosaic.
Photographing the panels at the same focal length and aperture are important to match the image scale of the image. This part is easy, as long as you are using the same telescope or camera lens for the entire project.
One of the more challenging aspects of creating an astrophotography mosaic is the ever-changing imaging conditions. Light pollution can be a factor, but also the moon phase. Frames shot during a full moon (even narrowband data) will look washed out compared to new moon data.
It is possible to create a nightscape or deep-sky mosaic using images shot at varying focal lengths, but you will need to perform some careful scaling and alignment in Adobe Photoshop. I prefer to manually align and scale my mosaic images in Photoshop, using a soft feathered edge between panels.
Building a Mosaic Image in Photoshop
Photoshop’s layer system was designed for tasks like this. Adjusting the opacity of each layer before applying it to the final image is a must. A transparent image will help you line up the stars at the edges of each panel with each other.
Bring all of your image panels into a single laid photoshop file as layers. You may want to use a reference image of the final framing to use as a base layer at the bottom
You can adjust the opacity of each layer (see below) to 50% to align the stars of each panel up with each other. When all of the layers are properly aligned, you can set each layer back to 100% opacity.

The graphic above shows why capturing a healthy amount of overlap area is important. If there is a gap between image panels, you will need to go back out and photograph the missing areas.
Take advantage of the guidelines tool (View > New Guide Layout) in Photoshop to help align each panel together. In the example above, a full-color, processed image is shown. In reality, this stage should take place before any major processing tasks have taken place.
You may want to perform a simple stretch in PixInsight or Photoshop applied evenly to each panel before aligning the images. A mismatch in processing techniques between panels will result in an odd-looking image.
Enhance Detail and Resolution to Existing Images
If you have captured a wide-field image of an area of the night sky, you can photograph individual objects at higher magnification and apply them to the larger image.
I would consider this to be a hybrid mosaic image because you are starting with the wide-field image first, and applying high-resolution details to it gradually. The technique isn’t perfect, of course, as you will still have large areas of the image in a lower resolution than the rest.
In the example below, you can see how I applied high magnification images of the Lagoon Nebula and Trifid Nebula to an existing wide-field image.
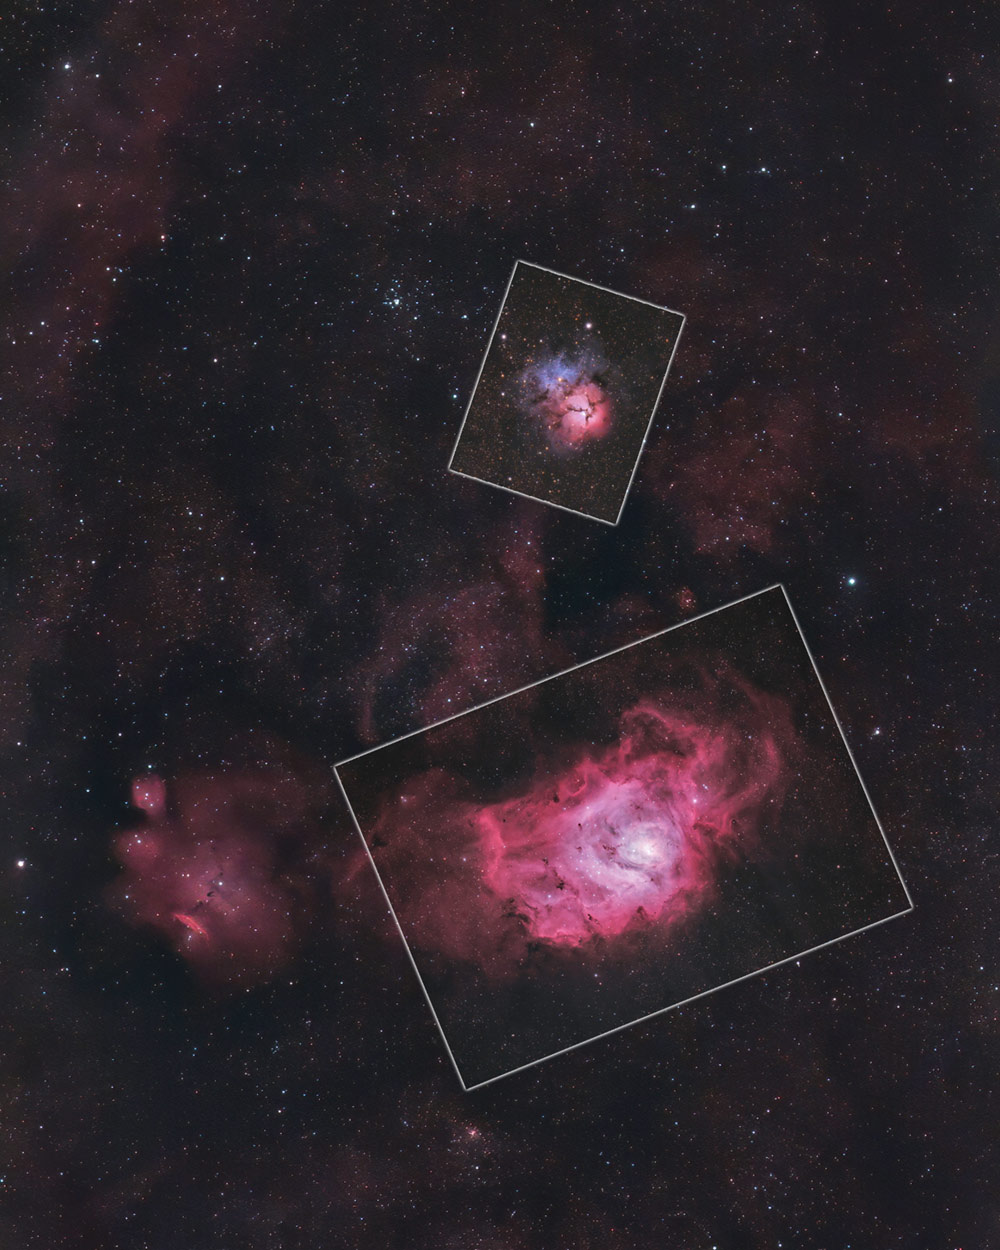
High-resolution images are applied on top of a wide field image to improve details. (outlines for reference only).
The same technique can be applied to images of the moon. In the example below, I merged a high-resolution image of the moon (captured through a telescope), with a wide-field image of the moon with passing clouds all around it.
This photo is a better example of HDR (high-dynamic-range) at work than creating a mosaic, but the sample concept of scaling images to increase overall resolution is at play.

A better example of the power of mosaics in moon photography is this incredibly detailed image of the moon by Andrew McCarthy. Massive lunar close-ups are fun to explore up-close and would look wonderful printed and framed on your wall.
Helpful Resources:
- How to Create a Mosaic Image in Sequence Generator Pro (Photographing Space)
- Create an Astrophotography Mosaic using Photomerge in Adobe Photoshop (Tutorial)
Related Articles:
- The Top 5 Best Astrophotography Telescopes For Beginners
- Astrophotography Cameras: What’s the Best Choice for a Beginner?
- How to Photograph the Milky Way (With any Camera)
This article was originally published in 2013, and updated on January 7, 2021.