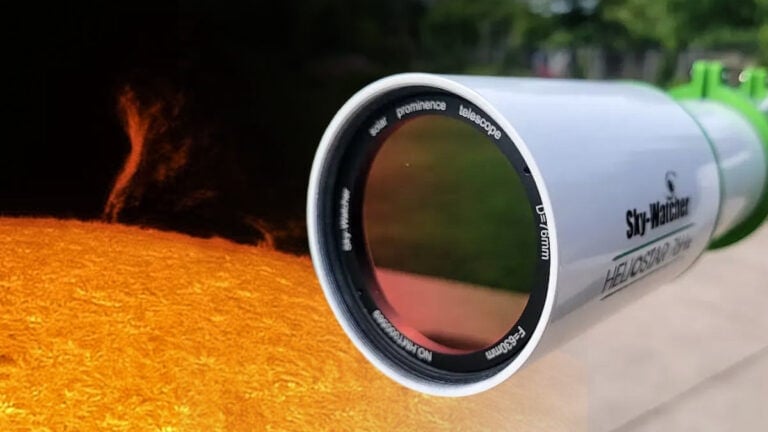
Radian Raptor 61 Review

The Radian Raptor 61 is a triplet apochromatic refractor telescope for astrophotography. It features a compact design with features custom-suited for wide-field, deep-sky astrophotography.
Since the Raptor arrived in September, I have taken some of my best astrophotography images to date with it. In this review, I’ll share all of the image examples I have collected since the prototype arrived at my door.
This compact telescope was designed for astrophotography with a camera attached, not visual observations through an eyepiece. If you’re interested in taking pictures of deep-sky objects in space, a wide-field imaging refractor telescope is one of the best options available (especially if you are new to the hobby).
At only 4-pounds, the Raptor 61 is suitable for portable, lightweight star trackers such as the iOptron SkyGuider Pro, or Sky-Watcher Star Adventurer. Even after adding a small autoguiding system to the mix, you will still sit well below the 11-lb maximum payload capacity of the most popular star tracker mounts.
This telescope is perfect for those that capture their astrophotography images with a DSLR/Mirrorless camera, or a dedicated astronomy camera. The large image circle (44mm), built-in rotator, and filter vault make capturing your next deep-sky project a painless experience. I enjoy pairing my Canon EOS Ra full-frame astrophotography camera with the Radian Raptor 61 most.

IC 1396 captured using the Radian Raptor 61 and Canon EOS Ra. Trevor Jones.

The Orion Nebula in H-Alpha. Starlight Xpress Trius 694 Mono CCD + Raptor 61.
My Involvement
In February 2020, I spoke to the CEO of OPT (Dustin Gibson) about the possibility of designing an “AstroBackyard signature series telescope“. The idea was to create a beginner-friendly astrophotography telescope that skipped over as much frustration as possible.
Countless phone calls, emails, sketches, and mock-ups followed this conversation, and eventually, the Radian Raptor 61 emerged. You may be interested to know that our original idea included the AstroBackyard branding on the scope and even an actual signature.
In the end, we decided that there were just too many people that didn’t care/know who I was!
I was adamant about building a wide-field, compact triplet that would allow beginners to experience positive results, right out of the gate. I chose the specs that I felt were most important for my personal astrophotography needs, and the team at OPT executed the specifics of that plan in terms of manufacturing a functioning prototype.
The final result was a sleek matte-black triplet refractor with a focal length of 275mm at F/4.5. Pride and accomplishments aside, I believe that this telescope is a serious contender for the best compact astrophotography telescope on the market.
The following video helps explain how the development of the Radian Raptor 61 materialized over time.
Radian Raptor 61 Review
The Radian Raptor 61 was designed to be the ultimate portable astrophotography telescope, and I believe it lives up to this description. There are other great refractors in this category, of course, but none quite like this F/4.5 triplet APO.
The Raptor 61 weighs just 4 pounds with the included mounting rings, meaning that it can be used on a portable star tracker mount or modest equatorial telescope mount with ease.
The Raptor is similar in size and profile to a telephoto camera lens, but with the added modularity of a dedicated astrograph. Mounting a guide scope, attaching and focusing your camera, and framing your deep-sky subject are all extremely easy tasks on the Raptor 61.
I have found myself reaching for the Radian Raptor 61 first when my time under a clear sky is limited. In fact, I can keep the entire imaging setup intact (including the equatorial mount), and simply carry the rig in and out of the garage at a moment’s notice.

View Complete Specs and Order from OPT.
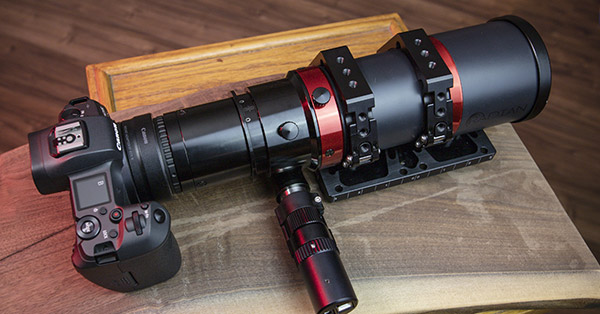
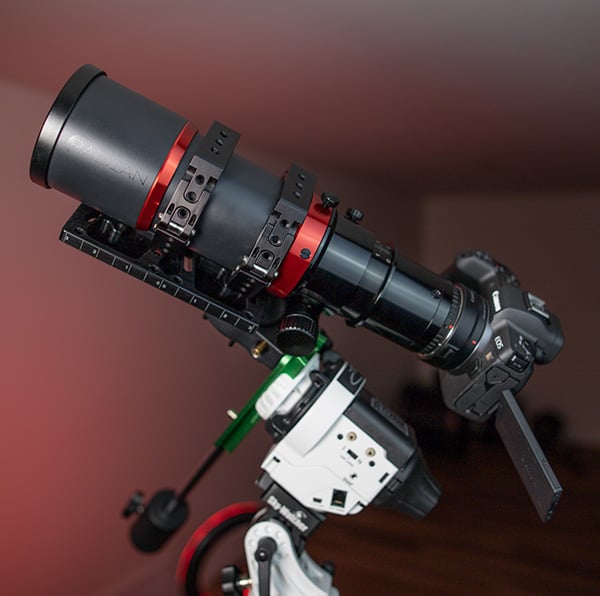
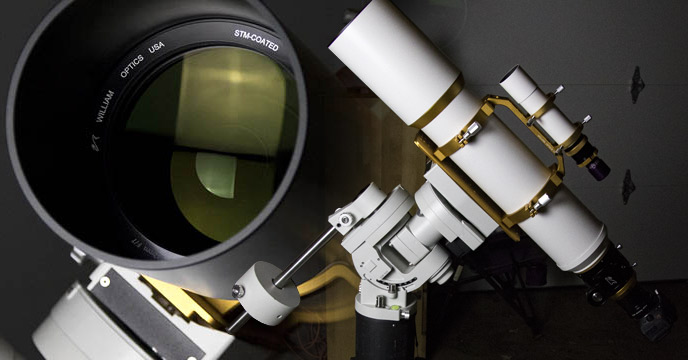
The Radian Hex Rings feature a robust locking mechanism that reminds me of a high-end watch. These rings were specially designed for the Radian Raptor 61 by Optec, and is probably the first thing you’ll notice when you see this telescope.
The rings grasp the telescope securely, and the tension of the rings can be adjusted using a tiny Allan key if necessary. The rings include soft padding on the inside to protect the matte black finish of the optical tube.
The rings also include and an ingenious slot to run your cabling along the base of the dovetail. You can channel the cords to a single source at the back of the telescope.
This is handy when wrapping a dew heater band around the dew shield of the Raptor 61, and a guide scope on top. You’ll likely leave the dew heater band on the telescope at all times when not in use, and simply connect the RCA plug to your dew heater controller before you start imaging.
Here’s a look at my camera bag when I travel with this scope. I keep the camera in the bag as well, along with the guide scope mount and t-ring. You’ll notice I also leave the Canon EF-EOS R adapter on the camera body at all times.

A look into my camera bag.
For me, the best part of the hex ring design is the ability to easily mount the Radian Raptor 61 to the dovetail, and mount a guide scope on top. This isn’t necessary to image with the Raptor 61, but for those shooting exposures longer than 3 minutes, it’s a logical next step.
The standard thread size allows you to mount your existing guide scope bracket on top of the Raptor. I mounted my William Optics 50mm guide scope rings securely to the hex rings for autoguiding.

The Andromeda Galaxy. Radian Raptor 61 + Canon EOS Ra. Trevor Jones.
Adding a small 50mm guide scope adds a bit of weight to the overall imaging setup, but it is well worth it in my opinion. The ability to autoguide exposures to 5-minutes in length (with dithering) is handy for deeper projects.
My best images with the Radian Raptor 61 were created by using 5-minute exposures at ISO 3200 with the Radian Triad Ultra filter in place. I’ve also used a dedicated astronomy camera with this telescope (ZWO ASI294MC Pro), but I think the Raptor 61 is best enjoyed when paired with a full-frame sensor.
I expect others to pair a monochrome dedicated astronomy camera and narrowband filters to the Raptor 61 to create detailed wide-field portraits of the night sky. To date, I have only captured images in one-shot-color with this telescope.
Raptor 61 Key Features
This telescope aims to make the process of getting up-and-running under a clear night sky as painless as possible. You do not need to go looking for a suitable mounting plate that allows you to balance your setup, or find a matching reducer/flattener to flatten the field of view.
The telescope is ready for you to attach your camera (with the correct spacing), right out of the box. You can thread your favorite 2″ light pollution filter into the filter vault, and be on your way. The attention to detail towards the needs of deep-sky astrophotographers is overwhelmingly evident with this package.
- Ultra-portable astrophotography telescope
- 275mm focal length at f/4.5
- Apochromatic Triplet Optics
- Radian Hex Rings with integrated cable management channels
- Full-frame image circle
- Field corrector built-in
- 4″ V-style dovetail & Radian 6.5″ universal D-style plates included
- 10:1 factory-tuned rack & pinion focuser
- 2″ Filter Vault for light pollution/narrowband filters
- Built-in 360º rotator
- Radian padded-insert travel backpack
- Built-in retractable dew shield
- Optional automated focuser upgrade available
The cost of this telescope seems to be a sore spot for some folks, at $999 USD. Personally, I think the price is competitive when you add in all of the extras like the premium rings, dovetails, and built-in corrector.
The world of photography and optics is expensive in general, and I believe anyone that’s invested in quality camera lenses will be less-shocked at the sticker price of this telescope. But don’t get me wrong, $1000 is a lot of money, and you’ll need to justify the expense to yourself (and possibly your spouse) before taking the leap.
With that being said, if you use the telescope almost every clear night over the next 5 years, was it a waste of money? Or did it pay you back ten-fold? (Feel free to use this line on your significant other).

First Impressions and Early Results
When the Radian Raptor 61 first arrived, it came inside of the Radian branded camera bag. I immediately noticed the stocky weight of the optical tube, and quickly mounted the telescope to the included Radian hex rings.
The package I received was a prototype and did not include the bonus items that others will enjoy. This includes the beautifully designed box with the phrase “For those who collect light in the dark“. And for those wondering, yes, that was the phrase I chose.
My Setup:
- Telescope: Radian Raptor 61
- Camera: Canon EOS Ra
- Filter: Radian Triad Ultra (2″)
- Mount: Sky-Watcher EQ6-R Pro
- Guide Scope: Starfield 50mm Guide Scope
- Guide Camera: ZWO ASI120MM Mini
- Accessories: Pegasus Astro PBB, Dew Heaters

Note: For my Andromeda Galaxy image, I used the same setup, but without the Triad Ultra Filter.
You’ll need to remove the protective cap on the interior of the Raptor 61 that covers the built-in reducer/corrector lens. This may throw you off at first, as you will not be able to look through the optical tube until it is removed.
I attached my Canon EOS Ra camera to the Raptor 61 using a standard Canon T-ring. You simply need to secure your camera to the M48 threads of the spacing tube at the imaging end of the scope.
The 10:1 rack & pinion focuser is robust and buttery smooth. It is one of my favorite features of this telescope because it is critically important for deep-sky astrophotography. The locking screw does not shift the image either, which again, shows you how much attention was given to the overall user experience of this scope.
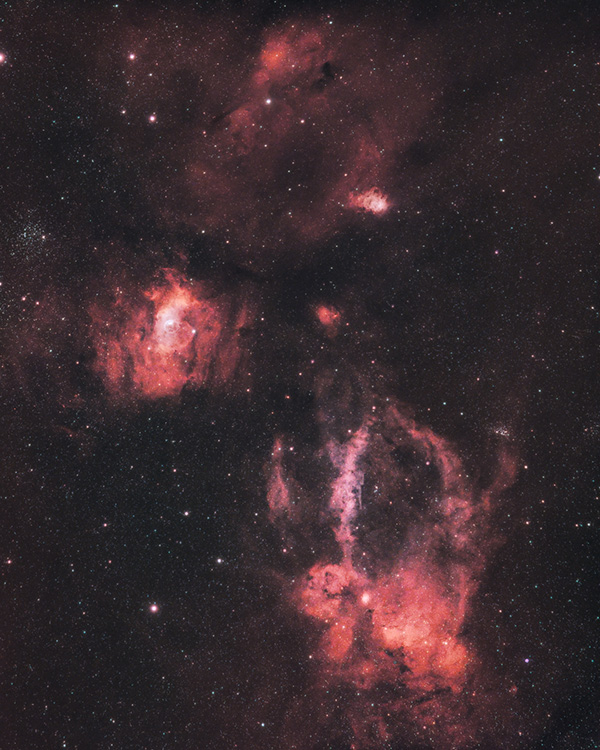
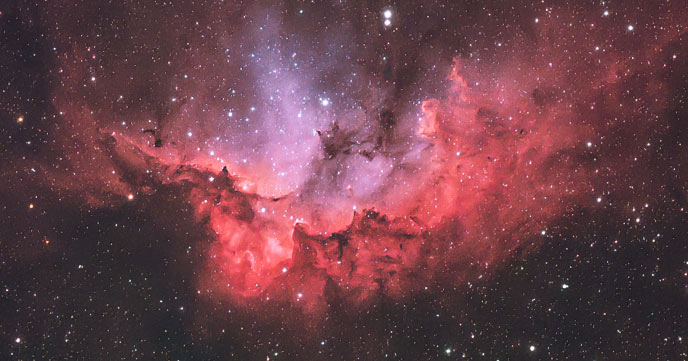
The first image I captured with the Radian Raptor 61 was the Heart and Soul Nebulae region. I managed to collect 6.4 hours of total exposure on this subject using the Canon EOS Ra camera and Triad Ultra filter.

Heart and Soul Nebulae. Radian Raptor 61 + Canon EOS Ra.
By the time the first 5-minute exposure finished, I knew that this telescope would be very popular in the astrophotography community. Seeing a large nebula region appear on the screen at a massive 275mm of focal length is an experience like no other.
The William Optics RedCat 51 offers a similar feeling, but the added aperture and slight focal length increase of the Raptor 61 make a surprisingly noticeable difference. Don’t get me wrong, I adore my RedCat, but I believe the difference in images justifies a clear line of separation between the two.
Not only did the F/4.5 optics gather enough light to reveal faint areas of the nebulae in 5-minutes, but the entire image was extremely detailed and sharp across the majority of the frame. I did see some elongated stars at the very edges of my full-frame image, but I believe this was because of the shallow Canon T-Ring I was using on the camera.
Depending on the camera you pair with the Raptor 61, you should see a crisp image edge-to-edge out of the box with the standard spacing provided on the scope. To slightly increase the spacing, you have the option of threading on a standard 48mm extension tube between your camera and the threads at the end of the Raptor.
Those attaching a DSLR camera to the Raptor 61 will enjoy a near-perfect spacing for a completely flat image out-of-the-box. If you’re using a dedicated astronomy camera such as the ZWO ASI294MC Pro shown below, you may need to make some slight tweaks to get the spacing just right.

A ZWO ASI294MC Pro Camera attached to the Radian Raptor 61.
The combo shown above allowed me to collect the widest field-of-view I’ve ever had with my ZWO camera. I chose to photograph the Lobster Claw Nebula with this setup and I am very happy with the resulting image.
It’s safe to say that unless you’ve attached your dedicated astronomy camera to a camera lens using a specialized adapter, the field-of-view on the Raptor 61 (275mm) will be your widest yet. Image/Pixel scale will come into play here, but no matter which camera you use, you can expect an extremely sharp image at this magnification.
I am sure many people will use the Raptor 61 with their one-shot-color and mono ZWO cameras, and I think you will be quite happy with the creative images possible using this combo.
The Lobster Claw Nebula. ZWO ASI294MC Pro + Radian Raptor 61.
Optical Performance
Among the many “controversial” subjects that forum members and Facebook group users chose to focus on, was the glass material used on the Radian Raptor 61. Heated discussions took place on Cloudy Nights about whether the Raptor 61 used FPL-53 glass or not.
I believe this thread may even still be alive if you’ve got a few hours of free time. I have no idea what glass type the factory uses, in this design. If this is a pivotal factor in your telescope buying decision, then you will likely have a hard time justifying the purchase of a Radian Raptor 61 (or a Sky-Watcher Esprit 150 for that matter).

I am not going to pretend to be an expert in optical design, but I can tell you that the apochromatic lens design of this telescope has been carefully designed to meet the highest imaging standards of today’s astrophotographers.
My personal results with this telescope should help put your mind at ease about image quality, but I have a feeling that any uncertainly will be further addressed when others begin to share their images with this scope.
With the correct spacing and no issues with tilt in your imaging train, you should be able to achieve an image field that is completely flat and free of coma and chromatic aberration.
As I mentioned in my video, I did experience some coma at the very edges of my full-frame images. This not an issue for me, nor was it anything I haven’t seen before with my wide-field imaging refractors.
Electronic Focuser Upgrade
Although the package I received included the optional motorized focuser, I have only ever used the Raptor 61 with the manual focuser. Although I have not tapped into the automated focusing system via ASCOM for this scope, I did install the electronic focuser upgrade on the scope to see how it fits.
Installing it to the telescope in place of the focuser knob was a straightforward process with the help of an Allan key. Those that demand critical focus over long periods of time will appreciate this automated option for their system.

The Optional Electronic Focuser Upgrade attached to the Raptor 61.
Complete Specs:
- Aperture: 61mm
- Focal Length: 275mm
- Focal Ratio: F/4.5
- Image Circle: 44mm
- Tube Rings: Radian Modular Hex Rings
- Weight: 4 lbs
- Carrying Case: Radian Padded Insert Backpack
- Corrector: Integrated Corrector with three-element design
- Dew Shield: Included
- Dust Caps: Front and rear caps included
- Filter Attachment: 2″ / M48 Filter Vault
- Focuser Knobs: 10:1 Dual Speed with Locking Knob
- Focuser Design: Non-Helical Rack & Pinion
- Included Dovetails: 6.5″ universal Losmandy D Style and 4″ Vixen V Style
- Optical Design: Apochromatic Triplet Refractor
- OTA Length: (Dew Shield Retracted) 235mm
- OTA Outer Diameter w/o Hex Rings: 80mm
- OTA Outer Diameter: 90mm with Dew Shield
- Rear Camera Connection: M48 x 0.75 (wide T Ring compatible)
- Recommended Back Focus: 55mm (can be reached with included adapters)
- Rotator: 360º with Locking Knob
Final Thoughts
The Raptor 61 has a lot going for it, and I am not just saying that because I hold a sense of pride and ownership of this product. I believe that the added features and attention to detail have earned the reputation of “best portable astrophotography telescope”, but that’s not for me to decide.
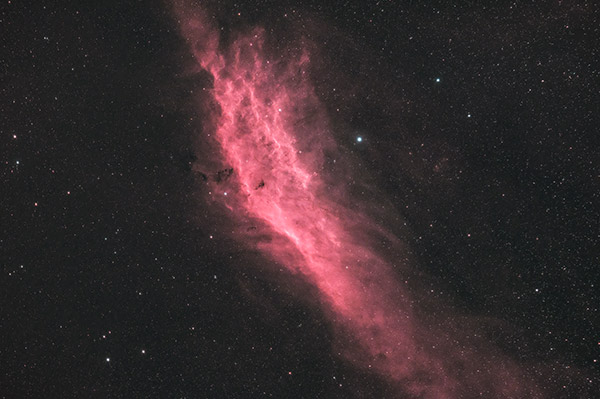
I have taken my personal best images of the California Nebula, Heart and Soul Nebula, and IC 1396 using the Radian Raptor 61. This is a subjective decision, but I can tell you that the optical system did not hold me back from creating my best work in any way.
An included Bahtinov mask would have been a nice touch to this package, and a number of people have expressed this. For now, you’ll have to use your own focus mask, or simply fine-tune the focus on a bright star.
The Radian Raptor 61 was not meant to be used for visual astronomy, nor is it suitable for small galaxies or planet photography. If these are your aspirations, a much larger telescope with more magnification is a better fit.
But if you’re like me and prefer to capture large nebulae regions in the sky in a single shot, the Raptor should be a serious contender for your next wide-field astrophotography telescope.
Most importantly, I believe the Radian Raptor 61 package removes many of the early headaches amateur astrophotographers face when getting started.
Backspacing issues, mounting hardware, and focusers that aren’t up to the demanding challenges of deep-sky astrophotography are just a few of these hurdles that don’t exist with this telescope.
A positive experience from the beginning will help ease the astrophotography learning curve. The Raptor 61 is probably the easiest astrophotography telescope I’ve ever used in terms of finding focus, and framing targets.
It’s lightweight, and easy to balance, meaning you’re much less likely to run into any issues in tracking, even on an entry-level equatorial mount or portable star tracker.
The bottom line is, when you just need everything to go right (like when you’ve booked a last-minute Airbnb under dark skies to photograph the Andromeda Galaxy), you need a telescope that won’t let you down. That is the Raptor 61’s specialty.

mine comes in on nov 18, can’t wait to try it out…err where did you get the williams optics guiding scope bracket?
Awesome, Michael! This one was direct from William Optics, it’s this one: https://williamoptics.com/2019-new-120mm-saddle-handle-bar-patented I can actually only fasten one of the screws into the hex rings, but it seems to be working fine for me.
Hi Trevor, thanks for that review. I just started astrophotography some months ago, and your site and pictures were a good reason for that. (And I like it, so thanks anyway!) Until today I only use my DSLR camera lenses (from Nikon) on my modified Canon 6Da. Since I still haven`t fully understood the difference (regarding the photographic result) between e.g. 275mm (raptor) telescope vs. (e.g.) a nikon pf 300mm camera lens: maybe you can help me out and explain the main advantages of one over the other for astrophotography. Of course I wouldn`t go out for wildlife photography with a telescope. But I do astrophotography with pretty good results with my tele lenses. Why would I still buy a telescope, especially with more or same focal length? It might be a dummy-question – but so be it then. 🙂 Saludos from Munich. Alex
Hi Alexander! I am glad to hear that I have helped in a small way! The biggest advantages you’ll notice are likely the 10:1 locking focuser and rotator, and the flat field, color corrected optics. Focusing and framing a deep-sky target can be tricky with a lens with that helical focuser. The optics are better suited for taking flat field images of dim objects in space – I’m not sure how your lens handles stars (especially at the corners), but I’d be willing to bet a triplet apo will do a better job. The spacing and threads on the Raptor 61 are ready to attach a dedicated astronomy camera, DSLR, Mirrorless etc. without any extra adapters. Just a t-ring for a DSLR. The mounting hardware is also designed to easily mount and balance on an EQ mount, mount a guide scope etc. The filter vault can hold a 2″ filter inside of the image train. Lots of benefits to an astrophotographer that you might not even think of right away!
Hey trevor! Its me again! Good review! Wish i could afford it XD
I am looking for some advice about practicality. I have the SW SA and i got the wedge finally. I try to get a great polar alignment every time and make sure that i can get longer exposures without trails. I struggled until i started using the hour clock meathod involving the clock on the reticle. This appears to have worked great and my 1 minute exposures are coming out great.
However i am really limited when it comes to overall integration time i can get. I can not leave it alone all night because the batteries may die (should i buy a power cord?) or the mount might go off….
how would i pull an all nighter without pulling an all nighter myself?
Glad to hear you are making progress, Liam! The Star Adventurer does not use very much power, I have run this star tracker for multiple all-nighters on the same set of batteries! I actually had the same set of 4 in mine for 6 months straight.
Hi Trevor, thanks for your quick reply! I`ll definetly take the Raptor into consideration. It will be available in “my” astroshop in Germany end of december. 1.355 € – xmas-time is coming… 🙂 Cheers, Alex
Trevor, another excellent rounded review love the idea behind the Raptor as a no fuss system with results straight out of the box !! However I have to say every time I see one of your reviews I’m swayed in that direction … I’ve gone from ZS61 to Redcat to Meade 6000 and now Raptor ! Christmas is rapidly approaching and I have to settle on one soon – should it be the Raptor ? Thanks so much for all your content endless hours of great advice and examples
Thank you, Chris! I am glad my enthusiasm inspires you, some people take it the wrong way:) It sounds like you’ve got plenty of great options in the wide-field refractor category. I don’t see any reason to make a change unless you’re hung up on an issue with the focuser on the RedCat and have an interest in the dedicated electronic focuser for the Raptor 61 (The RedCat does have an AF solution too). I really appreciate the kind words and it helps energize me to keep going! Clear skies
Thanks Trevor, as beautiful as the Redcat is, I am wary of the focuser, having had difficulties with my camera lens, so I think a solid R&P is the way for me. Keep up the fantastic work, you are an inspiration to thousands around the globe – which is something we all need in 2020 !. Clear skies
Good Day Trevor…
I was on board to buy the redcat 51 until I saw that new raptor coming. I took the plunge and purchased that one as my very first telescope. Your photos with all your scopes have really inspired me to get into this hobby. My question is what guide scope do you recommend for this telescope? I did buy a used Canon 6d but its not modified yet. So I’m also needing a t-ring think as well.
That’s great news, John! I am sure you will enjoy it. For guide scopes, a 50mm / 200mm FL guide scope should work great. I’ve been using a Starfield 50mm guide scope in a William Optics dovetail mount. This guide scope mount would be even better on the Raptor 61: https://bit.ly/2UOE4uE Yes – you will need a T-ring for you Canon 6D to attach to the M48 threads:)
Can the Raptor be used for visual astronomy?
Hi Bill. With the optional visual back, yes. You need to remove the threaded field flattener/reducer lens and attach the visual back that includes a 1.25″ opening for an eyepiece. I have not used it in this configuration myself, but my visual back should be arriving soon!
I just pre-ordered this and am super excited to get it! Just a quick question, would you be able to point me in the direction of a mount or a canon EF camera? I am using the EOS 7D mkII and want to make sure I get the correct one. Love your website and can’t wait to get this!
Hey Trevor! I have been following you on YouTube for some time now and I am so thankful for the time you spend making videos and teaching the newbies out there, such as myself.
My Radian Raptor 61 finally arrived an it truly is a beautiful work of art in terms of build quality and aesthetics, so thumbs up on all the input during the design and final build phases.
I have an iOptron Skyguider Pro with the William Optics Dec adapter and vixen style clamp. I have attached the Radian 6.5″ D-style dovetail to the tube rings and then attached the 4″ dovetail to the bottom of the dovetail plate so I could mount the entire setup to my Skyguider Pro. Is this a correct setup for the Skyguider Pro or could you give me some advice on how you would mount the Raptor 61 to the Skyguider Pro. Wish there was a way for me to send you a picture of the setup. Just want to make sure I have a solid setup before I take it out in the field. Thanks much!!
Hey, Trevor! One more thing if you don’t mind. I ordered the William Optics Redcat saddle to be affixed to the Radian Raptor 61 via the Optec hex rings, although the supplied attach thumb screws are too small for the hex rings mounting holes. Any suggestion on what size mounting screws will work to affix the WO redcat saddle to the raptor hex rings? Thanks!
Hi Trevor: I’ve had my Raptor 61 for about 2 weeks now and have had it out to image two times, first with a 97% waxing moon and second with a 96% waning moon. My targets were the Andromeda Galaxy, Orion Nebula and Pleiades cluster. I had reasonably good results considering how bright the moon was and the fact that I was not using any filters. One thing that I noticed was some purple haloing around the stars in my subs which I assume to be Chromatic Aberration. It’s noticeable in my subs, but even more so in my stacked tiff files. I can easily remove it with the defringe tool in Lightroom, but I don’t think it should be there considering that this is a triplet refractor with reducer/flattener. My image train is quite simple with nothing but a 48mm t-ring attached to the reducer/flattener and my Nikon D500 connected to the t-ring, no filters or spacers are being used. This is the same system that I use on my two larger refractors, a 80mm doublet and 115mm triplet, and do not get the purple halo around stars with those scopes. I am wondering if this is an inherent issue with the raptor or if maybe a got a bad one. All I know is that I don’t think it should be present in a telescope of this design and in this price range. I contacted OPT and expressed the same concerns with them, but have not received a response yet so thought I would reach out to you since you have experience with the scope and were involved in the design.
Hi Trevor! I was looking for light, portable and fast system for occasional use and your product looks very interesting. I’d like to know if Handy Stepper Motor (HSM30, which I already own) by Starlight Instruments could be used with the Raptor61. The HSM30 motor unit fits the 2.0″ Feather Touch Rack/Pinion focuser, 2.5″ and 3.0″ Feather Touch Rack/Pinion focusers, and the 2.7″ Astro Physics focuser with the Feather Touch Upgrade.
Thanks!
The Williams Optics Bracket in the Image shows Mounted to Rings and not Ring. I missed this and was sad find this out.
Anyone curious about using the Sky Watcher Star Adventurer should know that you can also skip using batteries. I currently a use the Anker Powercore 10000mAh rechargeable usb battery pack for astro as I already use it for backpacking.
The Star Adventurer alone isn’t enough to keep the battery from going to sleep as the power draw is too low. I bought a usb splitter and dew strap. So, with the dew strap and Star Adventurer plugged into the Powercore, the two combined are enough to keep the battery on. I never have to worry about replacing batteries. I just recharge the power pack. Although, in a pinch you can use batteries.
I have been able to image for 4 hours with plenty of battery life left. I could probably image two nights in a row without much concern, but I haven’t figured out the limits as I don’t want to be caught out on an imaging night and have to scrap a session.
Hi Trevor, I am interested in astrophotography. But something lighter for traveling purposes. Raptor61 is definitely tempting. Except, can it work on an Olympus OM D III?
Where in Canada can I get the Radian???
Hi Trevor!
I was reading this post about the Radian Raptor and it seemed like a perfect telescope to start in astrophotography: optical quality (triplet apo), it is fast (f/4.5), compact, light, easy to use and super specific for astrophotography with dslr.
But what I did not expect is that you were behind everything 🙂 I didn’t know that you had participated in its design, congratulations!
Do you know where I can buy it in Europe? It’s a shame that you discarded the idea that the telescope had your signature, for AstroBackyard fans it would be a great plus 🙂
A hug.
So, this is probably a newb question, but at those specs (275/61/f4.5), what about normal zoom lenses? I have an older Sigma 100-300 F4 that could serve just as well, no?
Also, wouldn’t targets be really quite small in the image, making any aberrations (stretch and color) near the edges mostly a non-issue after you’ve cropped the final image? For example, on a 24 MP FF camera like a Nikon D750…
Hi Trevor,
I love your channel, and your whole-hearted endorsement for the Radian for photographers like me taking their first step sold me. Aside from the months delay in finally receiving my order, there are a few significant issues that make this a great choice for entry-level photographers:
– The short vixen rail and plate. Enough has been said elsewhere on this, but having to place additional orders to William Optics, etc to get a rail that works is ridiculous. The plate doesn’t fit my new EQ5, so it’s useless.
– No clear guidance and packaging for specific DSLR/Mirrorless camera users. I had *no* idea that I needed to order a “wide Nikon T-ring” until ordering three “standard” t-rings from various manufacturers and having to send them back. This took another 2 weeks.
– The failure to provide a simple vixen guide scope rail. Why everyone has to buy/hack William Optics or the included vixen rail to this purpose again mystifies me.
– No real OPT or AstroBackyard “how-to” videos to setup their Radian Raptor. Aside from the OPT “marketing video” there’s little to help newbies out. We really need this, and I feel our voice is lost to those who’ve been around awhile. More targeted configuration videos for DSLR users would really help.
This leads me to my final point:
Astrophotography *needs* these types of telescopes to entice/encourage photographers to take the next step and grow into the hobby. People like me are willing to pay a premium to be guided into the hobby with near turn-key setups – or at least instructional videos to help avoid most common mistakes. OPT/AstroBackyard have/(had?) that opportunity here, but I sense everything has fizzled a bit. Why?
I’m now 5 months from order and still no first light. I’m now awaiting the right 1/4″-20 and/or M6 bolt to securely mount my finder scope rail. I can’t help but feel frustrated that in Vancouver, BC finding the little things to finish take the most time and money as I’m at least $400 into rails/rings/bolts/parts to make this “perfect entry scope” work.
You can and should demand a premium price if you help more newbies avoid costly mistakes. Right now it seems that we’re all just dumped into the same steep learning curve as you began 11 years ago. I think there’s a huge opportunity to expand the market if this can all be simplified.
Wishing you the best.
Keith
Hi Trevor,
Just received my Raptor 61 a few days ago.
First of all, I think you played with fire in mounting the WO 120mm slide-base over just one hex-rings. I just “machined” an interface plate (125mm x 50mm x 12.75mm) from aluminum stock. It’s a bit thick but can be 6mm thick without problem.
Another thing that’s bother me a bit about the Raptor 61. The M6x1 x 14mm screws provided were not long enough for installing the hex-rings to the D-type dovetail. Threading screws with only two turns (2 threads for M6x1) is not sufficient for good grip. Compared with 1/4-20 screws (20 threads per inch), the M6x1 has 25.4 threads per inch (1 thread each 1mm). The more threads per inch, the less deeper the threads are. So metric screws like Mx X1 or Mx X0,75 can be considered as fine threads compared to coarse threads from SAE system. This being said, M6x1 screws with just 2 threads screwed could be very risky. It’s even worst if the user decided to dismantled its gear after each imaging session. Personally, I bought some M6x1 x 20mm and did buff them to only eradicate the first thread to be sure the screw will not damage the OTA. Also put a washer between the bolt’s head and the dovetail plate to prevent maring it. Before buffing, I’ve inserted the screw into a die (taps and dies). This way, if a thread is a bit damage, extracting the screw from the die will correct the thread. For people not having mechanical skills, you can order metric SHCS size by 2mm steps (M6x1 x16mm or M6x1 X 18mm). I have already told Scott Laymon from OPT about these problems.
It could be great if Radian Telescope produced a slide-base type interface for their product.
Regards,
Yves
Just beginning AP and your advice has been great Trevor. Your tutorials are a huge help. Is this scope a good fit for a Canon Rebel T3i?