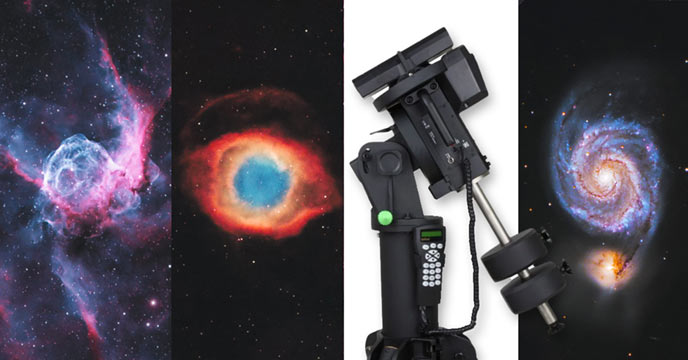
My Best Images & The Gear Used
On this website, I do my best to share information and astrophotography tips that provide value. I could pat myself on the back about all of the great astrophotography images I took this year, but it is of little interest to anyone if I don’t explain how I took the shot.
In this article, I’ll share my best astrophotography images of 2020, and the equipment setups used for each image. This way, you’ll have a better idea of what’s behind each image, and how you can accomplish a similar result yourself.
Capturing the images with the right set of gear is only half of the equation, of course. If you’re interested in learning how I process my deep-sky astrophotos, consider taking a look at my premium image processing guide.

Related Post: The Best Astrophotography Telescopes in 2023 (that I have actually used)
The Gear Behind My Best Images of the Year
As you know, 2020 was a strange year. I spent a lot of time at home and took most of my astrophotography images from my light-polluted backyard (Bortle Scale Class 7) in the city. I tried to capture a mix of galaxies and nebulae this year using a number of different telescopes, cameras, and filters.
I’ve included links to the equipment used for each shot, from the filter to the telescope mount. You obviously don’t need to use the exact set of gear to replicate my results, but at least you’ll have a better idea of what to expect.
I have also included the software used to photograph the images with my laptop computer, and the post-processing software as well.
For the absolute latest images, consider following AstroBackyard on Instagram and Facebook. For a behind-the-scenes look at how the images are created, you can also subscribe to my YouTube Channel.

Messier 82: The Cigar Galaxy
- Object Type: Irregular (Starburst) Galaxy
- Imaging Style: Deep-Sky LRGB
- Camera Type: Monochrome CCD
After a cloudy start to the year, I finally began my first serious astrophotography project in March. I have always wanted to photograph the Cigar Galaxy (Messier 82) with enough focal length to reveal the interesting structure of this irregular galaxy.
In the past, I’ve collected light on this area of the night sky using a wider field of view (400mm-800mm). This allows you to create an image that features 2 distinct galaxy types in a single shot (Spiral and Irregular).
Nearby Messier 81 always seems to get plenty of attention from the amateur astrophotography community, so I decided to give its neighbor some love. I don’t recommend photographing this galaxy on its own unless you’ve got at least 1000mm of focal length.
Overall, I managed to collect 5 hours and 25 minutes of total integrated exposure time on this galaxy in Ursa Major. I am happy with the result (definitely my best yet), but I would have liked to capture more hydrogen-alpha data to really bring out the “fiery-looking plumes of glowing hydrogen blasting out of its central regions”.
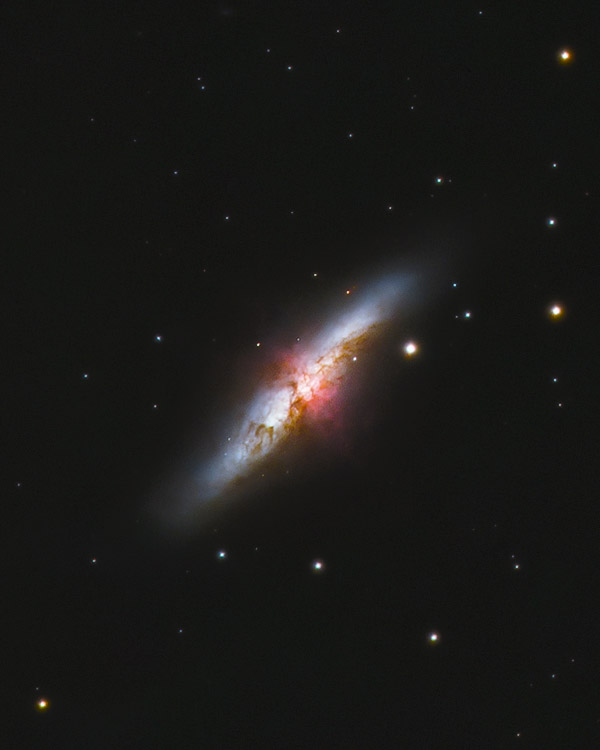
The Cigar Galaxy in Ursa Major.
This was an early project using the Starlight Xpress SX-42 (Trius 694 Mono) CCD camera, and I was still very new to building LRGB images in Adobe Photoshop. This camera features a 6.1 MP monochrome CCD sensor with 4.54-micron pixels.
It is my first CCD camera, and it has provided me with some of the most incredible deep-sky images I have ever taken (including my APOD in June 2020)

I now have an astrophotography rig better suited for photographing small galaxies (Celestron Edge HD 11), but the 6-inch refractor used for this photo is well-suited for medium-sized galaxies like M81 and M82.
Each and every exposure used for this image was 5-minutes long. 300-seconds seemed to be enough for the Ha, but I don’t think I’ll shoot my LRGB sub-exposures so long in the future.
- Total Exposure Time: 5 Hours, 25 Minutes
- Details: 17 x 300s Red, 14 x 300s Green, 18 x 300s Blue, 9 x 300s Ha
- Camera: Starlight Xpress Trius 694 Mono
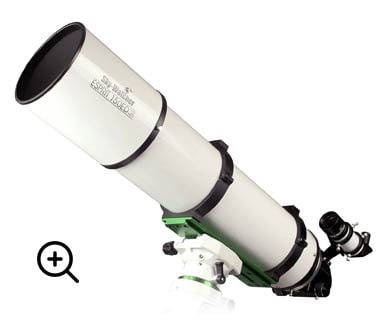
- Telescope: Sky-Watcher Esprit 150 Super APO
- Filter: Astronomik LRGB, 6nm Ha
- Mount: Sky-Watcher EQ8-R Pro
- Guide Scope: None (OAG)
- Guide Camera: Starlight Xpress Lodestar X2
- Image Acquisition: Astro Photography Tool
- Integration/Calibration: DeepSkyStacker
- Processing: Adobe Photoshop 2020
Messier 51: The Whirlpool Galaxy
- Object Type: Spiral Galaxy
- Imaging Style: Deep-Sky LRGB
- Camera Type: Monochrome CCD
Soon after completing my Cigar Galaxy photograph, I pointed my telescope towards the Whirlpool Galaxy in Canes Venatici. In the northern hemisphere, it’s an excellent project to take on in the springtime.
Again, I used my Astronomik LRGB filters and the Starlight Xpress monochrome CCD. With pleasing results on the Cigar Galaxy a month earlier, I decided to keep shooting 300-second sub-exposures on the Whirlpool Galaxy.
Unlike my image of Messier 81, I shot plenty of luminance data for this target (36 x 300-seconds). I believe this helped to keep the noise minimal, even after substantial stretching to the saturation and curves.
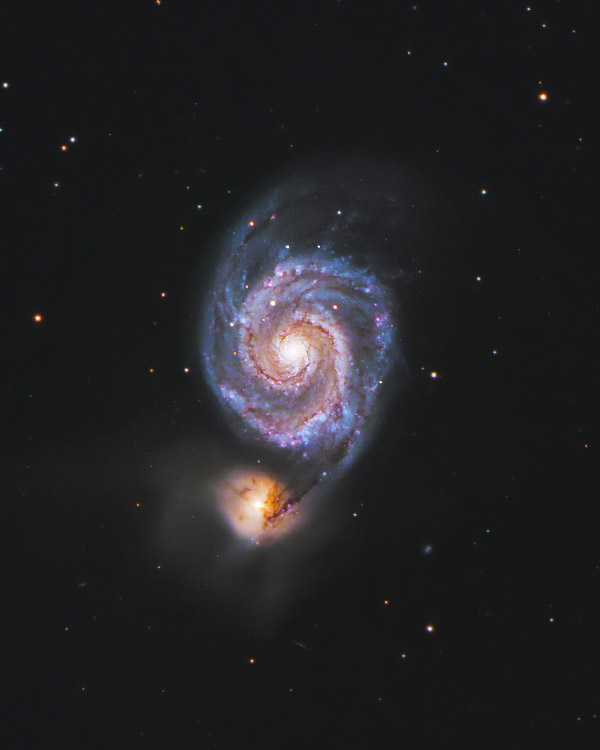
The Whirlpool Galaxy in Canes Venatici.
The aperture of the Sky-Watcher Esprit 150 (6-inches) helps to resolve faint, detailed structures in galaxies like this. The Esprit 150 really is a dream telescope for refractor fans.
The Starlight Xpress filter wheel is an absolute pleasure to use with my Trius 694 mono CCD camera. After installing the ASCOM drivers on my laptop computer, I can connect to the filter wheel using Astro Photography Tool and can change filters quickly and reliably depending on the subject matter.
It’s a 7-position wheel containing a complete set of Astronomik Luminance, Red, Green, Blue, 6nm H-Alpha, 6nm OIII, and 6nm SII 1.25″ filters. A filter wheel is a must if you plan on using a monochrome camera to build full-color images over time.
- Total Exposure Time: 5 Hours, 25 Minutes
- Details: 36 x 300s Lum, 9 x 300s Red, 12 x 300s Green, 15 x 300s Blue
- Camera: Starlight Xpress Trius 694 Mono
- Telescope: Sky-Watcher Esprit 150 Super APO
- Filter: Astronomik LRGB
- Mount: Sky-Watcher EQ8-R Pro
- Guide Scope: None (OAG)
- Guide Camera: Starlight Xpress Lodestar X2
- Acquisition: Astro Phototography Tool
- Integration/Calibration: DeepSkyStacker
- Processing: Adobe Photoshop 2020
NGC 2539: Thors Helmet
- Object Type: Emission Nebula
- Imaging Style: Deep-Sky Narrowband (HOO)
- Camera Type: Monochrome CCD
Thor’s Helmet Nebula is a fascinating deep-sky target in Canis Major and an object that can be difficult to capture from the northern hemisphere. From my backyard, this nebula skims the trees and rooftops of the neighborhood, allowing only a short window of opportunity.
Until this photo, I had only attempted Thor’s Helmet once before, using a telescope with a short focal length (400mm). This time, I was able to get an up-close view of this dynamic emission nebula at 1050mm using the Sky-Watcher Esprit 150 APO refractor.
I photographed this nebula in HOO (Ha, OIII, OIII). This means that I mapped the hydrogen to red, and the oxygen to green and blue. For this subject, I think it creates a beautiful result.

The Sky-Watcher EQ8-R Pro equatorial mount has been extremely reliable since it arrived in late 2019. This observatory-grade GoTo mount can handle a payload of up 75-pounds, yet handles like an EQ6-R Pro with an identical user experience.
This tracking mount has spent much of the year outside, with a Telegizmos 365 cover protecting it from the elements. It was so nice to have a deep-sky astrophotography rig already polar-aligned and ready to image when the weather allowed for it.

On clear nights, I will set up an additional rig (usually the more manageable Sky-Watcher EQ6-R Pro) to capture another deep-sky object at the same time.
- Total Exposure Time: 3 Hours, 30 Minutes
- Details: 22 x 360s Ha, 13 x 360s OIII
- Camera: Starlight Xpress Trius 694 Mono
- Telescope: Sky-Watcher Esprit 150 Super APO
- Filter: Astronomik 6nm Ha, 6nm OIII
- Mount: Sky-Watcher EQ8-R Pro
- Guide Scope: None (OAG)
- Guide Camera: Starlight Xpress Lodestar X2
- Acquisition: Astro Phototography Tool
- Integration/Calibration: DeepSkyStacker
- Processing: Adobe Photoshop 2020
NGC 6888: The Crescent Nebula
- Object Type: Emission Nebula
- Imaging Style: Multi-Bandpass Narrowband
- Camera Type: DSLR/Mirrorless (one-shot-color)
The Crescent Nebula is an extremely popular deep-sky target for amateur astrophotographers, and for good reason. The problem is, it’s small. To capture a detailed portrait of this 25-light-year wide cosmic bubble, you need some serious reach.
If you haven’t noticed a recurring theme in all of the images on this page up to this point, you should. Again, the incredible Sky-Watcher Esprit 150 Super APO refractor was used to create the image.
1050mm focal length is more than enough magnification for this object, but with a full-frame mirrorless sensor, you get some of the surrounding nebulosity too.

The Canon EOS Ra was my most-used camera of 2020, and it remains my favorite camera for astrophotography of all time. A full-frame modified sensor is something to treasure. The extremely user-friendly format of a mirrorless camera attached to the back of the telescope reminds me of how I got started in this hobby, and the joy it brings me.
Many people doubted my decision to purchase the Canon EOS Ra, and the critiques claimed it was overpriced. After nearly 30 image projects completed with this camera, I can safely recommend it to anyone looking for a reliable all-around astrophotography camera.
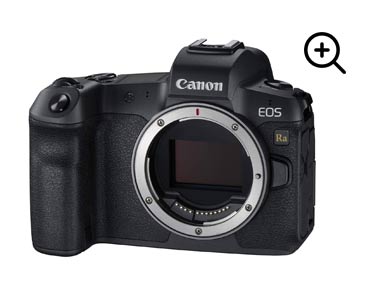
The Radian Triad Ultra quadband filter is an incredible fit for the Canon EOS Ra, and this was the filter I used for 90% of my deep-sky shots using this configuration.
It can be difficult to showcase the faint shell of oxygen surrounding the Crescent Nebula, and for this, I needed a little help. I applied a 25% layer of OIII data using my monochrome CCD camera to the image to really make that outer shell ‘pop’.
- Total Exposure Time: 5 Hours, 20 Minutes
- Details: 50 x 240-seconds
- Camera: Canon EOS Ra
- Telescope: Sky-Watcher Esprit 150 Super APO
- Filter: Radian Triad Ultra
- Mount: Sky-Watcher EQ8-R Pro
- Guide Scope: William Optics Zenithstar 72
- Guide Camera: ZWO ASI290mm Mini
- Acquisition: Astro Phototography Tool
- Integration/Calibration: DeepSkyStacker
- Processing: Adobe Photoshop 2020
Comet NEOWISE
- Object Type: Solar System (Comet)
- Imaging Style: Broadband Wide-Field
- Camera Type: DSLR/Mirrorless (one-shot-color)
Photographing Comet NEOWISE was an unforgettable experience. The tail of this evaporating iceberg in space was long and beautiful.
There were thousands of images of Comet NEOWISE taken in July 2020, and some of them were remarkable. I did my best to capture this memorable scene from my backyard using basic equipment.
Comet photography is quite different from traditional deep-sky photography, although there are a few best practices that came in handy. I used my Rokinon 135mm F/2 lens and DSLR to photograph this comet on July 17th, 2020.

The best part about photographing this comet was that it did not require an expensive deep-sky imaging rig. A portable star tracker and camera lens worked perfectly to capture this long icy snowball in the sky.
The Sky-Watcher Star Adventurer is a dependable, battery-powered, ultra-portable star tracker that can handle up to 11-pounds of gear. I’ve used this little EQ mount with everything from a DSLR and 50mm lens, to a Radian Raptor 61 APO.

You may be wondering why the comet is lying on its side in this image when most photos show it pointing downward. The silhouetted treeline at the bottom of the photo is actually the side of my neighbor’s tree, and I rotated the frame to capture the Comet lengthwise.
The position and timing of the comet made photographing this celestial event a challenge. It sat rather low in the sky, and there was a limited window of time to capture it in the early morning, or just after dusk. There are many things I would change if I could photograph Comet NEOWISE again, but I will have to wait until it returns to Earth in 8,786.
- Total Exposure Time: 7 Minutes
- Details: 32 x 14-seconds
- Camera: Canon EOS 60Da
- Telescope/Lens: Rokinon 135mm F/2
- Filter: None
- Mount: Sky-Wfatcher Star Adventurer
- Guide Scope: None
- Guide Camera: None
- Acquisition: Remote Shutter Release Cable
- Integration/Calibration: DeepSkyStacker
- Processing: Adobe Photoshop 2020
The Planet Mars
- Object Type: Solar System (Planet)
- Imaging Style: RGB
- Camera Type: Monochrome CMOS
The Mars Opposition was another amazing celestial event that seemed to further ignite interest in astronomy in 2020. On October 13th, 2020, Mars was at its closest to Earth, and I photographed the planet shortly before this date.
Up until this year, my best photos of Mars were tiny, blurry orange orbs in the sky. I had never captured any interesting details of the planet’s rocky surface before.
This type of astrophotography requires different acquisition software and a completely different post-processing routine as well. The results were incredible, considering I still have much to learn.
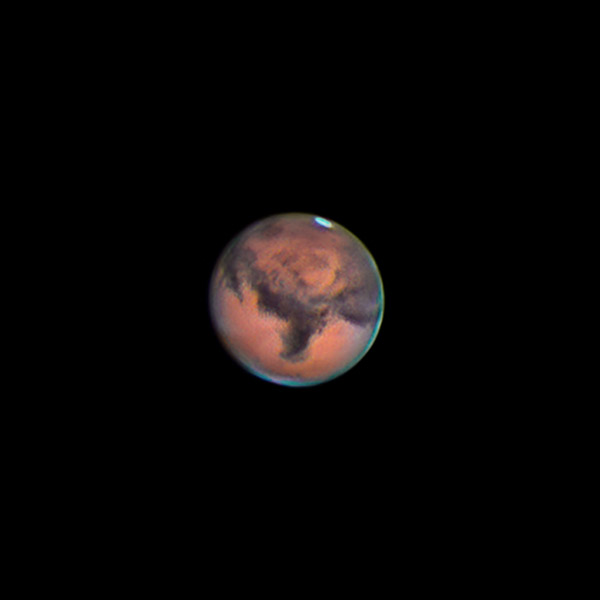
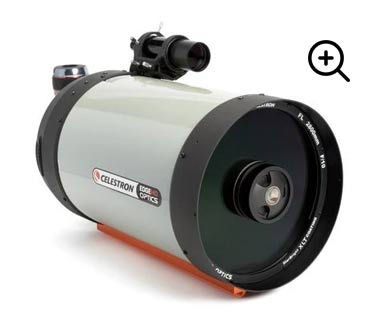
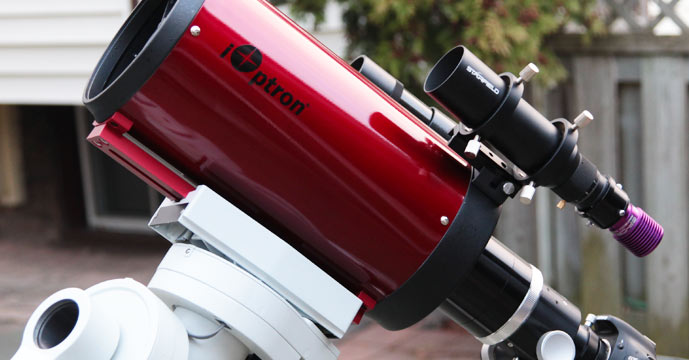
High magnification planetary imaging is still quite foreign to me, although I have been photographing planets for quite some time. This time, I used a large SCT (Celestron Edge HD 11) and a dedicated astronomy camera that excels in planetary photography.
The most difficult part of the process was painstakingly removing and replacing each RGB filter in front of the camera (and re-focusing each time) to create a full-color image with my monochrome camera. This is exactly why filter wheels exist, I just did not own one at the time.
The process becomes even more challenging as the planet slowly rotates (some, faster than others), and you realize that the rotation has created a mismatch in terms of surface details from one color to the next.
- Total Exposure Time: N/A
- Details: Stack of Best 250 Frames each RGB Filter
- Camera: ZWO ASI290MM Mini
- Telescope/Lens: Celestron Edge HD 11
- Filter: Astronomik LRGB
- Mount: Sky-Watcher EQ8-R Pro
- Guide Scope: None
- Guide Camera: None
- Acquisition: FireCapture
- Integration/Calibration: AutoStakkert!
- Processing: Registax 6, Adobe Photoshop 2020
NG 6960: The Western Veil Nebula
- Object Type: Supernova Remnant
- Imaging Style: Multi-Bandpass Narrowband
- Camera Type: Dedicated Astronomy Camera (one-shot-color CMOS)
I took several photos with the versatile QHY268C one-shot-color astronomy camera in 2020. It was difficult to choose a favorite, as they all ended up being my best versions of each object to date.
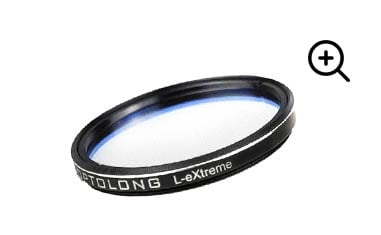
The Veil Nebula looked especially beautiful when captured with this camera, and I photographed it from every angle possible. The Optolong L-eXtreme filter was made for this target, and I was thrilled with my results using this combo.
The separation between the hydrogen and oxygen gases of this nebula from a light-polluted sky was impressive. If you’ve ever photographed the Veil Nebula using a broad spectrum filter, you’ll know that it can easily get buried underneath a sea of stars.

The sensor size of the QHY268C is APS-C (crop-sensor), which is quite large in the world of dedicated one-shot-color astronomy cameras. I thoroughly appreciated the field of view this sensor captured, in stunning high-resolution detail.
Although many of my best images of the year were captured using a monochrome camera, one-shot-color cameras continue to be a practical way to complete an image with limited time. In the case of the QHY268C, the image quality doesn’t have to suffer, either.

- Total Exposure Time: 2 Hours, 10 Minutes
- Details: 19 x 120-seconds, 23 x 240-seconds
- Camera: QHY268C
- Telescope/Lens: Sky-Watcher Esprit 100 ED
- Filter: Optolong L-eXtreme
- Mount: Sky-Watcher EQ6-R Pro
- Guide Scope: Starfield 60mm Guide Scope
- Guide Camera: ZWO ASI120MM Mini
- Acquisition: Astro Photography Tool
- Integration/Calibration: DeepSkyStacker
- Processing: Adobe Photoshop 2020
Messier 31: The Andromeda Galaxy
- Object Type: Spiral Galaxy
- Imaging Style: Broadband RGB
- Camera Type: DSLR/Mirrorless (one-shot-color)
I rented an Airbnb under Bortle Scale Class 4 skies to photograph the Andromeda Galaxy in October 2020. This sensational broadband galaxy often looks best when photographed without the use of filters.
Unlike most other galaxies, Andromeda is very large, and you may be surprised to find out that your current camera and telescope configuration will not fit the entire galaxy in a single frame.

This is one of the many sensational images captured using the Radian Raptor 61 apochromatic refractor telescope. This shows off the massive field of view provided at 275mm focal length. The conditions were far from ideal that night, but I am happy with how the photo turned out nevertheless.

I used my portable Sky-Watcher EQ6-R Pro GoTo equatorial mount for this photo and took advantage of the autoguiding feature of the mount. The entire imaging rig was very manageable, and one that I will certainly bring on more adventures away from home in the future.
As for the processing, I have shared an Andromeda Galaxy image processing tutorial in the past, and those techniques are largely unchanged today.
- Total Exposure Time: 3 Hours
- Details: 60 x 180-seconds at ISO 1600
- Camera: Canon EOS Ra
- Telescope/Lens: Radian Raptor 61
- Filter: None
- Mount: Sky-Watcher EQ6-R Pro
- Guide Scope: Starfield 50mm Guide Scope
- Guide Camera: ZWO ASI120MM Mini
- Acquisition: Astro Photography Tool
- Integration/Calibration: DeepSKyStacker
- Processing: Adobe Photoshop 2020
The Milky Way
- Object Type: Milky Way Photography
- Imaging Style: Wide-Field Nightscape
- Camera Type: DSLR/Mirrorless (one-shot-color)
This photo was taken on a rare adventure away from home in 2020. My wife Ashley and I rented an Airbnb under Bortle Scale Class 3 skies during new moon. The night sky was jaw-droppingly gorgeous from this location.
The core of the Milky Way was obscured by trees, but there was a large opening to the sky straight overhead on the property. Luckily, the timing was perfect as Cygnus and Cepheus are full of beautiful nebulae regions.
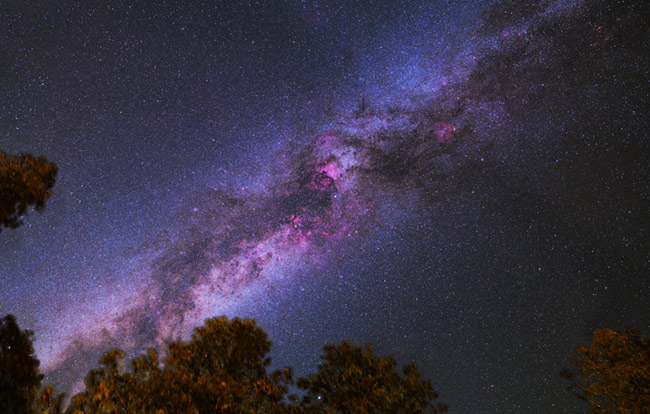
For this photo, I used my Canon EOS Ra mirrorless camera with a Sigma 24mm F/1.4 lens attached. This is a spectacular lens for astrophotography, particularly nightscape images like this. 
I compensated for the apparent motion of the night sky using a Sky-Watcher Star Adventurer 2i star tracker. This portable rig is so easy to set up and record wide swaths of the night sky. It is hands-down the best Milky Way Photography setup I’ve ever owned.
I used a different stacking software for this shot, one that is more suitable for landscape astrophotography. Sequator is a simple-to-use stacking software that does a great job of reducing noise in your image to provide an impressive file to process.
- Total Exposure Time: 14 Minutes
- Details: 9 x 90-seconds at ISO 3200
- Camera: Canon EOS Ra
- Telescope/Lens: Sigma 24mm F/1.4
- Filter: None
- Mount: Sky-Watcher Star Adventurer
- Guide Scope: None
- Guide Camera: None
- Acquisition: Remote Shutter Release Cable
- Integration/Calibration: Sequator
- Processing: Adobe Photoshop 2020
NGC 7293: The Helix Nebula
- Object Type: Planetary Nebula
- Imaging Style: Multi-Bandpass Narrowband
- Camera Type: Dedicated Astronomy Camera (one-shot-color CMOS)
The Helix Nebula is one of those deep-sky objects that remind you of why you got into astrophotography. Its iconic shape and bold colors can spark a passion for astronomy and space like few other objects can.
I photographed the Helix Nebula on several occasions in the summer of 2020, yet still didn’t manage to collect enough exposure time to truly do this object justice. This image is not technically amazing by any stretch, but it is still one of the most exciting photos I took all year.
For this image, I took advantage of the amazing Optolong L-eXtreme filter and QHY268C color camera once more.
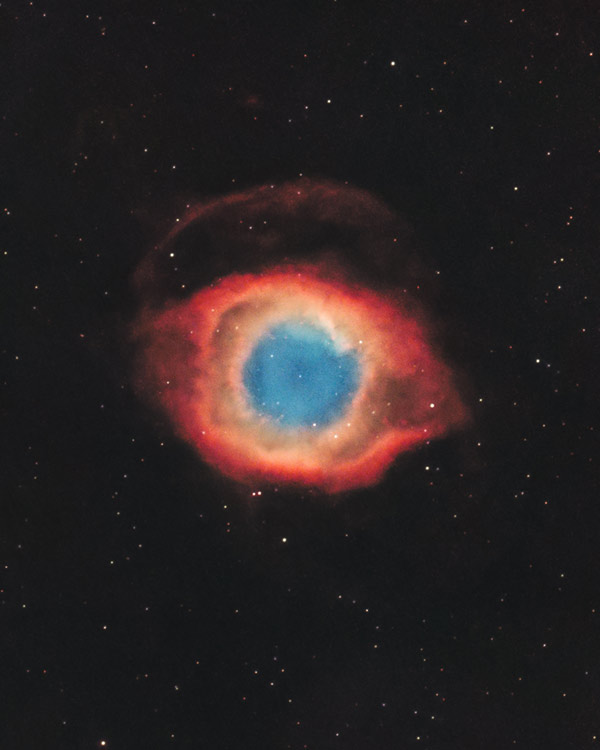
To achieve these colors, I had to do some selective stretching and color balancing. The outer rim of hydrogen in red/orange is pretty standard, but in my data, I had to pull the greenish/blue area in the center way up.
The central region of this nebula was much more greenish in the “out-of-the-camera” image. The Optolong L-eXtreme does a great job of separating the important wavelengths of light associated with some of the most popular nebulae in the sky.
This is quite a small target, so plenty of aperture and focal length is needed to really get a good look at the Helix Nebula.
- Total Exposure Time: 1 Hour, 44 Minutes
- Details: 26 x 240-seconds
- Camera: QHY268C
- Telescope/Lens: Sky-Watcher Esprit 150 Super APO
- Filter: Optolong L-eXtreme
- Mount: Sky-Watcher EQ8-R Pro
- Guide Scope: Starfield 60mm Guide Scope
- Guide Camera: ZWO ASI120MM Mini
- Acquisition: Astro Photography Tool
- Integration/Calibration: DeepSkyStacker
- Processing: Adobe Photoshop 2020
Final Thoughts
This was hands-down the busiest year of astrophotography I’ve ever had. There were a lot of sleepless nights, numb fingers, and long image processing sessions. My reward? The images in this article, and the countless memorable nights under a clear night sky.
I hope you have gotten some value out of the descriptions of these images, so you can tackle the job yourself. Of course, you do not need to use the exact configuration I did to achieve these results, but at least you will have a benchmark to start from.
If you have any questions about the astrophotography equipment discussed in this article, please feel free to let me know in the comments. Until next year, clear skies!

I follow your posts with great interest. Thanks for the quality of your work!
Thank you, Marco! I am very glad to hear that, I will do my best to keep sharing helpful info!
Sorry Trevor, did you really mount this telescope on this mount, or is the mount an error, cut and paste.
Love your images and tutorials by the way.
NGC 7293: The Helix Nebula
Total Exposure Time: 1 Hour, 44 Minutes
Details: 26 x 240-seconds
Camera: QHY268C
“Telescope/Lens: Sky-Watcher Esprit 150 Super APO”
Filter: Optolong L-eXtreme
“Mount: Sky-Watcher Star Adventurer”
Guide Scope: Starfield 60mm Guide Scope
Guide Camera: ZWO ASI120MM Mini
Acquisition: Astro Photography Tool
Integration/Calibration: DeepSkyStacker
Processing: Adobe Photoshop 2020
LOL! I would NOT recommend mounting an Esprit 150 to a Star Aventurer. 🙂 I’ve updated it now, thank you!
Concise, yet full of great information! I will refer to this often. Thanks for your great work and total dedication to this incredible hobby.
Welcome aboard, Ashley!
Wishing you a happy and prosperous New Year!
Jim
Rochester, Minnesota
Thank you very much, Jim! All the best in the new year! Clear skies:)
Truly remarkable year of images Trevor! Thank you for putting the time (and passion) into your work and taking us along for the journey!
I started my journey in astrophotography around March of this year (2020) due to being in lockdown for the pandemic. At that time, I didn’t realize how much I’d come to love this hobby. Your passion is contagious and looking back on my 2020 images, I’m proud of how I’ve progressed. Your YT videos, blog posts and Image Processing Guide gave me a solid foundation to get started.
Thanks again and clear skies!
Hi Trevor and Ashley,
I am a beginner, I am subscribed to your You Tube Channel, excellent ideas an advise and also purchased your imaging Guide.
Your photos are simply said “Amazing”
Will be looking for ideas from your future videos, also may I add that I like your choice of Hockey Team “Go Habs Go”.
Wishing you both a Happy New Year and lots of Clear Skies for 2021
Paul
Prince George, BC
Great publication, Trevor! Many budding as well as experienced astrophotographers will learn a lot from this compilation.
Thanks,
Bill Shaheen
Gold Canyon, AZ
Trevor, awesomely stuff! I can’t wait to see what 2021 brings! I’m not sure if you’ve done a topic on this yet, but a video on how you keep track of all of your acquisition data would be really helpful!
Trevor,
What an excellent summary! Your ability to convey what you do in this blog is as helpful as your YouTube videos. This likely takes a great deal of effort which is greatly appreciated.
With Ashley on the AstroBackyard team full time we will have a lot more to look forward to in 2021!
Tom
Trevor, all the passion and knowledge you share is remarkable, your astrophotography is amazing and of the highest standard. You remain humble and honest, you are true inspiration to all. Thank you for all your efforts in 2020! Wish you all the best for 2021. Bernard
Trevor… beautiful images, thanks for sharing!
Beginner questions:
– When do you opt for a mono camera vs a full color camera?
– How do you determine the color to apply to the photos taken with a specific filter?
Thanks
Wonderful summary, Trevor!
Your photos are truly amazing as well as your ability to convey your processes via YouTube videos.
Welcome aboard, Ashley.
Happy New Year.
Lou
Happy New Year Trevor, glad I was not going mad, looking forward to your 2021 posts.
Great article Trevor. It has been a great first year for me and much of what I accomplished was due to you and your excellent tutorials and videos. I am looking forward, with great excitement, to the coming year and the adventures that await us all. Just thinking back, what has been the progression of your mounts from when you first started up to the EQ8-r Pro? I am purchasing the EQ6-r Pro next month to upgrade from my present Star Adventure mount I maxed out with a Sky-Watcher 120mm Star Travel and T3i.
Trevor ,
Your dedication to the hobby is amazing and I am happy for you , that through your dedication, you’ve been able to create such a following, and a resource home for the rest of us. Most of the equipment I now own is directly due to your reviews. So far I have not been disappointed. Enjoy all your YouTubes and look forward to what adventures in DSO photography 2021 will bring.
Trevor
You are my go to for astrophotography, thank you for all your contributions
clear skies
Ota
I don’t think Ashley was ever less than 100% on the team – happy New year to both of you!
Great Site Trevor and thank you for sharing your information you are doing fantastic work. I look forward to the clouds parting in my part of the world so that I can get back into it.
Cheers……….
Thank you for sharing . Just taken up the hobby and going through the learning curve and your tutorials are inspirational. Am in a Bortle 8 region in Dublin , Ireland. Your fantastic pics show what can be done . Just wondering what you thought of the ASI air pro to use for acquisition etc?
Happy New Year to you all .
Many thanks Trevor!
Always precise, effective, useful and inspiring!!
Buon anno nuovo!!
Davide
I’m curious about how you are storing your larger equipment outside for extended periods of time. Do you leave it out scope and all? What weather conditions cause you concern with this. I have only left my rigs outside overnight and maybe through one full day but never considered leaving them covered for extended periods. Thanks, happy new year
Thanks for this Trevor.
I am a newbie and yourself and Dylan
and other YTubers have been a great help to me.
Just got my first decent shot of the Orion Nebula Wednesday night
Its been cloudy for two months in Ireland.
My equipment so far is an Esprit 100, AZ EQ6 Pro. L-Extreme and my D850 attached to the back. Looking into NINA and guiding next.
Happy New Year to you and yours.
Excellent year in review. Your talent shines just like your work does. Helpful information and much appreciated. Wishing you the best for 2021.
Henri -Julien.
Looking forward what team Trevor Jones has for us in 2021 happy new year to you both and clear sky’s from the UK.
Hi Trevor,
Great content. I have just recently subscribed and joined.
Looking at getting into astrophotography.
Currently have a few Sony camers (A7S and A7ii).
I am struggling with whether to purchase a larger focal length telescope (redcat, Meade 6000, etc) or got with the Rokinon .
I want to be able to use a simple mount and tracker. If all goes well possibly do some deep space photography later.
What do you suggest…I am leaning towards to the Rokinon 135.
Thanks again for all you do us beginners…
Andy
Trevor, thank you for this year in review listing all your gear, etc! Being in a similar Bortle 8 zone and still learning / experimenting, it is wonderful to see what is possible!
Also, beautiful images as always!
Wow Trevor. Everyone of you images is amazing! CS!
Hi Trevor I have a question, could you list the best telescopes you’ve used and the best cameras you’ve used for dso photography?