How to Photograph Planets
Photographing the five visible planets with your camera is not as difficult as you may think. Planets like Jupiter and Mars are quite bright, you just need to know where and when to look for them.
You can shoot wide-angle shots with a DSLR camera and lens where the planet appears as a bright star, or high magnification views using a dedicated astronomy camera that reveals surface detail.
There are a few ways to photograph planets with your camera, but the easiest and most straightforward is using a DSLR, a wide-angle lens, and a tripod. You do not need an astronomical telescope to find and photograph the five visible planets (Mercury, Venus, Mars, Jupiter, and Saturn).

The planets Venus and Mercury at dawn using a DSLR camera and lens on a tripod.
Because the major bodies in the solar system orbit the Sun in nearly the same plane as the ecliptic, the position of each planet is predictable, and you can plan for photographic opportunities in the future.
A suitable telescope that’s mounted to an equatorial mount is capable of high magnification, detailed views of the larger planets, and even the very distant gas planets such as Uranus and Neptune.
This article focuses on capturing the 5 visible planets of our solar system as they are the easiest to find and photograph using basic camera equipment. Unlike deep-sky astrophotography, you do not need a telescope or a tracking equatorial mount to capture beautiful images.
At a short focal length (300mm or below), you can take a picture of one of the five visible planets in the sky quite easily. The planet may appear as though it is just another star in the sky, but it will show characteristics, such as color and size, that distinguish it from the others.

Planets Venus and Jupiter before sunrise. DSLR camera and lens on a tripod.
Photographing planets at high magnification through a telescope is much more difficult than a wide-angle photo of the planets in the night sky. This type of photography (planetary astrophotography) utilizes dedicated astronomy cameras with small sensors and a high frame rate.
The process involves capturing short videos of the planet while accurately tracking its movement. The best video frames (the least blurry images) are then extracted and stacked, to reveal surface details and vivid colors.
A telescope with a long focal length (1000mm+) is required for a detailed photo of the planets. The photo below features my best planetary images of Jupiter, Saturn, and Mars using this method.

Planets photographed at high magnification using a dedicated astronomy camera and telescope.
What type of camera do you need?
There is no “one-size-fits-all” solution when it comes to planetary astrophotography. Some cameras are better at capturing a dramatic landscape image at dusk with Venus rising overhead. Others were designed to get a closer look at the polar ice caps of Mars’s surface.
Here are a few options to consider when selecting a camera to be used for photographing planets.
DSLR Camera
For wide-angle photos of planets in the night sky, a DSLR camera is best. A DSLR allows you to have full manual control of your camera settings from aperture to exposure length.
When it comes to astrophotography, leaving the camera shutter open for long periods of time can be advantageous. After all, most of the planetary photos you capture will be at night! The longer an image is exposed, the more light that can be collected by the camera sensor.

Also, a DSLR gives you the opportunity to photograph planets at different focal lengths using interchangeable lenses. Remember, anything with a focal length longer than about 24mm will begin to show star trailing in an exposure longer than about 15 seconds.
It is also possible to take pictures of the planets at high magnification using a DSLR camera and Barlow lens in your telescope, as described in this informative article by Sky and Telescope. However, a DSLR is probably not the best choice for this type of planetary photography. A dedicated astronomy camera like the ZWO ASI290MM mini is a more practical choice.
Mirrorless cameras are also up to the task of planetary photography when used with a camera lens. The important thing to remember when photographing planets with a DSLR/mirrorless camera on a stationary tripod (at any focal length), is that the planet (and the stars) will begin to trail in a long exposure image.
A star tracker can help you take long exposure images without star trailing, as long as it has been accurately polar aligned with the celestial pole.
Point-and-Shoot Camera
A point-and-shoot digital camera (or bridge camera) does not offer the level of control that a DSLR does, but it can still capture captivating images of planets in the sky.
The planets that often appear close to sunrise or sunset, such as Venus, are best viewed with these cameras, as they were not meant for low-light photography.
One advantage of point-and-shoot digital cameras over DSLRs is their small, built-in zoom lenses. You may be able to fit the barrel of your camera lens directly into the eyepiece of your telescope!

Jupiter, Saturn, and Mars captured using a point-and-shoot digital camera through a Dobsonian reflector.
If this is the case, it is best to capture a video file of the planet when using higher magnifications. Depending on the magnification of the eyepiece or Barlow lens you are using, it may be difficult to keep your video of the planet steady.
A non-tracking (or GoTo) telescope mount that requires manual movement will make this extra tricky, but it’s not impossible. The good news is that the individual images you extract from the video can be realigned and sharpened in post-processing.
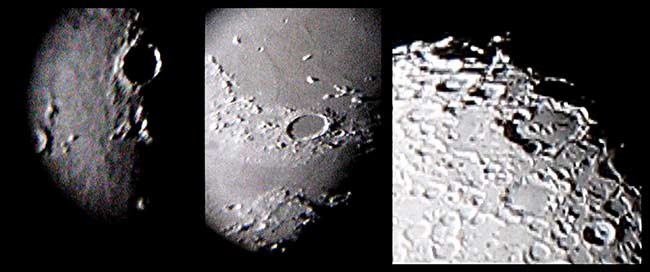
These cameras are also capable of capturing detailed images of the Moon using the eyepiece projection method. With the right eyepiece magnification and steady seeing, you can photograph interesting craters of the Moon’s surface.
Webcam or Dedicated Astronomy Camera
When it comes to an up-close look at the surface of planets in our solar system, a dedicated astronomy camera (or planetary camera) with a small, sensitive sensor is best.
These cameras typically have a fast frame rate (up to 50 frames per second or more) that gives you the best shot at capturing moments of clear atmospheric seeing.
A planetary camera connects directly to your computer with a USB cable and must be controlled using dedicated software. They do not include a screen on the camera body to review your images or control camera settings.

The ZWO ASI462MC is a popular choice to consider for planetary astrophotography.
When it comes to monochrome planetary cameras versus color, you’ll want to consider a number of factors.
If you already own a filter wheel with LRGB filters, a monochrome planetary camera makes a lot of sense. A mono sensor will collect more signal in a single shot (or video), providing the best possible data through your telescope.
Then, you will need to construct a full-color image of the planet using data captured through each color filter. The process is not overly difficult, but it will require some planning.
On the other hand, a color camera will produce a full-color image in one shot. This can be useful when photographing planets like Jupiter (Jupiter completes a full rotation every 9 hours!) that rotate rather quickly.
Smartphone Camera
Yes, you can photograph planets using your iPhone. For this to work, you’ll want to use the eyepiece projection method with a telescope. Simply place the camera lens of your phone perpendicular to the center of the telescope eyepiece to capture the action.
You’ll want to use the manual controls of your iPhone camera to adjust settings such as exposure time, ISO, and aperture (if available). Once you find the right settings to properly expose the planet you are photographing (so the planet is not too bright), the hardest part will be holding the phone steady.
Smartphone astrophotography has exploded over the past few years, with impressive images of the planets and the Moon being captured every day across the globe. To help keep the camera steady, it is beneficial to use a smartphone adapter that holds your phone securely to the telescope eyepiece.
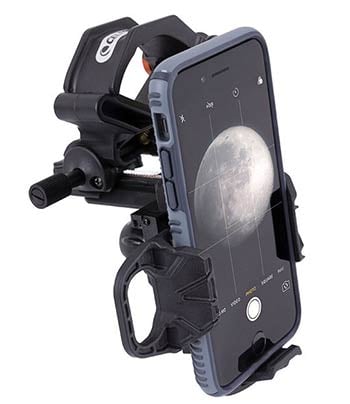
A Celestron smartphone telescope adapter for planetary astrophotography.
Through the telescope eyepiece
If you own a manual telescope for visual astronomy, such as a Dobsonian (shown below), chances are you have already seen the bright planets up close.
Visual observations of Jupiter and its moons are incredible, but photographing the planet in detail through a visual eyepiece can be tricky.

You can take pictures of planets through the eyepiece of a Dobsonian Telescope.
Taking up-close pictures of the larger planets is possible using an amateur telescope through the eyepiece, but it will involve a lot of trial and error.
The technique is called eyepiece projection astrophotography, as you will be pointing your camera lens into a telescope eyepiece or Barlow lens that magnifies the image.
For example, the photo of Saturn below was captured using a point-and-shoot digital camera. A video of the planet at high magnification in the eyepiece was recorded, and the resulting footage was stacked into a single image.

The planet Saturn through a telescope.
The hardest part of this type of planetary imaging is keeping the planet in your field of view at such a high magnification. If you’re using a manual telescope (such as a Dobsonian reflector), an eyepiece of 10mm or below will make tracking the planet quite challenging.
Your goal is to capture a short video of the planet through the eyepiece, keeping the camera as steady as possible. Once you have captured a video, you can select the best individual image frames from the video footage to isolate the moments of the least amount of atmospheric disturbance.
Then, you can stack the best image frames (sometimes referred to as “lucky imaging“) together in a software tool like Registax or Autostakkert to really sharpen and enhance your image.
Usually, amateur astrophotographers will use a point-and-shoot digital camera, webcam, or dedicated astronomy camera that is suitable for high-resolution planetary imaging. In the following video, I photograph the planet Saturn using my camera and telescope:
Use a planetarium to find planets in the sky
The first thing you need to do is find out where the planets will be in the night sky from your location, at a certain time. To find this information, you can use planetarium software that recreates a current view of the night sky from your location on Earth.
There are many fantastic astronomy and stargazing apps available for your mobile phone. They can help you plan your next photography session, and give you a better idea of where the planet will be in the sky.
I like to use Stellarium because it’s easy to understand and free. Simply enter the coordinates for your location on Earth to generate a “live” look at the current position of the stars and planets in your night sky.
To make it easier to locate the planets visible to you, adjust the label parameters to show only planets and not the names of constellations, stars, and deep-sky objects.
Which planets can you photograph without a telescope?
As I stated earlier, there are five “visible” planets. These are the brightest planets in the night sky, ones that anyone can identify and photograph with a bit of guidance.
There are eight planets in total (including Earth), but only five are visible to the naked eye. There are inner solar system planets and outer solar system planets. The planets that can be photographed with a DSLR camera are a mixture of both, but only the largest two outer solar system planets are within reach of basic camera equipment.
The five visible planets are:
- Venus
- Jupiter
- Saturn
- Mars
- Mercury
The outer solar system planets, Neptune and Uranus, are too distant and small to find without the aid of an astronomical telescope. A long exposure image may show a tiny “dot” that you have identified to be Neptune or Uranus, but this is not likely the type of planetary photography that interests you early on.
The five visible planets are not difficult to photograph with your DSLR camera as long as you use the right camera settings. The timing and location of the planets will play a large role in your camera setting selection process, as some planets appear when the sun is still lighting up the sky.

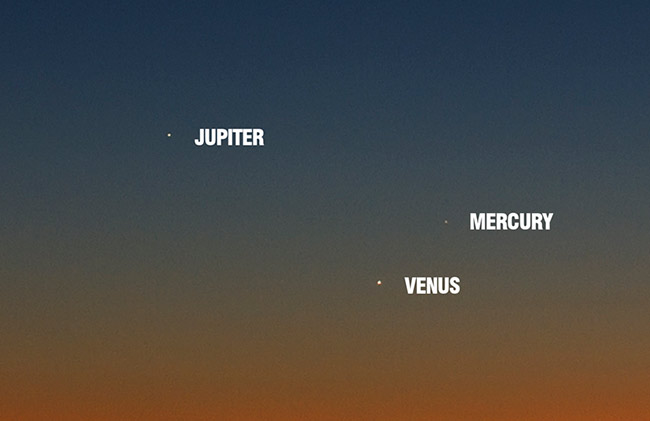
A triple conjunction of planets on May 26, 2013. Jupiter, Venus, and Mercury.
Tips for Photographing Planets
First off, you need to know where and when to look for planets if you wish to photograph them. A helpful resource I like to use is the Astronomy Calendar of Celestial Events. All you need to do is look for the “planetary event” icon to find out which planets are well-placed for a photo opportunity.
For example, you’ll know when Jupiter is at opposition. This means that it is at its closest approach to Earth and its face will be fully illuminated by the Sun. It will be brighter than any other time of year and visible all night long.
You can also find out when planets, like Mercury, are at their greatest eastern or western elongation or when the next transit of Mercury or Venus will occur.
The following tips should provide you with some insight into capturing each of the five brightest planets using a DSLR or point-and-shoot digital camera. Over the years, I have photographed the planets in a variety of different scenarios from planet conjunctions to solar transits.
Mercury
Photographing Mercury is tough. This is because Mercury is always close to the Sun, which makes it hard to separate from the bright glow (setting or rising).
Mercury can be seen through a pair of binoculars, but it can be very difficult to spot due to its proximity to the Sun. At certain times of the year (during its greatest western elongation) you may be able to spot Mercury with the naked eye if you know exactly where and when to look for it.
The daytime is usually the best time to take a landscape photograph, especially during the ‘golden hour’, which occurs during sunrise and sunset. This offers the most dramatic and beautiful lighting of any time of day.
So, use this to your advantage by including some dramatically lit foreground interest in your photo of Mercury. You’ll need a low view of the eastern or western horizon to pull it off because Mercury will be very low in the sky.
Venus
For a landscape image of the planet Venus, you’ll likely need to use a shorter exposure image, as the Sun may have just set or is about to rise. Venus is one of the most obvious planets to identify, as it can be intensely bright.
Venus often resembles a star and has even been nicknamed “the Evening Star”. Venus shows up at dusk, seemingly out of nowhere. This is because the orbit of Venus is on the inside track from Earth so it always appears to closely follow the Sun.
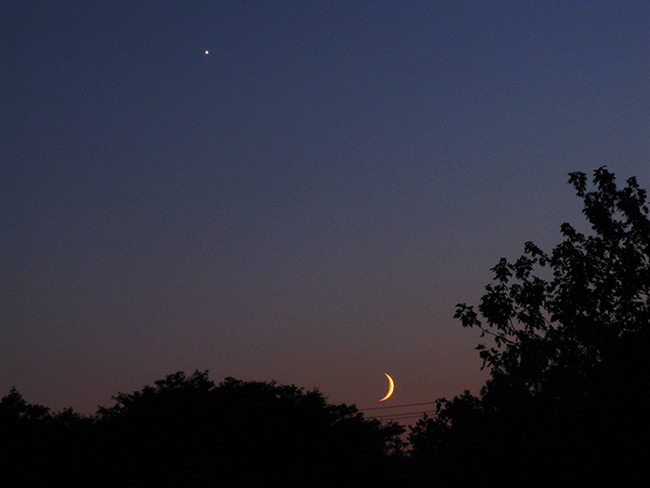
Venus and the crescent Moon. Photographed with a point-and-shoot digital camera.
Venus looks like the brightest star in the sky. Check with your planetarium software to confirm the location of Venus to be sure you’ve found it. The fortunate timing of the appearance of Venus makes for some unforgettable photographs.
One of the most exciting ways to photograph the planet Venus is when it transits (goes in front of) the Sun. In the image below from 2012, you’ll get an excellent depiction of the size Venus appears from our vantage point as it passes in front of the Sun.

I photographed the transit of Venus on June 5, 2012, from my backyard.
Have you ever noticed that band of pink light that sits on the horizon at dusk? This is called “the Belt of Venus” because it marks the height at which Venus often appears above the Sun. The official description of this phenomenon is “an arch of pinkish light above the shadow that Earth casts on the atmosphere opposite the Sun”.
In the photograph below, you’ll likely recognize that you have seen the Belt of Venus yourself many times.

The “Belt of Venus” (pinkish glow on the horizon) at twilight.
Jupiter
In the video below, I photograph the planet Jupiter at opposition using my camera and telescope on August 19, 2021.
Unlike Venus, this gas giant can appear along the ecliptic at any time of day or night. This is because Jupiter’s orbit is long and distant. It is an outer solar system planet whose orbit stretches way beyond Earth’s.
Jupiter is a massive planet, and with the right focal length of lens, it can showcase interesting surface details. A camera lens with at least 400mm is needed for this, which will also require steady tracking to follow.

A photo of the planet Jupiter through my telescope.
With adequate magnification, Jupiter shows off cloud bands on its surface, along with the Great Red Spot. The rotation of the planet is also observable and can be photographed over the course of one night.
You also may notice the four largest moons that orbit Jupiter, and their changing positions each night.
With an ordinary DSLR camera and wide-angle lens (such as an 18-55mm lens), you can photograph Jupiter in its current placement along the ecliptic so long as it is not behind the Earth.
A longer exposure image of at least 30 seconds will reveal how much brighter Jupiter is than the stars surrounding it. Jupiter makes for a fantastic visual target through a Dobsonian telescope. An aperture of at least eight inches is recommended for an unforgettable view.
Mars
The size of the “disc” of Mars can change dramatically over time. The reason Mars can look so much bigger from Earth at certain times is because of its elliptical orbit.
Mars is an interesting planet to photograph because of its proximity to Earth and its fascinating surface details. Mars is a terrestrial planet and the fourth planet from the Sun.
Using amateur astronomy and photography equipment, it is possible to record surface details on Mars, such as Valles Marineris and its polar ice caps. The planet Mars can reach an apparent magnitude of -2.94, which is surpassed only by Venus, Jupiter, the Moon, and the Sun.
Mars is the next planet out from Earth in the orbit of the Planets around the Sun. It’s relatively close to us when compared to other planets. So close, in fact, that we have sent robots from Earth to explore its surface!

The planet Mars shines brightly from my light-polluted backyard in the city.
Mars is distinctly red, which becomes obvious when photographing it. With the naked eye, it may appear to look like an orange ‘star’, but it’s actually the red planet, Mars.
On October 5th, 2020, Mars was nearing opposition, and I snapped this close-up using my telescope. On October 6th, 2020, Mars made its closest approach to Earth until 2035.
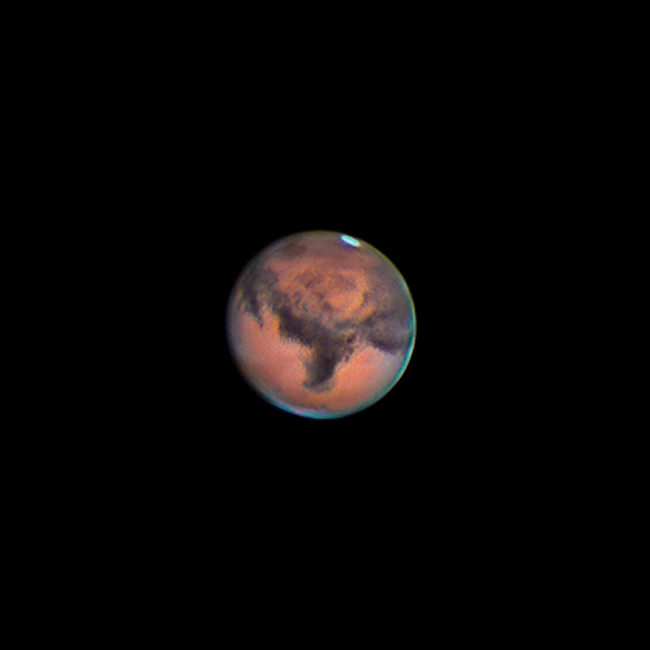
The Planet Mars through my telescope. October 2020.
Like Jupiter, the orbit of Mars allows it to freely travel along the ecliptic from Earth and appear at any time of night or day. As you’ll see in the video below, I chose to photograph Mars as it passed the Pleiades star cluster in the constellation Taurus.
Saturn
There are few sights more memorable than those of Saturn, making this planet a crowd favorite. Unfortunately, a wide-angle camera lens will not show much more than a pale yellow star with a noticeable glow.
In the photo below, you’ll see what looks to be an ultra-bright ‘star’ in the constellation Scorpius. The problem is, there is not supposed to be a star here! That’s because the bright yellow orb in this picture is actually the planet Saturn glowing brightly in the summer night sky.

The planets Saturn and Mars shine brightly in the constellation Scorpius.
To see and photograph the rings of Saturn, much more focal length and magnification are needed. However, the pale yellow color of Saturn contrasts the red of Mars, which sets it apart in photographs and makes it easier to identify.
It is possible to capture a quick photograph of Saturn through the eyepiece of a telescope with enough aperture. As mentioned above, this is called eyepiece projection astrophotography and involves holding your digital camera or smartphone up to the eyepiece objective.
Capturing high-magnification images of the planets
Don’t expect to capture detailed high-magnification images of planets up close right out of the gate. It took me many years of trial and error before I was able to capture an image of the planet Saturn like the one below.
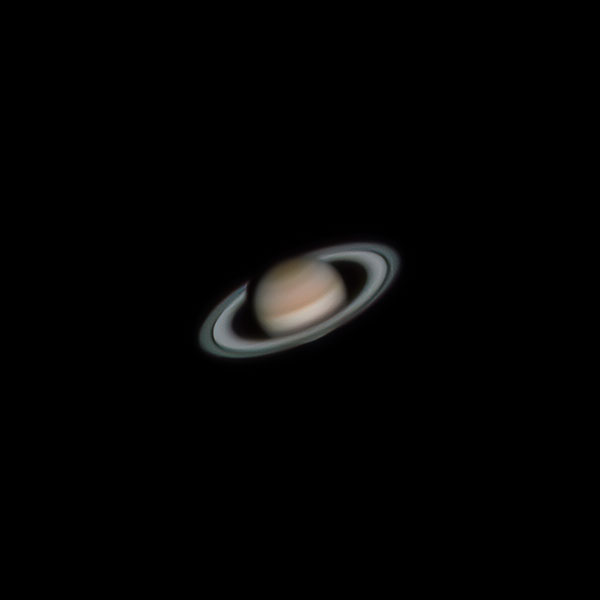
My latest image of Saturn. Celestron Edge HD 11 and ZWO ASI290MM Mini camera.
Beginners should start by photographing planets with whichever camera they own (i.e., a smartphone, a point-and-shoot camera, or a DSLR).
Once you are comfortable with the camera settings and controls of your camera, you can look into ways to attach it to a tracking telescope. Long focal-length telescopes require accurate tracking and alignment to photograph a planet effectively.
If you have your heart set on capturing detailed, high-magnification photographs of the planets, have a look at some of the equipment involved in this video. To produce detailed portraits of planets like Jupiter, Saturn, and Mars, you need sophisticated planetary astrophotography equipment.
Some of my favorite planetary astrophotographers are Damien Peach and Christopher Go. Take a look at their amazing work for inspiration and helpful tips.