How To Photograph the Planet Jupiter

I’ll get straight to the point. I’m going to walk you through how I took a detailed picture of the planet Jupiter through my telescope.
Compared to photographing deep-sky objects, like galaxies and nebulae like I normally do, photographing planets is a breath of fresh air.
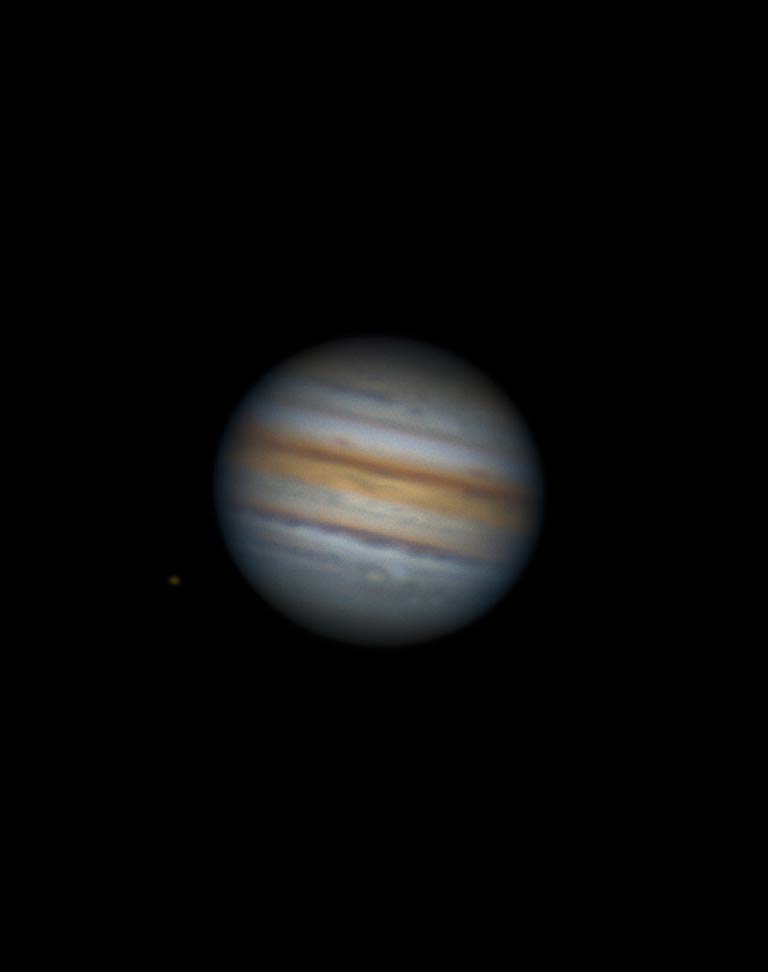
I am not a planetary imaging expert by any means, but I will share the simple steps I used to get results like the one below. The process involves recording short videos of the planet through my telescope and extracting the best image frames from the video for stacking.
On August 19, Jupiter was at opposition. This means that Jupiter was opposite the Sun (with Earth sitting between both objects). The gas giant was at its brightest and closest to Earth for the year, and I was lucky enough to have a clear sky that night.
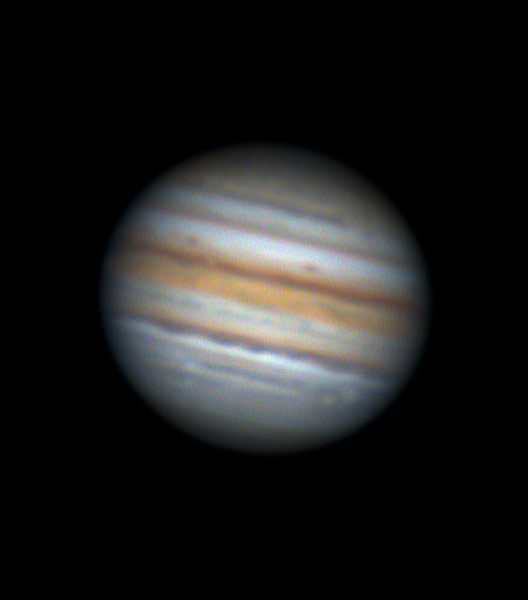
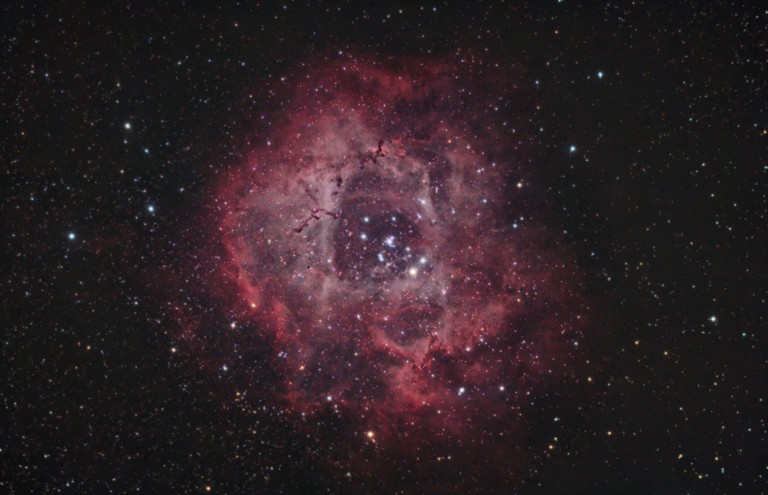
The Planet Jupiter through my telescope.
While I am happy with my latest photo, I am itching to give it another shot. I’ll attempt to photograph Jupiter again soon, under more favorable weather conditions, to see if I can capture a clearer view of the planet’s surface.
High-magnification planetary astrophotography can be heavily influenced by atmospheric conditions and elevation. This can make or break your image, and unfortunately, it’s completely out of your control.
However, unlike deep-sky astrophotography, light pollution and the current moon phase do not negatively affect the experience in any way. Taking amazing images of the planet Jupiter is possible from just about anywhere in the world.
Video
In the video below, you’ll see the camera and telescope I used to photograph Jupiter, along with real-time video footage of the planet through my telescope. I cover the astrophotography equipment used, and some simple tips for photographing Jupiter up-close.
It was a memorable night in the backyard, and seeing Jupiter in real-time on the night of opposition was a real treat. You may notice how poor the ‘seeing’ is during my imaging session. This is a common occurrence when photographing planets, but there are some clever ways to overcome this scenario in post-processing.
Planetary Astrophotography
The term astrophotography encompasses a broad spectrum of night sky photography. You can think of Milky Way nightscapes as the ‘ultra-wide’ end of the spectrum, and planetary imaging as the ‘extreme close-up’ end on the other side.
It’s a common misconception that the magnification or ‘zoom’ is the be-all-end-all measure of a telescope, which is 99% false. But when it comes to taking pictures of planets up-close, it certainly comes in handy.
The Early Days
My first interest in astrophotography, like many people, was to photograph the brightest objects in the sky that I could see with my naked eye. I knew where and how to find the moon and the planets, and I wanted to see and photograph them up close.
One of the first things I did when I got my new telescope was to look at Jupiter and it was life-changing; the cloud bands, the great red spot, the Galilean moons orbiting the planet. There it was, in real-time!
But after I observed the gas giant through my telescope and both eyepieces, I needed more detail. This new interest turned into a (healthy?) obsession causing me to go deeper, both literally and figuratively.
Entering Deep Space
I started learning more about space, reading astrophotography forums, and joining my local astronomy club. It was during this time that I ended up taking a slightly different path.
I figured that if I could photograph a planet so easily with my point-and-shoot camera and Dobsonian telescope, then why not a galaxy? Before I knew it, deep-sky astrophotography became my primary focus.
Photographing galaxies and nebulae became an obsession, and photographing solar system objects fell way down my priority list.
Back to My Roots
The recent opposition of Jupiter has rekindled my early passion for planetary imaging. Amateur astrophotographers are now taking such incredible images of planets, you almost wouldn’t believe they were captured from Earth.
I’ve been practicing my planetary imaging techniques over the last year, and it was finally time to take my best photo of Jupiter yet.
Photographing Jupiter
To photograph Jupiter, I used a Celestron Edge HD11 SCT. This is the biggest telescope I own with a focal length of nearly 3000mm, bringing Jupiter up front and center in the eyepiece.
A Schmidt-Cassegrain telescope is a popular type of telescope for planetary imaging in the astrophotography community. The large aperture and sharp optics allow you to really dial in the details of distant solar system objects.

Celestron EdgeHD 11 Scmidt-Cassegrain telescope.
Instead of a visual eyepiece at the base of the telescope, I attached a ZWO ASI462MC planetary camera. This is a highly sensitive camera that is capable of collecting full-color images of the planet at a high frame rate.
I should be using a UV/IR cut filter with this camera to sharpen the image up. Unfortunately, I do not own a 1.25″ UV/IR cut filter that I can thread onto the barrel of the camera nosepiece.
Normally, I use a monochrome CMOS camera to capture the planets (such as Saturn and Mars). However, because Jupiter rotates so quickly, I feared I would not collect enough exposures through each RGB filter before the planet had turned significantly.
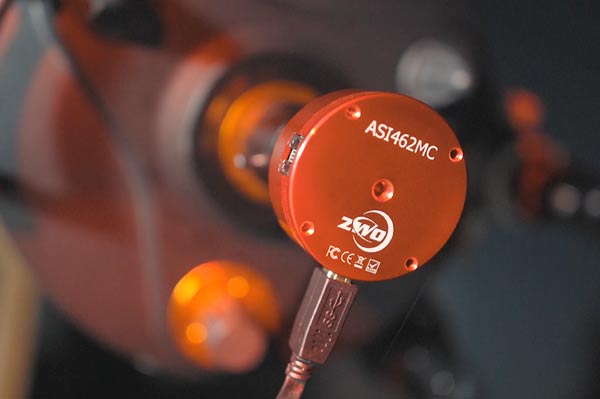
ZWO ASI462MC Planetary Imaging Camera.
I know that there are Jupiter de-rotation tools (such as WinJupos) to correct this issue, but I have not personally used this software before. I opted to collect an image in full color in a shorter period of time.
Helpful Resource: WinJupos Jupiter De-Rotation Tutorial (Dylan O’Donnel)
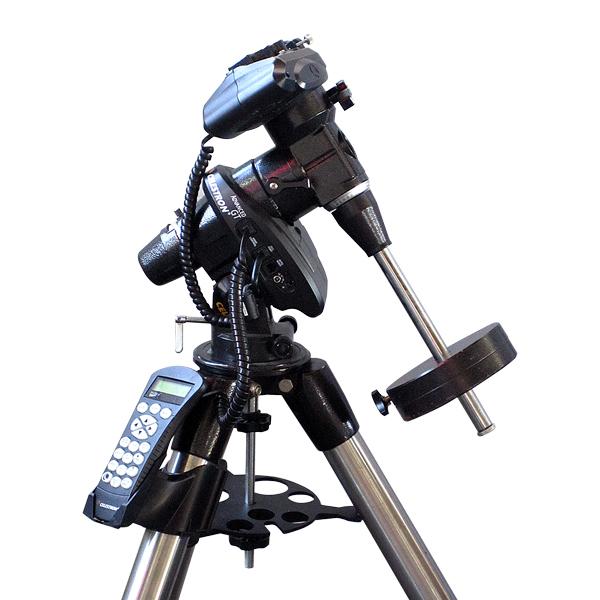
My computerized GoTo equatorial telescope mount (Sky-Watcher EQ8-R Pro) tracks the planet Jupiter so that it remains still during each image exposure.
I took short video clips of Jupiter through the telescope and hope that I can collect a healthy amount of good frames.
To run the camera and take these short video clips, I use a software called FireCapture which also has some really great tools for framing, focusing, and recording the planet.
The goal was to capture a video of about 60-seconds when the air is still, with as little turbulence as possible.
I use FireCapture planetary imaging software.
My Step-by-Step Process
Although I have been exploring astrophotography for over a decade, the majority of this time was spent in the deep-sky imaging realm. Photographing planets at high magnification is still new to me, and I still have a lot to learn.
However, it may be helpful for you to see the exact process I used to capture and process my latest image of Jupiter. The camera and telescope I use are well-suited for planetary imaging.
Equipment
- Camera: ZWO ASI462MC
- Telescope: Celestron EdgeHD 11 SCT
- Barlow: None
- Telescope Mount: Sky-Watcher EQ8-R Pro
- Software: FireCapture, AutoStakkert!, Registax 6
Many amateur astrophotographers will use a 2X Barlow lens in front of the camera to increase the magnification of the planet. This will indeed make the planet much larger in your image, but will also intensify any atmospheric disturbance.
I plan to invest in a quality Barlow lens in the near future for planetary imaging. The Tele Vue Optics PowerMate 2x is a popular option to consider.

Telescope Alignment and Focus
I use a Celestron 22mm visual eyepiece to align the telescope mount and center the planet in the telescope. This is also a great chance to actually observe the planet Jupiter and its moons visually in all its glory.
To align the telescope mount and center the target, I use the Sky-Watcher SynScan hand controller (this seems to make people angry).
- Polar align the telescope mount (QHY PoleMaster)
- Sky-Watcher 2-Star Alignment Routine
- Slew to planet Jupiter (it’s either in-view or very close)
- Center planet in the eyepiece and focus
- Replace the telescope eyepiece with a dedicated astronomy camera (ZWO ASI462MC)
- Open FireCapture software, connect the camera
- In FireCapture, set capture area to widest field of view
- Locate Jupiter (out of focus)
- Zoom-in to 125%
- Center and focus the planet as best as possible
The Capture Process
- Set camera gamma to 50%, gain to 60-70%
- Adjust exposure time based on the histogram (1-2 milliseconds)
- Set the capture mode to ‘Jupiter’ and ‘.SER’ file type
- Place Jupiter in the top left-hand side of the preview window
- Use the ‘ROI’ (region of interest) mode to crop the image to (352 x 400 pixels)
- Use the ‘Center Object’ tool
- Run capture by pressing the play button
- Capture video file of 10,000-15,000 frames
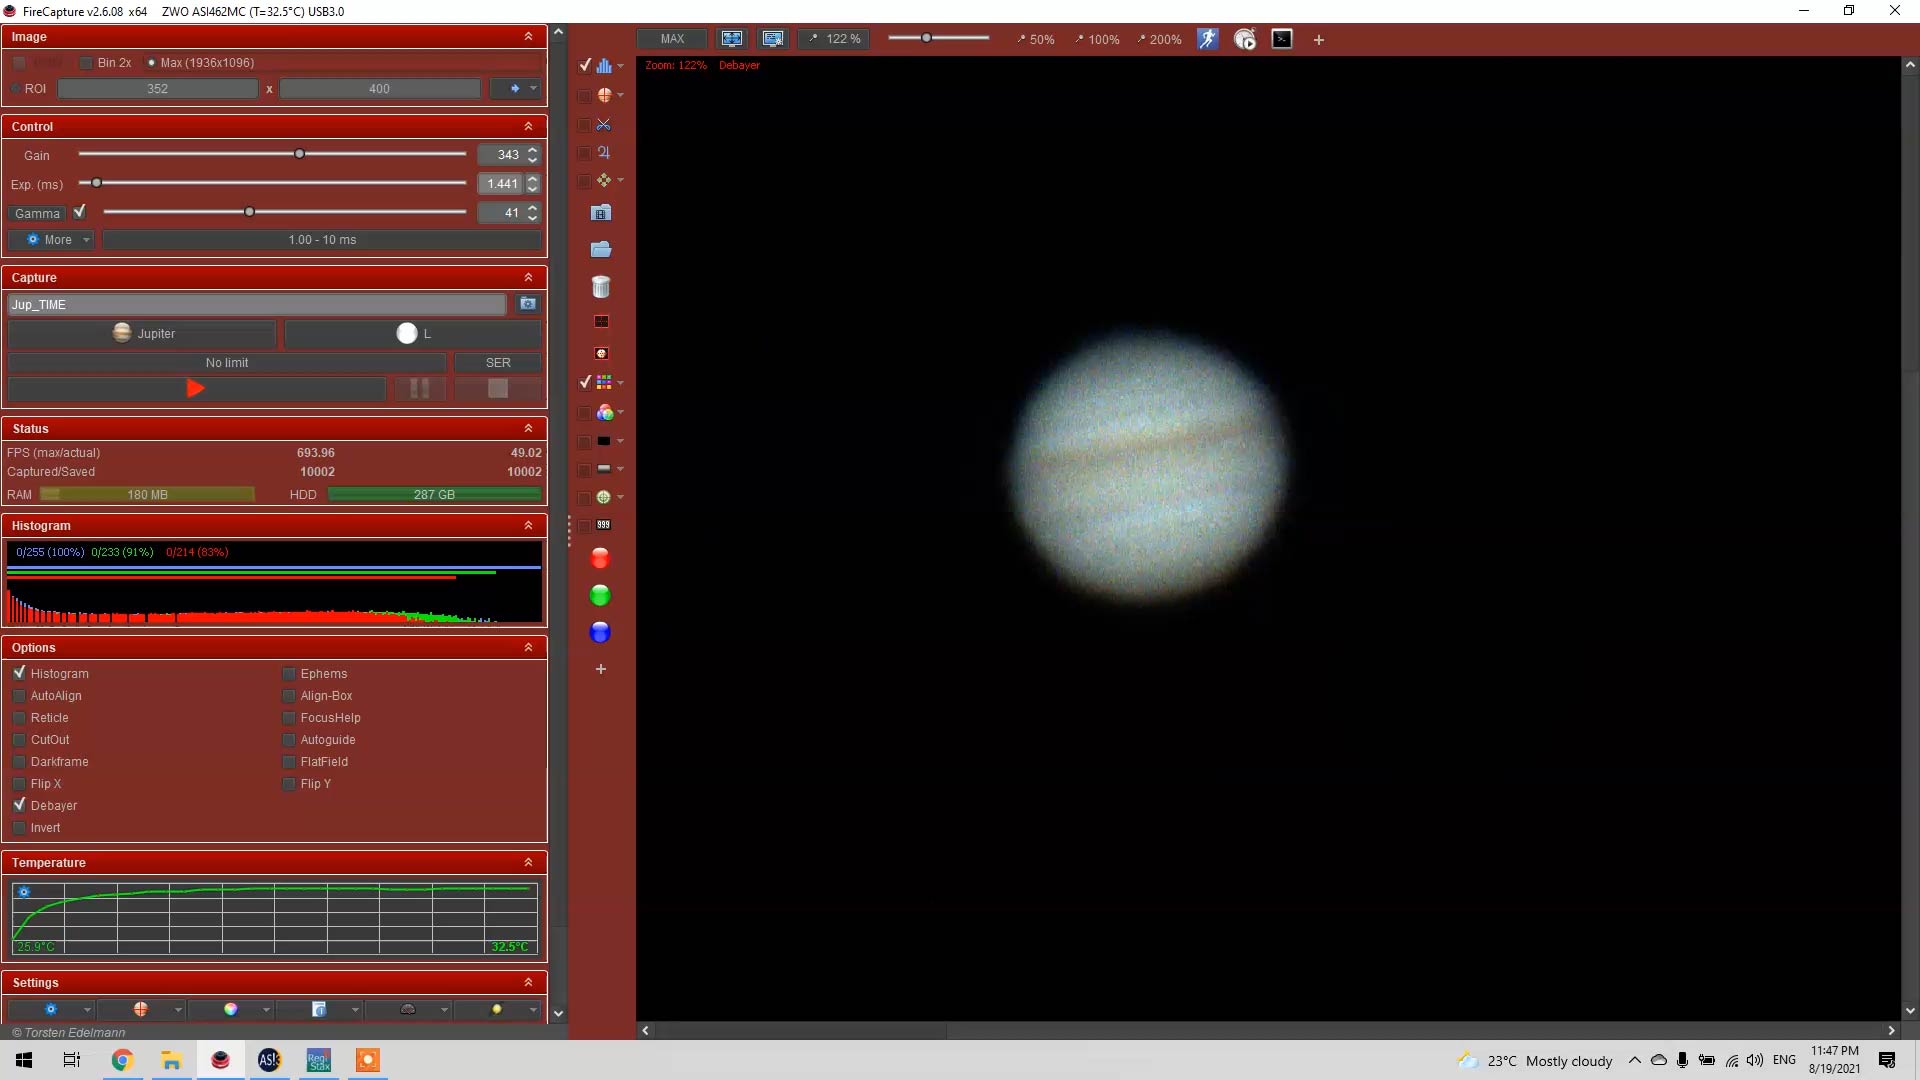
FireCapture planetary astrophotography software.
As you are collecting videos of the planet, pay attention to focus and changes in seeing and transparency. You may want to pause your session to re-focus the camera at some point, but be careful not to lose the planet’s position during this process.
Even when capturing a small field of view, the file sizes of the video can really add up (several GB’s each). Make sure you have plenty of extra hard disk space on your computer!
Image Processing
To process my image of Jupiter, I used two different applications; AutoStakkert, and Registax 6. I use AutoStakkert to turn the .SER video file into individual image frames and stack the best ones into a single file.
Because Jupiter rotates so quickly (about 1 minute), I limited my videos to about 60-seconds in total. Other planets, such as Mars and Saturn, do not rotate so quickly and longer video files can be recorded without issue.
AutoStackkert
- Open the video file (.SER)
- Analyze the file
- Place AP Grid (48 alignment points)
- Choose frame percentage to stack (30%)
- Make sure “RGB Align” is checked
- Check RGB Align and Drizzle 1.5X
- Choose .TIF file type for output
- Stack

Placing the alignment points on my Jupiter image in AutoStakkert!
There are many settings to play with at this stage but I have found success by stacking the best 30% of frames from a 15,000-frame video file. My video files were usually between 8 – 15k frames in size.
The image of Jupiter will look quite soft after the stacking process has been completed and this is completely normal. If you would like to learn more about using AutoStakkert! for planetary image stacking, I highly suggest watching this tutorial on YouTube.
Registax
Registax has a number of neat tools to get the most out of your planetary images. During this stage, I do my best to recover the surface details of the planet without making the image too noisy.
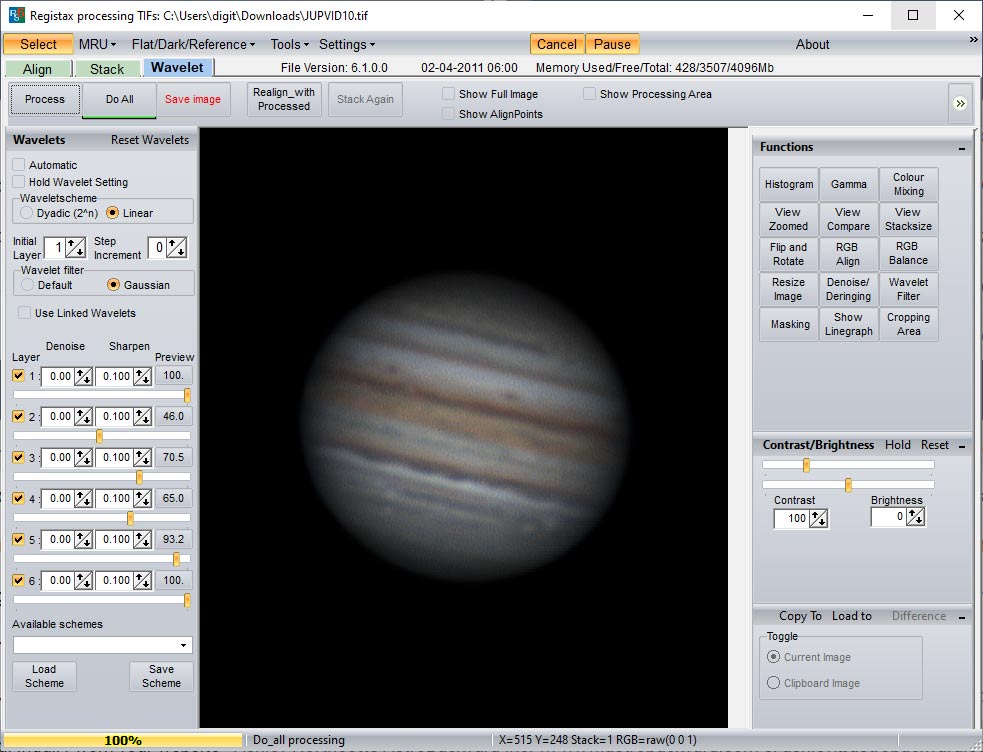
Processing Jupiter using Registax 6.
The wavelet processing tool in Registax 6 is where you finally get to reveal some serious surface details of the planet. I have found that adjusting the first slider to about 80% to right has the biggest impact on the image.
Feel free to experiment with the wavelet processing sliders to taste, and try to avoid creating an overly ‘crunchy’, noisy image. If your surface detail restoration and sharpening in Registax were too aggressive, you can always make noise reduction adjustments in Adobe Photoshop later on.

Before and after using the wavelet processing tool in Registax 6.
Helpful Resource: Processing planetary images with Registax
Adobe Photoshop
The final image processing steps are done in Adobe Photoshop. This is where I make some subtle tweaks to the image including boosting the saturation, and some additional noise reduction.
I have found the Adobe Camera Raw Filter to be an effective way to make slight improvements to the image with live feedback. I particularly enjoy the Dehaze and Noise Reduction sliders at this stage.
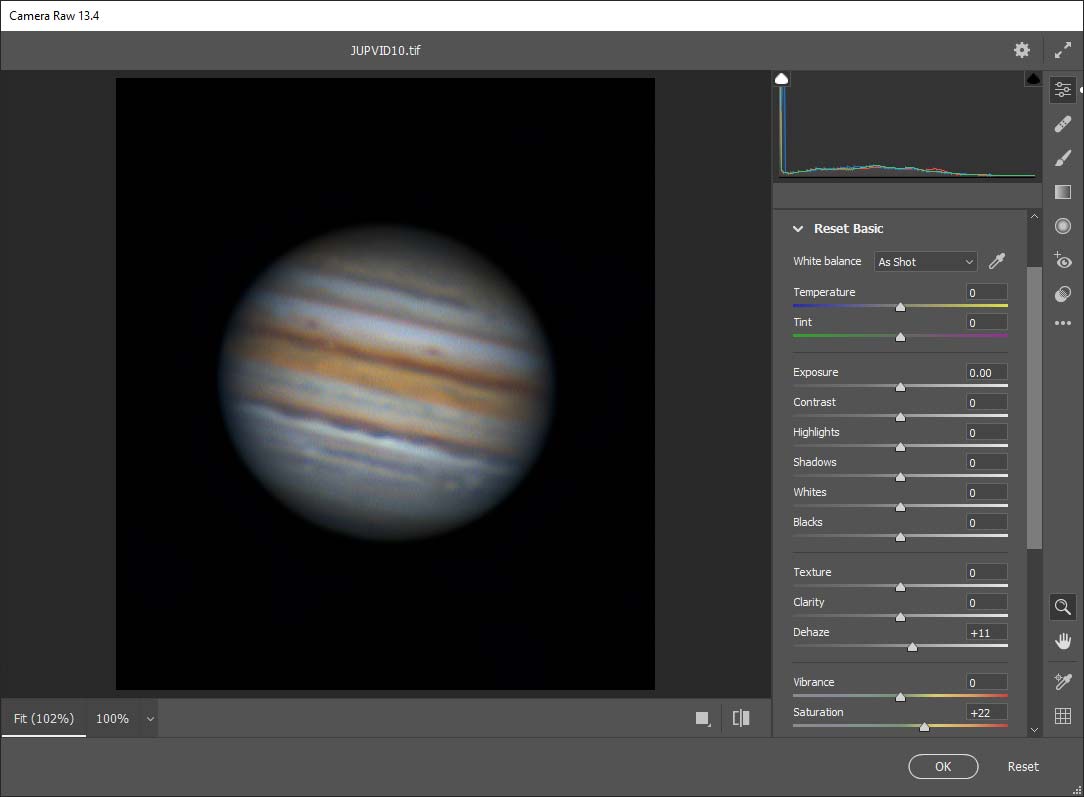
Adobe Camera Raw Filter.
Final Thoughts
There are many ways to achieve a successful image of Jupiter using a similar workflow to the one I have shared. Chances are you will develop your own subtle variations to the steps outlined above, and get an even better image of Jupiter than I have.
Once you have experienced the start-to-finish process of capturing a planet firsthand, you will begin to strategize little ways to improve your final image. For example, I believe that I will be able to produce a much stronger image by using a 2X Barlow lens and a proper UV/IR cut filter in the future.
Set your expectations low for your first night out and make small improvements to your capture and processing routines over time. Like everything in this incredible hobby, great results don’t happen overnight.


I was wondering to what extent you can get successful images of planets with a refractor telescope? I have a SW Esprit 100 ED and a ASI294 camera (and also a DSLR). Obviously, the focus length of the Esprit is only about 550mm and I understand I need a much longer one. I do have a TV 2x Powermate and I was wondering whether this can be used to do this? Thanks.
Hi Karl,
I have an ASI294MC Pro I use for DSO imaging with a Celestron 8 and Starizona Night Owl. I don’t use it for planets or the moon because of the large pixel size, 4.63 microns. Instead I use an ASI178MC which matches with the C8 at the prime focus for imaging the moon and planets. I actually still use a 2X Barlow oversampling planet data. You can use the formula at the following link to compute the minimum focal length needed for your combination of aperture and pixel size.
Pulling what little hair I have left out. Nobody talks about how to properly setup the imaging train. I am trying to get it focused with no luck. I have a Orion StarMax 127 Mak-Cass followed by a 2X Barlow, a Svbony manual filter wheel with RGB filters in it, followed by a QHY5LIIM camera all in that order. I bottom out the Barlow in the scope. I have the barlow threaded into the filter wheel. I then have the camera placed into the “nosepiece” on the other side of the filter wheel so that I can slide it back and forth to achieve focus. What am I doing wrong?
I am able to do narrowband imaging of DSO with my refractor but planetary imaging with my Mak-Cass is driving me nuts.
Really nice blog, the ir filter Wil loose details when using a color camera. So don’t spend your money on it for jupiter. The Barlow is really nice. And bin2 the camera when use.
And my advice don’t go lower than 5ms max record 120 sec and don’t blow the graph to high 100 out of 255 is more than enough so you keep the gain low and you have much more headroom to proces.
Deep-space you need gain. Planners need much more raw process.
Hope it helps clear-sky to all