How I Photographed a Nebula with a $200 Camera Lens

Taking impressive deep-sky astrophotography images is not reserved for those using an astronomical telescope. A budget camera lens can be used to take images of some of the best deep-sky objects in the night sky.
A telephoto zoom lens can provide enough magnification to pull distant objects in space in for a closer look, but you’ll need to find the lens’ “sweet spot” for a clean shot. In this article, I’ll share exactly how I photographed a colorful nebula region in space using a budget camera lens and a DSLR camera.
In my latest video on YouTube, I photographed a nebula in the night sky using a $200 camera lens. The photo turned out well, and I think it’s an eye-opener to anyone who thinks a telescope is needed for this task.
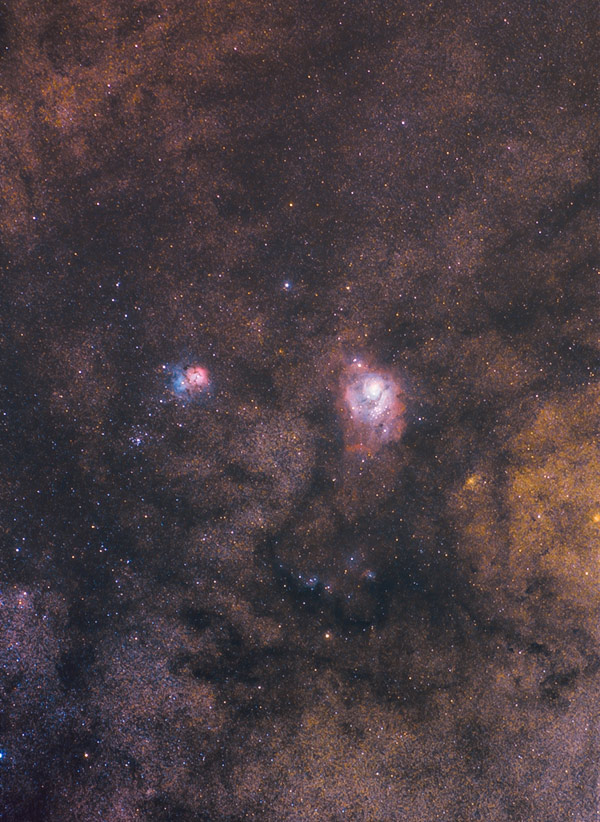
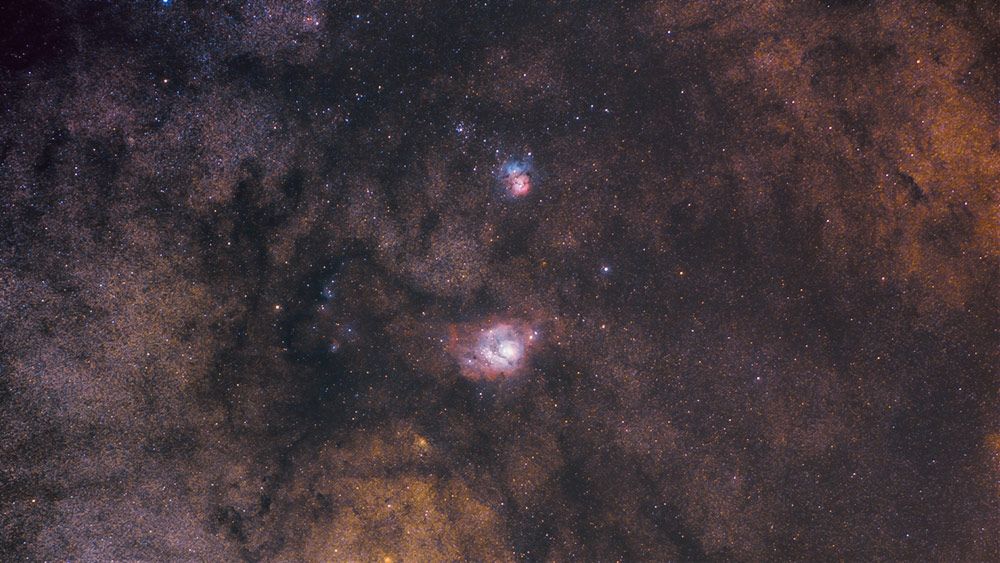
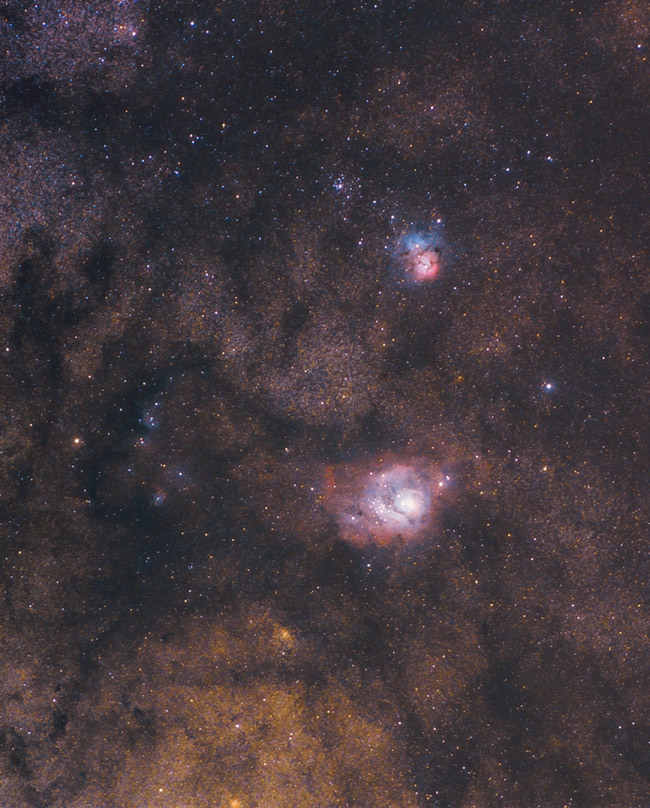
The Lagoon and Trifid Nebula region photographed with a $200 Lens.
Although I do most of my astrophotography in the city, it should be no surprise that I usually get much better pictures from a dark sky location (it depends on the project). Light pollution washes out the night sky, making it more difficult to locate and photograph your target.
For the photo shown above, I traveled to a dark sky park about 45 minutes from home. The location is special to me, as it was where I took my first image of the Lagoon Nebula through a telescope in 2013.
Equipment Used For the Photo Above
Here’s the camera setup I used to photograph the Lagoon Nebula with a camera lens:
- Camera: Canon EOS Rebel T7
- Lens: Canon EF 75-300mm F/4-5.6
- Star Tracker: Sky-Watcher Star Adventurer
- Remote Shutter Cable: Neewer Remote Shutter for Canon

While the kit listed above is capable of an impressive image, the camera lens is its weakest link. If you’re looking for something a little bit nicer (and more expensive), I recommend the Rokinon 135mm F/2.
Nebula Photography with a $200 Camera Lens
In the video, you’ll see me set up my camera and lens to photograph the bright Lagoon Nebula that lies toward the center of the Milky Way core.
The Lagoon Nebula is a stunning emission nebula in the constellation Sagittarius. The Lagoon Nebula is big (90 × 40 arcmin), bright (apparent magnitude +6.0), and it sits right next door to the beautiful Trifid Nebula.
If you’re new to astrophotography, you may want to stick to the brighter nebulae targets until you really get your system ironed out. Brighter nebulae like this make focusing, framing, and image processing easier.
You can use an astronomy app on your smartphone to filter out the brightest objects available in the night sky. The dimmer and smaller the object, the tougher the entire process becomes.
Using a Telescope vs. a Camera Lens
My first deep-sky photo of the Lagoon Nebula was taken using a DSLR camera and a thousand-dollar astronomical telescope (Explore Scientific ED80). The telescope, with a focal length of 480mm, delivered crisp, well-color-corrected images of my subject.
Telescopes, such as the apochromatic refractor, are designed to focus pinpoints of light (stars) without color fringing (chromatic aberration). They often use much longer focal lengths than a camera lens (higher magnification) and include robust focusers that allow you to fine-tune your focus position.
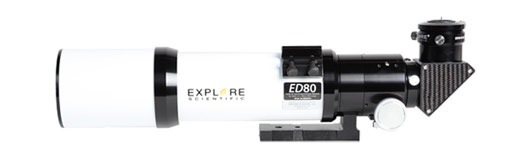
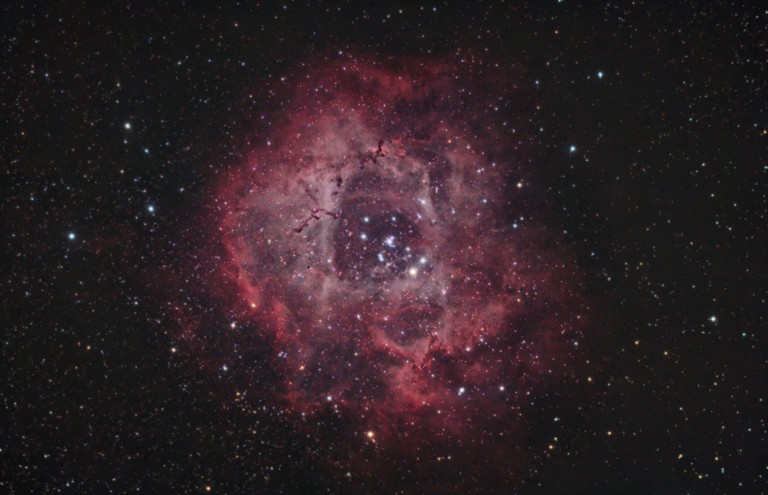
The Explore Scientific ED80 Apochromatic Refractor.
When it comes to deep-sky imaging, an astrophotography telescope will usually beat a camera lens every time, both in terms of the imaging experience and the results.
After all, telescopes are designed to observe and photograph deep-sky objects at high magnification; camera lenses are not.
Camera lenses excel at wide-angle shots such as Milky Way photography and nightscapes, but when long focal lengths are needed, you can’t beat an astronomical telescope.
However, the average person doesn’t own a telescope, but they may already have a DSLR camera and zoom lens at their disposal. At a focal length of 150mm and above, the larger deep-sky objects begin to reveal themselves in a long exposure image.
To prove that amazing deep-sky photos are within the grasp of an ordinary camera and lens combo, I chose to use one of the most entry-level kits I could find.
A Beginner DSLR Camera and Lens Combo
A dedicated astronomy camera is built for long-exposure deep-sky imaging, but if you own a regular daytime camera, you can still take fantastic astrophotography images.
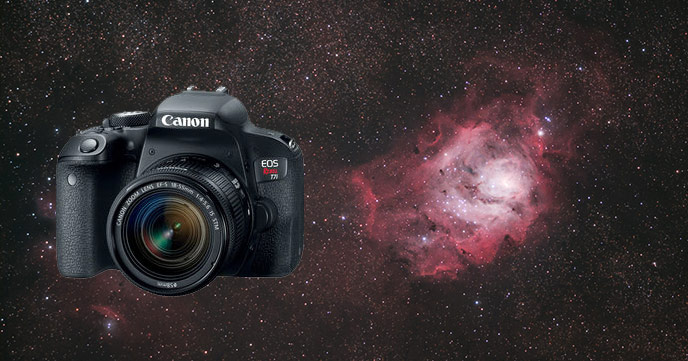
For this project, I used one of the most affordable DSLR cameras on the market, the Canon EOS Rebel T7. I purchased this camera and lens as a bundle from B&H Photo Video earlier this year.
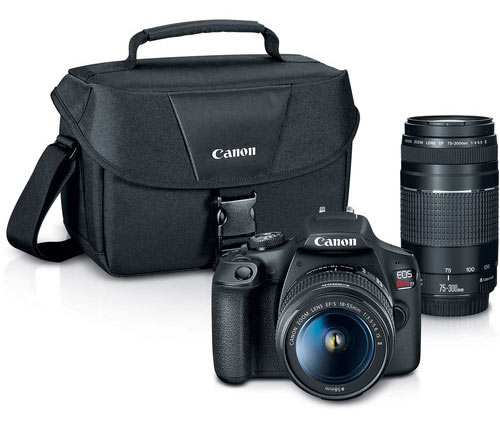
The Canon EOS Rebel T7 kit lens bundle.
The bundle included two lenses, the Canon EF-s 18-55mm F/3.5-5.6 IS and the Canon EF 75-300mm F/4-5.6.
The Canon Rebel series of DSLR cameras are entry-level camera bodies, suitable for beginner to intermediate photographers looking for complete control over their shot.
I’ve owned many Canon Rebel DSLRs over the years, from the XSi (450D) to the T3i. I highly recommend these reliable cameras for beginners looking to take their astrophotography to the next level.
The entire kit costs less than $600 (including the camera body and two lenses), but you can buy the Canon EF 75-300m F/4-5.6 lens brand new for $200.
The Camera Lens
The Canon EF 75-300mm f/4-5.6 III is a budget-friendly lens that lets you shoot at focal lengths from 75 to 300mm.
I’ve covered this lens’s astrophotography performance before, and it continues to impress me. As expected, this lens performs much better at lower f-stops.
I wouldn’t recommend shooting wide open at F/4 for astrophotography. I’ve found F/6.3 to be a great compromise between light-gathering power and star quality.
- Lens Mount: Canon EF
- Focal Length: 75mm-300mm
- Type: Zoom Telephoto
- Focus Method: Extending Front
- Autofocus: Yes
- Image Stabilization: No
- Weight: 480 grams (1.06 lbs)
- Elements: 13
- Groups: 9
- Filter Size: 58 mm
- Lens Coating: Super Spectra Coating
- Type: Zoom
- Maximum Aperture: f/4-5.6
- Specialty Type: Telephoto
If you watched the video I made earlier this year (kit lens challenge), you’ll know that this affordable camera lens exceeded my expectations by a long shot.
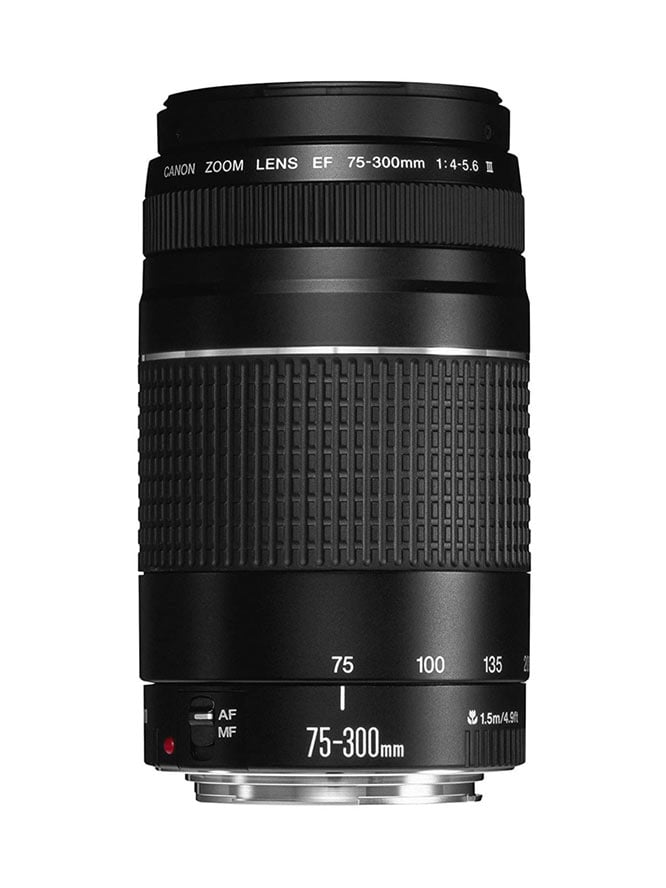
The Canon EF 75-300mm F/4-5.6 lens used for my photo.
Shoot Longer with a Star Tracker
I don’t think the average person realizes that it’s possible to photograph nebulae in space that are thousands of light-years away with an ordinary camera and lens.
However, one key piece of astrophotography equipment is critical for a truly amazing shot.
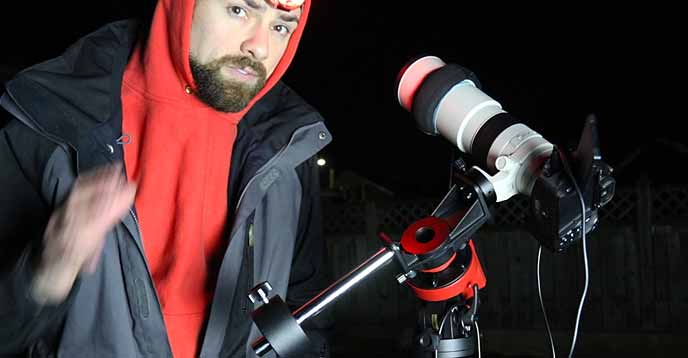
The key to capturing a great photo with a camera lens like this is the star tracker. The star tracker compensates for the rotation of the Earth and a moving sky.
It’s essentially a smaller version of a motorized equatorial telescope mount, like the heavy-duty ones I use with my larger telescopes.
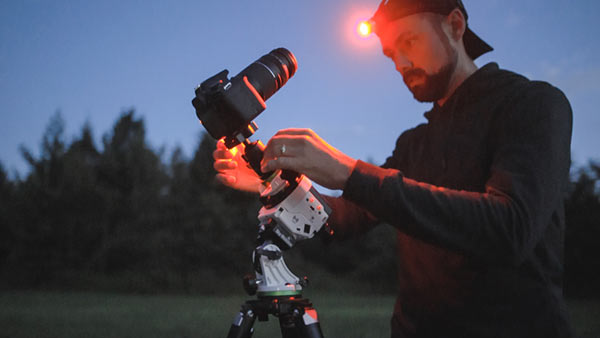
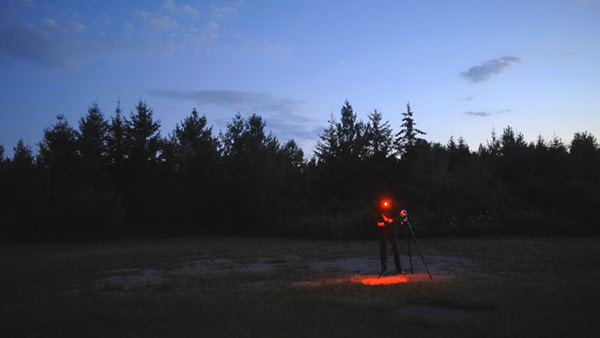
![]()
My camera and lens on a star tracker.
I highly recommend the Sky-Watcher Star Adventurer to anyone looking to purchase their first portable star tracker for astrophotography.
The star tracker allows you to take long-exposure images at long focal lengths (a maximum of 300mm with this lens) without star trailing. For the star tracker to work effectively, you must polar align the mount’s axis to the celestial pole.
If you don’t have a star tracker, you can still take images of nebulae like this, but you will be limited to much shorter exposures because the stars will begin to trail after only a few seconds.
Aligning the polar axis of the star tracker with the North Celestial Pole.
When you compensate for the Earth’s rotation, exposure time is no longer a concern.
You are free to experiment with less aggressive ISO settings, lower f-stops, and an exposure length that’s suitable for your tracker’s capabilities.
Star trackers, like the Star Adventurer, require you to manually locate and frame your subject, which can be difficult if your object is small and dim.
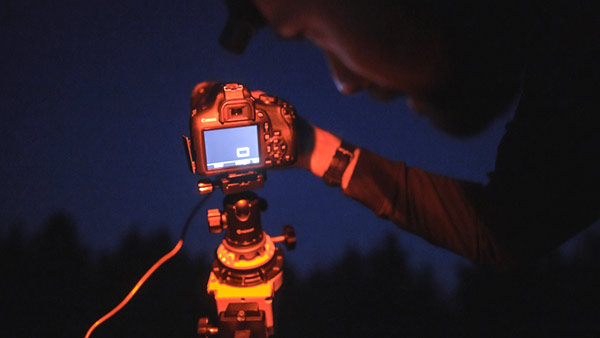
Focusing the camera on a bright star using 10X Live-View.
If there aren’t any bright stars in the same field of view as your target, you may need to focus first and then pan over to your intended imaging location. This is quite common when getting set up.
A red dot finder may help you align your camera lens with your subject, and a planetarium app such as Stellarium will help you “star-hop” your way to the general area.
Expect to take several test exposures (15-30-seconds each) before you actually start taking your long-exposure images on your target.
Related Article: The Best Milky Way Lens (Complete Guide)
Camera Settings and Advice
At a focal length of 100-200mm, exposure lengths of about 2-3 minutes will provide enough data per shot to produce a great image.
You’ll collect plenty of signal (light) in each shot without having to crank the ISO up (which can increase noise), and you’re not asking too much out of your little star tracker.
I recommend using “maxed-out” settings (high ISO, fastest aperture) for the framing and focusing process and taking many test exposures until you are happy with the framing and sharpness of the object.
I chose to use a 200 mm focal length on this zoom lens. This allowed me to capture the Lagoon Nebula at higher magnification yet still have a wide field of view of the area.
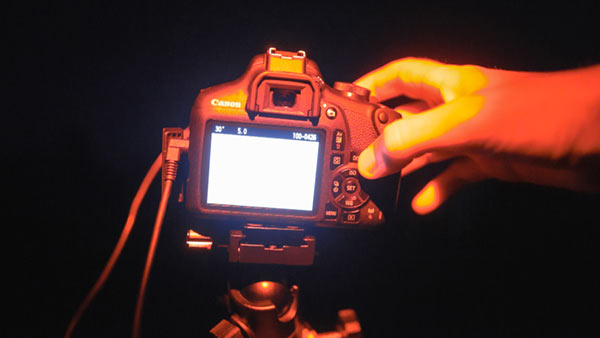
I used a roll of electrical tape to secure the lens at the 200mm position. This is an important step to remember, as you could easily lose your original focal length position while focusing the camera lens.
Focusing the camera lens on a deep-sky object can be challenging. In my case, I had to turn the LCD display up and switch to ISO 6400 for the brightest stars in the frame to stand out.
Related Post: How to Focus Your Camera for Astrophotography
Once I was satisfied with the centering of my object and the focus, I switched back to my imaging settings, which is a less aggressive ISO 1600 at F/6.3.
At F/5, the stars looked a little too bloated for my liking, and bumping the aperture down even 2 stops can make a big difference in terms of overall image sharpness.
Camera Settings for My Photo
- Mode: Manual
- File Type: RAW
- Exposure: 120-seconds
- Number of Exposures: 45
- ISO: 1600
- F-Stop: F/6.3
- White Balance: Auto
- Focus: Manual
- Focal Length: 200mm (TAPED)
Equipment Setup Breakdown
To operate correctly, the star tracker must be securely mounted on a sturdy tripod. I use a lightweight, sturdy, and ultra-portable carbon fiber tripod.
A remote shutter release cable is necessary if you want to use your DSLR camera’s longer exposure times (beyond 30 seconds) and automate a sequence of long-exposure images that fire off on their own.
Because the star tracker is battery-powered, the entire setup from top to bottom is completely portable and does not require additional power. Bringing an extra set of batteries for the star tracker and the camera will help avoid cutting the imaging sessions short.
A dew heater is recommended to prevent moisture on the camera lens, but it will require an additional power source (a portable USB charger may be all you need).
A small Bahtinov mask may make focusing easier, but it is not essential for a tight focus. Using the 10X live-view zoom on your DSLR camera will help you find critical focus on a bright star.
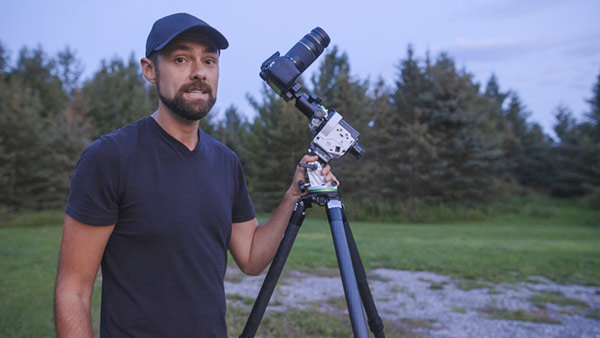
My portable deep-sky astrophotography setup.
My Results
The final picture includes 45 x 2-minute exposures at ISO 1600. The images were shot in RAW image format and stacked together using dark frames in DeepSkyStacker (DSS).
DSS is a free stacking software and a personal favorite of mine. Sequator is another excellent choice, and many people prefer the simplicity of this software over DSS.
As you collect more exposure time overall, the signal-to-noise ratio is improved, leaving you with an image that can be processed effectively.
The single image frames have a brown, washed-out appearance (see below), which is easily corrected during the post-processing stages.
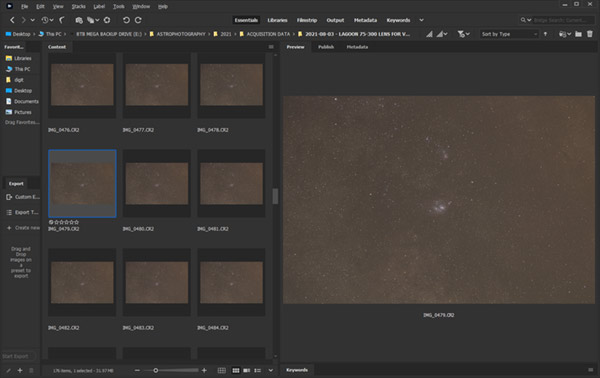
My individual image exposures (sub-exposures) on the Lagoon Nebula.
The final image was carefully stretched (curves) in Adobe Photoshop to bring up the brightest areas of the nebula. The colors were carefully balanced (setting the black and white points), and a healthy amount of saturation boost was applied.
Star reduction, gradient removal, and selective color boosting were also used. This website has covered all of these topics in detail over the years.
To learn more about my image processing techniques, please see my premium astrophotography image processing guide.
The Lagoon and Trifid Nebulae by Trevor Jones.
If you are just starting astrophotography, I hope this post has inspired you to take a second look at the camera equipment you may already own and start using it for the night sky.
For my latest astrophotography adventures, feel free to subscribe to AstroBackyard on YouTube and Instagram. Clear skies!


Trevor, great image! I was wondering that, can I photograph anything like this with a Canon Powershot Sx150 IS? A reply is appreciated! Also, I need to learn stacking so, can I get some of your old data? Have a nice day!
Isn’t focusing on any star is equivalent to focusing on deep sky object?
Enjoyed reading and learning from your article.
Thank you.
Hi Trevor. Great image indeed! I was trying to capture North America Nebula with a similar lens at 300mm and f/7. What I found problematic is to keep the focus during the session. Sometimes I got around 10 shots of 2mins each with crisp stars but after that I should recheck focus. How did you keep focus (almost) fixed during the night?
Thanks a lot.
Davide