Why I Built a Backyard Observatory
In this article, I’ll explain why I built a backyard observatory and how the entire project took shape this spring. Officially named “Black Dog Observatory,” this structure will become the epicenter of my astrophotography operations in the backyard.
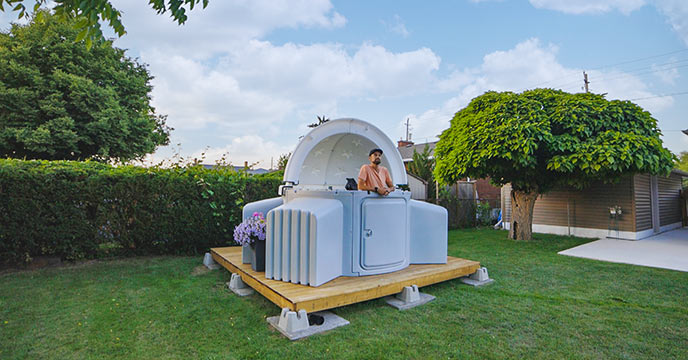
Below is a photo of me standing in my new SkySked POD XL5 observatory. I expect many memorable nights there this summer.
My backyard observatory
After 10 years of setting up my camera and telescope for astrophotography each night, I finally have a permanent setup to photograph the night sky.
Because the base of the telescope mount is bolted to the ground, lengthy polar alignment routines are a thing of the past. This is one of many time-saving realities of owning a personal observatory.
In general, my deep-sky astrophotography sessions start sooner, last longer, and happen more frequently. This is largely because the entire kit stays outside under the dome at all times.
Related Article: 9 Must-See Observatories in the US
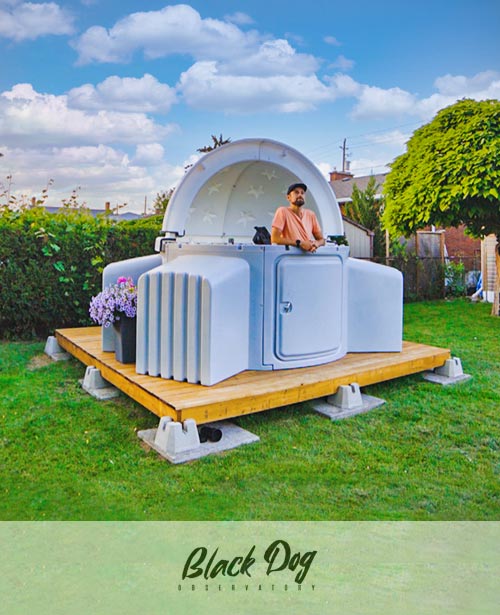
Black Dog Observatory
I named the observatory after my loyal companion, Rudy. It also pays homage to my Rock and roll roots (Led Zeppelin song) as my father and I were both drummers, and the owner of SkyShed (Wayne Parker) is a bassist.
This 8-foot-wide by 8-foot-tall dome will house my equatorial telescope mount, primary imaging telescope, astronomy camera, and all of the other accessories needed to run a deep-sky astrophotography session.
This project has been in the works for nearly six months, and finally seeing the observatory sitting in the backyard is a dream come true.
Timeline of Events:
- December 12, 2020 – Discussions with Wayne Parker about an observatory
- January 26, 2021 – Lengthy conversations convincing my wife to get on board
- March 17, 2021 – Ordered materials for wooden deck, and concrete footing
- April 29, 2021 – Picked up steel pier from factory
- April 30, 2021 – Selected location of the deck and dug a 4-foot hole
- May 1, 2021 – Constructed 12′ x 12′ floating wooden deck, poured concrete
- June 9, 2021 – Rented truck and 12′ trailer, picked up SkyShed POD
- June 16, 2021 – Completed construction of observatory and mounted steel pier
Construction
I chose a location in my yard that had the best view of the southern horizon. This is where many of the best deep-sky objects in the night sky reside. It also has a clear view of the North Star, Polaris, and decent views to the east as well.
The height of the observatory platform helps me see slightly lower on the horizon, which is handy when photographing and observing objects near the core of the Milky Way.

I selected a location with good views to the south.
My location is heavily light-polluted (Bortle Scale Class 7), but filters have helped me overcome this challenge to a large degree in terms of astrophotography.
The observatory walls, bays, and dome are fastened to a 12′ x 12′ wooden deck that sits 1-foot off the ground. In the center of the deck is a hole that allows a steel pier to anchor the telescope mount to a 4′-deep concrete footing.
I also built a conduit underneath my lawn to run household AC power to the observatory. I ran a 75′ heavy-duty outdoor (contractor grade) extension cord through the 2″ ABS pipe, and the outlet arrives at the base of the pier in the center of the floor.
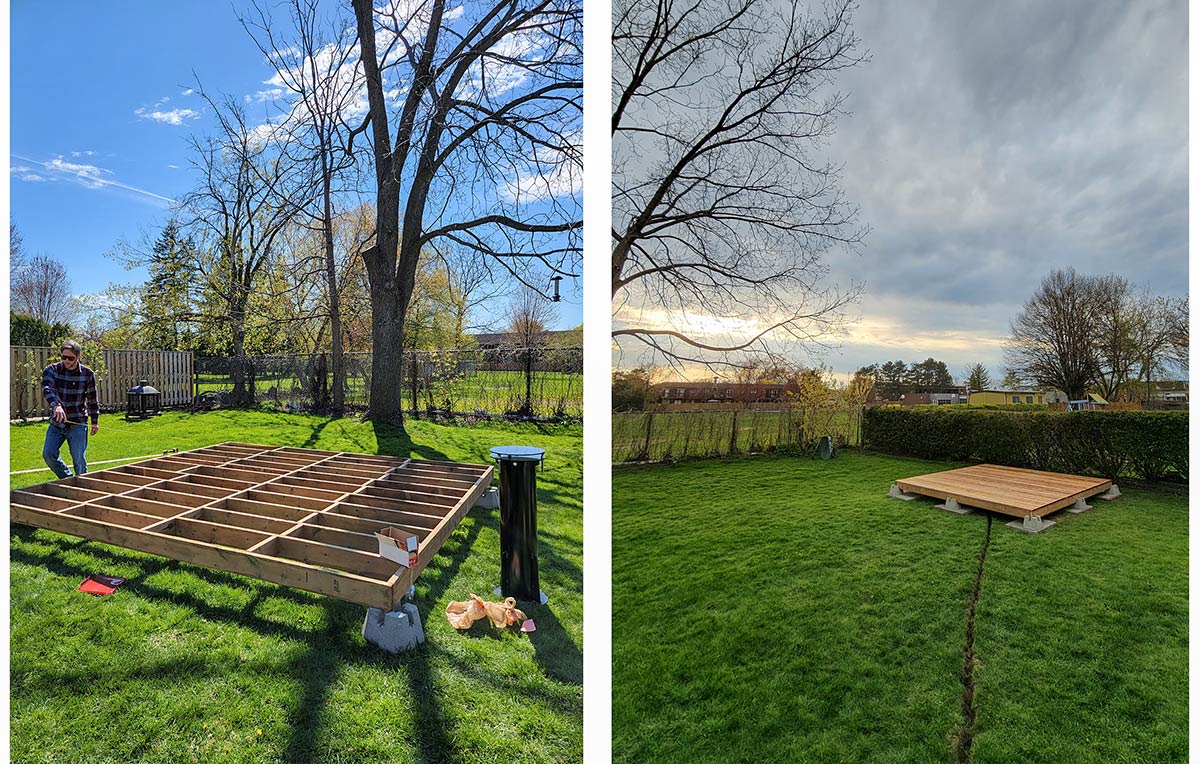
Construction of the 12′ x 12′ wooden deck for the observatory.
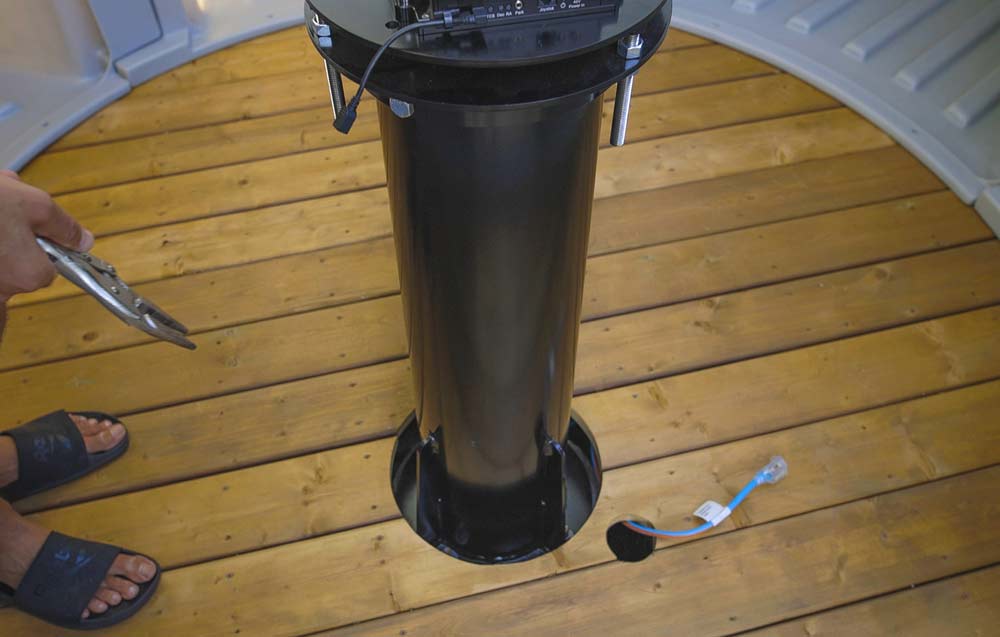
The steel pier is bolted to a concrete footing underneath the deck floor.
As you can see in the photo above, the steel pier rises up from beneath the wood floor so that it will not be disturbed when I walk around on the deck floor.
Wayne informed me that the pier’s height was an important measurement to consider. I settled on a height of 32″ from the floor to the top of the pier mounting plate.
This height is low enough that my long refractor telescopes have plenty of clearance from the dome closure, but not so low that my view of objects low in the sky is obstructed.
The SkyShed POD XL5
SkyShed Observatories is a Canadian company based out of southern Ontario just like me. Last year, I talked to the owner Wayne Parker (bassist for Glass Tiger) about my current situation of hauling gear in and out of the garage night after night.
I’d always dreamed of having a backyard observatory, but I struggled with committing to a permanent setup for a long time. It wasn’t until I saw a clear game plan laid out in front of me that I was ready to take the plunge.
Wayne began sending me an extensive list of resources to help me fully understand the construction process. He also provided me with a list of materials and instructions for building a concrete footing for the pier.
The observatory in my backyard is a SkyShed POD XL5. This model includes 5 POD bays for storing things like a computer desk, beer fridge, and even astronomy equipment.
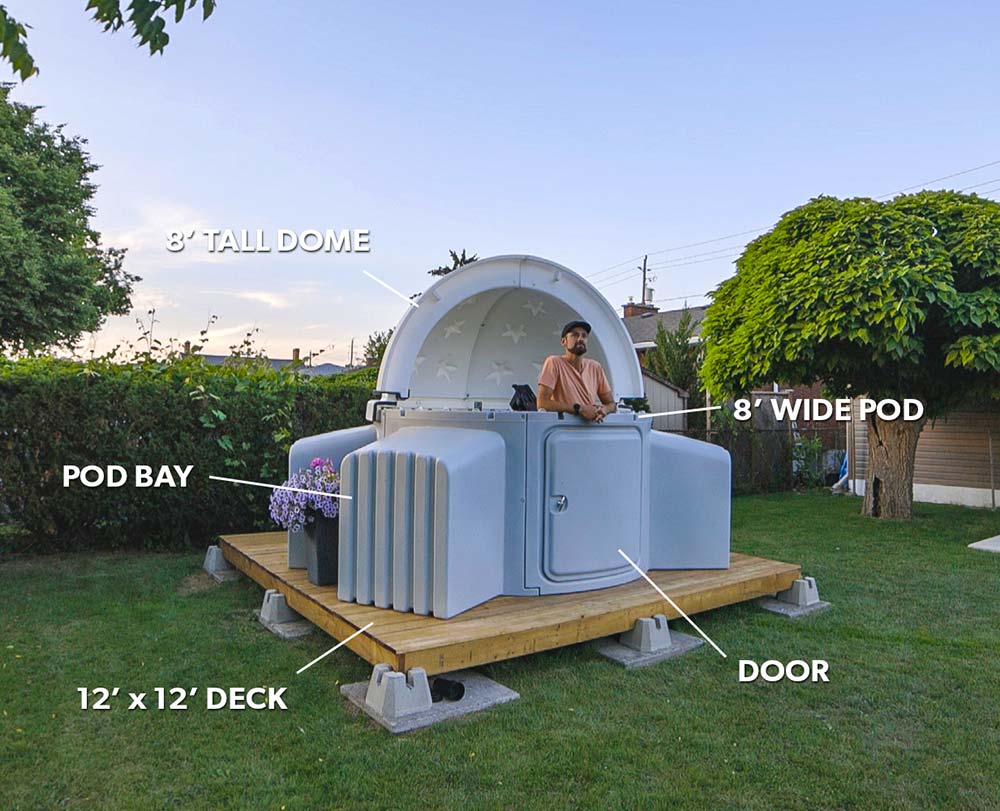
You can order the POD with as many bays as you want, from 0-5. There are also some cool upgrades to consider, like the PZT hardware kit. This allows you to slide the dome roof over in a roll-off observatory style manner.
The observatory itself is made of high-quality polyethylene plastic, and you can order the structure in a variety of colors. I chose light gray walls with a white dome as I felt this was the most modern color scheme, and that it would look best in my backyard.
These POD’s can be found all over the world. I guess you could say that I’m a part of the POD family now!
Why Build a Backyard Observatory?
A backyard observatory allows you to collect new astrophotography images on a more consistent basis. Because the telescope is always set up and ready to go, your camera can begin collecting photons sooner.
Because the polar alignment, balance, and even plate-solving and pointing models are already in place, a permanent setup will save time and maximize the amount of data you can collect in a single night.
On most clear nights, I will still run multiple astrophotography rigs in the backyard, but the observatory data will be my bread and butter.
One of the reasons I hesitated on building an observatory was the thought of being un-relatable to the average amateur astronomer.
Rest assured, I will continue to test and share information about techniques with beginner and intermediate-level gear in the backyard.

A look inside of my observatory.
Inside of the observatory is a Paramount MyT. This is telescope mount is on loan from the supportive folks over at Software Bisque.
The Paramount MyT is an observatory-grade telescope mount, that will allow me to tap into some serious automation features, but there is a huge learning curve as well. I’m not going to lie, this thing scares me.
I have no idea how long this loan will last, but I’ll need to get up to speed on the functionality of this telescope mount ASAP. I will be using TheSkyX Professional Edition to run the mount, which is entirely new software to me.

The Software Bisque Paramount MyT telescope mount.
In terms of telescopes, I’ll mount the William Optics FLT 132 APO on this mount for now, but it’s an evolving setup, and I’m not entirely sure what the final kit will look like.
I want to start using an electronic focuser on a more consistent basis, and the observatory rig is the perfect opportunity to finally nail down a reliable system.
Over time, the idea is to get the observatory as automated as possible. My goal is to get everything ready before winter, because our winters in Ontario, Canada can be harsh.
So far, I’ve spent one night inside the observatory, and it was a surreal feeling. Wayne told me I would experience the “dome-effect” and I can honestly tell you I got chills.
The dome opening frames the night sky as if it were a movie.

The Black Dog Observatory at dusk.
Final Thoughts
Wayne Parker has been incredibly helpful and responsive throughout this entire process. I am astonished at his commitment to his customers and willingness to help.
He generously donated the observatory structure to me for this project and was instrumental in its completion. He did not ask for anything in return, nor does he have any say/review over the information I share about it.
I am quickly realizing that SkyShed POD owners are a loyal and active group. I’m confident that this observatory will last a long time and potentially move with us to our next property.
For now, I’m going to try and focus on enjoying the conveniences of a permanent setup, although there is still a lot of work to do. I am looking forward to the process of automating many of the routines I have grown used to for astrophotography.
I still can’t believe I have an observatory in my backyard!

Follow Up Video:
In the following video, I discuss what it has been like to own a personal observatory and provide a complete breakdown of the astronomy equipment inside. I also share the very first completed photo captured from the Black Dog Observatory.
Thank you Trevor! As always, a great article. Funny thing is, this one is about us! CS!
Congratulations Trevor for this achievement. Very impressive. Can’t wait to see your pictures from the “Black Dog Observatory”.
Excellent Article on the Sky Shed Pod. Yes Wayne is something special as are the Whale Hunters watching for the POD’s (POD owners like you and me) Your kit and setup are top notch. Hopefully Software Bisque decides to make the loan permanent. I am a member of your group and get updates all of the time and really enjoy them. Greta job and Clear skies.
Are you able to provide a total approximate cost for the whole project? Thanks.
It isn’t your equipment that makes you relatable to us, Trevor. It’s you and your passion for this hobby of ours.
I can’t believe there’s a single person who is anything other than happy that you have the the Sky Pod for all of us to enjoy vicariously through you, Ash and Rudy.
Clear skies 👍🏻
Superb article Trevor, enjoyed reading it.
From my side, you may definitely post more frequently on this blog, I enjoy reading this even more than your youtube-channel 🙂
By the way, there is one thing I wouldn’t mind you elaborating on:
“January 26, 2021 – Lengthy conversations convincing my wife to get on board”: so how exactly did you convince her?
Just asking for a friend, I swear…
Looks fantastic Trevor, just be mindful at the hinges – rainwater gets through in my SkyShed Pod (but caught in containers). It saves so much time …. your next task is to have it all remoted back to the house. I have a 4 headed workstation for serious imaging with 3 cameras but have started some live streaming using a 32″ and 27″ monitor and that is more than enough real estate.
You’ve taken some great photos of DSO. Your observatory looks very sweet. But check out this video before you permanently mount the Paramount or any other equatorial mount.
https://www.youtube.com/watch?v=AOeLnecOMeg
This seems to be the critical piece left out of the article! Please do tell how you accomplished this.
Hi it would be wonderful if you could post the videos for SB on the MYT. I really pulled my hair out the first months of owning my MYT. My take away was to still use polemaster to get a good alignment and then make a T Point model.
The one thing I have not been comfortable doing or been able to figure out is how to re grease my worm gear. The video MYT has is poorly lighted and not so great. Would you please make one for SB? I have begged them to do so for over 1.5 years.
Thx
It’s beautiful Trevor, and something I am seriously considering myself. I am fixing to get started on a floating deck soon if I decide to go for it. Did you take the extra option of insulation in your POD? I am thinking that I will not do that but just curious what you ended up doing. Congratulations buddy. The Black Dog Observatory is wonderful.
Greg
Hi Trevor
I hope you enjoyed your observatory this winter so far. What are your thoughts about the humidity impact on the electronics you leave permanently in the dome.
Thanks
Hi Trevor. I’m envious. I was wondering from this posting whether you made progress on remote control? I know you said before, you like to “be with the equipment,” but I am an old man, winters can be strong in Colorado. 😉 I would be curious if you have thoughts on this. Eventually, I would like to remotely control all of my gear. Mitch