10 Light Pollution Filters for Astrophotography in the City

If you shoot your astrophotography images with a color camera in the city, there is a good chance that light pollution filters can make your life a little easier. No matter which astrophotography camera you use, filters can make the difference between a decent image and a great one.
They ignore specific wavelengths of light in the visible spectrum associated with artificial light sources such as street lamps. The best way to determine whether a particular filter is a good fit for your skies is to review examples taken by others in similar conditions.
A quality light pollution filter will allow the important colors and light emitted by your astrophotography subject to reach the camera sensor without the nasty brown glow of a washed-out sky. The filter’s design includes layers that block specific bandpass lines of the visible spectrum.
If you’re looking to collect the absolute best image data with your camera, there is no substitute for dark skies. However, the light pollution filters in this post may make astrophotography from the city a little more practical and rewarding.
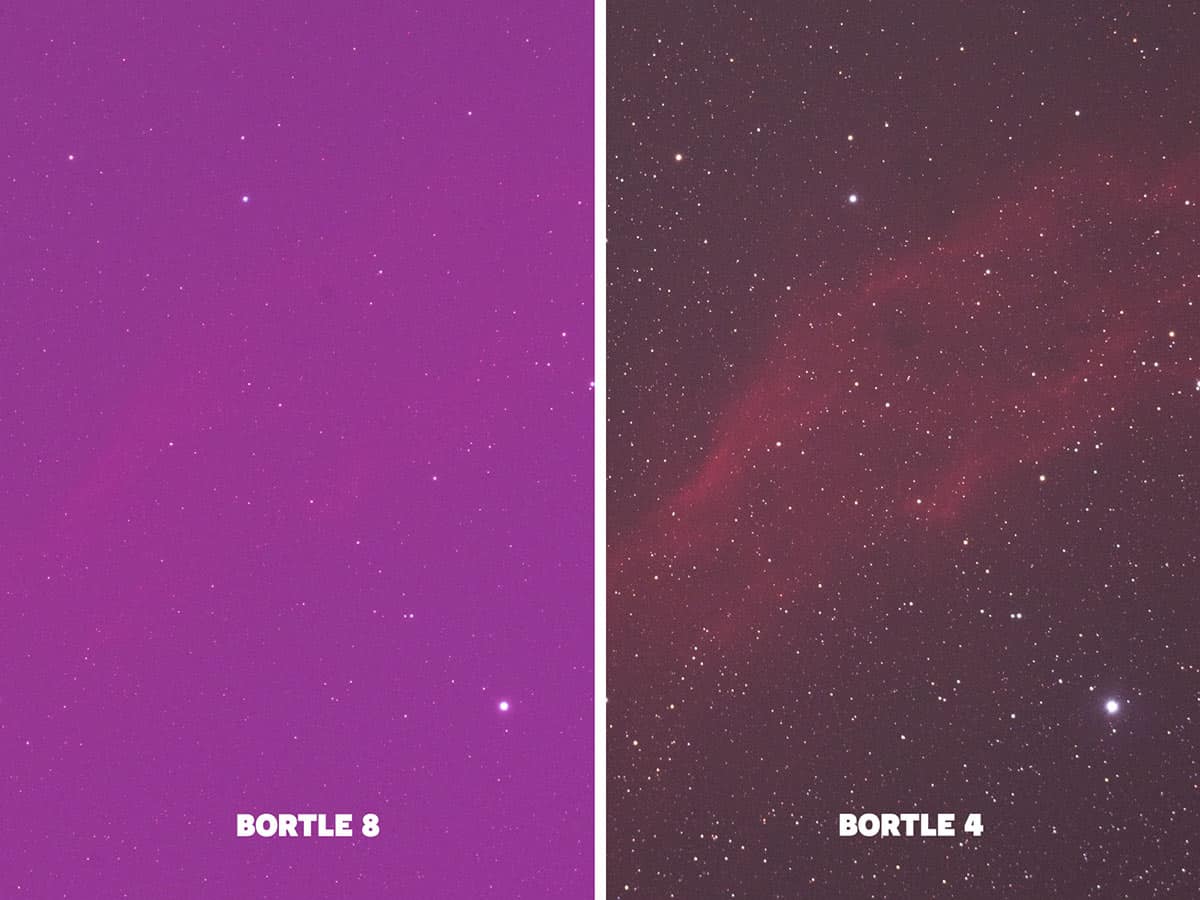
The image above shows a 5-minute exposure at ISO 1600 using the same camera and filter under two different skies. The first was taken from my Bortle 8 backyard (2017), and the other was from my favorite dark sky area, about an hour from home.
Top Choices
While the best light pollution filter for astrophotography depends on your imaging location and the types of projects you like to shoot most, I have a few suggestions for you based on my personal experiences in the backyard. The following filters will serve you well in a variety of situations and deep-sky projects.
- Best Overall: Optolong L-eXtreme
- Best on a Budget: SVBONY SV220
- Best for Broadband Targets: Optolong L-Quad eNhance
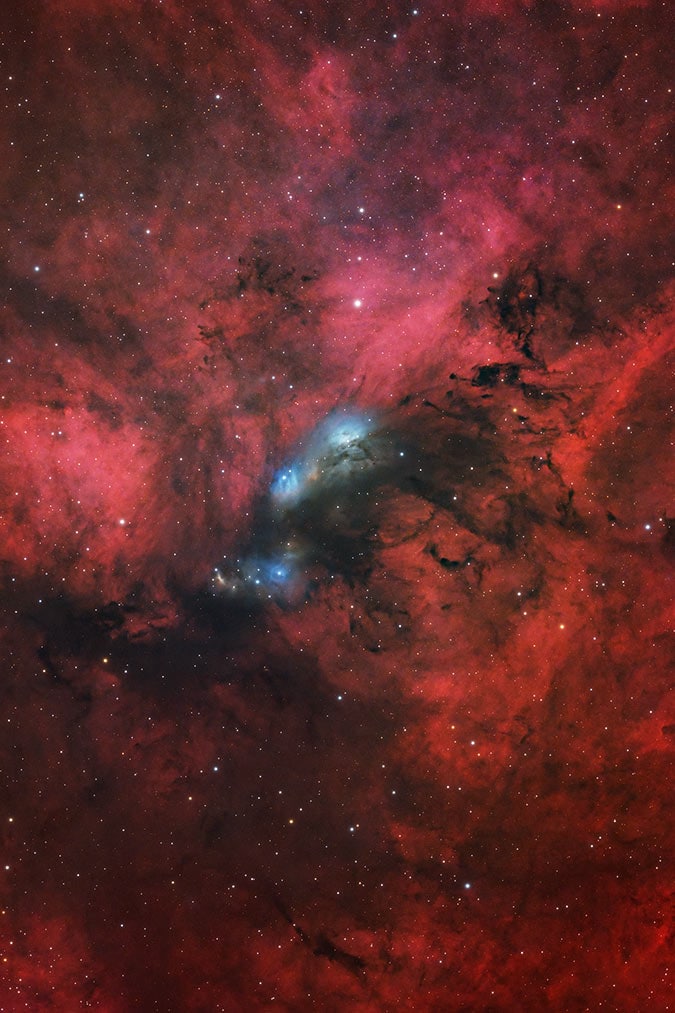
These filters can help you capture impressive deep-sky images from the city, especially objects with a strong signal in the h-alpha wavelength of the spectrum. Here is a recent image of the Flaming Star Nebula captured using the L-eXtreme filter from my backyard using a William Optics RedCat 51 telescope.
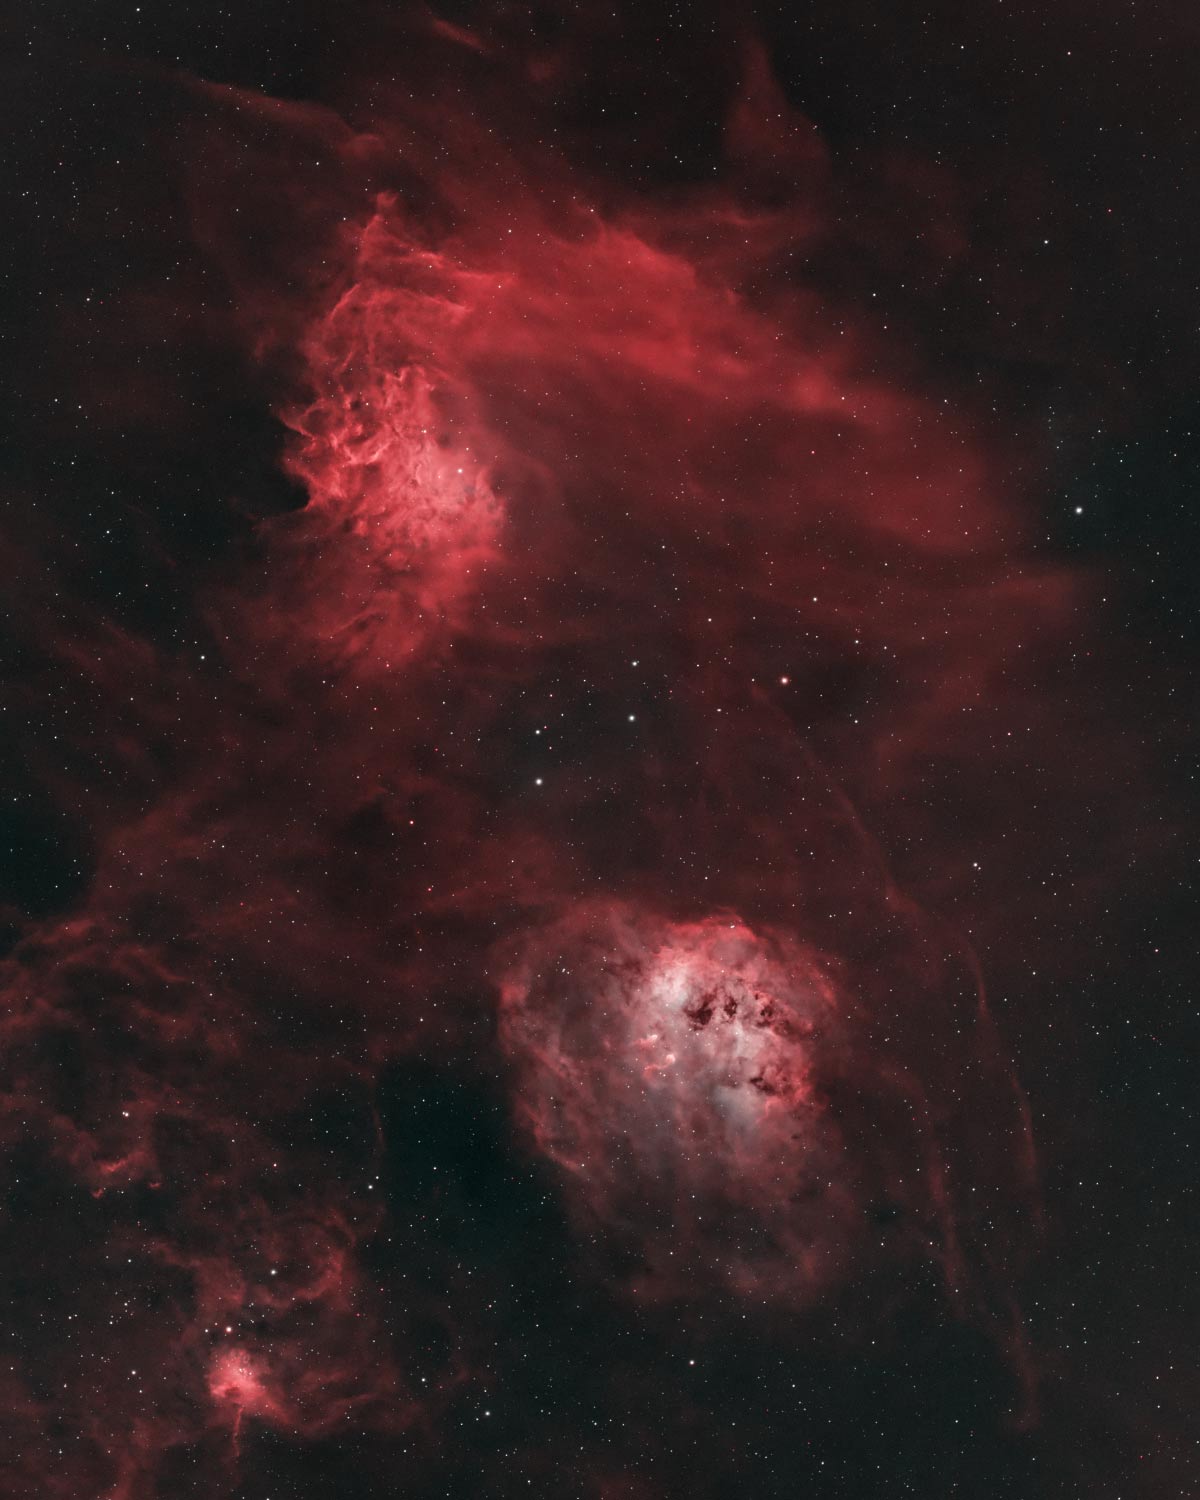
The Flaming Star Nebula and Tadpoles Nebula. ZWO ASI2600MC Air + Optolong-LeXtreme filter.
Why I Use Light Pollution Filters
I rely on light pollution filters to take astrophotography images from my backyard. They help ignore the bright city sky where I live and collect images of objects in the night sky with better contrast between my subject and a brown sky.
While I do travel to dark sky locations to take my image whenever possible, the reality is that most of my astrophotography is done at home in my Bortle Scale Class 6 backyard.
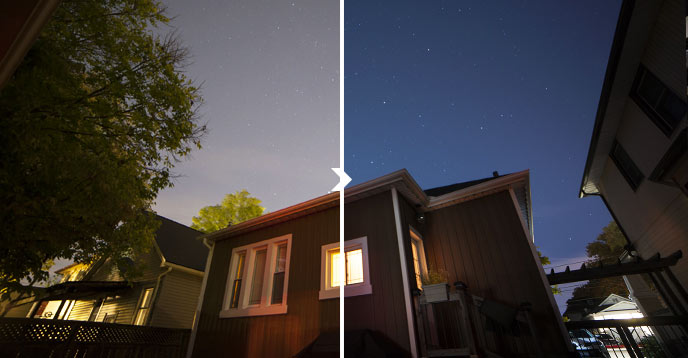
Look at the difference a light pollution filter made in my backyard sky (Optolong L-Pro).
Not everyone agrees that using a light pollution filter for your camera is the best way to do astrophotography, but depending on where you live, it might be the only option.
In this post, I’ll share several examples of astrophotography filters being used on various deep-sky objects from the city. I asked the incredible community on the AstroBackyard Facebook page for some example images, and they delivered big time.
If you are wondering how bad the light pollution is in your backyard, there are ways to measure the brightness of the night sky and compare your results from different locations. The difference between a city sky and a rural dark sky is substantial.
Types of Light Pollution Filters
There are probably over 100 different light pollution filters available today. The bandpass allowances vary widely, but there are essentially two main types of light pollution filters for color cameras: broadband filters (broad-spectrum, multi-broadband) and multi-narrowband (often dual-narrowband) filters.
Broadband filters are used to capture more natural-looking images of objects in the night sky at the expense of allowing a little artificial light through. Multi-narrowband filters aggressively ignore most wavelengths of light in the visible spectrum, allowing narrow bandpasses of light in key areas to pass through.

Broadband filters effectively capture galaxies, reflection nebulae, dark nebulae, and natural star colors. Narrowband filters are best used on emission nebulae and supernova remnants.
The type of camera you use for astrophotography will determine the right light pollution filter for you. For example, a stock DSLR camera will be much less effective when paired with a multi-narrowband filter. This is because a key bandpass for these filters is hydrogen-alpha (656nm).
I Use Broadband Filters For:
- The Milky Way
- Galaxies
- Star Clusters
- Reflection Nebulae
- True-color images
- Comets
- Meteor Showers
- The Moon
I Use Multi-Narrowband Filters For:
- Emission Nebulae
- Supernova Remnants
- Planetary Nebulae
It’s worth noting that I also shoot unfiltered in certain situations where a broadband filter would help. This often leads to a more challenging image-processing session, but the results are usually worth it.
Real Examples from Amateurs
I know you can go to the company websites for mind-blowing example images with these filters – but maybe we should look at what actual amateurs are doing from the backyards.
Before we get started, I should mention that the effectiveness of a particular light pollution filter will depend on your imaging location. You can find out the Bortle Scale class of your home using a light pollution map or, my favorite, the ‘Clear Outside‘ mobile app by First Light Optics.
My backyard is considered to be a class 6. The introduction of LED streetlights throughout my city over the last few years has brightened the sky significantly. I appreciate that they are full cut-off lights pointing directly downward, but what can I say? When you look up, you see fewer stars than ever before.
Using a Light Pollution Filter with a Camera Lens
There are light pollution filters available that thread onto the camera lens. These may be of interest to those wanting to capture ‘Nightscapes’ and Milky Way Photography using their camera and lens.
Filters like the Hoya Starscape Light Pollution Filter and the K&F Concept Clear Natruial Night Filter may help you produce a more pleasing image of the night sky with your camera lens.
K&F Concept 77mm Clear Natural Night Filter.
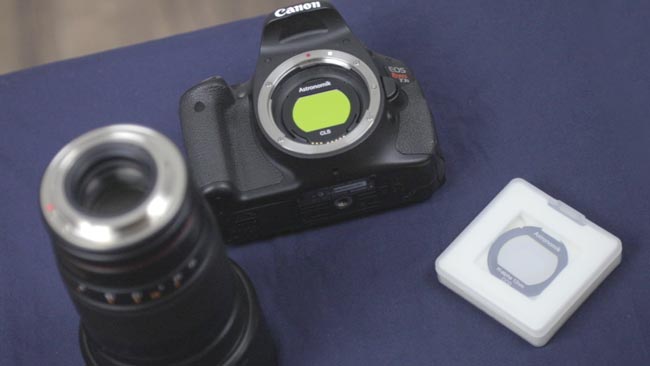
You can also invest in a clip-in style filter that sits beneath the lens inside the camera body, like the one shown below.
I recommend using the clip-in style filter over a large threaded (77mm, etc.) light pollution filter, as this is a better placement for filtration in the optical train. You are also not paying for a large piece of glass that needs to cover your camera’s objective lens.
Optolong L-Pro Clip-In Filter for Canon EOS R.
You need to ensure you purchase the correct-sized clip-in filter for your camera body. In the example above, the filter will precisely fit Canon EOS R camera bodies only. Optolong currently makes clip-in filters for Canon, Nikon, and Sony camera bodies.
While these filters may help you collect a more pleasing image of the night sky, I have found that landscape astrophotography (Nightscapes and Milky Way Photography) requires dark skies (without a filter) for the best results.
One-Shot-Color Filters
The filters I’ll discuss in this post are primarily used with color cameras. So, DSLRs, mirrorless, and one-shot-color astronomy cameras. These are astrophotography filters that let you capture a “complete” color image in one shot. They are not narrowband filters that collect data in one wavelength of light at a time.
There are two types of filters, broadband and narrowband, and they are exactly how they sound. Broadband filters collect a wide array of light wavelengths and can produce more natural-looking colors (especially the stars). Conversely, narrowband filters isolate a very specific bandpass only but ignore much more light pollution and moonlight.
I have included multi-bandpass narrowband filters, which can often create impressive “near” full-color images in one shot (with some processing). You could call this category one-shot-color light pollution filters.
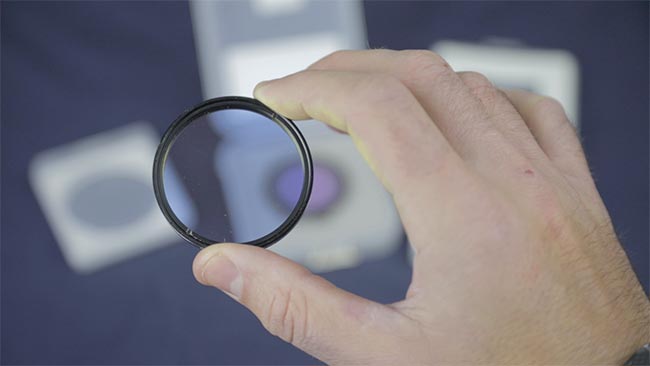
A 2-inch round-mounted Optolong L-Pro filter.
Modified Camera or Dedicated Astronomy Camera
Most images I am about to share were captured with cameras highly sensitive to the hydrogen-alpha wavelength at 656 nm. (Many of the great emission nebulae really shine here.)
If you’re considering getting a dedicated astronomy camera or modifying your DSLR, the images I will share may push you over the edge. The light pollution filter should list in the description whether it was designed for a stock or modified camera.
The biggest thing to remember is that a stock DSLR or mirrorless camera will have the internal UV/IR cut filter intact, whereas a full-spectrum modified DSLR, like my Canon EOS Rebel T3i, has it removed.
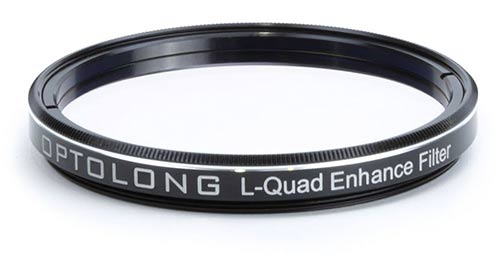
Filters such as the Optolong L-Quad Enhance include an added IR cutoff to 1000nm.
The Great Light Pollution Filter Round-Up
All of these filters will have a spectral graph on their website showing where they allow light to come through and where they don’t. Understanding the type of artificial light glowing above your backyard will help you make a smart decision about a filter.
You’ll need to purchase the correct format for your particular camera body, whether attached to a telescope or used with a camera lens.
A clip-in DSLR filter will sit underneath most camera lenses.
Clip-in models are great for camera lens work, while 2″ round-mounted versions are great for threading into your telescope flattener or filter drawer.
Canon seems to have the widest variety of camera bodies available. More and more Nikon and Sony DSLRs and mirrorless bodies are being used for astrophotography, and I expect the availability of astrophotography filters to follow.
For example, if you have old-school, yellow sodium vapor lamps lining your street, get one of the many light pollution filters blocking this glow (around 589nm).
I can’t tell you which light pollution filter is best for your needs, but hopefully, the examples shown in this post will give you a better understanding of what to expect.
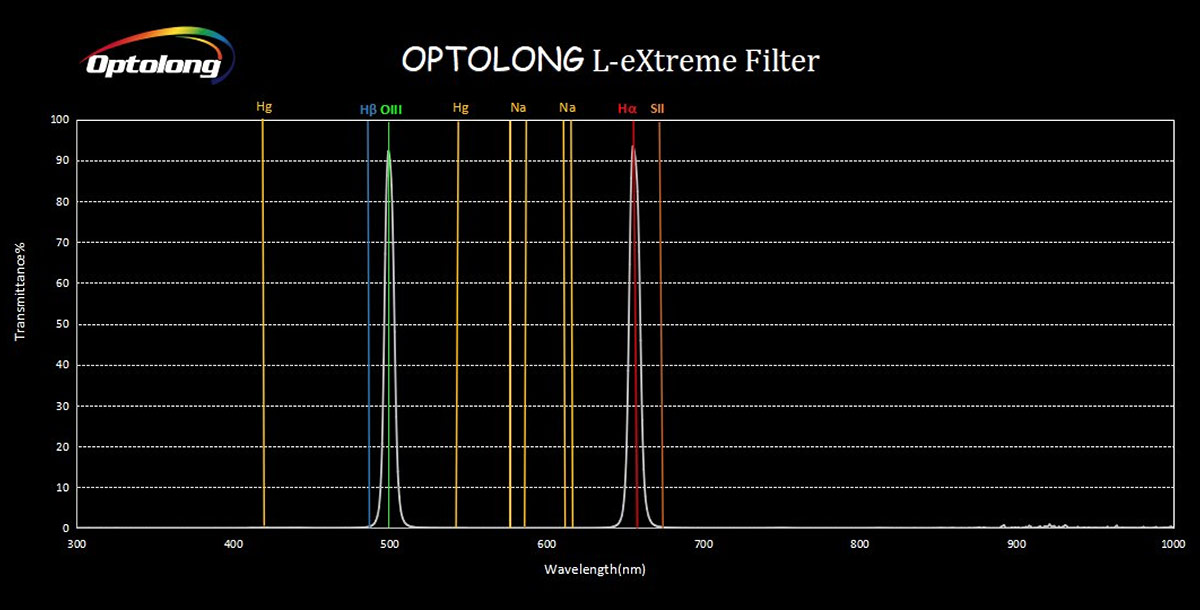
1. Optolong L-eXtreme
I believe the Optolong L-eXtreme Filter is an improvement over the L-eNhance version. It’s a dual-band filter that isolates two important wavelengths of light emitted by many deep-sky objects.
This filter version isolates h-alpha at a 7nm bandpass and OIII at 7nm without including H-Beta and the small bandpass between OIII and Hb.
The resulting images appear more dynamic and have better contrast. The following image of the Veil Nebula was captured using the Optolong L-eXtreme filter and a QHY268C one-shot color camera.
The Glowing Eyes of NGC 6914. ZWO ASI2600MC Pro + Optolong L-eXtreme Filter.
The Optolong L-eXtreme filter is my top choice when shooting emission nebulae from the backyard with my color cameras. The images it produces have a great separation between the target and the background sky and include a healthy amount of signal to play with in post-processing.

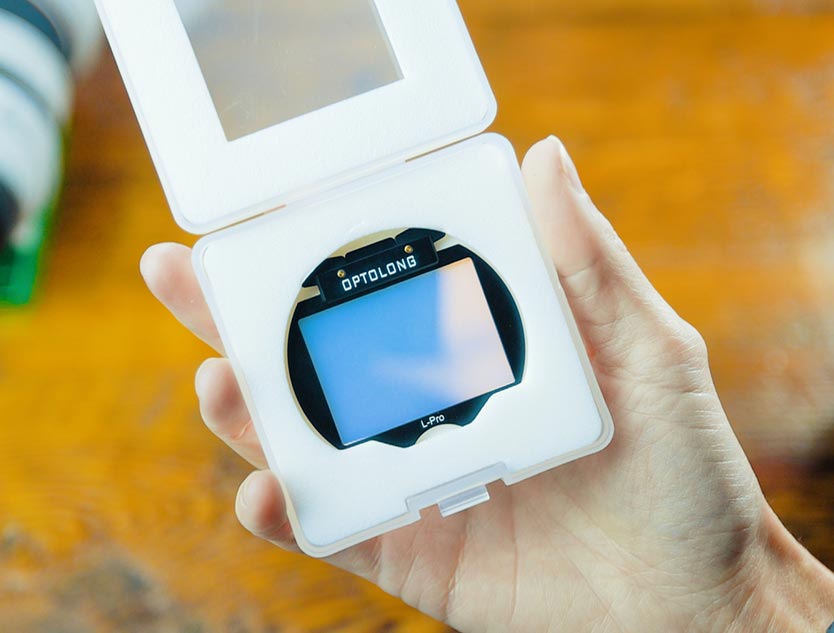
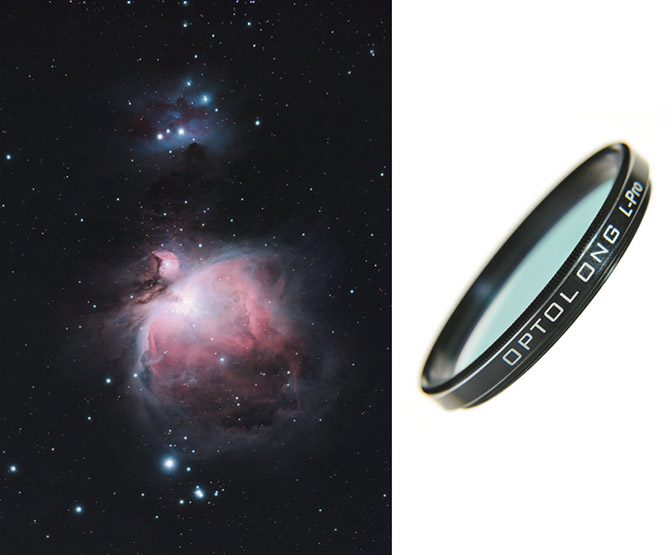
2. Optolong L-Pro
The Optolong L-Pro was designed for moderately light-polluted areas, although many are using this filter under some bright skies. This is a true broadband filter that aims to preserve the natural colors of stars in the night sky.
It includes a mild filter against known artificial light sources, including LED street lights. Broadband targets such as galaxies and reflection nebulae are some of the most difficult targets to capture from the city, and the image below is a testament to the practicality and performance of the L-Pro.
The following image of the Iris Nebula was captured using a ZWO ASI294MC Pro from my Bortle Scale Class 6/7 backyard using the Optolong L-Pro filter.
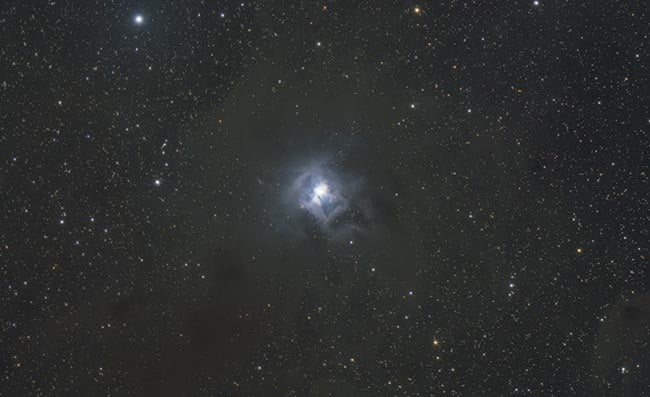
The Iris Nebula by Trevor Jones.
I used the Optolong L-Pro filter (see my video review) when imaging from my light-polluted backyard and was very happy with the results. Whether I used my DSLR camera or a dedicated astronomy camera, the stars were a bit red in the individual exposures.
This is very typical of a light pollution filter, as one of the primary light wavelengths it blocks is in the brown-orange range. However, it is possible to restore those red stars to their natural color (whether blue or yellow) using some simple techniques in Adobe Photoshop.
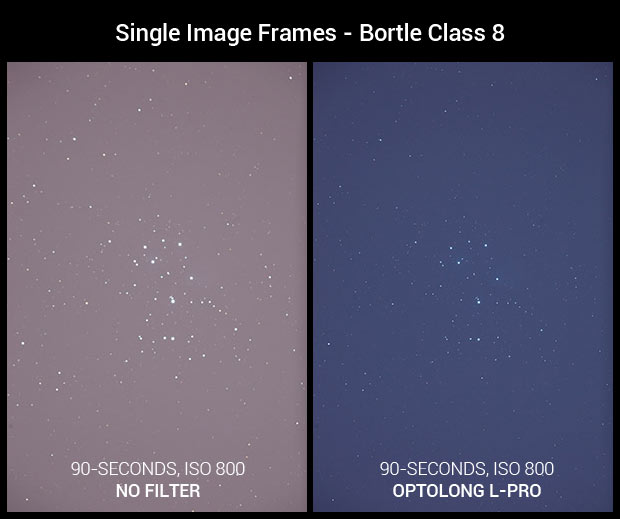
A single test exposure with, and without the L-Pro filter in place.
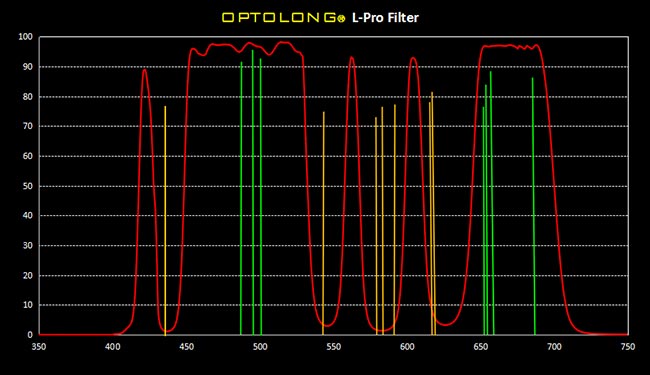
Comparing the transmission graphs of each light pollution filter against each other is a great way to help you decide which filter is right for you. The Optolong L-Pro filter has a very interesting bandpass selection, as you can see from the wavy transmission line with 5 humps shown below.
Each of the 4 major dips is a known source of artificial light pollution that the filter has selectively blocked.
The next filter is less selective (more aggressive) in its light-blocking abilities, resulting in a less natural but higher contrast image.
3. Astronomik CLS-CCD
This light pollution filter has been around for a long time and is a favorite among amateur astrophotographers shooting with a modified DSLR camera. The CLS-CCD version (unlike the “CLS” version), includes an additional IR layer for cameras that have had the stock UC/IR cut filter removed during modification.
I personally found this filter to be one of the most useful options when shooting emission nebulae targets from the city. Unlike a milder filter like the L-Pro, the Astronomik CLS-CCD is more aggressive and creates a strong contrast between the nebula and a bright sky.
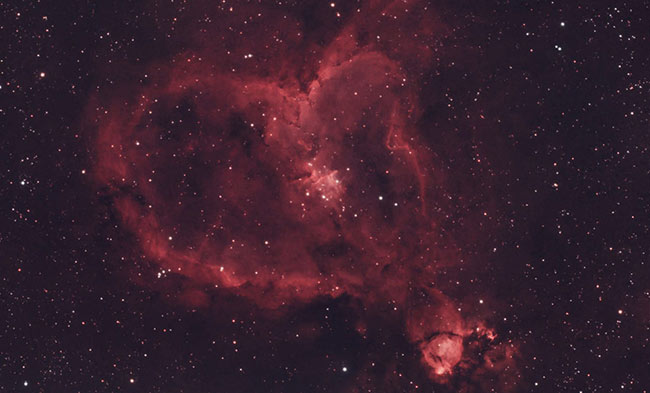
Here is an excellent example of this filter used by Niek Damen on the Heart and Soul Nebulae.

The Heart and Soule Nebulae by Niek Damen.
Niek mentioned that he uses this astrophotography filter on his DSLR, which he modified with a clear glass replacement he performed himself. There are many affordable DSLRs, both modified and stock, kicking around in the used market.

If you own a Canon EOS Rebel series DSLR with the full-spectrum “naked sensor” mod, this filter is for you. In my experience, the aggressive light-blocking properties of the Astronomik CLS-CCD filter can result in images with an overly red cast, particularly noticeable in the stars.
The red stars can be corrected in several ways during the image processing stage. I like to examine the red channel of the image and make sure that the stars are not larger here than they are in the other channels.
Another method is to use the defringe sliders found within Adobe Camera Raw under the lens correction tab.

After observing the transmission graph for this filter, it’s easy to see why the images have much more contrast straight out of the camera than the Optolong L-Pro. This filter is aggressively blocking all areas of the visible spectrum except two intentional humps in the 500 to 650nm regions of the visible spectrum.
4. SVBONY SV220
This filter is a fantastic choice for astrophotographers looking for quality results at an affordable price. It is a practical choice for either a modified or stock DSLR camera.
It provides just the right balance to focus on bright stars accurately, especially when paired with a Bahtinov mask. Overexposed, bloated stars are effectively suppressed, reducing the need for tedious star reduction in post-processing.
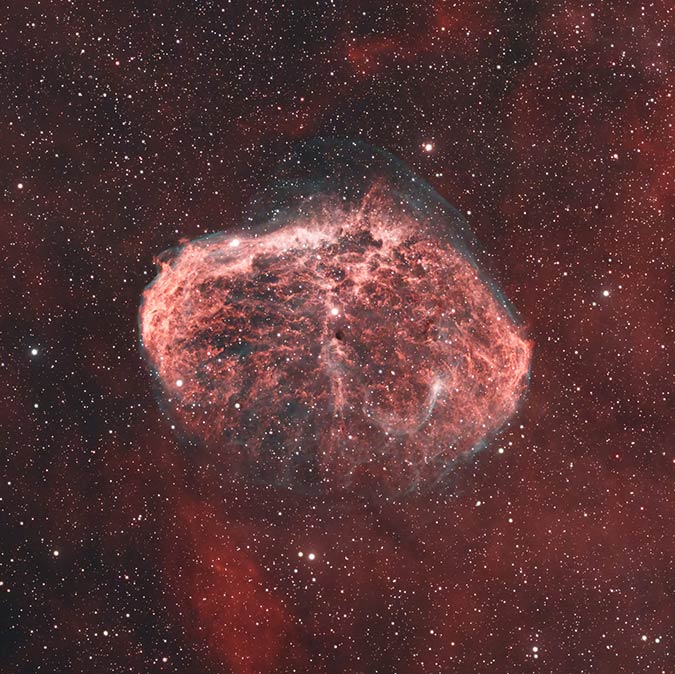
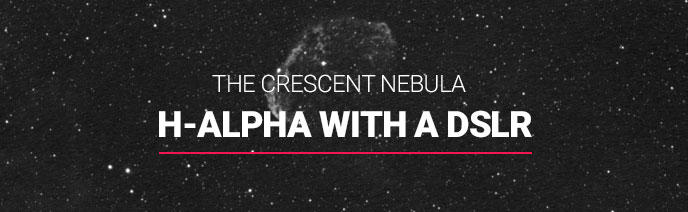
The Crescent Nebula using the SVBONY SV220 by Tristan Petroskey.
A standout feature of this filter is its ability to block nearly all moon glow, making it possible to capture emission nebulae even under a full moon.
This is ideal for anyone looking to extend imaging sessions through lunar phases without sacrificing image quality.
However, it’s important to note that this filter is designed specifically for Ha and OIII wavelengths, so it’s unsuitable for capturing reflection nebulae or galaxies.

5. SVBONY CLS
You may be surprised to see this filter talked about on this list. To be honest, the only reason I’ve included the SVBONY CLS filter is that I realized that many people are using this filter (and similar generic-branded filters) around the world.
The Svbony products are available on Amazon, and I myself have purchased affordable “no-name” filters for astrophotography in the past. Without having sufficient data to test myself, I would be very surprised if the Svbony wasn’t a clone of the original Astronomik CLS filter.
Here is a useful test image from Russell Hippert of the Dumbbell Nebula using the Svbony CLS filter from a Bortle Class 8/9 sky. Russell mentioned that his city does not currently have any lighting ordinance and that broad-spectrum intrusion from reflections is very high.
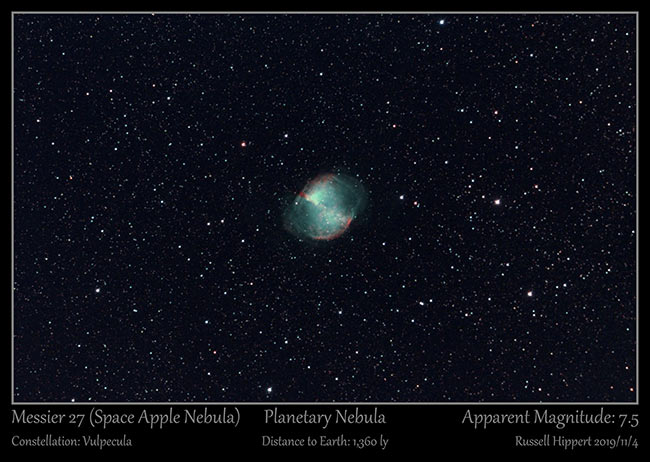
The Dumbbell Nebula by Russell Hippert.
These filters are worth giving a shot. I purchased a complete set of 1.25″ Svbony filters to use with a Starlight Xpress SX-42 and was astonished by my results on the Fish Head Nebula. Here is an interesting comparison on Cloudy Nights of the Svbony CLS filter against the Optolong L-Pro.
6. Optolong L-Quad Enhance
The Optolong L-Quad Enhance Filter is a great choice for astrophotographers who want to capture a natural-looking image while blocking some of the major light pollution emission lines.
I use this filter for broadband projects from the backyard, such as galaxies, reflection nebula, and dark nebulae. I find it to perform slightly better than the original broadband L-Pro filter.
Example images taken using the Optolong L-Quad eNhance Filter. (High Point Scientific)
7. Antlia Triband RGB Ultra II
The spectral design of this filter focuses on the important RGB bands, making it a practical choice for over 90% of deep-sky objects. Unlike ultra-narrowband filters, it’s versatile enough to capture galaxies, reflection nebulae, and star clusters, presenting well-balanced RGB colors, even from highly polluted Bortle 8 skies.
The Antlia team designed this filter with a broader blue bandpass to help bring out true-to-life hues in areas that naturally contain fainter blue tones. This feature also helps prevent unwanted green influence from overtaking the blue tones, a common issue in light-polluted environments.
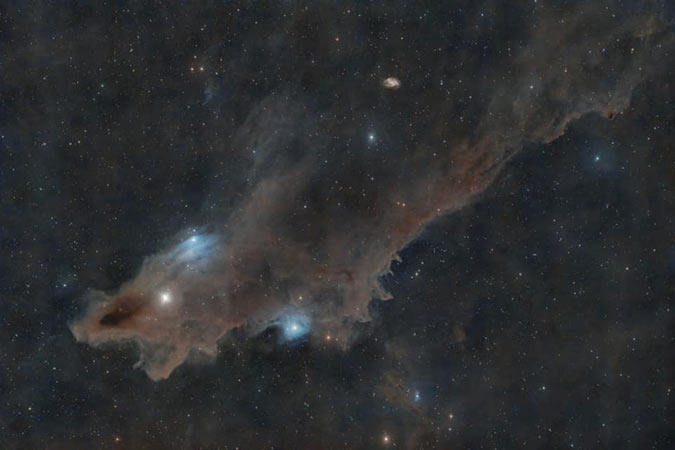
The Dark Shark Nebula by Dan Kokinda. Antlia Triband RGB Ultra II filter.
By enhancing the blue transmission, this filter can help maintain a more natural color balance. Overall, it’s a fantastic option for anyone who wants to capture high-quality astrophotography from cityscapes or other light-polluted areas without sacrificing color accuracy.
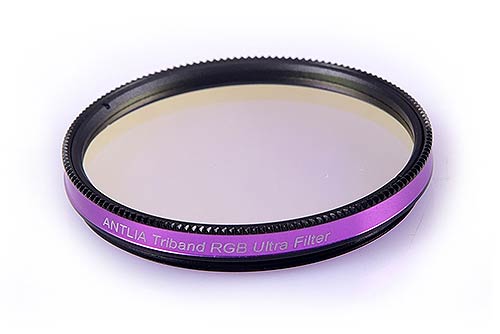
The Antlia Triband RGB Ultra Filter
8. Astro Hutech IDAS Nebula Booster NB1
The IDAS Nebula Booster shares a profile similar to that of the popular Optolong L-eNhance filter. It collects light in two primary areas of the visible spectrum, H-alpha and OIII.
The image shared by Tony Lanahan below looks remarkably similar to my version of the Heart Nebula taken using the L-eNhance. Having another option in this filter category is great news for amateur astrophotographers, as it seems dealers often have a hard time keeping them in stock.
The Heart Nebula by Tony Lanahan.
The most impressive aspect of the image above is perhaps that it was captured from the edge of Chicago, a massive metropolis of light. I think you’ll find multi-bandpass nebula filters, in general, to be a lifesaver from city skies.
As you’ll see in the transmission graph below, the IDAS NB1 also collects some data in the subtle SII wavelength. Combining all of the narrow bandpasses can result in dynamic images using a color camera.
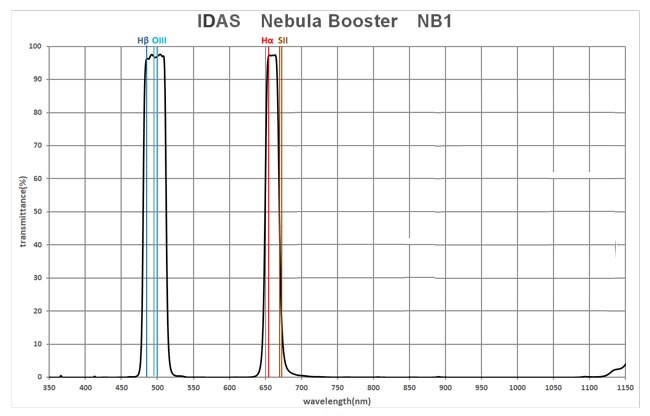
IDAS NBA (Nebula Booster) transmission graph.
9. Optolong L-eNhance
Since reviewing the Optolong L-eNhance filter in July 2019, I have taken almost a dozen impressive images with it. Fantastic new results are popping up daily with the L-eNhance, and I think it is safe to say this filter is a winner with color cameras.
The image below is a perfect example of what the Optolong L-eNhance filter was designed to do. In this area of the night sky, you can clearly see the light in Ha and OIII.
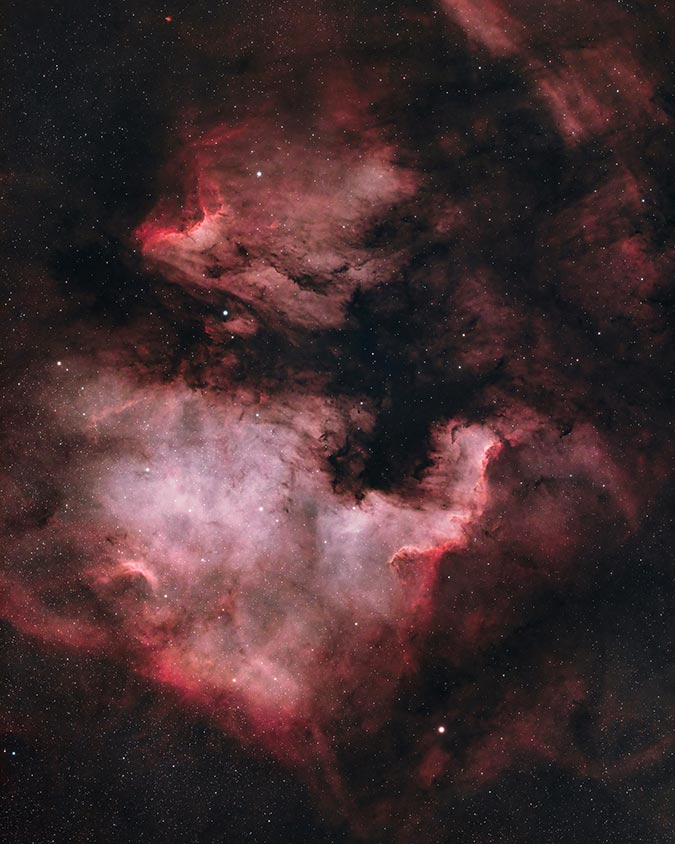
The North America Nebula and Pelican Nebula. Trevor Jones.
The picture above was taken using a ZWO ASI2600MC Pro color camera through an Askar SQA55 refractor telescope. This was captured from my Bortle Scale Class 6 suburban backyard. Combining a cooled CMOS astronomy camera and the L-eNhance is tough to beat.
When comparing the transmission graph of the Optolong L-eNhance with the IDAS NB1, it is interesting to note that the cutoff after the Ha (656nm) bandpass line is steeper on the L-eNhance. In theory, this could result in higher contrast images that look slightly less “natural” in overall color.
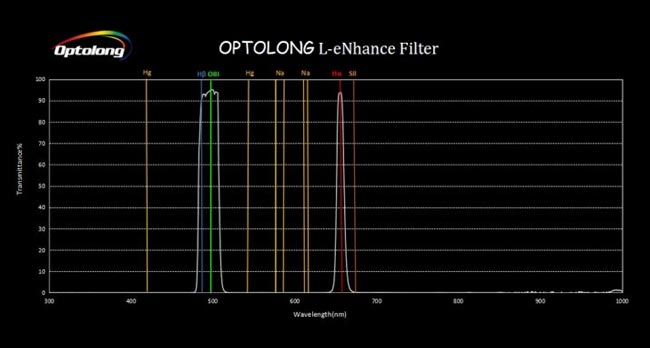
Optolong L-eNhance transmission graph.
10. Baader Moon and Skyglow
Lastly, we have the Baader Moon and Skyglow filter. I experienced some early success with this broadband filter when I used my first dedicated astronomy camera (Altair Hypercam 183C). Look at how this mild light pollution filter recorded the colorful stars in this image of the Ring Nebula in Lyra.
This photo was taken from a Bortle Scale Class 8 backyard, and the natural colors the filter allowed to pass through are commendable.

The Ring Nebula by Trevor Jones
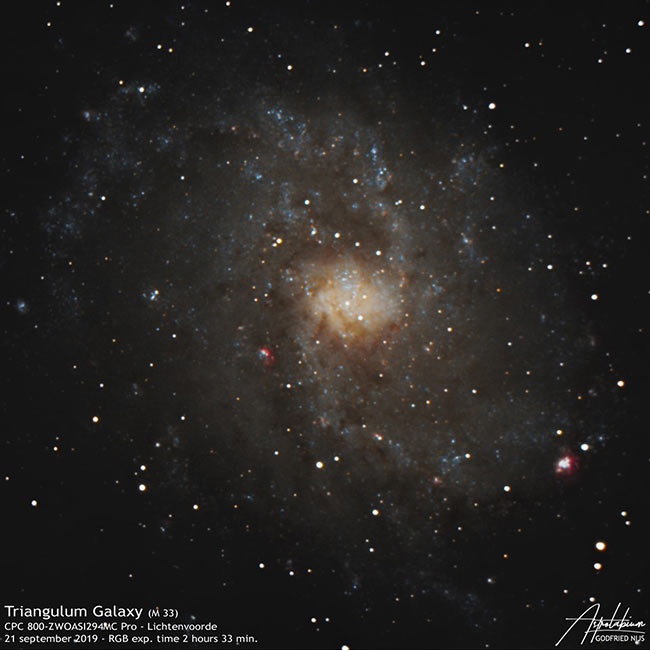
Here is a look at the Triangulum Galaxy in broadband RGB using the Baader Moon and Skyglow filter from a Bortle Scale class 4 site by Godfried Nijs. This photo was captured using a ZWO ASI294MC Pro color camera through an 8″ Celestron CPC 800 SCT telescope.
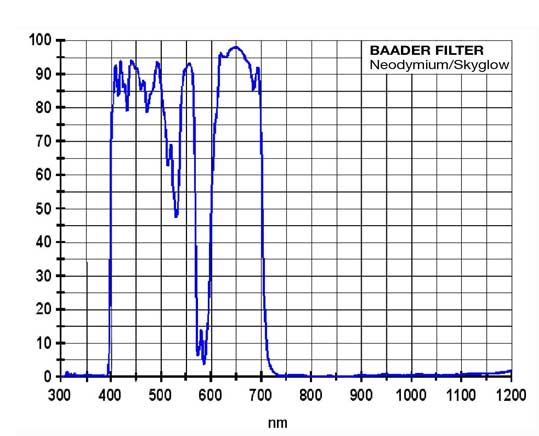
If you are not sick of looking at transmission graphs for astrophotography filters yet, here is a look at where the Baader Moon and Skyglow filter selectively allows light to pass through.
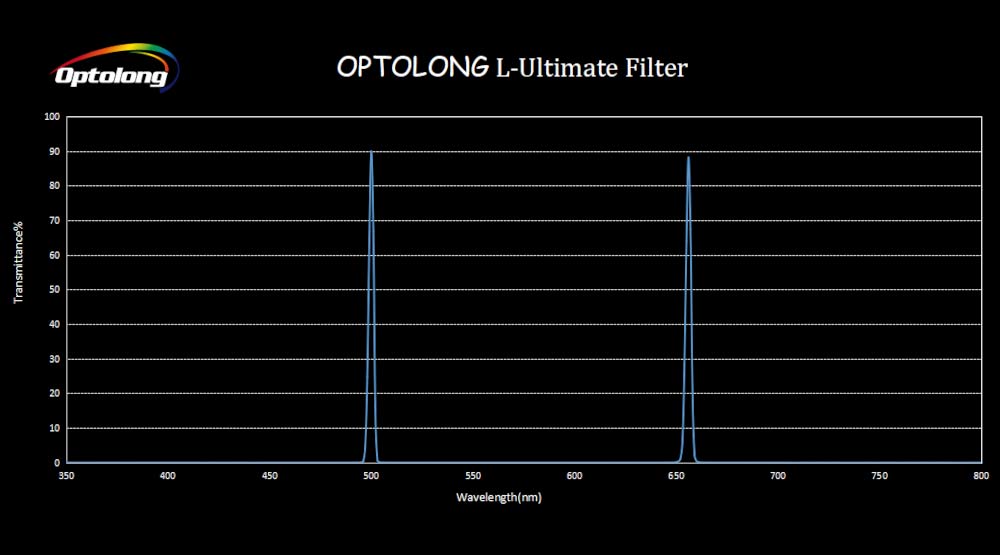
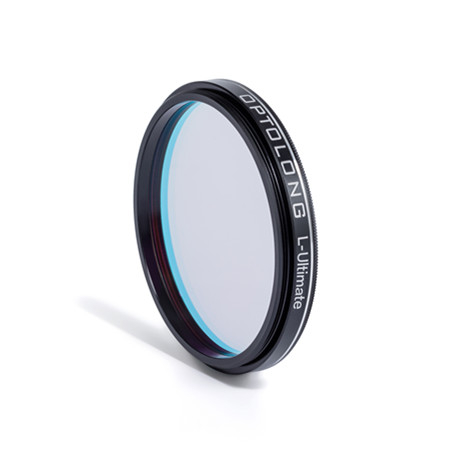
11. Optolong L-Ultimate
The L-Ultimate takes the success of the L-eXtreme one step further. It features an ultra-narrow 3nm bandwidth in Hydrogen Alpha and Oxygen III (656.3 nm and 500.7 nm, respectively) emission lines for the ultimate contrast in your nebulae images.
Compared to the L-eNhance and L-eXtreme filters—the L-Ultimate enhances even more contrast by blocking all other light, including wavelengths from mercury and sodium street lights. This, of course, comes at the expense of natural star colors (there is always a catch).
Cubby Proctor shared the following image of the Lion Nebula on the AstroBackyard Facebook page with the following remarks:
“I’m loving this filter. Much better results from the L-eNhance, which I used before. I still use the L-Pro broadband filter when the moon is less than half otherwise I just shoot filterless. This is 27 hours on the Lion a few weeks back with the L-Ultimate.”
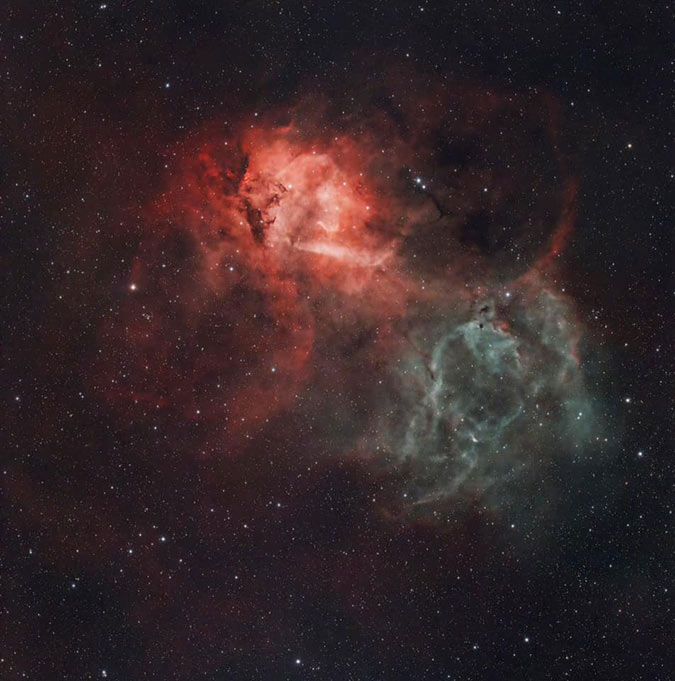
The Lion Nebula by Cubby Proctor. 27 Hours total exposure using the L-Ultimate filter.
Overall, the Optolong L-Ultimate is an excellent investment for anyone shooting with a color camera in severely light-polluted areas.
Final Thoughts
If you are looking for specific advice on choosing the right light pollution filter for your needs, you should first know that the answer depends on your unique imaging location.
For example, if you are living in a neighborhood with yellow sodium vapor lights dotting the streets, you will likely experience different results than I do from my glowing “blue-white LED” backyard.
The greatest test of a broadband RGB filter from the city is its ability to record natural-looking star colors, particularly the blues and yellows.
With careful image processing, these images can be adjusted to achieve a “near normal” looking color balance. Blend in some data shot using a broadband filter for star color, and you’ve got an impressive RGB image.
No matter which light pollution filter you choose, remember that your final result depends heavily on your image processing skills and how you manipulate the data. The images do not come directly out of the camera as you see them in this post.
However, a light pollution filter that is a great fit for your skies will make processing the image much easier and more enjoyable.

Trevor Jones is a deep-sky astrophotographer and a valued member of the RASC. His passion is inspiring others to start their astrophotography journey on his YouTube Channel so they can appreciate the night sky as much as he does. His images have been featured in astronomy books & online publications, including the NASA Astronomy Picture of the Day (APOD).
First off all, there’s no way I could tell any difference in detail in your sample images. They are simply compressed to death.
And if you can truly see a difference, why do you think a filter would make it worse?
I can’t imagine any way filters can somehow make detail disappear. Yes, lp filters also affect signal and that’s probably what you see. But they most importantly deminish lp even more, which directly results in less noise.
So you get a little less signal and a lot less lp/noise, which leaves you with a better signal to noise ratio.
And we all know that getting a better SNR is the super important in astrophotography. That’s also why we pile up hours of integration time.
Thanks for the comparison, some of the issues I find is finding out what lighting system(color) you street lights are to narrow down the many options.
I don’t have the budget to buy 2-3 or more of these to find the correct value so I can get the best final image with not-modified 80D.
Maybe info from the power company can help?
There is no dough one is needed, I agree…thank for the review.
I live in a Bortle class 7.. where most imaging is done..
Of course one question is , has the lighting been upgraded??
Don
Hey Trevor, I know you used to have a Bortle 8 backyard and I was wondering if you had any suggestions for someone living in a Bortle 9 zone (NYC).
Should I completely give up to on any sort of broadband astrophotography and only go for narrowband? I was thinking of getting the Optolong L-Enhance or something in that category. Or should I try to go monochrome and do narrowband there? Do you have any suggestions? I’d love to get Andromeda but I just don’t know if I can reasonably expect to get any broadband done here.
Thanks!
Thanks a ton for your great work, Trevor.
Good timing, I’m on the fence with filters (Bortle 4-5). You may be contacted by ZWO regarding Duo Band Filters 🙂
Cheers
Robert
Hi Trevor,
Question: What filters do I really need? I am new to astrophotography and I will be using a modified Canon T4i (awaiting an Astronomik MC-Klarglas to complete the modification) and have just ordered an Astronomik Ha 12nm clip filter, mainly for moonlight. My backyard is Bortle 4, I am 20 minutes from Bortle 3 and less than a hour from Bortle 2! Would I benefit from any other filters?
Clear Skies!
Fred McNeill
Thanks for the survey. That helps sort out the confusing assortment of filters now available. It would be interesting to test clip in vs screw in or drop in – I.e. how does placement of the filter affect performance, gradients, and star image quality on fast optical systems and lenses. Passbands shift a lot with these kinds of filters depending on the angle of incident light. Clip in filters will be more affected by that when using fast systems and wide angle lenses. Indeed, as Peter Zelinka showed in his testing, clip ins aren’t even usable with wide angle lenses. Thanks!
Thank you, Alan! You make a great point, and it is something I will cover in detail in the future. I have always found creative ways to correct star bloating, gradients and other issues that come up using a particular camera/filter combo – but I realize this is less helpful to those that want a higher quality image out of the camera (and obviously some problems cannot be fixed with processing!) I’ve been shooting with crop sensor cameras for a long time, and as you know this “hides” a lot of the nasty vignetting and other issues at the edges of the image frame. I did not have an issue using a clip-in filter with my Canon Rebel + Rokinon ultra-wide-angle lens (14mm F/2.8) – but of course, this was using a crop-sensor camera. I am testing a Canon EOS Ra now, and I’d like to shoot more full-frame astrophotography in the future. Thank you for your insight on this, and everything you have done for this hobby!
Hi Trevor I want to ask you to suggest me the exposures for taking flat fields with a mirror less Sony A7S. Sorry for my English I m from Italy.
Thank you
In response to the comment by Alan Faitelewicz:
Being in the 5th Bourough of NYC, my northern sky is quite light polluted during the summer months and of course all around in general. The zenith is usually most favorable and my easy and west horizons aren’t terrible as long as it’s not less than hour before or after sunrise and sunset.
I picked up a monochrome camera with LRGB filters and three others. These are Ha, CH4, and IR pass (Astronomik ProPlanet 742 IR Pass).
It is possible for me to take much longer exposures in Ha than with the LRGB filters. It seems that Ha basically doesn’t give a chance for any of the light-pollution wavelengths to get through.
So in theory, LRGB give me more control even if it does make for a more complex workflow.
That all said, I’m tempted to go all-in on narrowband but I’d prefer to have the ability to get some real colors. So I’m very seriously considering a light pollution or skyglow filter that I can stick directly on the camera or in front of the filter wheel. Basically something that can be used at the same time as the LRGB filters.
Simultaneously, I hope that if I get such a filter that I can continue to keep the filter installed while using the narrow-band filters.
At present, I’m investigating using Chuck’s methodology of using many short exposures. He just did the Cat’s Eye Nebula with 2000 short exposures, for example.
One thing is for sure, before I even buy a CCD, I need to address the light pollution issues when using LRGB. In the case of narrowband, it’s already solved.
Do I need a light pollution filter if using a Nikon D3200 with a Meade ETX 80? I have the Meade 07366 and 07378 adapters and the camera fits the rear port of the telescope. If so, where can I adapt a light pollution filter with this setup? Also, should I include a field flattener with this DX camera? Thank you!
The issue I have with almost all reviews of pollution filters is that the images aren’t really indicative of what I may get with the same setup. Somebody who is a master at image processing may be bale to make a terrible image look quite good. Then somebody with very basic image processing skills but a much better light pollution filter may struggle to produce a good looking image. Leading potential purchasers to believe the poor quality filter is actually better than the good filter, based on the end result images.
Maybe the comparison should only be done with raw unedited images Also instead of a multi-megapixel image which gets compressed and distorted by image compression, browser resizing and monitor setting. The images could be a small zoomed in region of the image so that each pixel of the image was tens of pixels on an average monitor. So that image resizing and compression artifacts were reduced or removed.
Thanks for that article, very interesting.
I’ve got a Canon EOS R6mkii, and would like to either capture DSO with my lenses (ie nightscapes) or with my Telescope (750mm newtonian). So I’m thinking about buying a clip-in filter which clips in front of my sensor, but it looks like there is only the Optolong L-Pro available. I could go for the L-enHance 2″ for my crayford but then would not be able to use it on my lenses for nightscapes.
thanks in advance =)
highly recommend the Antilla tri-band and quad band filters! the tri in particular I think is marginally “better” than the Optalong Quad … YMMV
I have to disagree with the Optolong range of filters, especially the L Extreme…it creates halos really badly and I have tried three L Extremes from friends who also have ditched them as the halos are appalling.
filters are great in heavy light pollution or to collect specific emission lines. but some have issues with halos especially on Olll. a review of which ones do not produce these halos would help sort out the “better” narrow band ( duo narrow band) filters for those that don’t particularly like halos.
I did just pick up a pair of Altair filters; the Ha/Olll and the Sll/Olll in 6nm. the 4nm versions were just a bit pricey for my budget. unfortunately it has been overcast or raining or mosquitoes all summer here. looking forward to December weather and WSP2025.
are there adapters for 2 inches filters to use in top of dlsr or mirrorless lenses (like those for Sony A6000 camera) ? The lenses normally have mm (67,52,49 mm) and most of the filters do not match on them. The most of adapters are to adapt mm to mm , but not for mm to inches
hii , I have been your long time fan ..well I need to ask you a question..iam try to use something like Samsung s24 ultra smartphone, and iam trying to capture some time lapse of the coming up atlas comet . but problem is I have light pollution, so which filter can I attach to my phone lens using a mount . thanks 🙏
nice review of the options. thanks. I already own the Astronomik CLS (not the CCD version), but now Ive modified my DSLR. Do you think its still suitable, I should invest the CCD version to match the mod?
It would be best if you could swap the CLS for the CCD version.
Hello, i need help choosing a light pollution filter cause i live in a bortle 5 (although looking a the map its close to a 6) and I’m getting a monochrome camera. I’m planning on replacing the luminance filter with said light pollution filter and slapping it on a 36mm filterwheel. I understand that typically you don’t replace the luminance filter with a light pollution filter but i’d like to get the most out of my area.
-Thanks
Hi James. I’d stick with a traditional L filter in that situation – especially under Bortle 5/6 skies.
I have a canon R8 and I have the laowa 10mm super wide angle lens I can put a 77mm lens and we go to places that on the average are bortle 5 maybe what filter would be good
Filter Optolong UV/IR cut with cellphone Xiaomi 10 pro is bad?