Deep Sky Astrophotography in Light Pollution

If you’ve been following AstroBackyard on YouTube, you’ll know that I regularly shoot DSLR astrophotography images under the heavily light-polluted skies at home. My night sky is classified as Bortle Class 8 in terms of sky quality, a white zone on the light pollution map. This certainly makes things more difficult in terms of collecting data and image processing, but I welcome the challenge.
It’s true, there is no substitute for dark skies. But being able to set up a portable astrophotography kit in the backyard on a weeknight is pretty cool. I don’t have to pack up heavy gear into the car and worry about portable power or internet access. I can open up the garage door and start capturing images through my telescope before it gets dark after work.
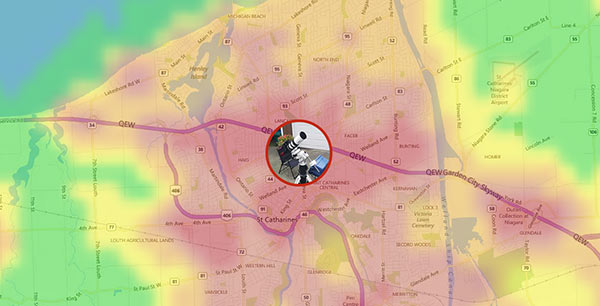
I live in the center of town, a red zone on the light pollution map
Don’t get me wrong, I adore traveling to dark sky locations, it just doesn’t happen as often as I’d like it to. For me, a typical night of deep-sky imaging happens during the week in between work, family time, and lots of dog walking. A clear sky in the backyard is my idea of the perfect night, no matter which targets I’m shooting.
I’ve been successfully capturing deep sky images from this light-polluted backyard for 3 years now. The best part about it is that I get to show others that live in the city that deep sky astrophotography is not only possible, but you can capture some truly incredible images. In this post, I’ll share my latest results from the backyard using a Canon EOS Rebel T3i DSLR camera and a small refractor telescope.

The Soul Nebula captured with a Canon DSLR and the equipment shown below
Light pollution is a major side-effect of urbanization and is said to compromise your health and can disrupt ecosystems. To discover the amount of light pollution where you live, simply locate your house on this interactive light pollution map. The Bortle scale is a way of measuring the brightness of the night sky.
Photographing a Nebula from the City
When it comes to capturing deep-sky objects from the city, one of the safest bets is to go after the brightest nebulae in the night sky. These targets give you the best chance at creating a decent image in a limited amount of time, simply because they don’t require as much overall integration as a dimmer object. If you’re looking for some inspiration in this department, be sure to check out these 3 easy astrophotography targets that look great at almost any focal length.
After much deliberation, I have decided to dedicate an increasingly rare and precious clear night to the Soul Nebula in Cassiopeia. I’ve photographed IC 1848 before, so I’ll be combining the new images I take with the previous data to create my best image of this emission nebula yet. All of the data I’ve ever collected on this nebula was shot here in the backyard with a DSLR.
My secret weapon is to collect absolutely as much exposure time on my target as possible. Stacking several images together can increase the amount of signal collected while reducing noise by canceling out its random output. For more information about the concept of signal-to-noise ratio, Craig Stark explains it better than I ever could.

My telescope with the Canon EOS Rebel T3i attached
Overcoming light-polluted skies
I’ve got lots of experience here, as the majority of my deep-sky astrophotography is done from home. In theory, a light pollution filter will let you shoot longer exposure times before being blown out on the histogram, but this comes at a price. The signal (light) is often weak, and the natural color emitted from the stars has been altered. For both of these trade-offs, capturing more integrated exposure time can be a huge help.
A popular and effective method of overcoming the light-polluted skies of an urban backyard is to use a monochrome camera equipped with narrowband filters (narrowband imaging). This has the power to aggressively ignore artificial light and isolate the light associated with specific gases in objects in space. But what about those shooting with a DSLR camera?
A color camera like a DSLR uses an internal Bayer matrix to create full-color images in a single shot. This convenience comes at the expense of a much weaker signal when compared to a monochrome CCD or CMOS camera. To offset this challenge, I like to use camera filters that help me isolate the light I want to collect.

I use a clip-in light pollution with my Canon DSLR (Skytech CLS-CCD)
Shoot During New Moon
Although narrowband filters have allowed me to take photos during all moon phases, the new moon phase is a special time for amateur astrophotographers. The days surrounding the new moon phase mean that I can finally capture true color images of my subject with more natural colors.
Believe it or not, the bright glow of Earth’s natural satellite produces enough skyglow to really reduce contrast in your deep-sky images. Even a narrowband filter won’t help if your target is sitting too close to a bright full moon.
Light pollution filters such as the Astronomik CLS and IDAS LPS D-1 help to reduce moonglow, but for the absolute best data on a deep sky target, the new moon phase is best. If you’re planning on shooting unfiltered, this is definitely when you want to try it.
Shooting Without a Light Pollution Filter
It’s also worth noting, that for certain targets, an incredible image can be captured without using a filter at all. Don’t believe me? Have a look at this photo of the Andromeda Galaxy posted by Jon Rista on Astrobin. The image was created by stacking 174 x 150-second subs at a modest ISO 400 under light-polluted skies. Inspired? I was too.
I plan to capture the Pleiades from my backyard again soon using only the required UV/IR (luminance) filter with my modified DSLR. This target does not emit light that a narrowband filter can isolate, as it is a reflection nebula. Another target that would be a great test subject for this technique is M31, as seen in Jon’s image above.
Update:
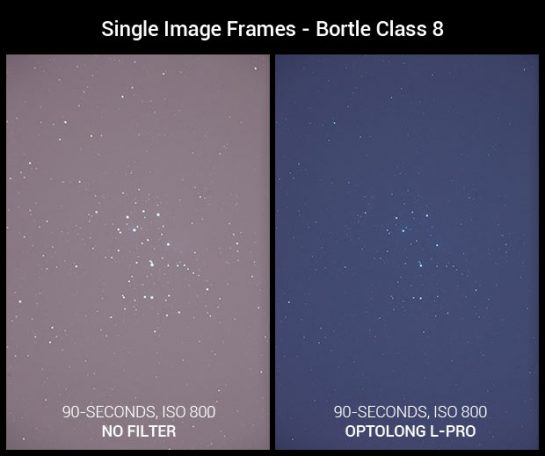
I captured the Pleiades star cluster using a new light pollution filter, the Optolong L-Pro. This is a multi-bandpass filter that does a great job of preserving the natural star colors in my images from the city. Have a look at the sample image comparing an unfiltered image and one using the Optolong L-Pro:
My full review of this broadband astrophotography filter includes an image of the Pleiades star cluster captured with a stock Canon 5D Mk II camera.
Optolong L-Pro Filter Review – An Urban Broadband Astrophotography Filter
An Astrophotography Filter for the City
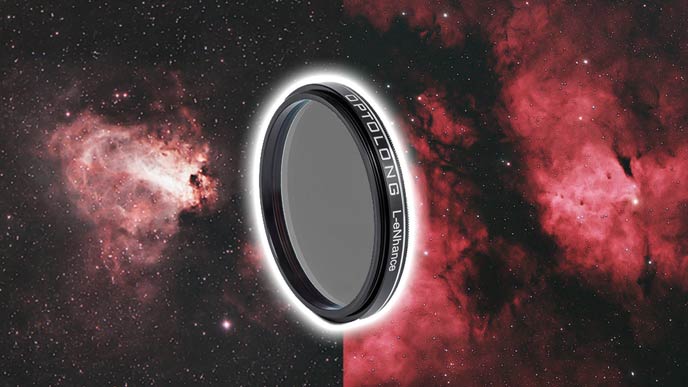
In the following video, you’ll see me describe the challenges of photographing deep-sky objects in space from a light-polluted area. The Optolong L-eNhance filter is an excellent choice to consider when shooting nebula targets that include areas of H-alpha and Oxygen III.
The image in this video was not shot using a DSLR camera, instead, a dedicated astronomy camera. However, a dual bandpass filter like the Optolong L-eNhance is a great choice for DSLR camera owners as well. This filter was designed especially for one-shot-color cameras.
Selecting a Target
I no longer go into my astrophotography projects blind. In the early days, I would set up my telescope and astrophotography gear and think to myself “what will I shoot tonight?”. As carefree and exciting as those nights were, they also included a lot of wasted clear sky time looking at a computer screen while the night passed me by.
These days, I prefer to take a much more organized approach to deep-sky astrophotography as my time is limited, and clear nights are rare. I find it best to double down on deep-sky targets that not only complement my equipment but maximize exposure time and increase the chances of “completing” a final image.

I often refer to my “The 100 Best Astrophotography Targets” book for inspiration (On Amazon)
Be sure to check out my list of 15 Best Astrophotography Books for many more great choices.
My decision-making process involves answering the following questions:
- Have I photographed this target before?
- Is the target in the early, mid or late position for the season?
- Is it a good fit for the focal length of my telescope?
- Does this object require narrowband data to properly showcase?
- Will it turn out well in color using a DSLR camera?
As an example of a target’s position relating to the season – you wouldn’t want to start a new astrophotography project on a DSO that is on its way out and fading deeper and deeper into the Western twilight each night. Right now, Orion (winter target) is in the early season stages, while objects like the Crescent Nebula (Summer target) are on their way out.
It’s beneficial to select a deep sky target that will get as high from the horizon as possible. This will, of course, vary by your location but aim to collect light on subjects that are in their optimal position for the time of year. Your backyard window of the sky and potential obstructions in your yard will also factor into your selection.

My deep-sky imaging setup in the backyard
Despite having several previous iterations of IC 1848 on my hard drive, The Soul Nebula checked off the most boxes and won the battle for option selection. It currently sits in an opportunistic area of the night sky to collect a serious amount of exposure time this month.
This will be a great opportunity to improve my broadband color data collected on the Soul Nebula to improve upon my image from last year.
Why I’m using a DSLR
With a number of dedicated astronomy cameras and cooled CMOS cameras in my possession, why would I opt for using an old DSLR camera instead of an impressive astronomy camera like the QHY128C? (I’m working on it)
For starters, I wanted to produce another example image using the Zenithstar 73 APO with a DSLR. In my last video I shared images of the Heart Nebula and Butterfly Nebula in narrowband Ha, but this time I’ll collect images in good old full color. My results on the Soul Nebula should give you a good idea of what to expect with a crop sensor DSLR camera like my Canon T3i or similar models.
A telescope like the Zenithstar 73 is a logical telescope choice for deep-sky beginners just entering the hobby, and many of those people will be using a DSLR. It’s easy to get carried away in my posts and videos and skip over the basic information beginners are looking for, so I’ll try my best to scale back when the situation calls for it.

My DSLR attached to the Flat 73 Field Flattener and Zenithstar 73 Telescope
Camera Settings for a Washed-Out Sky
From my bright sky here in the city, I’ll use 3-minute exposures at ISO 800 to capture the Soul Nebula. This is a rather conservative approach, which may have you wondering why I’m not shooting longer subs. A typical DSLR light frame under moderately light-polluted skies would normally be 5 minutes at ISO 1600, but it’s a hot humid night, and those settings would absolutely cook my sensor.
In these conditions, there is little value in collecting images longer than 3 minutes. As the noise increases significantly, the signal sees very little improvement. You are much better off capturing several shorter images over time. (My camera sensor hit 32°!) Even at 180 seconds, I am capturing A LOT of skyglow that will have to be dealt with in post-processing.
Camera Settings in the City
- Mode: Manual
- Format: RAW
- ISO: 800
- White Balance: Auto
- Exposure: 180-seconds (3 minutes)
*Note without using a light pollution filter, this exposure time would be cut in half.

Previewing my 3-minute light frames in Adobe Bridge before stacking
Focal Ratio is Important
The Zenithstar 73 APO is fast. Its fixed f-ratio of F/5.9 can collect light faster than most of the refractor telescopes I’ve used in the past (Including my Explore Scientific 102). This gives my images a much-needed boost in signal for each short 180-second sub. A lower focal ratio allows more photons to hit your camera sensor in a single exposure, which makes a big difference in terms of SNR.
Naturally, the aggressiveness of the filter (in this case a SkyTech CLS CCD) in front of the camera sensor changes how much signal I can record in a single exposure.
White Balance
I’ll leave the camera’s white balance set to auto, as I see no benefits in adjusting this setting at this stage. Because I am shooting the images in RAW format, I can manually adjust the white balance to whichever temperature I want in post-processing. With that being said, there have been some interesting discussions on the topic of the benefits of using a custom white balance for astrophotography in heavy light pollution.
Capture Software
The images are being captured using APT (Astro Photography Tool) on my new laptop computer. Autoguiding through PHD2 guiding and the Altair GPCAM + 50mm guide scope means that each image contains sharp stars each and every time. If you’re looking for an affordable autoguiding package to upgrade your kit, have a look at the Starfield autoguiding package offered by Ontario Telescope.
The images are dithered between each frame to further reduce noise – which can easily be switched on within the gear tab of APT. To learn more about the process of data acquisition including the use of support files (dark frames, flat frames), please visit the get started page.
Light Pollution Filter for Canon DSLRs
For broadband spectrum targets like galaxies (and many reflection nebulae), a light pollution filter is less effective. However, for an emission nebula like the Soul Nebula, isolating the light emitted in the H-Alpha and OIII wavelengths can make a big difference.
Longtime followers of the blog will remember the SkyTech CLS-CCD filter I reviewed last year. Time and time again, this filter has impressed me with its ability to produce impressive color images using my DSLR camera in heavy light pollution.

The SkyTech CLS-CCD clip-in light pollution filter for modified DSLR cameras
This filter has been my go-to choice when it comes to capturing true-color broadband images from home. It does a great job of creating contrast between my target and a washed out city sky. The only downside is that it also alters the color balance of my image and paints the surrounding stars with a red cast.
Later this month, I’ll be testing out an Optolong L-Pro filter with my DSLR camera, which is said to be “a true 5 bandpass filter”. This multi-bandpass filter is less aggressive than the CLS-CCD and should help with my color balance issues. My hope is that this filter is a much-needed middle ground between shooting with the CLS-CCD filter and unfiltered. I expect my exposures to be shorter using this filter here in the city.

The Optolong L Pro Filter is 5 Bandpass Light Pollution Suppression Filter
For Stock Canon DSLR cameras
Owners of stock (non-modified) DSLRs will want to get a standard CLS (city light suppression) filter such as the Astronomik CLS clip-in filter without the unnecessary UV/IR cut filter. If you’re unfamiliar with what it means to modify a DSLR for astrophotography, have a look at this page where I cover this aspect of astrophotography cameras and more.
The Soul Nebula in Cassiopeia
With an apparent size of 150′ × 75′, the Soul Nebula is a fantastic deep sky astrophotography target for a DSLR camera and compact wide-field refractor telescope. It also rises above the roof of my house just as nightfall sets in, which is perfect timing in terms of maximizing my imaging time.
It’s a beautiful emission nebula with several embedded open star clusters. It emits a strong amount of light in the hydrogen-alpha wavelength, which makes adding images captured through a Ha filter beneficial.

Where to find the Soul Nebula
If you’ve been following my backyard activity via the email newsletter, you’ll know that I’ve been using another exquisite compact refractor. This time, it’s the William Optics Zenithstar 73 APO, and my resulting image should give you a good idea of what you can expect from this affordable doublet from an urban sky.
My Telescope
The William Optics Zenithstar 73 APO is a compact F/5.9 doublet apochromatic refractor with an impressive entourage of accessories to get you up and running. The Flat 73 1:1 field flattener is an essential upgrade if you plan on imaging with a full-frame camera. In my opinion, this is still one of the best telescopes for astrophotography available due to its perfect balance of performance, practicality, and affordability.
This telescope has a focal length of 430mm, which creates an extremely wide field of view. This means that it is well suited for large nebula targets like the Soul Nebula or Heart Nebula in Cassiopeia, but less effective on smaller targets such as galaxies.
The package I have includes guide scope rings and a matching 50mm guide scope with gold accents. Using the M48 Canon adapter, I thread my Canon T3i to the Flat 73 for incredible wide-field exposures of my target of choice. Owners of DSLR cameras looking for an easy entry point into deep sky astrophotography should look no further than the Zenithstar 73 APO.

The William Optics Zenithstar 73 APO.
It’s incredibly compact and manageable to use. If you’ve ever fought with balancing a large reflector telescope on a mount, you’ll really appreciate a compact telescope like the Z73. There is less stress on the mount, meaning can effortlessly track your target, even if the overall payload balance isn’t perfect.
One of my favorite features is a simple yet ingenious design touch. They’ve built a Bahtinov focus mask into the lens cap.
Focusing the image with the Z73
The diffraction spikes focus mask (Bahtinov mask) is a convenient feature you’ll find in all-new William Optics refractors. To focus with my DSLR, I simply find a bright star in the live view screen with the focus mask attached. Because the material is made from optical acrylic rather than metal, this mask provides 92% light transmission.
DSLR camera sensors are not as sensitive as most dedicated astronomy cameras. So the added light transmission from this mask really comes in handy when focusing your star using the rather dim 10X live view mode. You’re presented with nice long diffraction spikes to really nail down your optimal focus position.

The built-in Star Diffraction Spikes Bahtinov Mask on the Z73
You’ll need a telescope mount that’s capable of handling a refractor telescope, but its small size means that beginner-level astrophotography mounts such as the Orion Sirius EQ-G, Celestron AVX, or Sky-Watcher EQ6-R Pro will perform well with it.
My Telescope Mount
The Sky-Watcher HEQ5 SynScan pro has been called in for duty to capture guided 3-minute subs on the soul nebula. It’s more than capable of accurately tracking this gorgeous nebula with the 5.5-lb Zenithstar 73 APO attached.
I purchased this mount from a Canadian astronomy classified website several years ago, and it’s been working flawlessly ever since. It is light enough to haul out of the garage and set up in about 15 minutes. The only faster way to start imaging a deep-sky target would be to use a portable star tracker.
It allows me to set up quickly and easily Polar Align the mount within minutes. I still use the SynScan hand controller to star align the mount and slew to my target, although most prefer to advance to using the EQMOD software to control this mount from their PC.
![]()
My Sky-Watcher HEQ5 SynScan Pro Telescope Mount
Speaking of Sky-Watcher, I am not done with the Esprit 100 ED just yet, not even close. With the departure of the iOptron CEM60 mount a few weeks ago, I had to find a solution to carry my heavier telescopes.
I am excited to announce the arrival of a brand new Sky-Watcher EQ6-R GoTo Mount this week. The built-in illuminated finder scope, SynScan hand controller, and snow-white finish will all feel very familiar – except there’s no rust on the counterweight!
I’ll have much more information to share about this soon.
Conclusion and Results
Mother nature doesn’t care what the calendar says, because Tuesday night’s imaging session was a nearly record-setting 31 degrees in Southern Ontario. Unfortunately, this increased the amount of noise in my images of the Soul Nebula (Sensor at 32°), but luckily my total integration time helped to improve the SNR.
Shooting with an uncooled DSLR is not ideal on hot nights like this – but nights like this are numbered, and soon I’ll be complaining about numb fingers, not camera noise.
The following image combines my latest data with images of the same target collected last year. All of the images were captured using a modified Canon EOS Rebel T3i camera and SkyTech CLS-CCD filter from the backyard. The only difference in acquisition details between 2017 and 2018 was the use of a Meade 70mm Quadruplet Astrograph in 2017.
Narrowband Hydrogen-alpha data was added as a luminance layer to this image using the HaRGB method in Adobe Photoshop. This is a powerful way to boost the signal in an emission nebula captured under heavily light-polluted skies. For these images, an Astronomik 12nm ha clip-in ha filter was placed inside of the camera.
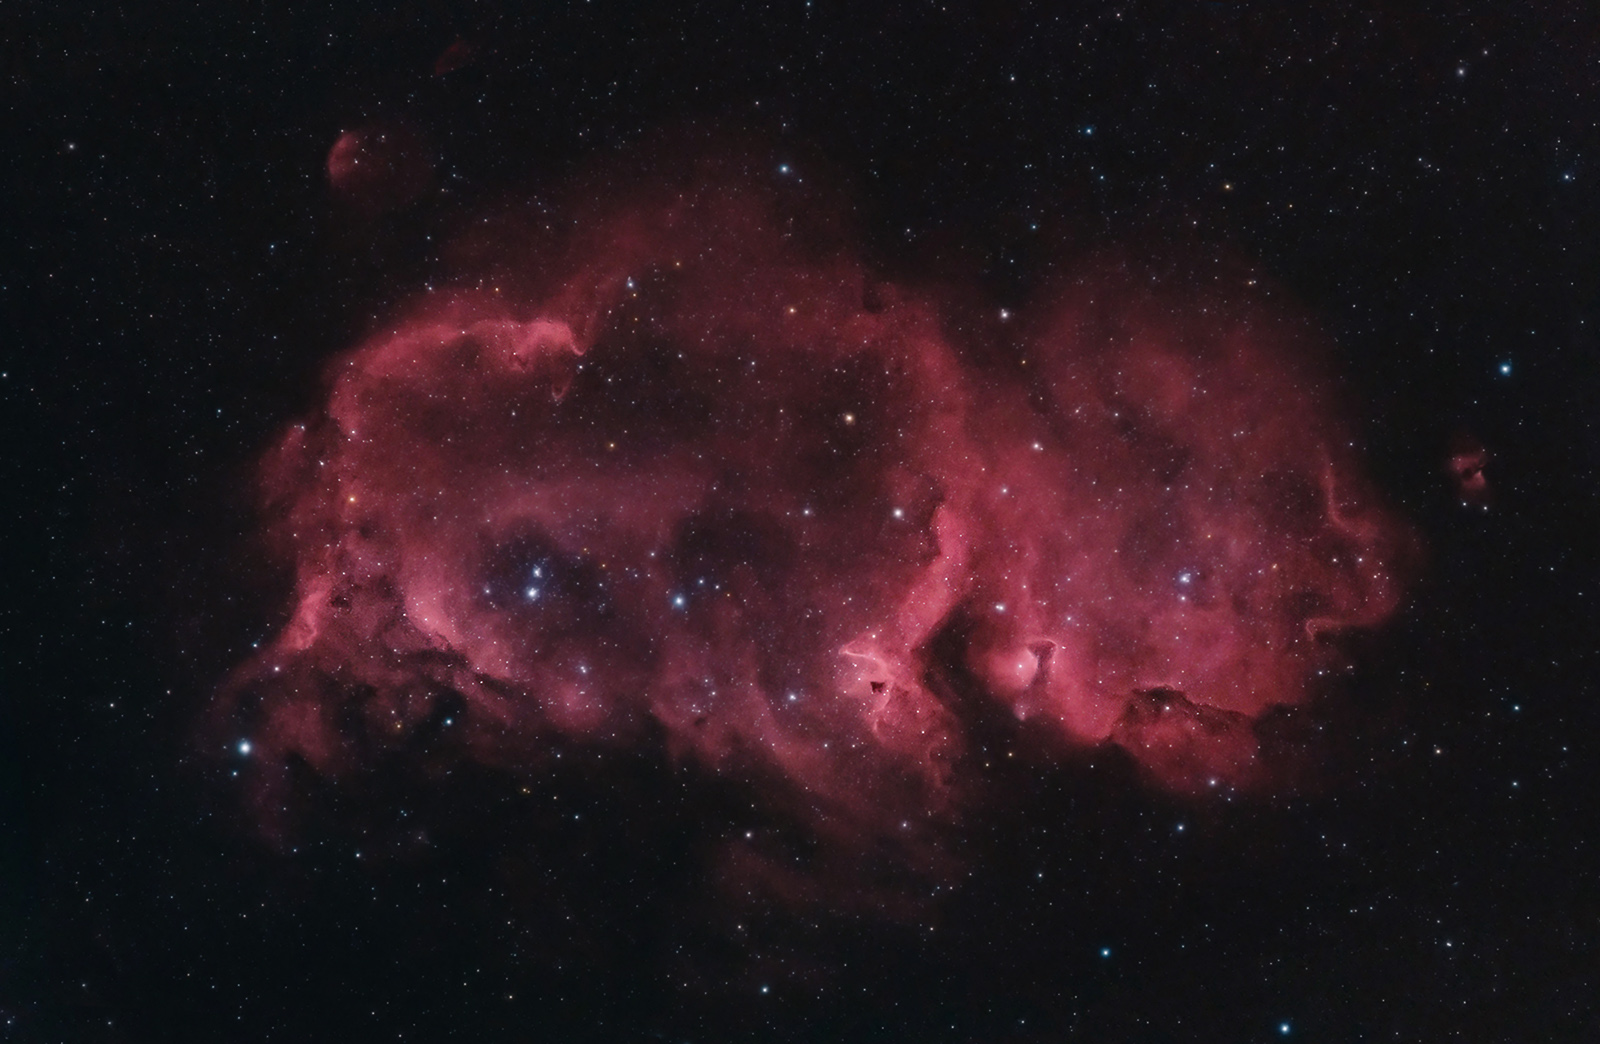
IC 1348 – The Soul Nebula captured from Bortle Class 8 Skies with a DSLR Camera
The images captured this week on the Soul Nebula using the Z73 totaled 3 hours and 15 minutes (65 frames). As expected, the final still contained a fair amount of noise, even with the aid of dark frames and over 3 hours of exposure time. Doubling my integration time would certainly help.
The images were registered and stacked in DeepSkyStacker, with the final image processing done in Adobe Photoshop. The Astronomy Tools Action set contains many useful one-click actions that I regularly use on images like this taken from the backyard. (You can find a list of the software I use to process my images on the resources page)
Darker skies have a clear advantage when it comes to capturing deep-sky astrophotography images. But with enough exposure time and the right image processing strategy, you can capture breathtaking images from your own backyard – no matter how light-polluted it may be.
Equipment Mentioned in this Post
- Sky-Watcher HEQ SynScan Pro GoTo Mount (Now the AZ-EQ5)
- William Optics Zenithstar 73 Refractor Telescope
- William Optics Flat 73 Field Flattener
- Canon EOS Rebel T3i (full spectrum modification)
- SkyTech CLS-CCD Clip-in filter for Canon EOS
- Astronomik 12nm Ha Clip-in filter for Canon EOS
- AmazonBasics USB 2.0 A-Male to Mini-B (6 feet)
- Replacement AC Adapter (Battery Replacement) for Canon T3i

Thanks Trevor-there is a lot of helpful information here! I really appreciate it as right now I am using my Nikon 5500 (crop) and still trying to figure it all out. We are planning a trip to a star party next year-not sure where or when yet (open for recommendations!) but hope to improve by then.
Glad to hear that Lynn! My pleasure. As for star parties, the Cherry Springs Star Party is a great choice for the East Coast! I’d like to attend some new ones next year as well:)
Awesome, i always love astrophotography. that really beautiful to see Night Sky Object but now day light pollution be the problem. so many people still dont understand about this problem.
Out of sheer curiosity, think the Zenithstar 73 would work on a camera tracker such as the Sky Guider Pro? Such would be for a lightweight and portable “it all fits in a backpack” kind of setup…
Nikon D3400 and 50mm 1.8f G lens. It’s a start. Life Pixel for the mod? Think that can wait until the 1yr warranty expires. Plenty of time to break it. NV to Camera adapter plus PVS-14. Northern Virginia Light Pollution:(
Great article!. You might also want to suggest pixInsight software for post processing, to take out sky gradients. Look up Rogelio Bernal Andreo for good examples.
Hi Trevor,
How nice to see some-one else capturing images from a Bortle 8 location and having success at it. I have been to where you live and know what you are up against, what with the mini “Las Vegas” at Niagara. I was staying in Burlington Ontario, but passed through your location on the Maple Leaf train to NYC having also visited Niagara falls overnight.
I live in SE London UK, and also have a Bortle 8 sky at home, but regularly visit Bortle 4 astro camps. My home location is very limited, but I have managed to get some pretty decent images from home and only recently started up a 2nd website for images done purely from that location. I started with DSLR imaging but now do Mono CCD imaging.
You might like to take a look at what i have achieved from Bortle 8 though this website is only for actual images. My more informative website which has everything I have done from both Bortle 8 and Bortle 4 (with lots of useful information its linked to.
https://sites.google.com/view/carastroimaging/home
Trevor,
What do you think of the IDAS LPS D2 for Bortle 7 & high pressure sodium street lamps?
Thanks for the great article! I do a lot of DSLR AP in the suburbs of Seattle. Do you use an autoguider when imaging with your Canon DSLR? If so, what type of autoguider? If not, how are you maintaining good tracking over 5 minutes?! Thanks and keep up the good work!
Scott C.
All I really have is a DSLR and a tripod. I don’t have a whole lot of room to buy anything else (Broke college student). Do I have any options? I also live in an 8 Bortle area
Hey Trevor
I live in Bortle 4 skies here in Western KY with access to Bortle 2 over in the National Forest. I recently picked up a modified 450D and an Astronomik CLS-CCD filter. What exposure do you recommend at home in the Bortle 4 skies with this camera and filter. If I go 1600 will I lose too much dynamic range? I don’t want to lose star colors because I enjoy the different colors as much as I do the objects I image many times. Thanks! I have a Skytracker Pro and use 50mm and 135mm lenses. Thanks!