3 Easy Astrophotography Targets for Beginners

If you are just getting into astrophotography, there is a good chance you have already taken some decent photos of the night sky using a basic camera and lens.
A DSLR or mirrorless camera and tripod are all you night to start photographing the stars and constellations, or even the Milky Way. These types of shots can be taken with ordinary camera gear, without the use of a tracking mount or telescope.
However, this excitement usually leads to a desire to capture more. Nebulae, galaxies, and star clusters are up there waiting for you to reveal them in detail. For this type of astrophotography (deep-sky), you’ll need to work a little bit harder.
Thankfully, the process is not quite as hard as it looks. With some simple beginner-level astrophotographer gear, you can take photos of some of the most stunning objects in the night sky.
3 Easy Astrophotography Targets for Beginners
In this post, I will describe how you can capture three of the easiest and most rewarding deep-sky astrophotography targets in the night sky using an ordinary camera and lens.
Unlike some of the more advanced projects I take on, you can capture these objects using a basic, affordable astrophotography kit in your backyard. These astrophotography targets are considered to be some of the easiest nebulae to photograph, yet they are all rewarding projects that will inspire you to keep going.
I’ll walk you through the process of finding and capturing the objects, and the astrophotography equipment I recommend. These deep-sky targets are so big and bright, they look good at almost any focal length.
In general, astrophotography can be difficult, but these targets are nearly foolproof, and I’ll explain why.
What Makes These ‘Easy’ Targets?
It might sound strange to hear to words ‘easy’ and ‘astrophotography’ in the same sentence. The process of successfully capturing a distant object in space is not something you can learn overnight, but these targets will make the experience a little more approachable.
First off, all three of the targets I recommend are bright. The brighter deep-sky nebulae and galaxies are easier to find and capture (on a basic level). This becomes especially important when you are taking photos from a backyard in the city where there is a high amount of light pollution. City lights make finding and framing dimmer objects more difficult, and this can create frustration and confusion outside.
The best part is, these objects don’t require any specialized filters or an astro-modified camera to capture. Some of the best examples of these targets were taken with a regular old DSLR camera like the one I’ll use in this post. This is good news if you’re a beginner and haven’t added any filters to your setup yet.

Related Post: The Seestar S50 Makes Astrophotography Easy (In-Depth Review).
3 Easy Astrophotography Targets
So what are the targets?
These are the three beginner-level deep-sky targets I recommend, which can all be captured right now, and into the winter season.
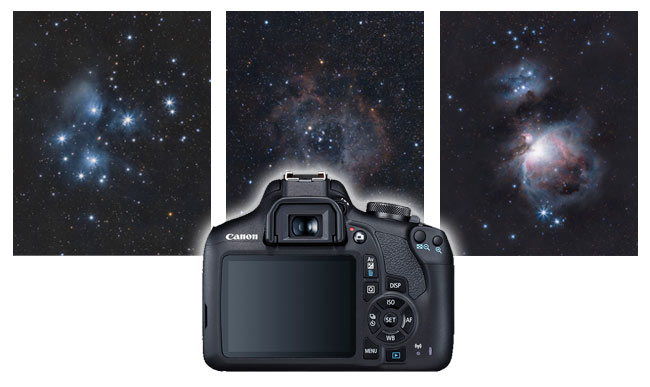
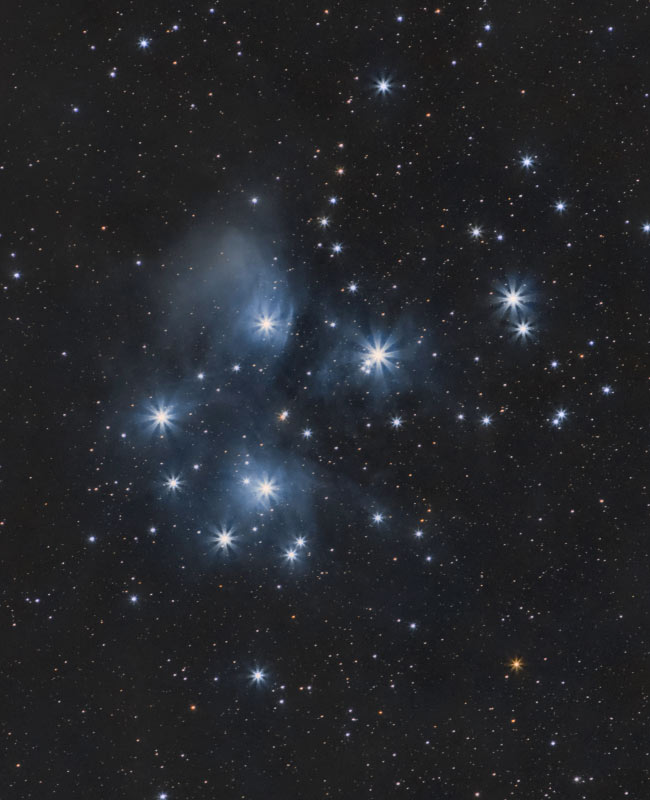
- Pleiades Star Cluster: a cluster of super-bright stars with an amazing glow of wispy blue reflection nebulosity around it.
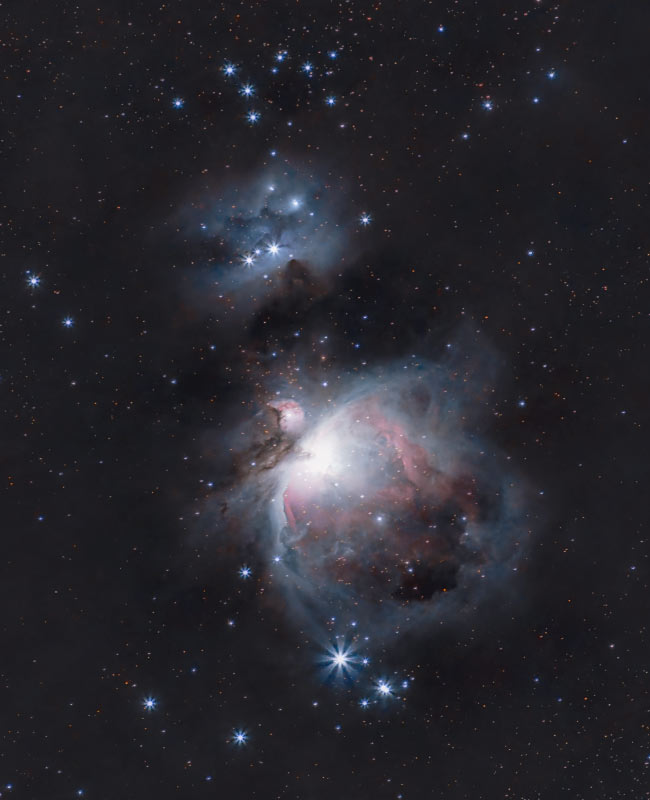
It’s one of the overall easiest targets to get started on, but the bright stars can also be tricky to get right in the processing. - Orion Nebula: as one of the most popular deep-sky targets, I’m sure you have already heard of the Orion Nebula. It’s easy to find (thanks to its brightness) and there are plenty of nearby bright stars to help you find it and focus your camera. The intense luminosity of Orion makes it easier to capture, however, capturing the full dynamic range will keep you busy well into the intermediate and advanced stages of your astrophotography journey.
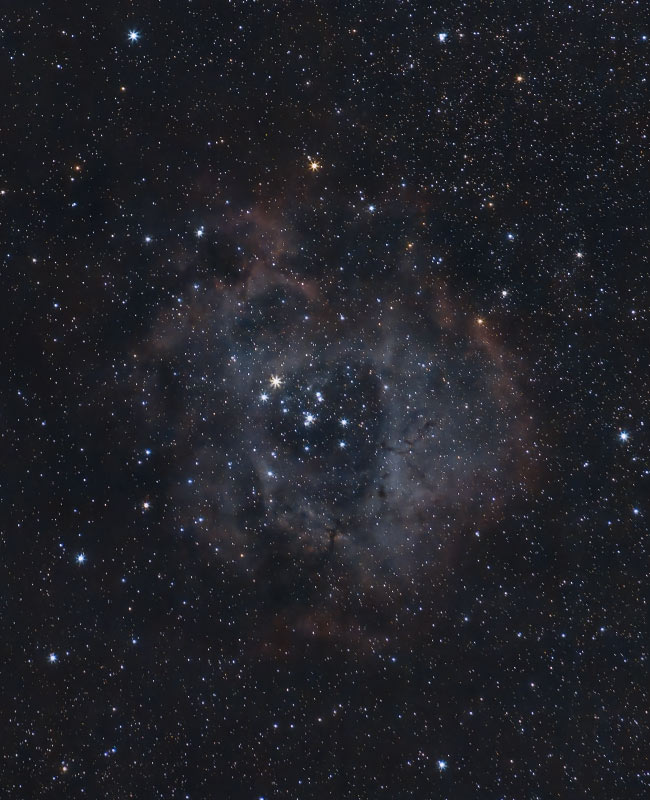
- Rosette Nebula: this target isn’t located too far from Orion, but it’s a little harder to find. This object involves a beautiful cluster of stars, with a symmetrical ‘flower’ of nebulosity around it. It is a big fan favorite and for good reason.
Of course, each one has its own challenges, but all of them are bright, colorful, and rewarding to capture using entry-level astrophotography gear.
Equipment
Even though these objects are bright, you’ll want to make use of tracking to capture these objects in all their glory. A portable star tracker or an equatorial telescope mount will allow you to record the long-exposure images needed for a detailed shot.
Below is a detailed list of the gear you will need, including the gear I used, to capture these beginner astrophotography targets.
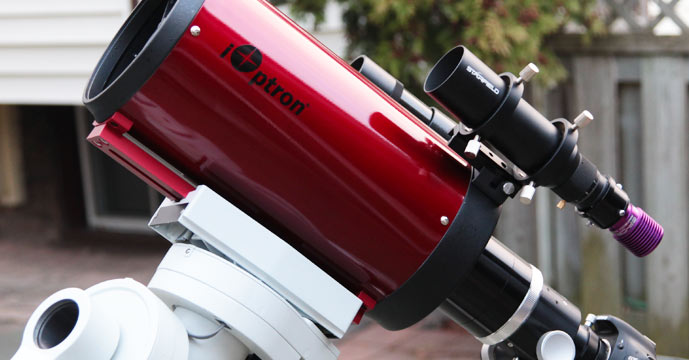
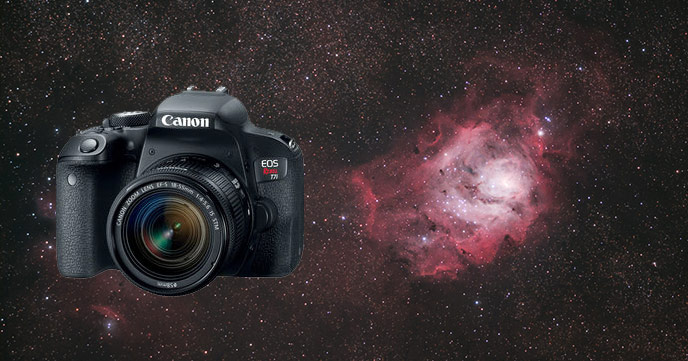
- Camera: The camera can be any DSLR or mirrorless camera. For the purposes of capturing these images, I used one of the cheapest DSLR cameras Canon makes, the Rebel T7. It’s a stock, crop-sensor DSLR, and you can pick one up with a lens for about 400 bucks. To make things easier on your neck, I recommend going for the T7i version with the flip-out screen if you can afford it. It can be a little awkward without this feature, especially when your target is straight up in the sky.
- Lens: In terms of optics, a telephoto camera lens or a small telescope with a focal length of about 300-400mm is ideal. In my case, attached to the camera is an old Canon EF 300mm F/4 that I bought used for about 700 bucks many years ago. This prime lens isn’t perfect by any means, but it uses some quality glass and mimics the telescope experience in terms of focal length and aperture.
- Tracker: I used one of the most affordable options available, the Sky-Watcher Star Adventurer. This tracker allows me to match the apparent rotation of the night sky and take longer exposures than I could on a stationary tripod.
- Accessories: a remote shutter release cable to run a sequence of images and a simple lens warmer to avoid the build-up of frost on the lens. Oh, and a piece of electrical tape, but I’ll explain what that’s for later.
![]() Rebel T7, Canon EF 300mm F/4, and Star Adventurer Star Tracker
Rebel T7, Canon EF 300mm F/4, and Star Adventurer Star Tracker
My Approach
Below I will walk you through the process from setting up your equipment to image processing. For the sake of showing you all the targets at once, I shot all three targets in one night. I would suggest focusing on one target at a time to allow for more overall integration time.
Because I am using a simple star tracker without ‘GoTo’ capabilities, I have to manually locate and point to each deep-sky object in the night sky. For those looking for a little help in this department, consider looking in the more robust Sky-Watcher Star Addventurer GTi, which includes a computerized GoTo system that can be controlled using a smartphone app and/or the ASIAIR.
Equipment Set Up
I like to set up my tripod on the concrete patio just outside of my garage whenever possible. I could probably get a better view of the sky by setting up on the lawn, but the ground is soft (and wet!) and the tripod will be less stable.
When setting up in my backyard, I always keep in mind the location of both the north star and my intended deep-sky objects. Use Polaris to polar align the tracker at dusk, when only the brightest stars and planets are visible. This gets much harder once dark, especially for a beginner.
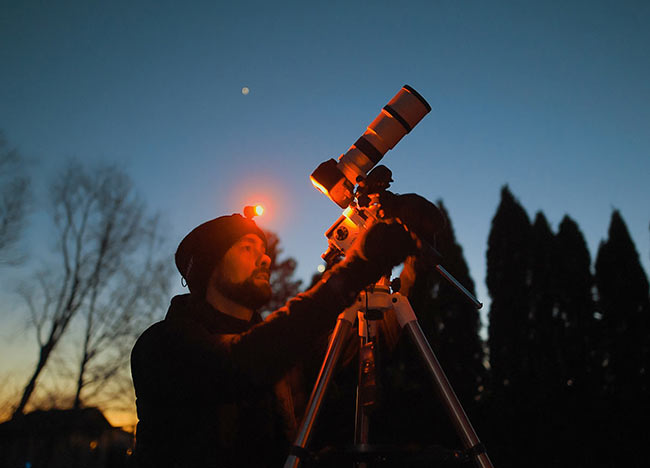
Using the adjustment bolts on star tracker to polar align at dusk
Polar alignment involves looking through the polar axis of the tracker, and moving the up and down, left to right (or alt/az) adjustment bolts on the mount. You can use a free app on your phone to guide you in the right direction. Then, it’s just a matter of fine-tuning the placement of Polaris to match the reference image on your screen.
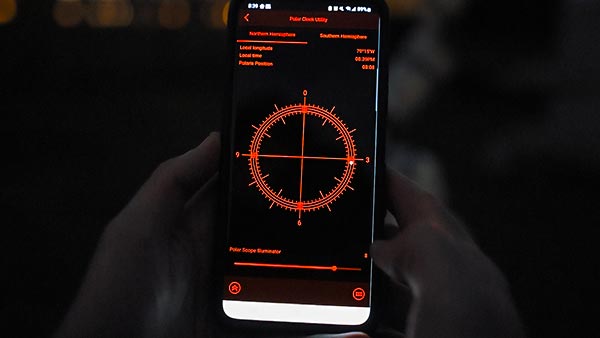
Polar Utility Check App
Once the tracker is polar aligned, it’s very important that you don’t move it or knock it out of position by kicking a tripod leg. If this happens, you’ll need to polar align again because accurate polar alignment is absolutely critical.
Focusing Your Camera
Thankfully, these objects are so bright and obvious, we can skip over some of the added time and frustration that comes with locating dimmer objects. But, if you need help locating any of these targets, a planetarium app is helpful.
I’ll start by pointing the camera and lens toward the Orion Nebula. This object has the added benefit of helping you find your initial focus by using any of the several bright stars within the field of view.
Orion has several bright stars in the field of view and I can use those to focus the lens while on target but this is not always the case. This is another reason why the Orion Nebula is such an approachable deep-sky target for beginners.
The process of focusing the lens can be a little finicky. The best advice I have for focusing on a star is to use the live view mode on your camera and then zoom in 10X.
When you rack focus back and forth, you may notice a purple fringe that turns green (chromatic aberration) as you go in and out. Try to find the sweet spot where as much of that color goes away. Use a piece of electrical tape to tape your position down and keep your lens from slipping out of focus.
If you’re having trouble finding your initial camera focus, you can use an even brighter star like Sirius, a bright planet, or even a distant street lamp.
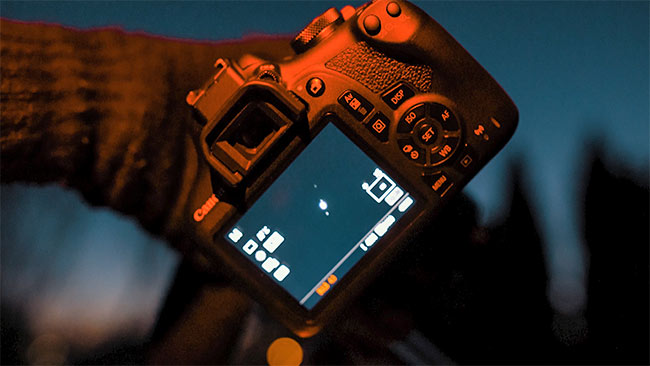
Using the planet Jupiter to help focus the camera lens.
Camera Settings
The camera settings I used are nothing special. A variation of these settings can be applied to nearly any deep-sky imaging session. However, if low-light photography is new to you, there are a few things to keep in mind.
Be sure you are using manual or bulb mode to tap into those longer exposures. This includes a low f-stop to gather more light and a higher ISO setting than you’re probably used to. For example, tonight I’ll take 90-second exposures using ISO 800, at F/5.6.
- File Type: RAW
- Camera Mode: Bulb
- White Balance: Daylight
- Aperture: F/5.6
- ISO: 800
- Shutter: 90-seconds
The type of lens you’re using might limit your f-stop setting. I could shoot at F/4 with this lens, but I know those stars will tighten up if I stop down, so I am willing to sacrifice a little light-gathering power.
You can try shooting wide-open with your lens, but you may find that it performs better 1 or 2 stops down. An ISO setting of 3200 is high, yes – but most of the noise we see in a single sub-exposure will cancel out after we stack the images.
My initial plan was to shoot at ISO 1600. I changed it to 800 due to the amount of light pollution in my backyard. It was too bright to capture 90-second sub-exposures without washing everything out. So you may have to see what works for your location.
Imaging Session
Once you’ve completed focusing your lens, take a test exposure to see how your target is framed. You’ll want to make sure your target is centered in the field of view.
During my session, Orion and the Pleiades were quite easy to line up in the center of my DSLR screen using live view but the Rosette was not.
The cluster of stars in this nebula was visible, but it was much fainter and less obvious than the other two targets. To manually center this target, I had to take a number of test exposures and star-hop over from recognizable patterns nearby.
If you have found the general area of the nebula, take a test exposure of 30 seconds to see if it shows up as a faint glow in the image. This can be a bit tedious, especially if you never end up finding the nebula at all.
This is something I’ve done before but if you’re new to this process, the Rosette may be too difficult to locate from a city sky.
Once you’re happy with the framing, you can set your remote shutter release cable to continuously take 90-second shots, with a 10-second break in between.
To make the image processing easier later, consider moving the position of your camera ever so slightly after every 5 sub-exposures or so. This can be done using the declination control knob on the Star Adventurer mount, and the RA motion buttons (up/down arrows) on the side of the tracker mount head itself.
It only needs to be a few pixels. Only a tiny, careful movement in both axis. These movements should be so subtle, that you haven’t even noticed that the image frame has changed at all on the display screen.
This is called dithering, and the more robust astro setups can automate this for you using an autoguiding setup. If you’re not comfortable with this yet, it’s not the end of the world but you may see some ‘walking noise’ in your final image.

In my case, since I was shooting all three targets in one night, I repeated the same settings and refocus for the next two targets.
My initial plan was to capture at least an hour on each target, which is enough to create an acceptable image.
However, if you’re going for a great image, this is considered a short amount of time. I wouldn’t advise shooting three targets in a single night, get as much time on a single object as you can.

I reviewed my sub-exposures in Adobe Bridge before stacking.
Image Stacking
I like to use Adobe Bridge to review my sub-exposure images because I can easily flip through each image, and zoom in on them to review the star quality.
You can also use Adobe Lightroom to review your RAW images, or whichever application you normally use to review your DSLR/Mirrorless images before editing.
Once you have finished imaging and have looked at the data, you may notice that some exposures are sharper than others. Don’t worry about this. We will stack the best 80% of the image exposures to ensure we’re only using the ‘good’ frames.
To improve the image quality, you can use autoguiding to ensure every frame is perfect, but that adds complexity and cost to the setup. For a portable setup like this, I would suggest mounting a small 30mm guide scope and guide camera, as this will add very little extra weight to your imaging payload.
I used DeepSkyStacker to score the best frames and stack all of the images together. The software assigns a score to each sub-frame based on star size and sky brightness, making it easy to identify the ‘bad apples’ in the bunch.
This is a free Windows-based stacking software that continues to deliver great results despite all of the great paid tools available.
I took 15 dark frames at the end of my session (with the lens cap on), which were the same length, ISO, and temperature as my light frames. Dark calibration frames (as well as bias and flat frames) make a monumental difference to your final image when used properly.
Image Processing
After you’re done stacking, you will have your master file(s) that are ready for adjustments in Photoshop (or whatever image processing software you use).
When it comes to deep-sky astrophotography, everyone has their own processing style. However, minimizing the star size, increasing saturation, and creating more separation between the object and the background sky, tend to be universally enjoyed.
I performed my image processing in Adobe Photoshop, and want to share a few key steps:
- Gradient Removal: if you’re dealing with gradients in the background sky, I recommend the Gradient Xterminator add-on. It does a great job at evening out the sky so we can focus on bringing out the colors in the image, such as the blue reflection nebula in the Pleiades.
- Reduce Star Size: you can easily reduce the size of the stars in your image which is a great way to make the deep-sky object stand out. The process involves making a careful selection of just the stars. In Photoshop, select color range, highlights, adjust the radius, and feather the mask. Then you can use the minimum filter select to ’roundness’ and apply it to all of the stars.
- Increase Saturation: you can also use a mask to select your deep-sky object, and increase the saturation. This way you aren’t bringing out any color noise from the background sky as well. The same mask will help you make curve stretches to the data too. It’s all about creating separation between the object and the sky.

Minimizing star size in Adobe Photoshop (watch the video tutorial).
I know this sounds like a lot to take in. So feel free to watch some of my previous image processing videos on my YouTube channel, go through my tutorials online, or get my Premium Image Processing Guide created for beginners.
The Results
Despite the limited integration, which was only about 30-40 minutes for each target, I think the data looks pretty darn good.
No filters, no camera modifications, not even a telescope – just a cheap DSLR camera and a decent lens with tracking.
Orion Nebula (26 x 90-seconds)
The Pleiades (30 x 90-seconds)
Rosette Nebula (25 x 90-seconds)
Final Thoughts
My goal for this post was to prove to you that incredible deep-sky astrophotography results are possible using basic equipment, but it all comes down to your approach.
I also wanted to give you a head start, by explaining why the 3 targets mentioned in this post offer your best chance at a successful image on your first night out.
Capturing 3 objects in one night was a little overall ambitious on my part, but I think the key points I was trying to make were illustrated. I urge you to give one of these 3 ‘easy’ astrophotography targets a try, and please let me know how you made out in the comments.
Until next time, clear skies!


watched the vid on youtube and have read the article thank you for taking the time to go through the process am in the middle of learning and thanks to your ch i have learned a lot still not confident to in my editing but am getting there
Hi!
I’m using a swsa and i can barely get 45s subs without trailing. lens is 135mm on an aps-c sensor.
what is the magic behind getting 90s clean shots? i mean apparently polaris sits dead on the spot on my polarscope, i don’t get it…
thanks a lot!
thank you for all the great photos you are creating, really enjoying watching all your videos.
Good article! Just what I needed………
Why use a separate intervalometer? Why not use the internal software of the SWSA 2i that will program dithering, shutter speed, time intervals between shots and number of frames?
Hi Trevor
Nice walkthrough for beginning astrophotography.
You might mention using the Right/Left buttons on the Star Adventurer to do the Dither moves.
I still like to use my SA for imaging with my 60Da and EOS Ra and camera lenses.
I hear you might be at the Texas Star Party.
Will try and look you up if I get lucky in the lottery drawing for onsite housing.
Take care
Hi – thank you for the great guide. I have noob question:
> but I know those stars will tighten up if I stop down
What do you mean by this? I understand the concept that you probably don’t want to use any piece of equipment at it’s extreme setting since that’s where things go wrong (otherwise the setting would be further out), but I’m confused by “tighten up”?