This Astrophotography Kit is Less Than $2K (and works amazing)
Astrophotography is about more than just the pictures you take, it’s about an overall positive experience along the way. I don’t like seeing people quit because they’re frustrated and confused. It doesn’t have to be that way.
When starting out, I think it’s important to choose a setup that is easy to use, and not overly complex. As you learn more about astrophotography, you can gradually upgrade your kit to include more advanced equipment.
In this post, I am going to break down an extremely practical and affordable astrophotography setup under $2000 that will allow you to take photos of stunning deep-sky objects in the night sky.
If you’re looking to build your first deep-sky astrophotography rig or you are looking for something a little more portable, I think you’ll find this post especially useful.
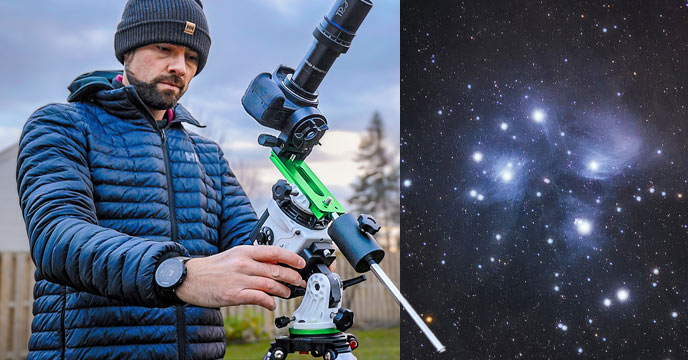
An Astrophotography Setup Under $2K
A starter DSLR and telescope kit like this is best suited for wide-field nebulae projects. Planets will be too small but large galaxies, like Andromeda and the Triangulum, are possible at this focal length.
The large APS-C sensor of the Canon T7 (in the astrophotography camera world) means that you can crop your images to frame your subject, while still maintaining a large, high-resolution photo.
So, what does this budget astrophotography setup include?
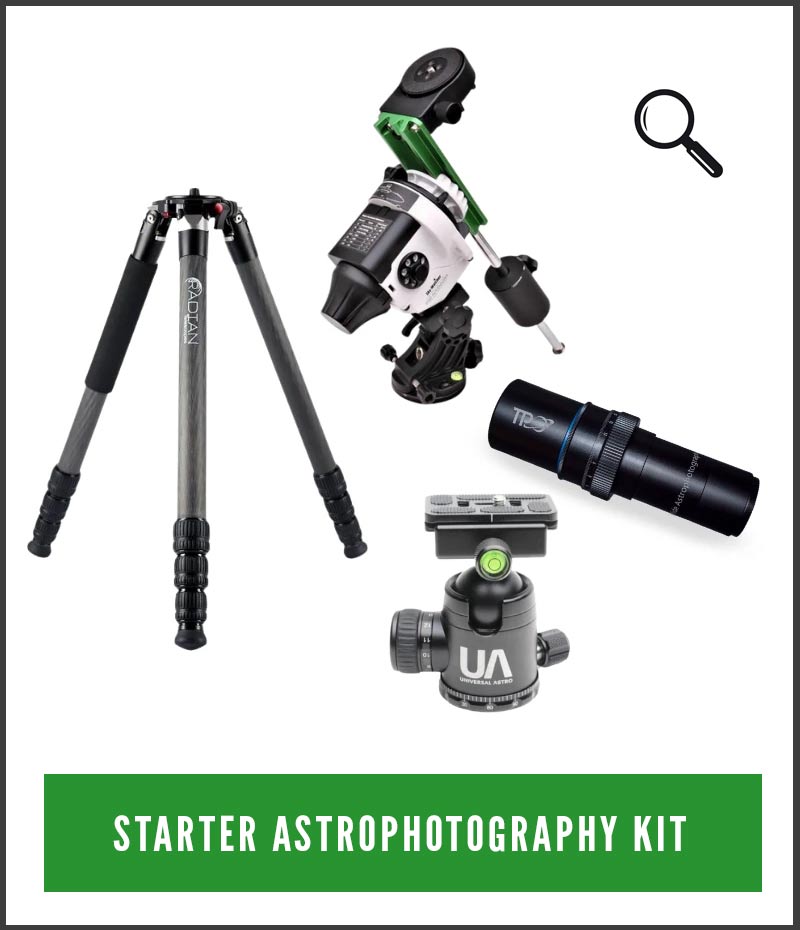
Astrophotography Bundle:
- Star Tracker: Sky-Watcher Star Adventurer
- Tripod: Radian Quick-Release Carbon Fiber
- Telescope: TPO Ultrawide 180
- DSLR Camera: Canon EOS Rebel T7
- T-Ring Adapter: Canon T-Ring
Optional:
- Dew Heater Strap: CooWoo Lens Heater
- Remote Shutter Release Cable: Canon Remote Shutter
Included below is a price breakdown, which includes the optional pieces of equipment, that you might wish to add to your setup.
| Equipment | Price |
|---|---|
| Sky-Watcher Star Adventurer 2i Pro Pack | $425 USD |
| Radian Quick-Release Carbon Fiber Tripod | $369 USD |
| TPO Ultrawide 180 f/4.5 Telescope/Lens | $399 USD |
| Canon Rebel T7 DSLR Camera | $449 USD |
| Canon T-ring Adaptor | $11.80 USD |
| Remote Shutter Release Cable | $19.99 USD |
| Dew Heater Strap | $22.99 USD |
| UA Canon Clip-in Light Pollution Filter | $140 USD |
| Total | $1,836.78 USD |

Wide-field Astrophotography Setup Under 2K
Sky-Watcher Star Adventurer
When I started, I was new to the idea of star trackers, and long exposure photography. The star tracker, or equatorial telescope mount, is the most important piece of your rig.
The Sky-Watcher Star Adventurer will allow you to consistently take sharp exposures of up to 3-minutes at focal lengths up to about 300mm. As the name suggests, it tracks the apparent motion of the night sky to freeze deep-sky objects in place.
I have been using the Star Adventurer for many years, and it is the star tracker behind some of my favorite photos. Feel free to watch my video review of this star tracker.
This tracker is easy to transport, polar align and operate, which some larger, more expensive mounts can’t say.
Although it’s very well made and reliable, it does have a few quirks. I am not a fan of the external clip-in light to aid with polar alignment and prefer to use my red headlamp instead.
The key to success with this tracker (and any equatorial mount) is to ensure that the mount has been accurately aligned with the celestial pole.
There are mobile apps to help you with polar alignment. Once you get it, it’ll take you only a minute or two to get it dialed in.
![]()
Use a mobile app to help you polar align the star tracker.
Balancing your setup is crucial, too. The Star Adventurer has a max payload capacity of 11 pounds, which is plenty for the TPO 180. Use the included counterweight on the pro pack to keep things stable, balanced, and secure.
Make sure everything is tight and secure. If anything is loose or dragging (check the counterweight bar, camera, remote shutter release cable), the balance of your setup will be compromised.
After that, it’s a matter of locating your intended object in space, choosing your camera settings, and letting the star tracker run. I love the simplicity and freedom of a portable deep-sky astrophotography kit like this.

Balancing the Sky-Watcher Star Adventurer
Locating Objects in the Night Sky
This is the stage where people can get lost. The sky is full of amazing (often dim) deep-sky wonders, but without a GoTo mount that knows where everything is, how are you supposed to find them?
I suggest using a planetarium software such as Stellarium to get a rough idea of where your desired target lies in the night sky. Point your telescope towards this region of the sky, using nearby stars as a point of reference.
Now, use your DSLR’s magical long-exposure night vision powers to reveal the dim objects in the sky. A 30-second exposure will reveal many more stars than your naked eye can see.
Depending on the magnitude of your deep-sky object, you should see a hint of it in a 30-second exposure (if it’s in the frame, of course). This is exactly how I find and frame all of my deep-sky projects when using a star tracker.
A wide-field telescope or camera lens makes this experience easier because you can capture ‘more sky’ in a single frame.
You only need to have a rough idea of the object’s location, and then you can take a couple of test exposures to fine-tune it from there.
Radian Carbon Fiber Tripod
Your tripod needs to be ultra-stable for the tracker to work properly. Even a small amount of wobble or shake will completely ruin a long exposure image of the night sky.
Once you’ve experienced a quality tripod that is easy to travel with and never lets you down, it’s hard to go back. In my opinion, a quality tripod is an investment in your hobby that pays you back tenfold.
There are cheaper options than this Radian Carbon Fiber quick-release model, but this is hands-down my all-time favorite. The quick-release plate is a lifesaver during polar alignment.
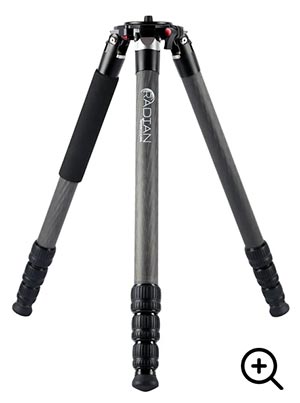
If you’re like me and skimped out on the quality of your tripod for a little too long, do yourself a favor and pick up the last tripod you’ll ever buy.
TPO UltraWide 180 F/4.5 Astrophotography Lens
The telescope (or lens) is a TPO 180 (TPO UltraWide 180 F/4.5 Astrophotography Lens) As the name suggests, it shoots a focal length of 180mm, at F/4.5. It’s tiny 40mm aperture does a surprisingly impressive job at collecting photons.
With a manual star tracker like the Star Adventurer, a wide-field optical instrument is your best friend. Not only does this make the tracking more forgiving, but it’s a lot easier to find deep-sky objects, too.
The 180mm is a great focal length for deep-sky imaging. It’s an ultra-wide field instrument, so most galaxies and planets are out of the question. But if you’re into rich starfields and beautiful sprawling nebulae, this is what you want.
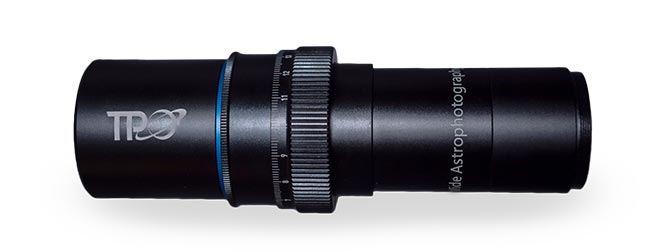
The helical focuser on the TPO 180 is really nice. It has the perfect amount of stiffness to it so you won’t accidentally knock the focus out of position. Camera lenses are generally much less forgiving in this department.
There’s a ‘sweet spot’ in terms of focus that will produce images free of chromatic aberration on the TPO 180, and it’s somewhere between green and purple. Take the time to focus on a bright star using your camera’s 10x live view and really dial it in.
If you don’t like this one, there is a growing amount of comparable scope/lenses available these days. Remember to keep the payload capacity of your star tracker in mind, you’ll want to keep it light.

North America Nebula (View Large Version on Flickr)
The “Entering into Space” YouTube channel posted an excellent TPO Ultrawide 180 review video, that helped me better understand this unique lens before I started using it. The video covers everything from using the TPO 180 lens as a guide scope to everything that is included in the box.
Canon Rebel T7 Camera
The camera I recommend is a basic DSLR, the Canon Rebel T7. It’s stock, it’s affordable, and it’s all you need to get started in astrophotography. There are many other affordable DSLR cameras to consider from brands like Nikon, Sony, and Pentax, but I personally shoot with Canon cameras exclusively.
As mentioned, this particular camera isn’t modified for astrophotography (i.e. it still has the stock IR cut filter), and going through the modification process is not something you need to do right away to enjoy astrophotography.
If you have your heart set on capturing emission nebulae, or any object with a strong signal in the hydrogen-alpha bandpass, a modification service is worth looking into. For more information about choosing a camera, see choosing a camera for astrophotography.
The Canon EOS Rebel T7 is an entry-level crop-sensor camera that is capable of incredible astro-images. If you’re serious about deep-sky, you’ll likely upgrade to a dedicated astronomy camera later on, but trust me, there will always be a reason to run this one as well.

Canon EOS Rebel T7 (stock).
If you already own a DSLR or mirrorless camera for daytime photography, you can certainly use it for astrophotography purposes too.
In this scenario, you have the advantage of already being comfortable with the camera’s controls and settings. For general information about camera settings for astrophotography, please read this article.
Putting it all together
You won’t have any trouble with the backspacing on this system. Simply attach the camera to the telescope using a standard t-ring, focus on a bright star (or a tree in the daytime), and dial back the helical focuser until you’re razor-sharp.
For the TPO to perform best from a color correction standpoint, you’ll need to really dial in the focus. One thing you can do, at least when starting out, is to stick to the brightest deep-sky objects in the night sky.
Bright objects will show up in your camera’s live view, as long as the ISO is cranked and your exposure time is set to 30-seconds or bulb.
The ultra dim targets are beautiful and exciting, but they will require much more overall exposure time, specialized filters, and maybe a darker sky.
You may also choose to add a light pollution filter to help deal with city light pollution.
If you’re a beginner astrophotographer starting out under a Bortle 4 sky or better -you have a massive advantage over most of us and you can basically forget about using a light pollution filter.

Universal Astro Light Pollution Filter.
When everything comes together, amazing deep-sky astrophotography projects are within your reach. If you’re looking for some great targets to try using a wide-field setup like this, check out: The Brightest Nebulae in the Night Sky.
The Result
I used the equipment mentioned above to shoot the beautifully bright Pleiades star cluster to show you what this setup is capable of.
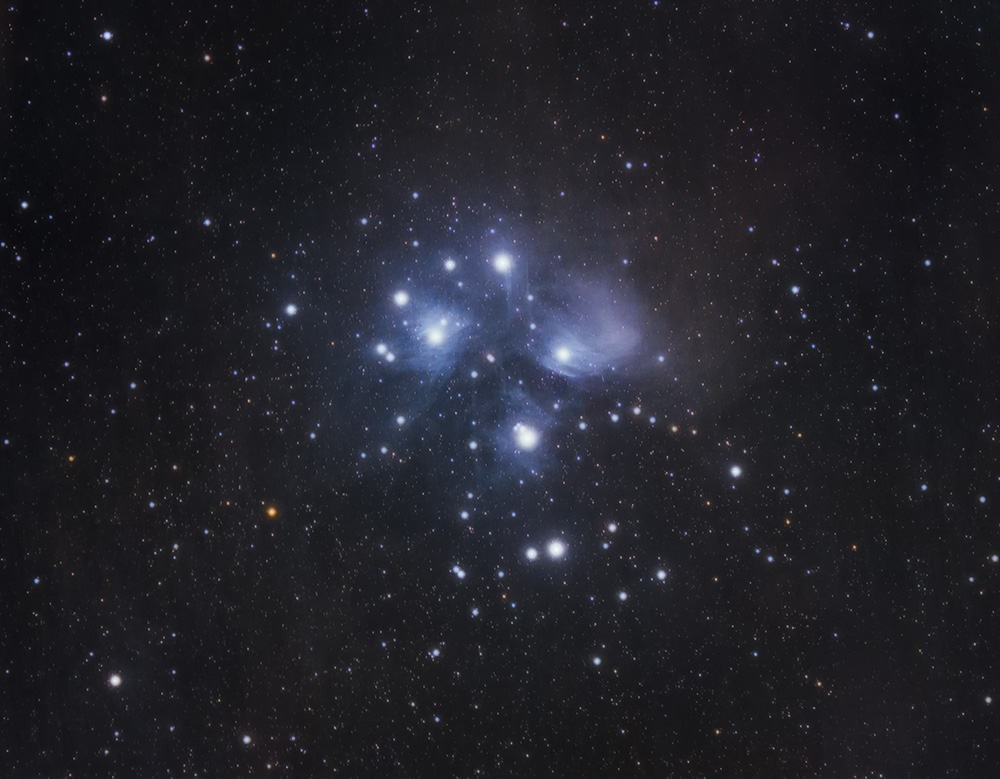
The Pleiades using the TPO
127 x 60-Seconds | ISO 800 | 2 hours, 7 minutes total
I chose this target because it has the advantage of being super bright and easy to find, and you will have multiple bright stars to focus your telescope on.
Since the stars are so bright, you may have to deal with reflections in your image processing but they’re not TOO much of a pain, depending on where they land.
If you want more information on how to handle reflections in post-processing, check out the section on this in my Image Processing Guide.
Final Thoughts
The practical and affordable setup discussed here in this post isn’t the only way to go about this but it’s about as good as any example I can provide to someone looking to get started in deep-sky astrophotography. This is the exact setup I would have approached my 26-year old self about.
This is the type of kit you can learn on and get some incredible results. You won’t hit a wall of frustration that makes you want to give up astrophotography for good, because it focuses on the fundamentals of deep-sky imaging. There is no way around it.
If you don’t take care of the fundamentals like polar alignment, you’re in for a rough go on any system.
This kit is just so painless and straightforward that I trust it to not ruin your first astrophotography experience.
So get that tracker polar aligned, the telescope focused, and point it towards that beautiful hazy patch of stars in Taurus. You may be surprised by the results.
Could you use the TPO on an existing mount like a CGEMII? Or is that just way more complicated to polar align?
Yes! You can use the TPO 180 on any existing tracker/equatorial mount you have. I believe that mount has a built-in polar scope to make things easier.
this is a great article and another example of your support to individuals and astrophotography as a whole
keep on keeping on dude
your efforts and time are really appreciated
🙂
I have you and that aussie to thank for my fortunate leap imto that rabbit hole called astrophotography. I spent a full year watching your videos from 6 pm till 2 am nightly, while living in a motel room while working out of town in Cranbrook. Covid made sure of that. I bought my first scope, celestron 6se, after about a year and a half after discovering your work and videos. I then had to wait for Saskatchewans chilly minus 40 winter to be over before I could actually spend some quality time in the field. Although I did brave a few fruitless, frustrating, yet wondrously inspiring nights out when it warmed up to minus 25. Now, almost exactly a year after arriving home, I finally have most of my rig complete. Still using the goto mount the OTA came with but it works for now. I think. I still haven’t gotten a chance to take it out. Not because of the cold, it’s been a worrying 0 degrees roughly, but because of cloud cover. Not sure how to proceed due to the fact that I have no guide scope for the orion auto guide system. I’d have to use it through th eyepiece where I would have my pentax dslr connected. I wouldn’t be able to utilize both at same time like that, or would I? With the goto mount, I wouldn’t be able to do any long exposure imaging either, right? I would have to have an equatorial mount for that, I believe.
I have had zero experience in life with photography and astronomy with no transferable skills from my career as a tradesman for the past quarter century, so this has been an overwhelmingly awesome and frustrating venture for me. Just my passion for reading sci-fi fiction has kept me trucking along. Thank goodness for you and Dylan, or I would be a lost little puppy still. The wealth of information and the motivation you two have instilled in me through your YouTube videos, websites, and tutorials, has been first rate. Know that I have shook your hand and said thank you to you over 50 times by now, if you were in Regina with me. Saskatchewan is an empty province compared to your home or BC or Alberta so hav next to no light pollution. We even have two dark sky preserves. One being largest in North America and third largest in the world, or so I’ve read. That knowledge makes me want to learn all I can so I am able to reap the rewards such a night sky has to offer. Hopefully in a few years, you will know my name and recognize my work as well. Hopefully you will bless us with an appearance at next year’s summer star party at Cypress Hills in August so I can thank you personally for changing my life through your work. Until then I hope this novel I just wrote, conveys the appreciation I have for the countless hours you have unknowingly mentored and taught me.
I am currently using the Canon T7, but I am having trouble with the blur caused by the mirror slap. Aside from holding something dark in front of the lens for the first second of exposures, is there something else I can do to prevent this?
I have a stock Canon 60d. With my limited budget I’m stuck between 55-250mm, 75-300mm and TPO 180. Which of these can produce better images?
Hey Trevor,
nice article Trevor, I have one question tho. I want to start astrophotography but with a better camera then the T7. I was looking at the Sony A7 II, the Canon Eos RP, 6D MKII and the 7D MKII. there are so many articles on forums but it’s a little overwhelming. What do you recommend?
For the frugal aspiring astrophotographer, putting together a fully guided and nearly fully automated kit should be within reach of about $2500. It took me several months of perusing classifieds to put together my kit consisting of a William Optics Z61 (with dovetail and guidescope receiver upgrades), flat61a, SkyWatcher AZ-GTi (set up in EQ mode) with WO wedge, ZWO ASI533MC Pro, ZWO Mini Guidescope, ZWO 120mm Mini camera, ZWO ASIAIR Pro, Optolong L-Pro and L-Extreme filters (1.25″), dew strap, and power adapters for about $2500. The only thing I don’t have for a fully automated rig is the ZWO EAF.
When I first tried astrophotography years ago I was continuously frustrated with trying to find and frame objects, and with the noise, especially during warmer months. The ASIAIR Pro is my favorite piece of gear hands down. While I think it’s absolutely great when people want to start with a manual setup, I’m 40 years old with 3 kids and the ability to set up, polar align, focus, plate solve, go to and guide allows me to enjoy this wonderful hobby and I think it could be very useful to any beginners who are frustrated with trying to find and frame object. A little more money can go a long way if one is willing to put in the time to find the gear at a good price and take the time to learn how to use it properly – it’s also a very portable kit.
Hi Trevor. Hope all is well. I’m sure you’re aware of the “go to” alignment part of the ASIAIR pro/plus where it uses plate solving to move the mount until the target is in the middle of the frame. Really amazing. Seems like no other alignment is necessary. I’ve used it with my 100mm refractor, but I’m wondering if you’ve used it with a much longer focal length like the 11 EdgeHD and if it works as well. I’m thinking of adding the 11 to my stock if I can find one.
Thanks,
Michael
Thank you very much for the tips. One question: should I go for the TPO lens or the Rokinon 135mm f/2 lens? I have heard great reviews for this lens for astrophotography. Greetings from Guatemala!
Hi Trevor, YOUR videos are the reason I finally bit the bullet and started along this stellar hobby.
I have gone down a similar, but different route and gone for the Skywatcher AZ -GTi with an EQ Wedge and updated firmware. My issues are finding are finding a dovetail plate to mount my DSLR to the DEC clamp (without the weight of the camera plus lens slightly unscrewing itself in RA) and finding a way to polar align (polecam is out of financial range). I would love any suggestions. With clouds, rain and more clouds spending a lot of time tweaking the new kit. (and watching more of your videos, or reading your blog) I would love to see if you could do a review of this in the future. Greetings from UK
I am new to Astrophotography. Looking for advice.
I am a sony A7III user and have 70-350mm crop sensor lens f5.6
1. can I use the TPO 180 with sony A7III, if yes what will have to get to connect this to the camera?
2. How is it better than the lens that I have? Sony 70-350mm lens has greater reach and glass is 670mm, whereas TPO has front glass 180mm.
will I still get a better picture with TPO?
Can I use T8i instead of T7? Already have access to T8i.. this way all I need is that $1200 kit from OPT
Yes – the T8i is actually a much better option with the flip-out screen. That’s an excellent camera for astrophotography!
One more question.
Radian Carbon Fiber Tripod Is out of stock everywhere.. any other recommendation? Maybe cheaper but reliable?