Attach Your Camera to a Telescope
It’s as simple as this: if you want to take pictures through your telescope, you need to properly attach your camera to it. Learning how to attach your camera to a telescope is one of the first steps needed to enter the world of astrophotography.
Whether you plan to photograph the planets using the eyepiece projection method or to take deep-sky images of galaxies and nebulae in space using a prime-focus adapter, attaching your camera to the telescope must be accomplished first.

Attaching a DSLR camera (with an internal filter) to a refractor telescope.
There are many astrophotography cameras available, but this article focuses on connecting a DSLR or mirrorless camera to a telescope. A DSLR/mirrorless camera is an excellent way to start capturing deep sky astrophotography images of galaxies, nebulae, and star clusters from home.

Only want quick photos? A phone adapter on a telescope eyepiece works, but if you want stacked, noise-free images with almost no setup, consider a smart telescope.
How to Attach Your Camera to a Telescope
Once you have learned the basics of using your telescope, you can explore the world of astrophotography by directly attaching your camera to the telescope.
A DSLR (or mirrorless) camera can be attached to your telescope using a T-Ring that locks onto the camera body like a lens and an adapter that threads onto the T-Ring. The prime-focus adapter is inserted into the focus tube of the telescope just like an eyepiece.
The T-Ring must match the lens mount design of your camera so that it can properly lock onto it. Then, a threaded adapter can be fastened to your camera and T-Ring with either a 1.25″ or 2″ barrel (nose-piece).
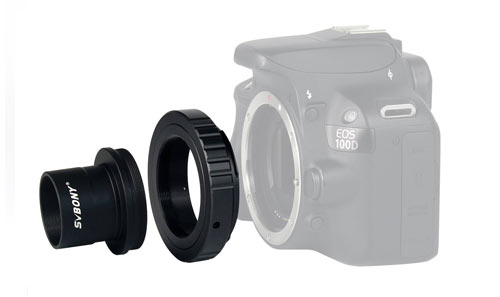
A T-Ring and 1.25″ Adapter for Canon EOS Standard EF Lens Mounts.
The adapter must be locked into place inside the telescope focus drawtube to avoid any camera shake or movement. The eyepiece opening of your telescope should have locking screws that were designed to hold your eyepiece or camera in place.
Make sure that your camera is securely fastened to the focus tube. The last thing you would want is for it to fall out when your telescope is pointed upwards. The heavier your camera and accessories (imaging payload), the more demand it will put on your focuser draw tube.

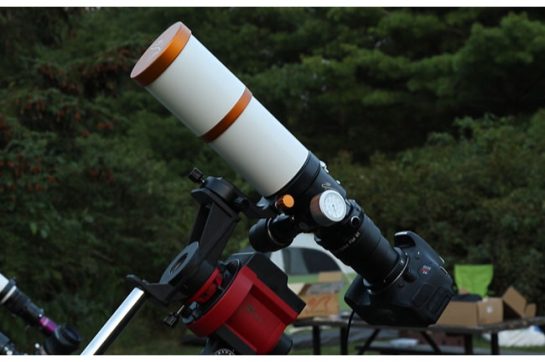
My Canon EOS R6 camera attached to an Askar SQA55 telescope.
Some telescope designs (especially ones designed for astrophotography) allow you to thread the camera directly to the telescope using your T-Ring. This is the optimal configuration for deep-sky astrophotography, as it offers the highest level of security.
If you want to capture deep-sky astrophotography images, you’ll want to use the prime-focus method, which does not use an eyepiece or Barlow lens in front of the camera. Yes, this means that you will be using your telescope’s fixed native focal length (magnification) to photograph all objects.
The eyepiece projection method is best for higher magnification photography of smaller targets, such as the planets or the Moon. This method involves placing an eyepiece between the camera body and the telescope using an adapter tube (eyepiece projection adapter).

An eyepiece projection adapter for high magnification views of solar system objects.
It is common for amateur astrophotographers to thread the camera and T-Ring directly to a dedicated field flattener or reducer. This accessory was designed to “flatten” the field of view from the telescope or reduce the magnification.
This accessory has additional glass optical elements inside to complement the design of a refractor telescope. A flattener/reducer usually has a diameter of 2″ and can be inserted into the eyepiece opening of the focuser drawtube.
| Camera mount | T-ring to buy | Common thread | Notes |
|---|---|---|---|
| Canon RF | Canon RF T-ring | M48 (2″) or T-2 (M42) | M48 helps reduce vignetting on full-frame. |
| Nikon Z | Nikon Z T-ring | M48 or T-2 | Short flange distance often makes focus easier. |
| Sony E | Sony E-mount T-ring | M48 or T-2 | Prefer M48 for full-frame sensors. |
| Micro Four Thirds | MFT T-ring | T-2 (M42) is common | Great reach from smaller sensor crop. |
Step-by-Step Instructions
- Remove the camera lens and attach the correct T-ring.
- Thread a 1.25″/2″ prime-focus adapter (or field flattener) to the T-ring.
- Insert the adapter in the focuser and lock the thumbscrews firmly.
- Focus on a bright star using live view (use a Bahtinov mask if you have one).
- Start with 5–20 s test exposures; save RAW and review star shapes.

Here are some T-Ring adapters for popular DSLR and Mirrorless cameras:
- Celestron T-Ring for 35mm Canon EOS Cameras
- SVBONY T2 T-Ring and 1.25″ Adapter for Canon EOS Cameras
- Astromania T-Ring and M42 to 1.25″ Telescope Adapter for Nikon DSLR’s
- Gosky Metal 1.25″ Telescope Camera Adapter and Nikon T2 T-Ring
- Celestron SONY E-Mount T-Ring

Make sure to get the right T-ring and Adapter for your specific camera body.
Once your camera is attached, you can utilize your telescope’s native focal length instead of a camera lens. So, if your telescope has a focal length of 800mm, it will now act like an 800mm camera lens for astrophotography.
If you are trying to figure out the exact magnification you can expect with your camera and telescope, remember to include the 1.6X crop factor that comes into play when using an APS-C-sized sensor. Full-frame DSLR cameras will utilize the full focal length of your telescope.
When you are ready to take pictures with your camera attached to the telescope, using a remote shutter release cable is useful. This accessory allows you to capture images without touching the camera and even set a sequence of images to fire off independently. (this is the one I use).
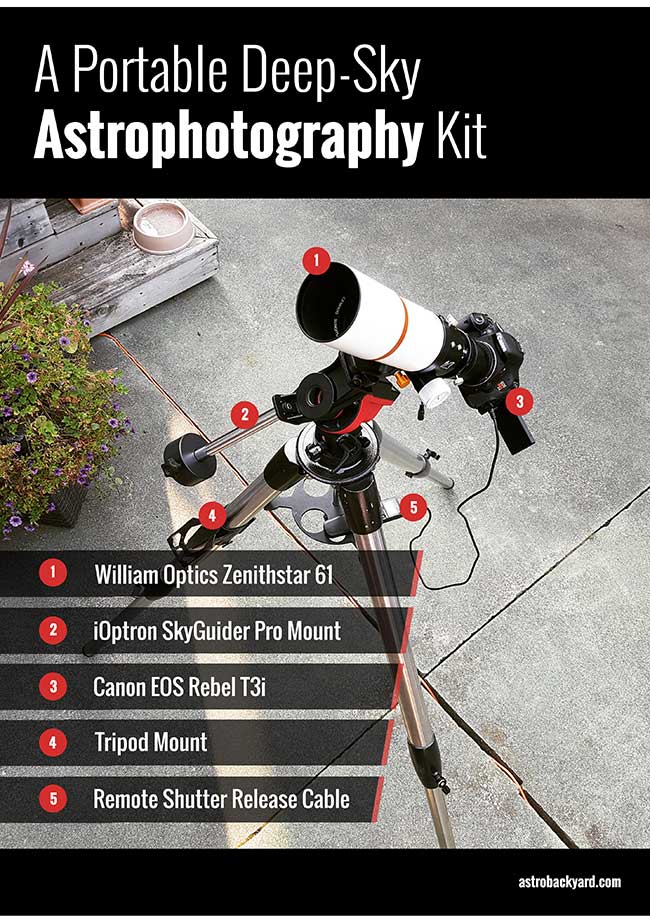
A basic deep-sky astrophotography setup using a William Optics Z61 telescope and DSLR camera.
Backfocus basics: If you use a field flattener or reducer, most call for 55mm sensor spacing from the back of the corrector.
Can’t reach focus? Try this:
- Remove the diagonal (go straight into the focuser).
- Need more in-focus: use a low-profile adapter. Need more out-focus: add a short extension tube.
- For planets, a 2× Barlow can help reach focus and add scale.
- Mirrorless bodies often have more focus travel than DSLRs—use that to your advantage.
Where to Put Camera Filters
Unlike in daytime photography, where filters are often threaded to the objective of the camera lens, in astronomy, filters are placed at the base of the telescope. You have a few convenient options for using a filter with your camera and telescope.
- Clip-in filters that sit inside the camera body
- Internal threaded filters that sit inside your camera adapter
Clip-in-style filters like the one shown below are useful when using your camera with either a telescope or camera lens. They completely cover the camera sensor of your DSLR while allowing a T-Ring adapter or camera lens to be mounted in front.

Using a clip-in filter with a DSLR camera for astrophotography.
A 2″ (48mm) thread filter is another great option. These filters can be fastened to a number of places in front of your camera. One benefit of 48mm round-mounted filters over the clip-in style is the option of using them with any camera you own, not just a particular DSLR camera body.
I often thread a 2″ light pollution filter to the end of my field flattener/reducer or adapter. Some flatteners, such as the Flat73, include a spot inside to screw in the filter.

A 48mm light pollution filter threaded to the inside of my 2″ field flattener.
You do not need to use a filter to capture astrophotography images using a camera and telescope, but they certainly help when taking pictures in areas of heavy light pollution. For example, I captured the following images from my Bortle Scale Class 8 backyard sky using an Optolong L-Pro filter with a Canon EOS 5D Mark II DSLR.
When taking images from the city, it does not take long to overexpose your images due to the extreme glow of artificial lights.

The Pleiades star cluster captured using a 48mm light pollution filter inside of the camera adapter.
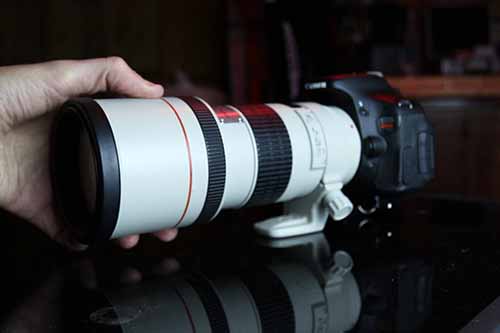
You may wonder why anyone would attach their camera to a telescope in the first place. If you already own a telephoto lens with a focal length of 300mm or more, you may want to use it for astrophotography before attempting to connect it to a telescope.
Deep sky astrophotography requires that you take long exposure images of the night sky. To accomplish this, you will need to use a computerized equatorial mount that matches the apparent rotation of the night sky.
A telescope is constructed differently than a camera lens. Besides the lack of autofocus and image stabilization (features that are rarely used in astrophotography), there are a few advantages and disadvantages between them.
Advantages of using a Telescope over a Camera Lens
This conversation often creates a lengthy debate about which optical instrument is best for astrophotography. In reality, both telescopes and camera lenses have their place in astrophotography. There are strengths and weaknesses to both options.
- Longer focal lengths (magnification) at an affordable price
- Dedicated precision focusers designed to focus on stars
- Include dovetail mounting rails for a wide variety of telescope mounts
- Convenient mounting options for a guide scope (autoguiding) and accessories
- Designed for astrophotography (internal baffles, dew shields, etc.)
Advantages of Using a Camera Lens over a Telescope
- Attach directly to your DSLR camera body without additional adapters
- High-quality lens construction and design
- Lenses available with extremely fast optics of F/4 and below
- Compact, lightweight, and portable construction
Summary
If you wish to capture images of the Moon, the solar system, or deep-sky objects, it’s worth taking the time to understand how to attach your camera to a telescope. A telescope is a fantastic optical instrument for photography and can provide you with a lifetime of enjoyment and opportunity.
Connecting your camera to a telescope is often the first step towards your first jaw-dropping image of a deep-sky nebula or galaxy, which is why I find this stage of the process so exciting. I hope this guide has given you a better understanding of what is needed for astrophotography and that you continue your progress one step at a time.