Astrophotography Image Processing in Photoshop
Below you’ll find my deep sky astrophotography image processing workflow. This tutorial is a handy reference for those who wish to process deep sky images captured with a DSLR camera and telescope.
This step-by-step process takes an RGB (color) image from the initial capture to the final processing stages to enhance color, detail, and clarity.
I believe that is important to develop a workflow that both compliments your imaging style and is an enjoyable process. My advice is to develop a system that works consistently and stick with it.
The order of the processing steps will evolve over time as you begin to see where each action falls into place. The best part is, you can always come back to your raw data and try out new techniques you have learned.
Related: Download my Premium Image Processing Guide
Before we get started
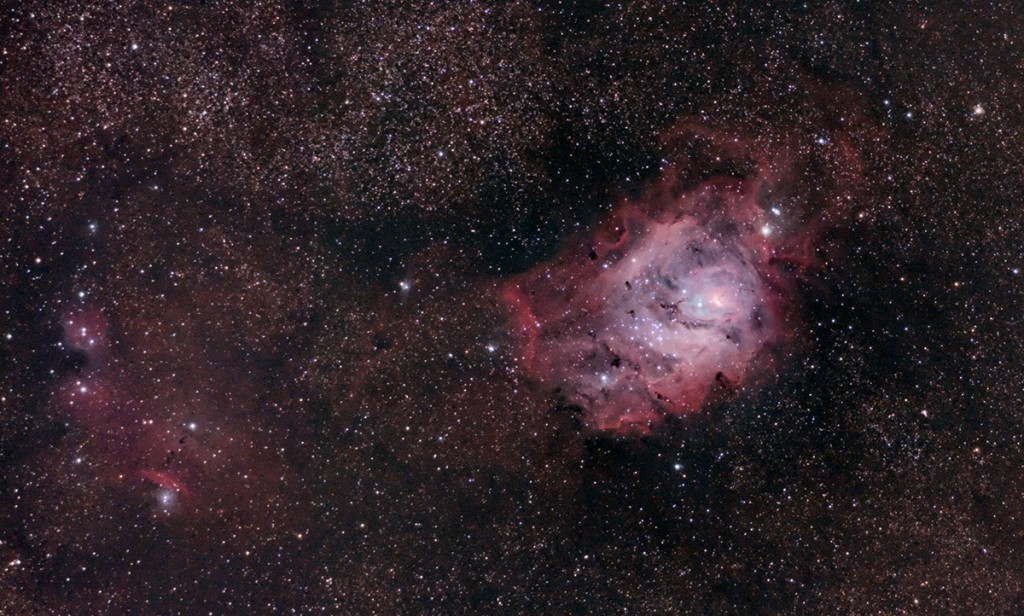
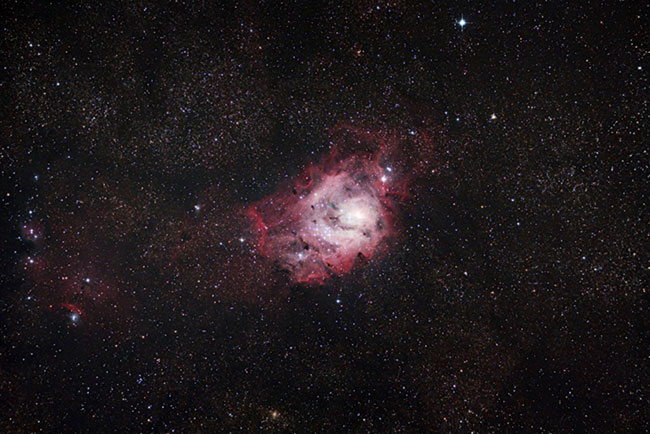
The image used in this tutorial is of the Lagoon Nebula taken using a Canon DSLR camera through an Explore Scientific ED80 telescope. This is a typical beginner deep-sky setup that includes a tracking equatorial mount to compensate for the rotation of the Earth.
If you are interested in seeing an example of the imaging equipment I use for deep sky astrophotography, have a look at this video: What do you need for deep sky astrophotography?

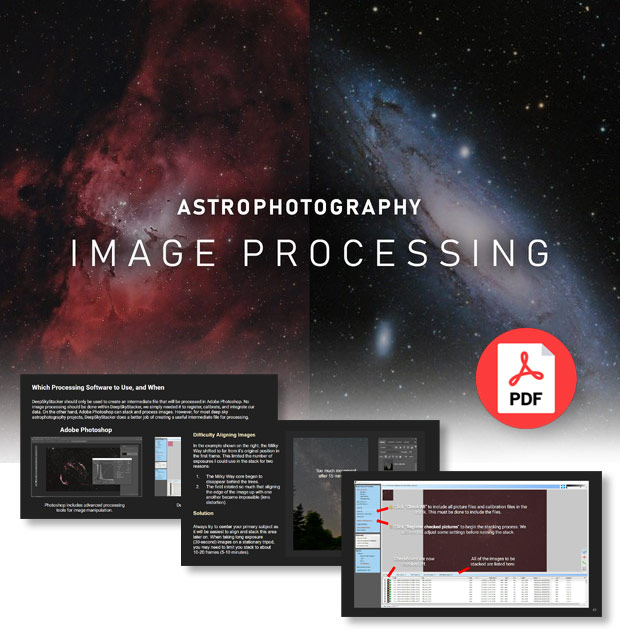
There are a number of choices when it comes to image processing, but my personal favorite route to take is Adobe Photoshop. This application is well equipped with all of the tools and actions needed to produce an incredible deep-sky astrophoto.
While others may prefer to use other tools for image processing such as StarTools or PixInsight, Photoshop continues to be my personal favorite for everything astrophotography.
I use some additional plugins and filters that help me process my astrophotography images, including the Astronomy Tools Action Set. I will outline the order I run these actions below.
Related Article: Image Processing Sofware for Astrophotography
Software Used in this Tutorial:
- BackyardEOS
- Adobe Bridge
- DeepSkyStacker
- Adobe Photoshop
- Astronomy Tools Action Set
- Gradient Xterminator
The complete list of software I use for astrophotography image processing can be found on the Resources page in the main menu.
What if I don’t have an action set or plugins?
This tutorial is still of value to those of you using only DeepSkyStacker and an earlier version of Photoshop. Many of the actions can be accomplished manually in a series of steps.
I have highlighted the workaround methods for certain actions such as the star minimizer technique and gradient removal without using Gradient Xterminator.
I highly recommend investing in the Astronomy Tools Action set. I purchased this action set many years ago and continue to find it very useful for all of my astrophotography projects.
Astrophotography Image Processing (Video version)
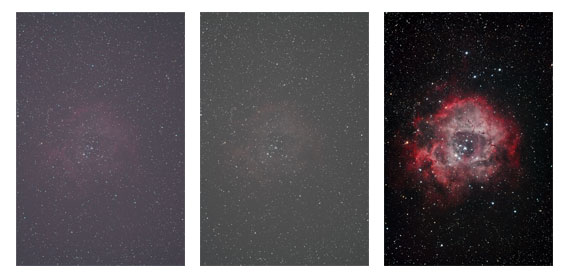
If you prefer to follow along with a video, you can do so below. The deep sky object is the Rosette Nebula, but the processing steps used to mirror the step-by-step guide below.
I take the unprocessed RAW image file through a series of adjustments and actions to bring out the full color and beauty of the Rosette Nebula.
Download: Unprocessed RAW astrophoto
Step by Step Image Processing Tutorial
If you prefer a step-by-step guide to my techniques, you can follow along with the astrophotography tutorial on the Lagoon Nebula below. The techniques used can be applied to many deep-sky objects but will work best on wide-field nebulae like the one in this tutorial.
The process involves stacking multiple images of your deep-sky object together and processing the high-resolution .TIF file created by DeepSkyStacker. The more exposures you have captured on your target, the better your signal-to-noise ratio will be.
Those of us who shoot in a light-polluted city backyard can compensate for a washed-out sky by collecting hours and hours worth of data. Support files such as darks, flats and bias frames also play a large role in correcting the data.
Our Subject: The Lagoon Nebula
 To start, I’ll cover the basics of stacking your light and dark frames in DeepSkyStacker to improve the signal-to-noise ratio of your final image.
Then, we can bring the stacked image into Adobe Photoshop for further image processing.
Assessing Your Data
To start, you will need enough signal on your deep-sky object to create a quality astrophoto. A healthy amount of signal (light) provides you with good data to work with. In the beginning, just focus on collecting as much exposure time as possible on each project.
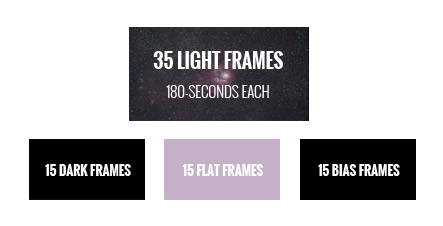
You’ll have an easier time working with your data during the image processing stage if you stick to the following basic sequence. The example sequence uses light frames captured using a DSLR camera:
Example Imaging Sequence and Camera Settings:
- Image Quality: RAW
- Exposure Length: 3-minutes
- Light Frames: 35
- Dark Frames: 15
- Flat Frames: 15
- Bias Frames: 15
- ISO: 800
- White Balance: Daylight
The exposure length and ISO can be increased, but this is a good benchmark to follow. From a typical backyard in the city, the more overall exposure you’ve collected, the better.
It takes a lot of data before the signal-to-noise ratio reaches a point where you receive a limited return on your time investment (I’ve never got there)!
Centering the target in the field is important, so take the time to orient your camera and telescope properly during acquisition. This will help avoid situations such as cutting off portions of the target and losing details do to vignetting or gradients.
In this tutorial, I’ll use the best 17 frames I photographed of the Lagoon Nebula back in June of 2013. The exposures were captured using a Canon DSLR camera, and are 5 minutes each @ ISO 1600. The software I use to view and organize my raw photo files is Adobe Bridge.
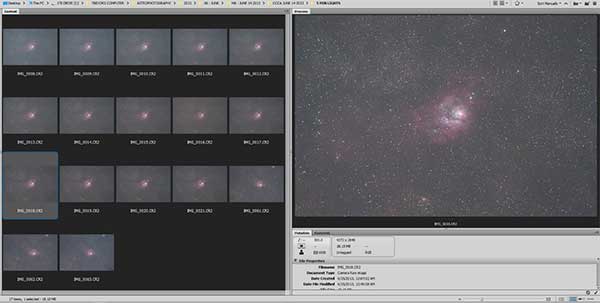
Assessing RAW image files captured with a DSLR in Adobe Bridge
The images were captured using a small refractor telescope, which is great for wide-field subjects such as the Lagoon Nebula. If you are new to the hobby, I can’t stress enough how versatile a compact, wide-field refractor telescope is for deep sky astrophotography.
5-minute, guided exposures on a modest equatorial mount that has been properly polar aligned are easily achievable. Learn more about the importance of your astrophotography mount.
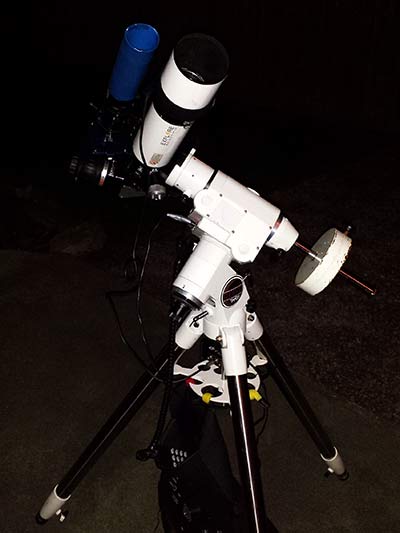
My Explore Scientific ED80 Telescope on a Tracking Mount
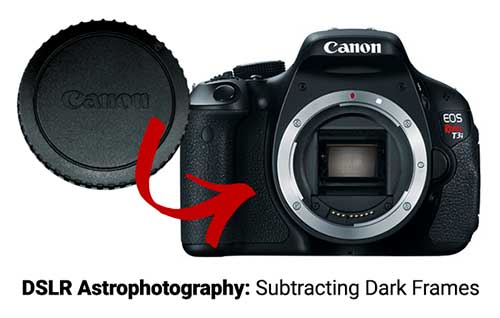
Subtracting Dark Frames
To help create a smooth image with an adequate signal-to-noise ratio, I took dark frames of the same exposure length and temperature, with the lens cap on. This is a very important step in my stacking process, and it does a great job of removing much of the noise in my images taken using such a high ISO.
Dark frames must be the same length as your “light” frames (the actual photos of the object), and they also must be the same temperature. I usually do this while I am tearing down my imaging equipment at the end of the night. I have seen the best results when I take 10-15 dark frames.
Keep your RAW image files organized
It is important to keep all of your RAW files in order. With so much time and effort put into collecting good data, it would be a shame to lose any frames because your files are unorganized. It also makes the stacking process much faster and easier when you have taken the time to create separate folders and name your work.
For each imaging session, I start with a folder with the target name. The folder structure includes the date, followed by separate folders for light, dark, bias and flat frames.
Stacking Images in DeepSkyStacker
I use DeepSkyStacker to register (align) and stack my astrophotos to improve the signal to noise ratio. The stacking process can also take place in Photoshop, but I prefer to use DSS based on my previous experiences using the “load files into stack” script in Photoshop.
If you don’t know how to use DeepSkyStacker to register your images, have a look at the DeepSkyStacker tutorial I have put together. This is an essential first step for any deep-sky image processing workflow.
After opening DeepSkyStacker, select Open Picture Files, and locate all your folder of light frames, which in my case was 17 X 5-minute subs of the Lagoon nebula. Once they have populated the area in the bottom half of the screen, you can then select dark files… and open up your 10-15 dark frames. They will be added to your list of stacked image files.
Use the same process to load in your flat frames and bias frames, if you’ve taken them. If all of the recommended support files have been applied in DeepSkyStacker, the notification bar in the Register Settings dialog box will turn green.
Click Check all, followed by “Register checked pictures”, and you should see the Register Settings dialog box appear on your screen like the one below. Make sure that the box next to Stack after registering is checked off.
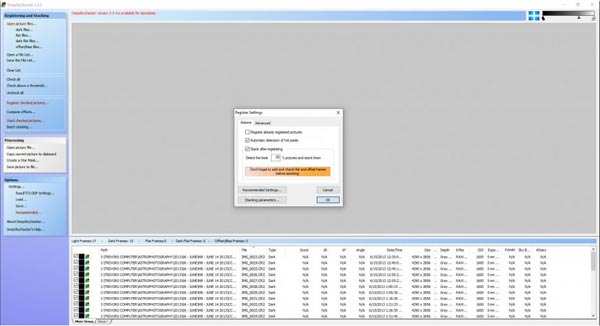
You can see your total number of light, dark, flat and bias frames listed above the stacking list. In this case, I have 17 light frames and 15 dark frames. I have not used any bias or flat frames for this project.
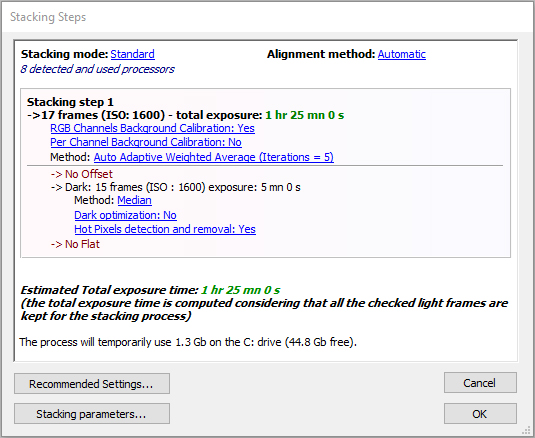
My settings in the Action Tab are to Select the best 75% pictures and stack them. Hit OK in the dialog box, which brings up the Stacking Steps dialog box.
This will show you the estimated total exposure time, which for me is 1 hour and 25 minutes. You can review the details of my stacking steps in the graphic below.
After hitting OK, you may want to go grab a coffee. The process of registering and stacking your photos can take up 10-minutes, depending on the comp
Stacked Master File
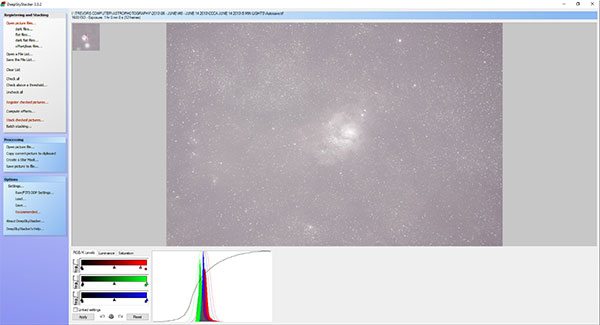
Once finished, DeepSkyStacker will create a 32-bit stacked master file, and autosaves it to the directory containing your light frames. In fact, the file it produces is by default named Autosave.tif.
This is the file we will be opening up in Adobe Photoshop for further processing. A preview of your registered and stacked image will display in Deep Sky Stacker when the process is complete.
The details of your final image are displayed in the top left corner of the screen including ISO, Exposure and the location of the created .tif file on your computer. My image ended up being exactly 1 hour of total exposure.
I do not make any adjustments to the image within DSS itself, everything from this point on happens in Photoshop.
Processing the RGB (color) image
Now the real fun begins as we find our Autosave.tif file in our light frame folder, and open it up in Photoshop. It will look very similar the preview you just saw in DeepSkyStacker. There are many ways we can bring out the true beauty of this deep-sky treasure.
When it comes to the way an astrophotography image “should” look, everyone will have their own opinion. However, I think we can all agree on this universal goal: Increase the color, detail and clarity of the image in a natural way.
What might look good on Friday, looks like a complete mess by Sunday. Rest assured, it’s part of the process. Every astrophotographer does the same thing. Just have fun!
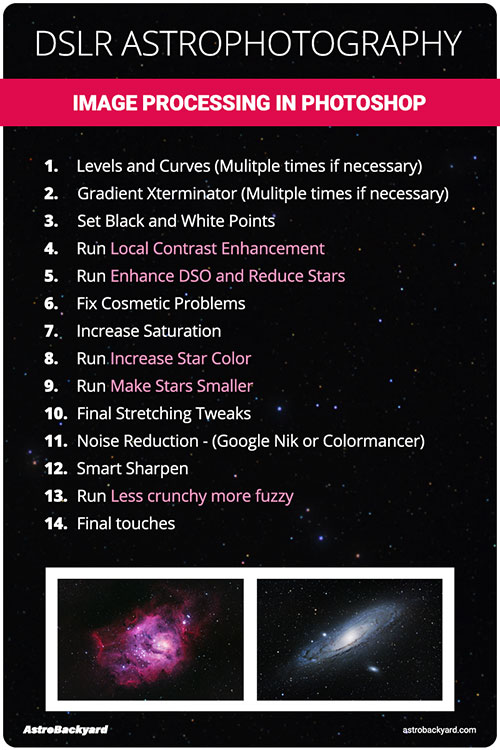
Image Processing in Photoshop: Step by Step
Now on to the fun part of this astrophotography tutorial, the processing. Using the 9 steps below, I will show you how to turn your dull original file into a colorful cosmic work of art.
Before we get started, I should note that the order of the processing actions you take can have a substantial effect on your results. The image processing reference graphic below outlines the order I take when using Adobe Photoshop.
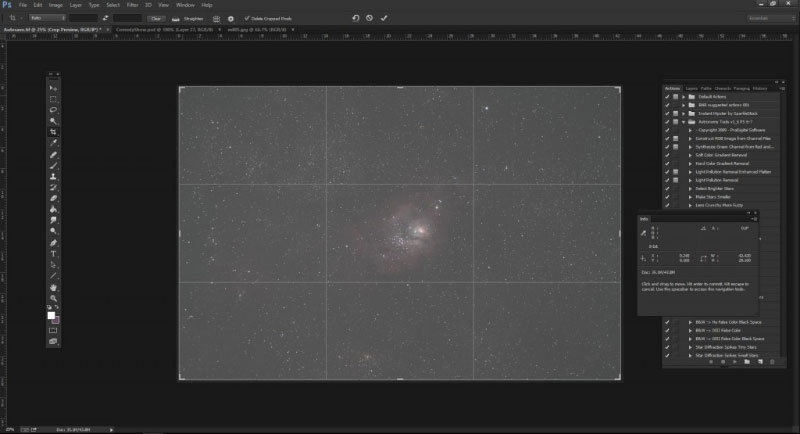
Step 1: Crop
The very first task I must perform to each of my images is a slight crop. I do this to trim away the edges of the image where any stacking and registering artifacts may have occurred. This is why framing your target in the center of the image is so important, you do not want to be cutting into any of your precious data. The crop tool in Photoshop handles this tasks with ease.
Drag the bounding box to your desired size, and hit enter to trim away the very edges of your frame.
Step 2: Removing the Gradient
There are several ways to accomplish this task, and every astrophotographer will tell you their way is the best. I prefer the ease and simplicity of a handy Photoshop plugin known as Gradient Xterminator. Once installed, this life-saver performs all of the in-between steps for you with the click of a mouse.
First, I select the areas of the frame affected by vignetting with the lasso tool, and then I run the RC-Astro Gradient Xterminator plugin with the settings seen below:
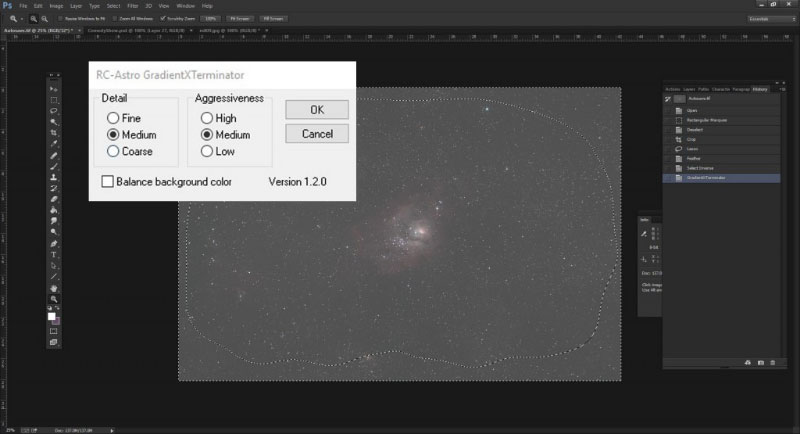
Some experimentation with the exact areas that have the vignetting issues may have to take place. Notice that I did not select the Balance background color option. Hit OK when you are ready to get rid of those nasty dark edges of your photo. I will say, that this example has little to no vignetting or gradient issues because this photo was taken under dark skies.
Any image I take from my backyard suffers from heavy vignetting and gradient issues, which take some time to get rid of.
Related Post: How to remove gradients without using the Gradient Xterminator plugin
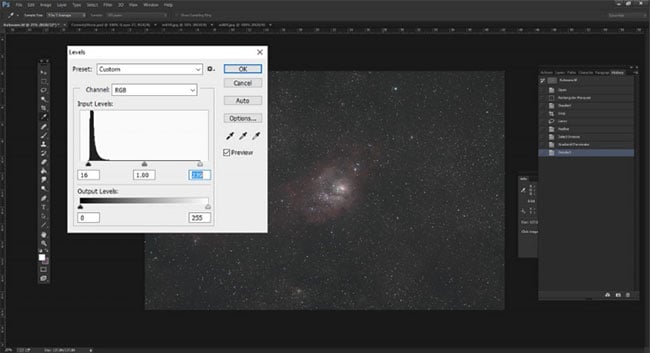
Step 3: Levels Adjustment
This where we start to separate the gorgeous pink nebulosity from the sea of stars and dark sky. You can find the levels adjustment tool under Image Adjustments > Levels. The initial levels adjustment should look like the histogram below, bringing the left-hand slider just to the edge of the data. You will also do the same with the right-hand slider, in towards the bright details of the image.
Bringing the sliders in passed the data will clip the image data, resulting in a loss of image information. A big no-no!
Step 4: Converting to a 16-Bit Image
We have reached the limit to where we can take this image in its current state. We will need to convert this .tif file into a 16-bit image to make further adjustments. You can accomplish this by selecting Image > Mode > 16/Bits Channel. When the HDR Toning dialogue box appears, make sure you change the Method from the default Local Adaptation to Exposure and Gamma.
You may want to experiment with the Local Adaptation method later, as it can produce some interesting results as well. Once you have selected the Exposure and Gamma method, press OK. You will not see any noticeable changes to the image, but it is now in 16-bit mode, and you will have access to a number of new editing options
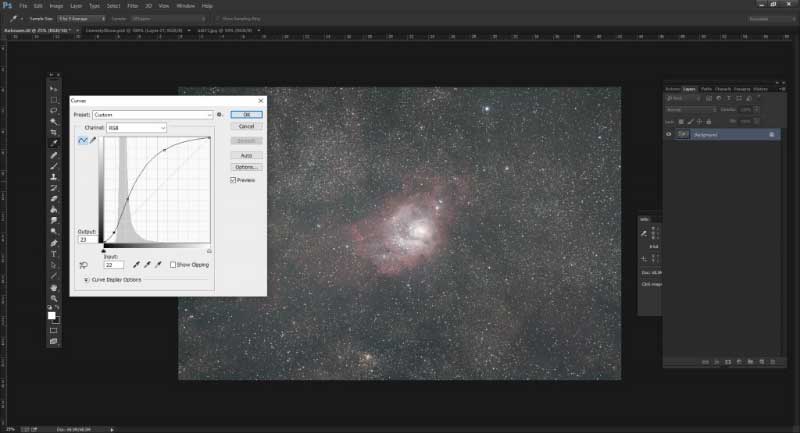
Step 5: Curves Adjustment
This is the single biggest adjustment you will make to your image. It gives you a preview of what you can expect your final image to look like. The Curves adjustment panel is found in the menu under Image > Adjustments > Curves. My initial curves adjustment usually looks similar to the screenshot below. This is a balance between detail and noise, you don’t want to blow the image out, or leave any extra details on the table!
I typically perform a few more slight curves adjustments, being careful to not blow out any bright details of the nebulosity. I find the best way to go about this, is to experiment with different values and use Photoshop’s history state feature to go back and start again.
Alternatively, you can make these curve adjustments on a New Adjustment Layer, and turn these layers off and on to see the changes. You will find the New Adjustment Layer option in the Layers menu.
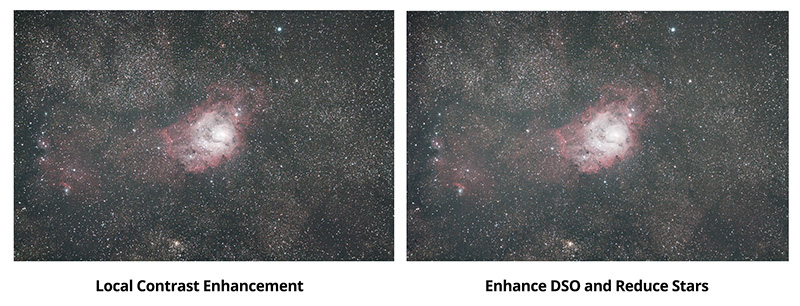
Step 6: Astronomy Tools Action Set – Phase 1
Enhance DSO and Reduce Stars
That’s right! Another plugin for Photoshop to make my life easier, and processing more enjoyable. This action set makes several astrophotography-based actions much simpler by offering a list of common tasks in the Actions tab, and running the multiple-step processes with the press of a play button!
The first action I like to run at this stage is the Local Contrast Enhancement action. This action runs rather quickly, but the one I run next does not – it can take up to 5 minutes on my machine. This one is called the Enhance DSO and Reduce Stars action.
Sometimes, this action can create an odd color cast on your deep-sky image. It displays a defined separation line of background color, usually in about 1/3 of the image. This can be hard to detect at first but becomes evident when viewing your image on a bright monitor or mobile screen.
I have found a solution that works, but it’s not an ideal one! Reducing the overall image size by about 10-20% before running the action can steer clear of the issue. I often take this route, as a slightly lower overall resolution is better than a larger version without the action applied.
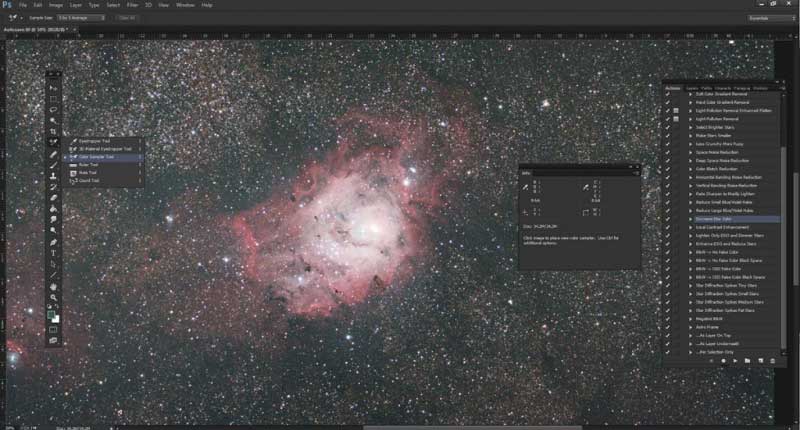
Step 7: Setting the “Black Point”
After the latest action has run its course, I like to increase the Saturation of the image and make another Curves Adjustment. This tames the now gray background sky back to a more natural black while preserving the details of the nebula.
A tip for achieving a neutral sky background is to use Photoshop’s Color Sampler Tool. It is located in the Eye-dropper drop-down panel on the toolbar. Make sure you have the Info tab open in Photoshop as well (located in Window > Info). Using the Color Sampler Tool, with the Sample Size set to 5 by 5 average, select a neutral area of the image that does not contain any stars or nebulosity.
Depending on what you have photographed, that may be tricky.
Once you have placed the pointer onto a neutral sky area, you will see the RGB values appear in the info dialogue box. In my example the values were:
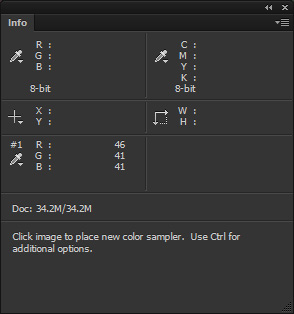
R:46 G:41 B:41
By adjusting the individual channels in the Levels panel, we can match each value to an even amount. For example 30, 30, 30, for a dark gray sky background. It is useful to add 1 or 2 more Color Sampler points on your image to get a better overall idea of which channels are overly present in your image.
My image of the Lagoon Nebula was very red, and by stepping down that channel, I was able to produce a more natural look for the subject, and the starry sky around it. You may find that you prefer your sky background to have a higher value in a certain channel. Often I will purposely have a higher value in the blue channel.
Processing Tip
Make sure your computer monitor is calibrated accurately to display your astrophotography images as the rest of the world will be seeing them on their various devices. Monitors can vary greatly, both the one you are processing on and the ones that other people are viewing your images on.
Once you view images on a well-calibrated monitor, it is easy to spot the images processed on monitors that were either way too dark, or too bright!
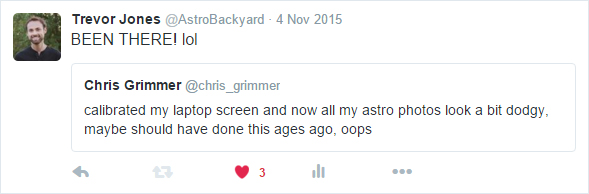
I experienced this issue for years, simply because I processed my images on a horrible monitor that displayed everything WAY darker and contrasty than the average monitor. I know that other astrophotographers have experienced it as well, just look at this tweet from @chris_grimmer
You can find a useful monitor calibration diagram from Astrosurf Here:
Monitor Calibration Chart for Astrophotography
Step 8: Astronomy Tools Action Set – Phase 2
Increase Star Color
I always run the Increase Star Color action on my photos, as it brings out the natural color of the stars rather than having them all appear bland and pale. I would not run this action more than once, as it may start to create some oddities within your image. Hop back and forth between history states to see the subtle differences.
Make Stars Smaller
This is just a personal preference of mine. I will run it twice if it makes sense for the image. You really need to check all areas of your frame to make sure that the stars are not turning into strange pixels that do not look natural and can ruin your image.
Space Noise Reduction
We already reduced the noise by a fair amount by subtracting the dark frames from the image. This post-processing method of reducing noise can help smooth out the image, at the expense of some sharpness.
You may also want to look into a dedicated tool for noise reduction such as Topaz DeNoise AI. I have found this to be a handy tool that works well in most situations.
Step 9: Finishing Touches
This is where your own style and presentation preferences come into play. It is helpful to find a version of the deep-sky object you have photographed online, and model your processing after that. From the intensity of the color to the darkness of the background sky, everyone has their own taste about how these wonders of the night sky should be displayed.
All I can say is have fun with it, develop your own style. When you get to a point with your image where you say “anything else would make it worse”, you know you have finished your masterpiece!
If you enjoyed this astrophotography image processing walkthrough, or have any questions about this process, please feel free to follow AstroBackyard on Facebook and add a comment there. I wish you all the best in your future deep-sky astrophotography endeavors!
Download My Image Processing Guide
If you would like to learn about every astrophotography image processing technique I use in DeepSkyStacker and Photoshop, you can download my premium guide. The PDF download contains over 100 pages of the specific steps I take to process all of my images: