Topaz Labs DeNoise AI Review
The goal of Topaz Labs DeNoise AI is to reduce digital image noise while preserving detail and increasing image sharpness. If you’re no stranger to astrophotography image processing, that almost sounds too good to be true.
I was skeptical of the application myself but now find myself using it in some capacity for every astrophoto I process. I believe that Topaz Labs DeNoise AI is a powerful tool that amateur astrophotography enthusiasts should consider adding to their bag of processing tricks.
In fact, I even added a new section about Topaz DeNoise AI in my premium astrophotography image processing guide. I have no interest in spending time learning and writing about tools with a short shelf-life, and I don’t see myself shying away from DeNoise AI anytime soon.
Until discovering this photo noise reduction software, I typically used the built-in noise reduction features of Adobe Camera Raw. This works well enough but is not nearly as reliably effective as the one-click, automatic noise reduction function of DeNoise Ai.
Whether you use Topaz Labs DeNoise AI to batch process a handful of night sky images in Lightroom or use it to subtly control the noise in your deep-sky images in Photoshop, this advanced learning software feels like it was built for astrophotography.
If you have experience using other noise reduction tools such as Skylum Luminar, Noise Ninja, DXO Prime, or any other of the many options available, please let me know how my results with DeNoise AI compare in the comments.

Download: Topaz DeNoise AI 30-Day Trial
Topaz Labs DeNoise AI Review
As you may already know, noise can be a big problem for amateur astrophotography, especially when using a DSLR or mirrorless camera with a high ISO setting. I have personally been battling noise in my astrophotography images for nearly a decade.
Even with great image acquisition best practices, lots of data, and a cool astronomy camera, you will likely still need to minimize the noise in your image at some point in the image processing stages of astrophotography.
In general, the tricky part of applying a noise reduction filter to your image is the possibility of detail loss, which can create a blurry looking image.
I originally shrugged off anything to do with this software due to the fact that I am a diehard Adobe Photoshop fan. I realize that many people are not willing to fork out the dough for a Creative Cloud subscription, but I certainly am. I’ve been using Adobe Software for nearly 20 years, and get full value out of my subscriptions to Photoshop and Premiere.
I’ve used many third-party plugins with Photoshop in the past (see the resources page for a few that stand out), but the Topaz Labs DeNoise AI plugin is different. I don’t believe any of the software I have installed in the past actually tapped into the benefits of artificial intelligence that continues to get better over time.
Topaz Labs DeNoise AI allows you to download a full-featured 30-day trial, so you’ve got nothing to lose. I took advantage of this opportunity, fell in love with the tool, and gladly forked out the cash for a lifetime license of the software.
In this post, I’ll explain how to incorporate Topaz DeNoise into your astrophotography image processing workflow, and why I think it’s a no brainer for anyone that spends as much time photographing space as I do.
Is it a Photoshop Plugin?
First things first, you’ll need to install the software on your computer. Topaz DeNoise is available for both Mac and PC operating systems. For better or for worse, I am a diehard PC user, and I installed the lightweight software on my Windows 10 desktop.
I am using Topaz Labs DeNoise AI as a Photoshop 2020 plugin exclusively. Users have the option of using the DeNoise AI as a standalone program, or a plugin in Adobe Lightroom or, of course, Topaz studio.
I don’t typically utilize the batch processing feature of Topaz DeNoise AI and prefer to invoke the tool on a per-image basis when noise reduction is needed.
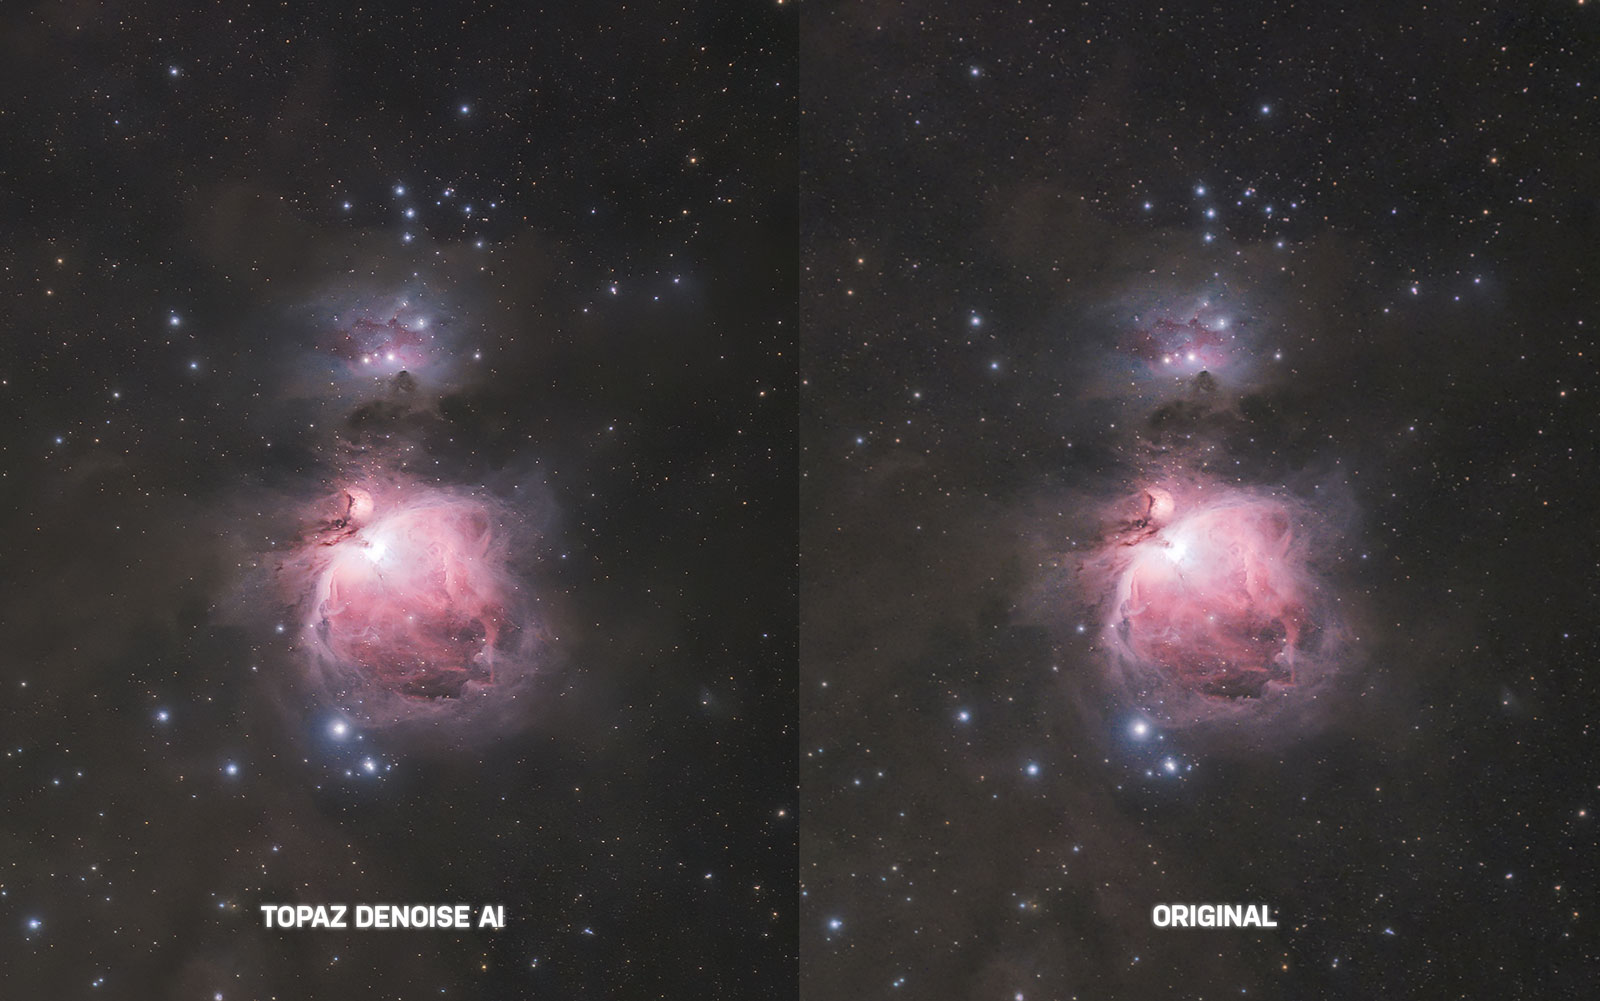
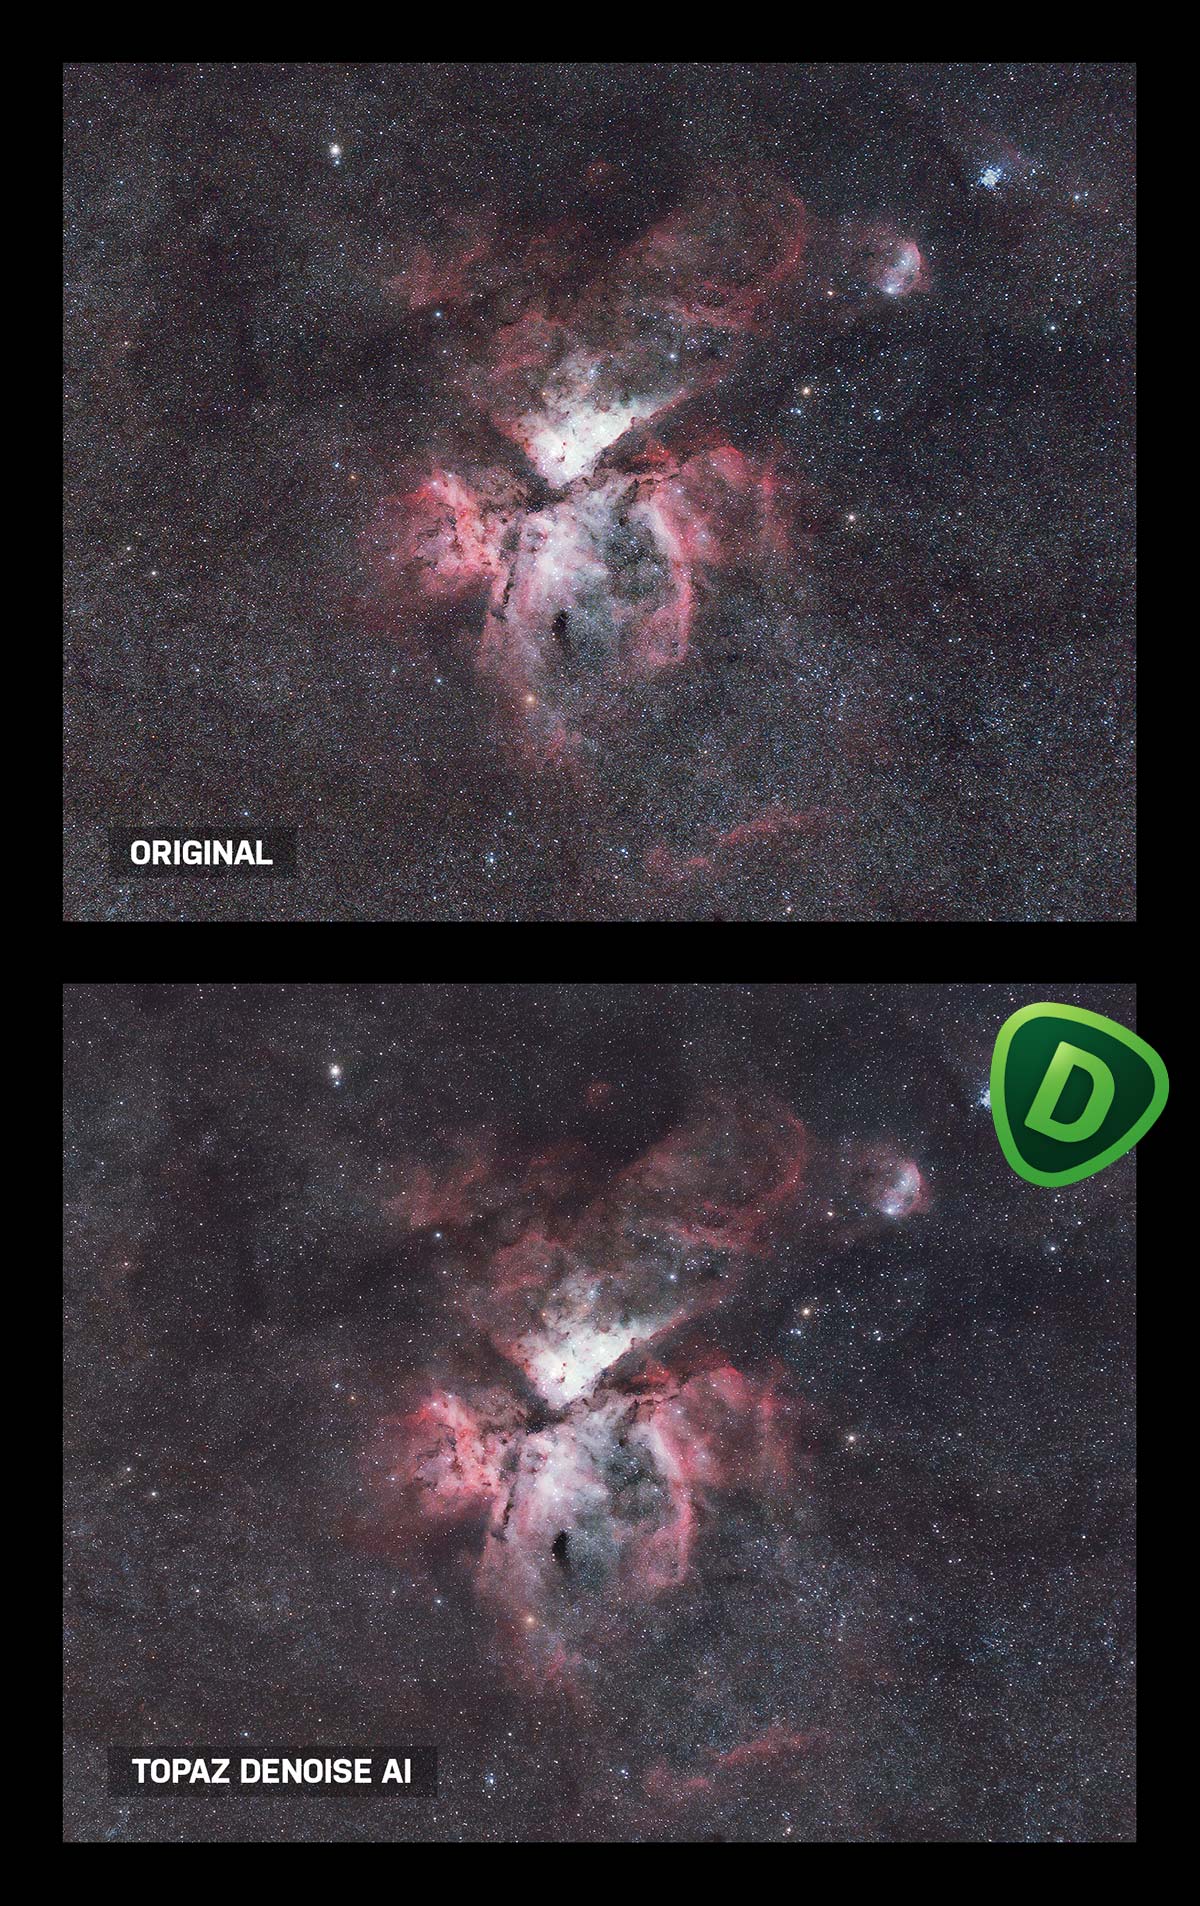
A before/after example of Topaz DeNoise AI on the Orion Nebula
As far as astrophotography goes, I am sure that most users will use the tool as a Photoshop plugin as I do, during the post-processing stages of their workflow. However, daytime photographers may find the tool handy when editing photos in Lightroom.
This is one of the biggest reasons why I was able to introduce the Topaz Labs DeNoise AI into my existing workflow so effortlessly. I simply run the tool on a new layer in Photoshop just as I would with any other Photoshop filter or external plugin.
Topaz Labs DeNoise is available as a plugin for the following applications:
- Adobe Photoshop
- Adobe Lightroom
- Corel PaintShop Pro
- Serif PhotoPlus
I absolutely love the simplicity of the user interface (UI). At its core, the software has to be good at one thing, and that’s effective noise reduction. The minimalist interface, large buttons, and massive preview window make it very easy to see what’s taking place.
The Problem with Noise in Astrophotography
Many factors come into play when assessing the reasons why your astrophoto is so noisy. Sensor design, size, and the camera settings used when the photo was taken are the most obvious.
Noise is the unwanted, randomly placed “grain” caused by your digital camera’s sensor. Noise often increases when using higher ISO settings, and appears as uneven color and grainy pixels distributed throughout your image.
It is most noticeable in solid areas of color, especially darker areas such as a black night sky. This can be a major problem for astrophotography, as our images usually have plenty of dark sky areas in them, surrounding the subject.
When you attempt to brighten your astrophoto to reveal faint structures of nebulae, stars, and galaxies, you also risk increasing the presence of noise.
When you zoom in on your image at 100% magnification, don’t be surprised to find grainy, random color specks, and overall inconsistency in the darker areas
The two ugly sides of the noise equation are Luminance Noise and Chrominance Noise. This article will help you understand what causes noise in digital photography.
The Signal-to-Noise Ratio
The best way to reduce noise in your astrophotography images is to improve the signal-to-noise ratio (SNR). Meaning, capture as many sub-exposures as possible and integrate the data using software such as DeepSkyStacker, Astro Pixel Processor, or PixInsight.
By nature, long-exposure photography in dark situations is just asking for noise. But amateur astrophotographers have found ways to overcome this issue to a large extent through image stacking, and calibration frames such as dark frames.
Yes, this practice is essential for creating a quality astrophoto, but sometimes it just isn’t enough. I’ve found myself in situations where over 5 hours of data were collected with my DSLR camera, and the healthy SNR still wasn’t enough to achieve an image with a smooth, sharp background.
A neutral, smooth background sky is one of the toughest challenges in the world of astrophotography image processing. Finding ways to isolate this element of the image, and tame the noise and unsightly artifacts found within it is essential. And this is exactly where Topaz Labs DeNoise AI shines.
The chroma noise reduction feature is especially handy in these situations, but monitoring your image as a whole during this step is a must. I can’t stress enough the fact that masking (see my Select and Mask tutorial), isolating, and defining each element of your astrophotography image is paramount for success.
How to Use Topaz Labs DeNoise AI
The software is simple to download and install, and automatically integrates itself into Adobe Photoshop. There is no need to drag-and-drop specific files into the program folders as you do with other third-party plugins.
At its core, DeNoise AI is a photo noise reduction software. More specifically, the tool was designed to enhance sharpness, remove chroma noise, and eliminate noise without losing details. The official Topaz DeNoise user guide includes a complete list of primary functions.
It’s safe to say that astrophotography was not the primary intended use for Topaz DeNoise AI, but it happens to benefit from it a great deal. The horizontal and vertical banding lines, black level correction, and high ISO image recover features are the most utilized aspects.
To run the plugin in Photoshop, you simply need to navigate to the Filter drop-down menu. At the bottom of the list, you should see Topaz Labs > Topaz DeNoise AI. If this option is greyed out, make sure your image is in 16-bit or 8-bit mode (it will not work in 32-bit mode).
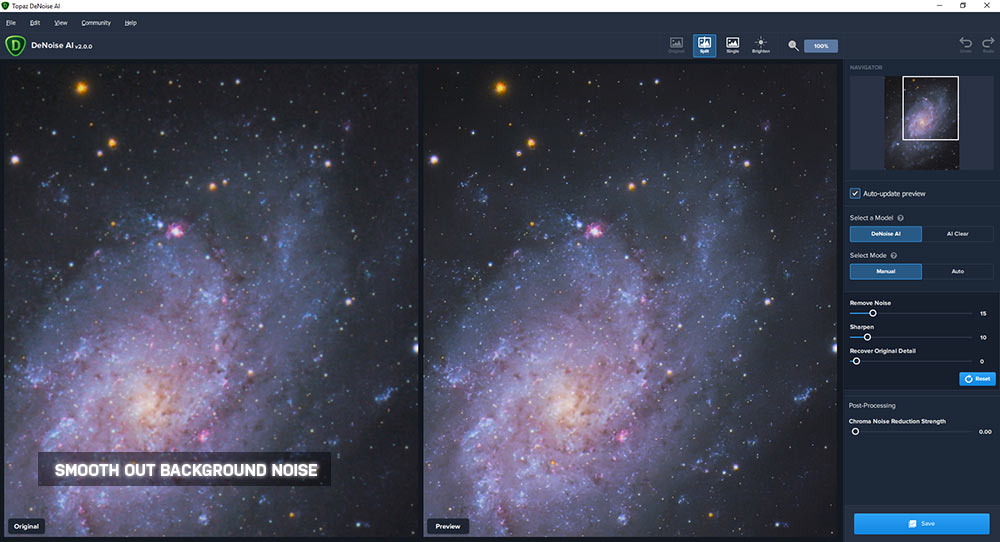
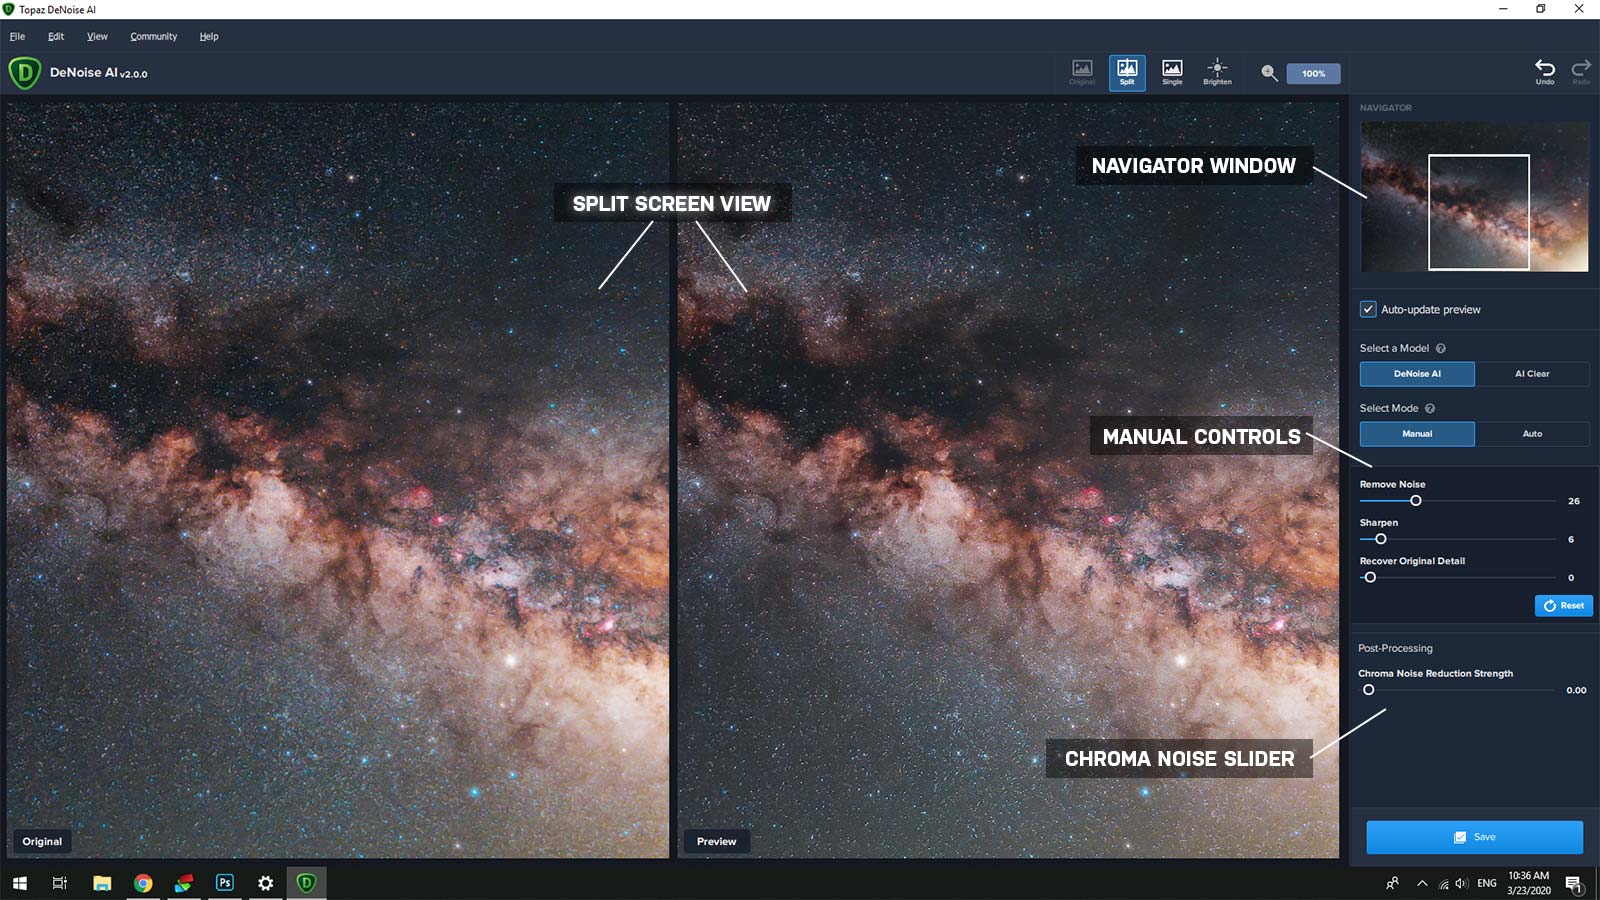
Upon activating the plugin, you’ll be delivered with a large preview window of the image with the noise reduction effects applied, next to your original (split view).
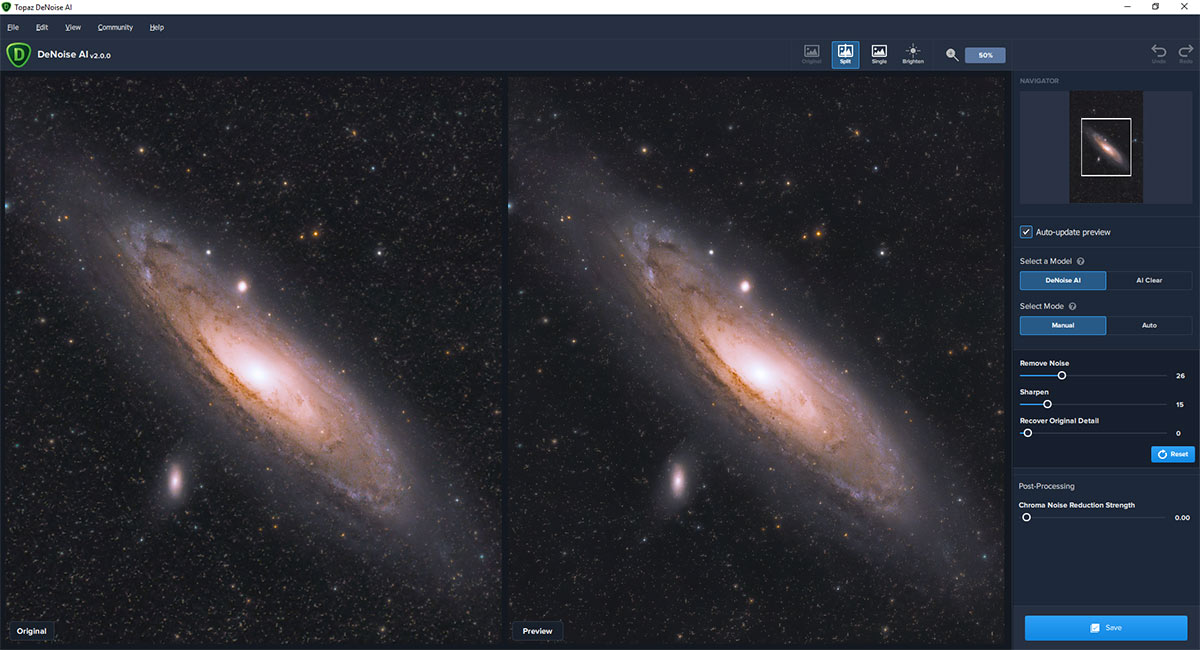
You’ll notice that the software interface presents you with two processing models: DeNoise AI and AI Clear. You’ll want to use the DeNoise AI option, as it is the newer feature and tends to work a lot better than the previous AI Clear mode (which was a feature of the original Topaz Studio).
With the DeNoise AI model selected, you can now select your noise reduction mode. I recommend trying out the “auto” mode on your image, as applying this filter to your picture often does a fantastic job (you can thank millions of AI training images for this).

The Manual Mode gives you much more control over the noise reduction filter. You can independently adjust the following sliders to your taste:
- Remove Noise
- Sharpen
- Recover Original Details
Best Practices for Astrophotography Images
Deep-Sky Astrophotography
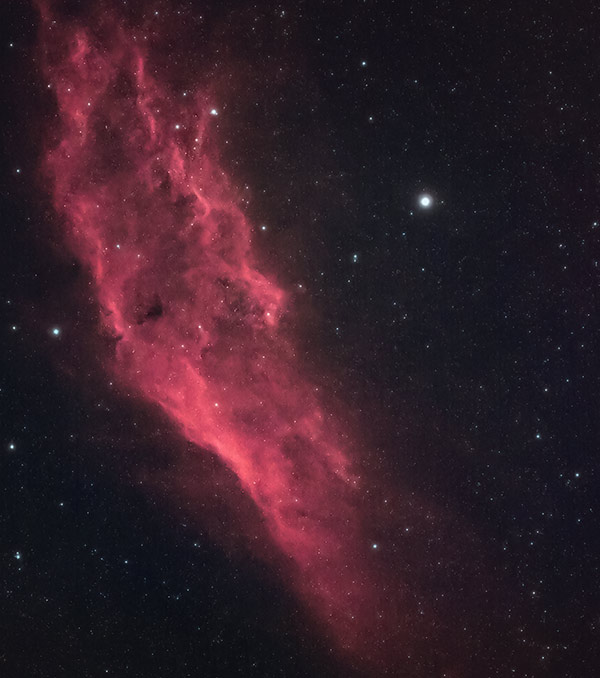
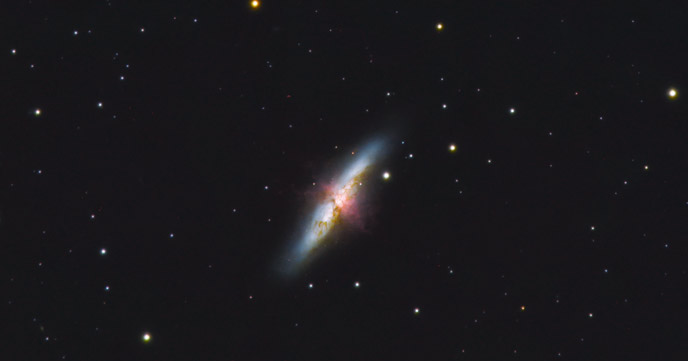
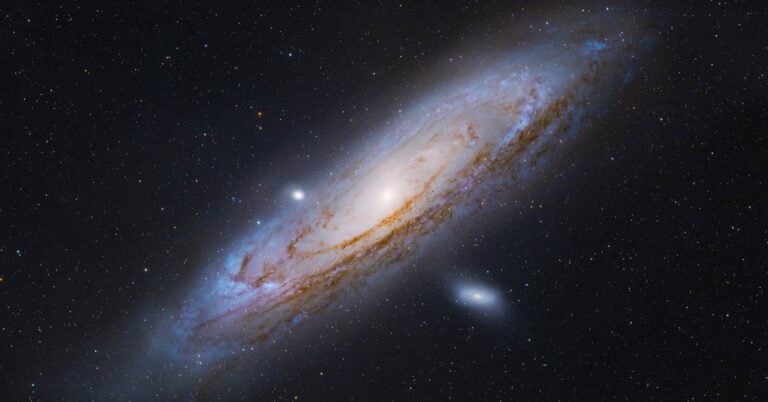
I primarily shoot deep-sky astrophotography images through a telescope, of distant nebulae and galaxies. For these types of photos, Topaz DeNoise AI is an incredible tool to help remove an uneven background sky.
The chroma noise reduction slider is especially handy when dealing with an astrophoto with a noisy, unevenly colored background sky.
I’d still mask the nebula or galaxy (and in most cases, the brighter stars) in the image before running Topaz DeNoise, but you can count on the DeNoise filter to improve the ugly luminance and chroma noise in the darker regions.
The power of DeNoise Ai in these situations should not be understated. Astrophotographers (particularly ones shooting with a DSLR camera) have been dealing with this problem for many years, and this software handles it better than any other tool I’ve ever used.
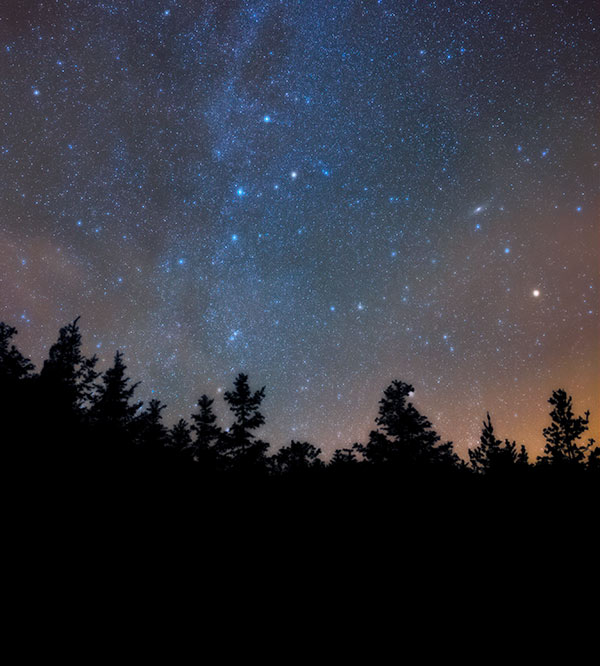
Nightscape Photography
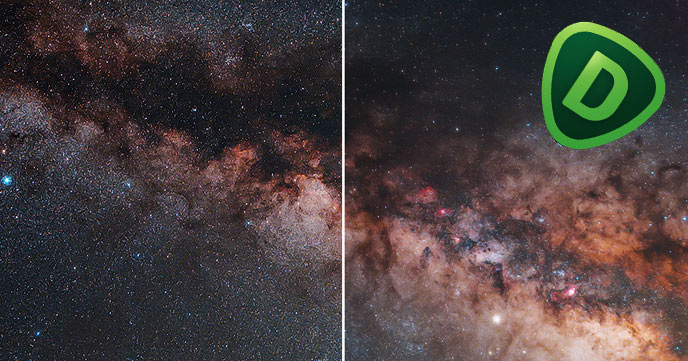
I’ve stated how impressive the tool works for images of nebulae and galaxies, but what about a wide-angle shot of the Milky Way? Well, I tested that scenario on an image of the Milky Way I captured under dark skies with a Rokinon 14mm F/2.8 lens.
As you can see, Topaz Labs DeNoise AI did a fantastic job of preserving important details of this demanding image, while making a noticeable improvement to the overall aesthetics by smoothing out grainy areas of the picture.

I don’t think that this post-processing tool can totally make up for an image shot using an ISO setting that was too high, but it may be able to save some of the images you originally thought were just too noisy to share.
Usage Tips
The best part about Topaz Labs DeNoise AI is how simple it is to use. Most often, I utilize the “auto” feature of the plugin and apply the default AI noise reduction amount to my image. It’s best to apply this action to a new layer on top of the image, so you can adjust the opacity and overall impact of the effect.

The “Auto” Noise Reduction setting works surprisingly well most of the time.
Usually, I will apply the DeNoise AI layer at approximately 65% over the entire image. Then, it is wise to monitor any negative changes to the look of the stars in your image. I have found that sometimes the DeNoise AI plugin will change the shape of small-to-medium-sized stars, and even create “holes” in them.
To avoid this scenario, you have a few options. You can create a layer mask in Photoshop to protect all of the stars in the image before running Topaz Labs DeNoise AI.
You could also (this is my favorite method), apply the DeNoise action to the entire image globally, and then use the eraser brush (set to the opacity, softness, and size of your choice) and carefully reveal each element in the image from beneath the DeNoise layer.
This may seem like a painstaking process, but I have found this way to offer the most control.
DeNoise AI has helped me revive some of my noisier images from the archives.
AI-Powered Noise Reduction
I know that most of you are no stranger to the concept of machine learning. Essentially, the team at Topaz Labs trained an AI model using specific filters to produce remarkable results.
This process is well-beyond my capabilities and understanding as an amateur astrophotographer, but that doesn’t mean I can’t leverage this AI power to create better images.
This article explains how Topaz Labs used millions of clean and noisy images to train the software to understand what to remove (chroma and luminance noise), and what not too (important details, colors, and sharpness).
To witness this AI technology in action, all you need to do is appreciate the automatic results of the DeNoise AI plugin on one of your noisy astrophotos.
System Requirements
A number of people have reminded me that you should consider the system requirements of this software before purchasing the plugin.
I am currently using Topaz DeNoise (version 2) on my Windows 10 Desktop with an Intel Core i7-9700K processor @ 3.60 GHz, and 16 GB of RAM. The Graphics Card is an NVIDIA GeForce RTX 2060.
On my machine, the DeNoise AI preview window updates really fast and applying the filter takes about 1-2 seconds. However, slower machines will inevitably bring this process to a crawl, so I looked into the system requirements Topaz recommends.
CPU Minimum
- Intel i5 or equivalent (3.0GHz and above)
- AMD Ryzen 5 or equivalent (3.0GHz and above)
CPU Recommended
- Intel i7 or greater (4GHz and above)
- AMD Ryzen 7 or greater (4GHz and above)
Graphics Card Minimum
- NVIDIA 2GB of dedicated VRAM (GT 740 or greater)
- AMD 2GB of dedicated VRAM (Radeon 5870 or greater)
Graphics Card Recommended
- NVIDIA 4GB of dedicated VRAM (GTX 970 or greater)
- AMD 4GB of dedicated VRAM (Radeon RX 460 or greater)
RAM
- Minimum: 8GB
- Recommended: 16GB
- Optimal: 32GB
If your computer meets the recommended requirements for the software, Topaz Labs states that ‘Users should experience no performance issues, though slowness may occur with large files”. I have found this to be true in my experience using the software on a fast Windows 10 PC.
Final Thoughts
Processing astrophotography images can be challenging, especially when you haven’t collected the amount of data you hoped to. It would be nice to acquire 10+ hours of exposure time on each target, but that isn’t realistic for a lot of people.
Topaz Labs DeNoise AI allows you to make the most of your data integration. If you’re sitting on a handful of images that aren’t quite “post-worthy”, run them through DeNoise AI and give them a second look.
One of the most exciting parts of this experience, for me, was going through some old astrophotos and seeing which ones I could potentially recover. Tools like DeNoise AI have the ability to breathe new life into old projects.
To justify the cost of a new software tool, you need to receive a lot of value from it. I truly think that you will enjoy using Topaz Labs DeNoise AI on your astrophotos now, and in the future.

Helpful Resources:
- Topaz DeNoise AI vs. DXO Prime (Forum Discussion)
- How to Batch Process in Photoshop using Topaz DeNoise AI (Forum Discussion)


It is awesome. I took photos of the skyline in London from inside a restaurant at night. The photo was rubbish until I tried Topaz. I was seriously blown away. It’s pretty amazing technology. Glad you’re writing about it.
Thanks for weighing in! I’ve been so impressed with the tool for astrophotography purposes – but I still haven’t tried it any daytime landscapes or nature photography (aside from that short clip in the video:). Thanks again, and clear skies!
Hi Trevor, nice to see this from you. I bought Topaz DeNoise late last year and was thankful that I was buying a new high-end PC because it would not work on my slower laptop (Note: check the required system specs – on slow machines Topaz DeNoise AI shows a blank screen – it’s not the software at fault, you need a faster PC :-)). On the newer machine it’s awesome – only used on two images so far but plan to implement it more often.
GREAT point Martin. I will add a note about that to my post. I am running it on a newer PC with good specs so it’s really fast. But I have seen some reviews on YouTube where the processes took some time to complete, especially on a large image! Thanks for weighing in, and I’m glad you are enjoying the software on the newer machine!
I have been using it lately ( a month or so trial ) and it’s jaw dropping, to me is sooo incredibly good that is if you were upgrading all your gear, as you can apply it’s NR feature to any kind of photograph. Is not that it just denoise, but it also brings/recovers details.
It’s a bit expensive at 79, however you can use this coupon i found and is still working “MeredithImage” for a 15% discount. There are other coupons that might work, or maybe Trevor can ask for an specific one for this article?
Thanks for the review!
Thanks for sharing that, Fredrico! I always google “software name + coupon code” and was able to find one for DeNoise AI as well 🙂 Ideally Topaz will become aware of this review (or my video) and provide an even better discount for us amateur astrophotographers. I’ll update the post ASAP if/when this happens! Cheers
Hi Trevor! Thanks a lot for ones again a very informative and in depth description on your sabotage and YouTube! Topaz DeNoise really impressed me!!! it’s incredibly good. I tested it (trial version) on every one of my images and work spectacularly well with all of them. Sometimes I had to refuse a little noise reduction or sharpness, but for the most does a fantastic job as it is. Definitely a must have even if a bit pricey. Thanks again Trevor!
I discovered T-denoise a little while ago and was very surprised by what it did to my images. It not only smoothes out the noise, but adds also incredible detail.
One has to be careful not to over-do it. I use it after pixinsight as a final touch up and polish.
The Sharpen app is good, but does not bring us what Denoise does.
Have a look at Gigapixel and be pleasantly surprised again. It’s a bit like drizzle but 10x better. Old noisy jpegs are blown up and become smooth like silk.
Really amazing this stuff. However, it does not always work as good on every image.
People on CN and other places ask me what is my secret to get my images so sharp and crisp. Do I rent Hubble time? No, the secret isTopaz Denoise.
I’m a seaman currently serving onboard a 280m tanker. Im taking some milky way shots from onboard using a Nikon D750 usually at 12800 ISO.
That means loads of noise. Under my esperience Topaz AI Denoise is the best NR software I’ve found for this kind of photography. The result is very organic compared to other software in the Milky way imagery but also deals great with the sea and dark sky. The only caution I have is to remove the color noise before with Capture One and use Topaz only for luminance. That is the combination Ive seen gives the best results.
Can this be used as a stand-alone tool? Don’t use Photoshop so I was just curious. Great info Trevor Thanks.
just caught up with this amazing software. It does wonders for lunar images too. Question: would it be even more beneficial to de-noise each individual sub-image before stacking?
Topaz denoise is a great tool for removing noise. I have used it for a year, and it changed my photos completely.
The down side is that it has now become unusable. They automatically loaded an “Upgrade” (Read downgrade) on me and loading a image after correction now takes 7 minutes. It was always slow (About a minute for a full Canon 5Ds image) but is now not usable at all.
Topaz will not allow reverting to the older version, so the software I paid for a year ago is now not available to me any more.
Think twice before laying out good money for it.