Deep-Sky Astrophotography How-To

While I have several videos discussing the topic of deep-sky astrophotography on my YouTube channel, I realized it was time for a thorough walkthrough of my entire current process for capturing deep-sky images with a camera and telescope.
This article aims to accomplish that goal by providing a step-by-step roadmap to follow to get your first successful deep-sky astrophotography image. In this beginner-friendly, in-depth tutorial, we will use a camera, telescope, and tracking mount to capture a distant emission nebula.
This isn’t the only way to do astrophotography, but it’s a step-by-step formula that works.
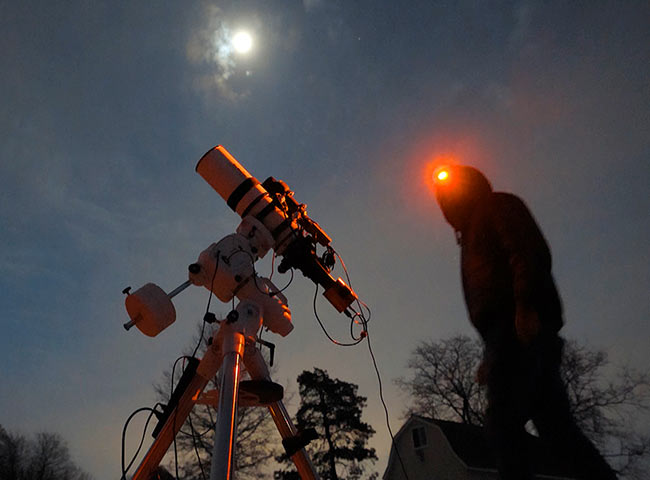
Feel free to watch the video version of this article for a behind-the-scenes look at setting up my astrophotography equipment to capture a beautiful nebula with my camera and telescope. You’ll notice the use of the ZWO ASIAIR Plus controller to automate deep-sky imaging sessions.
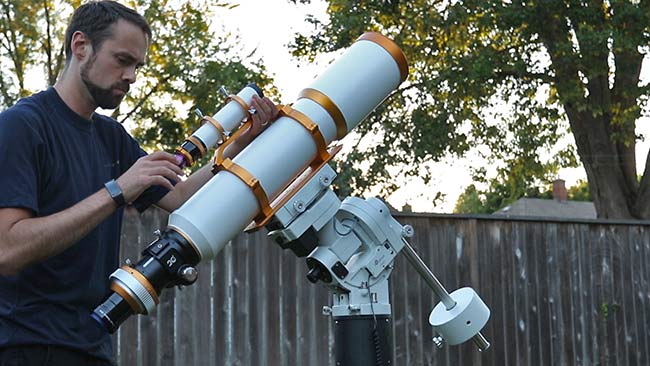
Many people have asked about the astrophotography telescope used in the video. It is a compact William Optics Zenithstar 73 apochromatic doublet refractor with a focal length of 430mm. This is an excellent telescope for astrophotography with a DSLR or dedicated astronomy camera.
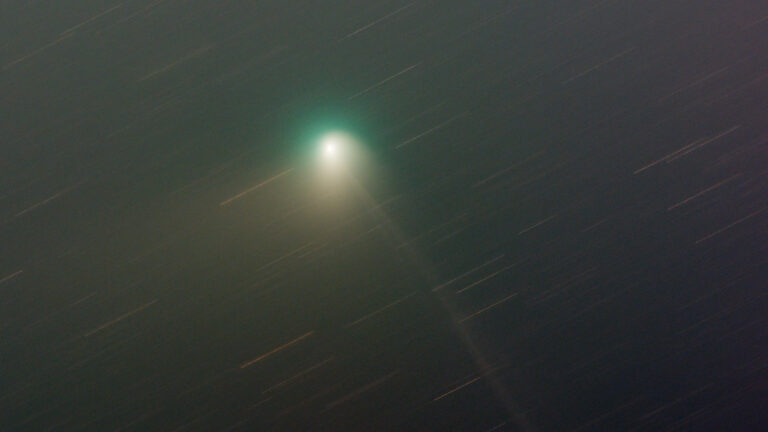
This tutorial walks you through the process of capturing NGC 7822, an emission nebula in the constellation Cepheus. The final image was captured from my backyard (Bortle 6) using the exact equipment listed on this page.

NGC 7822 in Cepheus (9 hours of total exposure time). William Optics Z73, ZWO ASI533MC Pro.
Deep-Sky Astrophotography How-To (Step-by-Step)
If you’re confused about what you need for astrophotography and how everything works in a setup like this, this article is for you.
I’ll cover everything from how to polar align the telescope mount to some recommended beginner-friendly targets. The process of astrophotography involves capturing several individual sub-exposures to create a master image.
If you are just getting started and do not have a telescope yet, please see my astrophotography tips for complete beginners. You can also read my beginner tips article about the different types of astrophotography available to you.
If you are ready to dive into deep-sky astrophotography with a camera and telescope, read on. I intentionally chose this equipment setup because it’s relatable, affordable, and has delivered incredible results for me for many years.
You are free to build a setup on your own with whatever gear you want, but I have listed this one piece by piece in this article for those looking to mirror my setup.
Consider this to be an example system and routine to base your future astrophotography purchases on.
So, get ready for a complete astrophotography how-to tutorial that’s easy to understand and doesn’t leave anything out.
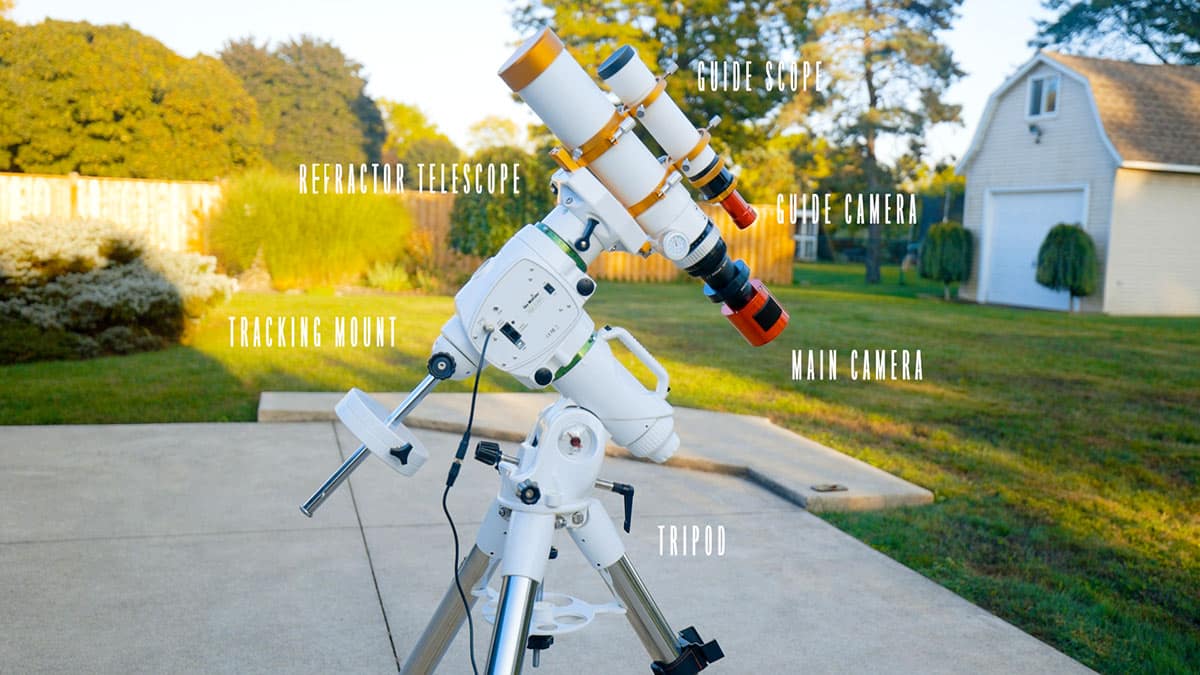
The example equipment used for this tutorial.
- Camera: ZWO ASI533MC Pro
- Telescope: William Optics Zenithstar 73
- Filter: Optolong L-eNhance
- Camera Controller: ZWO ASIAIR Plus
- Tracking Mount: Sky-Watcher EQ6-R Pro
- Guide Scope: William Optics 50mm
- Guide Camera: ZWO ASI120MM Mini
Helpful Planning Tools
Most astrophotography planning sessions occur when there is a clear night coming up during the new moon phase, and you have a deep-sky project in mind.
Several stargazing apps are available for your smartphone, which can assist with this process. All of the tools I am about to mention have both free and paid versions.
Astrospheric is a fantastic weather forecasting tool, and Stellarium is one of the best planetarium apps. Between these two tools, you can ensure that it is the right time of year to photograph your selected target and that the weather will cooperate.

Astrospheric provides advanced weather forecasting tools for amateur astrophotographers and astronomers.
Astrospheric provides you with detailed cloud cover information including ground fog, high clouds, smoke, and more. The paid version of Astrospheric is well worth it.
Stellarium is a simple, yet robust planetarium tool that shows you where everything is in the sky from your exact location. It has a mobile app and dedicated desktop versions available.
I also like to browse AstroBin for astrophotography ideas. This website hosts images from astrophotographers around the world and includes advanced search tools.
This can be a great way to discover what your specific camera and telescope are capable of because you can filter images by the equipment used.
Where to Set Up Your Equipment
Before carrying your equipment outside, you should know the general direction in the sky your intended target will be. This is much easier to plan when imaging from your backyard at home.
It is not uncommon for amateur astrophotographers to set up their telescope in a variety of spots in their yard depending on the target they are after.
Obstructions such as tall trees, neighboring houses, or sources of intense light pollution may affect your decision. For this process, being able to view the north celestial pole is essential as well.
You will also want access to household power (unless you are using a portable battery), and a flat, dry surface to set up on. The ground should be level, and your tripod needs to be stable (not slowly sinking into the grass).
Most deep-sky astrophotography targets will benefit from being taken without a bright moon in the sky. Duo-narrowband filters like the one I will use help to mitigate this.
If you are setting up your equipment at a dark-sky site away from home, you will need to prepare for the unexpected. Managing your power supply, remembering to pack everything, and adapting to a new environment can be tricky.
The ZWO ASIAIR Experience
For many years, my go-to process was to use a laptop computer with a handful of image acquisition tools installed. This computer accompanied my telescope outdoors, and precautions were taken to protect it from the elements.
Although this method delivered reliable results, I had to run multiple applications for image capture, plate solving, and autoguiding. All it took was an outdated driver to ruin a clear night of astrophotography.
These days, I use the ZWO ASIAIR Plus for almost all of my astrophotography sessions. It streamlines the experience in many ways and allows me to capture images faster and more efficiently.

The ZWO ASIAIR WiFi acts as a mini PC to fully control the camera and telescope mount.
The ASIAIR device and mobile app are the brains that control everything about my astrophotography setup. This includes everything from specific camera settings to the function of the equatorial tracking mount.
Some people don’t like this device because it caters specifically to ZWO ASI cameras, which I understand. If you are using a camera that is not supported by the ASIAIR, I suggest looking into the N.I.N.A imaging software.
The ASIAIR is a mini-computer that rides on top of the telescope and sends out a wireless signal to transfer data. You can control everything on the ASIAIR using your mobile phone or tablet.
Related Post: Astrophotography Made Easy with the Seestar S50 Smart Telescope
Setting Up the Tripod and Telescope Mount
The first step of every deep-sky astrophotography session involves placing your tripod down and making sure it is as level as possible.
I almost always set up my telescope on the concrete patio just outside of my garage, because it is flat, dry, and close to where my telescope is stored.
You may choose to keep the equatorial mount head on the tripod while transporting it, but this can be very heavy and awkward.
If you are transporting your equipment through doors or down a flight of stairs, you will need to separate the tripod from the equatorial mount head.
The Sky-Watcher EQ6-R Pro telescope mount weighs over 50 pounds when fully assembled (without the counterweights).
The Most Important Piece of Gear
Your telescope mount is the most important piece of the entire setup because by tracking the apparent motion of the night sky, you can take long exposure images.
As you may have expected, the most important piece of your astrophotography equipment is also the most expensive. While there are ways to cut costs throughout an imaging build, the tracking mount is something you want to ‘future-proof’.
A good computerized equatorial telescope mount will last many years. It will carry a wide variety of telescopes and astrophotography accessories as you inevitably upgrade your gear in the future.
The general rule of thumb is to purchase an astrophotography mount that can carry double the weight of your equipment. I think reaching 75% of your mount’s maximum payload capacity is reasonable.

Related Post: Best Astrophotography Mounts in 2026
The Mount: Sky-Watcher EQ6-R Pro
I highly recommend the Sky-Watcher EQ6-R Pro telescope mount for anyone who is serious about taking deep-sky astrophotography images. This is a quality astrophotography platform that will last many years and perform in all weather conditions.
Since starting out on a slightly smaller Sky-Watcher HEQ5, I have personally owned several Sky-Watcher astrophotography mounts. If you are not interested in balancing your equipment with counterweights, you may want to consider a strainwave drive mount like the ZWO AM5.
This computerized GoTo astrophotography mount can accurately track the sky and utilize autoguiding for even more precise tracking. This mount regularly performs with a total RMS error of under 1 arc second, which is exceptional.
It can also be controlled via the ASIAIR to utilize plate solving using the proper connection. This allows you to completely control the telescope mount using your phone or tablet with extreme pointing accuracy.
Powering the Equipment
To power the Sky-Watcher EQ6-R Pro mount, you will need a dedicated 12V 5A power adapter and the proper connection to the mount. The mount comes with a 12V DC power supply, which can also be used.
Here are some helpful links for powering the Sky-Watcher EQ6-R Pro and connecting it to the ZWO ASIAIR. You can choose to power the mount using the included DC plug (and converter shown below), or with a separate 12V 5A adapter like the one listed below.
- RJ45 Cable to Connect ZWO ASIAIR
- Celestron 12V 5A Power Adapter
- Adapter Cable to Connect EQ6-R Mount
- 12V DC Power Converter

Recommended DC converter for the power cord included with the Sky-Watcher EQ6-R Pro.
If you are running the telescope mount via a portable power station, I am told that the original DC connection uses less power, which is preferred.
The ZWO ASIAIR Plus device will need its own 12V 5A power supply, and it is not recommended to power the telescope mount through the output ports on this device.
I like to use a power bar with powered USB ports that I can use for my dew heater bands. I prefer to use USB-powered dew heater bands when possible, but for larger setups, an RCA-style connection is required.
Only the mount and ASIAIR device will need to be powered, as the rest of the gear can be powered using the output ports on the ASIAIR device itself.
Now that everything is powered properly, we can move on to attaching the telescope, camera, and the remaining accessories.
The Telescope: William Optics Zenithstar 73
This is a William Optics Zenithstar 73 apochromatic doublet refractor. This telescope falls into the wide-field deep-sky category at a focal length of 430mm and an f-ratio of F/5.9.
It’s a fantastic beginner astrophotography telescope for under $1000. This telescope excels at capturing larger deep-sky nebulae such as the Orion Nebula.
The Z73 features a large image circle, which is great for imaging with astronomy cameras using large-sensor (APS-C and full-frame) sensors. For optimal optical performance, you will also need to invest in a dedicated field flattener, listed below.
The standard package includes a Vixen-style dovetail rail, along with a handy mounting saddle on top to mount a small guide scope. The telescope weighs under 7 pounds, making it suitable for intermediate-level astrophotography mounts.

William Optics Zeinithstar 73 Doublet APO refractor.
Recommended Accessories
- William Optic 50mm UniGuide (For Autoguiding)
- William Optics Field Flat 73A (For Best Optical Performance)
I have taken several incredible images with this scope over the years and continue to use it regularly for astrophotography in the backyard. It’s a great value, but you’ll want to invest in the dedicated field flattener to get the most out of this telescope.
William Optics is known for its optical quality, and this model is no exception. The ‘Z73’ uses FPL-53 glass and can capture sharp, well color-corrected, contrasty images. Includes a handy built-in Bahnitov mask, and all of the necessary mounting hardware to attach it to your mount.
If you are looking for a similar telescope in terms of optical performance, but want a little more reach, take a look at the newer Gran Turismo GT81 WIFD. This telescope is a triplet apochromatic refractor with a more robust focuser.
While there are many other great types of telescopes, I recommend entering the hobby of astrophotography using an apochromatic refractor. The wide field of view is more forgiving in terms of tracking and makes it easier to find targets in the night sky.
Other Telescopes to Consider in this price range
- William Optics RedCat 51 Petzval APO
- William Optics Zeinithstar 81 Doublet APO
- Askar FRA 400 72mm Quintuplet APO

There are many great compact astrophotography refractors available in 2025.
The Camera: ZWO ASI533MC Pro
The camera is a ZWO ASI533MC Pro, a one-shot-color dedicated astronomy camera. Unlike a stock DSLR camera, the sensor has been modified for astrophotography.
It allows a very specific wavelength of light to be recorded in the red end of the spectrum, which is especially important when photographing nebulae. Many people choose to modify their existing DSLR/Mirrorless camera, or even purchase a rare factory-built astrophotography mirrorless camera, like the Canon EOS Ra.
This camera is one of the few non-planetary imaging camera options available for under $1000. It features a 1”-format square (11.3mm x 11.3mm) Sony IMX533 CMOS sensor with a pixel size of 3.76 μm. It features a built-in thermoelectric cooler to keep the sensor cold during long exposure images, thereby reducing noise.
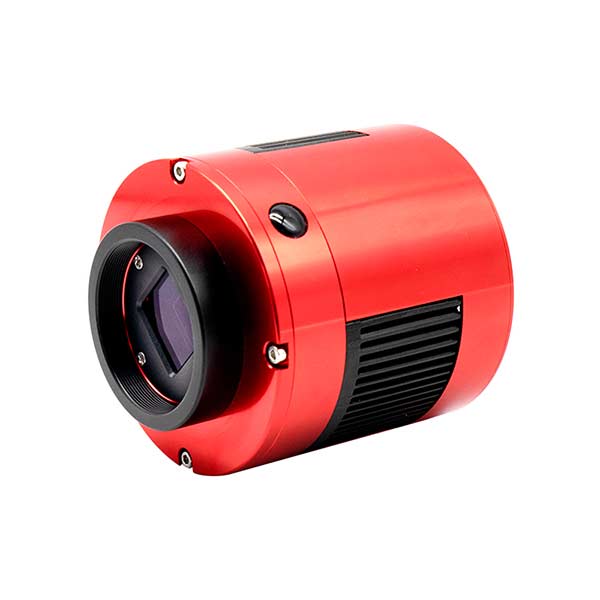
The ZWO ASI533MC Pro is an affordable one-shot-color dedicated astronomy camera.
I am a big fan of the pixel size of the ASI533MC Pro (3.76), as it creates a practical image scale (resolution) when used with most of the refractor telescopes I use for astrophotography. The square image format may take some getting used to, but wider image frames can be achieved by capturing a mosaic.
Other Cameras to Consider in this Price Range
In front of the camera is a simple filter slider drawer to utilize 2-inch light pollution filters. This is an easy way to swap different filters in and out, depending on the type of project I am working on.
The Filter: Optolong L-eNhance
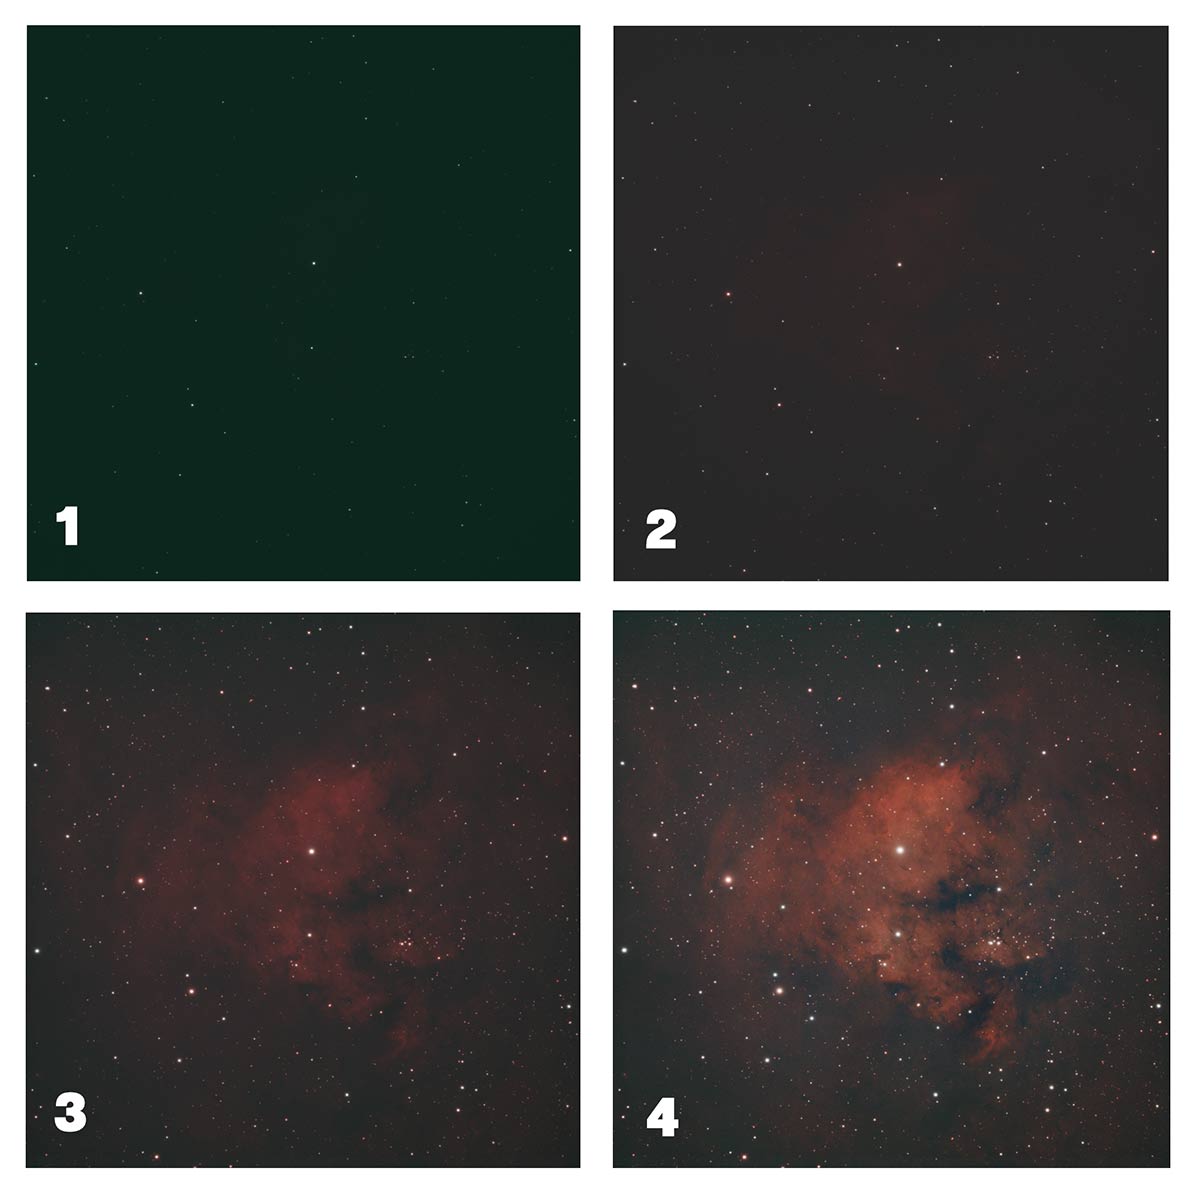
This type of filter is known as a duo-narrowband filter (or dual-bandpass), as it only allows two specific wavelengths of light to pass through (H-alpha and oxygen III). The Optolong L-eNhance was one of the earliest versions of these filters, and there have been many new variations released since.
Using the Optolong L-eNhance filter with a one-shot-color dedicated astronomy camera (or DLSR) results in images of nebulae (particularly emission nebulae) with impressive contrast. This filter does a great job of separating light in the hydrogen alpha bandpass from a bright city sky.

The Optolong L-eNhance is an affordable dual-bandpass astrophotography filter.
The easiest way to place this filter in front of a dedicated astronomy camera like the ASI533MC Pro is to use a filter drawer. I use the Starizona filter slider system, but there are a number of other options to choose from as well.
Backspacing
For your camera to perform optimally, you will need to ensure that you have the correct backspacing. This refers to the distance between the image sensor plane and the rear connection to the telescope or field flattener corrector.
For example, ZWO ASI cameras typically have a listed backspacing of 55mm. Your job is to make sure that your adapters (filter wheel, filter drawer, etc.) create exactly 55mm of space between the sensor and your telescope focuser.
There are some super handy reference images on the ZWO website explaining the exact adapters (spacers) you will need to use to achieve the correct backspacing with your camera and telescope.

Autoguiding Setup
The process of autoguiding involves using a secondary camera and telescope to analyze the movement of a star and provide corrections to your telescope mount to improve tracking accuracy. A simple guide scope and guide camera can accomplish this, and it can all be run quickly and easily on the ZWO ASIAIR Plus.
A guide camera will have a much smaller sensor than your primary imaging camera, and its only job is to record a live loop of the stars where your telescope is pointed. I use the ZWO ASI120MM Mini camera for this purpose, and it is one of the best options currently available for the price.
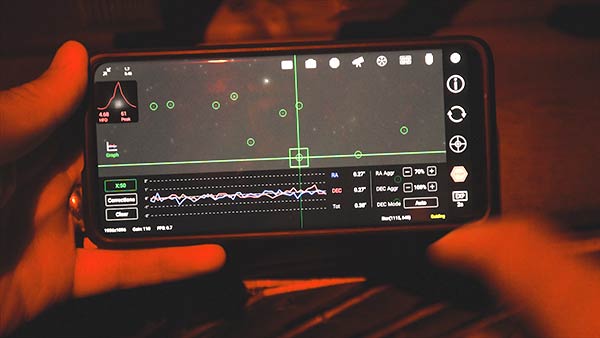
Multi-star guiding using the ZWO ASIAIR mobile app.
As long as the guide camera is in focus and the gain setting is high enough, you should see several suitable guide stars to choose from in the live 1 or 2-second image loop. We will take a close look at this process in the ASIAIR portion of this tutorial.
Connections
With the imaging telescope, dedicated astronomy camera, filter drawer, and adapters attached, we can start plugging everything in. You can keep your cables tidy and free of snags by using Velcro zip ties.
Remember, the Sky-Watcher EQ6-R Pro telescope mount and the ASIAIR Plus WiFi controller both need their own 12V 5A power supplies. Do not try to power the mount through the ASIAIR Plus.
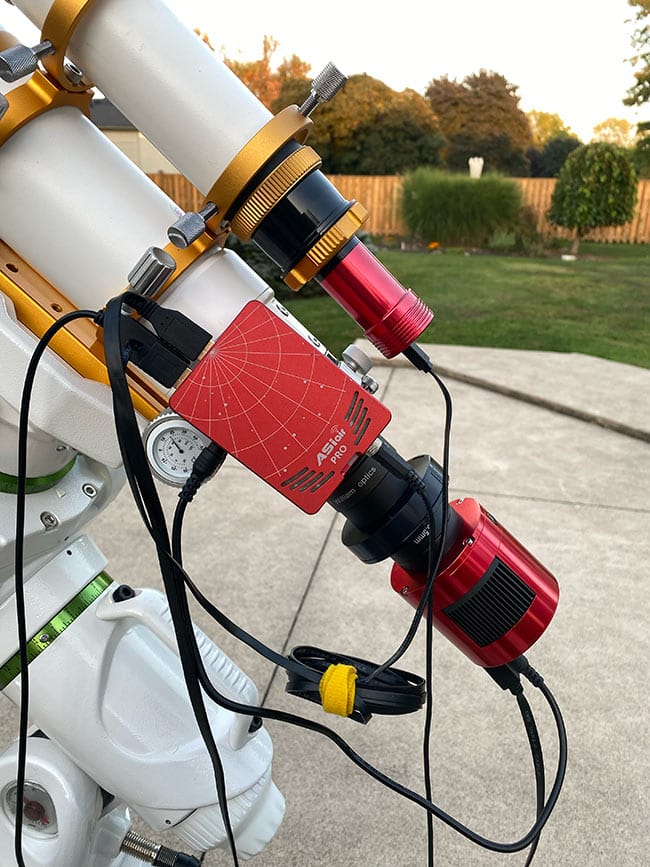
Connections from the ZWO ASIAIR to the main camera and guide camera.
We can now connect the power cable for the primary imaging camera (ASI533MC Pro) using a 2.1mm DC output port on the ASIAIR. You can use an inexpensive cable like this to connect the camera to the ASIAIR Plus.
The ASIAIR Plus includes 4 output ports, and we will only need to use 1 for the primary imaging camera to run the onboard TEC.
The guide camera doesn’t have cooling and only needs a USB Type-C cable to operate. You can plug your guide camera into the USB output port of your primary camera, or an open port on the ASIAIR Plus.
Make sure you plug in your dedicated astronomy camera to the USB 3.0 port for the fastest possible transfer speed. I plug my USB storage device into the second USB 3.0 port for a fast write speed.
All ASIAIR Plus Connections
- 12V 5A Power Adapter into the ASIAIR Plus
- ZWO ASI533MC Pro Camera into 12V power output on ASIAIR Plus
- ZWO ASI533MC Pro Camera into USB 3.0 port on ASIAIR Plus
- USB Storage Device (32 GB+ recommended) into USB 3.0 port on ASIAIR Plus
- ZWO ASI120MM Mini Guide Camera into USB 2.0 output on ASI533MC Pro
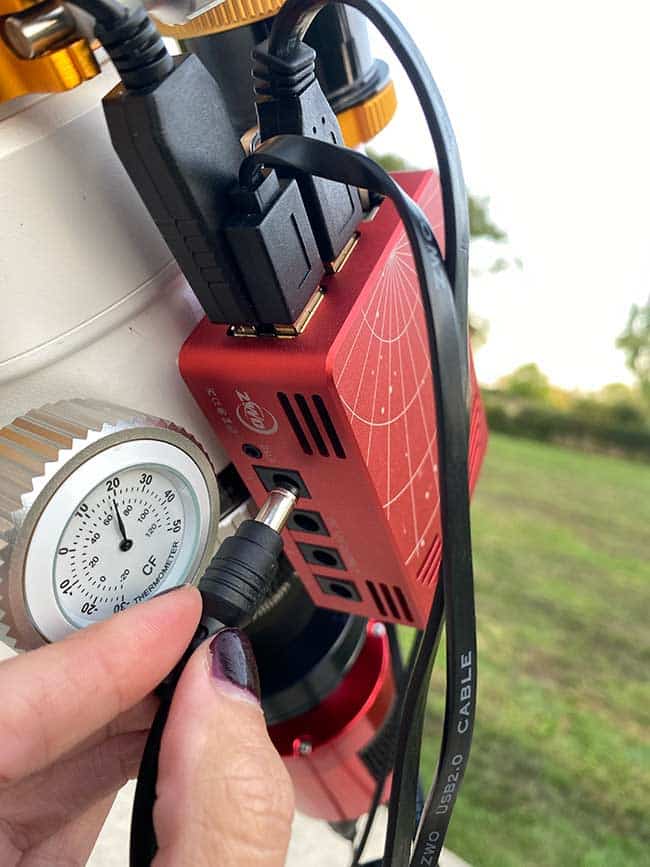
Utilizing the 12V power output port on the ASIAIR to power the primary imaging camera (ZWO ASI533MC Pro).
The ASIAIR Mobile App
Now it’s time to open the ASIAIR mobile app on your smartphone or tablet. I like to use a tablet whenever possible to take advantage of the larger screen.
You can download the ASIAIR mobile app from the Google Play Store or the Apple App Store. To connect to the device, you need to turn it on and find the correct WiFi signal to pair your device.

If a warning appears on your phone like “internet connection not available”, don’t worry. This WiFi connection does not require the internet to function.
You can also lose the WiFi connection (which will happen if you get too far away), and reconnect without interrupting your imaging session.
The ZWO website states the ASIAIR Plus can maintain a WiFi connection of up to 20 meters (65 feet), but I find about 35 feet to be the limit (through my garage wall).
Open The App
Navigate to the app on your phone or tablet and open it. From the home screen, select ‘enter device’.
I like to run the ASIAIR mobile app on my Samsung tablet to take advantage of a larger screen. It’s also nice to dedicate the device to my astrophotography imaging session rather than hopping on and off of the WiFi signal to use my smartphone.
The Samsung Galaxy Tab 8 32GB is the exact tablet I use to run the ASIAIR.
Enter Information
If you are running the ASIAIR app for the first time, you will need to enter your location, along with the focal length of your telescope, and guide scope.
This step is to make sure that the plate solving function works properly. As long as your telescope mount, and cameras are plugged in, you can choose them from the drop-down menu.
For this configuration, I entered a focal length of 430mm for my primary imaging scope, and 200mm for my 50mm guide scope.
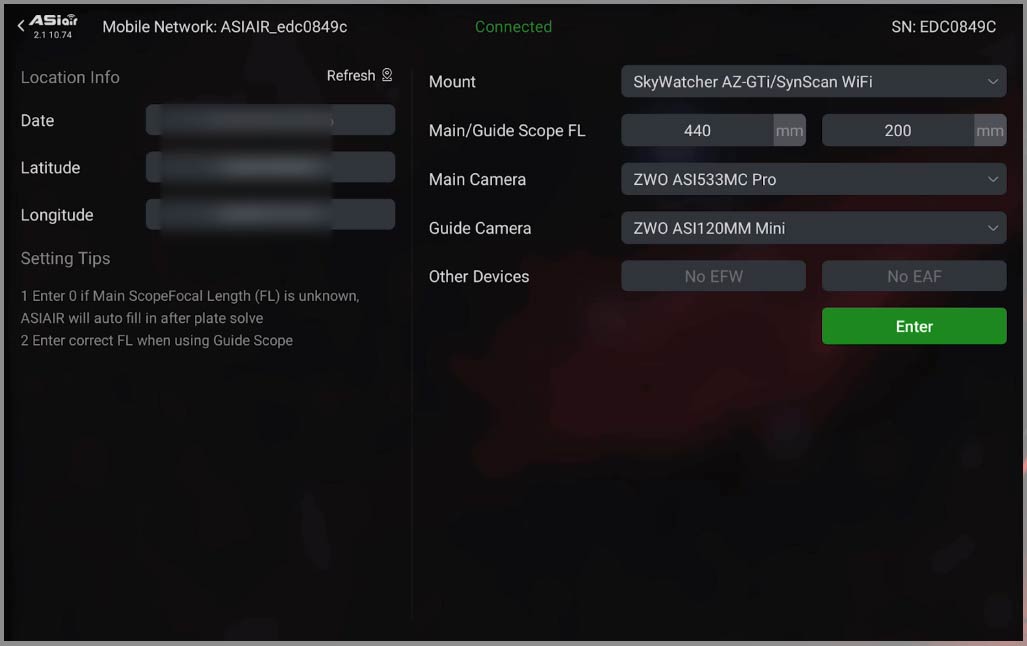
Enter your location details, your equipment, and the focal length of your telescope.
Camera Settings
I recommend shooting with a Gain of 100 (or ‘global gain’) with the ZWO ASI533MC Pro. I use this gain setting on most of my dedicated astronomy cameras, whether I am shooting in broadband or narrowband.
You should set the guide camera to a higher gain to increase the amount and brightness of stars through your guide scope. I usually choose ‘high’ or sometimes move the gain slider even higher than that.
If your camera supports it, I highly recommend checking the ‘anti-dew’ heater on the camera body as well.
Take a Test Image
If it’s dark enough to see a few stars, you can take your first test image to make sure you have a rough focus. Depending on the scope, you may have to really adjust the focuser to see any stars.
Do not use a strong filter (such as a narrowband or duo-narrowband filter) for this process, as you need plenty of light. You can increase the exposure time to see more stars, but ideally, you will use a short 2-second exposure to speed up the process.
Click on preview mode on the right-hand side of the screen to take a test shot to see how close to being in focus you are. This is where you will need to physically focus the telescope using the course or fine focus knobs on the telescope.
I recommend using the focus mode to start looping a 2-3-second image. This makes it easier to see stars that are way out of focus come into view. When you see tight stars, you can move on to the next step.
Complete Polar Alignment
The electronic polar alignment tool in the ASIAIR is super easy and confirms your accuracy. This method replaces the traditional manual method of looking through the polar scope of the telescope mount.
The process involves taking a few pictures of the sky through the main scope and then adjusting the alt-az bolts on the telescope mount based on this measurement.
Because the process involves taking pictures of the sky, it’s important that you are in focus, and that you have entered the correct focal length of your telescope.
Click the PA (polar alignment) button on the right-hand side of the screen and press start. It will take a short picture to understand where it’s currently pointed.
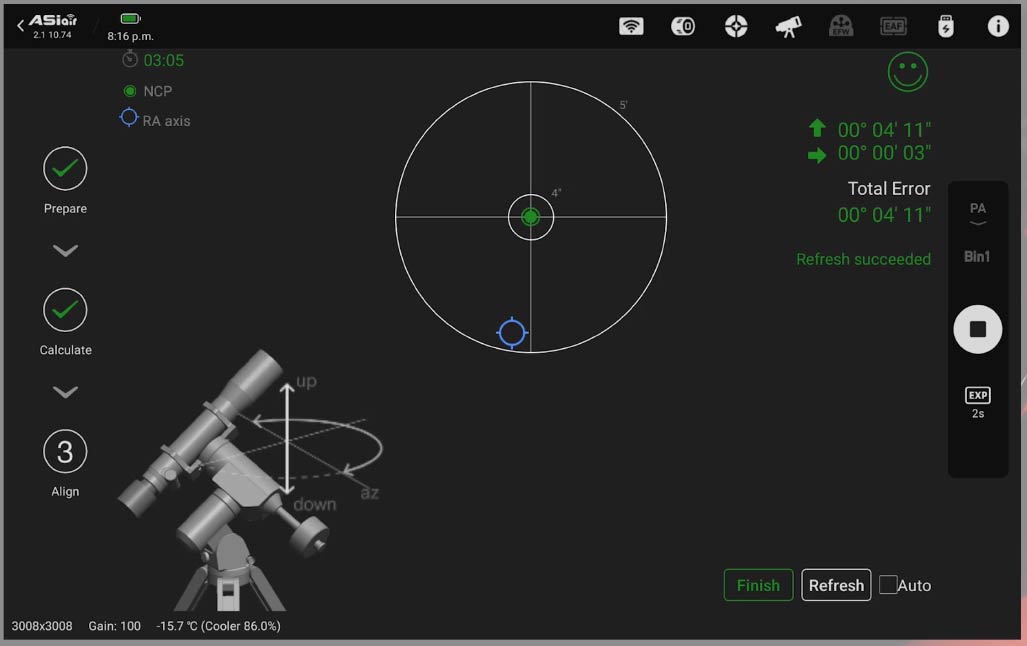
The ASIAIR polar alignment tool allows you to polar align your telescope mount with a high degree of accuracy.
Now, you can click let’s go, and the telescope mount will slew 45 degrees on it’s RA axis. This is a great time to ensure that you do not have any loose cables dragging down that could get caught on something.
Once the telescope mount has finished slewing, the ASIAIR will tell you exactly how much you need to adjust the alt-az bolts on the mount to be polar aligned. These readings are in arc seconds, and tiny adjustments to the bolts can make a big difference.
The goal is to get as close to 0 arc seconds on both axes as possible. You really just need to get under 1 arc second total and you’ll be just fine. Once the little face turns to a smile, you can go ahead and return the mount to the home position.
Find Your Target
With the polar alignment complete, you can now slew the mount to the home position and prepare to slew to your intended astrophotography target. This should be done without a strong filter in the imaging train to ensure that the plate-solving process succeeds.
You can use the Sky Atlas tool in the ASIAIR to choose your target, select the object in the star map, and then hit “GoTo”. The telescope will slew to the object and make adjustments to center the target.
You can also hop over to a bright star nearby to really dial in the focus, this time with our filter inside. So, select a bright star, place the filter in, and we can go back to the focus mode and use the Bahtinov Mask to create a star pattern with a central spike.
This allows you to confirm that you are in perfect focus before you hop back over to your target. Take the filter back out and re-enter the target. With a lot of these filters, you can leave it in the whole time and the plate solving will still work, but it may take longer as there are fewer stars to pick up.
If you are having trouble with plate solving using the ASIAIR, try increasing the exposure time of the images it takes.

Using the Sky Atlas planetarium tool to locate and center the nebula.
Start Autoguiding
Autoguiding is one of those things that people like to overthink. Misinformation about over-optimizing your guiding performance spreads like wildfire online, and it pains me to think about the beginners who become even more confused.
The ASIAIR autoguiding tool uses multi-star guiding and makes this process painless and hands-off. As long as the following basic steps have been taken, you can enjoy reliable guiding for the long haul.
- Your guide camera is in focus
- The focal length of your guide scope is correct in the ASIAIR
- Your telescope and all accessories are well-balanced
- Your telescope mount is polar aligned with the north celestial pole
While pointed at your target, you can start looping the guide camera in the autoguiding window. Again, if your camera is way out of focus, this live loop will make it very easy to see and find the sweet spot.

Autoguiding with the ASIAIR (multi-star guiding).
With the guide camera in focus, you need to hit the guide button and wait for it to calibrate. This is a necessary first step, and I recommend doing it again if you change targets, or perform a meridian flip.
Once the calibration is complete, you should be guiding nicely and you can monitor the performance on the graph. If you see under 1 arc second or better (eg. 0.67) you can be sure that you are capturing pinpoint stars.
Remember, you need to calibrate and run guiding when you are already on your target, and it is framed up the way you want it.
Set Your Imaging Plan
Head over to Autorun (on the right-hand side of the screen), and create a new light frames plan. This is where you tell the camera how long to take each picture and how many of them you want (for example: 30 x 5-minute exposures – or 30 x 300s, which will give 2.5 hours of integration).
With the light frame plan ready, we can go back to the main screen and press the play button. You will now see a countdown timer for your first sub-exposure image. When it completes, an autostretch preview file (JPG) will appear on the screen.
Congratulations, you are officially taking a long-exposure, tracked, guided, deep-sky photo of a nebula. If you made it this far, give yourself a pat on the back.
You can take a break, but make sure to check out that first sub exposure after it comes through to make sure there are no surprises (i.e., guiding issues, leaving the Bahtinov Mask on, and poor framing). I also recommend refocusing your camera after about the first hour or so, especially if the temperature has dropped.
I either spend the night outside with my gear, or I leave it running and check on it before bed to take dark and bias frames. It’s a good idea to capture your dark and bias frames in the dark and take your flat frames in the morning.
Calibration Frames
The ASIAIR makes it easy to capture calibration frames (i.e., dark frames, bias frames, and flat frames).
- Dark Frames: at the end of your session, you are going to want to take dark frames. These are taken at the same temperature and exposure length as the light frames but with the lens cap on. You’ll want to capture about 15 dark frames, along with all of the other calibration files I’m about to mention.
- Bias Frames: also captured with the lens cap on, but these are super short exposures (i.e. as fast as your camera can shoot).
- Flat Frames: after taking your dark and bias frames, keep your telescope in the exact same focus position for this to work correctly. In the morning, stretch a white t-shirt over the objective and point toward the morning sky or use a light panel to better control the lighting. You want it to be even across the field of view. Use the flats mode in the ASIAIR to make this really easy.
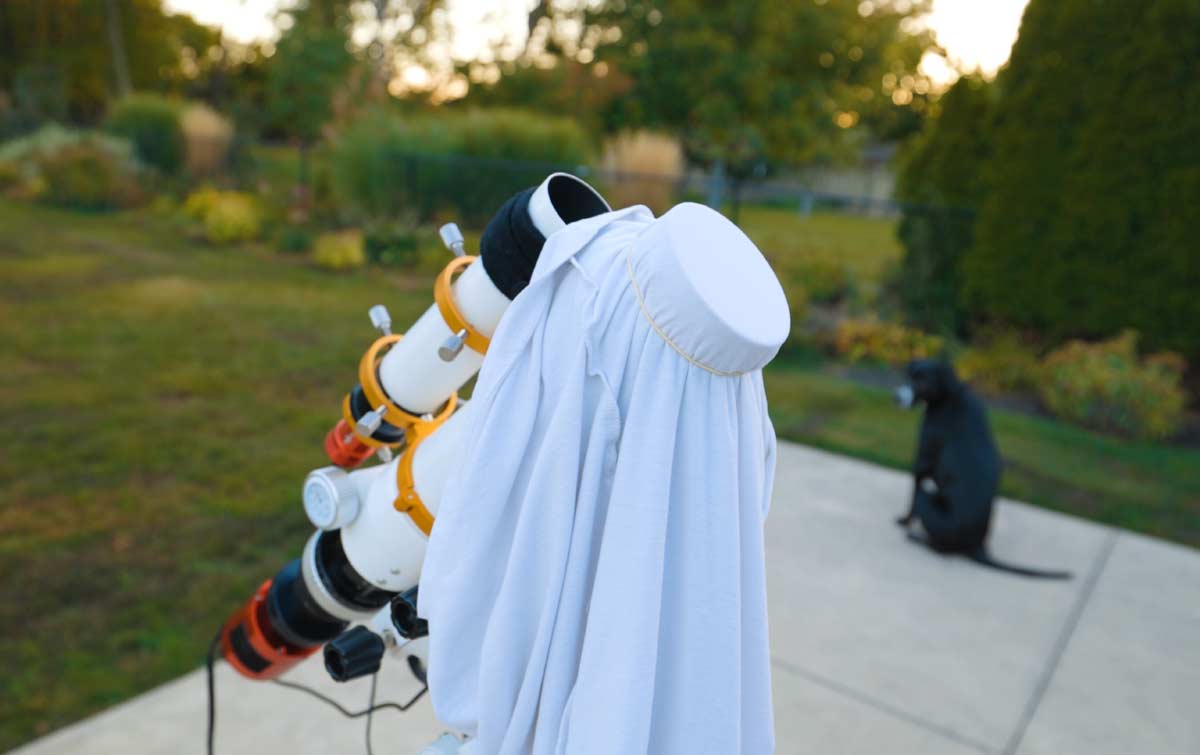
Example of capturing flat frames using the white t-shirt method
Transferring the Data
Once you have taken all of your calibration frames, you can transfer the image files from the USB storage device plugged into the ASIAIR to your computer.
I am very careful with this process, as I have lost and corrupted precious image data in the past. I transfer all of the image and calibration files to a Samsung T7 SSD Drive (2TB). This is a reliable, fast, solid-state drive storage device with plenty of room.

I recommend the Samsung T7 Shield SSD drives for secure file storage.
Organizing the image data by date, followed by the object and equipment used, is recommended. The standard image format for the ASIAIR includes useful information such as temperature and exposure length in the file name.
You can pull everything off the USB stick to stack it. You can reference the above video for a quick breakdown or use the step-by-step process in the Image Processing Guide available here to learn more about this process.
Create folders for each file type, and organize your files to make the image stacking process easier. You should have 4 folders: lights, darks, bias, and flats.
Image Stacking and Calibration
I like to use DeepSkyStacker (DSS) to register, calibrate, and integrate my individual sub-exposure images. There are many image-stacking software alternatives to DSS, including Siril, Astro Pixel Processor, and PixInsight’s weighted batch pre-processing script.
I find DeepSkyStacker to be the most straightforward, and it’s also quite fast compared to other methods. I managed to collect 100 light frames of NGC 7822 and calibrated them using 15 dark frames, 15 bias frames, and 15 flat frames.
The scoring feature in DSS is great for analyzing the quality of your light frames. You can quickly see which images have the sharpest stars (FWHM), and the lowest sky brightness. The overall score is a useful metric to decide which pictures you want to stack into your master image.
The final stacked image included 6 hours of total integrated exposure time. This is enough to create an image with a healthy signal-to-noise ratio. We can now bring this master file into Adobe Photoshop or one of the many other image-processing software tools available.
Image Stacking Steps in DeepSkyStacker
- Load your Picture Files (Light Frames)
- Load your Calibration Frames
- ‘Check All’ Pictures
- Register Checked Pictures
- Use the ‘Score’ Column to Choose the Best Light Frames
- Use ‘Check above a threshold’ to isolate the Best Light Frames
- Stacked Checked Pictures
The master file created by DeepSkyStacker will be a 32-bit TIF file (named ‘Autosave’ by default), and it will appear in the same folder as your light frames. This image has been calibrated, registered, and stacked.
You can now open this file in Adobe Photoshop to begin the process of ‘stretching’ the data to bring the deep-sky object out. If you want a better understanding of the process, I have created a premium image processing guide to download.

Page 54 of my image processing guide describes the creation of your master/intermediate file.
Image Processing in Adobe Photoshop
The image processing stage of the deep-sky astrophotography process could be its own 3-hour video (or 5,000-word article). I have several in-depth Photoshop image processing tutorials available on this website if you would like to learn more.
While Adobe Photoshop isn’t the only option out there, it continues to be a valid choice for astrophotographers in 2023. Some other image processing tools worth looking into include Siril, Affinity Photo, and GIMP.
For completeness, I have shared a breakdown of the steps I took to process our image example of NGC 7822 in Photoshop. I highly recommend purchasing the Astronomy Tools Action Set to automate some handy astrophotography-specific actions.
- Open the ‘Autosave’ 32-bit TIF file
- Image > Mode > 16 Bits/Channel
- Change ‘Method’ to ‘Exposure and Gamma’
- Slight Levels and Curves Adjustment
- Color Balance (Set Black/White Point)
- Specific Curves Adjustment
- Noise Reduction
- Saturation Increase
- Run ‘Enhance DSO and Reduce Stars’ Action
- Final Curve Tweaks
General processing steps of a deep-sky astrophotography image from its linear (unstretched) state.
Rather than using this as an exact process to follow, pay attention to the order of the steps and the concepts mentioned. Image processing takes time to master, and the best way to get better is by experimenting with your own image data.
If you would like to practice your image processing skills but do not yet have your own pictures, you can download practice data here. These are raw stacked files of different deep-sky objects using various astrophotography equipment.
After the basic stretches and color balancing have been applied, you are free to get creative with the image. You may prefer to create an image with smaller stars to draw more attention to the nebula, while others focus on the color and quality of the stars themselves.
The absolute best astrophotography images tell a story about the object in a dramatic yet natural-looking way. This can be tricky to master, and I am still working on this aspect myself.
NGC 7822 in Cepheus. Sky-Watcher EQ6-R Pro, William Optics Z73, ZWO ASI533MC Pro, Optolong L-eNhance Filter.
Conclusion:
After reading this article, it may seem like capturing a deep-sky astrophotography image is an incredible amount of work. I must admit, as a seasoned astrophotographer, it’s easy to forget just how time and energy go into each project.
However, it certainly doesn’t feel like work throughout the process. From setting up your tripod outside to the final curve in your image, the point is to enjoy the journey.
During the experience, you will learn more about the night sky, our universe, and the wonderful things we can photograph and study. I enjoy every step of the astrophotography experience, and it has almost become a way of life.
I hope this article has helped paint a clearer picture of the entire deep-sky astrophotography process. If I could clear up even one missing step from your process, then it feels like I have done my job.
To everyone just getting started, I promise that astrophotography gets easier and more enjoyable over time. The rewards of this hobby are worth every ounce of effort you put into it.

Trevor Jones is an astrophotographer and a valued member of the RASC. His passion is inspiring others to start their astrophotography journey on YouTube so they can appreciate the night sky as much as he does. His images have been featured in astronomy books & online publications, including the NASA Astronomy Picture of the Day (APOD).
Related Content:
- What To Consider Before Buying a Telescope (My Top 4 Picks)
- Smartphone Astrophotography Beginner’s Guide
- The Best Smart Telescopes Available in 2026


Fantastic Trevor. Just what need as I’m just starting AP. However. I think I did everything backwards. I have all the equipment to image…but I need to purchase a computer to process everything. I’m leaning more getting pixinsight as I’m not familiar with photoshop and, might as well take the full plunge. So, I’m not sure what I need as I’m not a computer guy. Any advice?
Jeff
Hi Jeff! I understand your position. You’ll want a powerful PC for image processing. I use a Windows PC myself, it’s an ASUS ROG Strix Gaming Desktop (similar to this: https://amzn.to/492SMmA). I like gaming PCs because they have nice graphic cards, lots of RAM, and internal SSD hard drives. All of these features will serve you well when running BlurXterminator! Good luck 🙂
Trevor, I keep saying this, but if you write a book, I will buy it. Further, I think it will sell. The trick I think, would be targeting the beginning to intermediate astrophotographer, and making the information as accessible and easy to grasp as possible; as you have done here. I really admire your efforts; I have been following them for years. I feel your work is excellent on several levels and you care about getting others involved–we all benefit. Good on you!
Sincerely, Mitch Linneman
Thank you, Mitch! I really appreciate the long-term support. You will be the first to know if/when the book is ready 🙂
Great tutorial Trevor. I’ve not done much imaging and to be honest setting up the laptop has been putting me off and I was wondering about buying an ASIAIR. After seeing this video you’ve convinced me that it would be an asset despite being tied into ZWO.
Dave
Trevor, I want to say this also. I have cut, pasted, and edited several of your writeups into a document I can have with me to annotate, update and also have at the nighttime sessions. I have also used to track pros and cons of purchases I am intending. A while back, I even posted one and gave you credit at Cloudy Nights. I hope you don’t mind this; I have done for others as well. I have followed several people who have the knowledge, skills, and experience, and bring the information down to the common person. I could list several, and you would know them. But I want to emphasize, I feel that your ability to popularize the concepts and make them understandable is second to none. And I was a tech writer for years, so I know something about this. It takes a lot of drive and energy to do what you do, and a certain mindset and ability to make the information clear. I hope you will encapsulate your writings and put them into a guidebook on the topics. It is my hope anyway. I wish you the best in life and your endeavors, sincerely.
I have been reading so many of your blog posts and watching so many of your videos (for about a year!) and I really have learnt so much, but everytime I read a new article or see a new video I learn something new. This is what I love about astrophotography. I started out with just a viewing telescope to hop around the sky, and a DSLR + tripod to capture the milky way.
I am now travelling overseas to try and build my first “proper” set up as I am ready for the next step. Unfortunately there are no local stores where I live.
My plan is to get a HEQ5 or ZWO-AM5 as the mount, and also AISair.
What do you think of the Explore Scientific ED102 and the Skywatcher Evolux 62ED? These two are going secondhand as a bundle so I could pick these up. One for wider field (and to start with) and one for closer.
Another option is the Askar 65OHQ/ FMA180 Pro.
Would love to hear your thoughts, and thank you so much for all the inspiration!
In your issue, I see many things I like, and are trying out, BUT what II don’t see is portable power supply.. I know you use a Anker 757 unit, but I am from Canada and the unit is only in the US. What is the equal in Canada?
Plus do you still use the anker 757 powerhouse unit?
I like to find a power unit I can use most of the year, for travel to dark sky areas, that have no power, and need to find a good unit to work with.
I know what I need for power, but like to know what brand is the best for Canadian weather, spring till late fall.
Thanks
David Beland