Use My Budget Astrophotography Build Guide to Complete Your Setup

Last Updated September 28, 2025
I recently assembled a budget astrophotography rig to capture deep-sky objects in my backyard. While I knew this system would be very capable, I was astonished by the quality of the pictures I took with it.
Astrophotography (and photography in general) can be an expensive hobby, with high-end equipment often costing thousands of dollars. While there are cheaper options available for beginners or those on a tight budget, they usually come with certain limitations in quality or functionality.
This rig offers a fully capable setup at a more affordable price without compromising on performance. It’s designed to capture stunning deep-sky objects while keeping costs lower than many premium alternatives, making it an ideal choice for those wanting to get serious about astrophotography without breaking the bank.
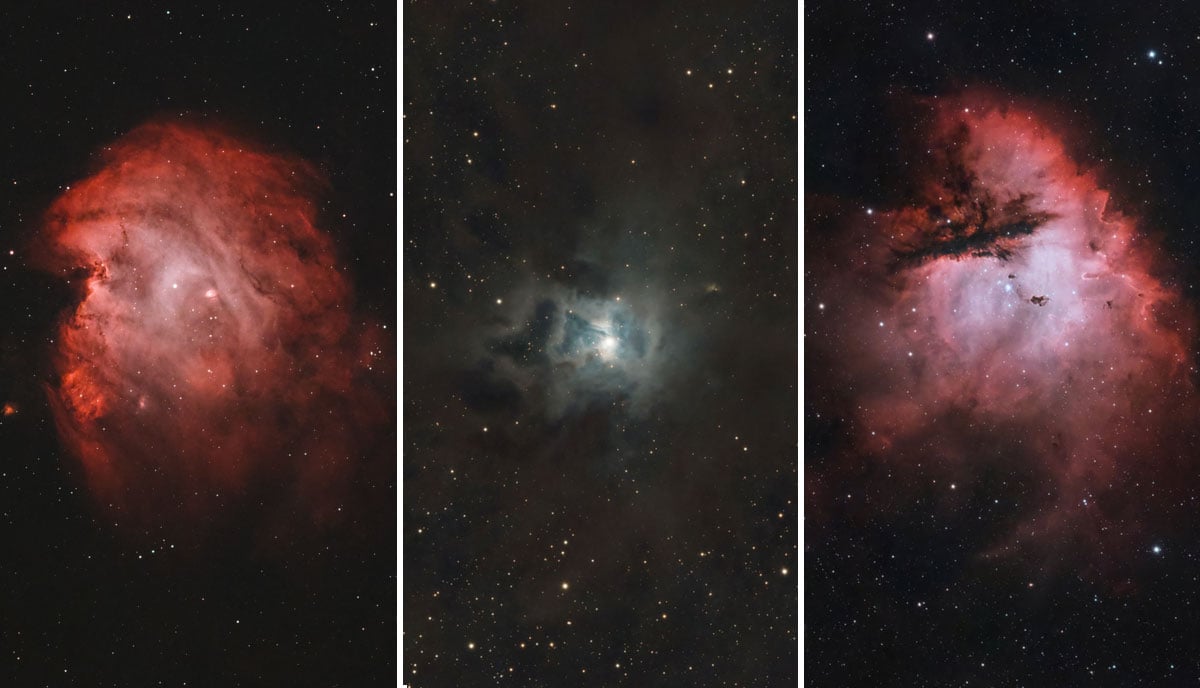
Example astrophotography images I have taken using this budget astrophotography kit.
Results Using a Budget Astrophotography Kit
For those of you looking to build a rig on a budget, I think you’ll really enjoy this guide. While there are many alternatives to this setup (from brands like ToupTek and QHY), this is simply a rough template to follow using the gear I have on hand.
Each piece of this deep-sky astrophotography kit can be swapped for a comparable item from a different brand. You can watch the video to see this deep-sky setup in action:
Quick Summary: Total $2,710 USD (price fluctuates – check for latest prices)
- Mount: Sky-Watcher EQ-AL55i ($760 USD)
- Telescope: SVBONY SV550 ($730 USD)
- Camera: ZWO ASI585MC Pro ($599 USD)
- Control System: ZWO ASIAIR Mini ($249 USD)
- Guide Scope: Starfield 30mm Guide Scope ($114 USD)
- Guide Camera: ZWO ASI120MM Mini ($199 USD)
- Power Box: SVBONY SV241($60 USD)
It’s important to note that “beginner” doesn’t always mean “cheap.” Many entry-level setups are designed with simplicity in mind, yet they still carry a price tag that reflects quality and performance.
Deep-sky astrophotography requires a specific set of equipment to capture clear, detailed images of distant celestial objects. While there are ways to keep costs down (such as buying used gear), astrophotography is an expensive hobby.
The key is finding the right balance between affordability and capability. Invest in equipment that is approachable, but powerful enough to grow with you as your skills improve.
Related Article: Browse the Astronomy Classifieds to Find Great Used Gear
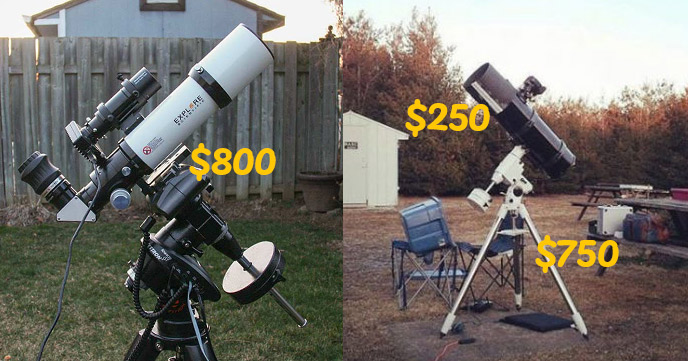
The Budget Build Template
Here is the fully assembled kit, including all the necessary accessories to complete a successful night of imaging. Feel free to use this as a template for your next telescope build.
You may choose to run your kit with a laptop computer or a dedicated mini PC (running N.I.N.A) in place of the ASIAIR. I prefer to use the ASIAIR as I am most comfortable with it, and it allows me to maximize every minute of clear sky time.

My budget astrophotography build featuring the SVBONY SV550 refractor telescope.
This system resembles the first successful deep-sky astrophotography kit I assembled over a decade ago, featuring the Explore Scientific ED80 Triplet APO refractor telescope. A mid-range focal length (480mm) is great for a wide variety of deep-sky objects, especially emission nebulae.
If a deep-sky astrophotography kit like this is overwhelming to you, consider buying a smart telescope to test the waters first. There are several affordable options available, and they can deliver impressive results with minimal effort.
The Tracking Telescope Mount
The inspiration for this build was a new intermediate-level mount that I believe could be a big hit with the amateur astro community in 2025. At $760 USD, the Sky-Watcher EQ-AL55i costs about the same as the Star Adventurer GTi but can handle double the payload at 22 pounds.
You can’t go wrong with an equatorial telescope mount for deep-sky astrophotography, especially from Sky-Watcher. My first serious astrophotography mount was a Sky-Watcher HEQ5, and it still works great to this day (over a decade later).
While it’s not a premium strain wave mount, I was hoping it would overperform for its price range, and I kept a close eye on my guiding graph. For a closer look at this mount’s tracking performance, be sure to watch my video where I show the known declination backlash issue.

With proper balance and autoguiding, this affordable mount does a respectable job. In my tests, I lost approximately 6-7 sub-exposures out of 120 due to tracking errors. If this is unacceptable to you, consider investing in a more robust telescope mount (here are the ones I recommend).
Otherwise, this mount feels like a mini Sky-Watcher EQ6-R Pro that is much lighter and easier to transport.
Sky-Watcher EQ-AL55i Specs:
- Mount type: Equatorial
- Payload capacity: 22 pounds (9.97kg)
- Saddle type: V-style
- Head size: 286mm x 241mm x 133mm
- Head weight: 8.2 pounds (3.7kg)
- Tripod Weight: 11.5 pounds
- Polar Scope: Yes, illuminated
- Tracking Modes: Sidereal, Solar, Lunar
Remember, your mount needs to support the combined weight of all your gear, including your telescope, camera, guide scope, and any additional accessories such as filters or cables.
Choosing a mount with the appropriate payload capacity is one of the most important factors in ensuring smooth tracking and accurate imaging.
Other Budget Mounts:
- Sky-Watcher Star Adventurer 2i (~$450): A highly popular option among beginner astrophotographers, the Star Adventurer 2i is a portable star tracker that offers accurate tracking for wide-field astrophotography. It has a payload capacity of 11 pounds, making it great for use with DSLRs and smaller telescopes.
- Sky-Watcher Star Adventurer GTi (~$700): a step up from the 2i, offering GoTo capabilities with an 11-pound payload capacity. It’s a hybrid between a star tracker and a GoTo mount. It can be controlled via Wi-Fi and is ideal for beginners looking for an affordable, automated tracking option.

Related Article: The Best Astrophotography Mounts in 2025 (From Beginner to Pro)
Astrophotography Telescope
For this session, the SVBONY SV550 made its debut. This triplet apochromatic refractor has a focal length of just under 500mm and an f-ratio of F/6. You can pick one up on Amazon for about $730 USD, which includes a field flattener.
This air-spaced triplet uses FPL-51 glass to produce images with good color correction. In my broadband imaging tests, the star quality and color correction of this telescope are quite good.

The SVBONY SV550 Air-Spaced Triplet Apochromatic Refractor.
I am quite impressed with the SV550’s performance. While I don’t expect the star point performance of a higher-end astrograph like the Askar SQA55, I think it’s a solid option for astrophotographers on a budget.
The following image of the Iris Nebula was captured using a mild light pollution filter, the Optolong L-Pro. This is an excellent example of the broadband optical performance of the SV550 under real-world conditions.

The Iris Nebula in Cepheus (5 hours total exposure). SVBONY SV550, ZWO ASI585MC Pro.
SVBONY SV550 Specifications
- Aperture: 80mm
- Focal Length: 480mm
- Optical Design: Air-Spaced Triplet APO
- Focal Ratio: F/6
- Weight: 8.2 lbs (3.75 kg)
Field Flattener
If your primary interest is astrophotography with the SVBONY SV550 (not visual astronomy), I highly recommend buying the dedicated 1X field flattener with the telescope.
While you can buy the telescope optical tube and flattener separately, I wouldn’t recommend attaching your camera to the SV550 without it. The field flattener corrects the image field for better astrophotography images.

The SVBONY SV209 1X Field Flattener.
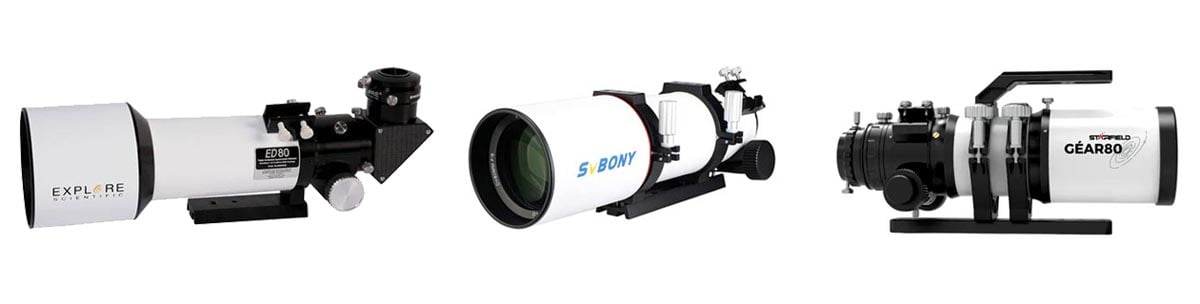
Other Budget Telescopes:
- Sky-Watcher Evostar 72ED: This is a popular choice for beginners in astrophotography. It’s a doublet apochromatic refractor with a focal length of 420mm and an f-ratio of F/5.8. While it delivers good optical quality for under $500, you’ll want to pick up the field flattener as well.
- William Optics Zenithstar 73 APO: Another apochromatic refractor, this telescope comes with a 430mm focal length and f-ratio of F/5.9. Priced around $700, it is a highly regarded scope in the astrophotography community for its optical quality and build.
- Starfield Optics GEAR 80 Triplet APO: This telescope offers an upgrade to the SV550, as it uses the desirable FPL-53 glass in place of FPL-51. It has the same focal length (480mm) and f-ratio (F/6) as the SV550.
Related Article: How Much Does a Telescope Cost?
The specs of the SVBONY SV550 80mm triplet mirror those of some of the most popular astrophotography telescopes on the market. The closest competitors to this telescope in terms of comparable specs are the Explore Scientific Essential 80mm Triplet and the Starfield Optics GEAR Series 80mm Triplet APO.
Astrophotography Camera
I attached one of the most affordable, cooled, dedicated astronomy cameras on the market: the ZWO ASI585MC Pro. This is a popular choice for those entering the world of dedicated astronomy cameras in place of a DSLR.
Although I was tempted to use the slightly larger ZWO ASI533MC Pro for this build, I stuck to the tight budget idea, and this camera holds the top spot in that category. Of course, you could use an old DSLR instead, but it wouldn’t be cooled or modified for astrophotography.
One quirk of the ASI585MC Pro is its long, narrow sensor, so I had to keep that in mind when framing my target. However, it was a great match for the telescope in terms of image scale at 1.2 arc-seconds per pixel.
ZWO ASI585MC Pro Specs
- Sensor: 1/1.2″ CMOS Sony-IMX585
- Resolution: 3840 x 2160
- ADC: 12-bit
- FPS: 46.9fps
- Full well: 40Ke
- Cooling temperature: 50℃
- QE: 91%
- Pixel Size: 2.9µm

The ZWO ASI585MC Pro one-shot-color dedicated astronomy camera.
Controlling the Telescope
There are many ways to run an imaging session, but none are easier than using the ASIAIR and a tablet. For this session, I used the ASIAIR Mini, the most affordable model in the lineup at $249 USD.
This is the perfect solution if you have very limited clear sky time, like I did, and need to maximize every minute. The ASIAIR Mini handled everything, from polar alignment to autoguiding and taking the pictures.
Using station mode, I had a strong connection on my tablet, allowing me to keep tabs on the session while I was downstairs.
To control the Sky-Watcher EQ-AL55i mount, I used an EQMOD cable (shown below). This plugs into the hand controller port of the telescope mount and allows you to utilize plate-solving with the ASIAIR and target selection via the Sky Atlas.

This is the cable you need to connect the Sky-Watcher mount to the ASIAIR for telescope control.

The SkyAtlas on the ASIAIR allows me to choose an object, and the mount will find and center it.
Autoguiding Combo
For autoguiding, I kept things bare-bones. I mounted a William Optics 32mm guide scope from a RedCat to the top of the SV550, paired with an ASI120mm Mini—a monochrome planetary/guide camera that has never let me down.
This combo added almost no weight and allowed me to shoot longer exposures, up to five minutes. I like the 32mm UniGuide model, but there are many alternatives, including the ZWO 30mm version.

The ZWO ASI120MM Mini is a fantastic little guide camera for the price.
I suggest using whichever guide scope you already have. A simple 50mm guide scope with a 200mm focal length will work fine. If you don’t own one yet, the mini guide scope I mentioned works great on a wide-field rig.
Here is a look at my guiding graph using the Sky-Watcher EQ-AL55i mount on the Monkey Head Nebula. With passing clouds, I experienced a total RMS error of 1.17″ – but this improved to below 0.8″ later on.
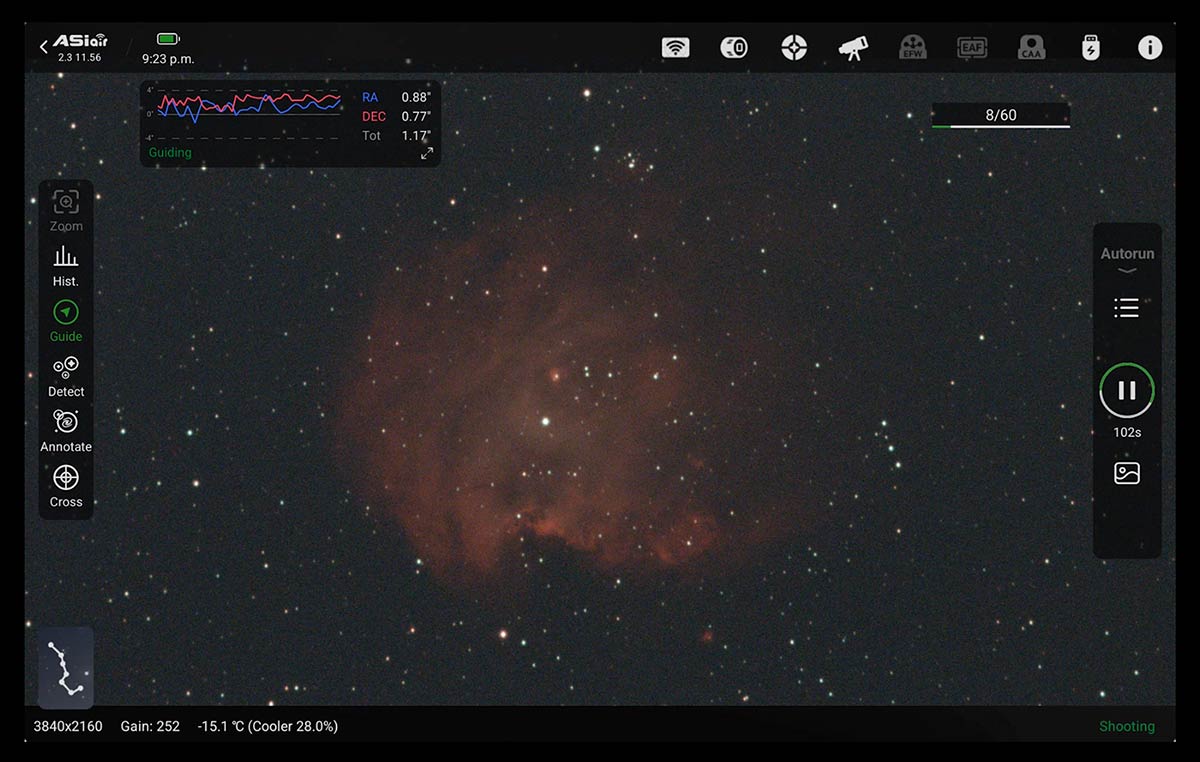
My guiding graph using the Sky-Watcher EQ-AL55i mount.
Light Pollution Filter
I regularly use light pollution filters to capture better images from my backyard in the city. They help me produce images with better contrast and a healthy signal-to-noise ratio.
For this project, I chose the Optolong L-Extreme filter. If you’re lucky enough to live somewhere with less light pollution (I’m in a Bortle 6), you could skip the filter, but moonlight is still something you’d have to deal with.
The Optolong L-Extreme, priced at around $300, is my go-to for nights like this. It’s a duo-narrowband filter that captures a healthy signal-to-noise ratio, even with a bright moon.
There are cheaper alternatives, like the SVBONY Dual-Band OSC filter, though I haven’t tried that one yet.

The SVBONY Dual-Band OSC filter is a cheaper alternative to the Optolong L-eXtreme filter.
Astrophotography Results
The first deep-sky object I chose to photograph with the budget rig back in March was the Monkey Head Nebula on the border of Orion and Gemini. This nebula is often overlooked because of its proximity to all-star objects like the Orion Nebula and the Horsehead Nebula.
My final image included a total of 4 hours of exposure time, which was enough to process it the way I wanted. Emission nebulae captured with dual-narrowband filters have the benefit of tight stars and punchy details.

My final image of the Monkey Head Nebula (60 x 4 minutes).
For this image, I separated the nebulous regions from the stars so I could process them independently. This nebula contains a lot of hydrogen gas, giving it a red appearance in a natural RGB palette.
Next, I captured a summer/fall target, the Pacman Nebula in Cassiopeia. I was really impressed with the data on this one, and it was a joy to process.
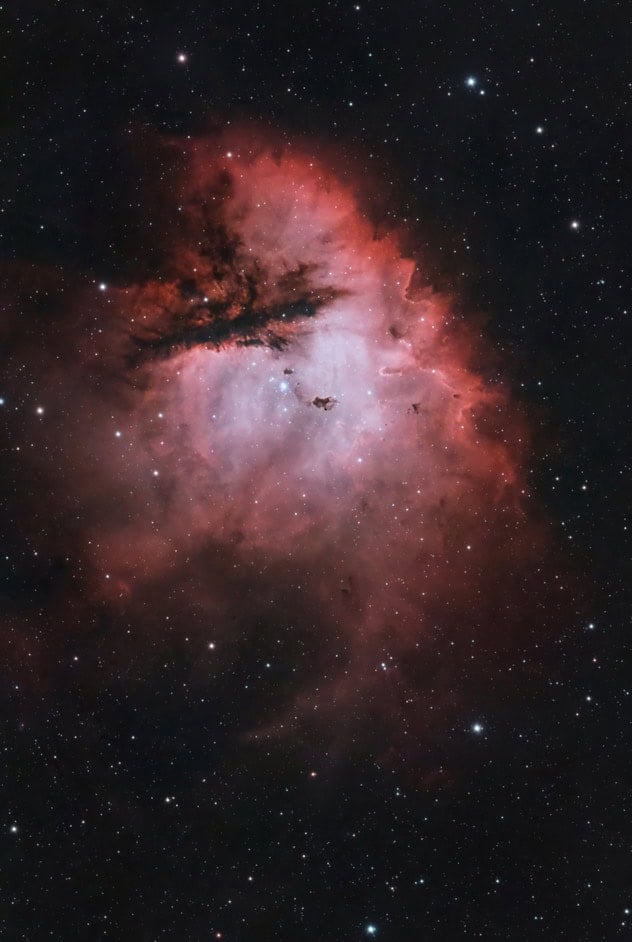
The Pacman Nebula. 5.5 Hours of Total Exposure (82 x 4-minutes)
Recommended Accessories
You can use your smartphone to control the ASIAIR, but a larger tablet makes it much more fun. This allows you to view image previews in a much larger format and keep your astrophotography session (and WiFi connection) separate from your phone.
I currently use a Samsung Galaxy Tab A8 (2022 version), which has been discontinued. A suitable replacement is the Samsung Galaxy Tab A9 (11″), shown below. This model can handle the ASIAIR mobile app with ease, and can be used for many other tasks as well.

To extend the range of your signal, make sure you utilize the Station Mode feature on the ASIAIR WiFi connection options. For it to work properly, connect to the 2.5 GHz band.
Conclusion
I have learned that discussing the price of astrophotography equipment can get the online audience very heated. While this equipment profile is significantly more affordable than many of the rigs used by astrophotographers on a daily basis, it is still quite expensive compared to less gear-intensive hobbies.
The key to this setup is the level of sophistication and image quality it produces. This is an astrophotography setup that makes it easy to find and track objects while capturing incredibly high-quality data (even from the city).
So, if you are looking for a starting point before reaching this level, that is absolutely fine. A DSLR camera, kit lens, and star tracker are all you need to enjoy this hobby!
 Trevor Jones is an astrophotographer and member of the Royal Astronomical Society of Canada (RASC). Through his AstroBackyard YouTube channel, he inspires beginners to start their own astrophotography journey and capture the beauty of the night sky. His work has been featured in NASA’s Astronomy Picture of the Day (APOD), astronomy books, and major online publications.


As a new bee, I hesitate to spend over a 1000$ that can have some flaws.
Do you see backlash issues with the Dec Axis on the Sky-Watcher EQ-AL55 as I read on the web?
Thanks
Hi Francois. With autoguiding, this mount performed flawlessly throughout my imaging sessions. I did not experience backlash that was strong enough to affect my guiding!
Hello Trevor..
great content as always.
regarding the al55i, does it have any issues out of the box ? getting it instead of the gti is a no-brainer. however im reading some negative things about it online.
do you recommend getting it for a newbie who is new to the hobby , or settle with a safer choice (gti) ?
thanks brother
Hey,thanks! Yeah, it worked great out of the box. As I mentioned in the video – it does kind of sound like it’s struggling when slewing. It’s the exact same sound as the GTi. The only thing to keep in mind is using the right power supply – as Sky-Watcher mounts tend to be picky with the power adapter used (the EQ6-R was like this, too). I use this one: https://amzn.to/4iIt63i
if you had not insisted on using the ASAIR, you could have reduced costs much more e.g. mini-pc with NINA and PHDII or RPi either stellarmate. you would then have non- ZWO alternatives for cameras (e.g. Svbony, Player One) as you would not be locked into the ZWO ecosystem.
Yup that’s a great option for those that want to take that route!
I agree with this list of equipment. This is a fine way to get into astrophotography, and someone new to the hobby could get years of use from this rig. For $200 you can add an EAF and get auto-focus, but you’re not getting dangerously close to $3000. I tried this exercise a while back and got much the same list of equipment.
Thanks for your input, Chris!
Hi Trevor
I’m looking at getting the set up you have recommended but I was wondering if I could swap the sv550 for a William optics z81 without any problems, as far as I can tell It should be OK but I don’t know enough to be sure. your opinion would be appreciated.
Yes, that will work out great!
Any chance of a deeper testing and review of the Sky-Watcher EQ-AL55i? I see it listed online from some shops but otherwise hear nothing about it online other than second hand accounts. Having someone like yourself putting it through its paces would be reassuring.
Hi Dave. I tested the DEC backlash issue in my latest video. Out of 120 sub-exposures, I lost about 6 due to tracking error. You can see my guiding graph in the video (sped up) that shows the error as well.
Didnt look at all components but the telescope and mount both went up in price.
I think the Sky-Watcher EQ-AL55i mount actually went on sale – but these prices sure do bounce around.
hi Trevor. I just bought an eq-al55i provide and I can’t find the amperage requirements needed for the mount anywhere on the internet. Do you know? I am thinking of plugging it in to the asiair power port to minimize dangling wires.
thx in advance,
steve
Hi Steve. Kevin at Sky-Watcher mentioned not to power the mount through the ASIAIR. I use a 12V 5A power adapter directly plugged into the mount, and it works great.
If anyone is interested, the CarbonStar 200 can work on that EQ-AL55 Pro mount, assuming PHD2 guiding, 585 sensor, it has worked for me.
But I will be switching to the AM5N sooner or later.
your review on the CarbonStar 200 was the main reason I got it, and so was the mount.
Great to hear the CarbonStar 200 is working well on the EQ-AL55 Pro with your setup. The AM5N will be a nice upgrade down the road, but I’m glad the Carbonstar 200 review helped guide your gear choices. Clear skies!
Trevor is there a reason you use a EQMOD cable instead of the USB-C port on the mount? Does it provide a better signal for guiding?
I’ve never been able to get the other cables to work reliably. I am sure there is a setting I am missing (would love to know, actually). But the EQMOD cable just works – every time.
I struggled with the USB connection initially. The EQMOD cable you suggested was on back order and I ran out of patience. I could not get guiding to settle down until I changed the baud rate from 9600 bps to 115200 bps. After that I was able to get some buttery smooth guiding. Still takes a few seconds to settle after dithering.
This is my first astrophotography rig, I’ve done visual for 25 years other than wide field dslr and the 3 axis cell phone mounts. I decided to bite the bullet after buying a house in a Bortle 4 location. This setup has been so nice to learn on, everything just works like it was a packaged kit. I’m already putting together mosaics (time to upgrade my pc.) Thank you for putting this guide together, your advice pushed me to go for it.
Hey Trevor, For someone completely new to deep-sky imaging, how steep is the learning curve with this kind of rig?
It’s moderately steep. If you are transitioning from a DSLR, it will take time getting used to a dedicated astronomy camera and the software to run it. The ASIAIR is the great equalizer – it will honestly skip over 2+ years of setup time and learning because it is so intuitive and easy to use.
Thank you and I appreciate you taking the time to respond to the question.
I started astrophotography with a five inch SCT, (Nexstar 5se) and I am wanting to get into deep sky rather than planetary. This blog has been very helpful, but I have been thinking about the Askar 60F Flat-Field Refractor. I wonder if it could do better than the SVBONY SV550? I am very interested in that scope, and for the price it seems hard to beat especially if it can really produce such good images as it claims. (Don’t know if you have the Askar 60F as it is still quite new, but I am interested in what you would think with your experience in deep sky.)
It’s also very lightweight that you could put it on the Sky-Watcher Star Adventurer GTi Mount which also has a decent price. Fortunately, I don’t need to worry about a camera as I already have one, but I’m curious what you think?!