Photographing the Elephant’s Trunk Nebula

As the season transitions from summer to fall, the nights have become longer and cooler in the backyard. This is beneficial for deep-sky astrophotography for many reasons, including more time to capture exposures on incredible targets like the Elephant’s Trunk Nebula.
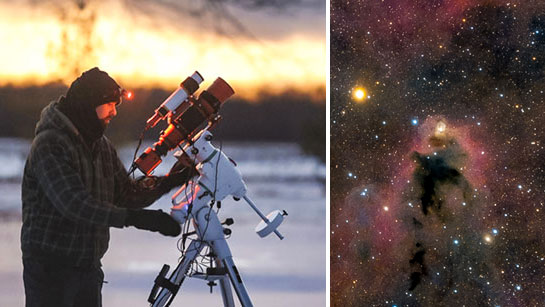
For those who have been following my YouTube Channel you’ll know that I’ve been testing out a new APO refractor telescope, the Sky-Watcher Esprit 100 ED. I was shocked to see just how many of my subscribers were already using and enjoying this exact telescope for astrophotography.
In the following post, I’ll show you how I captured the Elephant’s Trunk Nebula using a camera and telescope from my backyard in the city. The final image includes 1 hour and 50 minutes of total integrated exposure time.
Photographing the Elephant’s Trunk Nebula
From my little backyard, I like to choose targets that offer a long run of imaging time before running into an obstruction (like my neighbor’s roof). This can be challenging at times, and certain objects have a very small window of opportunity.
This, unfortunate reality that many of us backyard astrophotographers face often has a lot to do with the deep sky targets we choose to photograph. I’d love to simply choose the most interesting nebula or galaxy to shoot each month, but I usually opt for something that I can spend a fair amount of time on.
Total integrated exposure time is the single biggest factor to consider when executing a new deep sky astrophotography project. The best images in the world usually include 10 hours of exposure time or more, not an hour and a half.
With that being said, the Elephant’s Trunk Nebula is well placed in the night sky for plenty of exposure time during the months of September and October. I expect to collect a much more time on IC 1396 throughout the month of September.
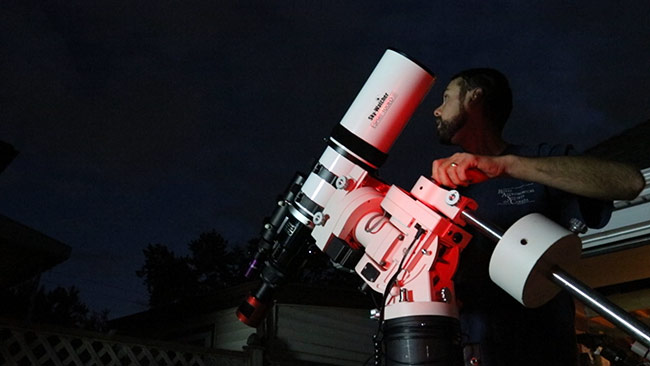
Setting up the Sky-Watcher Esprit 100ED APO Refractor
IC 1396
The high position of IC 1396 from my latitude is advantageous for some sharp and detailed images. This nebula stays away from the horizon and the ever-present glow of my Bortle Class 8 skies.
Targets that rise almost straight up in the sky benefit from less turbulence in the air, which (in my experience) results in tighter stars. It’s also free from the tall obstructions present on my back patio such as an increasingly tall Northern Hackberry tree.
The plan was to capture as many 5-minute exposures as possible during the brief stretch of clear nights we’ve experienced in September this month. These nights have all been mid-week, which can often lead to some groggy days at work to follow. But that’s what we signed up for.
To properly showcase this 5-degree wide emission nebula and cluster of young stars, I’ve decided to use a narrowband filter with a color camera. Not just any filter, a duo-narrowband filter that captures both Ha and OIII at the same time.
Object Details:
- Common Name: Elephant’s Trunk Nebula
- Cataloged: IC 1396 (Embedded Star Cluster), vdB 142
- Object Type: Emission Nebula with embedded star cluster
- Distance: 2,400 light-years
- Constellation: Cepheus

The location of the Elephant’s Trunk Nebula – Sky and Telescope
The Camera and Filter Used
The STC Astro Dual-Narrowband filter has been an astonishingly useful addition to my growing collection of light pollution filters. Together with a cooled color CMOS camera, I have been able to produce some of my best deep sky images to date.
With the cooler temperatures at night, I’ve managed to lower the sensor temperature on the ZWO ASI294 MC Pro to -20C. This helps capture low-noise images that make the image processing stages so much more enjoyable later on.
The sensor size of the ASI294 MC Pro is an excellent fit in terms of pixel scale with the wide-field Sky-Watcher Esprit 100ED refractor. The field of view using the Esprit 100 with the included field flattener (corrector) and this camera is perfect for large nebulae objects like the Elephant’s Trunk Nebula. I used this handy tool to calculate the field of view.
The image above illustrates where I threaded my 2-inch filter on the imaging train of this configuration. Finally, I think I’ve got the correct spacing between the camera sensor and the flattener!

The ZWO ASI294 MC Pro Camera attached to the Esprit 100 2-Element Corrector
Update: A number of folks contacted me after seeing how I connected the camera and filter to the field corrector in my Pacman Nebula video. Two helpful options for placing the 2-inch filter in front of the sensor have surfaced.
Thank you to Jimmy and Kevin for the tip. I appreciate the advice, guys!

The Starizona Filter Slider.
The Telescope
In late August, I was sent a Sky-Watcher Esprit 100ED APO to review. It’s a wide-field apochromatic triplet refractor, my absolute favorite type of telescope for astrophotography. I have only recently mounted the telescope to the iOptron CEM60 mount and sorted out all of the necessary accessories for astrophotography.
The Sky-Watcher Esprit 100 ED included a threaded 2-element field corrector (or, “field flattener”) and a Canon t-ring adapter. Instead of connecting my DSLR camera, I’ve opted to try the ASI294 MC Pro for some more narrowband imaging.
I’d like to eventually take advantage of the full-frame corrected focal plane with my stock Canon 5D Mk II. I may try shooting a reflection nebula using this camera such as the Iris Nebula, or Witch Head Nebula.

Video: Unboxing a Sky-Watcher Esprit 100ED APO
Sky-Watcher Esprit 100ED Super APO Triplet Specs:
Glass: Schott/Ohara ED
Aperture: 100mm
Focal Length: 550 mm
Focal Ratio: F/5.5
Weight: 16.3 lbs.
At a focal length of 550mm, this triplet is best for capturing large nebulae and galaxies. In my early tests on the Elephant’s Trunk Nebula, the very edges of the image showed elongated stars. After correcting the spacing between my camera sensor and the threaded field corrector, I am happy to report that the stars are now pin-points to the edge of the image.
Overall the Esprit 100ED has been a welcome addition to the AstroBackyard with yet another focal length and native magnification to play with. In contrast, my Explore Scientific ED102 has a focal length of 714mm despite only being 2 inches larger in aperture.

My Results
The following image was captured over 2 nights in early September from my backyard. The complete photo details and equipment breakdown are listed below.
IC 1396 – The Elephant’s Trunk Nebula – Trevor Jones
Total Exposure Time: 1 Hour, 50 Minutes
(22 x 5 minutes)
Mount: iOptron CEM60 center-balanced equatorial mount
Telescope: Sky-Watcher 100ED Super APO triplet
Camera: ZWO ASI294MC Pro
Reducer: Sky-Watcher 2-Element Field Corrector
Filter: STC Astro Duo-Narrowband Filter
Autoguiding: Starfield 60mm Guide Scope Package
Image Acquisition in Astro Photography Tool
Autoguiding with PHD2 Guiding
Stacking in DeepSkyStacker
Final Processing in Adobe Photoshop


Great write-up Trevor as always. Love your stuff – been following you on YouTube/Blog and your SoundCloud Podcasts for a while. You are a true inspiration.
I have just recently got the bug again after a 3 year hiatus (I’ll not go into that!).
All the best from Derbyshire, UK.
PS You need to start doing merch. – love your AstroBackyard T-shirt!
🙂
Thanks, Matthew! So glad to hear that you’re back into the hobby and are following the YouTube Channel and the Podcast. T-shirts are coming 🙂
Cette Asi 294mc pro tient toutes ses promesses , superbe photo !
Bravo
Merci! 🙂
Great image with that limited of integration time! I take it the Duo NB filter help a lot with that?
Definitely. There is no way I’d be able to produce a presentable image in RGB with that amount of time. If it was just in Ha – I’d have a B/W image – but in Ha + OIII I get a color image in one shot!
Hey Devon,
I have a (perhaps dumb) question — I’ve never used narrowband filters or anything yet. If your filter allows two diff bands through and it’s a color camera, does that mean your resulting data is an RGB image with strong peaks in the histogram for those two bands? Do you separate them out in the data for processing or just leave it as-is? Are the resulting colors “natural” or mapped somehow to one of the RGB channels?
Thanks and awesome photos!
Hi Chris! A great question – and yes, you have it completely right. I have not separated the wavelengths and mapped to separate channels. The final result is natural in the sense that I have only color corrected the image by balancing the background. Thanks for the kind words!
Great video Trevor. I liked your video on Cherry Springs. Imaged on some clear nights their to. Thanks for sharing? How do you like the Ioptron60 mount?
Hi Bruce! Thank you – the CEM60 is excellent. I’ve used a number of heavier telescopes with it and guiding has been incredible. As an example, I took over 50 frames on the Pacman Nebula last night and kept each and every one of them. It’s nice not worrying about periodic error now.
Hi Trevor,
Thanks for (again) a very inspiring video.
I wonder, do you ever sleep? 🙂
All the best from Zeist, The Netherlands.
Hi Trevor!
Very good video! Very informative as usual! I got last week the bigger brother of esprit 80, the 120mm (focal lenght 840 mm) and I realy am surpriced of the quality of this scope. Very sharp images!
I’m very intrested of the Astro duo narroband filter! I think it will be my next buy. Thanks again for sharing with us your experiences! /Francesco
Quick Question Trevor,
I have the same camera and I do live streams in EAA on http://www.nightskiesnetwork.com
I was looking into that dual narrow band filter for fast aquisition live shows. I see you where running 5 minute frames for your image, could you please tell me at what gain you where imaging? I’m trying to extrapolate if I will be able to run decent results at a high gain and short exposures (about 15 sec to maximum 30 seconds).
Hi Trevor. Great image and another terrific post.
Thanks so much for the image showing the full imaging train. I was wondering whether you might help me/us out with some further additions to that image, with labels showing exactly which components are in that image? It’s not clear to me where one item starts/stops and the next component begins?
Does the FLO adapter you describe as a possible option for including the filter in that imaging train work with the Esprit dedicated flattener? I read on their site it it not designed to work with a focal reducer, which I know is a separate and different item.
Otherwise, great stuff! Keep up the good work, and how about more images taken with the Esprit 100ED?
Matt, Sydney, Australia
I’d love to see
Hey Trevor! I recently read your 2018 article on the elephant trunk nebula and noticed your earlier image is similar to the VERY RED stacked and stretched nebula images I’m currently producing. Whether I’m using the L-enhance or L-extreme, they always seem to come out washed in red. Is there something in processing I need to be doing to pull out more colour variety? Or are the narrowband filters always going to produce very red images?
Hey Brandon! This is a very common problem due to the strong h-alpha signal in these targets. The way around it is to try and balance out each channel so that the blue/green can ‘compete’ with the reds. You can do this in PixInsight or Photoshop by stretching the channels individually. However, it only works if you have enough overall signal – as the blue/green channels are usually very weak! Hope this helps 🙂