5 Tips for Better PHD2 Guiding
PHD2 is a telescope autoguiding software that automates the process of tracking a guide star. This is an important aspect of deep sky astrophotography because it allows you to focus on capturing successful long exposure images and get the most out of your telescope mount.
PHD2 is easy enough for a beginner to use right away, yet also includes sophisticated guiding analysis tools that experienced users will appreciate. The software is available for Windows, Linux and Mac operating systems. The built-in help file inside PHD2 contains a wealth of information, or you can download the instruction manual here.
My autoguiding graph in PHD2 using the Sky-Watcher EQ6-R Pro telescope mount
PHD2 Guiding Settings for Astrophotography
I have found PHD2 Guiding to be an incredible tool for my backyard deep sky astrophotography. I have been using this software for a long time, starting with the original PHD “1” verion. The latest version of the software (PHD2) has been totally overhauled by a team of passionate developers that aim to make autoguiding even better.
Download the latest version of PHD2 Guiding
The guys over at the Astro Imaging Channel released an informative video featuring one of the team members of PHD who worked on the software. Andy Galasso quickly reveals just how passionate he is about the project, and how knowledgeable he is with the PHD guiding software.
The video is quite long, but contains a wealth of information about autoguiding with PHD:
The intelligent folks over at PHD can explain the full power of PHD2 guiding better than I can, but I thought I would share what I personally took away from this enlightening presentation. Before adjusting the settings in PHD2 Guiding, it is important to make sure that your equipment is prepared for imaging. This includes accurate Polar Alignment and balancing the weight of your payload.
How to use PHD2 Drift Alignment
Here are the top 5 tips I gathered from watching Andy explain exactly how to use PHD2 guiding for best results:
Use the Guiding Assistant
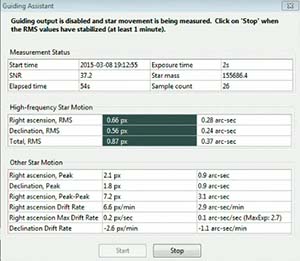 The guiding assistant was built to show you how your mount performs, and where corrections can be applied. This is an interesting method that involves watching your mounts behavior before you start guiding.
Find this feature under Tools > Guiding Assistant
As Andy puts it, you’ll want to observe an unguided star motion to see what you are up against. This gives you a window into the amplitude of the RA (Right Ascension) periodic error. Again, explore this tool for a more detailed insight into your particular mount’s characteristics.
The Right Ascension Max Drift rate displayed in the guiding assistant will display a recommended guide exposure length. Very handy!
Create a New Profile using the Wizard

The built-in equipment profile wizard in PHD2 guiding allows you to tell PHD exactly which hardware you are using. Here you can set all of the specific details of your gear. This includes entering in your guide scope focal length and autoguiding camera pixel size.
At this point it will also prompt you to build a dark frame library. You’ll want to make sure that PHD2 Guiding is making the necessary corrections relevant to your unique setup.
Use Auto Star Select
PHD 2 Guiding has an advanced feature that calculates the best possible star in your field of view to use for guiding. It will select a star based on algorithms to avoid over saturated or poorly sized stars. Why not let PHD choose the best possible star, rather than guessing yourself!
In the past, I would try to select a star that was “medium-sized” and near the center of the frame. This guessing game no longer takes place thanks to the auto star select feature within PHD2 Guiding.
Try using longer guide exposures
In the video, Andy explains that his tests show that using longer guide exposures results in fewer pulse corrections needed. This was a big eye-opener for me, as I had never given much thought to the guide exposure length I would use. Generally, my guide exposures were about 1 to 1.5 seconds. The diagram below illustrates how longer guide exposures can provide a smoother graph:

He recommends using longer guide exposures for improved performance. Earlier, I mentioned using the guiding assistant to give you a recommended guide exposure length. In the example used for Andy’s equipment, that was an exposure of 2.7 seconds. As a rule of thumb, do not expose so long that the stars begin to over saturate, or PHD will not be able to provide an accurate pulse correction.
Use the graph. Over/Under Correcting
When looking at the graph in PHD, remember that blue is RA, and red is DEC. If your graph displays a zigzag pattern like the one below, it is a good sign that you are over-correcting. Toggle the “corrections” check box to get a visual reference for exactly what PHD is doing.
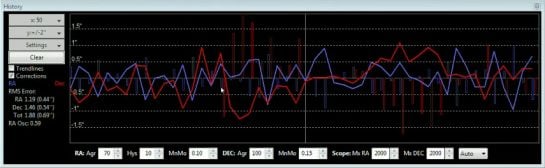
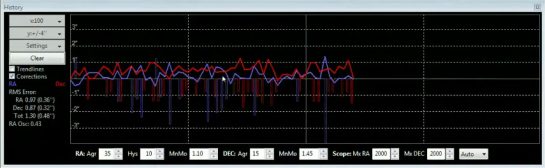
If you are over correcting, the solution is to decrease the aggressiveness and increase your RA minimum motion. On the other side of the coin, if you are under-correcting, your graph will look like the image below:
For more information about autoguiding with PHD2 Guiding, please visit the Open PHD Guiding Google Group Forum or the Stark Labs Astronomy Software Forum on Yahoo. These forums offer answers to many of the troubleshooting issues you may experience while using PHD for astrophotography.
Clearly, I am still learning the ins and outs of this software myself. I hope to improve my knowledge of PHD2 this year to get the most out of this amazing free resource for astrophotographers.
Improved Autoguiding with the iOptron CEM60
In October 2017, I tested out a new astrophotography mount, the iOptron CEM60. One of my main goals was to see if this mount could outperform my Sky-Watcher HEQ-5 Pro in terms of autoguiding, and overall tracking performance.
Have a look at the PHD2 graph I was able to achieve while imaging early on in my testing. The total RMS error was less than 1 second, and noticeably better than anything I had seen using the HEQ-5 Pro.
However, the fact that I was now pulse guiding via ASCOM to the mount directly may have made a difference as well. (This can be done on the Sky-Watcher HEQ5 as well)
PHD Guiding with the Sky-Watcher EQ6-R
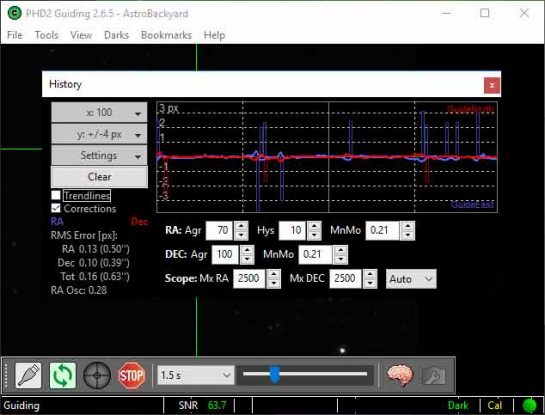
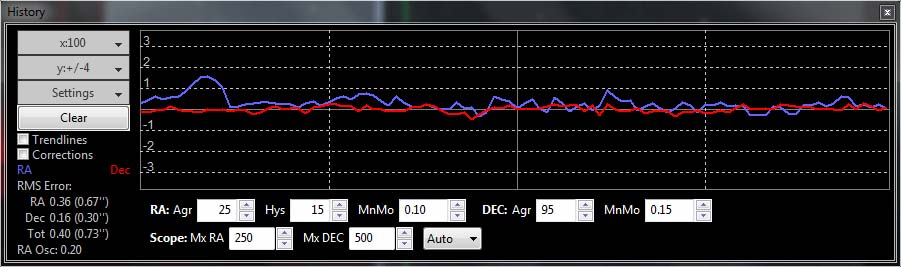
A new telescope mount presents an opportunity to compare guiding performance. The Sky-Watcher EQ6-R was very impressive in terms of autoguiding performance right out of the gate. Using the default settings with PHD and the generic ST-4 mount connection, I was able to achieve an impressive guiding graph.
In the screenshot below, you’ll notice that the total RMS error is 0.16 (0.63″). This resulted in an incredibly sharp image with round, pinpoint stars in each frame. Autoguiding with a telescope mount like this means that you will never have to discard image exposures due to bad guiding, and elongated stars.

My PHD guiding graph using the Sky-Watcher EQ6-R mount
Related Posts:
- Using PHD2 Guiding with the Lodestar X2 Guide Camera
- Autoguiding Camera for the ASIair – ZWO ASI290mm Mini
- Astrophotography Resources: Software and Tools