ZWO ASI294MC Pro Review
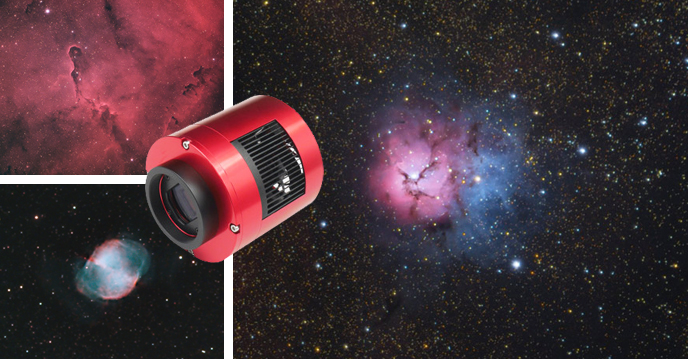
The ZWO ASI294 MC Pro is a competent one-shot color CMOS camera for deep-sky astrophotography. Whether you use it for broadband true-color images on a moonless night or ultra-long-exposure images using your favorite narrowband filter, this camera can produce insanely beautiful images.
This is easily one of the best color cameras I have ever used for astrophotography and my go-to choice for a night of deep-sky imaging. Over the past few years, I have used this camera extensively through various telescopes in my backyard and beyond.
Here is a taste of what the ASI294MC Pro can do:
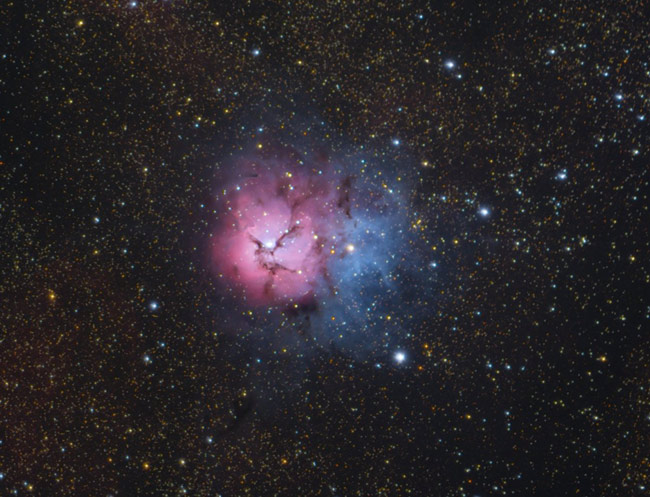
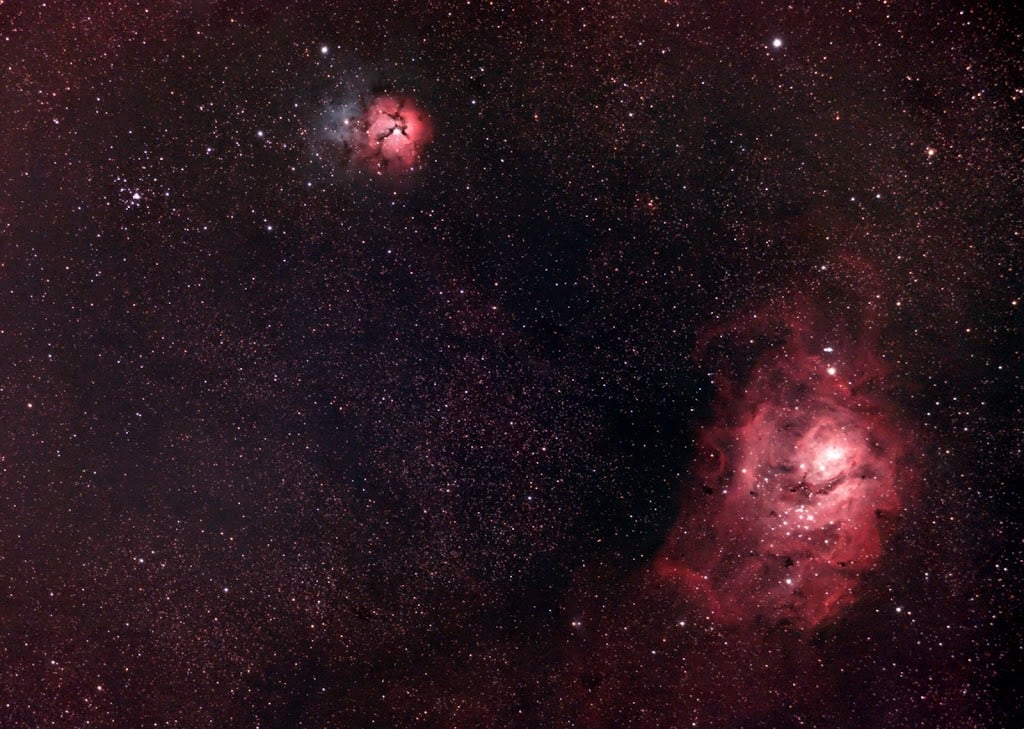
The Trifid Nebula using a Luminance Filter with the ASI294 MC Pro
This photo of the Trifid Nebula was captured using the ZWO ASI294MC Pro with a luminance filter (IR Cut) in front of the sensor. The image was captured under the dark skies of the 2018 Cherry Springs Star Party.
The ASI294MC Pro has proven to be an incredible 4/3 sensor CMOS astronomy camera in the astrophotography community. This camera is responsible for some of my best deep-sky images to date, including the photos shown below.

It is the best camera I have ever personally used for astrophotography, and I continue to use it to this day. For under $ 1,000 (US), you’ll be hard-pressed to find a more versatile, reliable, and easy-to-use color astronomy camera.
This camera works exceptionally well with broadband light pollution filters and narrowband filters. Many people will advise you not to use a color camera with narrow bandpass filters such as H-alpha or OIII, but I have found the 294MC Pro to perform extremely when used with a duo-narrowband filter.

Order the ZWO ASI294MC Pro Camera
ZWO ASI294MC Pro Astrophotography Camera Review
I can confidently say that I now know precisely what the ASI294MC Pro is capable of, as well as some recommended settings for a successful image. I’ve used this camera for both full-color images with light pollution filters, an IR cut filter, and narrowband filters that separate certain wavelengths of light, such as Ha and OIII.
This OSC (One-shot-color) camera performs exceptionally well in both situations. The idea of capturing narrowband images with a color camera is generally discouraged in the astrophotography community. This is because a color sensor will essentially record about one-quarter of the detail a mono camera would.
The cheat code, however, is to use a color camera like the ASI294 MC Pro with a duo-narrowband filter like the STC Astro Duo-Narrowband filter. This has the power to capture gorgeous, deep-sky images, such as the Eagle Nebula example below, in a single shot.
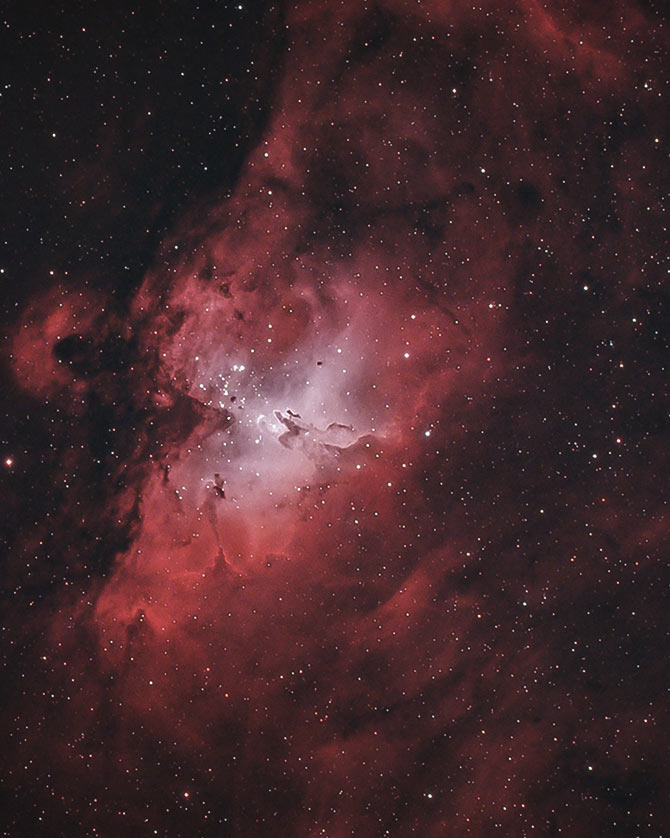
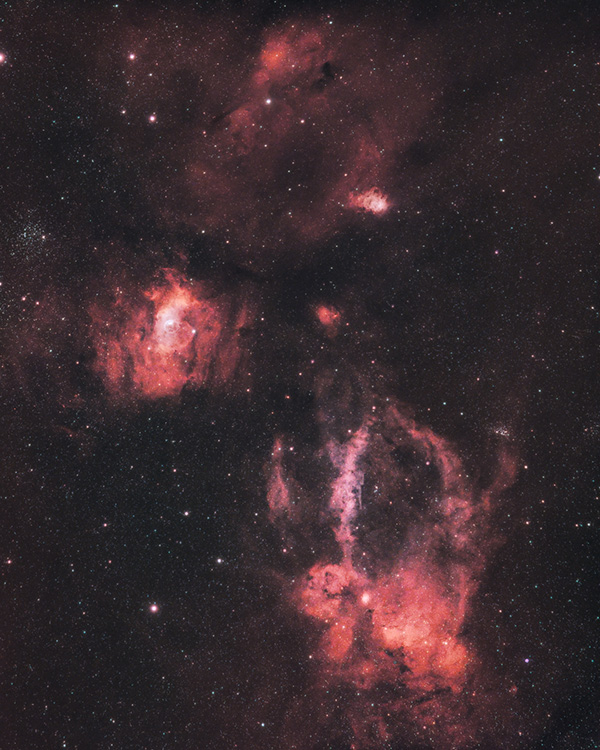
The Eagle Nebula in Ha + OIII (STC Astro Duo-Narrowband Filter)
The photo above was captured in a Bortle Scale Class 8 light-polluted area (my backyard) using the ASI294 MC Pro. It showcases both Ha and OIII gases of this Emission Nebula (Messier 16) for some astonishingly detailed results from the city.
This dedicated astronomy camera houses a high-sensitivity type 4/3 CMOS image sensor that supports 4K output at 120 frames per second. It’s a SONY 10.7 MP sensor that produces high-resolution 4144 x 2822 pixel images at its native resolution.
I generally bin my images 2×2, so that means that my photos are half of that size, in greater resolution. (smaller pixel size). The Bayer pattern of this color sensor is RGGB, which you’ll need to remember when selecting the camera in your image control software, and before stacking.
This camera is well-suited for color EAA (Electronically Assisted Astronomy), as the ASI294MC Pro features a 256MB DDR3 memory buffer to enhance data transfer reliability. This is a great feature to consider if you plan on diving into this type of visual astronomy.
You can benefit from the high-sensitivity sensor to view more detail in a deep sky object in a “live” looping video feed. Because I am obsessed with collecting images, the only time I experience a glimpse of this feature is when I am framing my target!
Comparing Specs Between ASI Color Cameras:
| Camera | Sensor | Sensor Size | Resolution | Price |
|---|---|---|---|---|
| ASI183MC Pro | SONY IMX183 | 1" | 20 MP | $799 |
| ASI533MC Pro | SONY IMX533 | 1" Square | 9 MP | $799 |
| ASI294MC Pro | SONY IMX294 | 4/3" | 10.7 MP | $999 |
All Pro model ASI color cameras include DDR3 Buffer technology, which results in faster data transfer speeds and reduces amp glow. Each one of these cameras requires 55mm of back focus between the image sensor and your flattener/reducer.
In the case of the Celestron 8″ RASA F/2, no field flattener is needed as this optical system is very flat to begin with. However, a new backfocus distance is needed between the camera sensor and the top surface of the lens group cell.
To achieve the required spacing of 29mm for the RASA, I used a Starizona filter slider drawer to give me some added backfocus.

Making the Upgrade from a DSLR camera
When I began using color CMOS cameras like the ASI294 MC Pro, I could no longer use the camera control software I did with my DSLRs (Backyard EOS). Instead, I use an application called APT (Astro Photography Tool), which allows me to control every aspect of the camera, from the cooling temperature to gain.
Upgrading from a DSLR to a CCD-type astronomy camera like this is a big transition. For me, the most challenging part was getting accustomed to controlling the camera entirely through external software.
The change in image file formats (from RAW to FIT was also a bit of a hurdle early on. Luckily, DeepSkyStacker is well suited to stack and de-Bayer this image format into a high resolution .TIF file that you can process in Photoshop.
The two-stage TEC (Thermo-electric cooling) is perhaps the biggest difference and advantage a dedicated astronomy camera has over a DSLR.
As you may know, noise is a significant issue to contend with when taking long exposures at high ISO settings. I’ve battled with noise for many years (and continue to do so) when processing my astrophotography images taken with my Canon T3i and 5D Mk II DSLRs.
A cooled CMOS camera, such as the ASI294 MC Pro, can cool its sensor down to 35 degrees below ambient temperature. This results in images that are virtually free of thermal noise.
I should mention that it’s essential to understand that this means 35 degrees below the current temperature, so if it’s a hot 30-degree night, the camera will max out at -5 degrees.

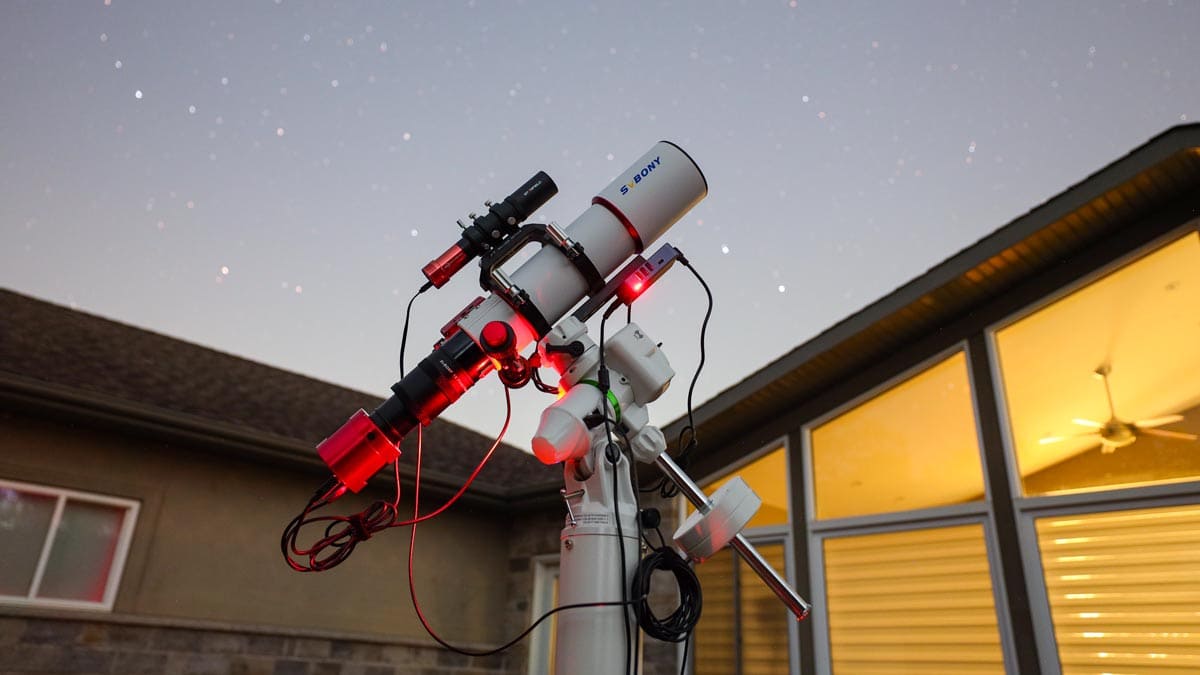
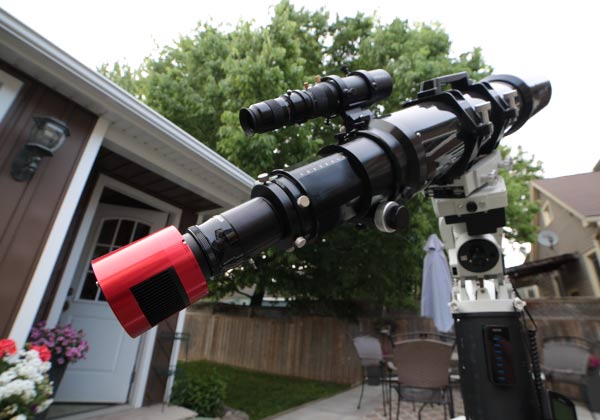
The ASI294MC Pro Camera attached to my Explore Scientific ED102 Refractor Telescope
Another Option to Consider
If you’re shopping for your first dedicated color camera, the newer ZWO ASI585MC Pro is an easy recommendation. It utilizes Sony’s IMX585 sensor (STARVIS 2), featuring a 1/1.2″ format and 2.9 µm pixels, to deliver a clean 4K (8.29 MP) image.
This pairing is particularly well-suited for short, wide-field refractors, as the small pixels enable the capture of fine detail without oversampling at typical focal lengths.
The cooled “Pro” body keeps noise low during long exposures, and the camera (unlike the ASI294MC Pro) has zero amp glow, making calibration straightforward. It also has a fast frame rate (up to 47 fps at full resolution), making it versatile for lunar/planetary and deep-sky work, all at an approachable price point.

The ZWO ASI585MC Pro is a great option to consider if you’re in the market for a color dedicated astronomy camera.
Related Article: My Budget Astrophotography Build Guide (featuring the ZWO ASI585MC Pro)
Pixel Scale
The pixel size of the ZWO ASI294MC Pro is a great match for many of my astrophotography telescopes. The pixel size of the ASI294 is 4.63µm, which is in the middle of the road for the ASI camera lineup. For comparison, the ASI183MC Pro has a sensor with a 2.4µm pixel size.
So what does this mean for your astrophotography images?
In the amateur astrophotography community, a general rule of thumb is to use a pixel scale between 1.0 and 2.0 to be “well-sampled”. This is simply a rough guideline and should not be taken too literally. The math for calculating the pixel scale of a particular camera and telescope combination is:
pixel size (4.63) / focal length (550) x 206 = 1.73
When using the ZWO ASI294MC Pro with the Celestron 8″ RASA F/2, I have a pixel scale of 2.38, which some consider to be “under-sampled”. Theoretically, under-sampling can lead to blocky or pixelated stars in your image, although in reality, I have never known this to be a noticeable problem (in any of my telescopes).
Compare this to the Sky-Watcher Esprit 100, which provides me with a pixel scale of 1.73. The bottom line is, it’s worth calculating the pixel scale of your camera and telescope combo before making any big decisions. In my experience, the ZWO ASI294 is an extremely versatile choice for many telescope focal lengths.
The Lobster Claw Nebula captured using the ZWO ASI294MC Pro.
Connections and Software
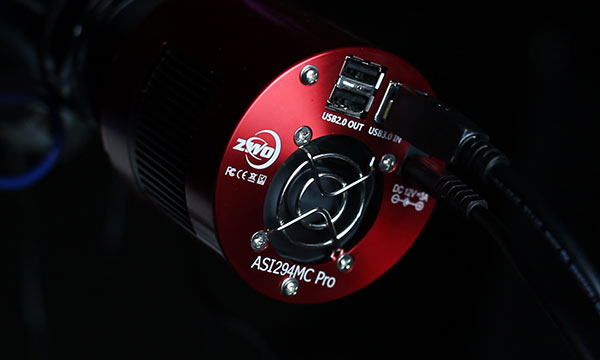
The camera is connected to my computer via a USB 3.0 cable. For the cooling feature, an external 12V power supply is also required, which is not included with the camera. If you’re anything like me, you have accumulated a number of 12V adapter cables over the years.
To keep things organized and convenient, I now connect the power port on the ASI294MC Pro to the outlets on my Pegasus Astro Pocket Power Box. This means that the camera and telescope don’t have another power cable running to an outlet. It all rides atop the iOptron CEM60 equatorial mount.
The camera is controlled using APT, which requires the appropriate drivers from the ZWO ASI website. Installing the driver is straightforward, and the “ASI camera” selection will then appear in the drop-down menu the next time you connect the camera to APT.
The cooling function is set using the “Cooling Aid” within Astro Photography Tool. It can take a few minutes to adjust the camera sensor to the desired temperature. It’s best to get a head start on this process so you’re not waiting around when it’s time to shoot.
Specifications
I love how sensitive the SONY IMX294CJK sensor is on this camera. The dynamic range of this camera sensor is listed at 13 stops. This is even more than the legendary AS1600 camera from ZWO.
This characteristic is thanks to the built-in 14-bit ADC (analog-to-digital converter) unit on the 294MC Pro.
ZWO ASI294MC Pro Camera Specs:
- Sensor: 4/3″ SONY IMX294 CMOS
- Diagonal: 23.2mm
- Resolution: 10.7 Mega Pixels (4144 X 2822)
- Pixel Size: 4.63µm
- Bayer Pattern: RGGB
- ADC:14bit
- DDRIII Buffer: 256MB
- Back Focus Distance: 6.5mm
- Cooling: Regulated Two-Stage TEC
If you’re wondering what the difference is between the MC-Cool and MC-Pro cameras from ASI, it’s the DDR3 memory buffer. For non-tech-heads (like myself), this basically means that the camera can transfer data faster and more efficiently. It also reduces amp glow because slow transfer speeds primarily cause this artifact.
Here is what the amp glow looks like on a single image captured with the ASI294MC Pro. The amp glow is completely removed after stacking the images with dark frames in DeepSkyStacker.

Recommended Settings for the ASI294 MC Pro
I find that the best camera settings to use with this camera are to set the gain at “unity gain” and an exposure length of 3 to 5 minutes. This, of course, depends on the deep sky target you are shooting and the filters being used with the camera.
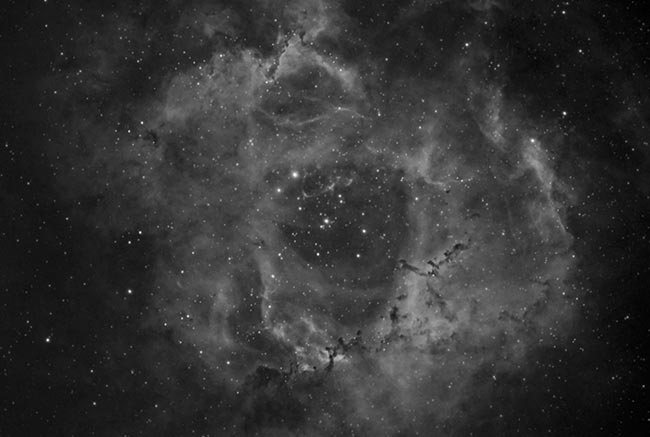
For example, using a narrowband filter such as a 12nm Ha, I would choose an exposure length of at least 5 minutes. I even shot some images that were as long as 10 minutes with this camera.
The photo below shows the Rosette Nebula, created from a stack of 20 10-minute exposures taken with the ASI294MC Pro and an Astronomik 12nm Ha filter.
Because the sensor is so sensitive, I can often find my deep-sky target in a 2-3 second exposure in live loop mode.
This is usually accompanied by a strong, narrowband filter in front, which is quite impressive. This makes framing the target much easier because you’re able to see the shape and orientation of the DSO (almost) in real-time as you adjust the telescope.
Taking Flat Frames with the ASI294MC Pro
I use three layers of white t-shirts when capturing flat frames with the ASI29MC Pro. I point the telescope towards the morning dawn sky with the t-shirts covering the telescope objective.
When the white t-shirt method isn’t cutting it, a flat field panel like the Artesky Flat Field Generator works exceptionally well.
Taking flat frames with the ASI294MC Pro using a flat field panel (Artesky Flat Field Generator).
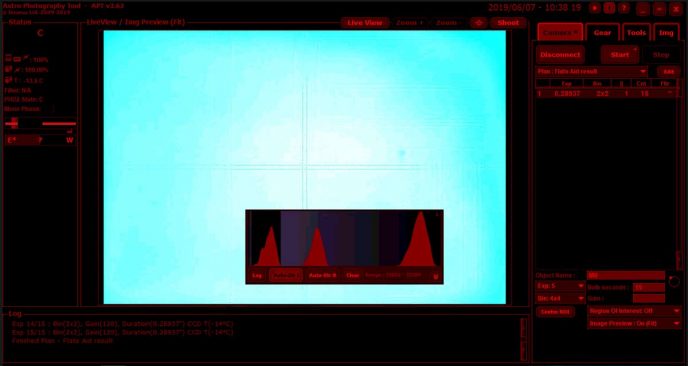
I use the CCD Flats Aid tool in Astro Photography Tool to find the correct exposure to hit my target ADU (25,000). In my experience, the images are usually around an exposure of 0.03381 when using a gain setting of 120 (unity gain). This creates a flat-field image with an ADU of approximately 25,000.
I have heard that others have found success by using longer, flat-frame exposures, which can be accomplished by adding more layers of white t-shirts or using an adjustable flat panel.
Final Thoughts
If you compare the ASI294MC Pro vs. the ASI071MC Pro, you’ll find that the price is significantly more affordable for the 294. I’ve used both of these cameras (The ASI071 camera was the older non-pro “Cool” version), and the image results are remarkably comparable.
The most significant difference between the two cameras is, of course, the sensor itself. The sensor in the AS071 is a 16MP APS-C-sized chip, while the ASI294 is a four-thirds 10.7 MP sensor. This changes the pixel scale of your images and thus the apparent size of the objects you’ll capture through your telescope.
For APO refractors in the 700-1000mm range, the pixel scale of the ASI294 MC Pro was the absolute perfect size for some of my favorite deep-sky targets like the Eagle Nebula and Pelican Nebula.
If you’re looking to upgrade your DSLR or current color astronomy camera to the realm of “cooled” CMOS sensors, my results with the ASI294 MC Pro should help you make a more informed decision. I highly recommend the ASI294 MC Pro camera if you are in the market for a color astrophotography camera with some serious power and versatility.
I hope you enjoyed this review! If you’d like to stay up to date with all of the future posts on AstroBackyard, please sign up for my newsletter.

Excellent review Trevor. As much as I want to go mono, the 294 has been a contender for my money. Somehow, as a newbie, with all the clouds and my busy work life, I just don’t see how I can spend the time to grab separate LRGB or SHO images over multiple nights. Maybe someday when I run out of the easy stuff I can go mono. That and the fact that spending 2000 or more for all the filters, wheel, etc. Quick and easy will lower frustration getting started too. Very timely review –thanks.
Glad to help Jack. A color camera certainly seems to save time (and money) at the moment. It’s a lot of fun to have a color image to process after one night!
Hi Trev…
Hi Trevor,
I almost bought a ASI094MC But at 4K in price… I was hesitant. (I had a ASI071) and wasn’t pleased. I exchanged that for a ASI1600MMC (which I like but post processing is time consuming. so I had hoped a OSC may please me.
Still in red/orange polluted skies in the suburbs of Grand Rapids I fear spending 4K on a camera to find too much light pollution makes it unacceptable.
I’d like to see the full sized images? (where can I find them?) astrobin or dsobrowser? You”re saying I can put a astrodon Ha filter (or other NB) and shoot mono with it as well? How is that done? Like when you debayer with NB filter it’s a mono color? or b/w? I suspect it’s the color of the NB filter? At least at 1000. it’s at a novelty price… I suspect I could get 1k of usage. I’d love to see the full files, a sub, a nb sub etc?
Hey Ron – I hear you about maximizing your experience under LP skies. Here is an unedited stacked TIF out of DSS for you to play with (Veil Nebula). This was about 1.5 hours under a nearly full moon in Bortle Class 8 using the ASI294 MC Pro with a duo-narrowband filter: https://drive.google.com/file/d/1nac9Iws-Dj4buDY_8Ra0XwSPOD7VWlu4/view?usp=sharing
Love the HA image – but it’s small – clicking doesn’t open a larger size?
Down sizing makes even poor images good. I’d love to see some large full size images?
I’ve included a link in your previous comment to the real deal – have a look! 😉
Nice review Trevor. The images you are getting are stunning. I was going back and forth with this camera or a monochrome. It was close but in the end I decided on the ZWO ASI1600MM mainly because I wanted to do Hubble palette images. So far I am liking my decision as doing each color channel (RGB) is not as hard as I though it was going to be. I use a 8-position EFW and finally have APT figured out pretty well. I do use PI now for stacking and combining RGB and NB images as it does it very well. You do have to do a set of flats for each filter you use so there is definitely more work involved but those are the trade offs. I may purchase a color CMOS with a smaller sensor when galaxy season comes around as they are better done in normal color anyway. – Cheers Kurt
Thanks for the update, Kurt. You can’t go wrong with that 1600MM. Some of the best amateur astrophotography images I’ve ever seen were using that camera. Glad to hear you are having success with APT and PI:) You have come a long way my friend!
Jack Urie says:, thank you ever so for you post.Much thanks again.
Hi!
I am interested in this ASI 294. The main reason is to be able to combine in two teams in parallel to obtain Luminance images with the ASI1600MMC and the color with ASI294MC.
In cloudynights forum some comments have appeared that discourage the use of this CMOS for long exposures.
The reason is because artifacts appear or refrigeration is not good.
I think that for a driver update it has been fixed but I have asked Sam to see how the issue is.
I have high hopes with this camera.
I am a nomad at night and I usually move 100km to plant the telescopes.
Thank you very much!
Carlos
Hey Trevor. Love your enthusiasm. Great professional videos.
I have the ASI1600 and am still working with control software to get the gorgeous image I think this camera is capable of.
Is there an advantage to the ASI294 over getting and stacking Lum RGB, Ha, OIII, SII with the 1600? Even with the convenience factor, it seems I would need 1/4 the exposures with the 1600 as with the 294 to get the same, or even better quality as the 294. And the duo band filter doesn’t include SII. Am I wrong? Do I need the 294?
Your Dumb Bell shot is gorgeous. Do you dither your subs?
P.S. Buddy sends “Woof” to Rudy.
Thanks Michael! I don’t believe there is an advantage over a mono camera like the 1600 – other than personal preference of user experience. Coming from a one-shot-color DSLR background – it’s just really nice to shoot without a filter wheel and have a “complete” image to process after a night of shooting. If you get your acquisition and processing process nailed down you’ll be able to create more dynamic images using Ha, OIII and SII with the 1600. I’d like to get to that point eventually. The duo-narrowband filter does not include SII – correct. Yes, I did dither my subs (and always do). Could have probably used more exposure time (what else is new?:) I will let Rudy know Buddy sends his regards!
Hi Trevor, I watched your review and decided to buy the 294 Pro.
Unfortunately using APT & DSS (1×1 bin) I get mono pictures. I saw in the review that you had the same issue, could you please let me know how you fixed it?
and here we are 6 weeks later, and my 294 has just arrived today!!! Really looking forward to learning. Your info is a huge help because I also have an ES ED102. Just in time for the dark window too.
Hi Trevor, nice review, very useful.
I’m thinking of buying this camera for my backyard setup.
What filter do you recommend for light polluted skies? Do I have to add an additional IR CUT or is it not necessary?
Thanks!
Why the ASI294 (IMX294) and not the IMX094 or IMX128?
Different animal – more expensive, larger chip. I’ve got a QHY128C I am trying to demo, just waiting on an M54 to M48 adapter.
Hello Trevor, I have the ASI294 and I’m just getting started in astrophotography. I was able to get the camera at a great price over the summer on Cloudy Nights.
Do you have any tutorials on how you setup and image with this camera and how you would process those images? If so, please point me in the right direction please. If not, well, what process is recommended?
Since you now have imaging experience with both Altair Astro 183C and this ZWO ASI 294, which one do you think perform better in light polluted zone and for NB imaging? Both use Sony chip and have TEC cooling options, so wondering if you can compare/share the real world imaging experience and QE factor side by side (keeping the brand name aside).
Thanks in advance!
Hey! The Hypercam 183C I used did not have TEC. So that feature alone makes the performance between the two night and day. The uncooled 183C performed exceptionally well for NB in the city – especially considering the ridiculously hot temps I used it in (30 degree nights!). True head-to-head comparisons are REALLY tough for me to do with limited clear sky time and ever-changing conditions (transparency, moon phase, temperature). Perhaps I’ll try a TEC altair camera in the future for a better comparison to the ASI294. Cheers
Hi Trevor, great review of the asi294mcpro, I’ve purchased one myself and am using it or trying to learn it on a William optic z73 to no avail, no matter how many extension tubes I use I just can’t get it to focus correctly and images although a bit blurry all seem to come out mono? Is my refractor to small for this camera? I’ve yet to try it on my 8” sct yet but am fast becoming angry with the 294 and about to chuck it at a wall. I’m currently trying to obtain a bigger refractor around 127 if I can, will this camera actually work?
I noticed that the ASI294MC Pro has an optional Canon EOS adapter. Have you, by any chance, tried this out? I already have the Canon 100-400mm f/4.5-5.6L IS II USM lens, which seems to do as well as small telescopes for imaging. I’m curious if swapping from my Canon 7D MKII to the ZWO would produce enough of a difference that it would be worth considering this setup. Any thoughts?
Hi Trevor, Came across your blog while passing time under the endless cloud cover called the UK! I have a very similar set-up including Esprit 120 ‘scope and ASI294MC-S and agree with your appraisal. Quick question: in your review of the Esprit 100 you mentioned use of the dedicated flattener. In other reviews you talk about using reducers. Have you come across a 0.8x ish reducer that works with the Esprit?
Hi Trevor. Old post but I hope you might have a tip or two for a relatively new ASI294MC user. Shooting at f/4.8 using unity gain, I’m getting blown-out stars after around two minutes, and they come out with an ugly yellow cast in post processing. Also using APT for capture and DSS for stacking. Are you using ASCOM or native drivers in APT? Also, how are you shooting flats? Many more questions for you at Cherry Springs this year (and thanks from ASH for making yourself available!).
Sorry for wasting people’s time.
It here it goes
I have SkyWatcher Eq6R Mount
ES102 Apo triplet Carbon Fiber
Use a Sony A 6000 dslr
Looking to get into long exposure astrophotography,
What color cmos or ccd camera can I start with that’s good quality for beginner
Thank you for your great review. I am really leaning towards this camera to add to my ES 102mm triplet, CEM60.
Have you managed or tried using it for any planetary imaging?
I do realize it is more geared towards DSO’s.
I have a neximage 5 that I have been practicing with, Not sure which is harder, lining up the target or figuring out the software.
Hello. I just orderd an ASI 294MC PRO and i’m new to a real astro camera and find your tutorials and videos realy helpfull. Only used DSLR before.
About the 2×2 binning that you usually use. I guess that you are getting a 2072×1411 .fit from the camera then? Are you fine with that resolution or do you make the picture bigger some how? In DSS or Photoshop? Just curious 🙂
Is there a tutorial where you stack the picture from the ASI camera? Settings and so on.
Tnx. /Mattias
Hi Mattias – great choice! Yes I Bin 2X2 each time but drizzle the image in stacking, so it comes out to twice that size. However, I usually scale my images down a bit anyway. You may want to shoot 1×1 and drizzle if you’re thinking about making large prints!
Hey Trevor great review. I just got my new camera and I used it last night for the first time. I was wondering how your were able to get previews at 3 second loops? I had to go up to 30 seconds just to see something. Am I forgetting a step? The only difference I saw was I was using SGP and Sharpcap instead of APT. I also had an optolong uhc light pollution filter would that have something to do with it? Thanks and keep up the great work
Hey Mike – great question. YES I see lots of stars in a 3-second loop, and usually the nebula/galaxy as well. (Crazy right?). The filter you are using is no problem, I believe it is just a matter of adjusting the image preview settings. APT has an “auto stretch” function, and I’m looking at 4 x 4 binned “FITS preview” images. I am not sure of the equivalent settings in SGP but I am sure you’ll find it! Let me know how it goes!
That’s what I was thinking that maybe you were using an auto stretch. I think i’ll give it a try tonight with APT, skies permitting of course.
Hey Trevor thanks so much for the help I was able to see everything at 3 second loops. My target is m33 triangulum galaxy tonight. And it’s crystal clear skies all night!
Hey Trevor. Thank you for all your amazing reviews and posts! I’m absolutely new to astronomy And astrophotography. My question is will the 294 be a good camera for the smaller ES ED80? And do you have an idea what would the back focus be on it with that?
My gear:
Explore Scientific ED80 CF
Celestron CGEM II
ZWO 60 Guide Scope
ZWO Asi385MC Guide Camera
ZWO ASIAIR
Celestron CPC800 GPS (XLT) on Alt-Az mount (no wedge yet)
Thanks!
Your telescope has a focal length of 550mm yet the sensor is 4/3rds… doesn’t that make the focal length 1100mm? Or does this not work like a DSLR? Is there no crop factor when using dedicated Astro cameras?
Hi Damian. I had some difficulty with this concept too, but the focal length of an optical system is the focal length, and the sensor/detector used does not change that. However, what does change is the field of view presented in the image, with a smaller sensor showing a smaller FOV than a larger sensor. In photography, people use the concept of equivalence to 35mm (full frame) cameras so that the FOV is comparable, with 35mm sized sensors is the standard everyone has adopted. But no such universal adoption in astrophotography sensors is established. So you are right, the coverage (FOV) of a 550mm FL on a 4/3 sensor will be the same as the coverage of a 1100mm FL system on a 35mm sensor. But the focal length of the system remains 550mm. At least that’s how I understand it!
Hi Trevor
Thanks for the great, in-depth review. I was wondering how does this compare to the ASI1600MM Pro. I know that this is a color camera and the 1600 is a monochrome so it may be a hard comparison but I thought I’d still ask.
Hi Trevor. Thanks for this great video. I have the same camera and ran into a issue when calibrating Darks with Pixinsight. If I use a master bias in the process, I end up with a master dark that has been clipped and a histogram showing that approximately half the pixels are at zero value (basicaly, the noise level of the dark is almost the same as that of the bias).This master dark gives weird results when used to calibrate the light frames. Did you run into the same problem? How did you circumvent it?
Thank you for the review.
Do you think the Asi 294 is a suitable camera also for a newtonian 250/1200 scope?
Thanks!
Hi Trevor, I used my new asi294mc pro the other night under class 1 Bortle skies in Eastern Oregon. First time out with it. Amazing subs. One problem I have is the subs all come out mono. I see several other posts here from people with a similar problem. You say you ran into this issue also. Any advice on how to fix this? I used APT to gather my subs.
I would like to thank you for all your generosity by sharing your knowledge. It has made such a difference for myself and many others.
Trevir, I wanted to let you know that binning at 2×2 with this camera I was told was a big no no. Here is his explanation below.
2×2 is 1/4th the size and proportionally lower in resolution. Being smaller makes processing faster. Imagine a sensor that’s say 16×16 pixels. That yields 256 total pixels. If you bin 2×2 you reduce each axis to 8. That means the binned total is 64. 64 is 1/4th 256. You can do the same for your sensor size and get the same result. Some confusion happens if the software takes the binned image and then “upsamples” (multiplies) back to the original image size. The result is the binned image has the dimensions of the original but has lost 75% of the original data
Hey Trevor!
Informative review! Thank you!
I currently own the ASI 1600mc cool. I am using it with either a 60mm or 80mm apo refractor.
Would you trade the 1600mc for the 294mc? I am not a specs guy, so just wondering if you had any insight on which camera is better?
Hi, great review. You have convinced me to upgrade from my unmodified 5d Mark III especially as you say a good fit for the Esprit 100ED. The only thing that is now holding me from hitting the buy button is that several of the comments on here all talk of getting the mono image output issue. I was wondering if yourself or any of the original commenters have found the resolution to this issue? Thanks in advance!
Hi Trevor,
I am about to upgrade from my Canon 6Da (which I for sure keep) to a dedicated Astrocam. Did you ever have artifacts with the ASI294MC as many users say? Did you recognize ampglow? Maybe yes – but is it rather easy to handle using DSS? Thnaks for your opinion, and keep on doing what you do – it is pretty cool…👌😎 Alex
Hi Trevor…
Great coverage of the huge capabilities of the camera!
I have a question for you (or anyone else who can share suggestions). In my processing I cam getting very green or very purple images after the colour conversion in ImagePlus v6, and have tried all their conversion settings for the OneShot Colour cameras.
In MaximDL, I find that conversion based on a Canon DSLR doesn’t look too bad, but not likely right.
Can you or anyone here make a suggestion of the best software to use to do the conversion? I like the ability to convert/calibrate/stack in one process that ImagesPlus offers, but either I need a different conversion or different software.
Thanks for any help,
Brian
What does back focus mean exactly? I’m imaging with SW 200P + EOS 5D at the moment. Have around 10mm left on the focuser when it’s in focus. 10mm left meaning that I can move it inside but 10mm left before it’s blocked. A lot more to pull out of the tube. You imaged with both full frame Canon as well as 294MC – are they similar in focusing? Is my 10mm enough? I don’t have a coma corrector yet – I guess it will further reduce this distance? (or the other way round?). Thanks!
Hi, I have recently purchased the 294mc pro, on advice I also purchased the uv/ir cut filter as it supposed to improve focus.
However, using this with the asi canon adapter on a canon 100/400 lens, I cannot get correct infinity focus. Using the canon camera on the same lens I get pinpoint stars, with the 294 they appear fuzzy. Is that a filter problem? By the way I’ve enjoyed your tutorials. Learned a lot