Optolong L-eXtreme Filter Review
The Optolong L-eXtreme filter is now being used in backyards across the globe, which is great news for those who take astrophotography images in heavy light pollution.
This dual-narrowband filter features even narrower bandpasses than last year’s L-eNhance, making it perfect for nebula photography from the city.
The Optolong L-eXtreme filter isolates the H-alpha (Ha), and Oxygen III (OIII) at 7nm exclusively. Unlike the previous L-eNhance, the eXtreme does not include a bandpass for H-Beta (Hb).

More selective bandpass transmissions are better suited to fast optical systems, such as an F/2 RASA or Starizona Hyperstar configuration.
In this article, I will share my results using the Optolong L-eXtreme filter with 2 different color astrophotography cameras.
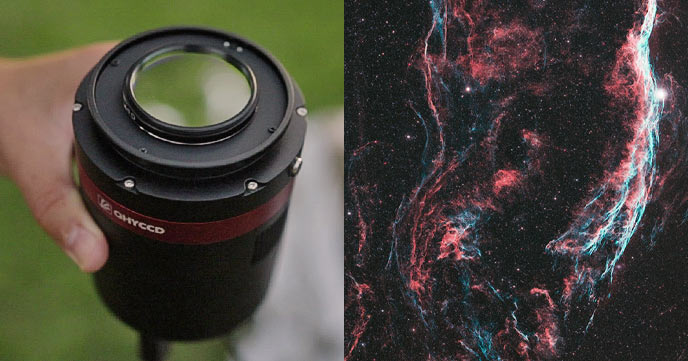
I have tested the Optolong L-eXtreme filter using a one-shot-color dedicated astronomy camera (QHY268C), and a Mirrorless Canon EOS Ra. The telescopes were both apochromatic refractors with f-ratios of F/5.5, and F/7.
If you have tested the performance of this filter using a contrasting optical instrument (such as a camera lens or larger Schmidt-Cassegrain Telescope), please share your experiences in the comments!
The Eastern Veil Nebula captured using the Optolong L-eXtreme Filter. (Click for larger version)
Optolong L-eXtreme Filter Review
From the moment I first heard about the Optolong L-eXtreme filter on Twitter, I was intrigued. The Optolong L-eNhance filter has been one of my favorite and most well-used filters to date, and the L-eXtreme promised to be even more effective at ignoring light pollution.
The L-eNhance was a popular choice for many backyard astrophotographers looking for an affordable solution for their color cameras, and I was not surprised to see the buzz around the improved L-eXtreme version.
The most obvious difference between the L-eXtreme and L-eNhance filters are the transmission lines. The L-eNhance allows a 24nm bandpass through the OIII and H-Beta regions, and a 10nm bandpass for Ha. The L-eXtreme, on the other hand, is strictly 7nm in Ha and OIII.
The official language from Optolong about what makes this filter so special:
“The advantage of the L-eXtreme filter is that there is no transmission between the H-beta and OIII lines, and there are also no nebula emission lines there. In this case, it isn’t letting light pollution come through, so it maximizes nebula signals, and the sky background is made darker while imaging.” – OPT product description.
I shoot 95% of my astrophotography images from my Bortle Scale Class 7 backyard in the city, so light pollution filters are necessary to capture them. Broadband targets such as galaxies are tough, which is why I usually reserve those objects for dark sky excursions.
Nebulae, on the other hand, are much easier to observe from a light-polluted city. The L-eXtreme excels at capturing high-contrast images with a greater separation between the nebula wavelengths and a light-polluted sky.
Specifications
- Substrate: B270
- Thickness: 1.85mm
- FWHM: O3 7nm+Ha 7nm
- Blocking range: 300-1000nm
- Blocking depth: light pollution line blocking >99%
- Surface quality: 60/40
- Transmitted Wavefront RMS: λ/4
- Parallelism: 30s
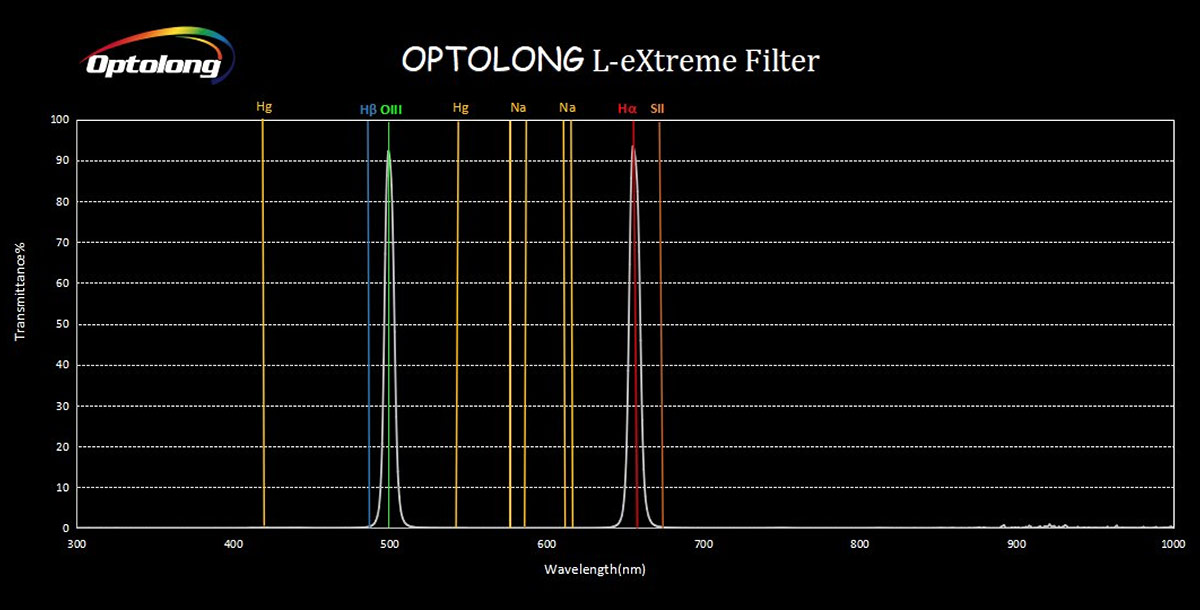
The transmission graph of the Optolong L-eXtreme Filter (Optolong).
As you can see, the bandpass allowance for this filter is extremely (pardon the pun) selective. This is fantastic if you enjoy high-contrast images of bright emission nebulae, but less useful if your imaging projects include broadband galaxies or reflection nebulae.
Compared to the transmission graph of the Optolong L-eNhance filter, the eXtreme blocks the Hb and region between Hb and OIII. It’s a tighter bandpass allowance in OIII and Ha overall (7nm for each).
In my personal experience, some of the most fun projects are built using multiple filters. To capture incredible astrophotography images from a light-polluted location (my backyard is a Bortle Scale class 7), you need to get a little creative.
Other Filters to Consider in this Category
Before I share my results with the Optolong L-eXtreme filter, I wanted to highlight some other filters in this category.
They are all multi-bandpass, narrowband astrophotography filters that allow light at specific wavelengths to reach the sensor.
The purpose of this type of filter is to maximize the signal of certain types of nebula, while blocking much of the light associated with a city sky.
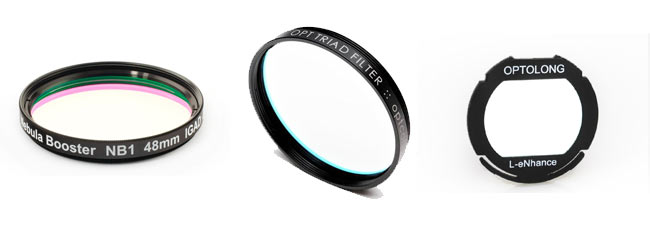
- Optolong L-eNhance Filter (Tri-band)
- Hutech IDAS Nebula Booster (Tri-band)
- Radian Triad Ultra Filter (Quad-band)
- Altair Astro Tri-Band Filter (Tri-Band)
- Altair Astro Quad-Band Filter (Quad-band)
- STC Optical Duo-Narrowband (Dual-band)
I have personally used 4 of the filters on this list, and only one jumps out to me as a favorite over the L-eXtreme, the Radian Triad Ultra. However, this is a personal preference based on the look of the images it produces, and my image processing tastes.
If you have used one of the filters on this list, please let me know how it compares to the Optolong L-eXtreme example images on this page.
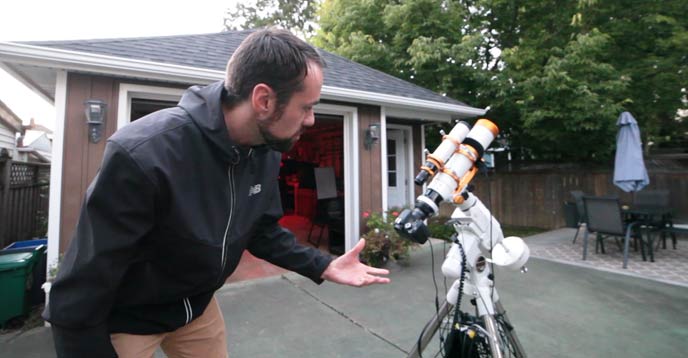
The Setup
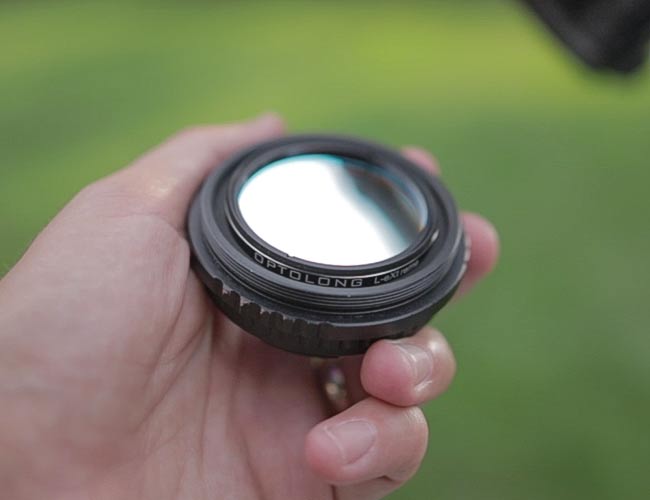
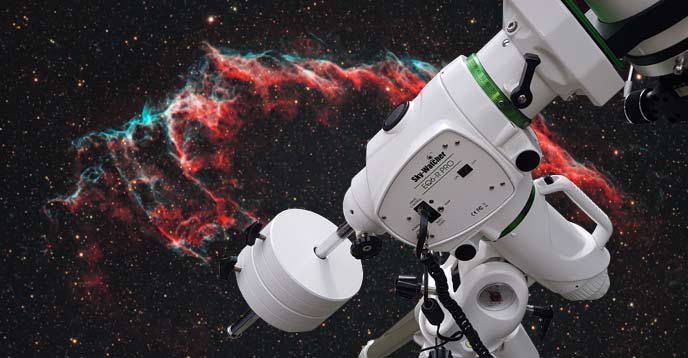
I have slotted a 2″ Optolong L-eXtreme filter into the camera adapter of my Sky-Watcher Esprit 100 rig. The filter sits in front of the QHY268C color camera and the 550mm focal length Sky-Watcher Esprit 100 APO.
A filter drawer is a better solution, especially for projects that involve capturing images over long periods using various filters. No more threading the filters in and out and changing the rotation of your imaging train.
I originally began photographing the Veil Nebula using the Starizona 0.65 reducer/flattener on my Sky-Watcher Esprit 100, but spacing issues led me back to the native focal length of 550mm. Even without the reducer, the APS-C (crop-sensor) of the QHY268C provides an impressive field of view through the Esprit 100.
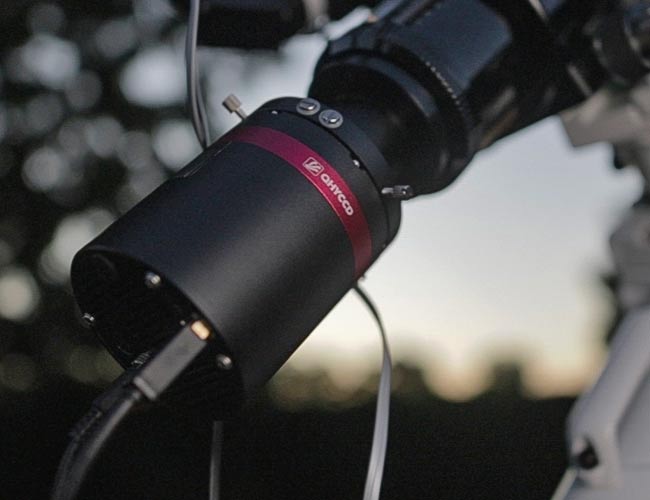
The imaging configuration used for my tests.
The QHY268C is an ideal candidate for the Optolong L-eXtreme filter. This cooled, one-shot-color camera captures full-color images simultaneously, allowing colorful emission nebulae to be recorded with a single filter.
Yes, building an image with a monochrome camera using LRGB and dedicated narrowband filters may yield a higher-quality result. Still, this process is not always convenient or accessible to many imagers.
I’ve also tested the Optolong L-eXtreme filter with my Canon EOS Ra mirrorless camera. In this imaging configuration, I threaded the 2″ filter inside the adapter that attaches to the focuser of my telescope.

The location of the 2″ filter in your imaging train will vary depending on the equipment you use. I find 2″ round-mounted filters to be the best overall choice in terms of format, regardless of the camera you use.
Who Needs This Filter?
If you enjoy photographing nebulae with a color camera, the Optolong L-eXtreme is an exciting option. One of the most challenging aspects of deep-sky astrophotography early on is dealing with large, blown-out stars and horrible gradients in the sky.
A narrowband filter (or, in this case, a dual-narrowband filter) corrects these issues to a large extent by isolating the wavelengths of light we want to collect on the sensor.
With these impressive narrowband capabilities come some additional challenges for amateur astrophotography enthusiasts. For example, if you are accustomed to using a DSLR camera and a simple broadband light pollution filter (such as the Optolong L-Pro), you may find the process of focusing your camera and telescope much more difficult using this filter.
The narrow bandpass emission lines mean much less light is reaching the camera sensor overall, making framing and focusing your target challenging. If you are using the live-view focusing method on your DSLR camera, don’t be surprised if only the brightest stars are visible.

A one-shot-color astronomy camera like the QHY268C is a great match for this filter.
With that being said, those using older DLSR models, such as a Canon Rebel series body older than the EOS T3i, may find it very difficult to frame and focus their targets.
Modern DSLRs and mirrorless cameras (such as the Canon EOS Ra) offer higher ISO settings and improved LCD displays, making the “live-view” function more straightforward to use.
Image Test Results
Testing a camera filter requires clear conditions and time. I managed to “complete” 3-4 impressive images, with relatively short integration times.
Since the Optolong L-eXtreme filter specializes in isolating the Ha and OIII wavelengths of gas in an object, I chose to photograph a bright emission nebula target that emits a strong signal in both bands. The Lagoon Nebula contains plenty of h-alpha and oxygen III details:
Here is the version of the image I shared on Instagram.
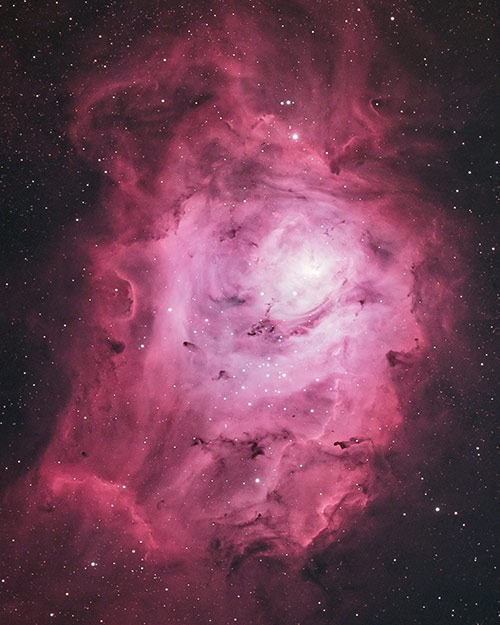
The Lagoon Nebula. Canon EOS Ra and Optolong L-eXtreme Filter.
Image Details:
- Integration: 21 x 5 minutes at ISO 3200 (1.75 hours)
- Calibration: 15 Dark Frames, 15 Flat Frames
- Stacking: DeepSkyStacker
- Processing: Adobe Photoshop 2020
- Camera: Canon EOS Ra
- Telescope: Sky-Watcher Esprit 150
- Mount: Sky-Watcher EQ8-R Pro
As you can see in the image, the intense regions of hydrogen and oxygen are well separated from a light-polluted sky. I find this particular deep-sky object to be one of the best overall test subjects for a dual-bandpass filter.
It’s worth noting that all dual-bandpass/tri-band filters seem to yield a pleasing result in this regard. A better performance indicator for the Optolong L-eXtreme is to shoot something less bright, in the direction of the light dome.
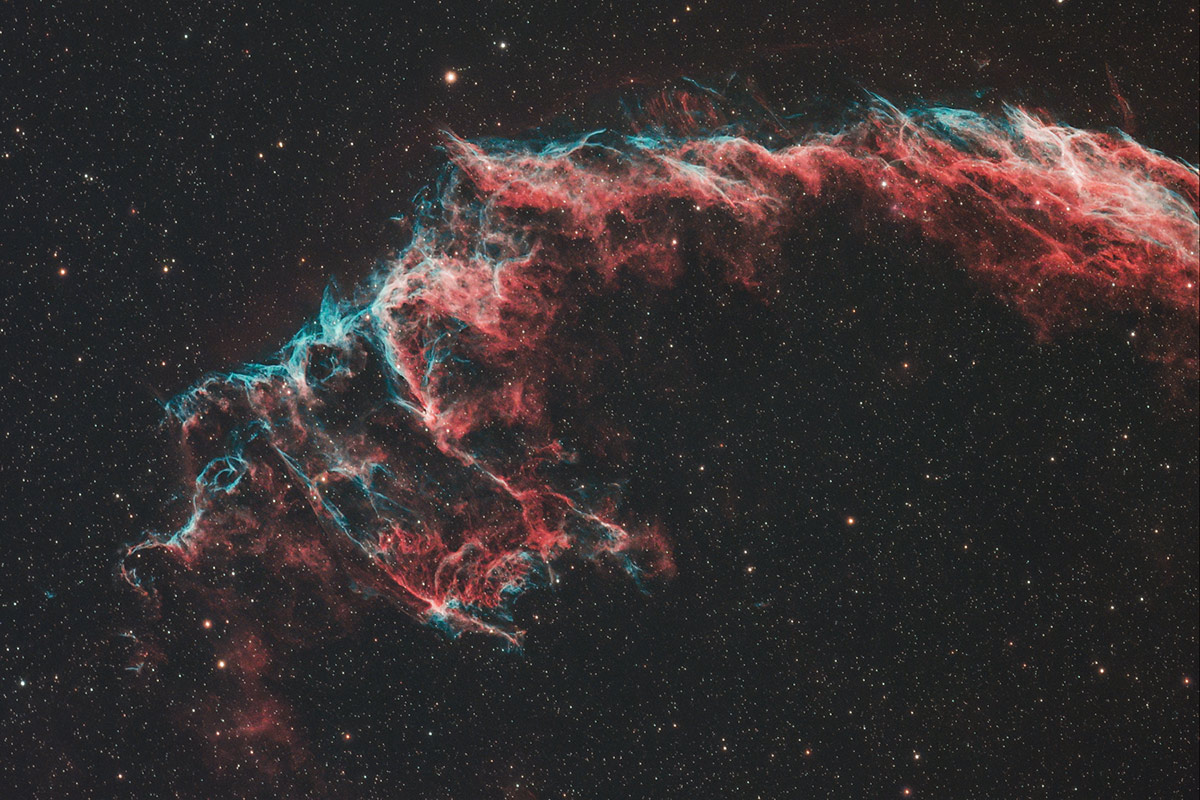
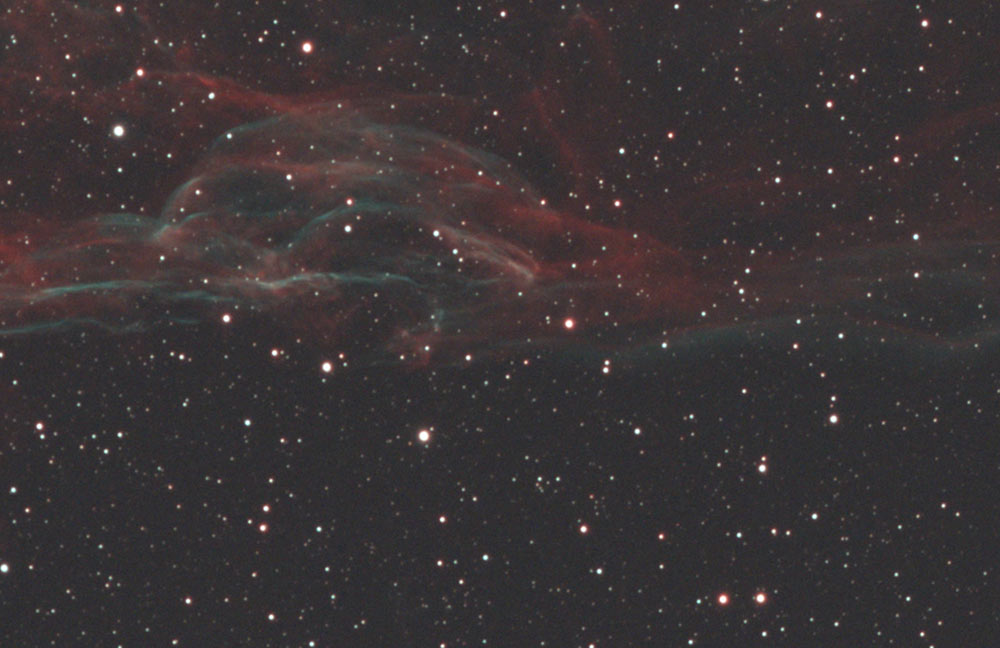
For my next test, I chose to photograph the Western Veil Nebula in Cygnus. This supernova remnant is very large and includes many interesting areas of nebulosity around the “witch’s broom” element (Cygnus Loop).
The prominent gases in this nebula jump off the screen, as the filter is only allowing the light from the Veil Nebula complex to pass through to the sensor.

The Veil Nebula in Cygnus.
Image Details:
- Integration: 23 x 4 minutes at Gain 100 (1.4 hours)
- Calibration: 15 Dark Frames, 15 Flat Frames
- Stacking: DeepSkyStacker
- Processing: Adobe Photoshop 2020
- Camera: QHY268C
- Telescope: Sky-Watcher Esprit 100
- Mount: Sky-Watcher EQ6-R Pro
In both cases, the stars in the image are recorded as rather colorless. This is one of the main drawbacks of a dual-bandpass narrowband filter. For accurate star colors, a broadband filter must be used.
It is possible to correct the star colors synthetically (to a degree), but this can be a painstaking process and difficult to accomplish effectively. I recommend re-shooting the target with a broad-spectrum filter such as the Optolong L-Pro.
The Optolong L-eXtreme filter keeps stars exceptionally small, which creates a pleasing effect on most nebulae targets. For those struggling with bloated, fat stars in their images, a dual-bandpass narrowband filter like this may be a great solution for you.
Below is an up-close look at a section of the Veil Nebula image, showing just how subdued the stars are with this filter. No star-minimizing actions have been applied to this data.
The dramatic separation between the nebula and a light-polluted sky.
Have a look at the individual color channels of my RGB image. Here, you’ll notice a strong signal in each channel, recorded in a single exposure.
For anyone looking to make the most of their limited time under a clear night sky, I think you’ll find it hard to top the L-eXtreme/One-shot-color astronomy camera combination.
If you would like to take a closer look at data captured using the Optolong L-eXtreme filter, feel free to download my stacked image of the Veil Nebula.
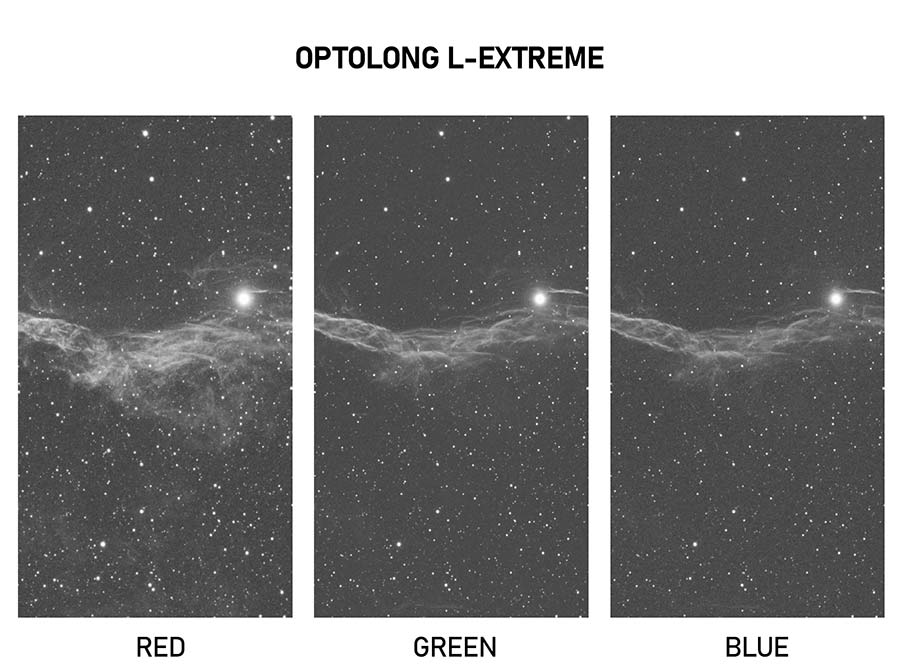
The RGB channels of my image using the L-eXtreme filter.
The Stacked Image
The following image shows the output from my brief integration of the Lagoon Nebula in DeepSkyStacker. This image includes 21 light frames (5-minutes each), and 10 dark frames.
I was thrilled with the preview image on my computer screen, as it often indicates that the image contains impressive details that will just need to be teased out further in Photoshop.
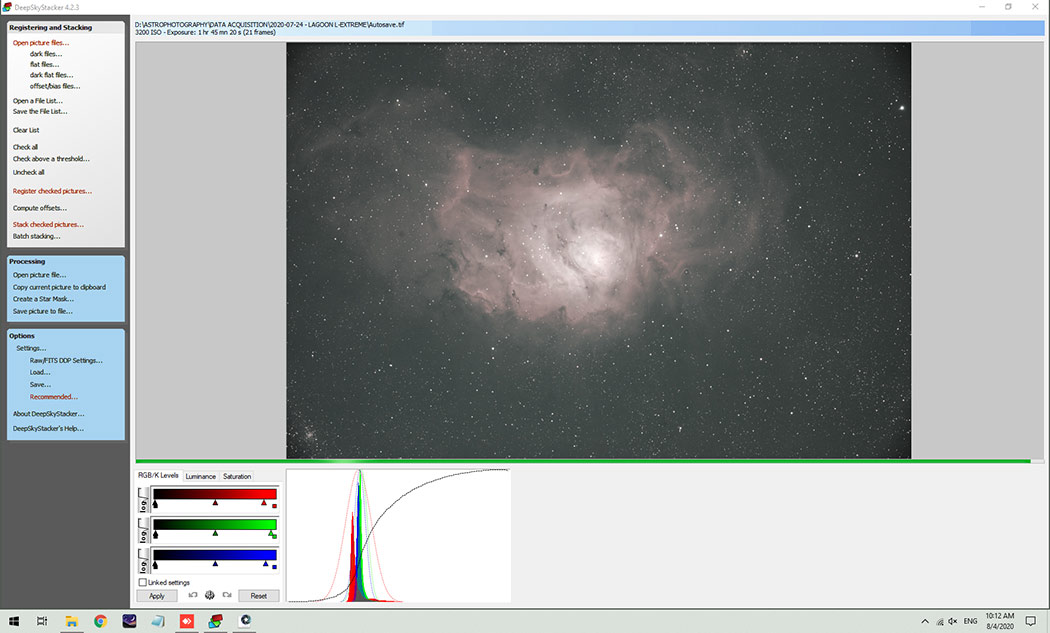
The stacked, linear image in DeepSkyStacker.
I share this because I don’t often see such an impressive-looking image ‘out of the box’. Usually, a lot of stretching and separation between the deep-sky object and the background sky must be applied in Photoshop to achieve this look.
The Optolong L-eXtreme filter delivers truly remarkable image quality straight out of the camera, and 5 years ago I would not have believed it was possible. The object is well-defined against the sky, and balancing the colors in post is straightforward.
For a better idea of what the linear image looks like before stretching occurs, have a look at the before-and-after of my Veil Nebula image.
It is very normal to start with a green image when using a color CMOS camera with an RGB Bayer filter. But once the colors are balanced out, a beautiful deep-sky image is revealed.

Final Thoughts
You’ve seen the images, and you now know what you can expect with a one-shot color camera. It’s designed for contrasty nebula photography, and it’s in a completely different class than a broadband filter like the L-Pro.
The Optolong L-eXtreme is still very new, but amateur astrophotographers have already achieved incredible results with it and have shared their results.
L-eXtreme vs. L-eNhance
If you were planning on purchasing the L-eNhance filter and now have the opportunity to buy the L-eXtreme, I would spring for the L-eXtreme.
I believe that the Optolong L-eXtreme filter is an improvement over the L-eNhance. The added bandpass allowance of the L-eNhance did not add any extra meaningful signal in my experience.
The 24nm bandpass in the OIII and Hb region has been reduced to 7nm in OIII only, and I think this is a better fit for most users.
I’ve heard others mention that the blue channel, in particular, looks much cleaner in one-shot-color data with the L-eXtreme.

They are both fantastic filters for one-shot-color astrophotography in the city, but the L-eXtreme does a slightly better job at creating an impressive contrast between the Ha and OIII wavelengths and a light-polluted sky.
Compared to some of the other filters on the market, the Optolong L-eXtreme filter is quite affordable, too. I think anyone who invests in this light pollution filter will get plenty of use out of it for years to come.
I’ll continue to use the L-eXtreme in my backyard, as it will replace my L-eNhance in situations where this filter is well utilized. The only other filter I would consider as useful as the L-eXtreme is the Radian Triad Ultra, but I realize that this filter is much more expensive.
At the time of writing, this filter only comes in the 2″ round-mounted option, and I don’t expect to see clip-in DSLR/mirrorless versions in the future.
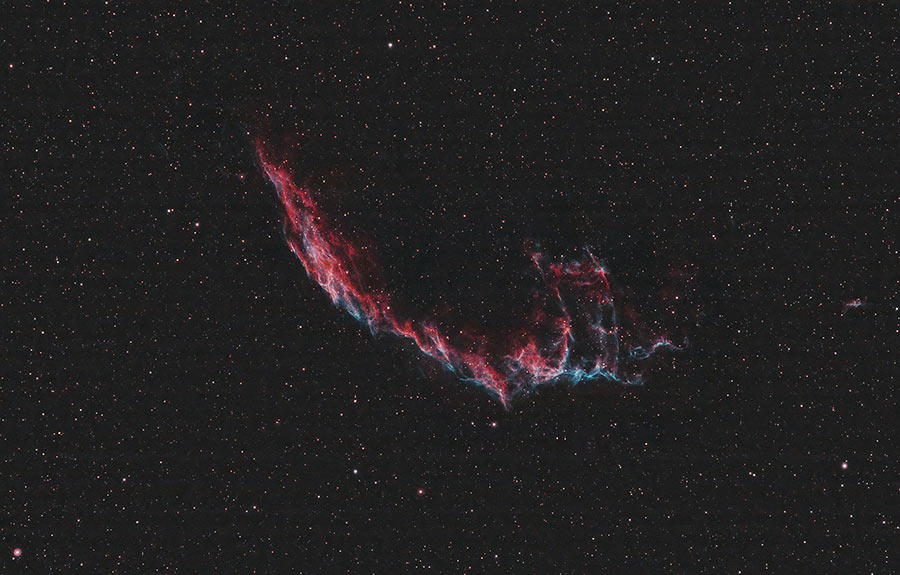
The following image of the Eastern Veil Nebula, captured by John Michael Bellisario, is a testament to the quality of this filter.

The Eastern Veil Nebula shared on Instagram. John Michael Bellisario.
“The L-eXtreme is a huge jump in OSC narrowband technology. A lot of community feedback from the L-eNhance was addressed in the development of this filter.
This improvement was apparent in my first time processing L-eXtreme data. Many of the struggles with noise, gradients, and the blue channel, which were common with the L-eNhance, were no longer an issue.
The data it produces is very forgiving, making it perfect for both advanced and beginning astrophotographers. In addition to producing excellent images right out of the stack, the 7nm bandpass allows you to image under heavy light pollution.”
Be sure to check out his Instagram account for more fantastic examples of this filter.
Summary:
Pros:
- Dynamic separation between nebulae and the sky
- Largely ignores city light pollution altogether
- Captures full-color images in a single exposure
- Can be used during a full moon
- Improved performance over the Optolong L-eNhance
Cons:
- More expensive than the L-eNhance filter
- Star colors are not recorded accurately
- Not suitable for broadband subjects (galaxies, reflection nebulae, etc.)
- It may be difficult to frame/focus targets with a DSLR camera
- Not available in clip-in DSLR/Mirrorless format (currently)

The Helix Nebula. Optolong L-eXtreme filter + QHY268C.
Testimonials:
I asked my good friend Ruzeen Farsad (AstroFarsography on YouTube) if he would be willing to share some thoughts on the Optolong L-eXtreme filter, as I know he has been using one for a few months now.
He graciously accepted and had the following to say about this filter:
“When I heard about the L-eXtreme my ears perked up. Having had used the L-eNhance alongside the ASI 533mc Pro and having had amazing results, I was keen to see what this filter was capable of. I received one to review and then set to work.
The first night of testing I decided I needed to go for the low hanging fruit. Being summertime, it’s all about Cygnus and the veil nebulae. I was using my Sky-Watcher Evostar 80ED and a modified Canon 600D.
The first images were a bit of a let down though. I was expecting a learning curve using this filter.
The Eastern Veil Nebula by Ruzeen Farsad. Canon 600D (modified) and L-eXtreme filter.
But having had used 7nm Hydrogen Alpha filters before with the same setup, I was prepared to shoot longer exposures. Really though, the weather wasn’t helping as the temperatures were in the high 20s Celsius.
That, with long exposures on a DSLR aren’t your friend. However I eventually pulled an image out from the noise and I could see some definite – and very intricate – separation between target and sky.
The light pollution had all been eliminated in my Bortle 6 skies and even with a small refractor some of the finer details were visible to see. It was a very impressive use from this filter and got my blood pumping for more.”

Be sure to follow Ruzeen on Instagram for his latest photos, and subscribe to his YouTube channel for more honest reviews.
Helpful Resources:
Shawn Neilson (Visibledark Astro on YouTube) shared this video on his channel about the Optolong L-eXtreme filter. Shawn has found a way to separate the color channels of the images shot using the Optolong L-eXtreme filter to create images that resemble the Hubble Palette.
The effect is truly remarkable, and I am actually quite blown away by his results using the QHY268C color camera.


Thank you Trevor 🙂
Thanks for the mention Trevor! Cheers.
My pleasure, Shawn! Thank you for all of the processing videos you’ve published. Even though I am not a PixIsight user, a lot of the methods can be replicated in PS 🙂
Great read:) Used this filter with the Samyang 135mm f/2 on the heart and soul nebula. Great results! I am under b5/6 skies.
Oh, very cool! I am assuming you used a dedicated astro camera with the lens? I am yet to try that lens with a cooled camera.
hey trevor! check your personal messages on cloudy nights! I would like to get in touch with you!
On the Veil did the Optolong L Extreme reduce the stars too or was that in PS? I use a Astronomik CLS and am getting so many stars it’s hard to reduce them in PI to make the nebula the Star it should be. Thanks
Hey Mark! I did a very minimal star reduction on the Veil Nebula image. The subframes out of the camera recorded very small stars due the narrow bandpasses of the filter (similar to shooting in H-alpha!)
Very nice review on your YouTube channel and am tempted to purchase it (though of course it is backordered on both Highpoint and Agena) as my backyard is Bortle 8/9. You mention that focusing through the filter may be tough so I am wondering about plate-solving as I believe you also use the ASIAir Pro? Any problems there?
can this filter be used with DSLR lens?
Hi Revor…nice review…like Jeff, I am wondering how it impacts plate solving. Obviously it seems like a longer exposure for plate solving is in order, but by how much? I typically use 15-20″ exps using an LPro…should I double that with the eXtreme?
Hey Trevor, I just wanted to confirm from you how is your Canon RA performing. I read on forums that it shows wierd halos and colours on bright stars on the edges. Is this the case with your RA also? You can also check those on Cloudy Nights and see if that is the case with your RA too.
Waiting for your reply in anticipation.
Thanks for your passion and commitment: My question is what is the difference in using this filter vs the Triad on these same objects, using the same color cameras, in heavy light pollution? Both filters have very narrow bands, but am I wrong to assume the Triad would give more color/detail with the 2 extra bands? or do these extra bands also let in more light pollution—compared to the L-eXtreme? Your review of the Triad had me convinced to get it despite the price, and combine it with QHY268, Esprit 120mm for use Bortle 9 to get some decent shots….I really don’t want to get both….does each have it’s own purpose in your opinion?
I have been using the L-enhance for some time with great results. The L-extreme looks great but as a fellow user of the L-enhance would you consider the L-extreme a worthwhile upgrade? I am not so sure!
Thank you for this review! I was going to buy the Enhance, but now I will get the Extreme! This new filter should change my photography and others for the better. I too have to shoot near and through light domes, particularly Buffalo to the East and Niagara Falls to the north.
When I receive this filter I will remount it into my filter holder that fits the Dropin Filter Mount for the Canon R series cameras.
Hi Trevor
Thanks for this review. L-extrem seems to be a killer ! But I’m afraid of the loss of the Sii band … Could you please tell me which filter is the most serious contestant of the Triad Ultra ?
Thank you 😉
Hi Trevor, could you please clarify how you installed the 2″ filter in front of the QHY268C? Did you use an adapter or changed something in the camera? If yes, please let me know the specs.
Thanks and keep posting more useful information!
Cheers, Diego
Thank you, Trevor, I’m just now getting into astrophotography thanks to your approach and information for beginners. I bought an inexpensive filter just to play with and have a puzzling question. Using a Nikon D7500 ASP-C DSLR, APT, & RedCat 51with a 2″ filter drawer I am trying to set the Exposure and ISO for the correct histogram. I have verified that the histogram on APT matches the histogram in PS/GIMP after stacking. But to maximize my exposure time where should the signal be on the histogram? The log scale, if exposed for a long time, bleeds off to the right. The regular histogram has peeked way to the right and if I push it will completely disappear to the right for a washed-out picture.
Currently, about the max I can get is ISO 800 for 120 – 180 seconds with the peak centered – blue is shited a little more to the right, the filter I guess. I am in a Bortle 8 area. Can you help solve the dilemma? I would like to get 4 – 5 minutes at ISO 800 – 1600, but it pushes the peaks out of sight to the right.
I have searched and not found a consensus. My next try is to buy an Optilong L-Extreme filter, but anxious about focusing – not many bright starts to choose from.
Thanks for sharing and keep posting your YouTube videos – I am learning a lot.
I’m fairly new to all this and was thinking i need to add a filter or filters. This sounds really good for nebullas. Do you use multiple filters in a shooting session? Seems like no in the photos shown here. Also no good for galaxies? Is there suggested filter for that? Thanks and love the content
Thanks for the review.
I’m using L-eNhance version shooting from the balcony in Krakow (class 8). This was taken with almost full moon yesterday.
But I’m still thinking would it be worse to replace with extreme version…
https://www.instagram.com/p/CG4c5tXlXTe
OK, Trevor, my hat’s in the ring.
I ordered my own OPTOLONG L-EXTREME DUAL-BAND FILTER – 1.25-INCH to put in my filter wheel.
As a DSO, Nebula Specific, OSC imager, I’m really looking forward to the addition for my winter imaging.
Great expectations!
Thanks!
Sonny
Hi Trevor!
Would you say that the L-eXtreme could be a full-on replacement for my 12 nm H-alpha clip filter in my DSLR? Could I still access the pure H-alpha signal via the red channel the same way, if I wanted to? I guess I’d only be willing to spend money on the L-eXtreme, if I could sell my H-alpha filter without losing any flexibility in my setup.
Thanks!!!
Best,
Ben
Hi Trevor, great review with excellent detail! By the way, do you know of a way to use the 2” filter with a camera lens and EOS RA?
can this filter be used with a monochrome camera? if so, how to use it correctly, who has any suggestions?
can this filter be used with a monochrome camera? if so, how to use it correctly, who has any suggestions?
Hi Trevor,
Thanks for the review, very useful.
Is possible use the EOS Ra with 2″ Optolong L-eXtreme and the RedCat51?
Thank you for your time!
Good evening Trevor. I love my LeXtreme! My first image with it was a mosaic of the Rosette Nebula that was stunning and so easy to construct because there was no visible seam.
I use the LeX with my Canon EOS Ra and either my R-C 8″, RC-10″ or Askar FRA600, but I don’t seem to be able to get much blue in my images. For the nebulae that are mostly red it is fabulous. I was reading your article, as I’m considering getting a L-eNhance as an alternative when the moon isn’t so full to be able to get more color. I have an LPro, but it seems to give some very funky artifacts, so I’ve been shying away from it. Sounds like from your article you wouldn’t recommend the L-eNhance – and just stick with the L-eXtreme?
BTW – I’m in the market for a second EOS Ra – if you have suggestions where I could get one, I would REALLY appreciate it.
Would this filter be good for a Seestar s50?