Optolong L-Pro Filter Review
I’ve recently had a chance to review the Optolong L-Pro filter (2 types) for astrophotography from my light-polluted backyard in the city. Unlike many of the filters I used in the past, the L-Pro is suitable for both stock and astro-modified DSLR cameras (it includes a UV/IR block).
I’ve always had trouble collecting images with an accurate representation of star color when imaging from the city. It’s something I spend a lot of time correcting during the image-processing stage of my projects. My hope is that the Optolong L-Pro filter lives up to its description of allowing more starlight to pass through than a traditional UHC or CLS filter.
(L-Pro = Luminance Professional)
Optolong L-Pro Filter Review
I’ll be using this filter with a Canon 5D Mk II to capture the Pleiades star cluster through a compact refractor telescope. I’ve chosen this target for the L-Pro because I want to showcase its ability to produce natural-looking images of broadband astrophotography targets from the city.
I’ll also show you what you can expect using the L-Pro with a camera lens, as I have both the 48mm filter and clip-in Canon EOS-C (APS-C sized sensor) models. The complete list of astrophotography gear used for this review is listed further down the post.
Since owning the Optolong L-Pro filter, I’ve captured two deep-sky objects through a telescope. The Pleiades star cluster and the Orion Nebula.

Test images using the Optolong L-Pro filter from my backyard
A broadband filter for urban astrophotography
If you are new to this blog, my backyard sky is rated a Class 8 on the Bortle Scale – fairly typical conditions of most big cities. If your night sky is darker than this, consider yourself to have an advantage when it comes to astrophotography.
Over the years, I have used many types of filters for astrophotography – mostly using a modified Canon Rebel DSLR camera (XSi, T3i). The type of filters you’ll want to invest in will depend on whether your camera has been modified for astrophotography or not.
This filter is less aggressive than all of the other astrophotography filters I use in terms of blocking light. As a side-effect of retaining natural starlight color, each shot will also expose more skyglow than I am used to with the much more aggressive SkyTech CLS-CCD.
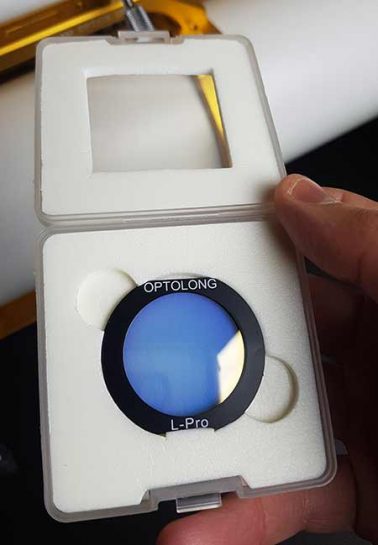
The Optolong L-Pro Filter (Canon EOS-C Clip-in version)
To offset the lack of signal recorded in each shot, I’ll simply increase the overall exposure time (what else is new?). If you want a natural-looking astro-image that doesn’t look like it was captured from a red zone – you’re going to have to work for it.
This light pollution filter’s job is to ignore as much artificial light from the city as possible, without interrupting the natural colors of objects in space in your image.

Reducing skyglow for better signal
I rely on light pollution filters for deep sky astrophotography from my backyard and have tested many types of them over the years. Although many of them do an impressive job at isolating light associated with nebulae – broad-spectrum targets such as galaxies, star clusters, and reflection nebulae have been challenging.
With a modified camera like my Canon EOS Rebel T3i, the cool colors in my image are often lost and need extensive correction during post-processing. My hope is that the Optolong L-Pro’s unique optical characteristics help capture the natural looking colors of my deep sky object while reducing enough city glow to produce a quality image.

The Optolong L-Pro Filter clip-in filter in my Canon T3i
I have found that it’s beneficial to use specific filters that offer unique optical characteristics for each type of astrophotography target (reflection nebulae, emission nebulae, globular clusters etc.). It would be great to have one filter that delivers impressive results for all astrophotography targets, but such a filter doesn’t exist.
The Problem with broad-spectrum Targets
I’ve avoided capturing broad-spectrum targets like the Pleiades from my city backyard. In fact, my personal best image of this star cluster was captured from a dark sky location about 45 minutes from home. The reason for this is that narrowband filters, and LPS filters like the SkyTech CLS-CCD, do not isolate reflection nebulosity from a washed-out sky the way they do with an emission nebula.
It doesn’t mean that a UHC or CLS filter won’t help on broad-spectrum targets like Pleiades or galaxies, they just really mess with the colors. To be more specific, the images have a red cast and the cool colors are often hard to bring back in processing. Despite my stance on “white balance doesn’t matter when shooting RAW”, it has been brought to my attention that using a custom white balance in these situations may make image processing a little easier.
I’ll experiment with this strategy over the coming weeks with the Optolong L-Pro filter. The process involves capturing an image of a white or grey card, through the telescope with the filter in place over the camera sensor. It essentially trains the camera as to “what white should look like”.
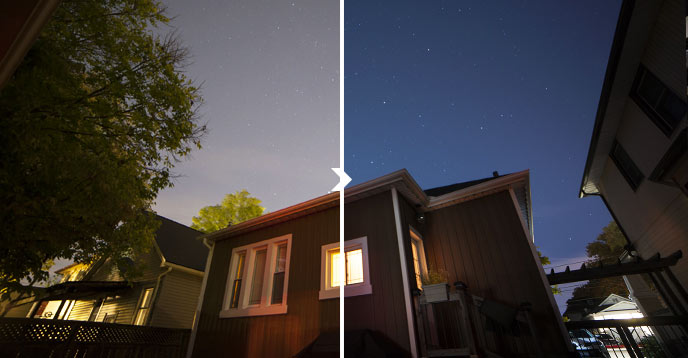
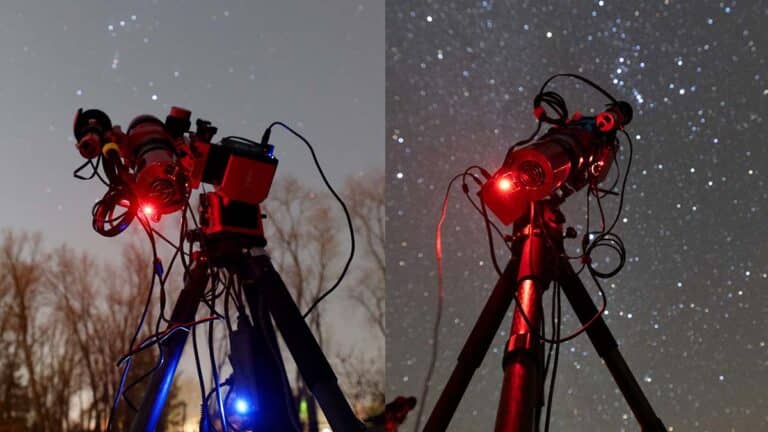
My backyard sky before and after using the Optolong L-Pro filter
Equipment used in this post
In this post, I’ll show you the difference between shooting unfiltered with a stock DSLR and with the Optolong L-Pro. For this test, I’ll use the 2-inch version filter in my Canon EOS 5D Mk II.
My list of camera filters has grown over the years, each with their own transmission spectral graph and light suppression qualities. As always, I’ll do my best to give you real-life examples of the filter in use – and save the detailed technical analysis for the Cloudy Nights forum.
| Optolong L-Pro 2” Filter |
| Optolong L-Pro Canon EOS-C Filter |
| Canon EOS 5D Mk II (stock) |
| Canon EOS Rebel T3i (modified) |
| William Optics Zenithstar 73 Refractor |
| William Optics Flat73 1:1 Field Flattener |
| Rokinon 14mm F/2.8 Lens |
| Shoot Remote Shutter Release Cable |
The full-frame stock Canon 5D Mk II was used through my Z73 telescope, while the APS-C Canon T3i (modified) was used with a Rokinon 14mm F/2.8 lens.
A multi-bandpass filter with selective light pollution suppression
The L-Pro is a multi-bandpass filter that suppresses the transmission of select light pollution lines. For example, mercury vapor lamps, sodium vapor lights and even skyglow caused by the oxygen in our atmosphere. The balanced transmission aims to offer great color balance and minimal color cast.
The Optolong L-Pro filter comes in 5 variations:
- Canon EOS Clip-in APS-C
- Canon EOS Clip-in Full Frame
- Nikon Clip-in Full Frame
- 1.25” Round Mounted
- 2” Round Mounted
This filter uses precision off-band blocking in the major emission lines of artificial light pollution (Na 589nm, Hg 435nm, and 578nm). Compare this graph to one on the more aggressive SkyTech CLS-CCD, and you’ll see that it allows more natural color to reach the camera sensor. The specifications for the Optolong L-Pro filter list that it blocks 90% of light pollution emission, with a spectrum of 380-750nm. The isolated light wavelengths this filter records are outlined in the spectrum graph showcased below.
Have a look at how the L-Pro compares to the other broadband light pollution filters from Optolong.

Who should use this filter?
If you’re under moderately light polluted skies on the outskirts of town, this filter will help reduce city glow and help you produce natural-looking astrophotography images with great color balance. If you’re like me in a red zone, the L-Pro will help when capturing broadband targets such as galaxies and reflection nebulas.
If you’ve been capturing deep sky images from a light-polluted location and have experienced harsh color casts in broadband targets like the Pleiades star cluster and Andromeda Galaxy, the L-Pro may be the solution you’ve been looking for.
As I and many other amateur astrophotographers have discovered, the L-Pro makes an excellent all-around broadband color filter. Even when shooting emission nebulae projects that benefit from multi-bandpass filters (such as the Optolong L-eNhance), it is beneficial to collect exposures using the L-Pro to capture the natural star colors in the field.
For example, the image of IC 2177 below (part of the Seagull Nebula) was captured using the Optolong L-Pro filter in front of the ZWO ASI533MC Pro camera. This data will be blended with narrowband images of the area (primarily H-Alpha) to achieve a more well-rounded and natural-looking image.
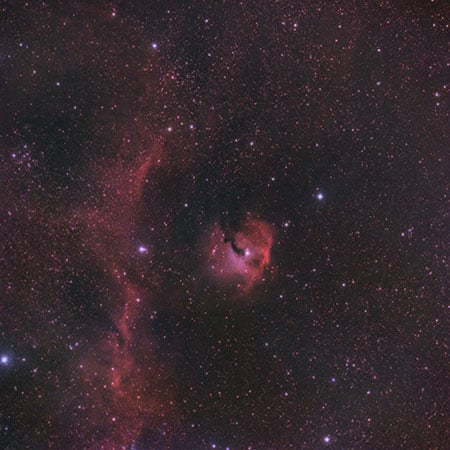
IC 2177 captured using the Optolong L-Pro filter and ASI533MC Pro camera.
Deep Sky Target: The Pleiades Star Cluster
I have chosen to capture an exquisite deep sky object that will showcase the broad spectrum qualities of the Optolong L-Pro filter in a light-polluted area. Pleiades (Messier 45) is a well-photographed open-star in the constellation Taurus. It contains a collection of 7 bright blue stars and plenty of reflection nebulosity. A deep long exposure image will also showcase vast amounts of cosmic dust surrounding this cluster.
The final image will include several images that have been stacked to improve the signal-to-noise ratio. From a light-polluted area, this can be a great way to offset challenging shooting conditions.
Test Images with a telescope
The test images were captured using a stock Canon 5D Mk II DLSR and a William Optics Zenithstar 73 Refractor Telescope. Each shot is a 90-second exposure at ISO 800. The RAW images have been converted to jpegs, but have otherwise not been processed.
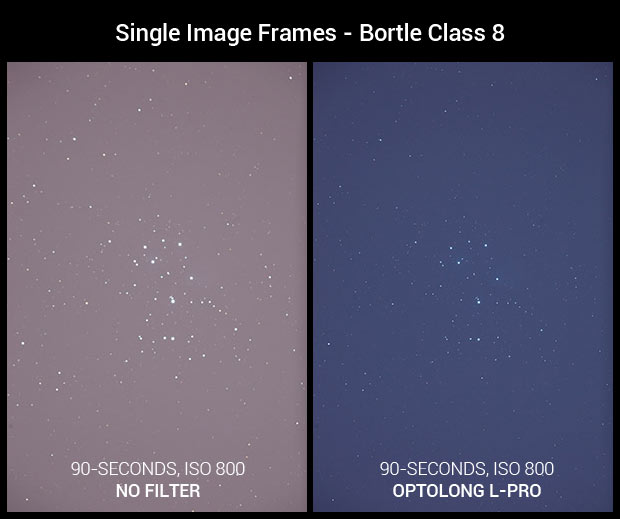
As you can see, not only is the background sky much darker, but the stars are also smaller. Both images were focused using a Bahtinov mask.
The Cameras
The camera I am using for Pleiades image is a stock Canon EOS 5D Mk II. This is my full-frame daytime photography camera that should provide an honest example of what you can expect using stock DSLR with this filter. The camera includes the original IR cut filter which reduces the impact of hydrogen-alpha light collected by the sensor. For reflection nebula targets like M45 without any h-alpha light, a stock camera like this is perfectly capable of producing a cracking image.
I also tested the Canon EOS-C clip-in version of the filter with my modified Canon EOS Rebel T3i. For these photos, I connected a Rokinon 14mm F/2.9 lens in place of a telescope. Up to this point, I’ve only taken a few shots around the backyard but would like to try this filter for some deep-sky imaging soon. I regularly use DSLR cameras for deep-sky astrophotography through telescopes and lenses, but only when the nights are cool enough. On warm nights, the thermal noise created by the camera sensor can become a problem, and no amount of noise reduction can correct it.
The Camera Filter
The Optolong L-Pro filter I used for this project was the 2” (48mm) round mounted version, which I placed inside the field flattener of my telescope. It threads securely to the William Optics Flat73 flattener, on the telescope-facing side. This is a convenient location to place the filter in the imaging train and has not created any surprise reflections in my images.
To recap, I am using this broad-spectrum filter with a stock DSLR camera. My results are most useful to those looking to capture natural-looking color images in moderately light-polluted skies without using an astro-modified DSLR. If you’re imaging location is darker than mine, expect to collect images with a much better signal-to-noise ratio!

The Telescope
The telescope is a William Optics Zenithstar 73 APO. It’s a compact doublet refractor with a focal length of 430mm. The ultra-wide field of view this telescope offers is particularly evident when shooting with a full-frame camera like the 5D Mark II.
At F/5.9, this apochromatic refractor is comparable to a 400mm telephoto camera lens like the Canon 400mm F/5.6L. Focal ratio is an important aspect of telescopes and lenses for astrophotography – as it will have a large impact on the signal-to-noise ratio of your images.
For large (broad-spectrum) deep-sky targets like the Pleiades star cluster, Andromeda Galaxy, and Triangulum Galaxy, the combination of a stock full-frame DSLR and a telescope like this can create some incredibly wide shots that capture the entire object with room to spare.

My Canon 5D Mk II and Zenithstar 73 – pointed towards the Pleiades
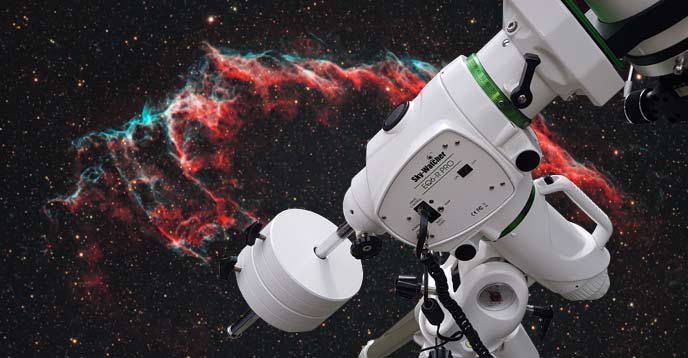
The Telescope Mount
The Sky-Watcher HEQ5 Pro SynScan computerized telescope mount performs exceptionally well at this focal length, even without the use of autoguiding. Accurate polar alignment and balance are imperative for successful imaging using an EQ mount without the aid of autoguiding.
Unfortunately, my balance isn’t perfect in this configuration. The heavy 5D Mk II puts stress on the mount in the declination axis because I need a longer dovetail bar for the Z73. However, it doesn’t appear to be much of an issue when shooting 90-second exposures.
The images are firing away automatically, thanks to an aftermarket remote shutter release cable. This lets me set a sequence of shots at my desired length, with a little break to let the sensor cool in between. I’ve set the automation sequence to collect 50 x 90-second exposures, but I’ve been checking in on the subs every 30 shots or so.
Camera Settings for Deep Sky
For my final image of Pleiades, I’ve decided to shoot rather conservative images of 90-seconds each, at an ISO of 1600. This time of year is much cooler at night with temperatures dropping to almost zero. I estimate the camera sensor to be recording my light frames at approximately 15 degrees C.
The data collected using these settings falls in the middle of the histogram, without clipping any information in the darks or highlights. The images could be shot using longer exposures, but I want to reduce the number of subs that could suffer from the periodic error of the telescope mount.
Camera Setting used for The Pleiades image:
- Camera Mode: Bulb (Manual)
- Image Format: Raw
- ISO: 1600
- White Balance: daylight
- Exposure: 90-seconds
Deep Sky Results
As you can clearly see from the single image frame comparison image I posted, the Optolong L-Pro filter makes a huge difference in terms of reducing light pollution. This certainly helped me collect data with better contrast and less skyglow for my image of Pleiades.
As always, increasing the overall integrated exposure time is my greatest ally in the battle against city light pollution. To create an image with a signal-to-noise ratio comparable to a dark sky site, I need to collect 4-10X the amount of data. Image processing is still a challenge, but I am used to it.
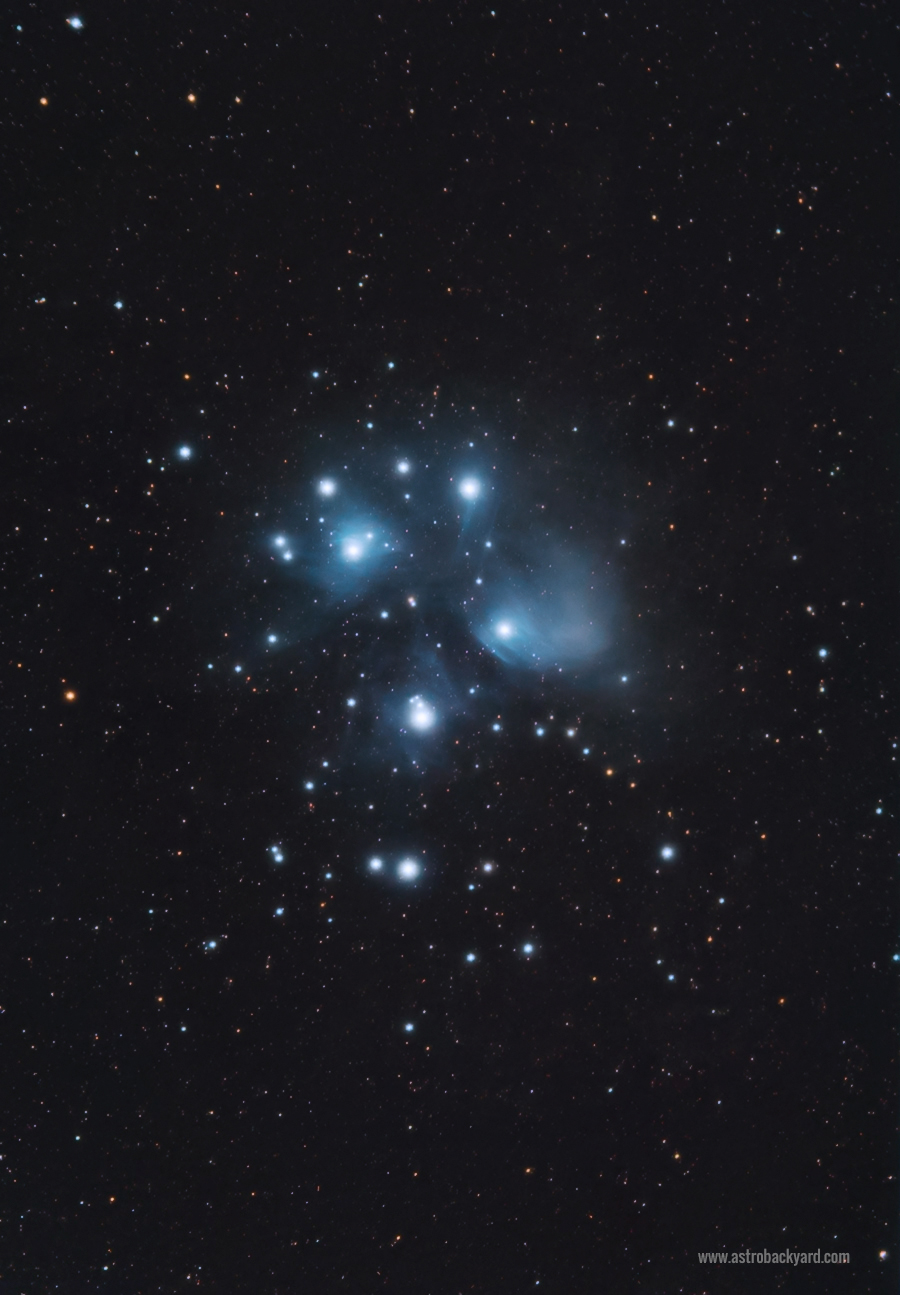
M45 – The Pleiades Star Cluster | Optolong L-Pro filter and Canon 5D Mk II
My final image of The Pleiades includes 4 Hours and 10 minutes of total integrated exposure time. Each 90-second, ISO 1600 light frame was stacked in DeepSkyStacker to improve the signal-to-noise ratio of my final image. Final image processing was done in Adobe Photoshop using a number of plugins (listed here).
Test Images with a modified DSLR
For the image comparison below, a modified Canon EOS Rebel T3i was used. The shots were 30-seconds each on a fixed tripod. I intentionally included the light from my back window to showcase the subtle light suppression qualities of the L-Pro filter.
“Daylight” white balance was used with an ISO of 800 for both the unfiltered and filtered shots. Notice the difference in the street light reflections in the trees? It appears as though this filter is reducing the bright glow of the LED lighting in my neighborhood.

The Optolong L-Pro used with a modified Canon DSLR and wide-angle lens
Interesting Tip
The image I shared earlier in this post was taken with the Optolong EOS-C filter in my Canon 5D Mk II. I was able to place this APS-C sized filter in my full-frame camera and attach the Rokinon 14mm F/2.8 lens on top. I wouldn’t recommend this configuration, but it is possible. I suspect this causes some serious vignetting, but it wasn’t overly obvious in my shot.
Final Thoughts
Because the L-Pro creates a rather natural-looking image, this would make a great choice for Milky Way nightscape photography. It could help tame any surrounding light pollution without creating challenging color correction issues to deal with in post-processing.
I am quite pleased with the effectiveness of the Optolong L-Pro filter from a city sky and thrilled with the image of Pleiades I was able to produce. The 2-inch round-mounted version fits neatly inside of my field flattener, allowing me to connect any type of camera I want.
It would be interesting to compare the difference between a complete broadband deep-sky project shot without a filter versus one using the L-Pro. I was not willing to soak this amount of precious time into an unfiltered image, but I’d be interested to see the comparison. My thoughts are that the star-bloat from an unfiltered shot alone is enough of a reason to employ a broad spectrum light pollution filter like the L-Pro.
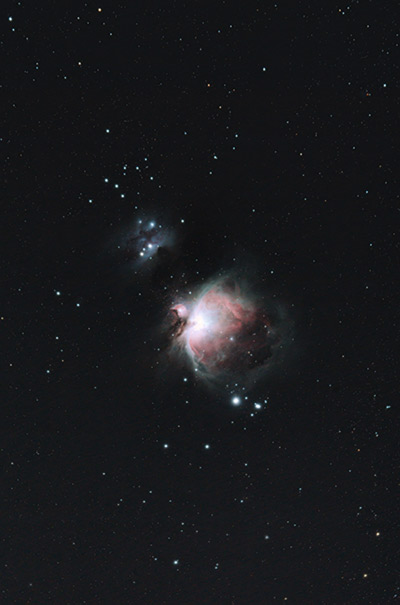
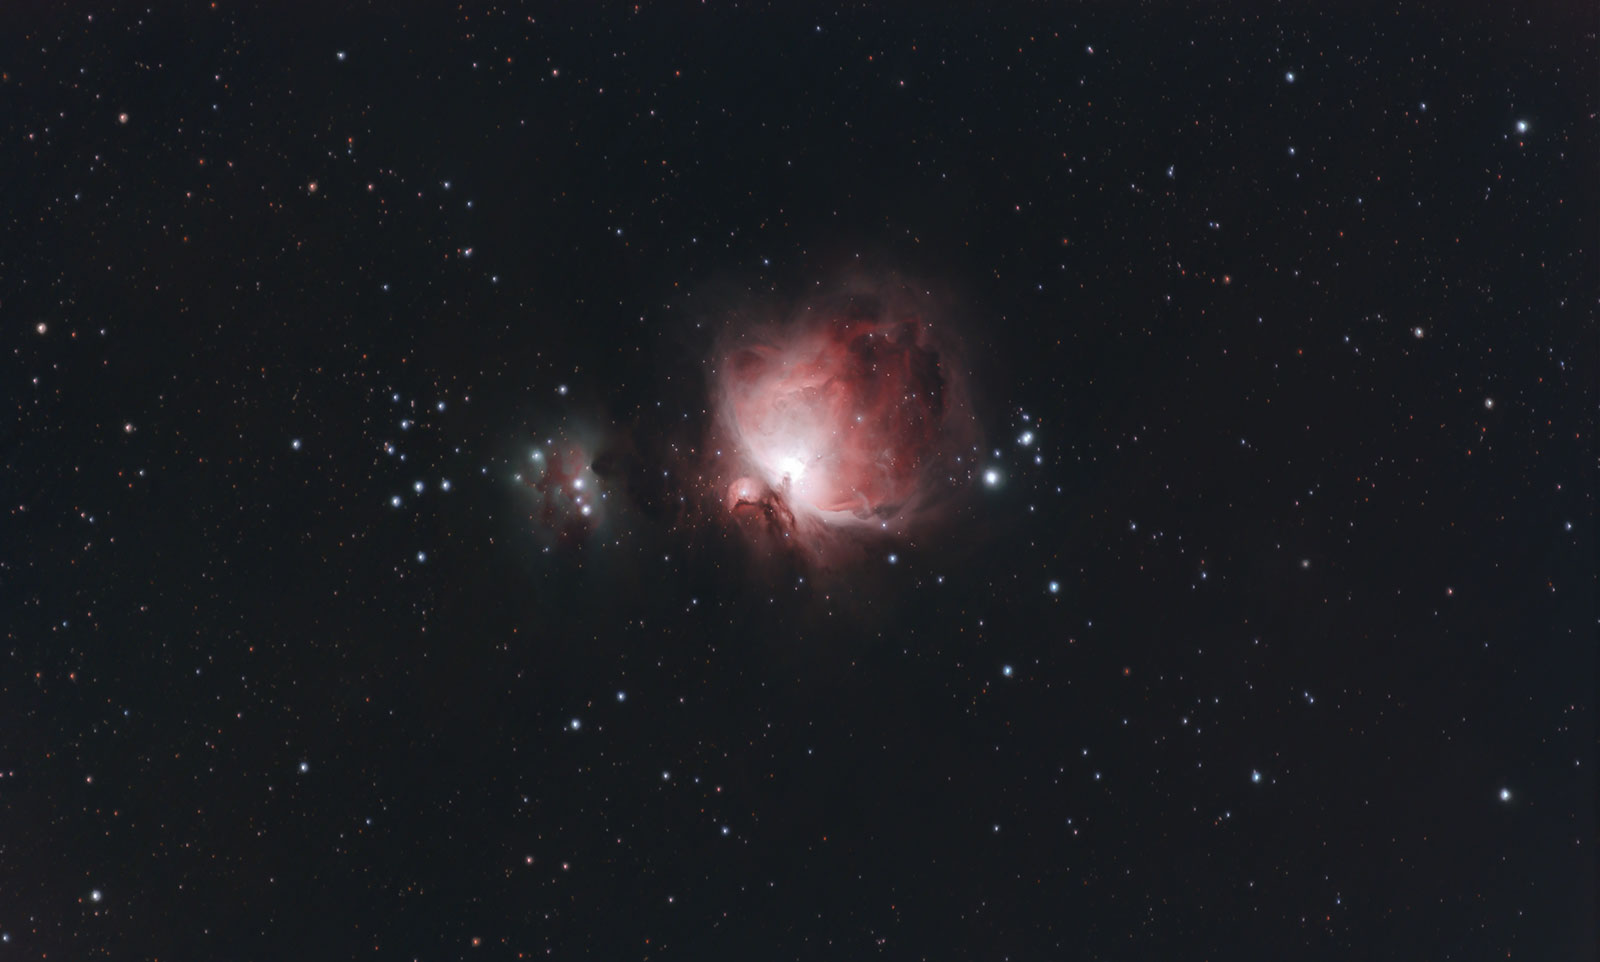
The Orion Nebula captured in broadband with the 2″ Optolong L-Pro filter
I late December, I pointed my 300mm Camera lens towards Orion, for another shot using the L-Pro filter. This time, I used my crop-sensor (modified) DSLR, t Canon EOS Rebel T3i. Here is what you can expect to achieve using the L-Pro with a full-spectrum modified DSLR from the city:
The Orion Nebula using a Modified DSLR and the Optolong L-Pro.
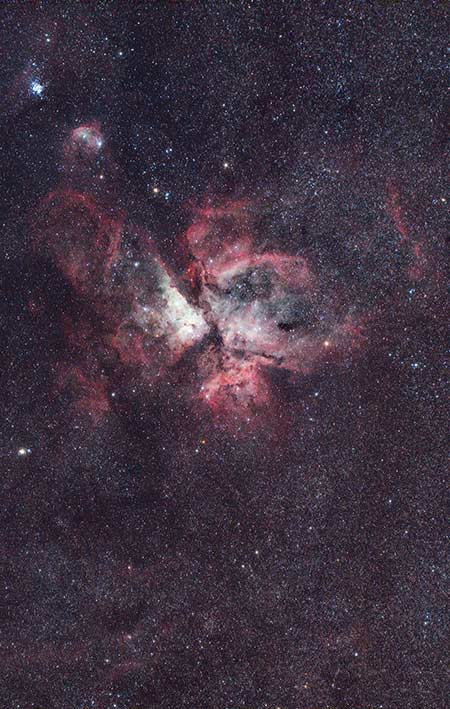
In March 2019, I tested this filter on a stock Canon EOS 7D Mark II DSLR. The target was the glorious Carina Nebula using a RedCat 51 refractor telescope. This photo contains less than 10 minutes of overall exposure time and was captured during my visit to Costa Rica.
I hope that my review of the Optolong L-Pro filter gives you a better idea of what to expect. Until next time, clear skies!


Nice review Trevor! It is a good filter indeed. Just a side note: I have the Optolong L-Pro clip-in for fullframe Nikon and it vignets heavily when used with my telescope (900mm F9). Normal lenses are fine.
How does it perform on galaxies?
I will find out soon enough! It’s been nothing but rain here in Ontario this month. I’ve had 2 clear nights since owning the filter and used them both on M45. I’ll be shooting multiple galaxies with the L-Pro over the next few months. Cheers
Just to add: it also vignets on my 420mm f5.8 telescope. I have tested this yesterday.
Thanks for the review, Trevor. It looks like a great product. Are you aware of any Optolong retailers in Ontario, or elsewhere in Canada? I tried to order one from High Point Scientific in NJ and they said they can’t sell to Canada due to dealer restrictions???
Keep up the great work!
I have a quick question. My backyard is a Bortle 5 and am just getting set up to image. I am using a William Optics GT71 with a 0.8 flatner. My camera will be a borrowed T2i but may move to a Zwo 294MC pro. I can only get one filter at this time so my question would be if you had only one filter to choose from starting out, which one would you prefer? Thanks
I like the thorough review. I have been using a L-pro as well on a full spectrum camera, and I wonder if you could give your opinion on the following:
The L-pro also serves as a UV/IR cut according to the spectrum. I have noticed that on long exposure, the large stars can become a little bit bloated, which may indicate that no all the IR is blocked by the L-Pro.
Have you noticed a difference in star sizes or star bloating between regular DSLR (with factory IR block) and full spectrum DSLR when using the L-pro?
Thanks.
A very interesting filter indeed. I am currently holding myself back purchasing one because of this Astronomik statement:
https://www.astronomik.com/en/news/chinese_copies_en/.
Very cool review 🙂 Thank you
Just bought it second hand for a FF canon 6D with IR filter removed.
I have tested its transmission under a spectro, it is essentially the same as advertised, although it has some leakage in the infrared not shown on the ad.
PM me if you want the transmission curve.
Hi, I’m Luis from Peru.
Thanks for this useful post.
I’m pretty happy because my Optolong -Lpro 2″ filter has just arrived today from Ebay. As you, i was also able to catch pretty good images of Eta Carinae Nebula with a cheap UHC filter from my capital, Lima (bortle 9).
However, i think this L-Pro would be the best choice for urban and suburban skies. I hope to get very positive results soon.
Do you know if this filter is also useful for blocking lunar brightness? I’m not talking about the full moon of course, but perhaps its crescent phase.
Regards!
Hi there Ruben,
2 things:
– where can I get one of theses filters? (I was only able to find them on the Canon version)
– Can you please post a link to a pict that shows the vignetting?
Hi Trevor, thanks for this review.
I live near the city with the view of the city skyline in front of my balcony, so severe light pollution. I would like to know if the L-Pro is the right choice or should I go for a CLS, or even a UHC? I use standard unmodified DSLRs (Canon 200D and the Canon 5DS) and my aim is to capture the Milky Way and possibly deep-space objects from my balcony. Would be great to know your thoughts.
Thanks,
Good to hear Simon! “A very interesting filter indeed. I am currently holding myself back purchasing one because of this Astronomik statement:
https://www.astronomik.com/en/news/chinese_copies_en/.”
I indeed bought the one out of Germany (directly from the Astronomik website and not the Optolong chinese knock off) and yeah, I’m glad I waited. Just a fluke as I was on my way here anyways and was short on time for ordering in Canada. Thanks for providing that link! Just learned about that 5 minutes ago.
Hi Trevor,
I am imaging with a Takahashi FCT-150 (F7) scope, Canon EOS 60Da, and the Optolong L eNhance filter. My exposures are typically 600sec @ ISO 800, and developing in Deep Sky Stacker.
The contrast with this LP filter is fantastic, however my stacked images are a rusty red that is hard to color compensate, even within Photoshop CC.
I notice that your photos of Hydrogen rich nebulas, always have the characteristic pink color. Mine are always red. Is there a setting in Deep Sky Stacker that needs to be adjusted for this LP filter?
Thank you for your shared knowledge,
Bill
I have the same problem, with L pro, I have reddish stars, and if I correct the star color with Astro Pixel Processor I get white stars but the target (e.g. some red nebula) becomes more pale, less red.
Hi trevor,
I have a Canon EOS Rebel T3i camera. Can I use the Sigma 18-35 f / 1.8 lens with the Optolong L pro filter?
Hi Trevor,
I have a modded Canon T3i and a stock 6D. Could you confirm whether the Optolong EOS-FF clip in filter would fit in both…? If so, it would be a great option for me. Thanks
Trevor its Jason Cousins out of Long Island and i have a quick question regarding the use of the filters above.
It may have been explained and I missed it but when using the 5dm2 and the WO Zenith are you stacking the L-Pro twice? Is the drop-in filter in the camera and the 2 inch screwed in the flattener simultaneously?
Hi Jason. You wouldn’t want to stack the filters. One or the other