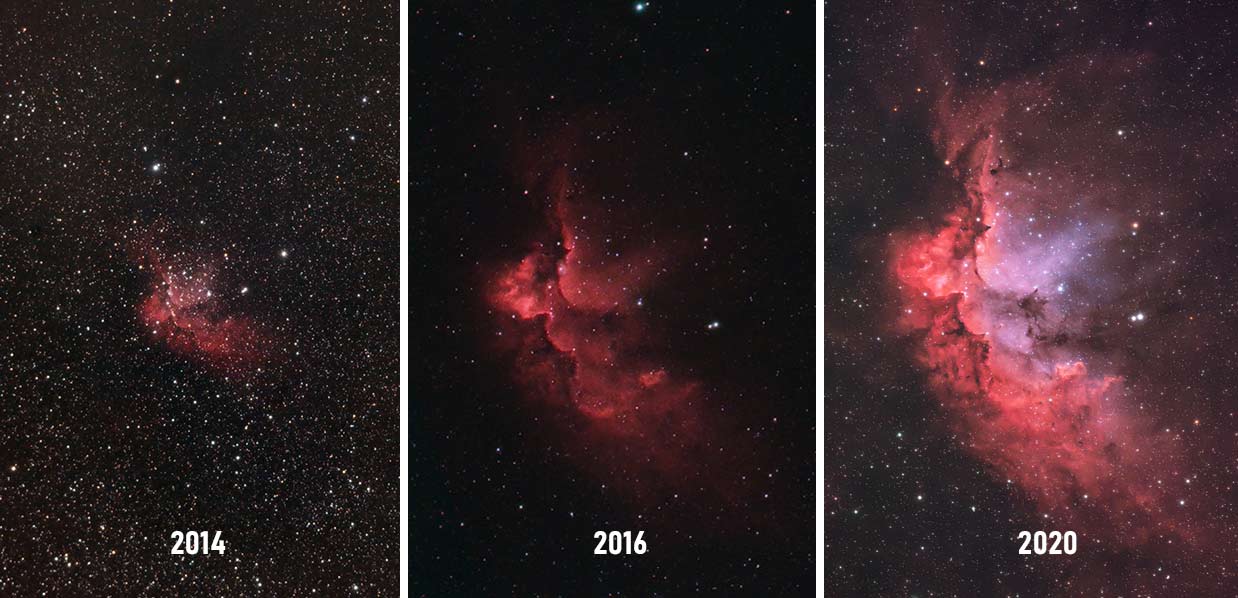
I Captured My Most Detailed Portrait of the Wizard Nebula Yet
Last week, I photographed the Wizard Nebula with my camera and telescope in the backyard. The final image includes 24 individual exposures of 4-minutes each, for a grand total of 1.5 hours.
Despite a bright moon interfering, it is by far my best image of the Wizard Nebula to date. In this post, I’ll explain how I captured the Wizard Nebula, and what to expect if you’re new to the world of deep-sky astrophotography.
You don’t need the latest and greatest gear to capture this nebula, although I’ll admit, it helps. Along with a few best practices, I’ll share a few ways that you can accomplish this goal with budget-friendly gear.
For a behind-the-scenes look at how this image was taken, be sure to watch the video on my YouTube channel.

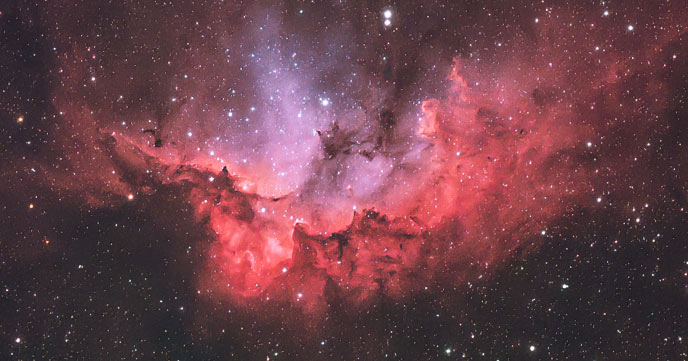
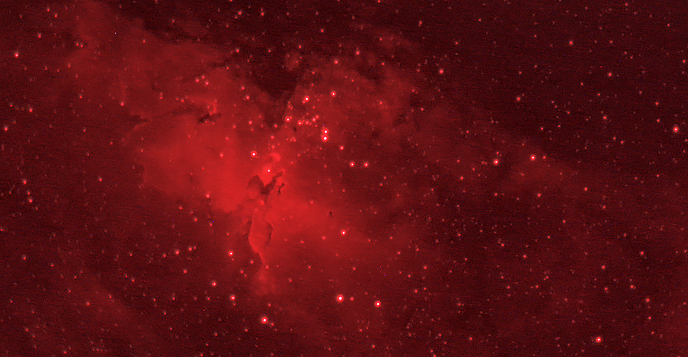
The Wizard Nebula in Cepheus. Photo by Trevor Jones.
The image above includes 1.5 hours of total exposure time captured through a 150mm refractor telescope (Sky-Watcher Esprit 150). The camera was a QHY268C (Photographic Edition), one-shot-color CMOS dedicated astronomy camera. You can see a larger version on my Flickr profile.
A dual bandpass narrowband filter was used (Optolong L-eXtreme) to ignore light pollution and isolate the light that is emitted by this deep-sky object. The pixel scale of this image is 2.11 arcsec/pixel, and the radius is 0.507 degrees.
Related Video: QHY268C Review
Photographing the Wizard Nebula
If you’re a seasoned astrophotographer, capturing deep-sky images in space with your telescope almost starts to feel “normal”. But the reality is, photographing a sensational object like the Wizard Nebula is quite an accomplishment.
Capturing any deep-sky object is an accomplishment, whether it is a distant galaxy, bright emission nebula, or even an open star cluster. Aside from understanding the basics of long-exposure astrophotography through a telescope, you need to plan your projects based on things like image-scale and apparent altitude.
Don’t believe me? Have a look at my first attempt at capturing the Wizard Nebula from 2014. For this image, I used a DSLR camera (Canon EOS Rebel XSi) and an 80mm refractor telescope (Explore Scientific ED80).
It’s not that this image is bad (I was quite proud of it at the time), it’s just that is overwhelmed by stars and there is not enough resolution to showcase its true structure.
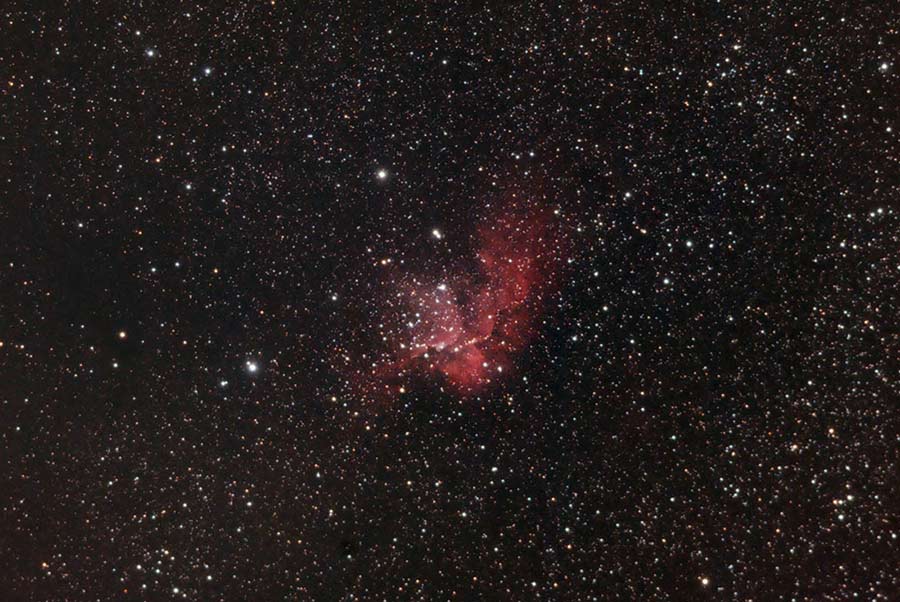
My first image of the Wizard Nebula from 2014.
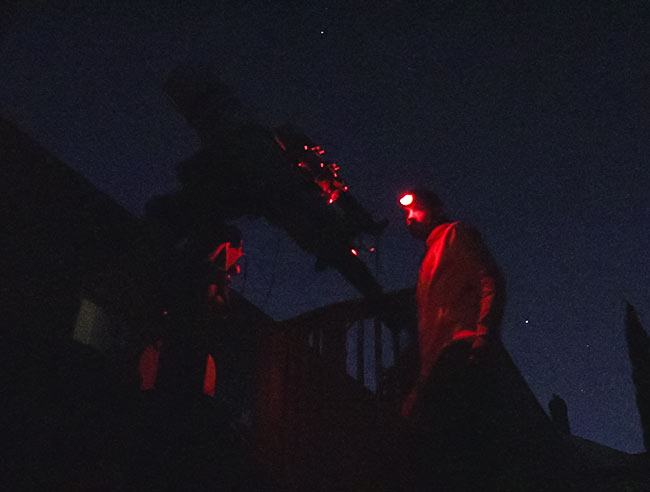
I remember this night well. I brought all of my equipment to a friend’s house (now my brother-in-law), as I did not have an outdoor space of my own to set up in at the time.
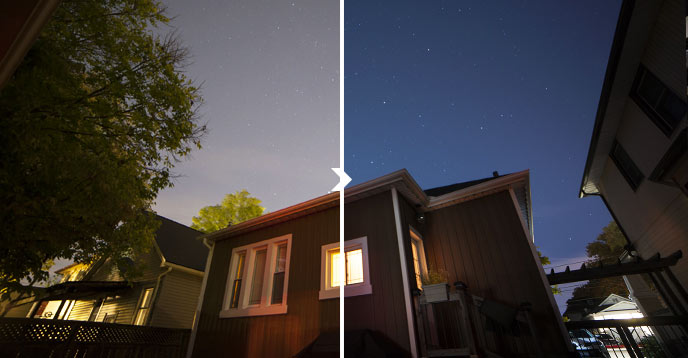
In the photo below you’ll see my 80mm refractor telescope riding on top of my Sky-Watcher HEQ5 GoTo mount. Some of the biggest upgrades in my imaging setup now are increased focal length and aperture, and the use of a dedicated astronomy camera.

My old astrophotography setup in 2014.
My latest version was captured with a 90% illuminated moon shining brightly. Ideally, I would capture all of my deep-sky images on a moonless night, but clear nights can be hard to come by.
Even though you’ll get better results during the new moon phase, certain deep-sky targets such as emission nebulae can be captured successfully using narrowband filters that ignore most of the visible light spectrum.
NGC 7380: The Wizard Nebula
This nebula lies 7,200 light-years away, and the fact that we look back in time to photograph it through a telescope is truly amazing.
Like all of the other deep-sky objects in the night sky with a common name, the Wizard Nebula gets its name from a resemblance of a recognizable figure on Earth. When the image is turned the right way, you can clearly see the wizard’s face, arms, and signature wizard’s hat.
The Wizard Nebula is a collection of interstellar gas and dust with an open star cluster (NGC 7380) embedded within it. For a more elegant description of this nebula in Cepheus be sure to see this incredible APOD image by Andrew Klinger.
- Classification: Nebula with an embedded star cluster
- Magnitude: 7.2
- Cataloged: NGC 7380, Sh2-142
- Constellation: Cepheus
- Distance: 7000 light-years from Earth
You may get a better understanding of the astrophotography equipment I used to photograph nebula in the night sky by watching the following video:
Location in the Night Sky
If you are trying to find the Wizard Nebula in the night sky with your telescope, you can use the star map shown below as a reference.
The northern constellation Cepheus is full of incredible deep-sky astrophotography targets. From my latitude (43 degrees North), this constellation is circumpolar, meaning that it never sets below the horizon.
From mid-northern latitudes, the best time to observe and photograph the Wizard Nebula is from August to November, when it reaches high into the northern sky.
You will have a hard time seeing the Wizard Nebula visually through the eyepiece of your telescope (or binoculars). At magnitude 7.2, it is just too dim. A camera, however, can record long-exposure images that reveal its dynamic structure.

Wizard Nebula star map. Sky and Telescope, IAU.
Now that you have a better understanding of where the Wizard Nebula is located, let’s focus on how to photograph it with a camera and telescope.
How to Photograph a Nebula
Astrophotography is a rewarding and awe-inspiring hobby, but it certainly isn’t easy.
If it weren’t enough that the night sky is a moving target, the steep learning curve of the hobby demands patience and perseverance. When you’re starting out, things like learning how to attach your camera to a telescope, and focusing on stars can be challenging.
Add in the endless amount of new equipment to learn how to use (and the cost of these items), and astrophotography begins to feel like a mountain to climb.
I vividly remember the early stages of my astrophotography journey, and how impossible photos like the one shared on the page seemed. The good news is, if you’re not overly technical or experienced, there is hope for you if you’re willing to be patient.
For a timeline of my images, be sure to follow AstroBackyard on Instagram. I upload new images each week, with a description of how they were taken. You can also take a look at my premium astrophotography image processing guide for a deep-dive into how I create my images.
Related Video: Nebula Photography Basics (Start-to-Finish)
My Deep-Sky Astrophotography Process
If you’re a frequent visitor to my website and YouTube channel, you already know how the process works. However, I realize (usually after making a post on Reddit), that the art of deep-sky astrophotography is still foreign to a large number of people.
If you’re unfamiliar with how the entire process works, the most important element is the tracking of the apparent motion of the night sky. I use an equatorial tracking mount to move at the same speed as the night sky to freeze the Wizard Nebula in place.

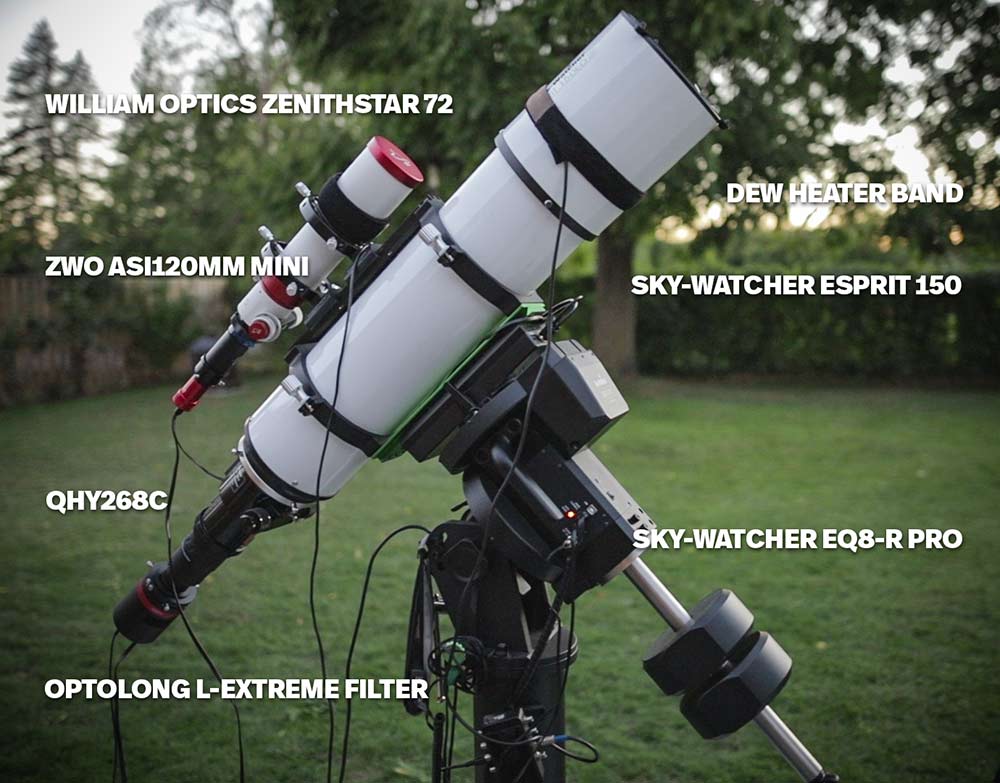
The telescope and mount used for my image.
For this image, I used the heavy-duty Sky-Watcher EQ8-R Pro, but you don’t need a massive observatory-grade telescope mount like this to take amazing astrophotography images. A compact star tracker like the Sky-Watcher Star Adventurer or the iOptron SkyGuider Pro is more than adequate for an entry-level imaging configuration.
Because the exposure times tend to go long for a deep-sky image (longer than 30-seconds), you’ll need the tracking mount to be spinning with the night sky at sidereal rate. The longer the focal length of the telescope (magnification), the more accurate the tracking must be.
For accurate tracking, the equatorial mount needs to be polar aligned with the north or south celestial pole. In the northern hemisphere, we have the good fortune of having the North Star (Polaris) as a helpful point of reference.
With the tracking platform compensating for Earth’s rotation, you can focus on capturing steady, long-exposure images of dim targets in space like the Wizard Nebula.
Tracking and guiding are two different things, but some people get confused about this. Guiding refers to autoguiding that utilizes a separate camera for improved tracking accuracy. You don’t need to autoguide for a successful image, but it will certainly let you shoot longer.
Using a Dedicated Astronomy Camera (Color)
I have used nearly every type of astrophotography camera available, from a sophisticated monochrome CCD camera to an entry-level DSLR. For my latest image of the Wizard Nebula, I used a one-shot-color (OSC) CMOS camera.
For beginners, I typically recommend starting out with a DSLR or Mirrorless camera. These cameras are versatile and remain a relevant option for astrophotography of all kinds (Milky Way Nightscapes, Deep-Sky, etc.). Some of my best images were captured using a DSLR camera.
The selection of dedicated astronomy cameras available now is staggering, and these cameras have the advantage of being designed for long exposure imaging. Back-illuminated sensors, thermoelectric cooling, and improved quantum efficiency are 3 important features that separate this breed from a standard daytime camera.
One-shot-color (OSC) dedicated astronomy cameras have the advantage of collecting full-color images in a single shot, even if they leave a significant amount of signal on the table (which monochrome cameras do not).
The QHY268C has proven to be an excellent performer for my style of astrophotography, particularly when coupled with a dual-bandpass narrowband filter. This camera has an APS-C (crop) sized sensor, which is quite large in the world of OSC astrophotography sensors.

The camera used for my photo of the Wizard Nebula (QHY268C dedicated astronomy camera).
The camera includes a cooling function to help keep thermal noise at bay and several other astrophotography-specific features that a daytime photography camera does not have.
Although a dedicated astronomy camera may seem like an obvious choice for deep-sky astrophotography, be warned that the complexity of the image acquisition stage grows as well.
No longer can I focus the camera using the display screen on the back, I must employ dedicated software to run the camera and control settings such as gain, offset, and binning.
These days, I am still using Astro Photography Tool to control my imaging sessions, as it does everything I need reliably.
The Ultimate Light Pollution Filter for Nebulae
My backyard suffers from horrible light pollution (Bortle Scale Class 7), so a light pollution filter that helps me isolate a nebula from a washed-out sky is essential.
The Optolong L-eXtreme filter is especially useful because it isolates two key areas of the visual spectrum. The Ha bandpass, and the OIII bandpass, both at 7nm each.
Although you can achieve better results using a monochrome camera and dedicated narrowband filters (narrowband imaging), a dual bandpass filter makes the most of your limited time under a clear sky.

For emission nebula targets (which there are plenty of), a filter that helps isolate Ha and OIII is incredibly useful. Instead of capturing a grayscale image using one narrowband filter at a time, you can produce color images with dynamic details in a single shot.
Once captured, you can process the data in many interesting ways, including new methods of extracting the data to produce synthetic Hubble Pallete images.
Essentially, the data you see in the red channel is the H-alpha, and the blue channel contains the OIII. It should come as no surprise that the red channel is the strongest, but you can extract the signal from this channel for a luminance layer as well.
My Image of the Wizard Nebula
My final image of the Wizard Nebula contains only 1.5 hours of total exposure time. In the realm of deep-sky astrophotography, this is a very short integration.
I stacked 24 individual light frames of 4-minutes each to produce an image with a stronger signal-to-noise ratio than a single exposure. I used dark frames to calibrate the image (reduce noise), and flat frames to correct uneven field illumination.
All of the integration and calibration takes place in DeepSkyStacker. When the intermediate file has been created, I can then bring it into Adobe Photoshop for post-processing.
I make slight adjustments to my image processing workflow depending on the subject matter, but there are a number of key actions that take place on each one:
- Levels Adjustment (Balance Background)
- Curves Adjustment (Masking the Highlights)
- Saturation Boost (Selective Color Boosting)
- Star Reduction (Multiple Iterations)
- Topaz DeNoise AI (Opacity Adjusted)
- Sharpening (Selective)
For a complete, detailed breakdown of these adjustments, please see my premium image processing guide. You can also view many useful image processing tutorials on the astrophotography tutorials page.
Image Details:
- Total Exposure: 1.5 Hours (24 x 240s @ Gain 102)
- Integration/Calibration: 15 Darks, 15 Flats, 15 Bias
- Camera Control: Astro Photography Tool
- Integration Software: DeepSkyStacker
- Post-Processing: Adobe Photoshop 2020
- Tools: Astronomy Tools Action Set, Topaz DeNoise AI
Equipment Details:
- Camera: QHY268C
- Filter: Optolong L-eXtreme
- Telescope: Sky-Watcher Esprit 150
- Guide Scope: William Optics Zenithstar 72 (no longer available)
- Guide Camera: ZWO ASI120MM Mini
- Tracking Mount: Sky-Watcher EQ8-R Pro
Final Thoughts
Through the process of capturing and sharing this image of the Wizard Nebula, I am reminded of just how far I have come. For me, astrophotography has been a slow and rewarding process.
I still remember the first time I tried to photograph the Wizard Nebula using my 80mm refractor telescope and DSLR camera. The image scale was all wrong, and the process of building an image using specialized filters was foreign to me.
However, I was just as excited to see the faint shape of a wizard appear on my camera screen then as I am now.
So, what exactly did I do to make such an improvement over the last image? It’s impossible to summarize everything I’ve learned in 6 years of deep-sky astrophotography, but here are some key improvements I made:
- I shot the image with more focal length (higher magnification) and aperture (light-gathering power)
- I used a duo-narrowband filter that isolates the prominent gases in this target (and keeps stars small)
- My guiding accuracy and tracking (polar alignment) have improved
- I now know how to take proper calibration frames to avoid excessive noise, dust, and vignetting
- My image processing skills have improved with new techniques for pulling out faint details
Over time, your standards will get higher, and what you deem “a decent image” will change. But as long as you are making small improvements in at least one aspect of your process along the way, astrophotography will continue to reward you with memorable nights, and images that make people say “Wow! You took that?”
Beautiful image, and a considerable improvement from 2014.
Thank you, Gary!
Hey trevor! very nice pic sir! you think you have the summer core low, well you should see me! the only thing i can realisticly image is Omega but its right into the lightdome! Also have sodium streetlighs approx every 10 feet along the street and we are actually surounded by them! (our property).
anyway rant over have a nice day!
Great improvement there Trevor from 14.I have not gotten a good one yet. will try with Z 81 with reducer corrector and altair quad band filter and altair 269 hypercam C. Keep these coming. Been following a couple years now. Bill Needham
Great tutorial, amazing results and a very encouraging story how to get your way through the challenges over years!
Makes me (and many others I believe) get up and start trying out new things to see the beauty up there!
Your journey in astrophotography helped me start my own three years ago. And, while I’m pleased with the results on my Flickr page nowadays, I am still learning so much from you … and still inspired by your documentation of your endeavor. I typically use the Optolong L-Pro due to the way it still gives me the colors of the stars. But I also have the L-Enhance and the STC Duo Narrow Band. Still your success in the moonlight with this image tells me I need to now save for the L-Extreme. Thanks for the journey, Trevor. We all appreciate it.
Question –
Do you think that shooting less total exposures at 240 seconds gains anything over shooting more exposures at 60 seconds if you are stacking.
I have been (in my workflow) shooting at 300 seconds but I want to limit the amount of light from Galaxies (which have been my major targets recently). So I will blow out the interior of Andromeda at 500 seconds – and I assume that I will have less of this effect at 60 seconds?
Unsure because the weather has not been cooperating for me to do a side by side comparison.
I am just trying to figure out the best timing for some of the Nebula as Orion starts to ride at a more reasonable time. If you have any resources you can share or any suggestions for exposure length, that would be great.
Thanks