How to Take Bias Frames for Astrophotography
As you continue to make progress in the hobby of astrophotography, you’ll quickly learn that taking proper calibration frames is essential. The most common calibration frames or “support frames” are dark frames, flat frames, and bias frames.
The main reason amateur astrophotographers take bias frames is to reduce noise in their images, more specifically, the fixed-pattern noise. No matter what type of camera you are taking your images with, the signal-to-noise ratio (S/N) is often the primary deciding factor between a good image and a great one.
In this article, I will describe bias frames and explain why they are crucial for enhancing astrophotography images.
What is a Bias Frame?
To start, I think it is important to understand what bias frames actually are.
Your camera inherently has readout noise as it reads each pixel on the sensor, called Bias. The noise or signal captured by the camera during photo capture can be isolated by taking Bias frames for calibration or removal from the light frames. Bias is therefore the offset that occurs from the camera sensor.
While this is a useful way to understand a bias frame is in simple terms, Warren Keller reached out to help me clarify exactly what a bias frame is (citing information from A Glossary of CCD terminology.)
“A more accurate description is that a bias frame is the artificially induced electronic offset that ensures that the Analogue-to-Digital Converter (ADC) always receives a positive signal. All CCD data has such an offset which must be removed if the data values are to be truly representative of the counts recorded per pixel. The bias is a charge applied to the sensor to prepare it to receive photons.”
Like the other calibration frames we use, Bias frames are meant to capture this so it can be removed. Below, is an exaggerated look at a bias frame captured using a Canon EOS Rebel T3i (600D) DSLR camera.

A single bias frame captured with a DSLR camera (ISO 800, 1/8000″).
What makes a good bias frame?
To capture a successful bias calibration frame, make sure the camera is in a dark place or room (I take mine at night). Take several pictures (20-40) and then stack them together in your pre-processing software such as DeepSkyStacker. Each pixel will have a slightly different value, except for a small amount of noise.
It is said you can use bias frames for a long period of time once you have them; however, I usually take Bias frames every few weeks or so just to be safe.

Bias/offset frames were subtracted from my light frames in this photo of the Orion Nebula.
For certain cameras, you may find that bias frames are not necessary (as was the case with my ZWO ASI294MC Pro). You’ll need to research your particular camera model to find out whether bias frames are recommended or not.
To clarify, experts recommend that the bias signal should always be removed, either by a bias or dark frame (which contains the bias). Certain CMOS cameras (in this case, the ASI294MC Pro) can’t produce a reliable bias frame.
When shooting with a DSLR, I always include bias frames in the stacking process. They are incredibly quick and easy to capture, so I usually capture a brand new set of bias frames for each and every imaging session.

How to take Bias Frames for Astrophotography
Taking Bias frames is easy and does not take a lot of time, so this should be part of your imaging routine. You can quickly acquire the number of frames needed to reduce your overall noise level.
Here is an overview of the steps required for Bias frames.
- Use the fastest shutter speed possible (often 1/8000″)
- Keep the lens cap on your camera or telescope (and cover the viewfinder)
- Use the same ISO as your light frames
- Capture about 20-40 bias frames
I usually capture my bias frames at the end of my imaging session. Whether I am using a remote shutter cable on the DSLR, or am running a sequence of images in Astro Photography Tool or the ASIAIR, collecting bias calibration frames takes less than 5 minutes.
Because each exposure is less than a second, you can quickly accumulate 20-40 bias frames for stacking purposes. Other than racking up the shutter count of your DSLR camera, there is very little reason not to shoot new bias frames after each session. Camera control software such as Sequence Generator Pro can completely automate the process for you if you want.
Once you have collected at least 20 bias frames, you can load them into your project in DeepSkyStacker, Astro Pixel Processor, PixInsight, or whichever pre-processing software you like to use. In DeepSkyStacker, I simply select all of the bias frames from the folder I created using the “offset/bias files…” button at the top left of the user interface.
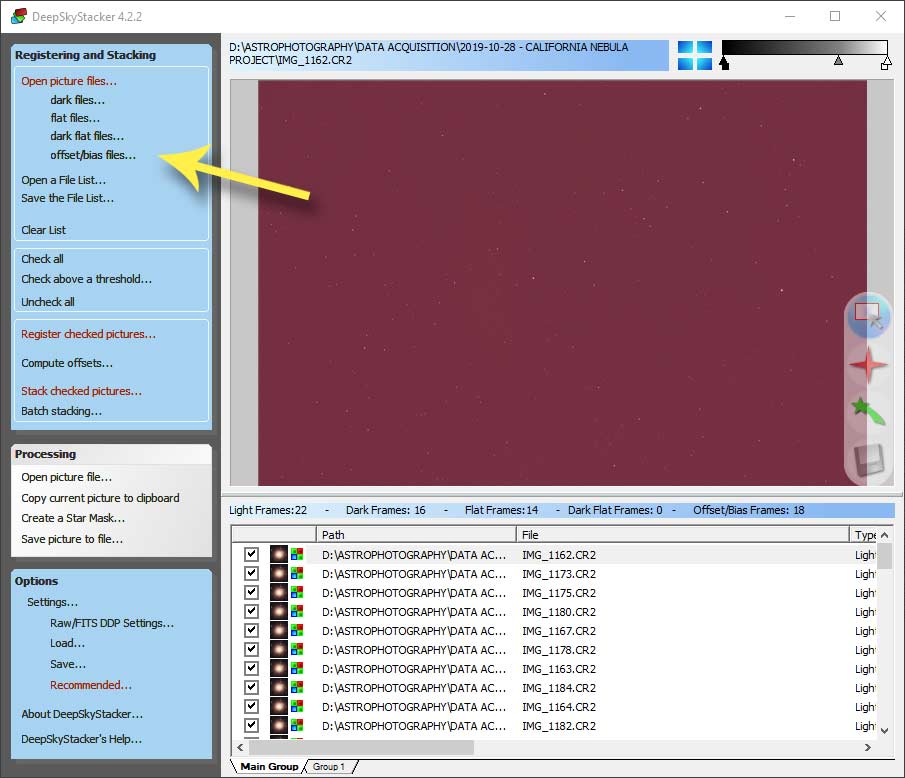
Loading bias frames into your project in DeepSkyStacker.
A stacking software such as DeepSkyStacker will create a master offset file from the bias frames you input. The master bias offset is an average of the pixel information contained in all of the bias frames. The stacking software will automatically subtract the master bias frame from your light frames before creating the final output.
I always use the default settings in the stacking mode parameters for bias frames, which happens to be “median” mode. Your stacking software should allow you to adjust these settings manually if you want.
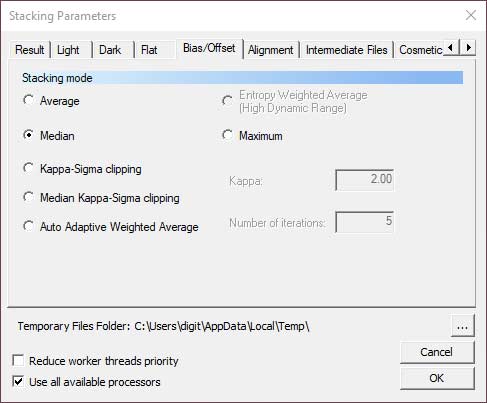
I recommend leaving the stacking mode set to median for bias/offset calibration files.
I hope this article has shown you how quick and easy it is to take bias calibration frames with your camera. Astrophotography is all about collecting as much signal as possible and reducing noise. By subtracting the bias readout noise from your camera sensor, your images will benefit from a stronger S/N, and the image processing stages will be much more enjoyable.