ISO and Astrophotography
What is ISO, and how does it affect your astrophotography images? It’s one of the first astrophotography camera settings newcomers to the hobby ask me about.
Does it really increase the camera’s sensitivity to light at the expense of introducing more noise? Is it better to shoot more short exposures using a high ISO than fewer long exposures with a lower ISO?
The answers to these questions are much more technical than you may wish (or need) to understand. If you have your heart set on understanding the complex history of ISO in photography, this article by Richard Wright is an eye-opener.
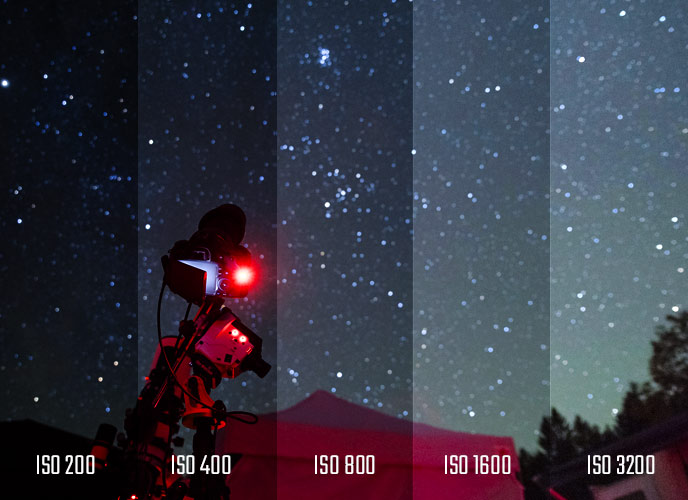
The image above illustrates how an image with the same exposure length and aperture appears when using different ISO settings.
If you want to brighten your single-exposure image without using a longer exposure or a wider aperture, you can try increasing the ISO setting.
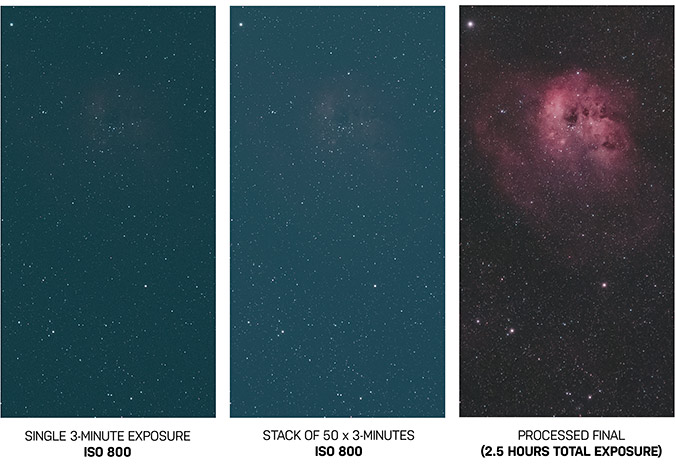
Boosting the ISO setting of your camera in a low-light photo taken at night may seem to drastically degrade the quality of your image (with grainy noise). Still, the truth is that it is not as much of a factor as you may think after several exposures have been collected.
Regardless of the ISO setting you use for astrophotography, stacking a series of exposures using image stacking software is the most effective way to enhance the signal-to-noise ratio and overall image quality.
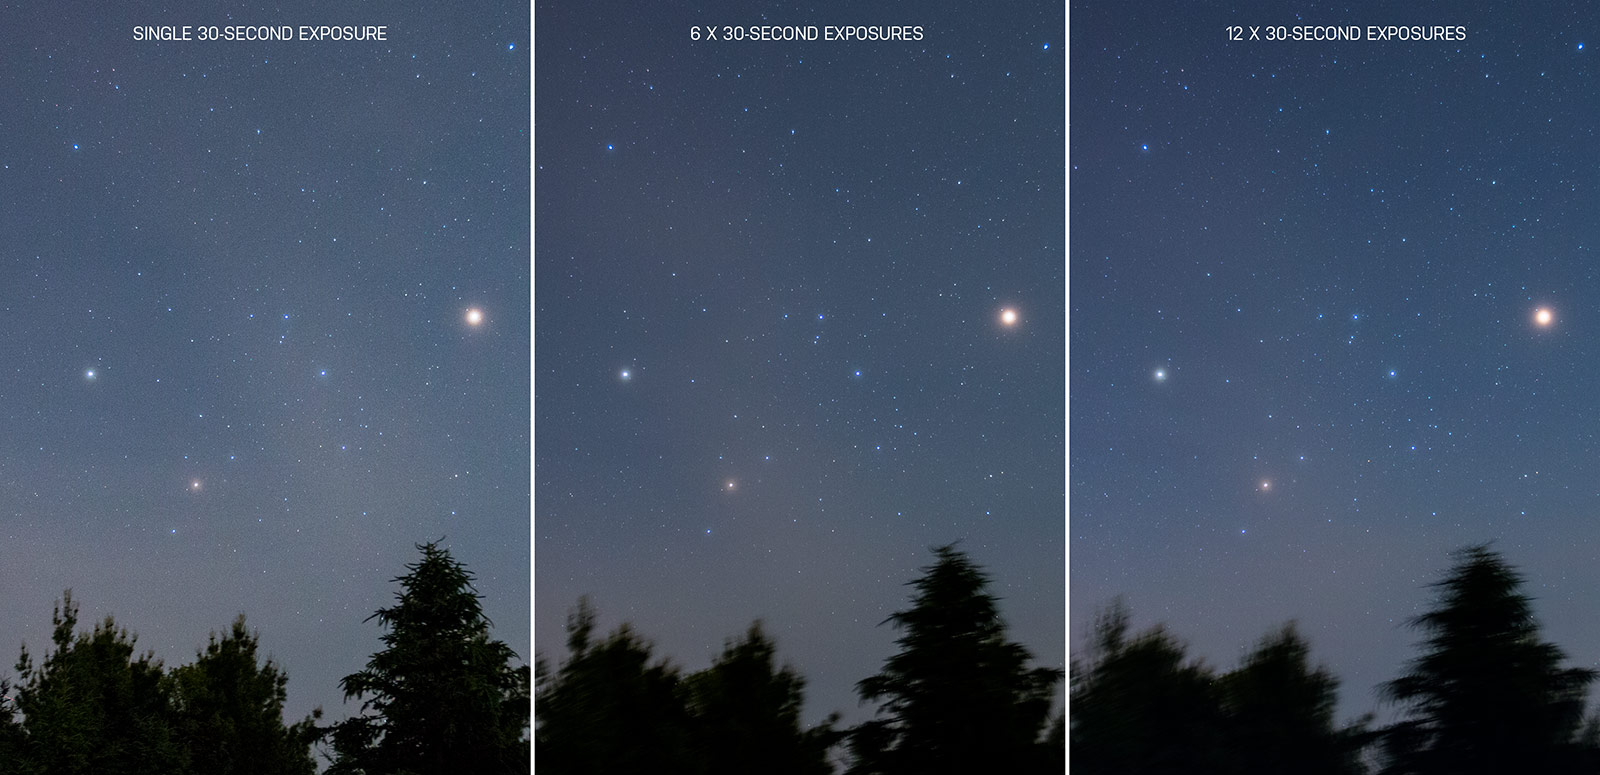
The power of image stacking and the signal-to-noise ratio at work (click to enlarge).
Understanding ISO and Astrophotography
In this article, I’ll do my best to provide an overview of the information that you can apply during your next astrophotography session.
If you are new to astrophotography but have a background in daytime photography, you likely already know what ISO is and its role in the photography world.
If you are a beginner astrophotographer or new to photography in general, it is essential to understand what ISO is and how it impacts your astrophotography images.
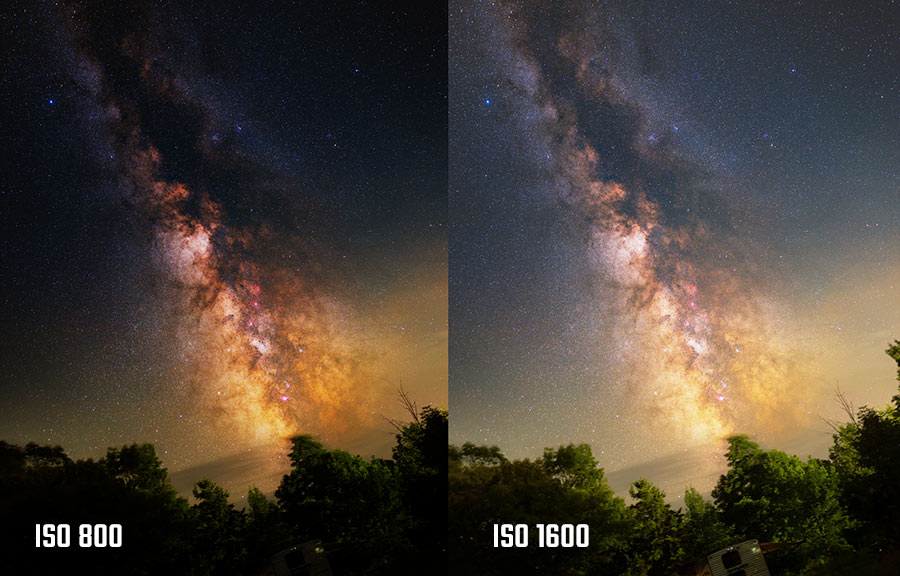
An example of how ISO affects the brightness of an image straight out of the camera.
While a higher ISO will produce a brighter image out of the camera by amplifying the sensor’s signal, photographs taken in low-light situations (like astrophotography) using a high ISO setting will appear to have more noise in a single exposure.
For this reason, many amateur astrophotographers (myself included) prefer to take a longer exposure using a lower ISO, to compensate for the lack in brightness and create a higher quality image.
Some cameras are ISO-invariant, meaning that the noise levels remain the same regardless of the ISO setting used.
To accurately compare the noise levels of your DSLR or mirrorless camera, take two exposures with the same aperture and exposure times, at both high and low ISO settings.
Adjust the brightness of the photo in the low ISO image so that it matches the brightness of the high ISO version. Is there really more noise in the high ISO image, or was it hidden?
The Best ISO for Astrophotography:
If you’re looking for the best ISO to use on your DSLR camera for astrophotography, start with ISO 1600. This is often the “sweet spot” for modern digital cameras, and it is my most used ISO setting for deep-sky and nightscape astrophotography.
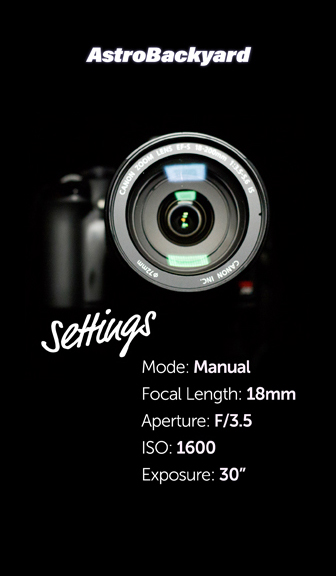
Here is a simple graphic I created that you can use as a benchmark to start taking images of the night sky on a stationary tripod or small star tracker:
To gauge the effectiveness of this setting, take a few long-exposure images (1-3 minutes in length) at ISO 1600 and examine the results. Monitor the histogram to ensure you are not clipping data in the highlights or shadows, and zoom in to see the balance of signal and noise in a single exposure.
If the data is within the middle or right side of the histogram, chances are your ISO setting will be just fine. Using dark calibration frames and dithering will take care of the noise during the pre-processing stages of your image.
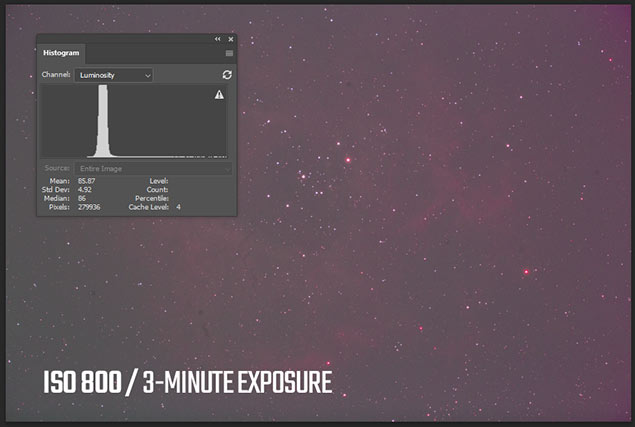
The histogram on your camera allows you to confirm your exposure, f-stop, and ISO settings are appropriate (not clipping data).
Don’t let a noisy sub-exposure scare you. The calibration and stacking process will magically remove most (if not all of the noise). Reducing noise and improving signal is why amateur astrophotographers need to take multiple image exposures to create a beautiful image.
Most of the astrophotography images I take include over 50 sub-exposures to create an image with a healthy signal-to-noise ratio. Through integration, I am able to greatly reduce the amount of noise present in the final image.
What is ISO?
ISO, in combination with aperture and shutter speed, helps to control the exposure (i.e. brightness or darkness) of your image.
Years ago, amateur astrophotographers had to use film with a specific ISO to achieve their desired light sensitivity. For example, ISO 400 film was twice as sensitive to light as an ISO 200 film.
For a low-light night sky image, you could seemingly increase the sensitivity of your camera by using an ISO 1600 film.

Using ISO 400 film vs. selecting ISO 400 on a digital camera.
Now, digital cameras have an electronic sensor that receives light and reads out an image of electrons. The measure of a digital camera’s ability to convert light into electronic signals is known as quantum efficiency.
The good news is, you don’t need to fully understand the history of ISO to choose the best possible ISO setting for your next astrophoto.
If you use a dedicated astronomy camera, you can think of the gain setting like ISO, although the values you choose do not directly correspond to ISO.
Which ISO Should I Use?
Before discussing ISO, let’s do a quick review of aperture and shutter speed since they all work together to affect the overall image:
- Aperture: the amount of light that reaches the camera sensor through the lens/telescope based on the f ratio (i.e. focal length of the lens/telescope and the size of the opening). The lower the f-number, the wider the opening – and the wider the opening, the more quickly light is collected.
- Shutter speed: the length of time the camera shutter is open to expose the camera sensor to light, which is measured in fractions of a second. The slower your shutter speed, the more light is let into the camera.
ISO is a way to brighten (or darken) your image by amplifying the signal (similar to gain). If you are not able to brighten your image using a wider aperture or a slower shutter speed, you might try increasing your ISO.
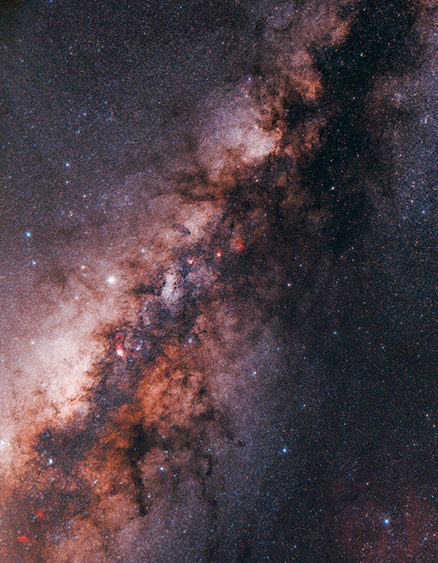
The photo of the Trifid Nebula below uses an ISO setting of 1600 for each single sub-exposure of 2 minutes in length. This ISO setting produced a healthy amount of signal (a balanced histogram) in the shot, and the stacking process removed much of the noise present in the single exposure.
The f-ratio of the telescope used was F/7, and this aspect comes into play (along with exposure length) when deciding on an appropriate ISO setting for the shot.

The Trifid Nebula. 60 x 120 seconds at ISO 1600 (F/7).
ISO and Astrophotography
Due to the shooting conditions associated with astrophotography (i.e., nighttime in darkness), it is essential to set an ISO that strikes a balance between the amount of light collected and the level of noise produced.
When you increase your ISO, as a method to brighten your photos in a single exposure, it can amplify the amount of visible noise (i.e., grainy look) in your images.
What is Noise?
Noise is the part of the photograph that we do not want. Noise is interference that appears as speckled grain, obscuring the signal and thus the details of the photograph.
Noise is typically generated by heat or imperfections in the electronic components of our digital cameras.
Some noise is random with every shot (shot noise), and some noise is produced consistently by the camera’s sensor (read noise). In general, the more noise, the lower the quality of the photo.
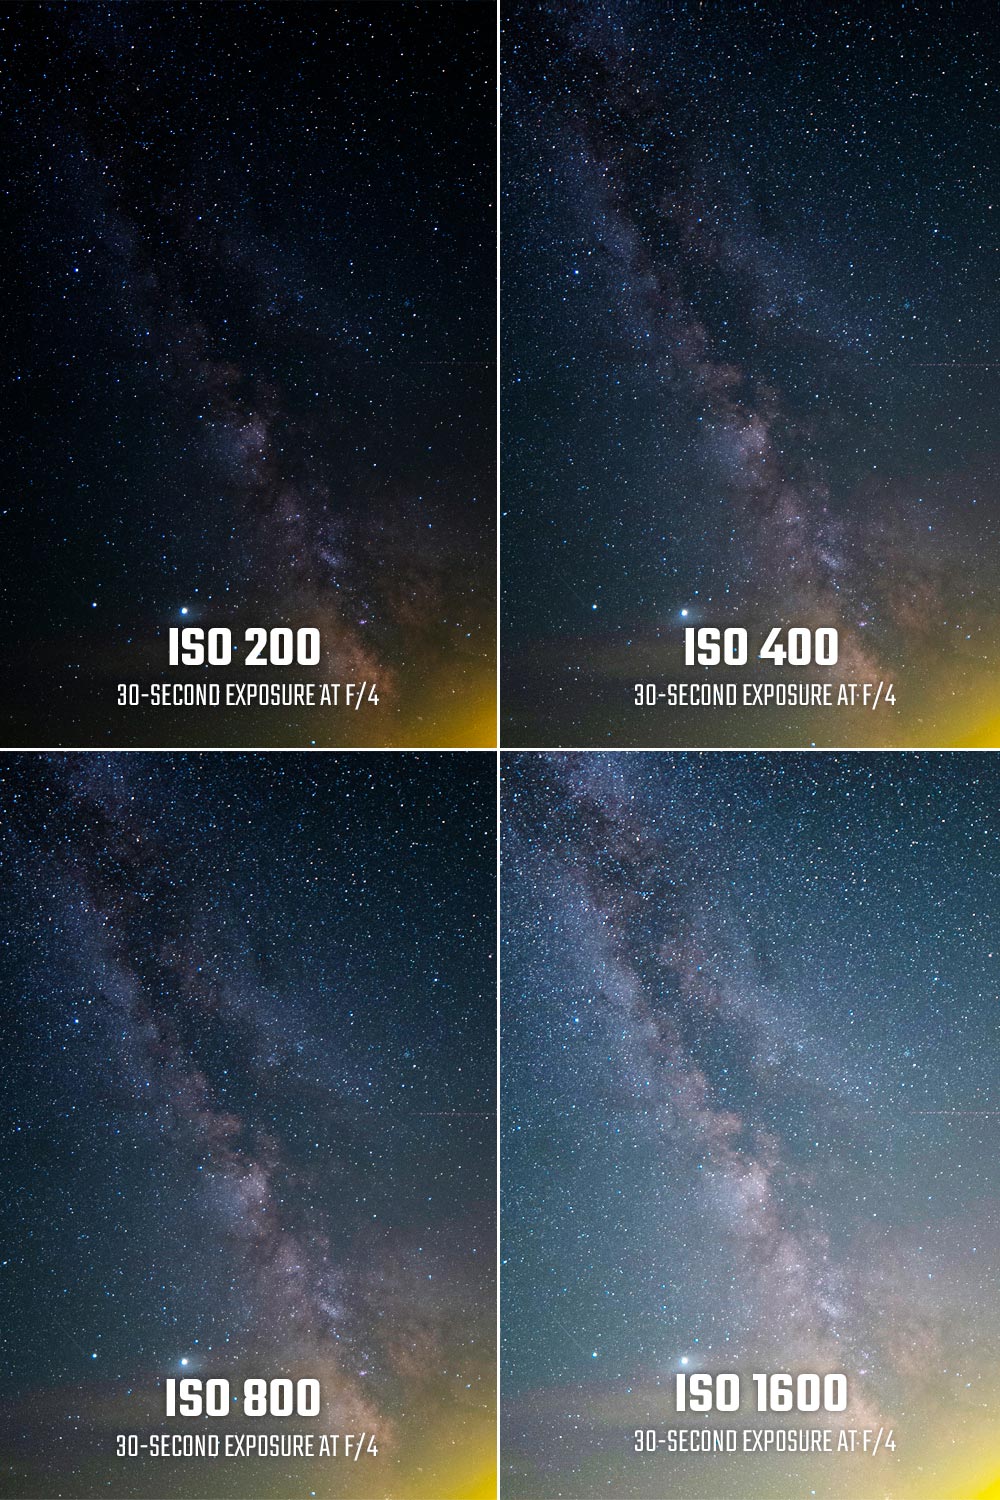
As you can see in the illustration above, the ISO 1600 image is the brightest one before any stacking or image enhancements have been made. When the aperture and exposure length are fixed, ISO allows you to brighten the image by amplifying the sensor signal.
Common Misconceptions
You may have heard that it is a common misconception that increasing ISO increases the sensitivity of a camera sensor (I’ve explained ISO in astrophotography this way many times in the past).
I find this to be the easiest way to explain what your camera’s ISO setting does in simple terms, even if it is not technically accurate.
But the truth is, ISO doesn’t actually change the sensitivity of the camera sensor. By increasing the ISO setting of your camera, you increase the brightness of a photo by amplifying the sensor signal.
Astrophotographers using dedicated astronomy cameras may be familiar with the term gain, which is a comparable measure to ISO as it amplifies the signal.
ISO does not technically affect how much signal (light) your DSLR or mirrorless camera collects. To increase the amount of light collected in a single exposure, you must take a longer exposure, or increase the aperture (lower f-ratio).
High ISO Noise Reduction Settings
If your camera has an automatic noise reduction setting (most modern DSLR and mirrorless cameras do), I recommend turning it off in most cases.
Cameras like the Canon EOS Ra include both a long exposure noise reduction and high ISO speed NR (noise reduction) setting.
You will have more control over your precious data by using calibration frames (such as dark frames to remove hot pixels) and stacking than you would by using the built-in feature on your camera.
If you are trying to capture a scene (such as a nightscape) in a single shot, you may way to try the built-in long exposure/high ISO setting to improve the quality of your single image.
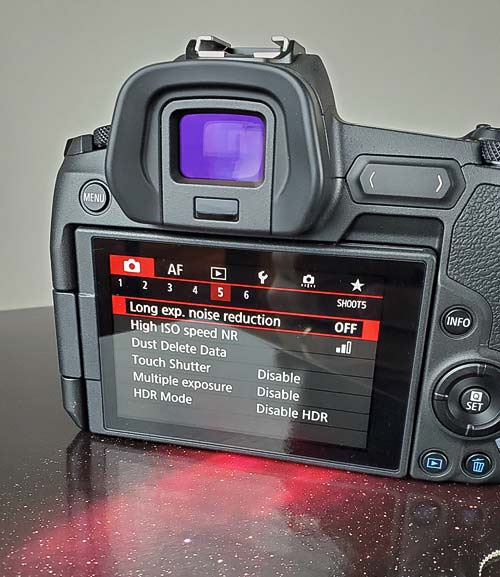
If your camera has a built-in high ISO noise reduction setting, I recommend turning it off for most situations.
Remember that you can always control noise in post-processing, using tools like Adobe Camera Raw in photoshop, and the Topaz DeNoise AI plugin.
Beginner Tips for Setting Your ISO
I regularly receive the question of whether it is better to take a shorter exposure (30 seconds) with a high ISO of (ISO 6400), or a longer exposure using a lower ISO.
I always recommend letting the exposure length do the “heavy lifting” whenever possible. This, of course, means that your tracking is accurate enough to capture a sharp long-exposure (2-minute or more) exposure.
This is one of the main reasons I suggest that beginners who want to take their astrophotography to the next level invest in a quality star tracker, which enables them to collect light for longer periods.
So, use an ISO setting of 800 for an exposure of 2 minutes rather than a setting of ISO 3200 for 30 seconds if possible. It’s all a balancing act between light-gathering ability, your conditions, and your equipment.
The Milky Way. 60 x 2 minutes @ ISO 1600 (tracked).
For the image of the Milky Way shown above, I decided to take 2-minute exposures at a modest ISO setting of 1600. A similar result could have been achieved by shooting 40 x 3-minute exposures at ISO 800 because the overall exposure time is the same.
If you are shooting a nightscape image on a stationary tripod, you do not have the advantage of using a longer exposure to offset the increase in ISO “brightness”. In these situations, you may want to bump up that ISO for a brighter shot in a 30-second window.
Many people have argued about the best exposure time to use for an image project. Is it better to take 100 x 1-minute exposures or 50 x 2-minute exposures?
The truth is, the final resulting image will be nearly identical because the overall integration is the same. This reality was a bit surprising to me but true.
Multiple Images vs. a Single Exposure
Unlike daytime photography, astrophotography requires multiple images (sub-exposures) taken using the same settings, which are then stacked on top of each other using dedicated software.
It is common to see very little detail in a single exposure, and in some cases even in your stacked image with your sub-exposures.
Once you have your stacked image, you can use processing software to bring out the details from the data that was collected.
The Bottom Line
When trying to decide on the best ISO setting to use for your next astrophoto, take a few test shots using anywhere from ISO 400 to ISO 6400 and inspect the results.
Using ISO 800 for a 30-second exposure is often a good place to start and can be adjusted depending on the amount of light pollution present and/or the f-ratio of your camera lens/telescope.
The histogram on your camera represents the shadows and highlights in your image, allowing you to accurately check the exposure of your image.

A healthy-looking histogram for an astrophoto.
As you may have guessed, this is particularly helpful in astrophotography since your object doesn’t often appear in a single exposure.
A histogram to the far left can indicate that your image is underexposed (i.e. too dark), while a histogram to the far right can indicate that your image is overexposed (i.e. too bright).
Ideally, you want the peak of your histogram as close to the center as possible, but that doesn’t mean that sub-exposures skewing left or right are not usable.
Using test shots in combination with your histogram will help you to determine what is the best ISO for your gear and shooting conditions.
Image Stacking
Once you have the appropriate camera settings applied to your single exposure (whether it’s a wide-angle Milky Way shot, or a close-up of a nebula through a telescope) take several exposures using the same settings.
Software tools such as Sequator and DeepSkyStacker enable you to harness the power of image stacking to reduce noise and enhance the signal in your final image.