Beginner’s Guide to Deep Sky Astrophotography
Have you ever wondered how ordinary people use their DSLR cameras to photograph deep-sky objects in space? Astrophotography is an incredibly challenging yet rewarding hobby.
If you have ever looked through a telescope, you probably already know that the vibrant colors and contrast you see in the images do not appear that way in the eyepiece. This is because a camera sensor can record much more light than our eyes can.
If you are interested in taking your own photos of the astonishing deep-sky objects in the night sky, such as the Orion Nebula and the Andromeda Galaxy, this beginner deep-sky astrophotography guide will get you on your way.

The Orion Nebula captured using a DSLR camera and telescope.
Related Article: The Best Astrophotography Telescopes (Tested with Image Results)
Introduction
There are many types of astrophotography, from wide-angle Milky Way photography to high-magnification planetary imaging to deep-sky astrophotography through a telescope or camera lens.
“Deep-sky” (often called “deep space”) means photographing objects like nebulae, galaxies, and star clusters. Some objects are faint or underwhelming through the eyepiece yet explode with color and detail when photographed.
This particular form of astrophotography includes understanding the camera settings required to capture long exposure images, how to achieve (and maintain) sharp focus, and everyone’s favorite image processing.
As you can imagine (or may have experienced), a hobby like this involves a specific and potentially overwhelming set of equipment. To help you find deep-sky objects in the night sky, I recommend using a stargazing app on your mobile phone (Stellarium is great).
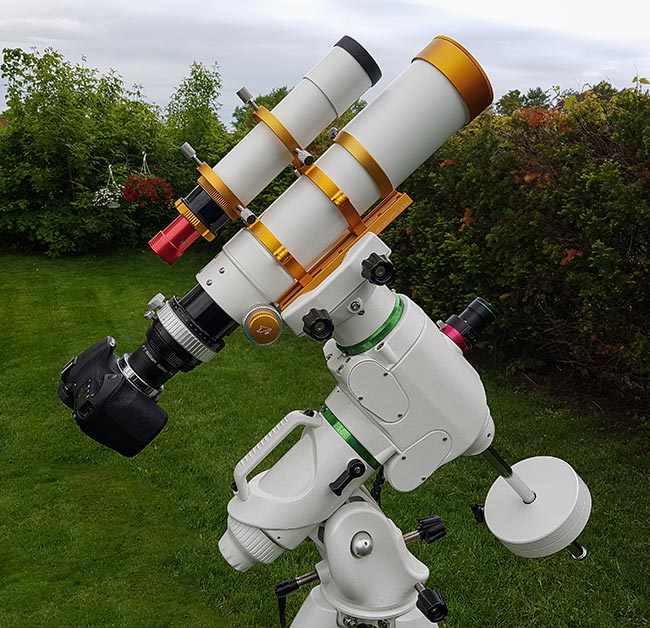
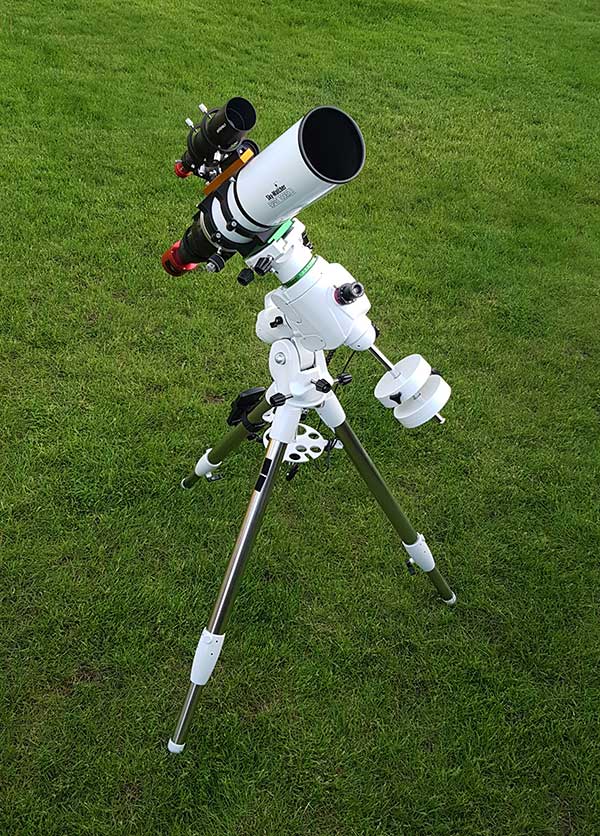
A basic deep-sky astrophotography setup with a DSLR camera and telescope.
My astrophotography equipment has evolved and expanded over the past 12 years, and the learning process never ends.
Small milestones and gradual progress along the way are huge motivators to continue moving forward. Don’t think that you can skip over a number of steps by buying top-of-the-line equipment early on.
Because I’ve got news for you, it never ends.
Your shiny new toy quickly loses its luster, and you’re left with the actual enjoyment of the process to fall back on. That is how you sustain your enjoyment of this hobby in the long term.
No matter what it looks like from the outside looking in, deep sky astrophotography is not about what gear you have. It’s about the journey you take on the way to achieving the image you’ve always wanted to capture.
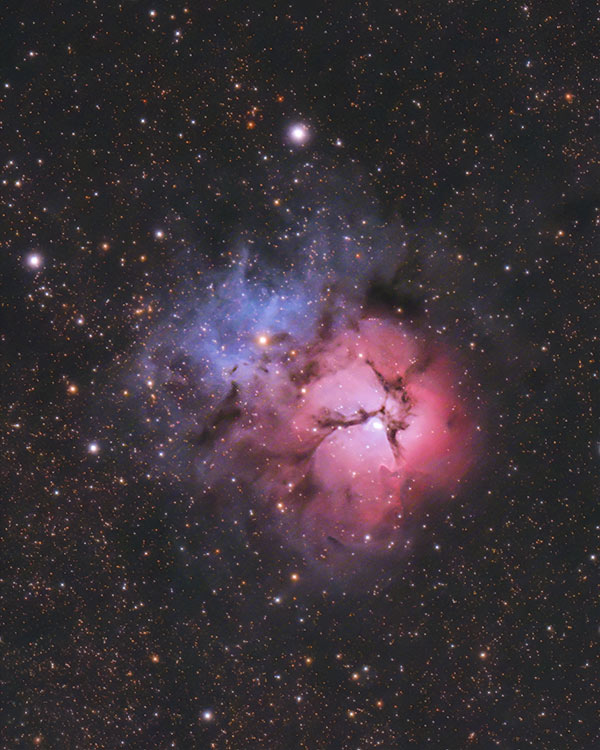
The Trifid Nebula captured using a Canon EOS Ra camera and telescope.
A Beginner’s Guide to Deep-Sky Astrophotography
If you are interested in seeing a complete step-by-step walkthrough of the entire experience, please see my deep-sky astrophotography how-to article that describes each part of the process. You can also watch the video version below:
Photography at night requires a basic understanding of your camera’s ISO, aperture, and shutter speed settings. Essentially, you need to understand how to predictably control the amount of light that reaches the sensor.
Modern-day DSLR cameras offer an incredible way to capture the night sky. They are well equipped to maximize the light collected in a single exposure. Settings like ISO, shutter speed, and aperture (f-stop) control how much data you can collect on your subject simultaneously.
If you’ve heard the term “modified for astrophotography” before, it simply means that the standard internal IR cut filter has been removed or replaced with one that allows more of the red signal (primarily emitted by emission nebulae) to reach the sensor.

Related post: Choosing a camera for astrophotography
Professional services are available to do this, or you can brave this task on your own. Fair warning: The first time I modified my Canon XSi and put it back together, it didn’t turn on again.
Before modifying your existing DSLR camera to improve your Astro-images, I’d first explore a stock camera’s impressive capabilities. The photo of the Andromeda Galaxy shown below was taken using an entry-level (used) Canon EOS Rebel XSi.
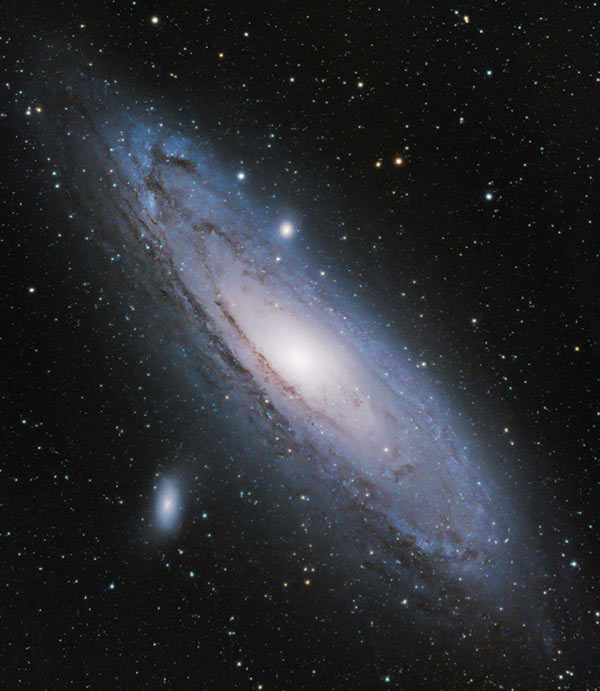
The Andromeda Galaxy captured with a stock DSLR and telescope.
Recommended Camera Settings
Seeing as we chose a hobby that involves taking pictures in the dark, we can’t use the same camera settings that daytime terrestrial photographers do. Most of the time, we want to let in as much light (or signal) to the sensor as possible.
Traditional photography settings that work well in daytime situations just don’t cut it for astrophotography. For example, if you try to take a photo of the night sky in a single shot using ISO 100, @F/4, for a less than a second – you might as well keep the lens cap on.
Typical DSLR astrophotography camera settings use a much higher ISO setting, usually north of ISO 800 or much more. The exposure length for a single astrophotography image can be anywhere from 15 seconds to 5 minutes when using a DSLR.
If the focal ratio (the f-stop, or aperture) of your lens or telescope is closer to the F/2 range, you’ll have many more options when it comes to settings and the way you approach your target. A “faster” optical system means you’ll be able to collect more signal in a single shot.

Unlike a dedicated astronomy camera, a DSLR lets you control camera settings without computer control.
To tap into the full control of your DSLR, you’ll, of course, want to use manual mode. It’s easy to make a mistake in this mode, as the camera is no longer assisting you in any way in terms of recommended settings. However, digital cameras are great for taking test shots and experimenting.
Benchmark Camera Settings for Astrophotography
- Camera Mode: Raw
- Focus Mode: Manual
- File Type: RAW
- White Balance: Daylight or Auto
- Exposure Length: 30-seconds *
- ISO: 800-1600
- F-Stop: F/4 or faster
* This will depend on the focal length of your camera lens/telescope, and whether you are tracking the movement of the sky or not. Some people like to use the 500 rule as a guide.
It’s not like the film days anymore. You can shoot, delete, and shoot again with one adjustment made to monitor the results. These experiments may eat up some time early on, but once you identify the sweet spot, you’ll remember it moving forward.
You’ll also have a much better understanding of the functionality and mechanics of your camera and why you’re using the settings you are and not blindly following a recipe of best practices.
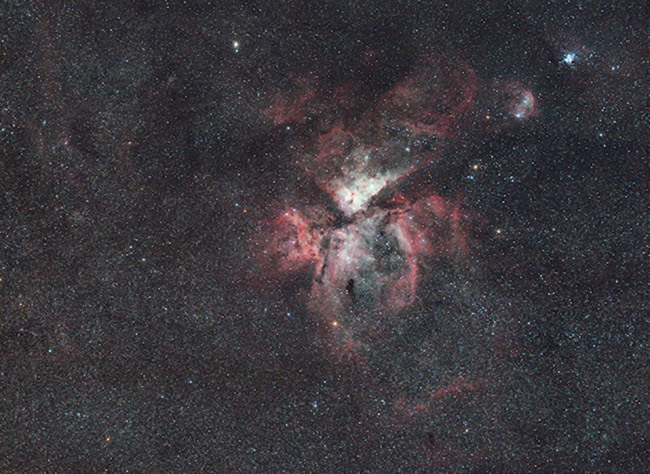
The Carina Nebula. Image created using 30-second images @ ISO 6400.
The 3 Challenges
A “fast” camera lens or telescope essentially lets more light through to the sensor at once, and when shooting objects in the dark, that’s a great option to have.
So you might be thinking to yourself, okay, I’ll shoot a 30-second exposure, at ISO 6400 @ F/2.8. That should pack a punch in the signal department. Well, there’s a catch – to ALL 3 of those promising night sky settings. A higher ISO setting will result in more “noise” in the image.
A fast f-ratio will make it difficult to focus and present challenges with bright stars. And perhaps most importantly, a 30-second exposure will show elongated, trailing stars if you’re not accurately tracking the apparent movement of the night sky. The longer the focal length of your camera lens or telescope is, the more critical this becomes.
These are 3 reminders of why not everyone captures and shares incredible images of the night sky. If it were easy, everyone would do it, and I for one am happy that this isn’t the case.
Luckily, there are some relatively straightforward steps we can take to avoid the common challenges night sky photographers face. And when you keep them in mind, shots like this is actually quite achievable using basic gear.

The Milky Way captured with a Mirrorless Camera and Wide-Angle Lens.
The photo shown here did not use a telescope to capture the scene, even though several deep-sky objects can be seen in the image. Instead, a wide-angle camera lens was used to capture the central core of the Milky Way.
This is where concepts like the signal-to-noise ratio come into play.
All this means is that by increasing signal (light), we can improve the ratio between the data collected on our subject, and the artifacts resulting from a hot camera sensor.
Thermal and digital readout noise is pronounced in long exposure images using a high ISO, but we can offset these problems by stacking (integration) several exposures together.
Noise and other annoying artifacts can be removed in the pre-processing stages through calibration.
Why You Need to Stack and Calibrate Images
Here is a look at why we stack images using image-stacking software. The image on the left a single 2-minute exposure, with plenty of noise, and poor signal.
The image on the right includes 70 x 2-minute exposures (non-linear) for a stronger signal and less noise.
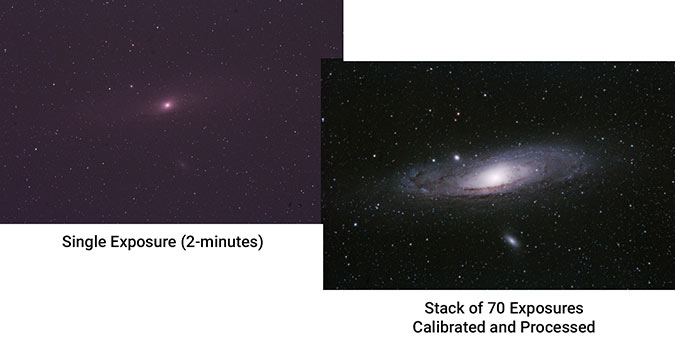
It is not possible to extract that kind of detail from a single exposure. By improving the signal-to-noise ratio, you have more flexibility and creative options for processing.
You are not limited to the restraints of a single, noisy image with a weak signal-to-noise ratio.
I won’t go into depth about calibration frames in this article because I have covered these items in previous posts.
But I will say that one method involves taking pictures with the lens cap on (dark frames), and the other with a white t-shirt stretched over the objective of the telescope (flat frames).
When you are ready to take your passion (and magnification) further, you can upgrade from a small camera lens and attach a telescope or telephoto camera lens to your DSLR, and use nearly identical camera settings for an up-close view.
Tracking the Night Sky
It’s the tracking that makes all the difference. As you’re aware, the blue marble we can home is spinning on its axis, and at a good clip, I might add.
This is great news for landscape photographers interested in shooting quick exposures of the dramatic changing light of a sunrise or sunset.
But for those of us who are up at 2 a.m. trying to photograph the Andromeda Galaxy, this apparent movement of the sky is a real challenge. (It’s not moving; we are!)
A Sky-Watcher EQ6-R Pro Computerized Equatorial Telescope Mount.
We need to freeze these objects in their tracks because our cameras need time to soak in hours of light onto the sensor.
Think about that: we have chosen to photograph objects that are dim, require precise focus, and are moving.
Luckily, this obstacle is easily surmountable thanks to the ingenious design of the German equatorial telescope mount (often called a “GEM”).
As long as the mount is aligned with the Earth’s polar axis on which it rotates, the optical instrument riding on top can accurately “track” the moving sky.
This movement is slow enough to only realize after an extended period of time and is called the “sidereal” rate in the telescope mount world.
Polar Alignment
The act of aligning the axis of the telescope mount with the North Celestial Pole (NCP) here in the northern hemisphere is called polar alignment.
There are many useful tools, both hardware, and software, to help you accomplish a quick and easy polar alignment.
With an accurate polar alignment from your latitude, a well-balanced payload, and a telescope mount that can slew to any object available in the sky above, you got yourself the key to heaven’s door.
In the northern hemisphere, we are lucky enough to have a pole star, Polaris, to help us identify the position of the NCP. In the southern hemisphere, you’ll need to use Sigma Octans to guide you, as there are no bright stars close to the south celestial pole.
Pointing Accuracy
Alignment accuracy is an important aspect of this system, as objects are often so dim that you cannot see or find them visually. It’s not until you’ve taken a long exposure image that you actually start to reveal the DSO – and even then, it may be very faint.
For this reason, a rock-solid star alignment routine is critical. This is the process of calibrating your telescope mount so it knows exactly where everything is.
Typically, this is done by selecting and confirming a number of alignment stars or taking pictures of a starfield and using software to calculate where it’s pointed. Again, the higher the magnification of your lens or telescope, the more critical pointing accuracy becomes.
Let’s say your equatorial telescope mount is perfectly polar aligned, and tracking your target smoothly, now what?

Using a Camera Lens vs. a Telescope
If you’re using a camera lens, the way it’s attached to the DSLR camera body is a non-issue. Camera lenses lock onto the body at the right distance to achieve perfect focus and allow you to control the f-stop of the lens.
The trickiest part about using a camera lens for deep sky astrophotography is often how you actually mount it to the tracker.
If the lens isn’t too heavy, you can simply mount the camera and lens to a ball head without having too much of an issue balancing the rig. However, finding an even balance in the payload becomes tricky as the lenses get heavier.
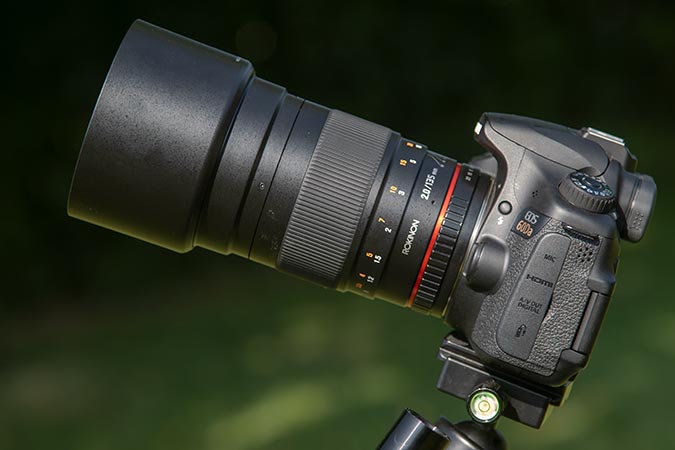
Lightweight mid-range telephoto lenses like the Rokinon 135mm F/2 are a great way to get your feet wet.
But what about a refractor telescope with a focuser drawtube, a diagonal, and an eyepiece at the end? To connect a DSLR camera, you need a t-ring (one made for your specific camera) and a t-adapter.
This is called prime-focus astrophotography, and it uses the native focal length of the telescope.
There are no additional eyepieces to magnify the image between the camera body and telescope. Whatever your telescope’s fixed magnification is, that’s what you get.

A DSLR camera attached to a small telescope with a 250mm focal length (RedCat 51).
In the case of my Sky-Watcher Esprit 100, that’s a rather wide 550mm focal length, which is considered to be a wide field of view in deep-sky astrophotography.
In the refractor realm, it’s often best to invest in a specialized adapter that flattens the imaging field and/or reduces the telescope’s focal length. These are called field flatteners or “field correctors” and can be very specific to a particular optical design.
A typical DSLR astrophotography setup for deep sky imaging will have the DSLR camera body attached to the field flattener (or flattener/reducer) via the t-ring, and the barrel of the flattener fastened to the telescope focus tube.
It’s important that the spacing between the camera sensor inside of the body and the optical element of the flattener/reducer is correct. With the camera attached appropriately, you can then slew to your target of choice and begin running an imaging sequence.

Attaching the camera to a telescope using a T-ring and a 2″ field flattener.
Automation and Running a Sequence of Images
Because you’ll want to capture as many images as possible, it doesn’t make sense to stand next to your telescope and activate the shutter one by one. Depending on the location of your target, you may spend upwards of 6 hours or more collecting images of the same target.
You can use a remote shutter release cable to automate this process and eliminate the possibility of creating any shake or unwanted movement in the camera or telescope.
These simple and affordable devices allow you to set a series of exposures to fire independently. For example, you can program the remote to take 50 shots, with a 10-second delay between each one.
The manual camera settings you’ve input will remain, and the remote will start by flipping the mirror up and recording the data in 50 separate instances.
When the sequence is finished, you can review your bounty and remove any frames that suffered from periodic mount errors, airplane trails, or someone kicking your tripod with their foot on their way to the snack bar.

A DSLR camera and telescope tracking an object in the night sky.
Focus Your Camera
Like all forms of photography, achieving a sharp focus on your subject is extremely important.
You may experience the moment every amateur astrophotographer faces at one point early on: they review their night’s work up close on the computer and realize they were more than a hair off throughout their entire session.
Stars are unforgiving when not in focus and tend to grow the farther out you are. Luckily, the bright ones present a great point of reference to use when setting up.
The brightest named stars will shine through to the live view display on your DSLR camera. Modern DSLR cameras allow you to zoom by 10X on a star with a live video display.
This lets you focus on it in real time, making subtle adjustments and taking test images if necessary.
Once you are happy with the sharpness of the star and it’s as tight as possible, you can position the camera and telescope on your target with the pre-focused settings applied.
As the temperature drops overnight, you may need to refocus again. Reviewing your images by scrolling (while zoomed-in) is a great way to review a gradual loss of focus right on the camera display.
The good news is that you won’t be far off, and only a slight tweak is needed to sharpen those stars to a point again.
Practical Advice for Beginners
Beginners often start with a small star tracker for wide-angle astrophotography images. Entry-level camera mounts such as the Sky-Watcher Star Adventurer are a great place to start.
This opens the doors to long exposure photos that include deep-sky objects such as galaxies and nebulae.
Above all else – a star tracker or equatorial telescope mount is the single most important investment you’ll make in this hobby.
It gives you the power to let the exposure time do the heavy lifting. It opens up new options in terms of the camera settings you’re able to use and the focal lengths that you shoot at.
![]()
A Camera and lens mounted to the Sky-Watcher Star Adventurer.
Light pollution filters can make a huge impact on your individual sub-exposures. A broadband light pollution filter such as the Optolong L-Pro helps collect longer images without blowing out the histogram.
Any sort of filtering will disrupt the natural balance of the of colors in your image (particularly, the stars), but I find a mild filter like the one shown below to be extremely handy from the city.

How do you know what exposure length to use? Early on, the answer to this is likely as long as your telescope mount or tracker will let you.
For example, it’s better to shoot for two minutes at ISO 400 than for thirty seconds at ISO 6400.
The ISO 400 image will have a better signal to noise ratio, because you put the exposure time to work, not the sensors amplification of the electronic signal (which produces more noise).
Use a fast F/2.8 lens, and you’ve got even more attractive options to choose from. Now you could roughly pull in the same amount of signal you would in a 4-minute exposure at F/4.
Can you see how combining a tracking mount with a fast lens or telescope is advantageous?
As for the “best” exposure possible, look to the histogram. This is a visual representation of your data and a useful point of reference.
Aim to have the mountain of data in the middle or slightly to the right of the histogram.
The key is to avoid clipping data on either end as this indicates unrecoverable details in either the shadows or the highlights of your image.
This data will be stretched extensively after the fact anyway, so the important thing is that you can see that the individual image data fits safely in this range.
You’ll need to be realistic about the types of images you can expect to collect from your location.
The target you choose will be dictated by the current moon phase, the amount of light pollution, your elevation, and any obstructions.

The Lagoon Nebula in Sagittarius. 17 x 5 minutes @ ISO 1600.
Practical Tips You Can Try Tonight
Remember to consider your location and time of year when selecting targets. For example, what altitude will your subject reach, and when? The target you select from a dark sky site will likely be very different than one that you would choose from a light-polluted backyard.
If you’re lucky enough to be somewhere dark (Bortle Scale Class 4 or below) take advantage of your surroundings by shooting something in broadband “true” color. That means collecting precious broadband color data that just isn’t possible from my backyard.
There is no substitute for dark skies and never is this more evident than when attempting to collect full-color images using a DSLR. The goal is to capture natural and vibrant star colors in these areas while you’re there, as this is nearly impossible to achieve from the city.

Final Thoughts
DSLR astrophotography is often more enjoyable because it can be done without a laptop computer and all of the extra accessories and devices that accompany a cooled astronomy camera.
With a portable star tracker (such as the Star Adventurer GTi) you can mount your DSLR camera and lens to frame up massive deep-sky targets such as Rho Ophiuchi.
A small remote shutter release cable is all you need to collect incredible data that can be stacked and processed into an unforgettable image. There is no need to plug into anything; just take the entire rig and go.
What a setup like this lacks in complexity (and perhaps proficiency), it makes up for in freedom, creativity, and the pure enjoyment of astrophotography without all of the headaches.
This is why I will always shoot deep-sky with a DSLR (or Mirrorless) camera. I believe it’s the perfect entry point into the incredible addict – I mean hobby we call astrophotography.

The Carina Nebula captured using a Canon EOS Ra and a TPO 180 lens.
Related Posts:
- The ZWO Seestar S50 Smart Telescope makes Astrophotography Easy
- Building a Deep-Sky Astrophotography Kit From the Ground Up
- The Perfect Starter Dedicated Astronomy Camera: ZWO ASI533MC Pro