Photographing the Lobster Claw Nebula

The Lobster Claw Nebula (Sharpless 157) is a bright emission nebula. It lies near the edge of the northern constellation Cassiopeia, bordering on Cepheus. As you’ll soon see in my long-exposure image, this bright HII region is surrounded by many more interesting deep-sky objects.
It sits very close in the sky to another popular emission nebula for amateur astrophotography, the Bubble Nebula (NGC 7635). Although I have photographed the Bubble Nebula several times, it wasn’t until this year that I focused my attention on the neighboring Lobster Claw Nebula.
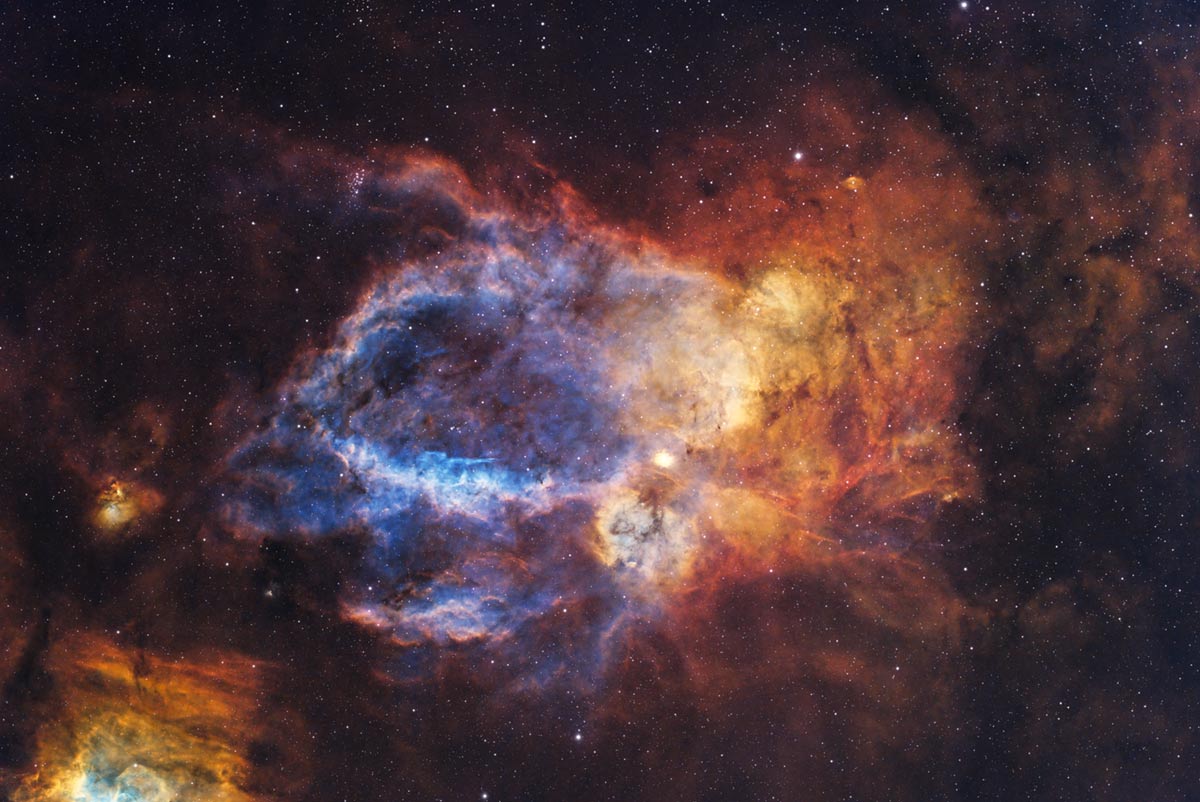
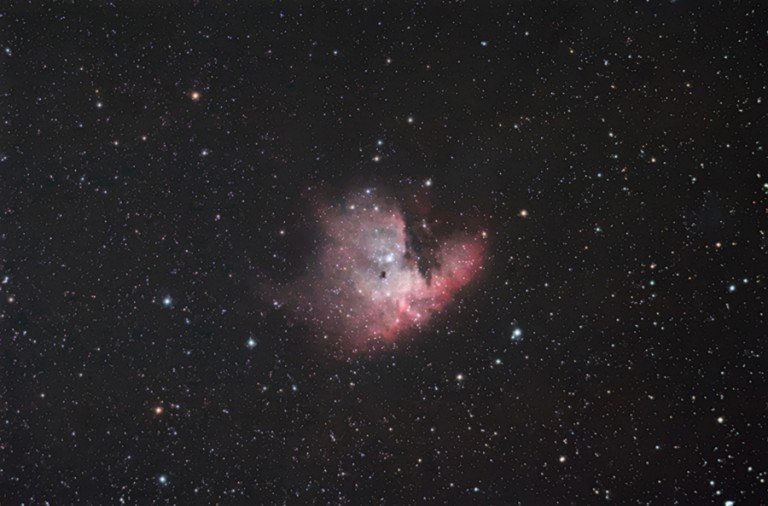
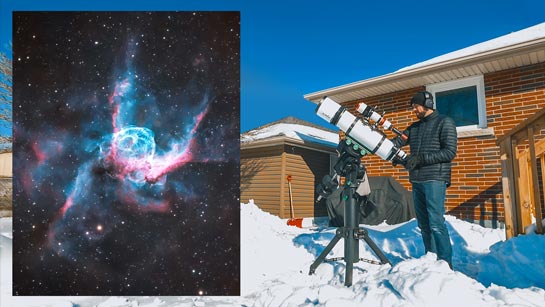
My latest picture of the Lobster Claw Nebula. ASI2600MM Pro + William Optics UltraCat 108 (8 Hours Total Exposure).
If your GoTo equatorial telescope mount does not allow you to choose a Sharpless Catalogue object, you should be able to find the Lobster Claw Nebula by traveling south from NGC 7635 (The Bubble Nebula).
You can also “star hop” your way over to this nebula, starting from the bright star Caph in Cassiopeia. From my location, Cassiopeia and Cepheus reach high into the sky in the Fall, which makes October/November the best time to capture the Lobster Claw Nebula.
Don’t bother trying to view this visually dim deep-sky object through the eyepiece of your telescope; this emission nebula is best enjoyed through long-exposure astrophotography.

The Location of the Lobster Claw Nebula.
The Lobster Claw Nebula
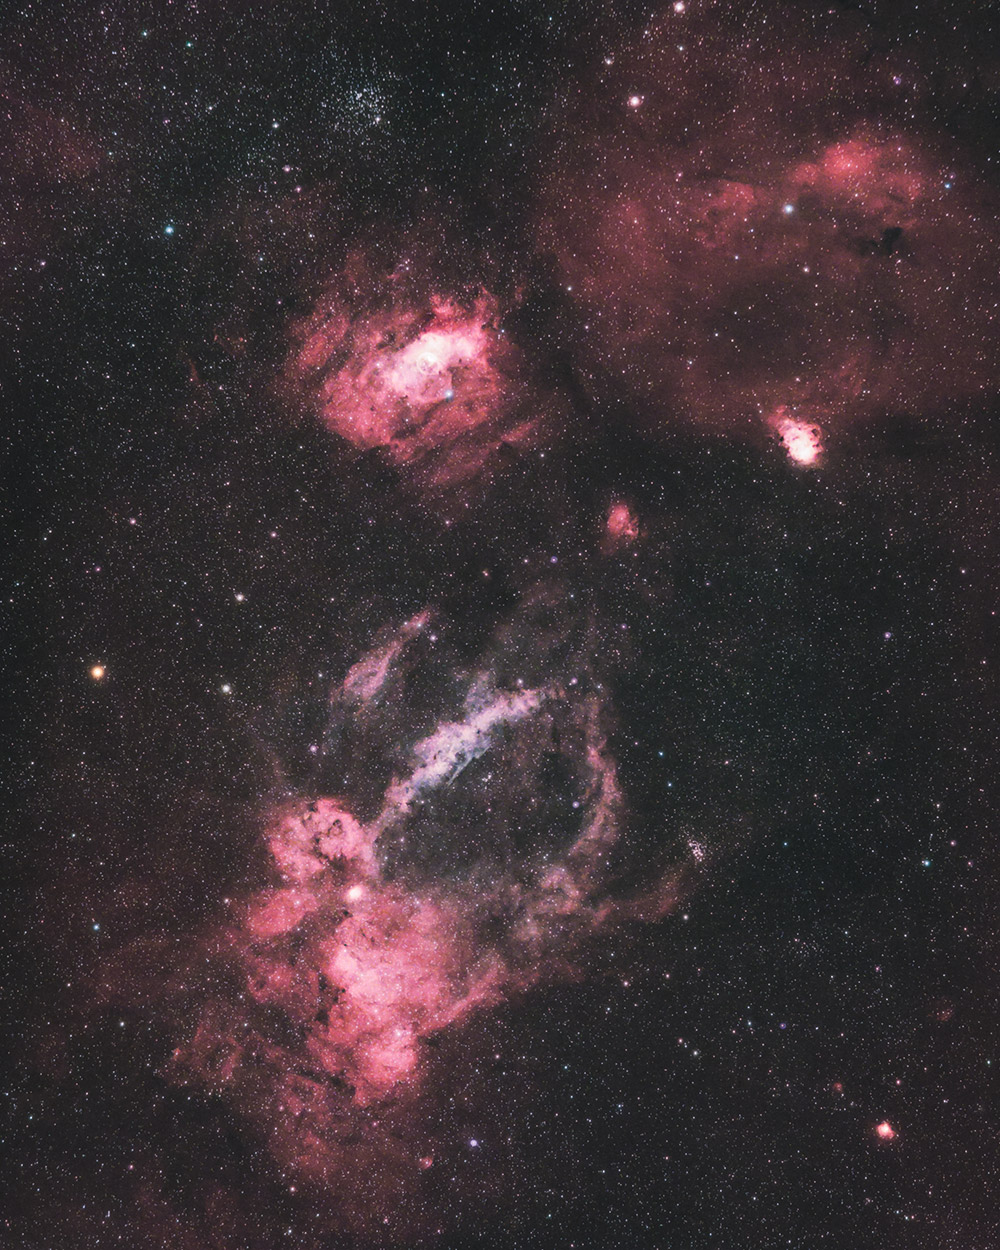
The Lobster Claw Nebula Region. Trevor Jones.
- Cataloged: Sharpless 157 (sh2 157)
- Common Name: Lobster Claw Nebula
- Object Type: Emission Nebula
- Constellation: Cassiopeia
In terms of deep-sky nebulae in the night sky, the Lobster Claw Nebula is quite large. A wide-field optical instrument with a focal length of less than 500mm (paired with the right camera sensor) is recommended to ensure you capture the entire thing.
For my photo, I used a Radian Raptor 61 Triplet APO telescope with a focal length of 275mm. Combined with the micro four-thirds sensor of the camera I used (ZWO ASI294MC Pro), the field of view included the nearby Bubble Nebula, Messier 52, and NGC 7538.
I deal with plenty of light pollution from my backyard, so I used an Optolong L-eXtreme filter to isolate the H-alpha and OIII light emitted by this nebula. This helps to create a dynamic-looking image at the sacrifice of a more natural-looking image.
Shooting at an F-Ratio of F/4.5, I choose to capture my individual sub-exposures at 4 and 5 minutes in length. The camera was set to “Unity Gain”, and I captured a respectable amount of overall exposure time on this target (80 frames).
Autoguiding was utilized to improve the tracking accuracy of the Sky-Watcher EQ6-R Pro mount and capture sharp images throughout each exposure. Dithering via PHD2 Guiding was leveraged to improve the signal-to-noise ratio of my final image.
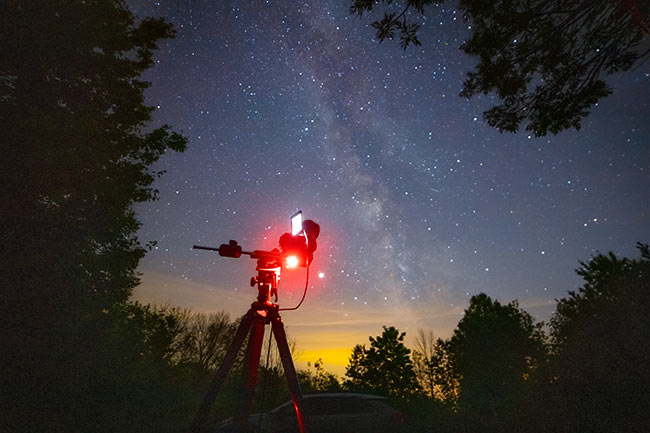
You can see a picture of the complete deep-sky astrophotography setup used for this picture below. Here is a breakdown of the gear used:
Equipment Details:
- Telescope: Radian Raptor 61
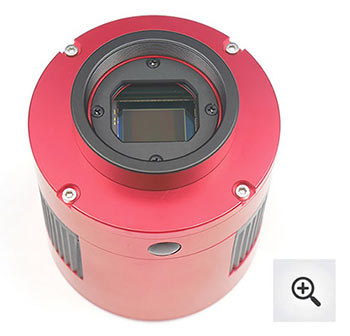
- Camera: ZWO ASI294MC Pro
- Filter: Optolong L-eXtreme
- Guide Scope: Starfield 50mm Guide Scope
- Guide Camera: ZWO ASI120MM Mini
- Mount: Sky-Watcher EQ6-R Pro
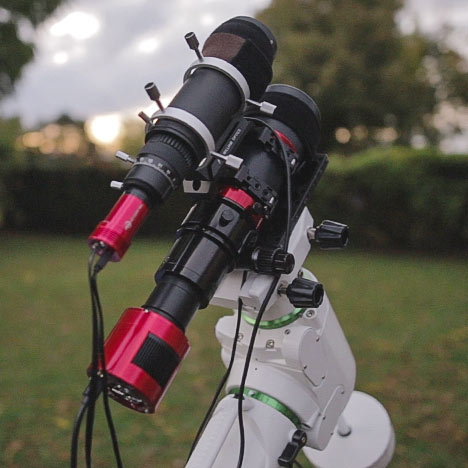
Photo Details
- Total Exposure: 5 Hours, 20 Minutes (80 Frames)
- Image Acquisition: Astro Photography Tool
- Calibration Frames: 40 Dark Frames
- Stacking and Calibration: DeepSkyStacker
- Processing: Adobe Photoshop 2020
- Size: 2.37 x 2.96 deg
- Radius: 1.897 deg
- Pixel Scale: 3.95 arcsec/pixel
For a better understanding of my image processing workflow (including the stacking and calibration stages), be sure to check out my premium image processing guide.
The Lobster Claw and the Bubble
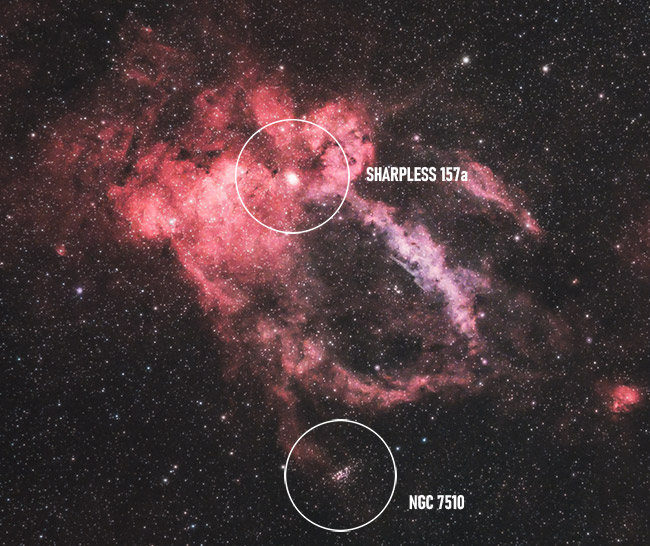
There are several interesting deep-sky objects within or near the Lobster Claw Nebula. Planetary Nebula Sharpless 157a and open cluster NGC 7510 can be seen in the image when viewing the Lobster Claw Nebula up-close (see below).
As I mentioned earlier, this nebula sits right on the border between Cassiopeia and Cepheus. In fact, the open star cluster (NGC 7510) is listed as being located in Cepheus!
My image was captured using a refractor telescope with a focal length of 275mm. A telescope with a short focal length is advantageous when capturing large areas of nebulae in a single frame.
An even wider field of view showcases the nearby Bubble Nebula, Messier 52, NGC 7538, IC 1470, and more. If I ever attempt to capture the Lobster Claw Nebula region again with a full-frame camera sensor, I will try to include the nearby Cave Nebula as well.
As you can tell, there are a lot of concentrated areas of hydrogen in this area. Click on the annotated version of the image below for a closer look at this busy section of the night sky.

The Lobster Claw Nebula and Surrounding Deep-Sky Objects
A telescope or lens with more magnification can create a wide-field image (nearly 2 degrees) like this as well, but you must create a mosaic image using multiple frames. The extra work will likely pay off because you’ll have an image with more detail and resolution.
Related Video: Capturing the Same Object using a Small vs. Large Telescope
Focusing and Framing the Subject
Like many other large nebulae regions, framing this target up just right can be tricky. Finding the Lobster Claw shape isn’t too difficult, but deciding where it should be placed within the frame can take some time.
Luckily, the Lobster Claw Nebula is bright enough to pick up in a 10-30 second test exposure. From there, it’s a matter of using a reference image to determine which nearby deep-sky objects you can include with it.
The focal length of your telescope or lens will dictate the overall field of view available, but your camera’s sensor size and image scale will come into play as well.

In my case, It was easy to frame up the Lobster Claw Nebula and Bubble Nebula safely within a single frame, but the Cave Nebula was just out of reach. I try not to squeeze in another deep-sky object if it means cutting off an outer edge of my primary subject.
Focusing the telescope manually was a breeze (the Raptor 61 has a motorized focuser option), and I did not need to adjust focus throughout my imaging session as the night progressed. There were several bright stars to choose from in the field to use as a reference.
I rotated the field significantly from my initial framing on the Lobster Claw Nebula. Rotating the adaptor and filter vault on the Raptor 61 is a smooth process, literally. I have the tension of the rotator adjusted to a degree that allows me to slowly rotate the camera sensor while maintaining my original focus.
The zero-shift focuser locking screw holds the stocky focuser drawtube in position, yet allows just enough play to make subtle, fine adjustments using the fine focus knob.
Radian Raptor 61
This is one of the first photos captured through the new Radian Raptor 61 triplet apochromatic refractor. Until this image, I had used the Raptor 61 with my full-frame Canon EOS Ra and Radian Triad Ultra filter exclusively.
This time, however, I tested the performance of this telescope with a one-shot-color dedicated astronomy camera (ZWO ASI294MC Pro) and the Optolong L-eXtreme filter. I am certain that this will be a popular configuration, and I wanted to make sure there were no surprises.

The Radian Raptor 61 APO
As you may know, I was heavily involved in the design of this astrophotography telescope, and the features and specifications were selected to meet my needs as a full-time astrophotographer. I believe that beginner-to-intermediate astrophotographers will be absolutely thrilled with the capabilities of this versatile triplet APO.
This compact telescope is extremely user-friendly, and the only hurdle you may have early on is refining the backspacing of your camera sensor. In my experience, the field is extremely sharp, but you’ll need to fine-tune any sensor tilt to ensure the very edges of your full-frame sensor are pinpoints.
Thanks to its balance of practicality, performance, and affordability, I believe that the Radian Raptor 61 will be one of the most popular telescopes for astrophotography of all time. I will continue to test this wide-field astrophotography telescope in the backyard over the coming months and share my results.
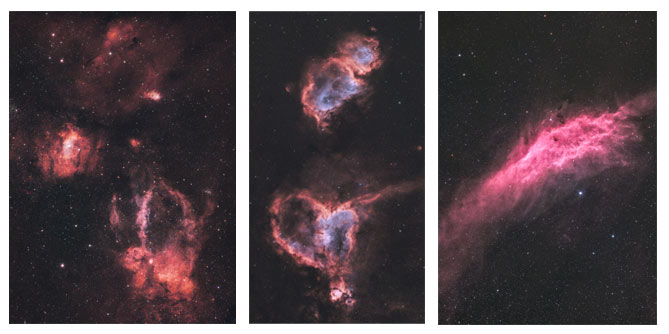
Images captured using the Radian Raptor 61 APO.
Final Thoughts
Although I am happy with my final image of the Lobster Claw Nebula captured from home, I would like to photograph this deep-sky object again under dark skies.
There are some gorgeous blue and gold stars in this region of the night sky, and narrowband filters can not achieve the natural look I am hoping for. This image by Mark Shelley of the nebula should give you a better idea of what I mean.
I hope my experiences capturing the Lobster Claw Nebula from my light-polluted backyard have inspired you to take a photo of this gorgeous emission nebula from your own backyard.


Hey Trevor! Love this thank you! Thinking about having a crack at this with my Rokinon 135 and Nikon D5100 tonight! (PS the video is not on here of the small and huge telescope for astrophotography)
Could you help me with something real quick? I am wondering about investing in a new filter (old one is well old now lol) or a new tripod and wedge for better stability?
Thank you in advance!
Hi Liam! Thank you – the video link appears to work on my end. I did not embed the video to save some loading time on the page 🙂 Now to your question – Between those 2 items you’ll want to take care of your tripod/wedge issue first. Filters won’t help anything if your stability and tracking are off! Cheers 🙂
Hey Trevor! After watching your video on the Raptor 61, I was wondering what should be my first ultimate wide field scope: The Raptor or The RedCat? I am very much concerned about the full frame image quality (chromatic aberration and round stars in the corner of full frame sensor). So according to you, which of these scopes perform the best in optical image quality? If you can give me some additional tips regarding this, then that’ll be awesome!
Hi Trevor,
Wooow! This is a wonderful image Trevor. I want to let you know that your exceptional work and contribution to the Astronomy community is so greatly appreciated! You’re the greatest astrophotographer I have ever known! 😊 I watch all of your Youtube videos and visit this site often to learn new things about astrophotography. I follow you on instagram(cool_astronomy) too, and I find your work is amazing! Please take good care of yourself and stay safe. You’re such a kind and great person. Thank you!
Navid
Thank you very much for the kind words, Navid! It is an honor to share my astrophotography experiences with the world. I am so happy you enjoy it 🙂
You’re so very welcome Trevor! I wish you the best and the greatest success! Take care buddy 👍😊
Hi Trevor
Viewing your videos and testing with photo lenses. I just grab an old Nikkor zoom 80-200mm vintage (all metal) and tried it with my ASI294.
I was stunned by the sharpness which is far better than my recent lenses.
So I am working now with vintage lenses: 35mm, 50mm super fast F/1.4, and my zoom covering 80 to 200mm F/4. For smaller targets, I use a RC 8. Thanks for your inspiration videos and writings !
Sincerely,
Marco