Essential Image Processing Video Tutorial
This video may change the way your shoot and process astro-images forever. It covers the few simple steps needed to create an ultra high-resolution master frame with a high signal-to-noise ratio. This tutorial covers the capturing, processing and production of gorgeous wide-field astrophotography images using a camera lens or small telescope. If you are a DSLR imager like me, many of the techniques you’ll see demonstrated in this video will make their way into your capturing and processing workflow. Even if you focus more on deep-sky imaging with a large telescope, there is still much to take away from Tony’s practices. You might even learn a little bit more about the way DSLR’s work, its limitations, and how to get around them to produce stunning images.
Self-proclaimed “Lazy” Astrophotographer Tony Hallas discusses the basics of DSLR imaging and provides intermediate pointers for capturing and processing amazing images. In this video, Tony explains how he has learned to harness the powerful and sophisticated capabilities of Adobe Camera Raw (ACR) to handle the majority of his astrophotography image editing and processing. I will be implementing Tony’s techniques into my own workflow, and I will share my new images using his techniques as I capture them. Here is a Milky Way image processing tutorial that includes some of the methods Tony uses in Adobe Camera Raw.
The measure used in science and engineering that compares the level of the desired signal to the level of background noise.
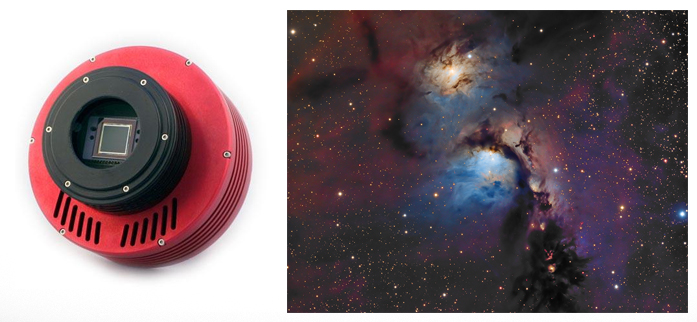
DSLR Camera vs. CCD – Which is Better?
A DSLR and a CCD camera may seem similar, both essentially use a sensor to gather light photons. However, there are several key differences that make these tools worlds apart. Each has their own benefits and downfalls. Some of the major advantages of a CCD camera over a DSLR are the specialized astrophotography features, such as a cooled and regulated chip temperature, and better handling of noise during long exposures. The mono chip, combined with calibrated narrowband filters, provides extremely accurate color control.
In Tony’s opinion, narrowband imaging is the realm of CCD cameras, and not worth the time and effort of tackling with your DSLR. It is not possible to produce an astronomical image as deep and detailed with a DSLR as you would with a CCD. The major downside on CCD cameras is their steep learning curve, and high price tag. An entry-level CCD Camera will cost you upwards of $2,000.
What is the Best DSLR Camera for Astrophotography?
If you ask Tony, he’ll tell you it’s the full-frame, Canon EOS 6D. His was astro-modified by Hutech for astrophotography. My friend and fellow astrophotographer Phil owns this camera and produces amazing results when combined with his ultra-portable iOptron Skytracker mount. You can view a photo he captured of the Milky Way at the bottom of this page. I currently use my old modified Canon Rebel Xsi, but my next DSLR will definitely be full-frame. Whether I spring for a used Canon EOS 5D Mark II, or the newer 6D, is yet to be decided.
Benefits of using a DSLR
The advantages of using a DSLR for astrophotography are many. The first is that it is easy to focus the camera using live-view. You can simply find a bright star, zoom-in by 10X and fine-tune your focus whether it is through a telescope or on the camera lens. DSLR cameras do not use very much power.
I use an aftermarket battery grip that I purchased on eBay. These 2 small batteries will last an entire night’s worth of imaging. You have the option of taking shorter exposures to adjust your frame and enjoy a quick preview of your subject. Instant gratification. The most important factor of them all is the fast setup, and minimal equipment.
If you plan on doing any travel astrophotography, chances are you will be using a DSLR and a lightweight tracking-mount. I believe that this is the reason DSLR astrophotography has become so popular around the world.

Some of the drawbacks of using a DSLR for astrophotography are the lack of temperature regulation, the handling of color using a Bayer mask (RGB) and the primary noise source of “color mottle”.
Color mottle by Tony’s definition is horrible globs of red, green and blue artifacts that appear in a long-exposure DSLR frame. In the video above he explains the steps, he takes to remove the large amount of grain and noise in his long-exposure astrophotos. The process is known as dithering, which subtracts the noise data by taking frames slightly apart from each other, and then registering and stacking the data afterward.
Best Camera Lens for Astrophotography?
The 4 camera lenses mentioned in this video that would make excellent choices for astrophotography purposes are the Canon 70-200mm f/2.8 L, Nikon 14-24mm f/2.8 G, Canon 15mm f/2.8 Fish-eye (not pictured) and the surprisingly high-performing Rokinon 35mm f/1.4.
Tony noted that the Nikon 14-24mm was the best wide-angle lens, that he uses an adapter to connect to the Canon body. You can browse insightful performance statistics about each lens including the amount of vignetting and resolution on the Photozone website.
The Rokinon Lens is 1/3 of the price of the big-name brands and scores top marks in the categories of vignetting and resolution. As Tony says, this lens is a total sleeper.
 |
| The Resolution of the Rokinon 35mm Lens scored top marks from Photozone |

I personally enjoy the Rokinon 14mm F/2.8 lens for wide-angle astrophotography. This lens is very affordable and can capture extremely wide swaths of the night sky with either a crop sensor or full-frame DSLR camera.
So What Equipment do I Need for this Process?
As Tony describes in the video, there are some essential pieces of equipment and software to produce the high-quality images he is taking. Remember, you don’t have to jump straight to top-of-line equipment right away. I certainly didn’t! This is merely a guideline for those wondering the exact equipment used in the video.
1. Astro-Modified DSLR Camera such as the Hutech Modified Canon 6D
2. High-Quality Camera Lens such as the Rokinon 35mm f/1.4
3. Recent Version of Adobe Photoshop with Adobe Camera Raw
4. Latest Version of the Registar Software

The Tony Hallas DSLR Processing Workflow
Tony uses Adobe Camera Raw for the bulk of his processing. He then combines the corrected images together using Registar, and back into Photoshop for final editing. His DSLR processing workflow is shown below:
1. Initial ACR batch processing and save as 16 bit TIFF to folder
2. Register frames in Registar and combine with median/mean function
3. High Signal-to-Noise ratio 16 bit TIFF imported into Photoshop for final processing
Chromatic Aberration and Vignetting
He begins his process by opening the first frame in a series of images and removing the chromatic aberration with the tool designated for this in Adobe Camera Raw. This is a powerful technique that can remove even severe chromatic aberration produced by inexpensive lenses. Next up is vignetting. The traditional way of dealing with vignetting was to shoot “flat” frames using an old white t-shirt to cover your camera lens or telescope, and shining a bright, evenly lit light into it. Try explaining THAT to your nosy neighbor watching you in your backyard. Tony simply uses the anti-vignetting tool in the Lens Correction tab of in ACR.
Noise Reduction and Colour Adjustment
The noise-reduction tool in ACR is comparable with powerful third-party plugins dedicated to this task. A liberal amount of luminance noise-reduction is applied in the example. He then opens the curves tab, selects the red colour channel, and reduces the amount of red (caused by light pollution) in his image. A small contrast adjustment is made next. Our instructor seems a tad rushed through this part of the tutorial, but if you are following along with the video it all makes sense.
A general rule of thumb when processing astro-images in ACR is to start from the right tab, and work your way left. Resist the temptation to start moving sliders in the far left tab right away.
Now that we have this one “perfect” frame with all of our adjustments, we can apply these settings to all of the frames at once using the “synchronize” command. This is the stage of the game Tony calls “halfway home”, where we have all of our images in the series with the exact same adjustments made.
Registar
I’ll start by saying that I have never used Registar. I use free software called DeepSkyStacker for registering my images, and Registar is listed at $150 US! I will see if I can supplement this step with DSS before forking out 150 big ones for Registar.
In a nutshell, he tells Registar where to look for the image set, uses the default program settings, and goes for a coffee. (I like your style Tony!) Registar then goes through each image and accurately aligns each image star by star. This takes about 5 minutes. The next step is to click on “Combine Control” and select “Median/Mean” to average all of the frames together and create a neutral image. You can also take this process a step further by using the outlier rejection capabilities of Registar to remove unwanted objects such as a satellite trail.
The final combined image is created by Registar is impressive. The stacked image is smooth and free of grain, colour noise and spurious colors. This averaged image is now the Master Frame. A 16-bit TIFF with all of the adjustments made and a high signal to noise ratio.

Final Processing in Adobe Photoshop
This is where your artistic freedom comes in to play. There are limitless ways to process your final astrophotography image, and this is definitely my favorite step in the entire process. The big difference this time is that you now have a very smooth, clean image to play around with. An image free of vignetting, chromatic aberration, noise, and properly color corrected. I hope you got as much out of this tutorial as I did the first time I watched this amazing video from Tony Hallas.
You can visit Tony’s Website Here.
Wide-Field Astrophotography Image using Canon EOS 6D and Tony Hallas Processing:
 |
| The Milky Way – Photo by Philip Downey using Tony Hallas Processing Techniques |
Phil is a member of my astronomy club and takes incredible astrophotography images using a Canon 6D and iOptron SkyTracker. You can visit his blog here.
Trevor,
Are you still using Tony’s technique described? Seems as if you are using a different approach as of 2/2021 based on your recent vlogs.
Thanks.
Love you vids. Oh… I want your R5a😉
Ra.