QHY PoleMaster Review
The QHY PoleMaster electronic polar scope was designed to make your polar alignment routine easier, and more precise. No matter which camera tracker or equatorial telescope mount you’re using, when it comes to astrophotography, accurate polar alignment is critical.
If you have ever struggled to polar align your telescope mount with the north or south celestial pole, the QHY PoleMaster may just be your new best friend. With a slew of recent technical headaches and an unforgiving winter, my appreciation for devices that make my life easier has grown.
The QHY PoleMaster delivered exceptional results for me on my first night out with it. The dedicated polar alignment software was easy to use, and the camera produced a crystal clear image of the starfield surrounding the north celestial pole.
I experienced that cliche moment I expect all backyard astrophotographers had with this device their first night where I thought, “I should have been using one of these a long time ago”. It’s true.

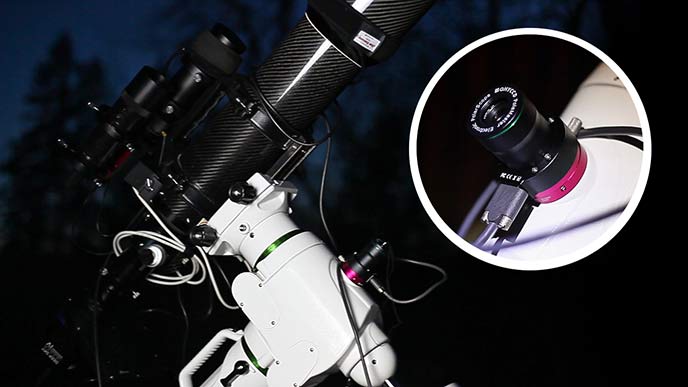
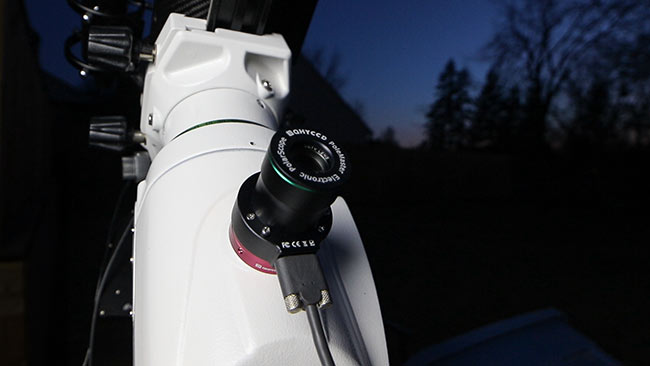
The PoleMaster I am using is for my Sky-Watcher EQ6-R Pro EQ mount, and I have fastened it to the mount using the dedicated QHY adapter for this model.
QHY PoleMaster Review
In this post, I’ll review the QHY PoleMaster from the perspective of an experienced amateur backyard astrophotographer who’s spent a lot of time manually polar aligning mounts using polar finder scope.
When others would mention the QHY PoleMaster to me, I would say that I just don’t need one. I felt comfortable manually polar aligning my telescope mounts and camera trackers, from the iOptron SkyGuider Pro, to the Sky-Watcher EQ6-R Pro.

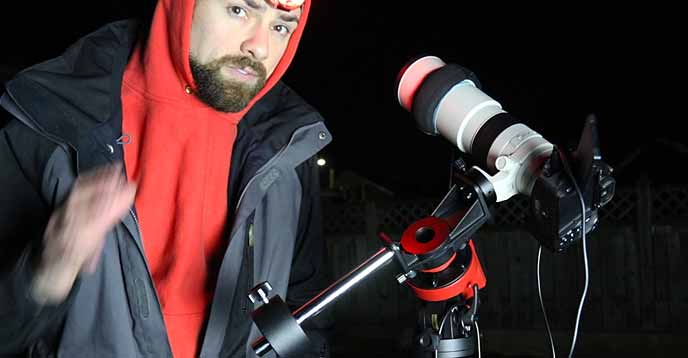
My deep-sky astrophotography setup with a PoleMaster fastened to the polar axis of the telescope mount.
I use a mobile app (Polar Finder) that gives me a readout of the current position of the north celestial pole and fine-tune the altitude and azimuth controls of my mount to line the axis up as best as possible. On the Celestron CGX-L, I have the All-Star Polar Alignment feature to help me out.
So why do I need a QHY PoleMaster to aid me in this process? Because sometimes “as best as possible” just isn’t good enough. Oh, and kneeling on the cold pavement or wet grass to get behind that polar scope kinda sucks too.
What about confirming the position of Polaris in the illuminated reticle after I’ve started imaging? Depending on the angle my telescope is pointed (on the EQ6-R), this simply isn’t an option. In fact, there is a long list of benefits to using the QHY PoleMaster over a manual alignment routine that I seemed to have ignored up until now.
Polar Alignment speed, accuracy and experience improvements with the QHY PoleMaster:
-
I can polar align faster, at dusk
My old method of polar alignment was fast, this one is faster. I no longer need to wait until I can see Polaris with my naked eye to get started.
-
I don’t have to get on the ground
I like to leave my telescope mount tripod legs at their minimum height for maximum stability. However, this makes getting underneath the polar scope tricky and somewhat painful (I feel old).
-
Improved polar alignment accuracy
A high precision camera can achieve a higher level of polar alignment accuracy than “my best try”. The imaging camera in the PoleMaster has a resolution of 30 arc seconds.
-
I can monitor and confirm my polar alignment at any time
Any slight amount of drift due to bumping the mount, sinking into the lawn or other factors I had no way of monitoring are now easy to identify and fix.
-
No more 3-star alignment routines

Why didn’t someone tell me about this feature? The spot-on accuracy of the PoleMaster means that only a 1-star alignment routine is needed for your telescope mount to learn the sky.
The pointing accuracy of your telescope mount will vary depending on the focal length of the telescope you are using for astrophotography.
Eliminating any cone error in your telescope mount will improve your pointing accuracy even further. The Sky-Watcher EQ6-R Pro has an option to adjust this.
QHY PoleMaster EQ Mount Polar Alignment Camera Specifications:
- Field of View: 11 degrees by 8 degrees
- Interface: Mini USB 2.0
- Resolution: Approximately 30 Arc seconds
- Weight: 115 g (0.25 lb)
What’s included in the box
This PoleMaster was sent to me from High Point Scientific for review. The team at High Point made sure to include the necessary adapter for my EQ telescope mount. Here is a look at everything that comes with the PoleMaster:
- PoleMaster camera body
- Lens cap with a lanyard
- Mini USB 2.0 cable
- Mount adaptor
- Mount adaptor cap
- M4 hardware for attaching the adaptor
- Allen key for lens focus adjustment

When ordering your PoleMaster, make sure to specify which mount adapter you need for your specific telescope mount.
View list of available mount adapters
Fastening the PoleMaster to your telescope mount
The PoleMaster I am using is for my Sky-Watcher EQ6-R Pro EQ mount, and I have fastened it to the mount using the dedicated QHY adapter for this model. The hardware was easy to install, and the materials used and overall finish of this device is attractive.
The adapter for my Sky-Watcher EQ6-R came with a tiny Allen key to adjust tension, so I could securely lock the PoleMaster into the front of the polar axis scope of the mount. The adapter I am using for the Sky-Watcher EQ6-R also works with CGEM style mounts from Celestron.

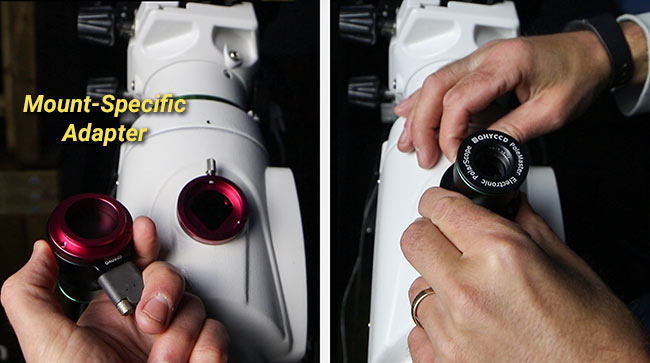
The QHY PoleMaster Adapter for the Sky-Watcher EQ6-R
There are two parts to the mount adapter for the PoleMaster, the camera base disc that attaches to the camera body, and the camera mount ring that you need to secure to the mount. You secure the camera base disc to the mounting ring using a thumbscrew.
For the EQ6-R mount adapter I used, there were three tiny grub screws to tighten using the supplied Allen key to lock the adapter into place.
I have also mounted the PoleMaster to a Celestron CGX-L telescope mount using a Celestron ADM adapter. The adapter clamps to the dovetail bar of the imaging telescope (In the example below, an 8-inch RASA). This adapter worked exceptionally well when polar aligning the Celestron CGX-L for imaging without the use of autoguiding.

The PoleMaster mounted to a Celestron CGX-L mount and RASA telescope using an adapter.
The device connects to my PC via a Mini USB 2.0 cable, with miniature locking screws to avoid yanking the cable out by accident. I wish more of my device connectors had this. The manual instructs you to position the USB port of the PoleMaster to the left-hand side when looking at the device head-on.
I ran the mini USB 2.0 cable from the PoleMaster into my recently upgraded powered USB hub, which consolidates the various astrophotography devices I have running to a single USB cable into my laptop.
The adapter allows you to take the PoleMaster off of the mount while not in use or in storage, but I think I’ll leave it right where it is. The tiny camera adds no weight to my rig and maintains a low profile.
I’ll just have to make sure I don’t bang anything against the device by accident when setting up. The included lens cap should stay on the PoleMaster when not in use to protect the lens.
There are several adapters available for the PoleMaster to fit with your specific telescope or camera mount. From small camera trackers such as the Sky-Watcher Star Adventurer to monster mounts like the Celestron CGX-L. Be sure to speak with the vendor about which adapter you need for your mount.
For mounts like the Celestron CGX-L that do not have a polar axis scope in the mount, a specialized L-bracket and adapter is needed to mount the device. In the photo below, you’ll see how I have mounted the PoleMaster underneath the dovetail rail of the 8″ RASA F/2.

The PoleMaster mounted to the CGE dovetail rail of the Celestron RASA.
Looking for a dedicated electronic polarscope for the iOptron SkyGuider Pro? If you haven’t found an adapter to mount the PoleMaster to this mount, consider the iOptron iPolar device. The iPolar and adapter were made specifically for the iOptron SkyGuider Pro.
Software and Downloads
All of the software and drivers needed to run the PoleMaster device were found on the QHY website. The company has recently updated its site, which lead me on a bit of a wild goose chase.
Rather than using the URL printed on the green card that came with the camera, I simply “Googled “QHY PoleMaster Driver” to find the appropriate section of the QHY website.
Here, I downloaded the latest stable driver for the PoleMaster, along with the dedicated software needed to communicate with the camera and control parameters such as gain and exposure length.
With the 2 downloads unpacked and installed, I ran the PoleMaster software on my field laptop with the camera connected. The QHY PoleMaster manual (link below) was to-the-point and helpful through this process and instructed me to click the “connect” button.

I heard the reassuring “new device connected” chime on my Windows 10 OS after plugging in the PoleMaster, so I new the camera was successfully recognized by my PC.
Tip:
If your PC has trouble recognizing astrophotography accessories and devices, I recommend unplugging the device and reconnecting to a new USB port. Monitor the Windows device manager to troubleshoot any connection issues.
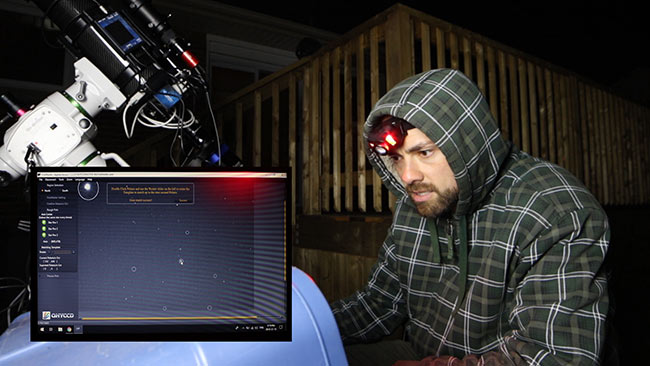
After hitting the “connect” button, the PoleMaster delivered a live-view loop of the stars in the northern sky. The mount was already roughly polar aligned to my latitude at 43 degrees north and pointed in the general direction of Polaris in my backyard.
The PoleMaster camera lens has an 11 x 6 degree of field of view. This means that the pole star should be visible if the mount has been roughly polar aligned.
Even though it was not completely dark out yet, I could see a formation of stars in the display screen right off the bat. After zooming out to 75% view, the north star, Polaris was obvious.
Us northern hemisphere folk have the luxury of having a bright pole star. In the southern hemisphere, the PoleMaster Uses Sigma Octans as a reference, which is a bit trickier to identify.
Using the PoleMaster Software

The PoleMaster software user interface.
The first thing you’ll want to do is adjust the gain and exposure settings so that it is easy to identify the pole star and a number of adjacent stars in the field.
The software walks you through a simple process of identifying and confirming the pole star. The process involves matching an overlay of star positions with your current view of Polaris and surrounding stars.
The rotate tool on the left hand sidebar lets you rotate the star pattern overlay using your mouse or trackpad to line up with your current live view of the north star.
Then, you are asked to rotate the RA axis of your telescope mount to determine the rotation of the mechanical axis. By rotating your mounts right ascension axis by 15 degrees or more, the software can confirm this value.
Fine-tuning the polar alignment accuracy of my telescope mount using the QHY PoleMaster.
I made the mistake of releasing the RA clutch of the mount to perform this step when the manual clearly states that this must be done using the hand controller or mount control software such as EQMOD.
The reason for this specification is that by releasing the RA clutch, you shift the rotational center of the mount. Instead, keep the RA clutch locked, and perform this rotation by pressing the east button on the keypad.
Next, the on-screen prompts tell you to confirm the center of rotation. Eventually, you will get to a point where the application displays a small green circle. This is exactly where the pole star needs to be. At this point, the ultra-fine adjustments you make to your polar alignment are far beyond what’s possible with the naked eye.
I wonder how far off the north celestial pole I was in the past?
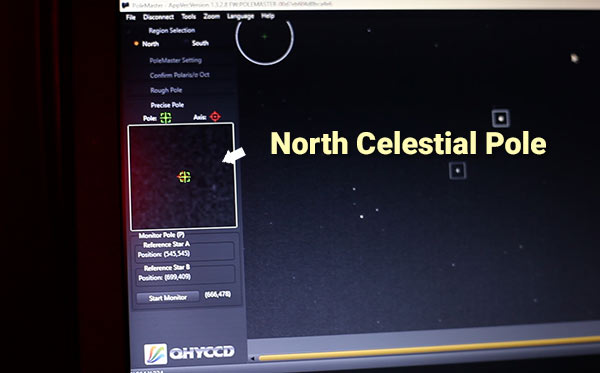
Aligning the polar axis of my telescope mount with the true north celestial pole using the PoleMaster.
Atmospheric Refraction
The PoleMaster has an option to enable a feature called atmospheric refraction to further improve your polar alignment accuracy. This feature asks you to input your coordinates, temperature, and pressure. For atmospheric refraction to work correctly, the USB connector on the PoleMaster must be facing east.
Owners of the PoleMaster have recommended starting the polar alignment routine with your telescope to the west instead of the home position. 2 moves or more than 30 degrees can be difficult from the home position, so if the telescope starts in the west it is not an issue.
If you do not remove the PoleMaster from your telescope mount between astrophotography sessions, you can reuse the centering procedure from your previous polar alignment. However, if you are using the atmospheric refraction feature, you’ll need to remember to adjust the temperature and pressure settings for that night.
PHD2 Drift Alignment for Improved Accuracy
Some amateur astrophotographers has found that by using the drift alignment tool in PHD2 guiding, you can improve your polar alignment accuracy even further with the PoleMaster. The drift align tool in PHD2 works by measuring the error (drift) of a star and adjusting the mount to reduce the error.
You repeat the process of measuring the drift error and adjusting the mount by adjusting the altitude and azimuth bolts until the drift error is as close to zero as possible. Because this feature of PHD2 gives you a way to measure the amount of drift error in your polar alignment, it can be a useful way to really dial in the accuracy of your polar alignment that you have determined using the PoleMaster.
I have never went to these lengths to confirm the preciseness of my polar alignment myself, but if you are interested, you can watch this presentation on the Astro Imaging Channel. For those that are setting up a permanent observatory, I can see how this level of accuracy justifies the commitment of time.

My photo of the Pinwheel Galaxy using the QHYCCD PoleMaster for polar alignment on the Celestron CGX-L mount.
Final Thoughts
There is a reason so many amateur astrophotography enthusiasts own a QHY PoleMaster. Whether you want to improve your polar alignment accuracy, save time, or ditch those 2nd and 3rd alignment stars when setting up – the PoleMaster can make your time under the stars more efficient.
The pressure and urgency to capture images increases when you have a limited window of clear sky time. When even a single aspect of your astrophotography setup is off, you can quickly squander your night sky bounty for the night.
Devices like the QHY PoleMaster help to optimize your imaging experience and allow you to focus on the photography side of things, like collecting images. The peace of mind knowing that your telescope mount is optimized for the apparent rotation of the night sky is one aspect of the hobby every one of us can appreciate.
At under $300 USD for the QHY PoleMaster Electronic Polar Scope is an obvious upgrade to any amateur setup, whether you think you need one or not. Is it possible to get your rig accurately polar aligned without the PoleMaster? Sure.
But in a hobby where little things make the difference between a good image, and a great one – I like to take every advantage I can get.


You should look into trying the polar alignment tool in SharpCap. It uses your guide camera and guide scope and goes through an alignment routine similar to the PoleMaster. It’s really accurate and a many find it easier to use and more accurate. Plus you don’t need yet another device connected to your rig.
I had been manually aligning like yourself for the last 5 years with my AVX until I discovered this function last summer. It took the job of polar alignment using my polar finder and then ASPA in about 10-15 minutes down to a 5 minute (at most) affair. And I’m so glad I did when I upgraded to a CGX in the fall. There’s no way I’m buying that awkward “arm” to mount a polar scope or a PoleMaster on the CGX.
This would be helpful with for you with your CGX-L. The precision adjustments for alt and az make it so easy to dial in perfect polar alignment.
Hello Trevor,
I was wondering if your guiding accuracy improved at all with the polemaster? I used to use sharpcap, but it just does not produce good enough results for my setup. I am using a similar mount to yours.
Thanks.
Hey! I’ve used the Polar Alignment routine in SharpCap before – made a video about it and everything (https://astrobackyard.com/polar-alignment-in-sharpcap/) It was certainly a great way to align the mount – and a great option to consider for SharpCap users.
I found the routine with the PoleMaster to be more enjoyable and easy – but that’s just a personal preference. I’ve had a lot of people mention the SharpCap method – and I should have mentioned it as an alternative in the video! Thank you for this input – and keep up the amazing work with Dark Arts Astro 🙂
Hey Joe – so for my imaging session going on when I filmed the video, I didn’t use autoguiding (guide scope completely frosted over). The stars were completely sharp in my short 2-minute exposures using the PoleMaster.
In the very near future I will try shooting 5-minute exposures using the PoleMaster to polar align, without autoguiding. I have a feeling I am going to like the results…
Hi Trevor, Does it also help to calibrate the polar finderscope ?
I would imagine that it does. You could remove the PoleMaster once aligned and confirm through the polar finder!
Would this work with the iOptron SkyGuider Pro? What adapter would I need? Could you do a tutorial on how that would work?
Trevor,
Can you use this to polar align the iOtron SkyGuider Pro? Which adapter would I need? Can you do a tutorial on how you would use it with the SkyGuider Pro?
Yes! I have seen a few iOptron SkyGuider Pro rigs with a PoleMaster attached. You would just need the adapter. (This looks like the one: https://www.ioptron.com/product-p/3337.htm) I’d double check with the vendor to get one that fits!
Trevor… I noticed the usb port on your PoleMaster is facing down. If you put the usb on the left side (when facing the camera), it will line up the image with the adjustments. When you turn the right bolt the image moves left, rear adjustment bolt the image moves down, etc. I had mine facing down at first too, and thought the adjustments were a bit confusing 🙂
Hi Trevor, been using the polemaster since i started Astro imaging. Just an FYI, not sure if it makes any difference, but pretty sure the polemaster manual calls for the USB port to be facing to the left (east side) when viewing the camera from the front of the scope. Otherwise good review.
Never mind see you said that in your detailed review.
Very nice review Trevor. I’ve seen SharpCap mentioned a couple times. I went the SharpCap route and have a FB album with everything I did to put it together. For someone who’s been in the hobby a while they are likely to have the parts needed to build up a SharpCap system. If you needed to purchase all the pieces needed to put a SharpCap system together it would be about the same as the PoleMaster. For someone that does not have all the spare part to build a SharpCap system I would highly recommend the PoleMaster. It comes with everything you will need and you’ll be getting nearly perfect polar alignment within minutes. If you’r interested in seem my SharpCap setup here is a link https://www.facebook.com/media/set/?set=a.10155078397866358&type=1&l=a8b5b413db
Hello Trevor,
Thanks so much for all the videos you make , as a newbie to this great hobby I was wondering if I can get away with just the PoleMaster ? Or would I still need a guide scope ?
Hi
This doesn’t work with the Celestron CGX mount though does it – or have they come up with an adaptor now?
Yes there is an adapter for it. Check out the Celestron ADM adapter I used to mount the PoleMaster to the CGX-L mount (on the telescope dovetail bar). I’ve added a new image to the post.
Hey John – With a precise polar alignment, most modern mounts with a balanced load can accurately track the sky for long exposure images of 3 minutes or much more. The higher the magnification you use, the more demanding tracking becomes. Each mount will have its own periodic error but I have found the Sky-Watcher EQ6-R and Celestron CGX-L to perform excellent without autoguiding for up to 5-minute exposures.
Hi Trevor
Do u checked which Adapter is needed to Use polemaster on skyguider pro?
Hi Trevor
Do u checked which Adapter is needed to Use polemaster on skyguider pro?
hi Trevor
New product from ioptron
https://www.ioptron.com/product-p/3339.htm . It can be used for skyguider pro.
Maybe u can get one for review
Trevor,
Can you do a short review of using the Pole Master with a DSLR setup? I’m imaging on a Sony A7iii with Sigma 150-600 mounted on an Orion Sirius EQ-G I am VERY interested in the Pole Master but it is unclear if I will benefit from it with my setup.
Thanks for all the info you’re providing to the hobby.
Daniel T
Hi Trevor,
Nice review. I was thinking of buying till I saw the iOptron iPole. It seems to be a step up on the PoleMaster and Polaris does not need to be visible for those with blocked viewing. Also appears to be simpler to use. One model of the iOptron SkyGuider Pro comes with one preinstalled making it (iPolar) a bit cheaper when you consider the whole package. Nice to see a review of this one like Alexander suggested.
Their (current) software requires administrator to run! Why isn’t that mentioned anywhere?
I hate giving administrator rights to any software!
Good point Kevin – yes it does! In general, the QHY software can be a little “interesting”. I experienced this most when installing the drivers for the 128C.
Am I wrong in thinking this gadget only works with windows? I am typing right now on a windows 10 desktop, but that doesn’t come outside with me.
Like millions, I have an iPhone and an iPad. I am not eager to go purchase a windows laptop just for the telescope.
So what are the ios options for aligning a EQ6R?
My view of polaris is obstructed year-round. Is this system able to look at the stars to the left and right of where Polaris is and make its assessment based on those stars? Many thanks!
Hello,
I have a Meade LX90 with fork mount. I am interested in buying the PoleMaster PolarScope.
Are there adapters to install this camera on the fork mount?
Many thanks!
Hi. I do my polar alignment using ASIAIR Pro’s all-sky polar alignment function. Is using the QHY Polemaster better for polar alignment than the ASIAir polar alignment?
Tom – No it is not! I find the ASIAIR polar alignment to be a better option.