Upgrade Your SkyGuider Pro with iPolar
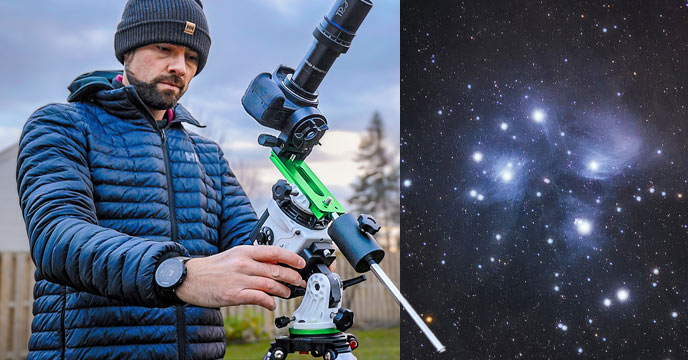
In my latest video, I captured a wide-field deep sky object using an impressive little star tracker, the iOptron SkyGuider Pro. Since 2017, I’ve captured several deep sky images with the SkyGuider Pro, with a DSLR camera attached to a camera or small telescope.
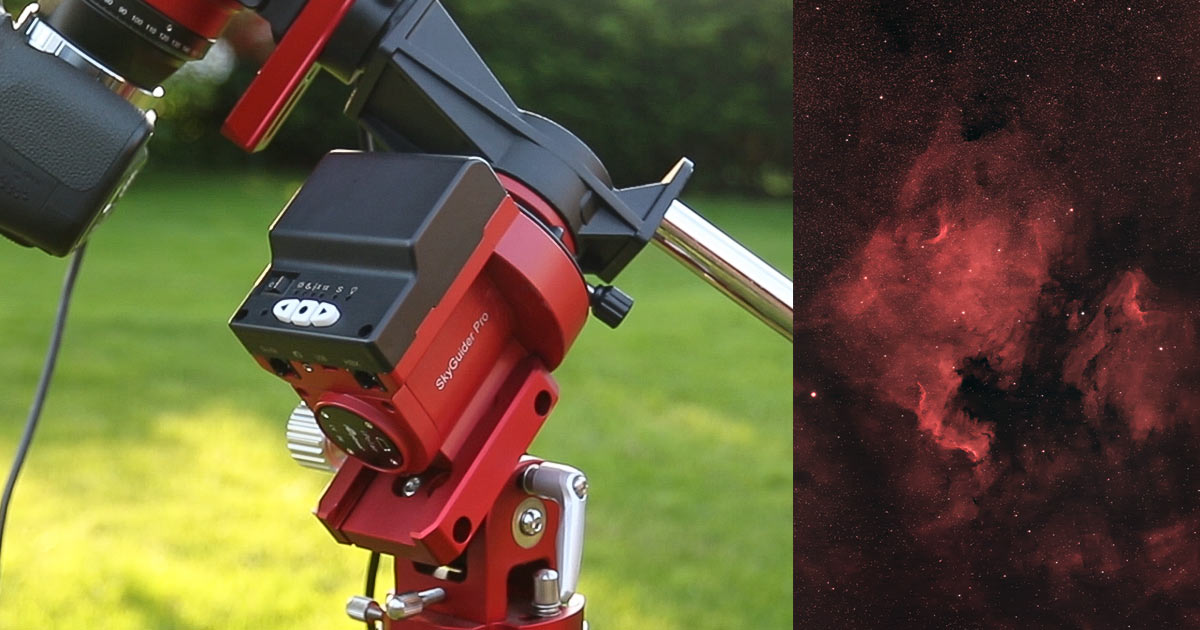
In my latest adventures in the backyard, I’ve set up the iOptron SkyGuider Pro once more, but this time I’ve added a rather simple device that makes a critical step of the astrophotography acquisition stage process easier, and more precise.
The iPolar Electronic Polarscope
The iPolar electronic polarscope uses a small camera to understand the mounts positioning, and tell me exactly where it needs to be so that it is perfectly aligned with the north celestial pole. As seasoned veterans will tell you. polar alignment is an essential step of the deep sky imaging process, and it should not be rushed, or skipped.
The iPolar camera is just like the QHY PoleMaster I use on my larger equatorial mounts such as the Sky-Watcher EQ6-R Pro, but this one uses its own dedicated software, and was made specifically for popular iOptron mounts like the SkyGuider Pro.
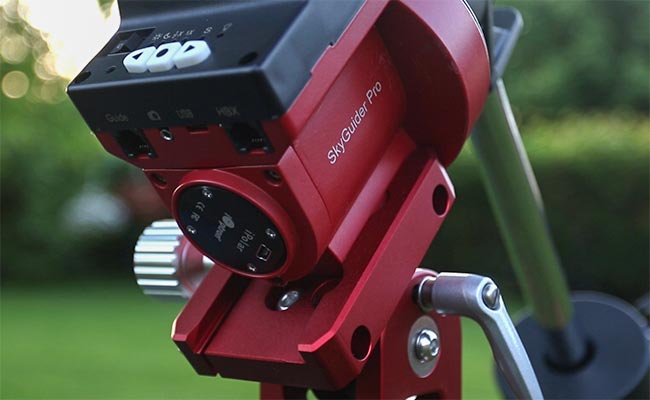
The iPolar Electronic Polarscope in the RA axis of the SkyGuider Pro.
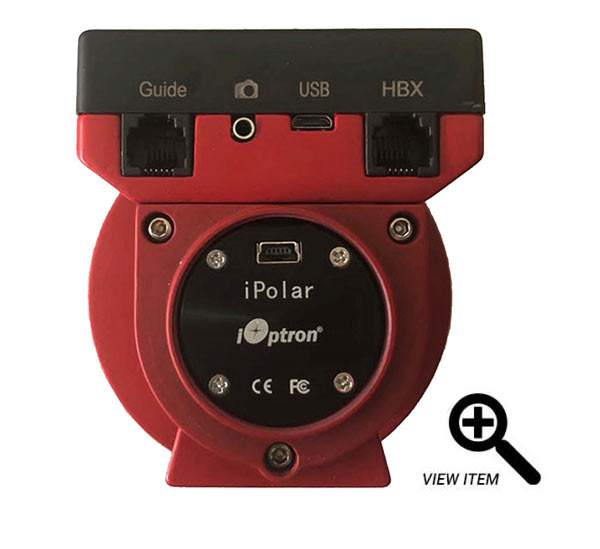
The version of the iPolar I have came with an adapter to externally mount the device to the SkyGuider Pro. It comes with a USB cable to connect the iPolar to your Windows PC, and the polar alignment is done with using the on-screen instructions of the software.
The system only needs 4 stars to locate the pole, and can do so even if the pole location is obstructed by tree branches or clouds. The field of view of the iPolar is 13-degrees, with a resolution of approximately 30 arc-seconds.
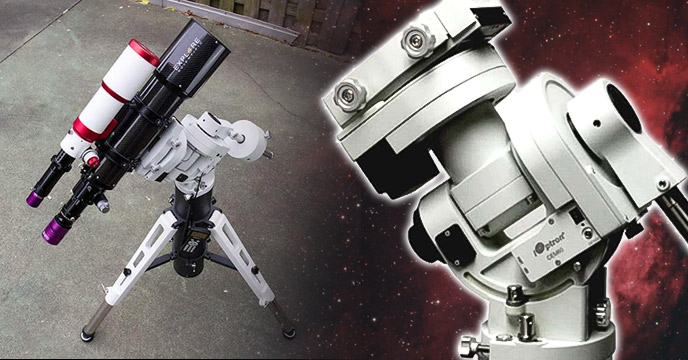
iPolar Compatible Mounts
The iOptron SkyGuider Pro is sure to be a popular mount to add the iPolar upgrade too, but this is not the only telescope mount compatible with this electronic polarscope. In fact, there are currently more than a dozen iOptron mounts compatible with the new iPolar device:
- CEM120/CEM120EC/CEM120EC2
- CEM60/CEM60EC
- CEM40/CEM40EC
- CEM25/CEM25EC/ZEQ25
- iEQ45Pro/iEQ45
- iEQ30Pro/iEQ30
- SkyGuider Pro
- SkyGuider
- SkyTracker Pro
- SkyTracker

I know that owners of the iOptron SkyTracker Pro star tracker have been looking for a solution like this for some time now. It will be interesting to see just how far backyard astrophotographers can push the SkyTracker Pro, with the added polar alignment precision the iPolar provides.
The iOptron SkyGuider Pro
As you may already know, the SkyGuider’s job is to accurately track the apparent motion of the night sky for long-exposure astrophotography. It’s RA (right-ascension) motor slowly rotates at sidereal rate to match the skies movement – very simple, yet vital for deep sky imaging.
This lithium-ion battery-powered camera mount was designed for portable astrophotography with a camera lens or small telescope riding on top. This setup usually consists of a DSLR camera and lens, but I’ve seen some incredible little setups using dedicated astronomy cameras, and telescopes as big as the William Optics Z73 mounted (with a 50mm guide scope)!
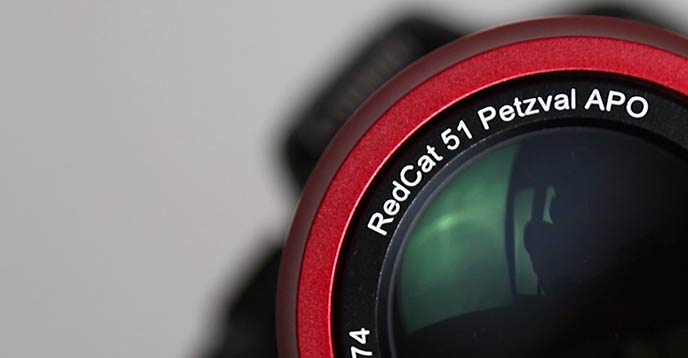
It can handle up to 14 lbs of gear, which means that small refractor telescopes like the William Optics RedCat 51 are no problem for the SkyGuider Pro. I’ll attach my newly acquired Canon EOS 60Da to the RedCat, with a dual-bandpass narrowband filter inside (2″ Optolong L-eNhance)
I have used the iOptron SkyGuider Pro with the RedCat 51 extensively. I’ve traveled to Costa Rica with this setup in my carry-on bag and set the rig up in 3-feet of snow in the backyard. No matter what the weather conditions or surrounding scenery were, the SkyGuider and RedCat 51 combo have given me some of the most memorable astrophotography imaging sessions of my life.
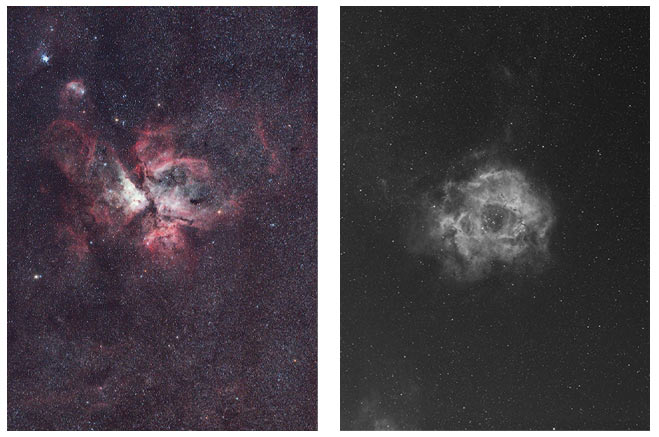
Images captured using the SkyGuider Pro with the RedCat 51 and DSLR attached.
All of these incredible moments took place using only the built-in, illuminated reticle polarscope that comes with the SkyGuider Pro. As you can imagine, I had mixed feelings about disrupting this proven configuration to upgrade it with the iPolar device.
The SkyGuider Pro has proved to be an incredibly reliable star tracker that only takes a few minutes to set up. The addition of the iPolar electronic polarscope adds time (and additional gear) to this process, which I will discuss further in a moment.
Deep Sky with a Telescope
I’ve fitted a 2″ Optolong L-eNhance filter into the adapter of my RedCat 51. This narrowband filter blocks nearly all light from hitting my camera sensor except for very specific wavelengths emitted from emission nebulae like the North America Nebula.
The North America Nebula in Cygnus is a large, bright, and beautiful target that’s located in an area full of hydrogen gas including the impressive Pelican Nebula.

A William Optics RedCat 51 Refractor mounted to the iOptron SkyGuider Pro.
With a focal length of 250mm (400mm equivalent with a 1.6X crop-sensor DSLR), the RedCat will fit this entire area in a single field of view. Astrophotography at this time of year means limited dark-sky time to collect light on a deep sky target, as we’re almost at summer solstice here in the northern hemisphere.
Late June may have the shortest nights of the year, but it sure beats spending extended periods of time outside in the cold winter months.
Shoot Longer Exposures
Narrow bandpass imaging requires that you collect longer exposures than you would in broadband, especially when using a color camera like a DSLR. The goal is to collect as much signal on a specific wavelength of light as possible.
But longer exposures put a higher demand on tracking accuracy and polar alignment, and that’s where the iPolar comes in.
At focal lengths of 200mm+, capturing an image of 3-minutes or more requires a precise polar alignment of the mount. Even a careful polar alignment routine that is slightly off will begin to negatively affect your images after about 2-minutes.
![]()
The iOptron SkyGuider pro includes a built-in polar scope, and you should be able to achieve an accurate polar alignment by eyeballing it. This is more than enough for a sharp 2-minute image using a camera lens with a focal length of 100mm or less.
I’ve been extremely satisfied with the results I’ve achieved using this method of polar alignment, but it’s time to push the SkyGuider Pro mount even further.
An electronic polar scope uses a camera to plate solve an image of the area of sky around the celestial poles – and provide useful feedback to guide your adjustments to the Altitude and Azimuth controls.
No matter how good you are at manually aligning the mount through the polar scope with your eyes, I think it’s safe to say a camera has got you beat.
It’s this level of accuracy that users of the SkyGuider Pro have been asking for.
Installing an iPolar to the iOptron SkyGuider Pro
Until the iPolar, SkyGuider Pro users were left to improvise and create a custom adapter to mount a QHY PoleMaster. If you haven’t yet gone down this road, it’s worth looking into the new iPolar.
I must say, the iPolar experience and software felt very familiar, which isn’t a bad thing considering how much I love the PoleMaster. You simply download the iPolar software and calibrate the camera on the RA axis of the mount.
The iPolar installation process was… interesting. Now, I am not overly technically sound, so it was a bit unnerving to open the SkyGuider up with a screwdriver. The process involves removing the control board and unplugging a few small cables.
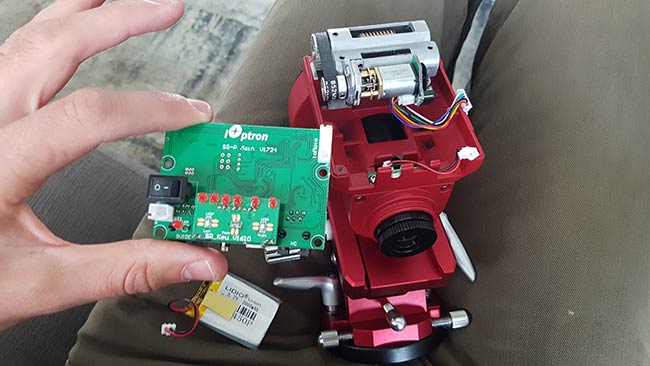
The process of removing the stock illuminated polar finder scope inside the iOptron SkyGuider Pro.
No big deal for those that like to tinker with electronics, but definitely an adventure for people like me. All in all, it took about 15 minutes to remove the standard polar scope and install the iPolar on the SkyGuider Pro.
The included casing adapter to package the SkyGuider back together matches up nicely, and it looks like the iPolar was there all along.
Polar Alignment using the iPolar Software
The iPolar software is available to download on the iOptron website. After a quick installation of the software on my Windows 10 laptop, I connected the device via the included mini-USB cable.
The device was recognized in my device manager, and I connected the camera by clicking the “connect” button at the top left-hand of the screen. For anyone that has used the QHY PoleMaster, this experience should feel very familiar and comfortable.
The first thing you’ll need to do is take a single dark frame for camera calibration purposes, which I did by covering the RA axis with my hand. (did you catch that in the video?)
From here, it’s a matter of adjusting the camera settings so that the iPolar can pick up enough stars to plate solve the image. I attempted this process at the early onset of dusk, and found that I had better results waiting until it got a little darker. Just change the gain adjustment and exposure length until about 10 stars are detected.
Unlike the PoleMaster, the stars are displayed as exaggerated black and white blobs that the software uses for plate solving. For a more “normal” looking view through the camera, simply click on the RAW image button. You’ll need to un-check this for the software to calibrate properly.

The iOptron iPolar Polar Alignment Software.
You’ll need to enter in the lat-long coordinates of your location, which you can easily find online or using the GPS on your phone. You also need to set the rotation center of the mount, which can be calibrated after clicking the “clear rotation center” button on-screen.
Rather than going through the rotation center calibration process (that involves confirming 3 positions of the mount), I opted to enter the rotation center using the manual input rotation center button. The official iPolar manual states the following:
You may also manually enter the rotation center, X=480, Y=640, for rough alignment if you are sure the iPolar center is not far away from the mount RA axis.
Once the plate solve has succeeded, you should see a red cross, and a red dot on the screen. Your job is to align these two indicators with each other by making adjustments to the alt-az adjustments knobs on the mount wedge. You may have noticed that I am using the upgraded William Optics wedge to mount the SkyGuider Pro, and this certainly makes this process a little more enjoyable.

As you get closer to being perfectly polar aligned, the red dot and cross-hair will enlarge. When the red dot fully covers the red cross, you are all done.
Final thoughts
With the polar alignment dialed-in thanks to the iPolar, I was able to shoot 4-minute exposures at ISO 1600 on the North American Nebula and surrounding area. These are unguided sub exposures at 250mm (that’s actually 400mm when you factor in the 1.6x crop factor).
Here is a look at the image I was able to capture using the iPolar for polar alignment on the iOptron SkyGuider Pro:
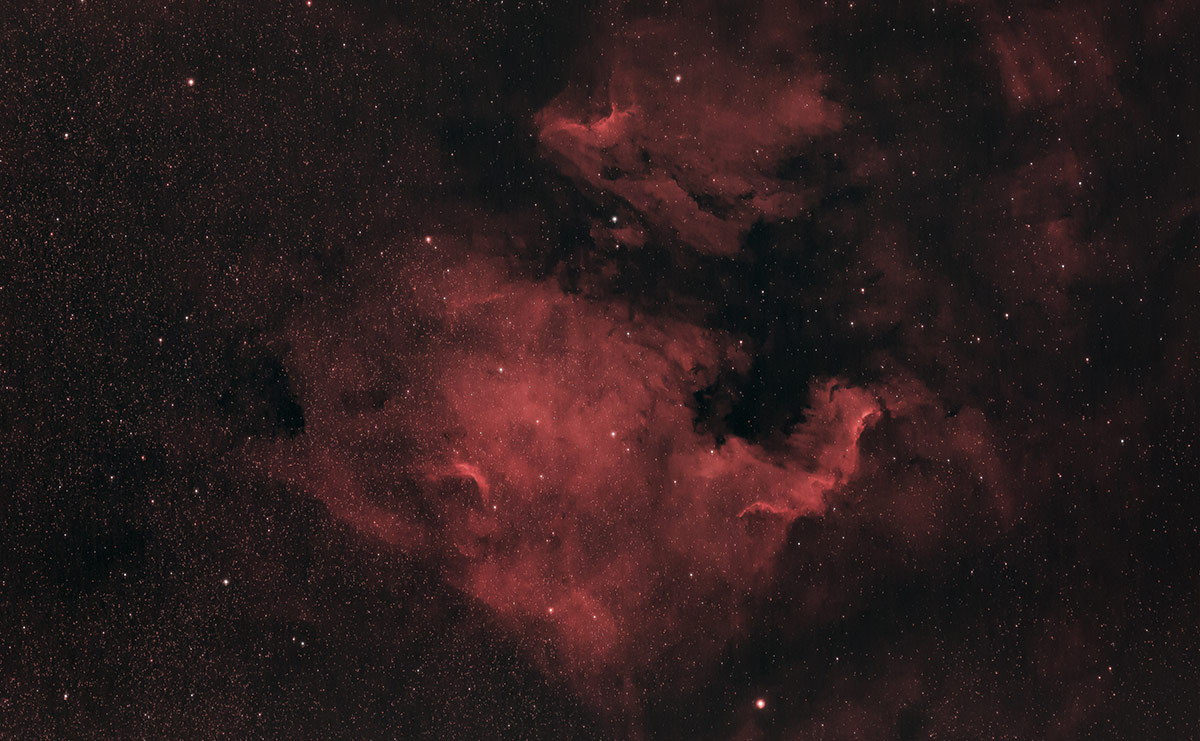
Results using the iPolar for polar alignment of the iOptron SkyGuider Pro.
The final image includes 62 x 4-minute exposures for a grand total of 4 hours and 8 minutes. The lack of dithering was evident in the data, and would have helped to reduce noise in the final integration. Regardless, I used each one of the 62 (240-second long) sub-exposures for my final image.
That’s some incredibly impressive data acquisition from a star tracker that fits in your hand.
The iOptron iPolar was developed because of a demand for polar alignment accuracy. Owners of the SkyGuider Pro looking to push the mounts capabilities further now have a dedicated device for this critical aspect of astrophotography.

Check out those round stars! I used all 62 x 240-second exposures in my final image.
I enjoy the simple setup and dead simple software to polar align the mount – however, I’ve now lost some of the portability of this mount. I’m now connected to a laptop for polar alignment, as I’ve removed the visual polar scope completely.
Seeing as how this mount was designed for portability and simplicity, it’s an upgrade that may not make sense for you. You add performance at the cost of more set-up time.
So, if the SkyGuider Pro is your main deep-sky imaging rig, the iPolar is a no-brainer, especially if you’ve had trouble with polar alignment in the past. But if it’s your travel/quick setup rig – remember that you have given up your ability to polar align the mount without software assistance.
If you have found this review helpful, please let me know in the comments. If you would like to know more about the iOptron iPolar, I would be happy to answer.


I was about to try to customize my skyguider pro with a polemaster, before I saw this video. Now you gave me something new to consider. Thanks.
Also is this a typo….62 x 40 minutes.. Or should that be 62 x 4 minutes?
Nam – Glad to hear this was useful for you – it’s a great option for SkyGuider Pro owners.
Thanks for pointing out the typo! – The polar alignment was really dialed-in, but a 40-minute exposure is a but much. 😀
Cheers
Hi Trevor, Nice upgrade from iOptron. You have previously reviewed ZWO’s ASIAir but you may not know that this device will soon have Polar Alignment built in using the main imaging scope/lens and camera. In beta testing at the moment but I can tell you it works exceptionally well. Should be officially released soon as foc upgrade to ASIAir app. Excellent option for the lightweight traveller as needs no extra gear or electronics at all! Works well with SGP and Redcat 51 combo.
Great point Robin!! I knew that feature was coming to the ASIair – and that’s an excellent option for those that want to keep their rig travel-friendly! I’ll have to try it out soon 🙂
Trevor, I’ve gotten a ton of inspiration and guidance from you these last few years. I even traded in my SkyTracker for the SkyGuider Pro, and I added the William-Optics Z61 as well. My one regret is that I haven’t given it a proper test drive yet. Compared to the ease of polar alignment with the SkyTracker, I’ve been a bit intimidated about the alignment due to the way the polar scope rotates in the shaft, thus potentially off-setting the alignment. I don’t know if I just need to spend more time fiddling with that or upgrade to what you just shared, so I can enjoy more DSO AP with that simple setup.
Hey Mark! I would definitely get the PA dialed-in as best you can using the built-in polarscope first. I looked back at some images captured in February (from the “I’m seeing Red” video) – they were 4-minutes each at an equivalent focal length of 400mm – unguided. You should be able to take some sharp images of at least 2-3 minutes with the 350mm FL Z61 with a sound polar alignment. As for the rotating RA and polarscope – just rotate it so that the illuminated reticle is lit and oriented the same as it is displayed in your polar alignment reference (I use the “Polarfinder” app on my phone)!
I found this review helpful instructive and inspirational.
Thanks Trevor for you hard work and clear and informative videos !
What did you do to locate the target ? live view and trial and error?
Hi Merrick! Yes – exactly. This one is easy due to its proximity to Deneb – which shows up in live view even through a NB filter! Then its just a matter of taking a few test shots at 20-seconds each to frame it up nice. The shape of the North America Nebula starts to show after about 15-seconds at ISO 6400:) Thank you for the kind words!
Hi again Trevor,
would you please edit my name in the comments to ‘Mel’
instead of my full name pls
Thx
Trevor, Great video again !!! Before you converted did you do a polar alignment with your gear hanging on it ? I use a Astrotech 72 ED II and Sony A6500 . I noticed the weight changes my polar alignment so I started doing it with my counterweight attached but before the scope and camera. Not sure I want to invest in the camera yet , but out of fear of star trailing I only do 30 sec exposures (a lot).
Hi Trevor
I think that you have highlighted in your video a good point: by replacing your polar scope with iPolar you are loosing the possibility to use it without a PC. This is why I prefer to use a PoleMaster with a customized adapter in front of it. With this solution you can still use your polar scope when you are traveling. Second point: you are using the William Optic Base mount instead of the one provided by Ioptron with the Sky Guider Pro. This base mount is incredible and clearly a game changer for the stability of your gears. It is mandatory when you want to track with 400mm focal lenth for 4 min. Thanks for your reviews. It was nice to talk to you at NEAF.
I was looking at the William Optics base. It sure looks nice until I looked a little deeper. It comes in Low Latitude (7-34 degrees) and High Latitude (32-59 degrees) versions. I’m in Dallas at 32 degrees. If I travel to South Texas, say the Texas Star Party (29 degrees), I need the low latitude version. If I travel up into Oklahoma, like the Oki-Tex Star Party (36 degrees), I need the High Latitude version. I don’t want to have to buy 2 of them! I guess I will stick with the stock mount.
Hi
In fact they are the same: you just need to change the position of one piece. Check on YouTube “William Optics Vixen Style Base Mount – Latitude Versions info” from Orion2400.
Best regards
Olivier
Can the ioptron ipolar also be used for guiding?
Excellent! That solves that problem.
Hi Trevor,
Thanks for the review. The reticle can be illuminated in a range when rotating (I would say several degrees of difference can still make it lit). I am not sure when should I stop rotating. What did you do with it?
In an e-mail form Ioptron support I was told yesterday that an app is forthcoming for iPolar.
So goodbye laptop when that day comes (hopefully soon).
For those with ASIair let’s hope ZWO hurries up with their polar alignment.
こんにちは!日本から英語も理解出来ませんが貴方のユーチューブの動画を見て参考にしてます。ioptron Skyguiderproを使用してます。ASIairも購入しましたipolarも注文しました。いずれも使い方が不明瞭です。ユーチューブの動画に可能なら日本語訳もお願いします!
Hello, i really enjoyed watching your videos and im inspired. I want to ask if you have any forum or way for people like me to consult with you directly for short advise? Im in Indonesia and a lot or equipment in the US, we dont have it here. I dont want to buy from amazon as the shipping cost and customs regilations here makes it even more difficult and time consuming. I just wondering maybe I can ask for advise with what euipment i have. thanks a lot!
Hi,
is iPolar software available only on Windows? Any idea if it exist for Mac OS?
Thank you.
A Mac OS version is in development & I was told would be released soon. Also it will work with Parallels Desktop for Mac & Windows 7, 8.2 or 10.
Thank you for the awesome, and very thorough, review of the iOptron SkyGuider Pro with iPolar! The information you have provided is invaluable.
My question for you is this: I am looking for a tracker to be able to get into astrophotography more than I already have been (photographed the Great American Solar Eclipse, attempted to capture the lunar eclipse in January; using a few different Nikon cameras-film and digital, and a 500 mm lens with 2x teleconverter), and feel the iOptron SkyGuider Pro is the correct guidance system. As a “beginner,” am I better off starting without the iPolar, or should I jump to the improved technology?
Thank you for the thoughts!
Trevor, Nice review . With my Astrotech 72 ED and Sony A6500 I can currently get two minutes with my skyguider no star trails. But.. My pictures really seem to get blown out at that time with pollution. If I get 4 minute exposures, how will I deal with the light?
I am getting a star guide or tracker setup for an upcoming workshop. All of my images will be landscapes using a DSLR and wide angle lens. With camera & ball-head my equipment tops out at 5lbs. Being as minimal as possible on gear/weight for trekking is important. I am leaning towards the SkyGuiderPro or SkyTracker Pro. I would like a setup that can function without a counter weight if possible. From what I’ve researched it looks like you can do all that on the SkyTracker Pro even though 5lbs is outside the specs on the payload without the counterweight. That being said do you have any advice for choosing between the two? I want to buy one and be done rather than wish I’d upgraded later. My second question is whether to not to go with the ipolar? It sounds like the ipolar requires a computer for setup which does not appeal to me taking another piece of equipment into the field? Sorry for the novel and thank you so much for your opinion!
Hi,
Enjoy your videos. I cannot see polaris clearly from my location any night be their trees or other obstructions. Is it better that I upgrade my Skyguider pro with Ipolar or ASIair as you use a phone with ASIair.
I have a small min-PC USB stick that I have used with Sharpcap to take my images. I could use the stick with IPolar. If I would use one of these which would you choose? Thanks.
Trevor, wonderful review, thank you!
When you were using a heavy lens, did you remove the lens from the mount when fine-tuning the polar alignment, and then put it back? or you did the polar alignment with all the combo on the mount? I found it could be hard to adjust the knob of the WO vixen base with heavy combo attached. However, if I did the alignment without the lens, the alignment could be shifted when I put the lens back.
I see you have what appears to be the William Optics wedge, rather than the OEM wedge from iOptron. I take it that you think it’s a worthwhile upgrade?
so you have said “The lack of dithering was evident in the data”
so its not possible to Dither with SkyGuider Pro + iPolar?
If yes how?
Thank You
Hi Trevor,
Thank you for an outstanding website. I’m about to enter the world of astrophotography.
I’m trying to decide on Skyguider pro with ipolar or without. There is only a $50 difference.
You write: “remember that you have given up your ability to polar align the mount without software assistance.”
This is a concern to me. However, would it not be possible to somehow side mount a polar scope for manual polar alignment?
I bought the SGP with ipolar already installed and had it working in minutes linked to my MacBook Pro running V1.1 of the native MacOS software. Was doing 2min subs at 85mm with zero trailing and clearly it is capable of much more. MacOS v1.1 and Windows V2.1 share a common new plate solving engine so are worth having.
With MacOS now supported that might give us hope that a wired IOS or iPadOS is on the way soon, which would
Restore the portability of the SGP. Everybody tell ioptron to sort it out! Thanks for the great video and text review from AB.
Hi Trevor,
I have a question that I found no answer from the manual and the web.
After using iPolar and a Windows PC/laptop to do the polar alignment successfully, do we simply unplug the usb cable and not need the laptop anymore?
Or we need the laptop to be on and to be connected to the iPolare, and check for alignment from time to time for the whole astrophotography session?
Thanks.
Hi Nick. After the polar alignment process is complete, you can unplug the cable and put it away. You just need to make sure that the mount does NOT move (eg. sink into the grass, gets knocked by your foot) after completing the polar alignment!
Trevor, are you able to CHECK the polar alignment after you disconnect the cable? During shooting?
In 2020 it would be great if you don’t need a laptop at all. Maybe via smartphone and an App and built in WiFi is a must today.
Absolutely brilliant wealth of information. Thank you very much Trevor. I think that that iOptron should develop a smartphone app and connect to the camera with wifi or bt. It’s very easy to do it and also cheap. They just need to hire one developer.
Alternatively in “theory” you could do this:
1. Buy a raspberry pi + powerbank + ultra small usb wifi router
2. Install Raspbian, Wine and VNC server
3. Install a VNC client app into your smartphone
4. Connect the VNC client to the Server an do the alignment from your phone.
Trevor thank you for your excellent review. As for the ipolar, I saw a mention in one advertisement that bipolar could be used when one cannot see the pole star. That seems counterintuitive unless they were suggesting that maybe just the North Star was obscured but the other stars around it were visible. Because if the pole star and the other stars around it are obscured by trees, it would seem like it would not work. Am I correct in that assumption? Also what is the great advantage to using the Williams Optics wedge? Lastly if one was just shooting with a DSLR and camera lens oh, would you also recommend a ball head attachment to the Skyguider pro? Thank you.
Hello, Which cable do you use to connect the canon camera to the ipolar? or to your computer?, to take the black photo and to take the 4 star photo.
Thanks
Hi! First off thanks for creating this awesome community, I found many a helpful information on your website and at channel.
I’m using the ioptron skytracker since a couple of years and with great pleasure. However, I recently tried to capture rho ophiuchi with my 200mm f4 lens I brought it to its knees (I ended up shooting at 100mm). Since then I’m looking into sturdier trackers (skyguider pro ipolar in particular)
Anyway, I digress. Long story short, here are my questions:
1. Does the laptop need to be connected throughout shooting or can it be switched off after alignment is finished and how long will it stay aligned if I use a heavier rig with let’s say a 400mm lens.
2. How does autoguiding work? Do I need am extra scope and camera or is it possible with the iploar and laptop?
Best regards from Berlin
Benjamin
I’m about to purchase my first tracker, and I’ve chosen the SkyGuider Pro. The only thing I cant decide on is whether or not I should get it with iPolar or not since I am by definition, a beginner. I don’t mind the extra time for set up. Does it really make it easy enough to make a difference for a beginner like me?
Quality tutorial/review.
I just got the Sky guider Pro bundled with i-Polar.
Does the i-Polar only connect & work with a PC/Laptop? Or has someone come up with an android app that would allow us to hook up via USB to our phones with the right cable, e.g mini USB to micro USB or mini USB to USB-C so we can basically do the same config setup without the need of the extra luggage.
I am trying to keep everything as small and light as possible. To that end I am using a smallrig very small and very stable tripod. The issue is that it sits to low to the ground to see through the polar scope. I am trying to find a way to install a 90 viewer. I found an old Contax that has the same threads – but find myself at a loss as how to put it all together.
Has anyone ever done this – or is there an accessory tht would accomplish this?
Hi! Big fan – thank you for all the information you share with us! And the stunning images!
My biggest problem with my SkyGuider Pro is the alt-azi mount it came with. I find adjusting the polar alignment with it to border on insanity-inducing. While I’m intrigued by the iPolar, I’m even more interested in that red aluminum-looking alt-azi base under your SkyGuider. What is it? Would you recommend it? Or another?
I am so grateful for your videos. I am just starting out with the SkyGuider Pro with iPolar and a Williams Optics z61… and here’s my noobie question— do I point my camera towards Polaris whe I first start using this? does the Red Dot represent Polaris or will it align to any stars? Hope this makes sense. Thanks again!
General question:
Regarding the Ipolar, is is sensible to fit along with an Asiair Plus?