Astrophotography Gear Update
Despite the excitement of a moving into a new house under Bortle Class 6 skies, I’ve had a rough start to the new year in terms of astrophotography.
The weather has not been friendly, from -30 C nights to consecutive weeks of precipitation and clouds. However, this has given me some time to get my astrophotography gear organized in the garage for my next imaging session. My weather app shows that Saturday has a chance of clear skies for about 2 hours, and I’ll be ready.
In this post, I’ll provide an update as to the astrophotography gear I’ll be using next. My goal is that you find some inspiration in this setup, and to keep you guys up to date with the latest happenings in the AstroBackyard.
You can also stay completely up-to-date by subscribing to my newsletter: AstroBackyard Newsletter

Astrophotography Gear Update
As you progress in your journey of deep sky astrophotography, I think you’ll find that you gravitate towards equipment that delivers a painless and enjoyable experience. To me, this hobby is about more than just aperture and guiding accuracy. Yes, improving the quality of my images is very important, but its the road to get there that I think I enjoy most.
If you have been paying attention to the AstroBackyard YouTube Channel, it may appear as if I am collecting all of the latest and greatest gear to bring to show-and-tell. The truth is, if I don’t actually get a chance to use and share my experiences with these items, it’s of little value to the amateur astrophotography community.
We’re half way through the month of February, and I’ve got a staggering amount of exciting telescopes, mounts and accessories on loan for review. I’ll share more information about these products over the coming months, as I continue to educate myself about them and their intended purpose.
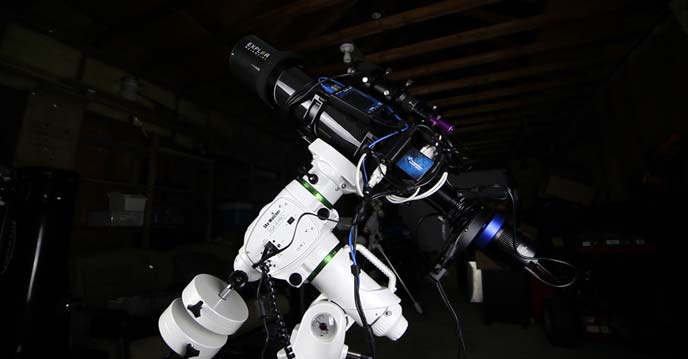
This post will focus on a deep sky astrophotography rig that I have set up in a semi-permanent fashion. This means that I can quickly set up this rig for some deep sky imaging if the weather provides an opening through the clouds. I do not own a permanent observatory, so everything needs to be carried from my garage to a spot in the yard.
This rig has been commissioned into action for this month based on the current temperatures and weather conditions I’ve been experiencing. Options such as a larger mount or telescope are reserved for more accommodating temperatures and predictable conditions.
Here is each piece of the deep sky astrophotography setup I have put together:
- Telescope Mount: Sky-Watcher EQ6-R Pro
- Primary Imaging Telescope: Explore Scientific ED 102 CF
- Primary Imaging Camera: Meade DSI IV (Mono)
- Reducer/Flattener: Starfield 0.8X Flattener/Reducer
- Guide Scope: Starfield 50mm Guide Scope
- Guide Camera: Altair Astro GPCAM2 Mono
- Filter Wheel: Xagyl 5-Position EFW
- Filters: Optolong LRGB Filter Set (2″), Optolong L Pro
- Motorized Focuser: Pegasus Astro Stepper Motor Kit and DFMC
- Accessories: Pegasus Astro Pocket Power Box, Kendrik Dew Heater Bands
As you can see, there are some familiar faces on this setup. There are also some exciting new additions such as the Meade Deep Sky Imager IV and Xagyl Filter Wheel. I have never captured images using a filter wheel before, so this should be an eye-opening experience.
Another noticeable change from my last deep sky setup is the use of a monochrome astronomy camera in place of the OSC (One-Shot-Color) ZWO ASI294MC Pro. The Meade DSI IV uses the same camera sensor found in the incredibly popular ZWO ASI1600MM, the camera behind countless jaw-dropping images from Chuck Ayoub, Dylan O’Donnell, and Diego Colonello.
Let’s take a look at each piece of the rig in detail.
Telescope Mount
The Sky-Watcher EQ6-R has been an absolute pleasure to use since it arrived in the fall of 2018 from Sky-Watcher. This computerized equatorial telescope mount is reliable and capable. The EQ6 model has been refined over the years, a big improvement over my old HEQ5 Pro SynScan in terms of build quality, technology and features.
It is a step up from the HEQ5 in terms of payload capacity as well, offering a commendable 44-pound payload. This is more than enough for most of the telescopes I use for astrophotography, including the Explore Scientific ED 102 CF refractor that’s currently riding on top.
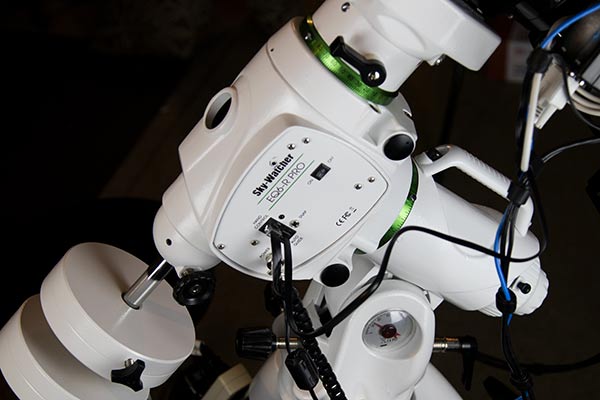
Sky-Watcher EQ6-R Pro Computerized Equatorial Telescope Mount.
I have yet to control the EQ6-R via my computer, tasks such as star-alignment and object slewing have all been accomplished using the hand controller thus far. While browsing the Cloudy Nights forum, I discovered an incredibly helpful article by John Upton about controlling SynScan telescope mounts from your computer.
The Sky-Watcher EQ6-R I have has the new Version 5 SynScan hand controller with the USB A-Male to B Male (Printer Cable) on the bottom. This does not require the use of the PC Direct Mode when controlling the mount using Astro Photography Tool (APT).
Long story short, I plan to leverage the power of ASCOM and PC control to further automate this setup over the coming months.
Primary Imaging Telescope
Ah, the Explore Scientific ED 102 CF. My reliable 102 is beginning to rival the number of imaging hours I put on the 80mm version of this triplet years ago.
The ED 102 has a practical focal length and ratio for most of the deep sky targets I am interested in capturing (714mm and F/7). The 102mm diameter gives it enough aperture to give it some extra light gathering power for faint nebulae and galaxies over a smaller refractor, yet it is still very lightweight and easy to manage.

Explore Scientific ED 102 CF Triplet Apochromatic Refractor.
I have taken countless images through the ED 102, but collecting light on deep sky targets in monochrome with a filter wheel is all new territory.
The reason I have chosen to enlist the old ED 102 instead of the Esprit 100 or William Optics Z73 is the modifications I have made to it. I have fitted a motorized focuser and focus motor controller box to this refractor to help me fine tune my focus on the fly.
I have photographed many incredible deep sky objects with this telescope over the past 3 years and highly recommend it to anyone looking for a high performance imaging APO for astrophotography.
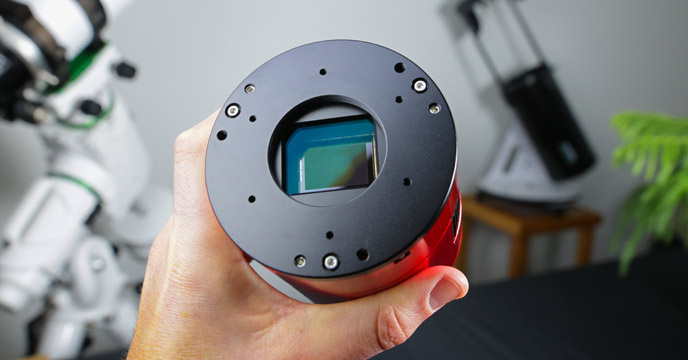
Primary Imaging Camera
The Meade DSI IV is a rather new dedicated astronomy camera in the amateur astrophotography world, and there is not a lot of information about it yet. Ontario Telescope and Accessories saw an opportunity for me to share information about this camera and dive into monochrome LRGB imaging.
When I learned that the Meade DSI IV mono houses the same sensor as the ASI 1600MM, I immediately agreed to this arrangement. The Meade DSI IV mono marks as a return to the dedicated astronomy camera market by Meade, and I have high hopes for this 4/3″ format 16 Megapixel CMOS sensor.

Meade Deep Sky Imager IV Mono CMOS Camera.
The thermo-electric cooler will ensure that my images are virtually noise free when compared to the images I capture on a DSLR. This camera requires an external AC power adapter to run the cooling system, and connects to my PC using a USB 3.0 cable.
I have installed all of the necessary software to run this camera using APT on my imaging laptop, and have tested everything out to make sure the images are recorded properly. I will not be using the included SkyCapture camera control software that was bundled with the camera.
Reducer/Flattener
I have always used a field flattener and reducer with the ES ED102 Triplet to maintain a flat imaging field of stars in my images. The Starfield 0.8X reducer/flattener is a perfect match for this telescope as it was designed for imaging refractors of F/5.5 and above.
This flattener requires 55mm of back focus, which I have achieved between the camera sensor on the Meade DSI IV and back of the flattener. The required distance was accomplished by using a t-mount adapter ring to thread the camera to the Xagyl filter wheel.
Threaded to the reducer/flattener, is an Optolong L-Pro light pollution filter. This 2-inch filter sits in front of the LRGB filter set residing inside of the electronic filter wheel (EFW). So, each colored filter in the EFW (and the luminance filter), will benefit from a a subtle reduction in the amount of artificial light pollution collected when imaging in the backyard.
This is a bit of an experiment, so I plan on imaging without this filter in the future to compare results.
Guide Scope
The autoguiding telescope is a Starfield 50mm guide scope. This miniature refractor telescope has a focal length of 190mm, and serves as a lightweight solution for autoguiding. I have used this guide scope on a few rigs now, and I enjoy the precision of the helical micro-focuser.
I’ve mounted the guide scope to the cradle ring handle of the ED 102, as there is a convenient slot to mount accessories using 1/4″ screws. This is better position than the default finder scope bracket that I have used in the past. The autoguiding combo now sits directly center over the primary imaging scope.
This mounting position also allows me to use a finder scope with the ED 102 and autoguiding combo attached, which is nice to have for my 3-star alignment procedure. Both the guide scope and finder scope add very little extra weight to this setup.

Starfield 50mm Guide Scope Package with Altair GPCAM2.
Guide Camera
The camera I am using on this setup is my well used Altair Astro GPCAM2 Mono. This camera is sensitive enough to provide accurate autoguiding results using the PHD2 Guiding software, and has proven to be a dependable little camera over the past 2 years.
Its low profile takes up very little space on the telescope and is virtually weightless. This autoguiding combo is a painless way to add some seriously powerful tracking abilities of your existing telescope mount without adding a heavy telescope or unneeded complexity to your setup.
The camera connects to to my USB hub with a USB A Male to B Male cable to display the live loop images on my PC, while the ST-4 cable communicates subtle commands to the EQ6-R for improved tacking accuracy via PHD.

The Altair GPCAM2 Mono Guide Camera.
Filter Wheel
This a new experience for me, and I am still getting used to seeing a big black plate in front of the camera. This is a Xagyl 5-position filter wheel with 48mm slots certainly requires some space, but this Xagyl model is only 0.7″ thick.
I’ve moved the imaging payload around with everything attached and balanced, and it appears as though I won’t have to worry about the filter wheel crashing into anything. I will certainly keep an eye on things, though.
With the included adapter from Xagyl, the filter wheel added an additional 19mm of back focus which I needed to account for when fastening the camera and flattener.
The filter wheel connects to my USB hub with a mini-USB cable, and thankfully does not require another power source and additional cord to my setup.

Xagyl 5-Position x 2″ Electronic Filter Wheel.
Camera Filters
The team at Optolong has provided me with a complete set of Optolong LRGB filters to use in conjunction with this monochrome camera. This is my first foray into the world of LRGB imaging with a monochrome camera, as I have never owned a filter wheel to automate the process.
These filters are the 2-inch (48mm) round mounted versions that I have carefully threaded into the Xagyl 5-position filter wheel. I have tested the selection of each filter using APT and everything appears to be working flawlessly thus far.
The images I take through the Optolong filters will showcase not only the potential of the Meade DSI IV mono, but the LRGB filter set as well. Unfortunately, I have nothing to compare them too, but I will produce a full-color deep sky image with this system so you can make an informed decision for yourself.

Motorized Focuser and Controller
I installed a Pegasus Astro Motorized Focuser on my telescope in late 2017. Since then I have enjoyed the added functionality of my ED 102, which comes in really handy when monitoring my gear outside remotely. I used to have to run outside to make a small tweak to my focus, which would often result in a lengthy back and forth process.
Now, I can make fine adjustments to the focus on the fly using a combination of Team Viewer for remote access of my imaging laptop, and the focus control panel in APT. As the temperature changes throughout the night, I often need to tweak my original focus position from the start of my imaging session.
Pegasus Astro Stepper Motor Kit and Dual Focus Motor Controller.
I simply observe any changes to the star sharpness and quality over the last few images, and make any slight adjustments as needed in between frames using the Pegasus Dual Motor Focus Controller (DMFC). APT provides useful HFD and FWHM metrics to measure the focus quality of your stars.
I have not experienced the autofocus feature in APT yet, but plan to investigate this further this year.
Accessories
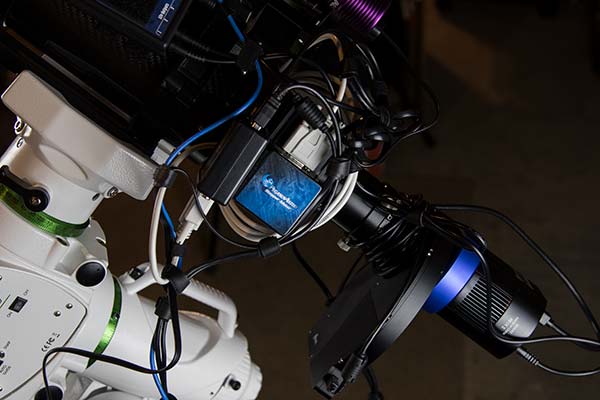
My favorite astrophotography accessory of this setup has to be the Pegasus Astro Pocket Power Box. If you remember my video from last year, this little blue box allows me to better organize and balance my deep sky imaging rig by connecting almost everything on top of the telescope.
It powers my primary imaging camera, DFMC, and 2 dew heater straps. This not only cuts down on the number of cables running from my power bar and computer to the telescope, but also allows me to control the output of each port remotely using dedicated software from my PC.

The Pegasus Astro Pocket Power Box.
I’ve also mounted an Anker USB 3.0 7-Port hub to the eyepiece tray spreader underneath the EQ6-R mount head. This gives me all of the USB ports I need for my astrophotography cameras and accessories.
I no longer recommend using this USB Hub. It has given me some trouble lately, potentially due to the cold weather. I have since upgraded to a StarTech 7-port USB Hub.
What I have plugged into the StarTech 7-Port USB Hub:
- Meade DSI IV Mono Imaging Camera
- Altair GPCAM2 Guide Camera
- Pegasus Astro Pocket Power Box
- Xagyl 5-Position Filter Wheel
- QHY PoleMaster Electronic Polar Scope
With all of the cables carefully run down from the telescope into the 7-Port hub underneath, I only need to connect a single USB 3.0 cable to my imaging laptop. I ordered a nice 9-foot A-Male to B Male USB 3.0 cable for this connection to give me some flexibility when setting up.
The computer I use for deep sky imaging is a portable laptop I purchased on Amazon last summer. This computer has all of the necessary software for astrophotography image acquisition installed such as APT, PHD2 Guiding, and the Pegasus Astro software for the Pocket Power Box (PPB), and DMFC.
To combat moisture on the objective lens of my primary imaging telescope and guide scope, I use Kendrick dew heater bands that are powered by the PPB.
The Bottom Line
Cable management was a top priority of mine, as the goal is to be able to control this mount remotely from inside the house when it gets too cold to be out all night. I’ve used over 25 Velcro ties to bundle up the cables as neatly as possible to avoid potential cables snags. Some soft tubing to completely conceal this cables might look best, but I’ll monitor how things operate like this first.
The entire imaging payload is balanced perfectly on top of the Sky-Watcher EQ6-R in both axis. I’ve pointed the telescope in almost every possible position, and nothing catches or strikes the tripod. I still do not feel comfortable slewing to a new target remotely (nor do I have the PC connection set up yet), so for now that operation will only take place when I am sitting next to the rig.
The most important aspect of this rig are the automation and portability qualities. What I mean by that is, I can quickly carry this rig out of the garage to set up and image on a night with a limited amount of clear sky time. Without the counterweights attached, I am able to lift the entire load up and place it in the yard without having to re-assemble it.
If the telescope were larger and heavier, I wouldn’t be able to do this safely without sacrificing my back or the chance of dropping something.
Once I set up the tripod and polar align the mount, I can perform a quick 2-star alignment and slew to my target. Once I am locked on and framed properly, I’ll head inside the house to monitor the imaging session using Team Viewer to access my laptop outside.
From here, I can make slight adjustments to focus and take images through each LRGB filter. I expect I’ll need a window of at least 3 clear hours to produce a color deep image using this system.
Now, if I could just decide on a target…
What’s Next?
You may have noticed the absence of some existing new astrophotography gear I have talked about over the past couple of months. Namely the ZWO ASIair WiFi camera control unit and the Celestron CGX-L telescope mount.
Both of these products will be used in the near future as the weather improves and I can dedicate longer periods of time under the night sky. The plan is to use the ASIair on the Celestron CGX-L, with the new Celestron 8″ RASA attached.
I’ve got a few other new products to share as well, so I hope you stick around to see them over the coming months. Until next time, clear skies.

Thanks for the breakdown. I’m glad to see Meade stepping up with the new camera. My first scope was a Meade so they’re a bit nostalgic with me. And thanks to Celestron for innovating, competition always improves the market which is better for all of us. I’ll be getting a RASA myself in the near future so I’m looking forward to your thoughts as you step away from the Refractors.
Hey Trevor – long time follower. I love your posts and videos. You mentioned 1/4” screws coming up through the handle I’d the ED102 to connect your guidescope but where is the finder scope attached? I have the ED102CF myself and figuring out how to mount both together has been a challenge.
Thanks
You are a talented writer, Trevor, thanks a ton for sharing your experience. Minus 30°C??? Warmest greetings from Okinawa.
Hi,
I have followed this site for a year or more. There are lot of interesting information about astronomy equipment. Partly same problem I strugle with. One example, the field flattener, here I change from a 2.5″ to a 3″ to handle the vignetting better:
http://www.astrofriend.eu/astronomy/projects/project-three-inch-flattener/project-three-inch-flattener.html
The camera is a Canon 6D full frame.
Lot of mechanical problem to solve.
Lars
You mentioned you will be using the ASlair again I n the near future. IIRC, your video (https://astrobackyard.com/zwo-asiair-review/) noted that it can only control ZWO cameras. How do you plan to integrate the new Meade?
Hi Trevor, and congrats for your great site and posts, I love them!
While looking at the video regarding your new setup, I thought it could be of interest sharing that, in order to move easily in and out my setup, I swapped the original EQ6R tripod with the “Skywatcher EQ6R Pier”, that is natively equipped with three wheels for small translations. It is a detail, but an important one as the transfer is now smoother and more ordered for me.
I will stay tuned with your updated configuration testing – enjoy it!
Mau
Thank you, Mau! I have just looked at that pier for the Sky-Watcher EQ6-R (https://bit.ly/2Xl959J) – And you’re right, that looks like an improved way to transport the mount from the garage to the yard. I will look into this option for the future! Thank you, and clear skies!
Glad to see you managed to describe the weather without having to resort to 4 letter words 🙂 Just ordered the Pocket Power Box, since I have nothing better to do until the skies clear! Would love to see you do a quick video tutorial series on “Astrophotography Tool for dummies”.
Are you hitting NEAF this year???
Hey Trevor, I enjoy your YouTube channel & grateful for all the instruction you give on equipment. I ask when are you going to give instructions on Plate Solving? I here plate solving can save a lot of time. Please do a YouTube video on plate solving & the various programs that offer plate solving & give us your take on which program would be the easiest to use for plate solving. Thanks & Clear Skies…
Hi Trevor,
Our skies have been binocular-interesting, in Ann Arbor and at the Dark Sky State Park near Adrian. However, the light pollution has become more and more crazy-making.
We are on a very limited income, don’t need to record (but would enjoy it) and are certainly not able to think about cool accessories.
I am wondering what you would suggest for moving to a telescope and if you know of any reputable sites for finding better than adequate equipment.
BTW, we are waiting with bated breath for the first Black Hole photographs.
Thank you kindly,
Laurie