Do You Need a Telescope Filter Wheel for Astrophotography?

I’ve recently upgraded my Explore Scientific ED102 with a telescope filter wheel that allows me to quickly change filters. The Xagyl 5-position, 2-inch filter wheel was designed to help automate your astrophotography image acquisition process by electronically aligning each filter over the camera sensor.
A telescope filter wheel can streamline your astrophotography acquisition process by allowing you to change filters without removing the camera. An electronic filter wheel adds a layer of automation to your deep-sky imaging rig, as you can now change filters using dedicated camera control software.
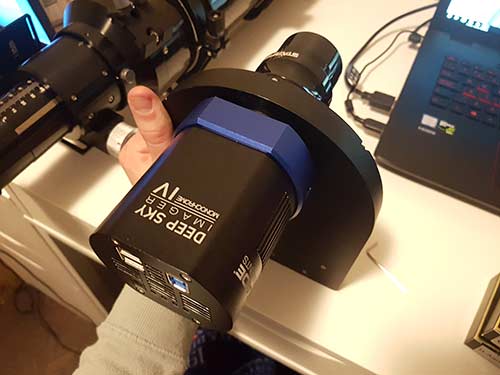
In this post, I’ll share my results using a new Xagyl electronic filter wheel for deep sky astrophotography in my backyard. The camera used in this post is a Meade DSI IV (monochrome), with a set of Optolong 2″ Mounted LRGB filters.

Who Needs a Telescope Filter Wheel?
As I continue my journey in amateur deep-sky astrophotography, I stumble over an endless supply of new tools and accessories to aid in the process of capturing better images. From portable power supply boxes to focusing masks, each item has an important role to play.
The great thing is, a deep sky rig can be built piece by piece, with little more than a camera, telescope and tracking mount needed to start. Gradually, you can add new upgrades to your kit to help capture images in a more automated fashion.
A filter wheel was a long-overdue upgrade for me, as I have been manually swapping out camera filters for several years. For a long time, these were DSLR clip-in light pollution filters that could quickly snap into the body of the camera.
Multiple-Filter Projects
When I began using dedicated astronomy cameras such as the ZWO ASI294MC-Pro, I transitioned to 2-inch threaded filters that fasten directly to the nosepiece adapter. Although this is a one-shot-color camera, I experimented with several narrowband filters such as the Astronomik 12nm Ha and the STC Astro duo-narrowband filter.
This is when I began to feel the sting of having to remove the camera from the telescope and thread a new filter to the nosepiece. Aside from having to manually take the imaging train apart, the ordeal also involved re-focusing the camera and venturing back outside in the middle of the night.
Because of this, I would avoid projects that involve multiple filters, and stick to images that could be completed in a single night, with only one filter. As any experienced amateur astrophotographer will tell you, this is not the best way to build an impressive image.
The instant gratification of capturing a color image in one night is great, but you are missing out on some really amazing data. By leveraging the power of narrowband imaging with a monochrome camera, you can maximize the amount of signal you collect for your image.

A Must for Monochrome Cameras
To complete a full-color astrophotography image using a monochrome camera, you must shoot through colored filters. For me, that meant manually threading each 2-inch RGB (Red, Green, Blue) filter on to the camera and focal reducer before taking each color. Until now!
I can tell the Xagyl 5-position filter wheel to switch to whichever filter I want using the included standalone software. Applications such as SGP (Sequence Generator Pro) and APT (Astro Photography Tool) also support the control of this filter wheel and many others. Using TeamViewer to remote-in to my rig, I can (for the first time) change filters without stepping outside.
Now, I can “build” a full-color image in one night by dividing up my overall imaging time between each LRGB filter with the monochrome camera. For an adequate amount of overall exposure time, I’ll likely shoot over several nights. The signal-to-noise ratio will be much stronger than my one-shot-color images of the past.
This is because I am now benefiting from all of the light hitting the sensor, rather than dividing it up into the Bayer pattern of a color camera. A filter wheel provides me with a practical solution for dividing up the light I collect on a deep sky object.
Automate your Image Sequence
How much time am I saving by not having to remove the camera and thread a new filter in? Manually changing filters involves touching the camera and telescope each time, which can be another opportunity to introduce issues to balance or focus. It’s best to make adjustments to the rig remotely, whenever possible.
Perhaps the most powerful benefit of a filter wheel is the new sequencing capabilities available using camera control software. For example, SGP allows you to set an imaging sequence that will automatically switch filters between image sets.
So, I could tell the software to capture 30 images in red, 30 in blue, and 30 in red. When the sequence has finished, I’ll have an equal amount of exposures in RGB to create my final image.
Because the Xagyl filter wheel includes 5 slots in total, I can also utilize the included dark frame filter disk (all black) and an IR cut luminance filter.
As I said earlier, my imaging project often includes data captured over several nights, but it’s possible to capture a limited number of frames from each filter in one night.
The Filter Wheel I Use
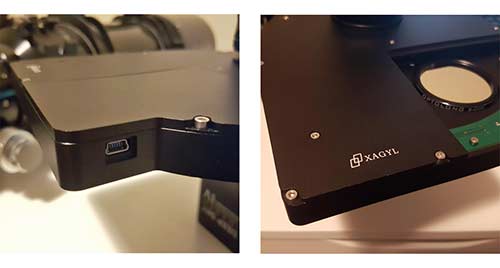
I chose the Xagyl 5-position filter wheel for 2-inch filters to utilize my existing Optolong RGB and narrowband filter set. Xagyl filter wheels are made in Canada, and have a long-standing reputation of making high-quality filter wheels for amateur astrophotographers that demand the best.
An interesting feature of the Xagyl filter wheel I experienced first hand, was the self-centering system that uses magnets to align each wheel position.
When I gently push on the wheel carousel (simulating the pressure of threading a new filter in), the carousel automatically returns to an aligned position that ensures that the image sensor centered and not blocked by the wheel.
Xagyl 2-Inch 5-Position Filter Wheel Specs:
- Type: 5 x 2″ Motorized Filter Wheel
- Platform: ASCOM
- Size: 7.6″ x 8″
- Thickness: 0.7″
- Connection: Mini to USB (2.0)
- Power Supply: None (USB powered)
- Included Adapters: T-thread with locking ring, 2″ nosepiece

Adding Filters and Controlling the Device
To add filters to the filter wheel, I simply removed the small door to access the carousel with the supplied 2mm Allan key. Then I manually moved the wheel to thread in each 48mm filter securely. The order I put the filters in was as follows:
- L (UV/IR Cut – Luminance)
- R (Red)
- G (Green)
- B (Blue)
- Dark Filter
This is a popular order of rotation to use in a telescope filter wheel, and it made the most sense to me. You can use whichever order you would like, as these filter wheel positions can be assigned appropriately later in your camera control software.
To control this ASCOM filter wheel, I use Astro Photography Tool. Installing the software was quick and easy, using the Xagyl drivers on the Starfield Optics website. The filter wheel connects to my imaging laptop via a mini USB cable, and was recognized in the “connect focuser” tab of APT right away.
I then assigned the 5 filter positions to the corresponding Optolong filters, and away I went. I can set up an entire sequence of image exposures in the APT software to to collect light through each filter, including the necessary dark frames.
Finding the Correct Spacing
When using this the Xagyl filter wheel with my Starfield 0.8X reducer/flattener on the ED102, the required back focus is 55mm. This requires me to use the supplied T-thread adapter with integrated locking ring to fasten my camera up against the filter wheel. The locking ring allows you to position the camera sensor at the distance you want, and lock it in.
The amount of required spacing will depend on the field flattener/reducer you use. You can usually find this key information on the product page of specific field flattener/reducer you are using.

It’s important to square up the camera sensor with the filter wheel when attaching your camera. Any extra time spent during this process will be worth it in the end, as there will be no need to remove the camera from the assembly until you are ready to replace the filters in the carousel.
It’s a tight spot, so it may be hard for you to fit your fingers in to tighten the threaded ring. You can either use a set of needle-nose pliers to tighten it or ask your wife to help if she has small fingers. (Guess which approach I took?)
My LRGB Filter Set
The filters I am using with this filter wheel are the Optolong 2″ round mounted versions. This set of LRGB filters was designed to be used with a monochrome camera such as the Meade DSI IV. They block the the infrared wavelengths from 700nm to 1100nm of the light spectrum, so I do not need to use a separate UV/IR cut filter in front.

Each filter is constructed using a 2mm Schott B260 substrate material with multiple layers of anti-reflection coatings. The L filter (luminance) is simply a UV/IR cut filter that will collect pure monochrome light signal from my target.
To help reduce light pollution in each color channel, I will thread an Optolong L-Pro filter to the reducer that enters the telescope focuser. This will apply the benefits of a mild broad-spectrum light pollution filter in front of each LRGB image set.
Do you Need to Re-Focus Between RGB Filters?
This was a question I had early on, so I will share my findings. The popular opinion is that, yes, you should refocus after changing between each RGB filter (and your UV/IR filter). The focus will be very close, but I would rather be sure before collecting more data.
The red and green filters are said to be extremely close in terms of focus, but the blue filter is the one to watch out for as the focus distance can change considerably. A motorized focuser is best in these situations, as you can easily make micro-adjustments without touching the telescope.
I use a Pegasus Astro Motorized Focuser on my Explore Scientific ED102, that I installed in late 2017. This stepper motor and controller can be controlled using the Pegasus Astro standalone software, or with APT. As I collect light through each LRGB filter, I make any focus adjustments needed for optimal results.
Camera control and sequencing software such as APT and SGP have the option of storing focus information on a per-filter basis. So in the future, I’d like to leverage this feature to automate the focus settings as a part of my overall imaging sequence.
Final Thoughts
I have not used the popular ZWO EFW filter wheel for comparison, but the Xagyl model has been a pleasure to use thus far. It would be nice to control a ZWO filter wheel using the ASIair, but now I am just getting greedy. The Xagyl unit I have is very thin and lightweight, with no protruding parts.
For someone who is not used to having an extra accessory of this size at the camera end of the telescope (especially considering it’s a 2-inch carousel), I was quite surprised at how light and low profile the Xagyl filter wheel really is.
The price of the Xagyl telescope filter wheels is comparable with models from ATIK, QHY, and Starlight Xpress. The ZWO filter wheels are the exception, offering a lower price on their large electronic filter wheels than the others.
What separates this Xagyl model from the competition, is the design, and unique self-centering magnet system. The slender 0.7″ design does not have any protrusions such as a motor sticking out which helps to reduce the chance of a snag.
A motorized telescope filter wheel is an essential accessory if you plan on creating full-color images using a monochrome camera. I’ve spent long enough avoiding multi-filter projects due to complexity. From now on, I’ll apply my filters remotely (from in the house)!