How To Take Pictures of Stars & The Night Sky

Here are the exact camera settings I use to take pictures of stars with a DSLR camera and lens. The following steps will help ensure that your photos are clear and sharp and include plenty of stars in the night sky.
- Mount your DSLR to a tripod to avoid camera shake
- Set the aperture (f-stop) on your camera lens to f/4 or lower
- Set your camera lens to manual focus mode
- Set the white balance mode on your camera to ‘daylight’
- Set the exposure length between 15 and 30 seconds
- Select a high ISO between 400 and 1600 (or more)
- Use the live-view screen to zoom in on a bright star and focus the lens
- A wide-angle lens is best for avoiding star trails during long exposures

For the best results, set your camera up at a location well away from the city lights. This will reveal the fainter stars and constellations in the night sky and avoid a washed-out-looking photo.
You can try using the 500 rule, to maximize your exposure time while retaining round stars without blurring them. This is not an exact science but a helpful starting point for star photography.
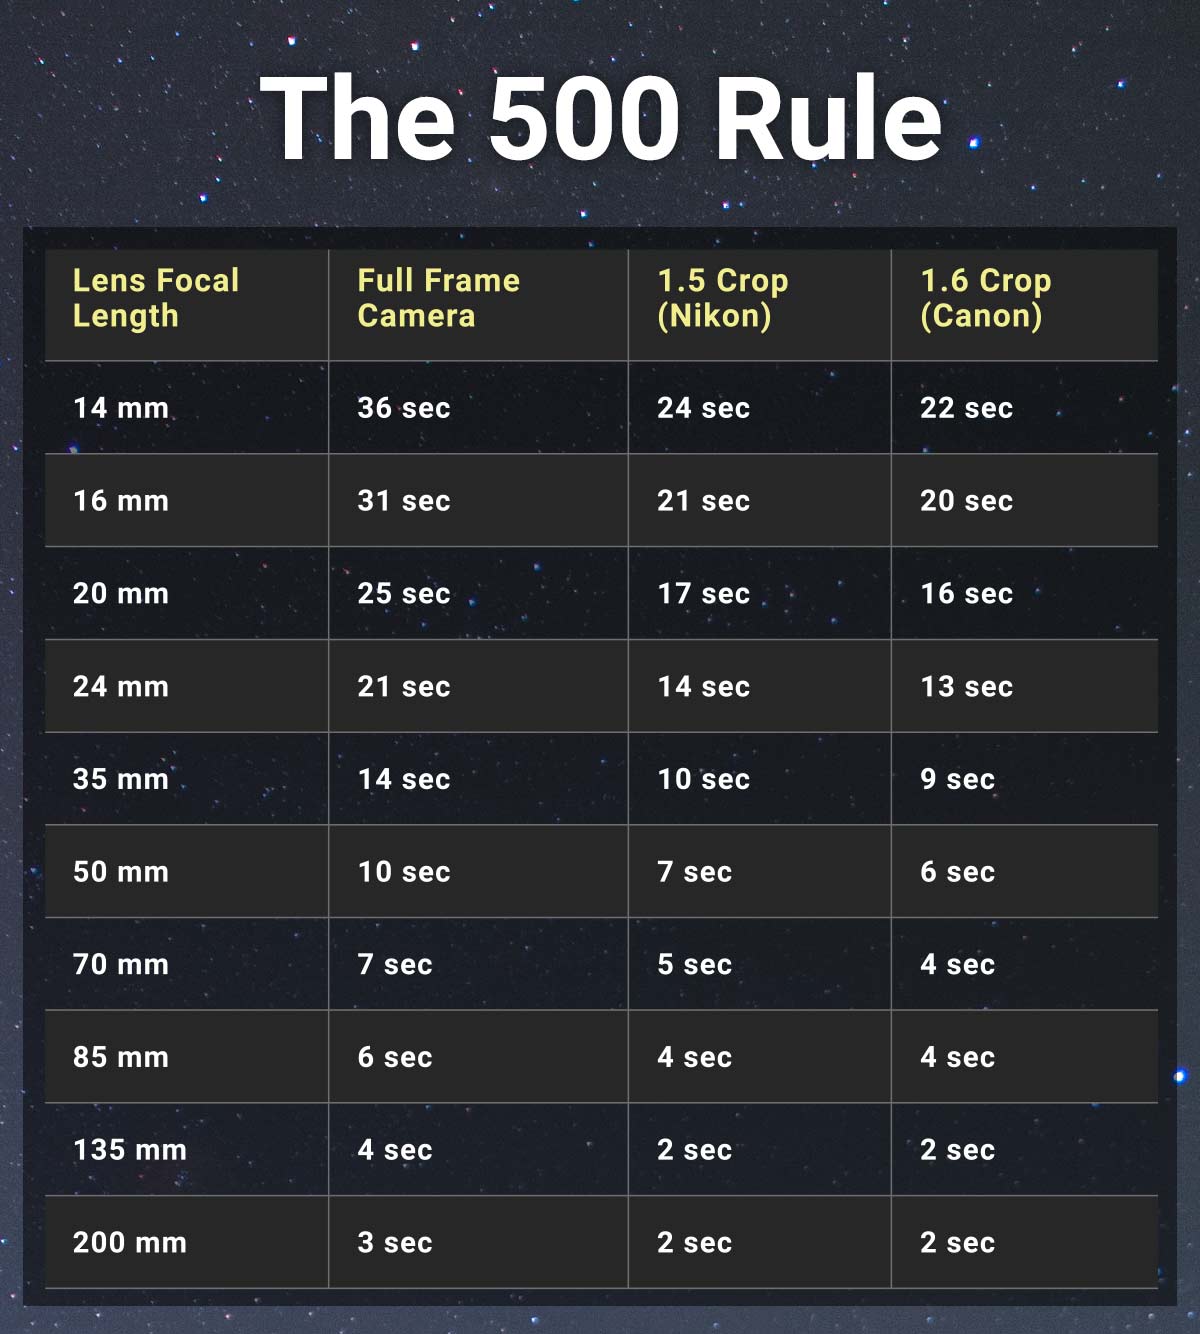
Use this handy reference chart to choose the best shutter speed for star photography.
With a bit of practice, you will be able to capture beautiful star pictures – full of colorful, sharp, glimmering points of light in the night sky. Let’s look at specific ways to capture impressive photos of the stars and planets in the night sky.

Related Post: How To Take Pictures of the Moon (with any camera)
Types of Star Photography
There are many creative ways to take pictures of stars using your digital camera. Night sky photography is all about understanding how your camera can collect light by balancing ISO, aperture, and shutter speed.
With a stationary tripod and an entry-level DSLR camera and lens, you can explore the world of nightscape and starry sky photography. This is how I started my astrophotography journey, and it has enriched my life in unimaginable ways.

Colorado Star Trails by Joel Tonyan (Flickr)
Star Trails & Light Painting
Light painting is a creative photography technique that adds an additional element to a night sky scene. It uses long exposures to create images filled with dynamic, glowing trails of light.
This method is often used to illustrate the Earth’s rotation through star trails but can also be applied to urban landscapes and natural settings for a creative touch.
Many people like to experiment with different light sources, such as flashlights, LED strips, or sparklers, as each can offer unique effects. When you incorporate movement into the light source, you can generate interesting patterns and shapes.
Time Lapse
Time-lapse astrophotography involves taking a series of photos at regular intervals and combining them into a video to highlight changes over time, such as the motion of the stars or the progression of a lunar eclipse.
Use a remote intervalometer or your camera’s interval shooting feature to automate photo capture. This ensures precision and allows you to focus on other elements of your shoot.
Afterward, compile and enhance your images with video editing software to create a captivating time-lapse video, adjusting speed and adding transitions or music for a more immersive presentation.

The Big Dipper Asterism in the night sky. Trevor Jones.
Nightscapes
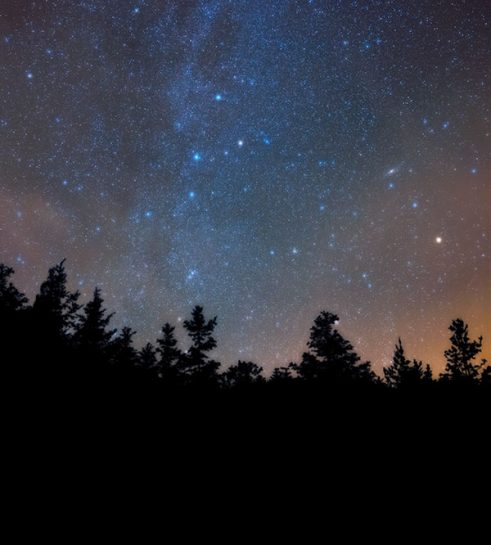
Photographing nightscapes creates a beautiful outdoor scene at night, incorporating celestial details that are more dramatic than the naked eye can see.
To achieve the best results, use a DSLR or mirrorless camera with a wide-angle lens and a large aperture (f/2.8 or lower) to capture more light and detail.
A star tracker or equatorial mount can also improve your images by compensating for Earth’s rotation, allowing for longer exposures without star trails.
![]()
Telescope Close-Ups
Using a telescope for astrophotography allows you to capture stunningly detailed images of celestial objects, but it requires more specialized equipment than standard photography.
To achieve the best results, select a telescope with a large aperture and high magnification to gather more light and reveal finer details. Some popular subjects include the planet Saturn and the surface of the moon.
Attach your camera to the telescope using a camera adapter for precise imaging, and ensure your setup is stabilized with a sturdy equatorial or alt-azimuth mount to avoid vibrations.

The surface of the moon through a telescope. Trevor Jones.
How To Take Pictures of Stars and Planets with Your Camera
If you are wondering how to take pictures of stars and the alluring wonders of the night sky, look no further. In this article, I’ll share an absolute, bare-bones approach to capturing a spectacular photograph of the stars above the one below.
This includes covering which camera to use, the exact camera settings I recommend, and the right conditions for a successful photo. I’ll also cover some of the next steps to consider for night sky photography, including recommended light pollution filters, and an introduction to star trackers.
Anyone with access to a DSLR camera and a tripod (or a steady surface) can take stunning photos of the night sky with all its glorious stars. You will even start to see some Nebulae, Galaxies, Globular Clusters, the Milky Way, Meteorites, Auroras, and more.
If you own a point-and-shoot (compact) camera or are just using your smartphone, you will need to use the manual settings to shoot long-exposure images.
Smartphones like the Google Pixel 9 (with astrophotography mode), and newer iPhone, Samsung, and Huawei models are getting better at low-light photography, but the small sensors will limit your success. You may be able to get some decent pictures of stars in the night sky with these devices, but for the best results, you need to get your hands on a DSLR or mirrorless camera.
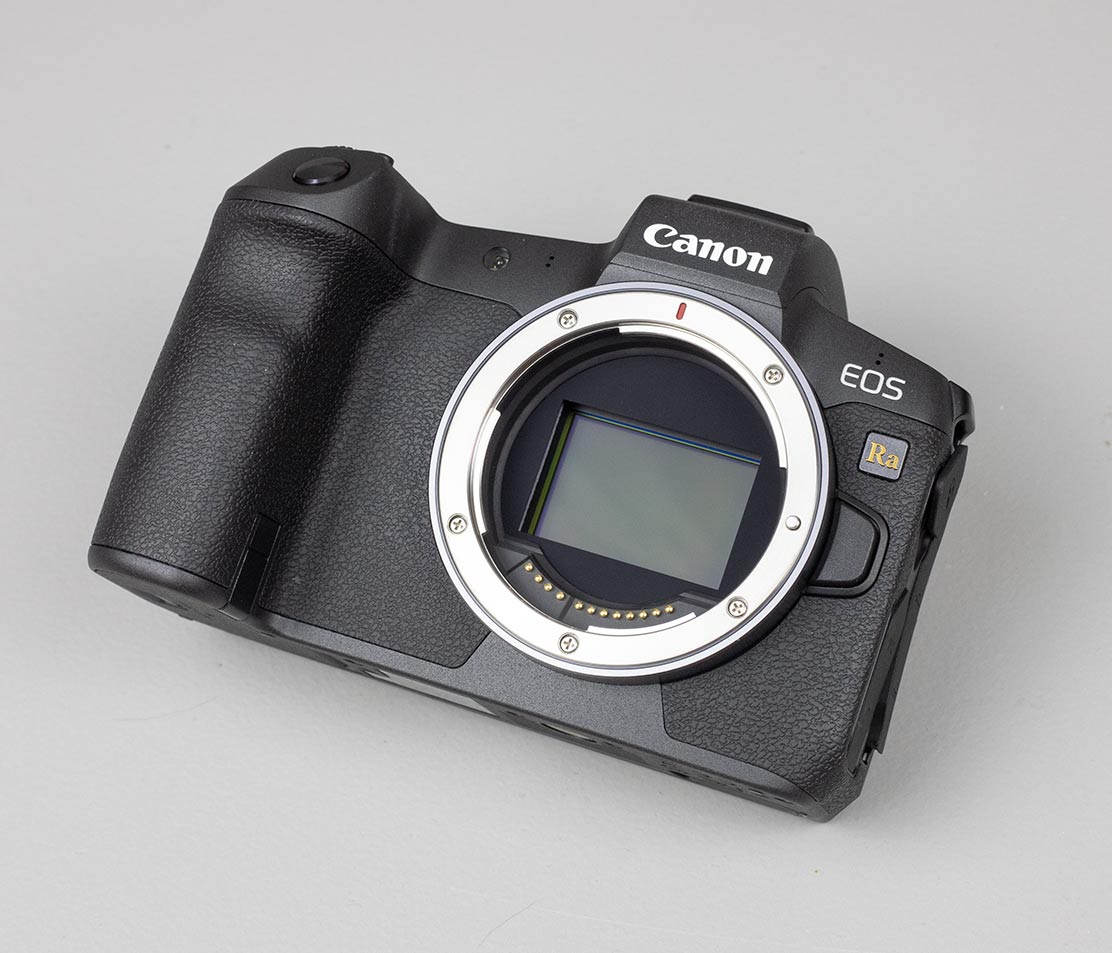
Canon’s mirrorless astrophotography camera, the Canon EOS Ra.
The good news is that you don’t need an astrophotography camera like the Canon EOS Ra to photograph the night sky successfully. Even an entry-level DSLR camera (such as the Canon EOS Rebel T7i) can produce spectacular results.
Take Stunning Pictures of the Night Sky
Taking pictures of a starry sky (nightscape photography) is a wonderful experience that may help you learn some of the constellations as well. A camera sensor, like the one in your DSLR, is capable of recording much more light than our eyes can see. This is why we are able to enjoy much more detail in a photograph than with our naked eye alone.
Whether you are just getting started with a new camera or have just never attempted night photography before, the simple steps below should give you a strong foundation to put into action the next time you are under a clear night sky.
![]()
Related Post: 7 Astrophotography tips to put into action, tonight
The process of collecting long-exposure images at night is very different from regular daytime photography. Focusing the lens, keeping the camera steady, and choosing the right subject for your setup are critical steps of the process.
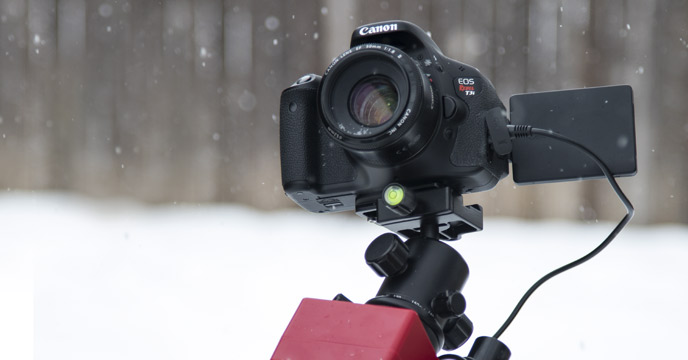
The Basics: Camera Equipment
As I mentioned, there are plenty of suitable cameras for night sky photography, but some will give you more control (and better results) than others. For example, those of you who have access to a DSLR or mirrorless camera with detachable lenses have a huge advantage.
For this type of photography, remember to keep things lightweight and portable. For a great shot of the stars, you may find yourself traveling to a distant location.
Here is a promising, entry-level night sky photography setup:
Essential:
- DSLR Camera (Or mirrorless body)
- Wide-Angle lens (24mm or wider is best)
- Sturdy Tripod (Lightweight)
- Red Headlamp (To see at night without ruining your “night vision”)
- Memory Card (Easy to forget)
- Spare Camera Battery (Especially in cold weather)
Extras:
- Planetarium Smartphone App (to help you locate objects in the night sky)
- Remote Shutter Release Cable (To avoid camera shake and set sequence)
- Heated band and controller (To prevent moisture on the lens)
- Light pollution filter (Depending on location)
- Star Tracker (To take exposures longer than 30-seconds without star trailing)
Getting Started
Have you ever tried to take a picture of the moon at night? Chances are (if you are new to astrophotography), the results were less impressive than you had hoped. Well, taking a successful image of the stars in the night sky can be even trickier.
This is because night photography is unlike daytime photography and creates many new challenges. Low-light situations require a completely different approach to photography than you may be accustomed to. It is not possible to take pictures of stars using the “auto” mode on your DSLR camera, because it was not designed to record a nightscape image.
Instead, you’ll need to use a specific set of camera settings that allow you to capture long exposure images of the night sky and all of the wonderful treasures found within it. The cameras used for the images in this guide were all Canon EOS Rebel-series DSLR’s.
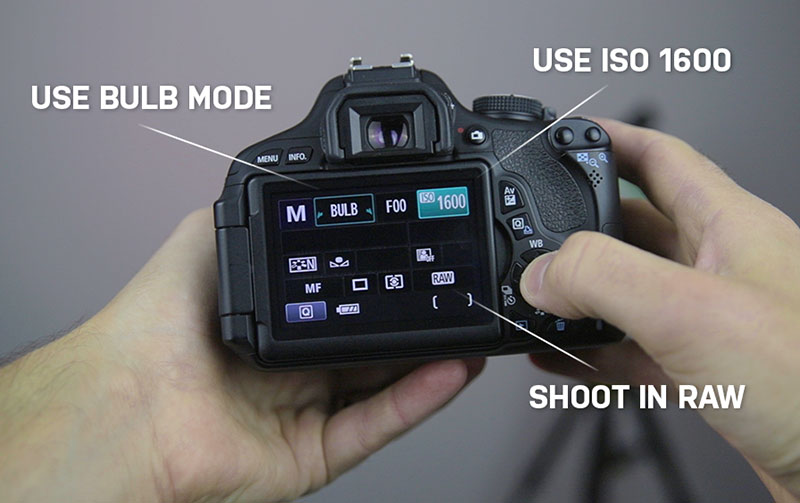
Step 1: Camera Settings
The first thing you will need to understand is that in order to capture enough light for your camera’s sensor to pick up lots of stars in the photo, you need to take a long exposure photograph. This can range from 5-30+ seconds depending on your equipment and conditions. To do this, you will want to make sure your DSLR is in Manual Mode.
Manual mode gives you complete control over each internal camera setting, and it can be a bit daunting to shoot in this mode for the first time. Manual mode is indicated by an M on your camera’s dial (Canon or Nikon).
The camera settings available to customize in this mode include:
- Aperture (F-Ratio) of the camera lens
- ISO (Sensitivity to Light)
- Exposure Length (How long the shutter stays open)
- White Balance (Daylight, Auto, etc.)

These variable camera settings will change depending on the camera lens you are using. For example, if you are shooting with a lens that has a focal length of 18mm or lower, you shouldn’t see any star trails (due to the rotation of the earth) until you shoot an exposure of 20 seconds or longer.
Some photographers like to refer to the 500 Rule to determine the perfect exposure length for them to shoot using a particular camera and lens combination.
Wide-angle lenses (such as the Rokinon 14mm F/2.8) have an extremely large field of view, which not only capture more of the sky in a single shot but are also more forgiving in terms of star trailing. A lens with a longer focal length (such as the Canon 50mm F/1.8) will capture a higher magnification image, but stars will begin to trail much sooner.
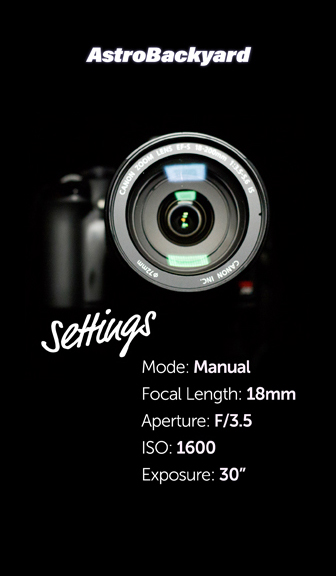
For the guide below, I used a Canon 18-200mm F3.5 lens, at the widest focal length of 18mm.
Exposure
The maximum exposure length you can shoot is generally limited to the focal length of your camera lens. Unless you are intentionally trying to capture a star trail image, this exposure will likely be under 30-seconds. If you want to shoot longer than that, a tracking camera mount is needed.
If your exposure time is limited to under 30 seconds on a stationary tripod, you’ll need to experiment with the other camera settings that affect the amount of light captured in a single shot. The focal ratio of your lens (e.g., F/2.8) can make a big impact on collecting light in a short period of time.
This is called aperture, one of the most important camera settings to consider when taking pictures of stars.
Aperture
On my camera lens, that is a setting of F3.5. The lower the F-number, the more light the camera brings in.
ISO
The next setting you will want to adjust is ISO. This is the camera’s sensitivity to light, which is very important for our purposes! Generally, you will want to use the highest ISO your camera has, which may be 1600, or even 6400 or higher.
Increasing your ISO will introduce more noise to your photo, but the trade-off is more stars and more light-gathering ability. You may want to use a lower ISO if you are finding your photo to be too noisy. Modern photo-editing software tools like the Adobe Camera Raw noise filter in Adobe Photoshop do a great job.
White Balance
For our purposes, Auto White Balance or Daylight White Balance works just fine. You also want to make sure that you are shooting your photos in RAW format. This gives you the opportunity to really bring out the images full potential in post-processing. You will need Adobe Photoshop to make these adjustments, so if you don’t have it, a .JPG photo will have to do!
Step 2: Setting up your camera on the tripod
Now that you have the proper settings for nighttime photography, you are ready to point your DSLR to the heavens and capture more stars than you have ever seen with your naked eye alone! Securely fasten your camera to your tripod via the removable mounting plate. Make sure that all of your adjustment knobs are tight before leaving your camera on the tripod. DSLR’s can be heavy, and you will be angling the head straight up in some cases.
Focus
To achieve a proper focus on the stars, do not use autofocus. Manually focus your lens to infinity, then focus back a hair. Take some test shots and try to get the stars to look as tight as possible. Another way to achieve focus is to use the live-view mode of your camera, and focus on something far away (like a street lamp). Zoom in while in live-view to really get it right.
Star Trails
In a 30-second exposure, you will notice small star trails because of Earth’s rotation. (Yes, even in 30 seconds!) The star-trailing is subtle and will not affect the overall look you are trying to achieve. If the stars are trailing too much for your liking, consider reducing your exposure to 20 seconds.
Step 3: Take the shot!
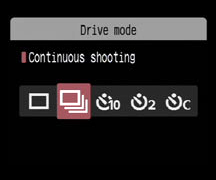
Activating the Shutter
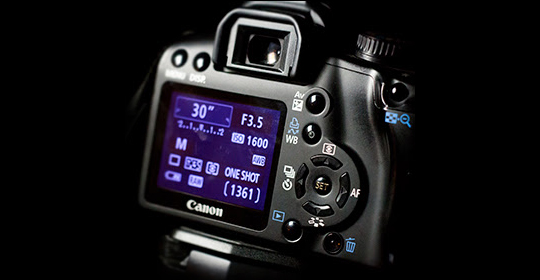
Set your drive mode to a 2 or 10-second delay to avoid shaking the camera slightly when activating the shutter. You can find this option in the Even the slightest movement (like pressing the shutter button) can be enough to create a shaky shot! The drive mode option screen should look something like this:
Things to keep in mind
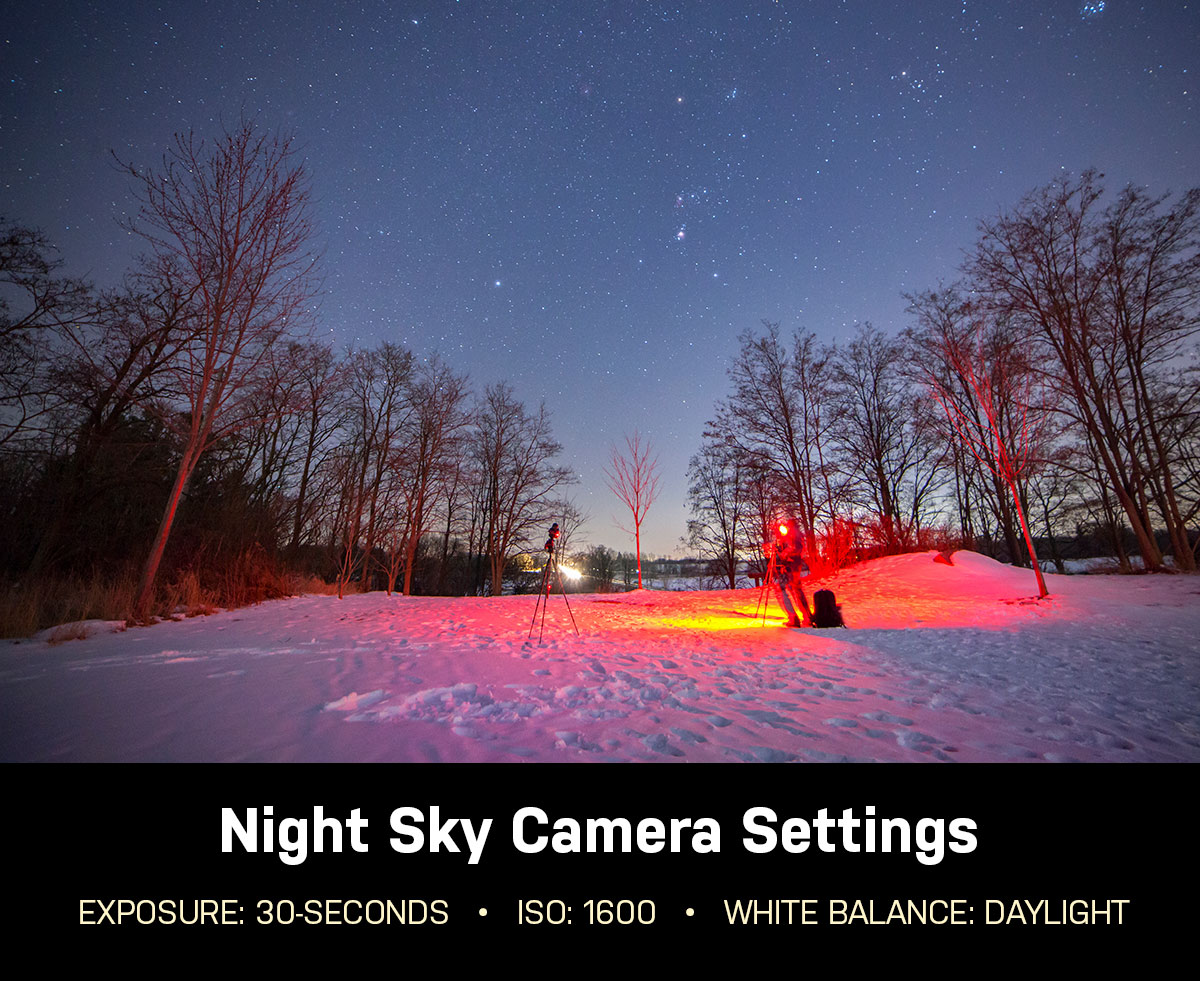
Make sure that your lens has not fogged up, or your shots will look blurry. A blow dryer will remove dew if necessary. Light pollution is your biggest enemy when it comes to astrophotography. Get as far away from city lights as possible for your star shots. If there is a city glow near you, point away from it. You may find that a shot in the city using a high ISO and long exposure produces a very bright, washed-out photo. If this is the case, bump your ISO down and shoot a shorter exposure. Eg. (ISO 800, 15 seconds)
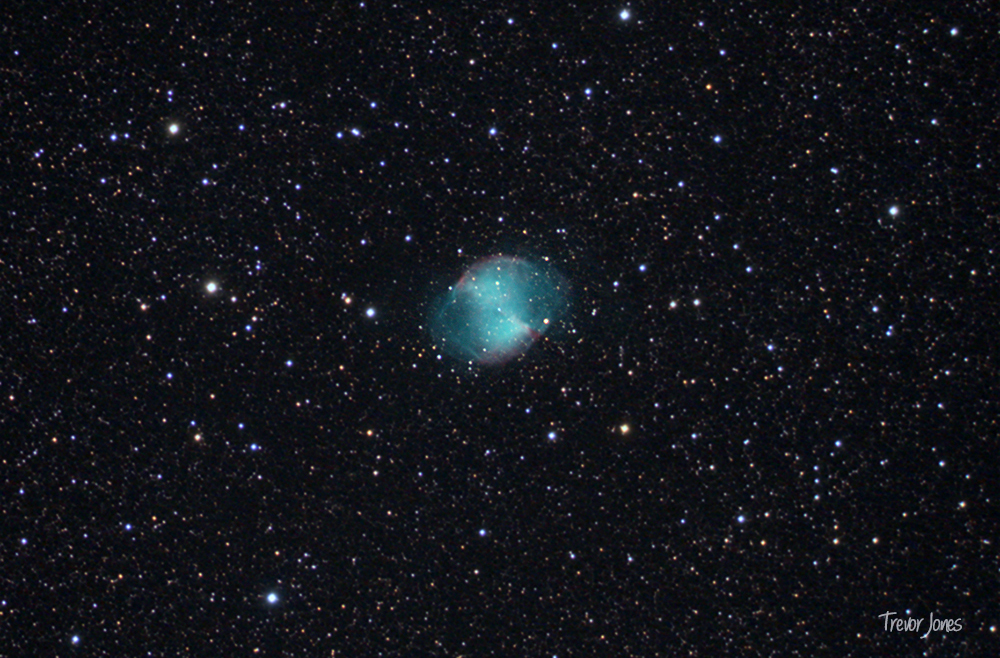
Next Steps: Stacking Exposures in Photoshop
One of the most effective ways to produce an attractive image of the night sky is to take advantage of a technique known as image stacking. This involves placing multiple images on top of each other as layers in Adobe Photoshop.
There are also a number of dedicated tools to accomplish this task, including DeepSkyStacker and Sequator. I recommend trying the manual method of image stacking first, to see the power of signal-to-noise ratio in action first-hand.
To create the image below, I manually stacked 5 x 30-second exposures shot at ISO 3200 in Photoshop. The key is to reduce the opacity of each layer gradually.
This picture was created by stacking 5 x 30-second exposures in Photoshop.
The next time you are out taking pictures of the night sky or the Milky Way, be sure to take a series of 30-second images rather than just one or two. Aim to capture about 10-20 pictures to realize the benefits of image stacking.
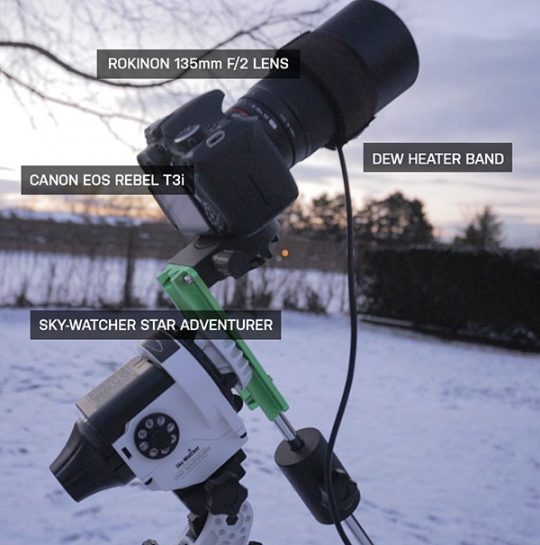
Next Steps: Use a Star Tracker
A portable astrophotography setup like the one pictured below is capable of capturing incredible deep-sky objects in the night sky. The Sky-Watcher Star Adventurer Pro is capable of tracking the night sky with a DSLR camera and a telephoto lens for long-exposure images.
A portable deep-sky astrophotography setup.
A star tracker opens up the door to more ambitious astrophotography projects such as faint, deep-sky nebulae and galaxies. The setup shown above was featured in one of my videos where I photographed the Horsehead Nebula from my backyard.
The same basic principles of long-exposure night sky photography apply to this configuration. The only difference is that the star tracker allows me to shoot exposures of up to 3 minutes in length without worrying about star trailing.
This article was originally published in October 2013 and was last updated on August 21, 2024.
Trevor Jones is a deep-sky astrophotographer and valued member of the RASC. His passion is inspiring others in their astrophotography journey on his YouTube Channel so they can appreciate the night sky as much as he does. His images have been featured in astronomy books & online publications, including the NASA Astronomy Picture of the Day (APOD).
Related Content:


Dear sir please can you help ive been doing astronomy from the age of twelve mainly planetary
Did film developed my own etc now iam seventy doing digital nothing special astro video and ZWO camera for solar system imaging
I saw your site very impressed
Now trying dslr imaging of constellations etc when imaging inraw in deep sky stacker hoh do i downlod my images when isave to file after stacking cant seem to find the fil only autosave
yours john south wales uk
Great guide, very helpful for beginners getting into night sky photography. For anyone who wants a simple step by step breakdown of camera settings, focus, and exposure, check out How Do I Set Up A DSLR To Take Photos Of The Stars?. It explains everything in a clear and practical way.