Andromeda Galaxy Astrophotography Tutorial
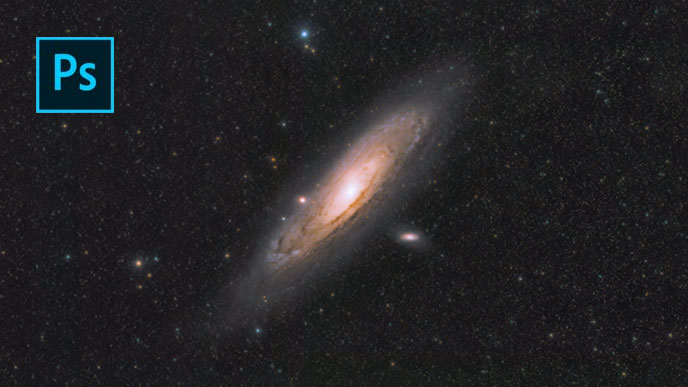
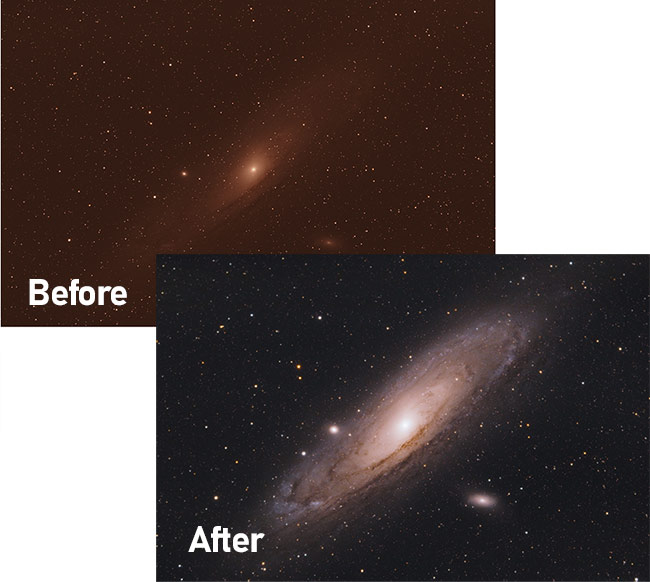
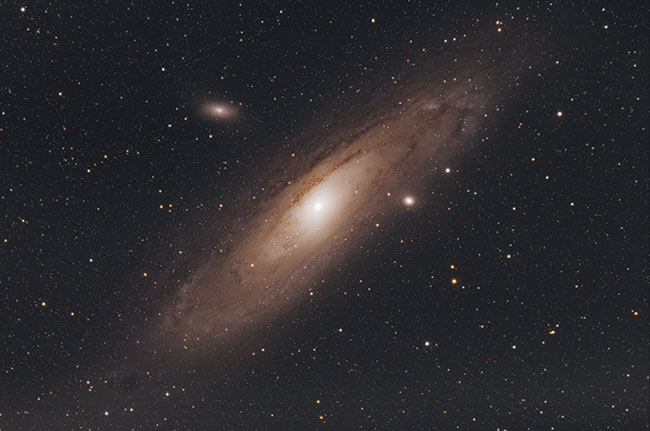
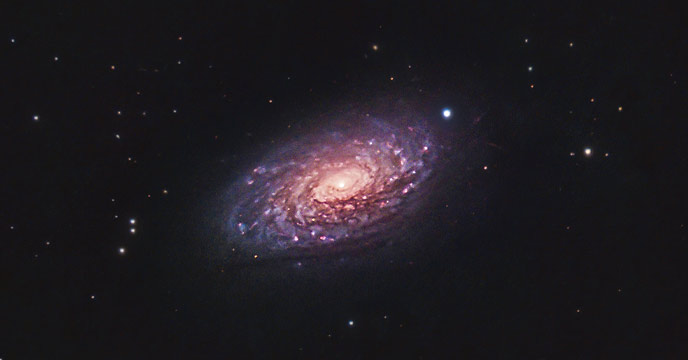
In this post, I’ll walk you through the image processing steps I used to create the image of the Andromeda Galaxy shown below. This astrophotography tutorial uses Adobe Photoshop to bring out the intense colors and detail of a galaxy that was photographed using a DSLR camera and a small telescope.
You can follow along and process the exact same data I did (download here), or you can try these techniques on your version of the Andromeda Galaxy taken using your own equipment. If you choose to download my data and process it, you can skip straight to the Photoshop portion of this tutorial.
This tutorial uses DeepSkyStacker and Adobe Photoshop. If you are new to this process, you may find the following DeepSkyStacker tutorial useful. The images used in this tutorial were captured using a Canon EOS 60Da DSLR camera with the RAW image type selected.
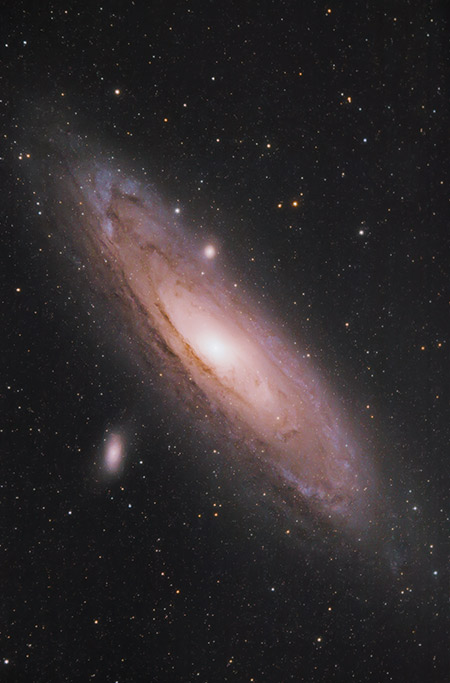
Messier 31 – The Andromeda Galaxy.
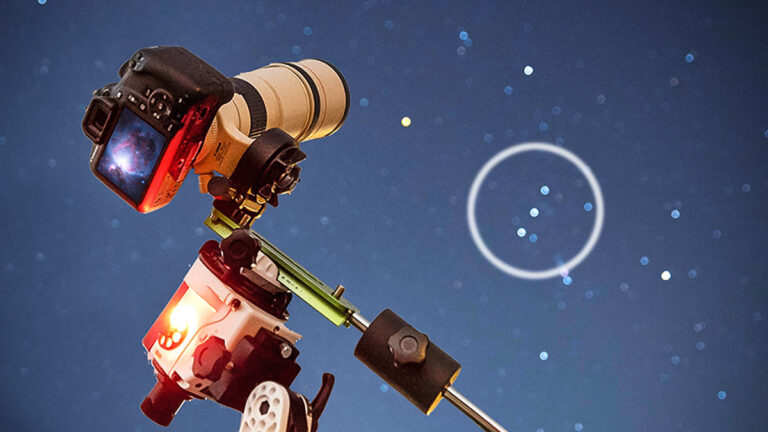
The equipment used for this shot:
- Camera: Canon EOS 60Da
- Telescope: William Optics Zenithstar 73 APO
- Filter: Optolong UV/IR
- Telescope Mount: Sky-Watcher HEQ5 Pro
- Guide Scope: William Optics 50mm Guide Scope
- Guide Camera: Altair Astro GPCAM 2
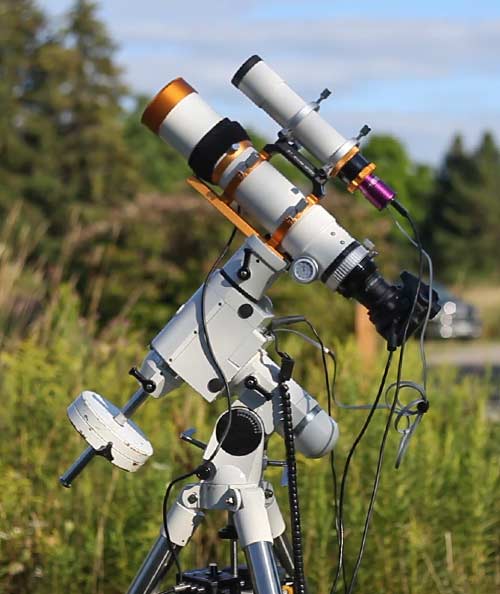
The camera and telescope equipment used for the photo on this page.
About the Image
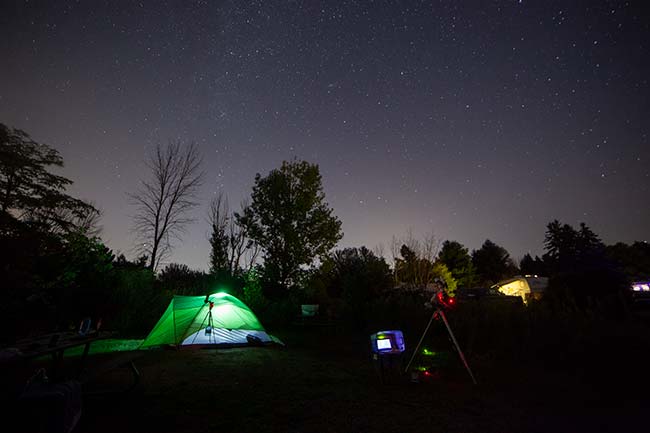
This image was captured on a clear night under Bortle Scale Class 4 skies. A William Optics Zenithstar 73 telescope was used like a telephoto lens on my Canon DSLR camera. The telescope tracked the apparent movement of the night sky thanks to Sky-Watcher HEQ5 equatorial telescope mount.
You can watch the complete journey leading up to this image in the following video: Photographing the Andromeda Galaxy. The images were collected while we camped under the stars on a beautiful August night.
The final stacked image includes 67 x 2-minute exposures (2 Hours, 14 Minutes Total) at ISO 800. Calibration frames were used (15 x darks, flats, and bias) to help calibrate the final integration.
Wide-Field Version
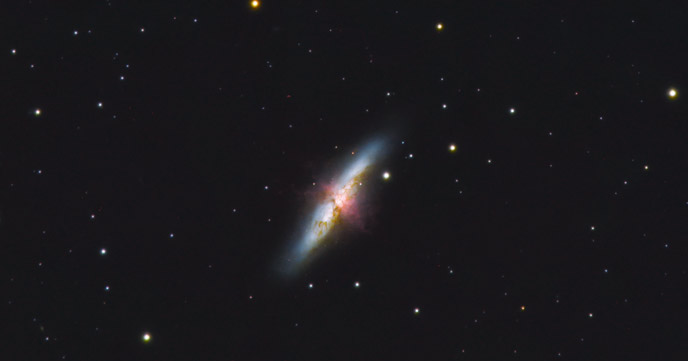
Roughly a month after capturing the original version of the Andromeda Galaxy shared on this page, I photographed this amazing object again from even darker skies. This time around, I used an ultra-wide-field refractor telescope, the William Optics RedCat 51.
The 250mm field of view at F/4.9 created the widest, deep image of the Andromeda Galaxy I’ve ever taken. Using the same image processing techniques shared on this page, I created the following image using 100 x 2-minute exposures with my Canon DSLR.
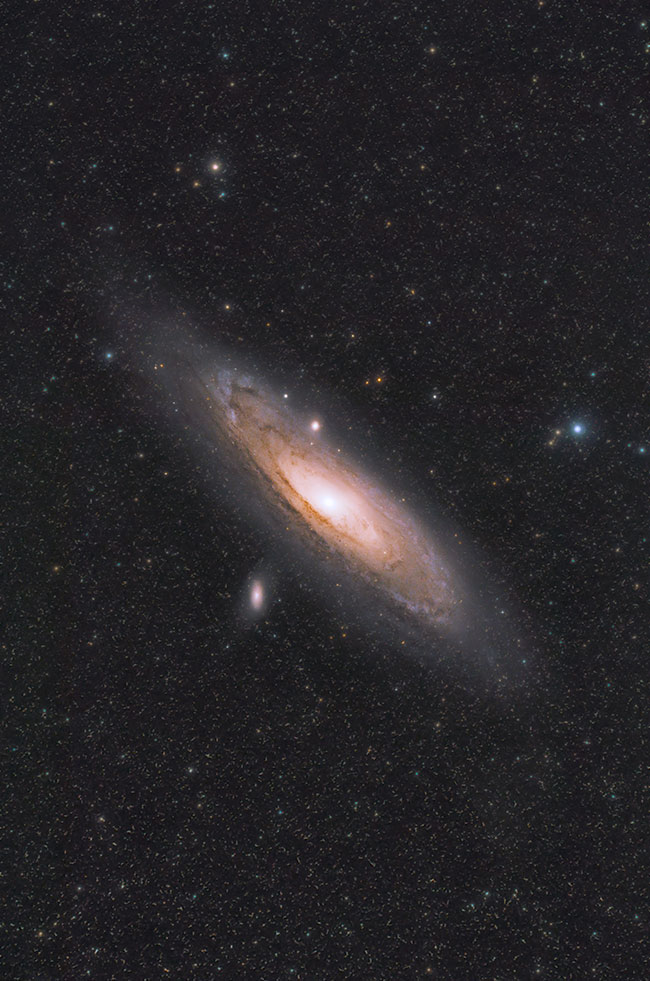
The Andromeda Galaxy captured using the William Optics RedCat 51.
I blended in my previous version of M31 using the Zenithstar 73, but only at about 25% opacity. I believe this helped to showcase a bit more of the outer structure details.
Andromeda Galaxy Image Processing Tutorial
The goal of this image processing tutorial is not for you to follow my process step-by-step to achieve the same result, but to get a better understanding of the tools and techniques I use to edit my astrophotography images. No matter what level of experience you have, I am confident that you will find a number of helpful tricks you can use while processing your own image of the Andromeda Galaxy.
Assessing your Data
After collecting your images of the Andromeda galaxy with your camera, you need to organize all of the files on your computer so that you can easily find them. I like to sort all of the picture files and calibration frames into separate folders.
Create a folder for your light frames, dark frames, bias frames, and everyone’s favorite, flat frames. The root folder should include the date the images were taken so you have all of the information you need to reference later including the moon phase and location.
You may also want to include the telescope, camera, and filter that were used in the folder name, as these details may be hard to remember years later. Here is a look at the folder structure for my data on the Andromeda Galaxy.

Make your life easier by taking the time to organize your images and calibration frames into folders.
You may find it useful to go through your light frames in a RAW image preview software such as Adobe Lightroom or Adobe Bridge. Delete any frames that have airplanes, or satellites passing through them, or that are not the full exposure length. If your tracking accuracy and autoguiding were successful, you should not have to delete any frames due to poor tracking.
With the files organized and easy to find, we can now import the image data into DeepSkyStacker for calibration and integration. This will create an intermediate file that can then be processed extensively in Adobe Photoshop.
Stacking and Calibration
DeepSkyStacker will allow us to calibrate our data using support frames, and improve the signal-to-noise ratio of the final image through integration. The software will automatically align and register the images on top of one another, to reduce noise and increase the signal (light) in the image.
To start, select all of your light frames (the actual pictures) by clicking the Open picture files button on the top left of the screen. This is where you will choose all of the images on the Andromeda Galaxy you would like to stack. If you have organized your images and folders neatly, and have filtered out any images that should not be in there, this process will be very easy.
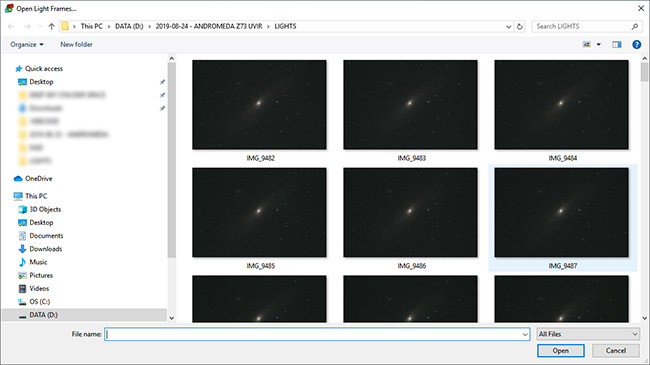
Load all of your light frames (picture files) into DeepSkyStacker.
You will then need to repeat the process, for your calibration frames. Click on the buttons for dark frames, flat frames, and bias frames in the top left-hand menu of DeepSkyStacker. I recommend using at least 15 support frames to properly calibrate the image for further processing.
You can review the details of your image files in the lower portion of the screen.
This is a great time to check to make sure the following:
- Your light frames are all the same exposure length and ISO
- Your dark frames match the exposure length and ISO of your lights
- Your Bias frames are the fastest exposure length possible
- You have loaded at least 15 flat frames into DeepSkyStacker
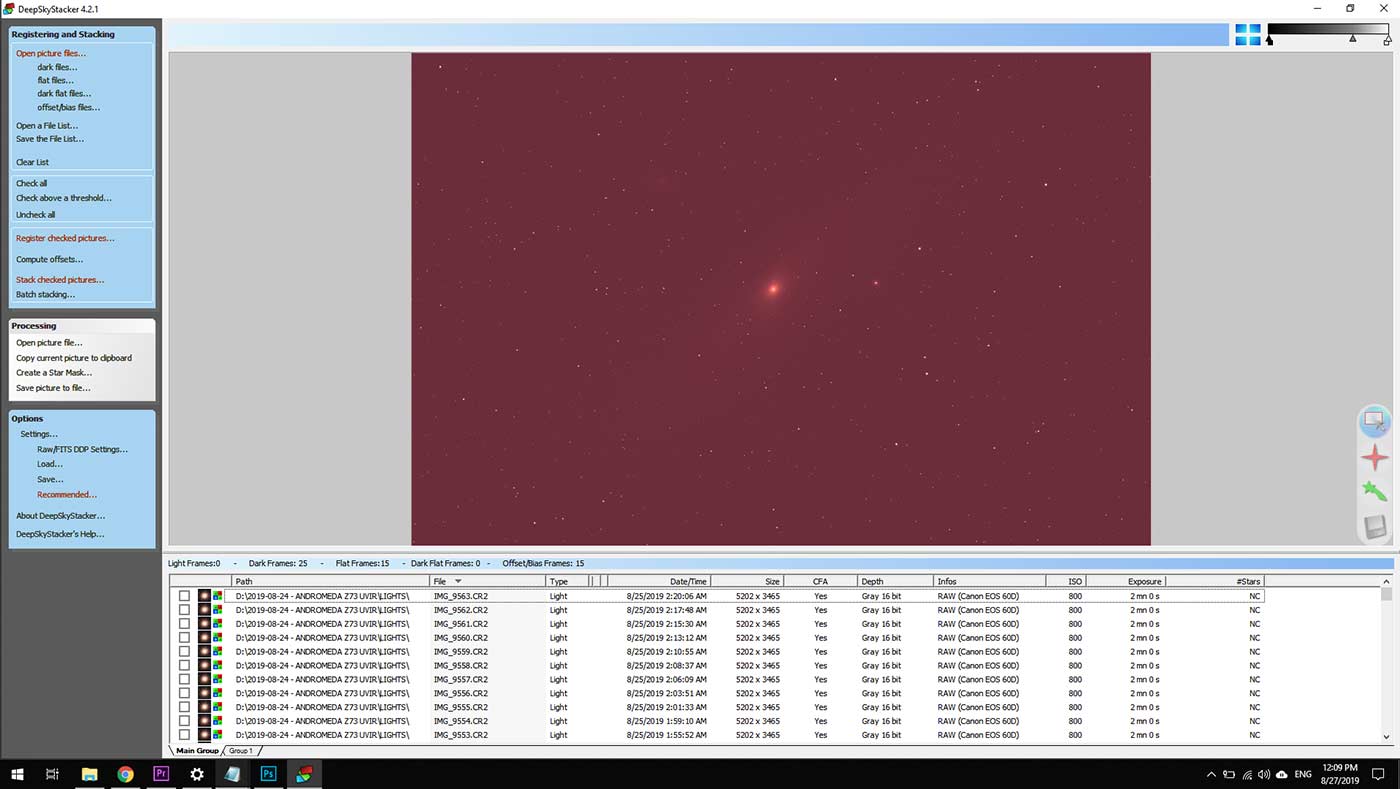
Review the details of your image files in the lower half of the DeepSkyStacker dashboard.
If everything looks in order, you can go ahead and click check all, followed by Register checked pictures. From here, we will need to make sure that a few key settings are used so that DeepSkyStacker can properly integrate and calibrate the image data.
Register and Stacking Settings
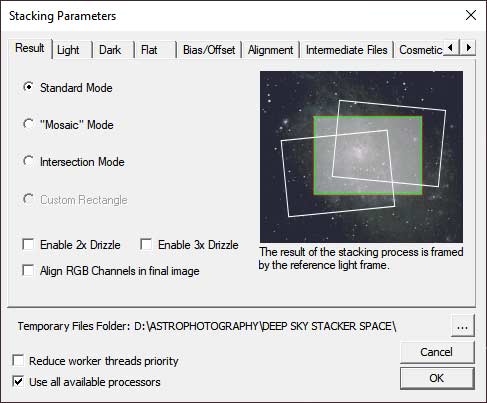
Use the Register Settings shown in the image below as a reference. Because we have used all of the recommended calibration frames, and have pre-screened the images, these settings should work well. Feel free to try using the exact settings I have used to stack the image, including the sigma-clipping combination method to stack the light frames.
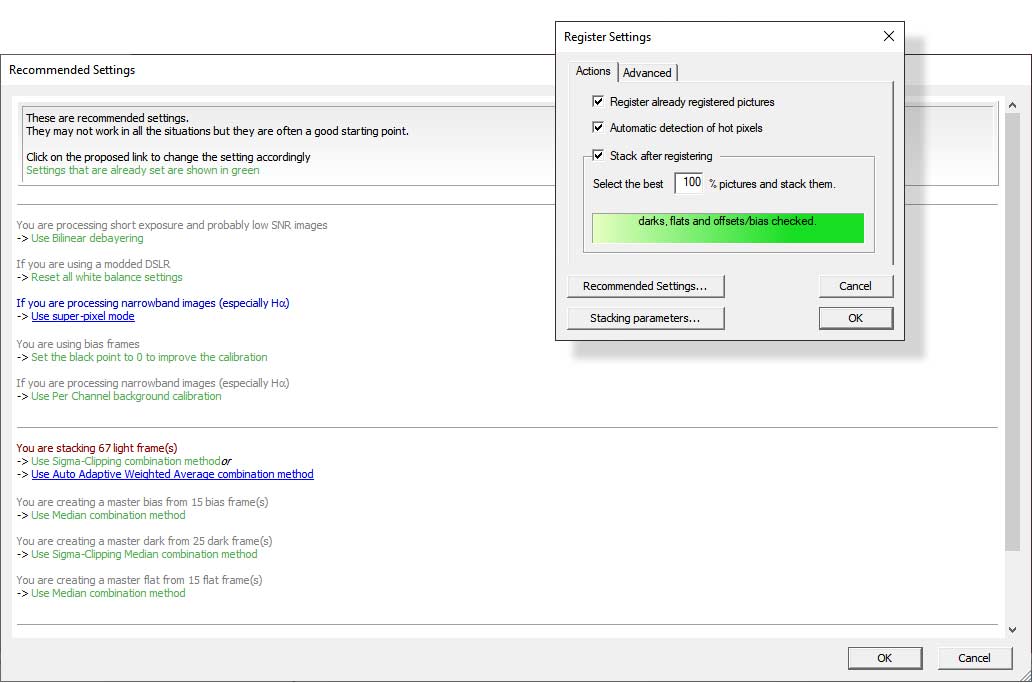
Recommended Settings in DeepSkyStacker.
You can change the Star detection threshold in the advanced tab of the Register Settings. The setting you use will depend on the type of data you are stacking. For this image, I suggest using a threshold of 25%, as it will speed up the stacking process significantly, and 456 stars are more than enough to successfully register the image. I have always kept the “Reduce the noise by using a Median Filter” option checked.

As for the Stacking Parameters (which can be accessed by clicking the button in the Register Settings box), I suggest leaving the default settings in place under the light, dark, flat, and bias tabs. You can select the Enable 2x Drizzle option if you want, but be warned that your computer will kick into overdrive, and the output file will be massive. (learn more about the benefits of using drizzle).
Now, click the OK button and review the final Stacking Steps of your image, and the estimated total exposure time. The total integrated exposure time for my image of the Andromeda Galaxy is 2 hours, and 14 minutes.
Your stacked image of the Andromeda Galaxy may look very different than mine. Everything from the amount of exposure time invested in the image, to the filter used will affect this.
The resulting image of the Andromeda Galaxy shown below has a typical look to broadband, color images shot using my DSLR camera. This is our intermediate file, that is now calibrated to reduce much of the noise and artifacts present in a single exposure.
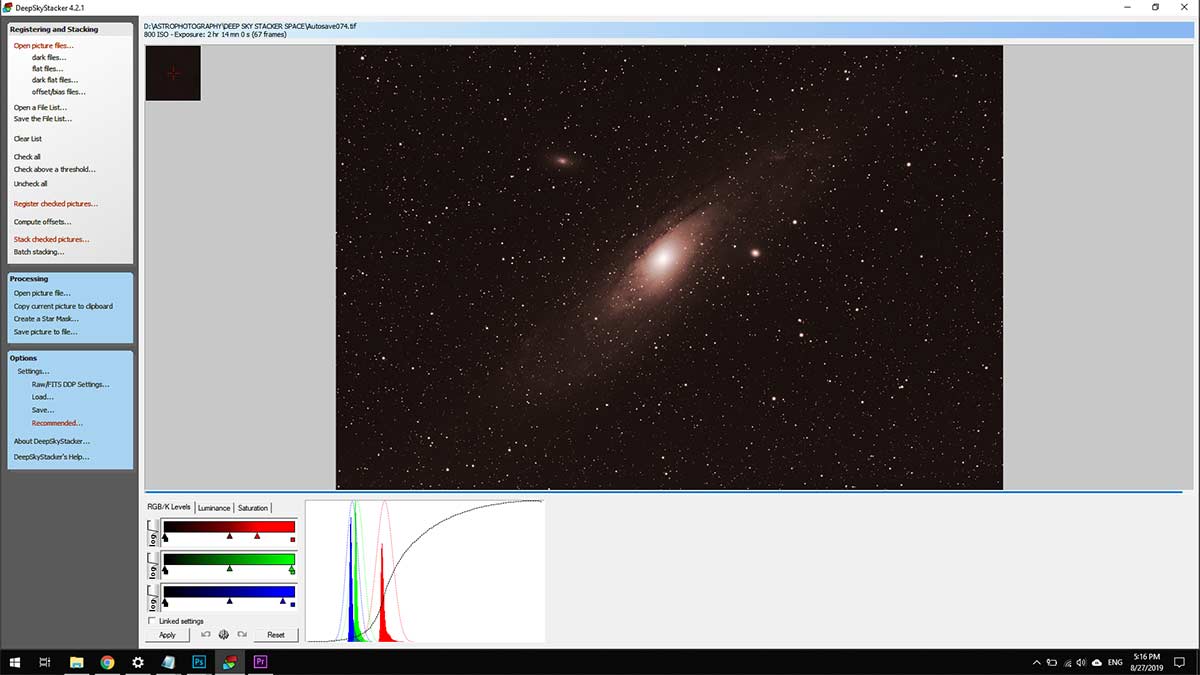
The stacked 32-Bit TIF file created by DeepSkyStacker.
The integrated data now has a much better signal-to-noise ratio, which will make the processing and manipulation techniques in Adobe Photoshop much more effective. The final processed image will look much different than the version you see at this stage.
Image Processing in Adobe Photoshop
Adobe Photoshop is a powerful tool for processing astrophotography images. It is a robust graphics software designed primarily for photography and design, but many amateur (and professional) astrophotographers use Photoshop for astrophotography image processing.
Adobe offers a subscription service for their complete Creative Cloud Suite, or for stand-alone products such as Adobe Lightroom or Photoshop.

Download Photoshop CC (Single App Plan)
Open the Stacked TIF Image
The first thing we need to do is open the file that DeepSkyStacker created using all of our pictures and calibration data. By default, DeepSkyStacker will output the intermediate file as a 32-bit .TIF, in the destination you have selected in the settings.
The default name of this file will be Autosave.TIF. You can change this file location in the output tab of the stacking settings option.
Alternatively, you can save the stacked .TIF file by clicking Save picture to file, at which point it will convert the image to 16-bit mode. We need to convert the 32-bit image to 16-bit to fully process the file in Adobe Photoshop anyway.
Now it’s time to open the TIF file you created in Adobe Photoshop. If you are opening the Autosave.TIF file that DeepSkyStacker created on it’s own, you first need to convert the image to 16-bit, by clicking Image > Mode > 16-Bits/Channel.
You will now have complete access to all of Photoshop’s tools to manipulate the data.
Crop and Initial Curve Stretch
I like to start by cropping the image slightly, just enough to remove any stacking artifacts around the edges of the image. This can create an inaccurate histogram reading, and you wouldn’t want to include these edges in your final image. You can use the Crop tool, or simply select the area you would like to keep (98% of the image), and click Image > Crop from the main menu.
The first change we will make to the data is a simple curves stretch. Using the Curves tool (Image > Adjustments > Curves), perform a basic curve stretch using the image below as a reference. Now, the data is non-linear, and has been manipulated to help us better see the dynamic range of this object. All of the amazing deep-sky astrophotography images you have ever seen were “stretched” like this.
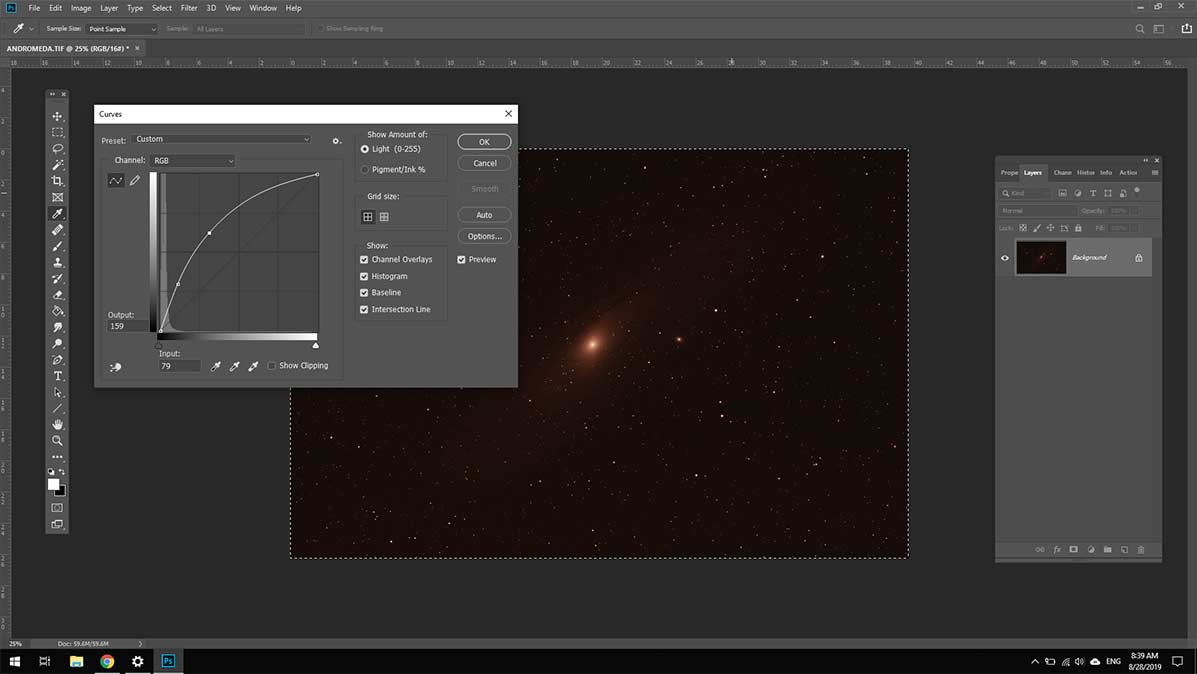
My initial curves adjustment.
For this object, it is important that we do not over-stretch the core of the Andromeda Galaxy. It is the brightest area of the object, and details surrounding it could easily be lost. To avoid this, you can either blend in shorter exposure images of the core using a layer mask, or isolate this area (again, using a mask) so that you do not stretch this data as far as the surrounding details.
In the next step, I’ll show you an easy way to selectively stretch all of the areas of the image except the bright core.
Selective Curve Stretch
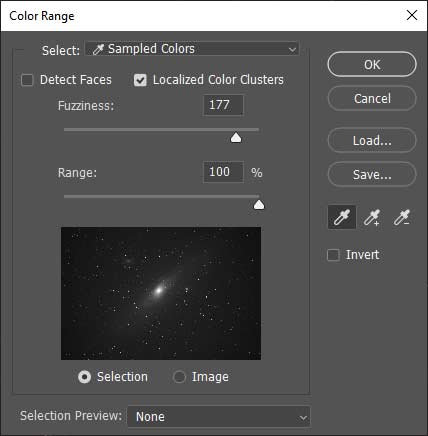
To start, we’ll select the brightest area of the image using a mask. Click on Select > Color Range > Sampled Colors. Now, use the eyedropper tool within the Color Range dialog box to select the nucleus of the Andromeda Galaxy.
Feel free to use settings similar to the ones below on your image. This will create a rough mask that we now need to refine.
Now, navigate over to the Select and Mask tool (Select > Select and Mask) to soften the edges around the selection. This is an important step because we need to create a smooth transition between the areas at the edges of the mask.
Once you are happy with the amount of feathering around the mask (using the Feather slider in the Select and Mask dialog box), you can click OK, and the selection mask will activate. Now that we have defined the area we want to leave untouched, we need to click Select > Inverse to apply our curves adjustment to.
Perform a modest curves stretch as you did in the last step, and notice that the areas we have masked off (the nucleus of the Andromeda Galaxy) remain unchanged. You may want to make several iterations of this process, making small curves stretches each time.
Before and after making a selective curves adjustment.
If you were too aggressive in your selective curve stretch, you will create an unnatural looking transition between the core of the galaxy and the mid-tone areas. To avoid this, find a balance between the amount of feathering at the edges of your mask and the amount of curve adjustments you make.
The same process of masking the bright core of the galaxy can be used on the surrounding stars in the image. This technique is a great way to pull your data forward without bloating the stars.
Color Balance the Image
At this stage, we will balance the color of the image by setting the black point, and the white balance. Start by creating a Threshold Adjustment Layer (Layer > New Adjustment Layer > Threshold). This creates an exaggerated view of the image showcasing the brightest and darkest areas of the image.
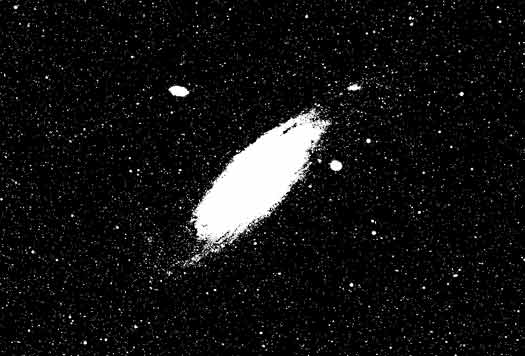
A threshold adjustment layer used for setting the black and white points.
We’ll use this layer to plot our black and white prints of the image. The black point is used to balance the background night sky to a neutral grey, while the white point is used to set a natural white color as we know it on Earth from the Sun.
Using the slider in the properties tab of the threshold adjustment layer, choose an area of the sky that contains no stars, and is not touching the galaxy. Use the Color Sample Tool (found in the main toolbar) to plot 2 points on the image where there is nothing but dark sky.
Make sure that the Sample Size (found at the top left of the screen) is set to 5 by 5 average for the best results.
Setting the Black and White Points
Now, plot a point on the image that is the brightest “white” area of the picture. In most cases, this is a star, but this time I have chosen to use the center of the galaxy core to set the white balance. For the most accurate rendition of colors, you will want to use a star that is the same type (G2V class) as our Sun.
These plotted points will now give us a reading of the pixel information and the current balance of colors in the image. To see this information, turn off (or delete) the threshold adjustment layer, and open the Info window (Window > Info).
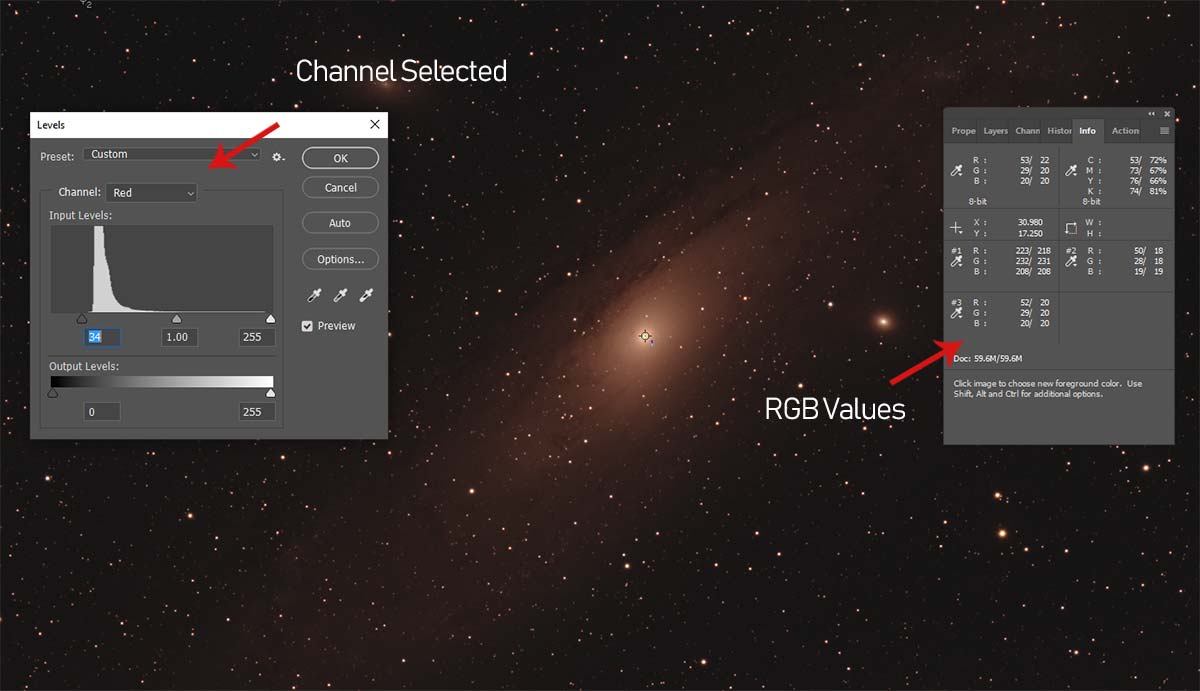
At this stage, we just need to balance the colors out a bit. If your image is like mine, it is very brown and ugly at the moment. We can balance the colors by adjusting each color channel independently and matching the values of our plotted points.
With the Info window open, click on Image > Adjustments > Levels. From the levels window, select each color channel from the drop-down menu and adjust the sliders. For my first levels adjustment, I have set the black point to read 20, 20, 20 across the RGB channels. These values will increase shortly, as we will pull the data forward even more.
This is a good time to save the image. For all further edits, it is wise to create new layers on top of the original. This way, you can save the file with each adjustment made on its own layer. Label each layer with the adjustment you have made, and then you can save the complete .PSD file with the ability to go back and edit at any stage later.
Targeted Curves Adjustment
A powerful way to make a targeted curves adjustment in Adobe Photoshop is to hold down CTRL on your keyboard and plot a temporary reference point. With the Curves window open, hold down CTRL and click an area of the background sky. Now, holding down CTRL once more, click an area of the Andromeda Galaxy that you would like to brighten (the mid-tones at the edges of the galaxy),
If you noticed, the histogram on the Curves window now has two points plotted on the graph. You can now “pull” at the data with a targeted approach, as you now know where specific pixel data lies in the graph. The goal is to bring out the mid-tones, without bringing up the dark sky, or disturbing the bright core of the galaxy.

Making a curves adjustment with plotted points on the histogram.
At this stage, we can now see a lot more of the galaxy structure. The image is far from done, but it’s nice to see all of the interesting details of our deep sky object. This is another great time to save the image. I also like to use the History state feature of Adobe Photoshop (Window > History) if I ever need to go back and make small changes during my process.
Saturation Boost
You may want to increase the saturation of the colors in your image (watch my video tutorial on boosting colors). I find the best way to accomplish this is to create a Hue/Saturation Adjustment Layer. We need to define specific areas of the image to apply this effect to, and the Color Range Tool is a convenient option.
Go to Select > Color Range > Highlights, and adjust the slider to define the areas of light we would like to increase the color of. In my case, I have chosen the bulk of the highlights, as I would like to increase the saturation of the galaxy as a whole, and the brightest stars in the field.
To refine the selection, you can use the Select and Mask Tool, or simply Select > Modify > Feather using a value of 1 or 2.
With the selection active, go to Layer > New Adjustment Layer > Hue Saturation. Now you can adjust the Saturation slider to taste, boosting the intensity of the colors in your image. This is where your personal taste dictates the direction of the image. I would suggest not going overboard with your saturation boost adjustment.
At this point, I recommend creating a visual merge (Shift + Ctrl + Alt + N + Eon the keyboard), and naming this layer “SATURATION”. If you have followed a similar path to me, your image and layers will look a little something like this:
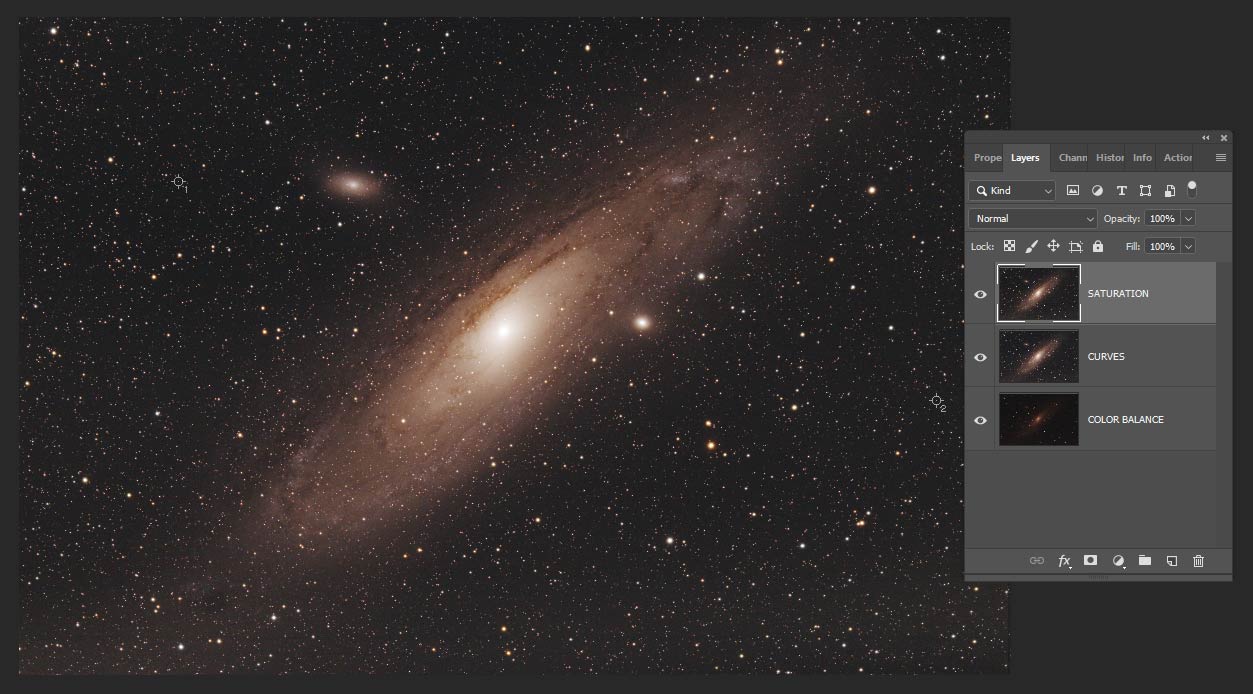
The Andromeda Galaxy with a selective boost in saturation.
If you want to dive deeper into this process, you can read my full tutorial on selective color boosting for a complete breakdown of the technique.
Minimize Stars
Minimizing the size of the stars in your image is a great way to draw more attention to your deep-sky object. I find it to be one of the most dramatic differences between a good astrophotography image, and a great one.
Reducing the size of the stars in your image is easy, but you will need to monitor a few things along the way. First, create a new layer, and name it STAR MINIMIZE. That way, we can turn the layer on and off to see the difference it made.
Start by using the Color Range Tool again, selecting Highlights from the drop-down menu. Adjust the slider so that most of the stars are selected, but not the entire disc of the galaxy.
The goal is to select only the stars, so we can apply a minimizing effect on them. We will need to refine this selection and remove the bright areas of the galaxy, as we want these areas to remain unchanged.
Using the Lasso Tool (found in the main toolbar), hold down the ALT key, and draw around the areas of the Andromeda Galaxy that you do not want to apply a star minimizing effect to. Holding ALT will ensure that this action de-selects area of the selection.
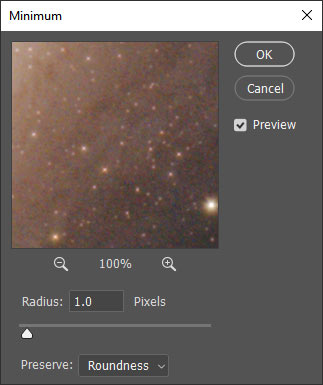
Settings for minimizing stars with the minimum filter in Adobe Photoshop.
Now, go to Select > Modify > Expand, and expand the selection by 1 pixel. You should notice that the “marching ant” selection has changed and that there is now more room around the star selected. You may want to expand the selection by 1 more pixel, depending on the aggressiveness of the original selection made.
Next, go to Select > Modify > Feather, and use a Feather Radius of 1 pixel. This has softened up the selection around the edges, which is important for blending purposes.
With our selection carefully refined, we can apply the star minimizing effect to the stars. Go to Filter > Other > Minimum, and use a radius of 1.0 pixels. Make sure that the Preserve option is set to Roundness and click OK. Click anywhere on the selection using the Lasso Tool to deselect it.
Here is what my image of the Andromeda Galaxy now looks like with smaller stars.
Noise Reduction and Artifact Removal
If your stacked image includes 3+ hours worth of exposure time, chances are the noise is minimal. For my data, there is still quite a but of camera noise in the images, even using 67 light frames and calibration data. There is also an unnatural glow coming from the bottom of the image.
Let’s start with the noise. I prefer to use the noise reduction tool found within Adobe Camera Raw. To access this feature, click Filter > Camera Raw Filter. The noise reduction tool is found under the Detail Tab and can be controlled using the Luminance slider under the Noise Reduction heading.
Zoom into the image to about 200%, and experiment using different levels of noise reduction on the slider. You can also mask and sharpen the image using this tool, but I don’t recommend doing that yet (even though I did in the example). Here are the noise reduction settings I chose to use for my image of Andromeda.
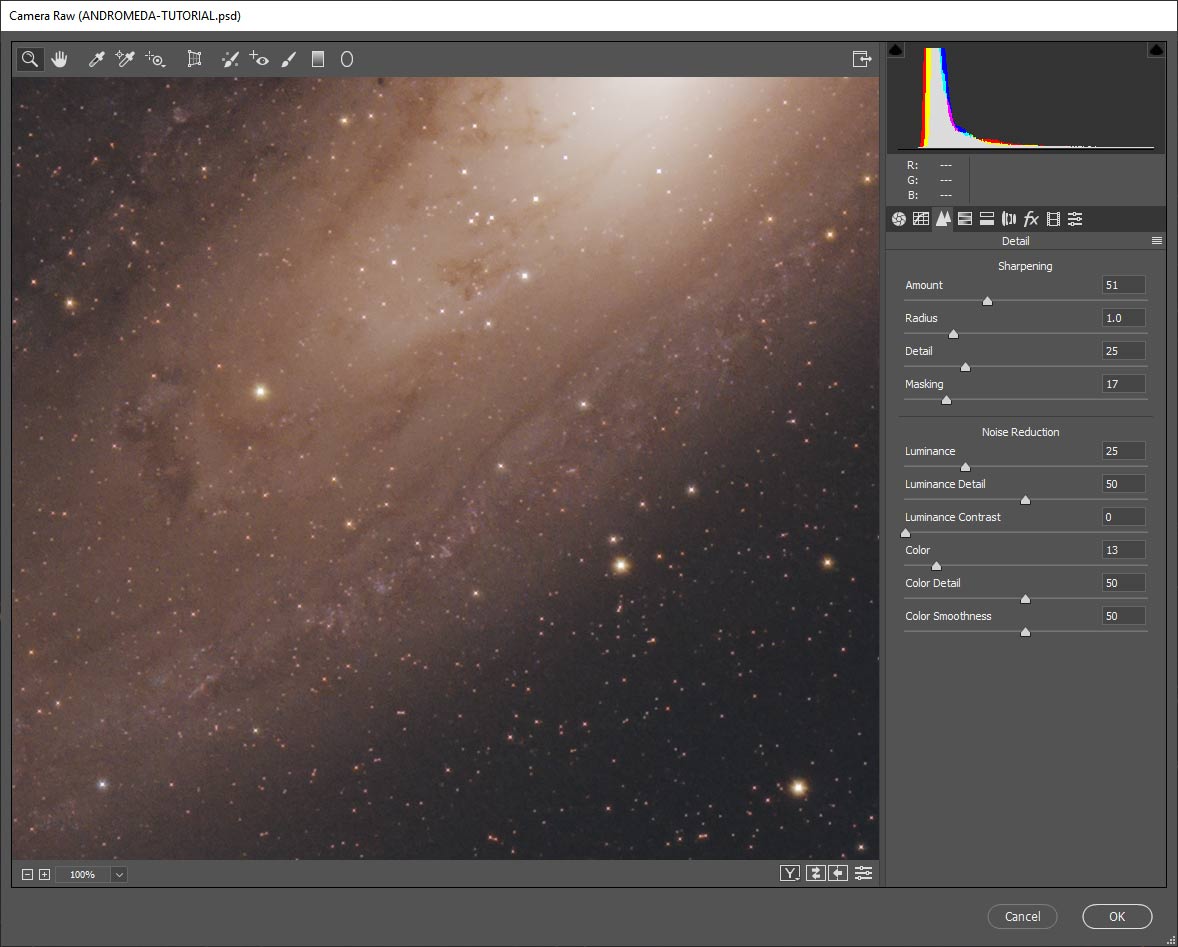
Use the sharpening tool found under the detail tab of Adobe Camera Raw.
Now that the noise is under control, we can tackle the subtle glow at the bottom of the image. In this situation, I think the easiest way to correct this is by copying the top most layer, and reducing the brightness. Then, I can remove the areas of the image that I do not want to darken using a simple mask and the Eraser Tool.
Odd gradients like this are some of the most challenging processing scenarios, and can usually be avoided with proper flat frame calibration. I’m not quite sure what went wrong this time (the horizontal banding indicates it could be something to do with the dark or bias frame signal), but luckily fixing a subtle horizontal gradient like this is not too difficult.
Gradient Xterminator is a handy third-party plugin for removing gradients and vignetting in your images. This is the method I used on the Andromeda Galaxy image, although I have shared ways to remove gradients without Gradient Xterminator in the past.
Using Photoshop Actions
I have installed a useful astrophotography image process Action Set to my version of Adobe Photoshop, and I find it exceptionally useful. The Astronomy Tools Action Set contains many time-saving, powerful actions you can apply to your image with the click of a button. You do not need these actions to create amazing images in Photoshop, but I find them to be very handy.
If you are using this action set, I like to run the “Enhance DSO and Reduce Stars” action at this point. It can make a dramatic difference to the image in a single click. It basically pulls the faint details of the galaxy forward and applies another star minimizing effect the image. I prefer to set this layer to 50% opacity once complete.
You can also try running the “Make Stars Smaller” action, which should be used carefully as it can eat away at the stars in your image.
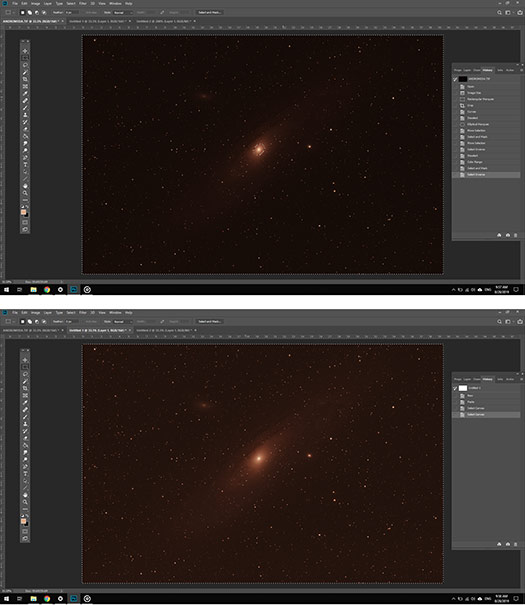
Here is a look at each layer of the process, to give you a clear idea of when each processing technique took place.
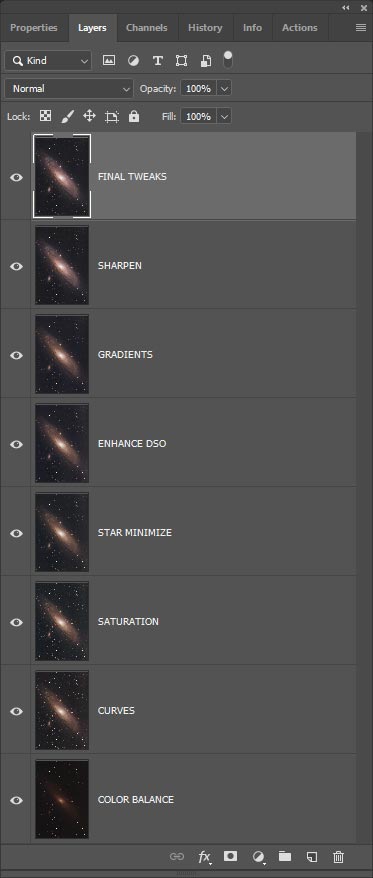
Each layer of the image is labeled with the processing step that took place.
Selective Sharpening
It is wise to only sharpen the areas of your images that you intend to sharpen and to not simply run a sharpen filter over the entire image. For example, you would not want to sharpen empty areas of the background sky or the larger stars with a pleasingly soft glow.
Again, we’ll use a mask selection to isolate the areas we would like to sharpen. The Select > Color Range > Highlights method works well, and be sure to refine the mask with careful feathering.
The sharpening filter I enjoy most is the one found inside of Adobe Camera Raw. This tool features a number of useful options to apply just the right amount of crispiness to your image. You’ll find it under the Detail Tab of Adobe Camera Raw (Filter > Camera Raw Filter).

Finishing Touches
From this point forward, you need to decide the overall story you want to tell with the image. You can apply subtle tweaks to enhance the details of the image you enjoy most, whether that is having tiny stars across the field, cool blues in the galaxy, or a well-defined core. It may take several astrophotography image processing sessions to understand what makes a great image in your eyes.
You may want to adjust the orientation of the image, too. For the Andromeda Galaxy, I like to see it in portrait orientation so the galaxy is on an angle. To me, this gives the Andromeda Galaxy more depth and better showcases its spiral structure.
One tip I’d like to share is to process two entirely different versions of the image. This means starting from scratch, making subtly different decisions about each action along the way. Then, compare both processes of the image, and decide which one you like best. Often times, I will combine the two processed image together with the top layer at 50%.
With the selective masking techniques I shared in this tutorial, you’ll have countless ways to process your image of the Andromeda Galaxy in the fashion that you prefer.
I hope you have enjoyed this image processing tutorial on the Andromeda Galaxy. To keep up with my latest videos, tutorials, and equipment reviews, please subscribe to the AstroBackyard Newsletter.
Download My Image Processing Guide
If you would like to learn about every astrophotography image processing technique I use in DeepSkyStacker and Photoshop, you can download my premium guide. The PDF download contains over 100 pages of the specific steps I take to process all of my images. The guide is available here.


Hi Trevor,
You might have done this already, but can you talk about the software that you use in the field to capture the frames? I think you’ve briefly mentioned it but I am still figuring out what I would need. I have the ioptron skyguide pro and at this point, With just a modified camera and a long telephoto…nothing exotic.
Thank you for everything that you share. Everything is always clearly described and I’ve learned so much. Always happy to see your happy family with Rudy and your wife. Makes me always smile.
Trevor this is amazing. I love your site and I cant wait to get my rig up and running. Your passion for this stuff is really inspiring!
What a delight full post 🙂
Hi Trevor,
last week, I shot nearly the same Andromeda images like you did. I will follow your tutorial tomorrow. Currently, I shoot 12x Ha @ 480s.
How should I merge the Ha images in order to enhance the final picture?
Thanks,
Sven
Great tutorial. When converting the initial TIF file to 16-bit, PS offers several options. Local Adaptation is the default, but it is way overexposed. There is also Exposure and Gamma, Highlight Compression, and Equalize Histogram. Which option do you recommend?
Regarding my previous comment, I am using Photoshop CS6. It appears that not all the steps you used are applicable to CS6. I know there are many ways to do the same thing in PS, so I’ll try putzing around to see what I can find.
This tutorial is very nice and complete on the subject. However I found it difficult to process my own astro-photo.
I have just started to use SIRIL for stacking and processing, and it makes all steps of this tutorial, from DSS stacking to level/saturation adjustments, much painless. Then I use this tutorial tips for final selective level adjustment and noise removal in Photoshop.
Thank you
Hi Trevor,
This is your best post on Astro Imaging as far as I am concerned. I did have a question for you. I purchased your Imaging Guide and notice both in this post and in the Guide you say that you can use the command Shift+Control+Alt+N+E for visual merge. I was getting frustrated using this since it was not working. I later found that the visual merge recommended by other users is Control + Alt +Shift +E . I tried this and it worked finally. Perhaps I am doing something wrong but if not, it would nice to correct it for people using this guide and in your Image Processing Guide you have for sale.
Hi can you tell me which direction is North and East, is your image inverted or flipped? In other words, if the eye could see what your scope saw, how would the galaxy be oriented?
Tx in advance if you can answer!
I found Sequator to be easier and better in Stacking than DSS. But DSS is more powerful I guess. Thoughts, Trevor?
Your videos and tutorials are awesome. I’ve tried to follow along with this Paintshop tutorial and it’s unbelievable how different my version is from yours a year and 3 months later. I made it through the first few steps then it was like I was using some program from another planet. Nothing is where you say it is or it doesn’t react the way it did in your description. Meanwhile, I took some decent photos of Andromeda last night, first time. DSS worked just fine. Paintshop, not so much. All day, started over from scratch 5 times. I have ver. 22.0.1 They have moved so much around, for no good reason, that its impossible to follow along. Such a huge, disappointing learning curve.
But keep up the good work. I do enjoy the videos and tutorials.
This is my edit of your image. Thanks for all of the great info and keep looking up!
https://i.imgur.com/GXM7c0T.jpg
Hello Trevor,
I have been having dreams of doing this for months now so I googled it and I saw your posts and pictures. Sadly I have little knowledge of photography and photoshop. I am doing as much research as I can on what to buy etc. I wanted to thank you so much for being so giving of your knowledge. I am supporting your page and will be following you. I wanted to know if you would be willing to do a workshop? Where people come to you and you teach your style on this, I am a physical learner so its hard for me that everything is going on line 🙁 It would be amazing to watch all this unfold in a weekend course. I am sure plenty of people would love to go camping and see it step by step on how you do this. I live in Florida but I would be willing to fly anywhere for a weekend course or a one on one training. Please contact me. Thank you Loretta
Hello Trevor –
Should you take some HA photos and combine them like to showed before.
I really like your videos.
Thanks, Roger
The most straightforward, non-mucky-muck guide to editing Andromeda I’ve seen. Purchased the full guide and happy to pay it. Thanks for the good work! You’ve ignited this hobbyist.
Many thanks for sharing your steps.
CN post of my M31 processing based on your steps:
https://www.cloudynights.com/topic/796306-andromeda-m31-with-redcat-51-altaz-canon-eos-rebel-t7i/?p=11470948
Any thoughts on DSS settings for a non-modded Canon T7i?
Thanks again,
Tony.