How I Photographed a Nebula in Another Galaxy

I recently photographed a galaxy in the night sky with my telescope, using a new approach I have never tried before. The technique is not new, but it is something I’ve never actually tried on a galaxy before.
Not only did it produce one of my favorite images I have ever captured, it revealed a completely new type of astrophotography to me. The idea of capturing nebulae outside of our own Milky Way Galaxy.
And not just nebulae, globular star clusters, and variable stars. These are not deep-sky objects in our night sky, but ones in someone else’s sky. I still can’t wrap my head around that.
Now that I have a taste for this incredibly fascinating idea, I plan to use this method with an even bigger telescope to push the limits of intergalactic nebula photography.
This is how I took a picture of multiple nebulae regions in another galaxy. I haven’t been this excited about an image in a long time.
How it All Started
Every year in November, Ashley and I try to get out to a dark sky location for a ‘company retreat’ (it’s just the two of us). During the day, we discuss strategies for future content, and at night, we photograph deep-sky objects through our telescopes.
This year, we rented a cabin about 3 hours north of us, near Owen Sound, Ontario. The cabin sat on 40 acres of land under a beautiful Bortle Scale Class 3 sky. Although the property was heavily treed, there was a suitable opening to set up our telescopes.
When booking these trips, we never know if it will be clear during our stay, so we were delighted to see partially clear skies in the forecast for the week. With our astrophotography gear in the trunk and Rudy in the backseat, we set out for our destination first thing in the morning.

The Imaging Location
While we had a general understanding of the location based on the photos online, we never really know what we’re getting into until we arrive. The property was surrounded by tall trees, which can make deep-sky astrophotography a challenge, depending on your intended target.
Until we got there, I didn’t know exactly which deep-sky target I would capture, but I had a few ideas in mind. After seeing the tall treeline surrounding the open area of the property, I decided to capture the Triangulum Galaxy due to its high position in the sky in November.
This property was in the ‘blue zone’ on the light pollution map, which is impressively dark compared to our home on the outskirts of the city. The Clear Outside mobile app provided a measurement of Bortle Scale Class 3, and we later measured the darkness of the sky using a sky quality meter (SQM) device.
Dense trees separated the property from the neighbors next door, and the back of the property opened up to an untouched forest spanning several miles.

An Unspoiled Dark Sky
Night 2 of our 3-night stay was the first clear night, and I finally got to experience the intense darkness of the location. It was dark enough to feel a little unsettled with the blackness of the forest behind me.
Coyotes howled soon after dusk from all directions. I estimated 2 dozen animals howling at one time, an impressive pack communicating with each other over many miles. Thankfully, none of them were close enough to give me a scare while manning the telescope.
We used a Pegasus Astro Uranus Meteo Sensor to measure the brightness of the sky. Our official reading was MPSAS 22.4, NELM 6.8. The sky was more than dark enough to justify shooting in broadband without the use of a light pollution filter.
Related Article: How Dark is Your Night Sky (& How to Find Out)
In situations like this, I tend to focus on capturing galaxies, reflection nebulae, and/or dark nebulae. These types of targets are impossible to capture effectively from home, so I take advantage of my surroundings when I can.
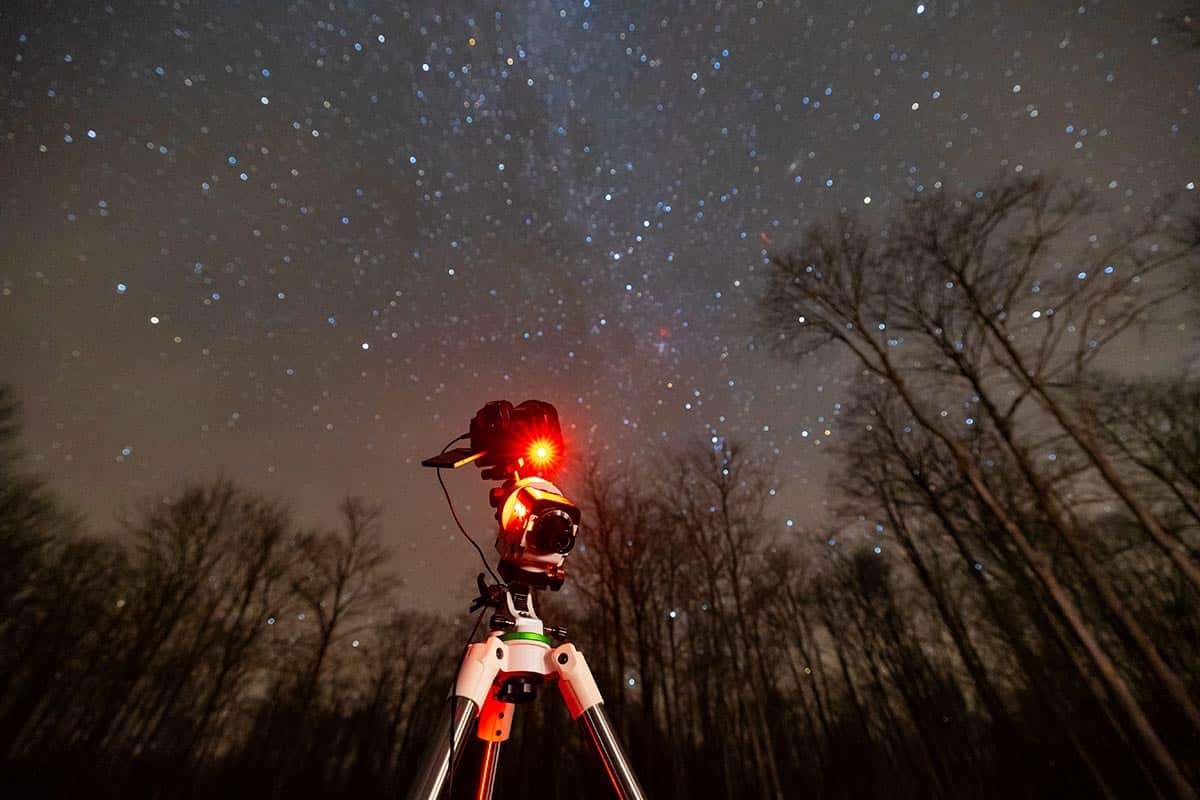
My Astrophotography Setup
To keep things easy and portable, I packed a ZWO AM5 mount, and a mid-range refractor telescope, the Starfield GEAR 115 Triplet APO. This system has served me well for a few months now, and I am very satisfied with the optical performance of this affordable triplet.
The native focal length of the GEAR 115 F/7 is 805mm, but I like to use the dedicated 0.8X reducer for faster light-gathering ability. This brings the focal length down to 644 at F/5.6. The telescope weighs about 15 pounds, which is not a problem for the ZWO AM5 strainwave drive mount.
I attached a ZWO ASI2600MM Pro dedicated astronomy camera to the reducer (with the required 12mm spacing), along with a 7-position filter wheel housing a complete set of Chroma LRGB filters. This APS-C sensor monochrome astronomy camera is now officially my most used astrophotography camera of all time.
Riding on top of the GEAR 115 refractor is a small 50mm guide scope (also Starfield) with a ZWO ASI120MM Mini guide camera for autoguiding. The entire kit is controlled via the ZWO ASIAIR Plus, from the image capture automation sequence to plate solving.
The only 2 missing pieces to this kit are a motorized focuser (autofocuser) and a rotator. While I do have an extra ZWO EAF, I am still not ready to commit this modification to the GEAR 115 over some of my other refractors (I had the William Optics GT 81 in mind).

Astrophotography Kit Breakdown
- Camera: ZWO ASI2600MM Pro
- Filters Color): Chroma LRGB (36mm)
- Filter H-Alpha): Chroma 3nm H-Alpha (36mm)
- Filter Wheel: ZWO 7-Position Filter Wheel (36mm)
- Telescope: Starfield GEAR 115 F/7 APO
- Reducer: Starfield Adjustable 0.8X Reducer
- Camera Controller: ZWO ASIAIR Plus
- Mount: ZWO AM5
- Tripod: Starfield Portable Tri-Pier
The Triangulum Galaxy
Messier 33 is an extremely popular deep-sky target this time of year. It rises high into the eastern sky after dusk, making the perfect time to begin photographing the Triangulum Galaxy with your telescope.
It’s a stunning spiral galaxy in the constellation Triangulum, with beautiful cool colors and an intricate spiral structure. This galaxy lies 3 million light-years from Earth and is believed to be a satellite galaxy of Andromeda.
I have photographed the Triangulum Galaxy many times before, including from a dark sky site (Black Forest Star Party) in 2019. However, I have learned many new strategies I can apply to this project to make it my best version yet.
The longest focal length I had used to photograph M33 previously was 550mm on the Sky-Watcher Esprit 100. This time, I attempted it with a modest increase from 140mm to 640mm, using a refractor telescope with an additional 15mm aperture.
Also, I used a monochrome camera and LRGB filters to create a full-color image in place of a one-shot color camera. I knew that by tackling this project with more aperture and a higher resolution monochrome sensor, I could drastically improve the image data.
What Makes this Target Special
Aside from being one of the largest galaxies in the night sky, this colorful spiral galaxy contains many dynamic HII regions of nebulosity. These are nebulae in another galaxy so large that they are cataloged deep-sky objects.
For an in-depth look at the many fascinating HII regions, star clouds, and star clusters in the Triangulum Galaxy, have a look at this incredible resource by Leonardo Orazi. This webpage inspired me to annotate my image of Messier 33 to include the largest cataloged deep-sky objects within the galaxy.
There are many cataloged deep-sky objects within Messier 33, from globular clusters to massive H II regions. For example, NGC 604 is one of the largest emission nebulae in the Local Group of galaxies, over 40 times the size of the visible portion of the Orion Nebula (and 6300 times more luminous).
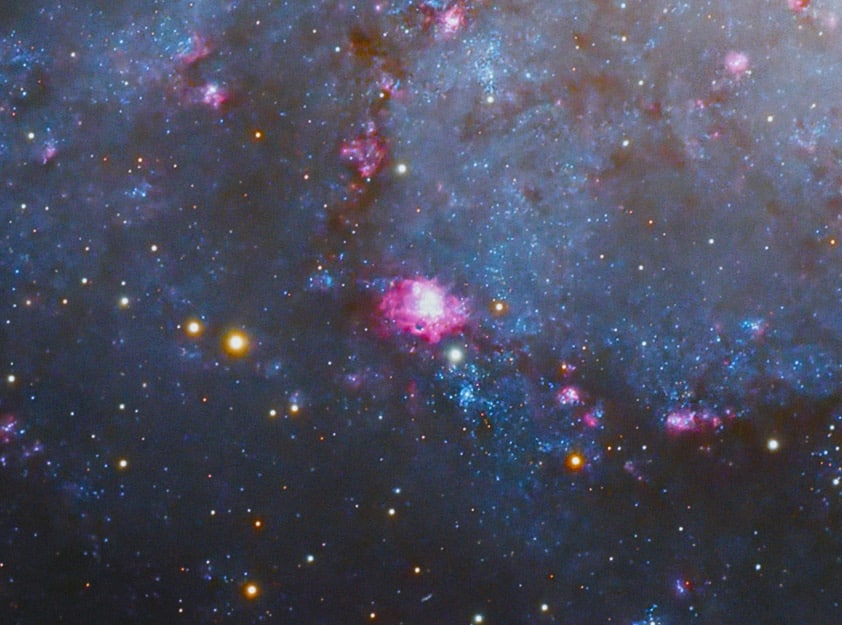
NGC 604 is an emission nebula inside of the Triangulum Galaxy.
Astrophotography Results
I managed to collect many sub-frames on the Triangulum Galaxy over the course of two nights from the cabin. There were some intermittent high clouds throughout the night, meaning I had to cull about 30% of my exposures before integrating the data into my image-stacking software.
Flat frames are critical for broadband astrophotography projects, especially when shooting through 4 different filters. I took the time to collect flat frames using the white t-shirt method pointed at the dusk sky for each LRGB filter in the filter wheel.
When I arrived home, I collected an additional 2 hours of narrowband h-alpha data to add to the project. Because the Triangulum Galaxy contains many dynamic HII regions, creating an LRGB + Ha (or HaLRGB) version of the image is recommended.

HII regions in the Triangulum Galaxy.
There are a few ways to incorporate the Ha data into the RGB image. On top of blending the h-alpha stack into the luminance layer, I also incorporated it into the red channel at an opacity of about 20%. I used a selective mask to ensure that I didn’t wash out any non-h-alpha regions using the narrowband data stack.
After registering, calibrating, and integrating the single image frames in DeepSkyStacker, I brought the stacked master files into PixInsight to align each channel together (using Process > StarAlignment, and Process > ChannelCombination) to create a full-color image.
I could already tell from the resulting full-color, broadband RGB image that I was going to have a lot of fun processing the data. These days, my image processing workflow is split about 50/50 between Adobe Photoshop and PixInsight (PI). While the majority of the color enhancements are done in Photoshop, key steps like background extraction and BlurXterminator are performed in PI.
Photo Details
The final image includes 6 hours of total exposure time through 5 different filters (HaLRGB). Each LRGB filter captured 1 hour of total exposure time and an additional 2 hours in narrowband h-alpha was added.
I am thrilled with the results of this image, and it has inspired me to dig deep into Messier 33 and capture some of the nebula regions up close using a larger telescope.
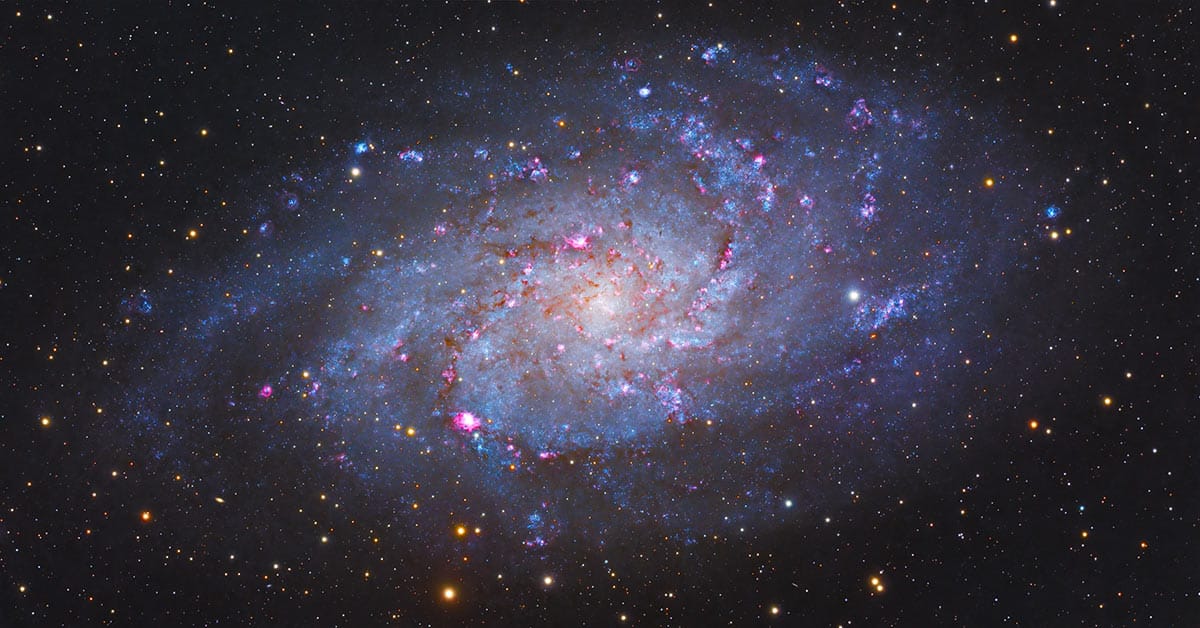
The Triangulum Galaxy in HaLRGB. 6 Hours Total Exposure Time.
- Luminance: 30 x 2-minutes
- Red: 30 x 2-minutes
- Green: 30 x 2-minutes
- Blue: 30 x 2-minutes
- H-Alpha: 24 x 5-minutes
Here is the annotated version showing some of the most interesting deep-sky objects found within the M33 galaxy.
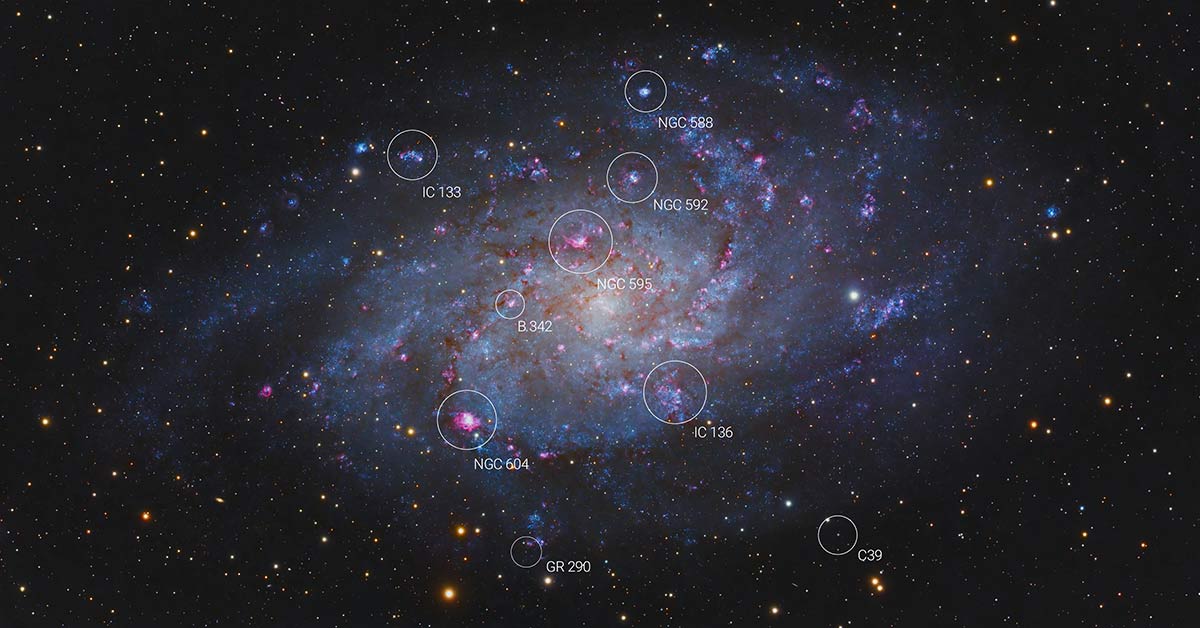
Messier 33 with the locations of key deep-sky objects within the galaxy.
Intergalactic Nebula Photography
So, as you can see, not only did I photograph a nebula in another galaxy, but an entire system of nebulae in a distant night sky. Imagine a world located in the Triangulum Galaxy looking up and seeing a distant Milky Way in the sky.
And maybe a few of our brightest nebulae can be spotted from that distance (probably Carina). Long story short, I’m excited to try photographing the bright nebulae in M33 and other galaxies using a larger telescope.
‘Intergalactic astrophotography’, has a nice ring to it. Clear skies!
Helpful Resources:
- The Best Astrophotography Telescopes Available (with Image Examples)
- 20 Amazing Stargazing Apps for Your Smartphone to Explore the Night Sky
- Find Your Night Sky Brightness on the Bortle Scale

Hi Trevor,
You achieved a very nice result, congrats.
You can actually achieve event better results by increasing the number of subs and by selecting only the one with the highest resolution. Also, I used DSS for long time, but now that I switched to PI for the pre-preocessing, I noticed a significant increase in the quality of the stacked images. Adam Block explains the pre-processing in PI in detail. It is worth testing it.
By using an optimized setting (for instance with a 10MICRON mount), you may not only see nebulas in M33, but also stars.
Have a look here as an example
https://www.astrobin.com/3jlcok/B/
CS!
Nicola
Hi Trevor
Really nice image and processing.
I’m looking forward to trying out your imaging technique at our club’s dark sky site ( Texas astronomy society, site in Oklahoma)
Although I shoot with 1 shot color cameras ( asi2600mc pro ) which is wonderful with zero amp glow.
If you haven’t already tried it you might give GraXpert sw a try
Amazing AI based software to get rid of gradients in your image.
Check out YouTube
Free Al Gradient Removal – the GraXpert Beta is AMAZING! Ultimate Laziness!
Take care
Steve