How to Photograph a Solar Eclipse

Photographing a solar eclipse can be a life-changing experience.
You may only get a few chances in your lifetime to view or photograph this celestial event, so you want to make sure you are well-prepared and practiced ahead of time.
If your first run with your gear is the day of the eclipse, you’re setting yourself up for disappointment. Whether you are hoping to take a picture of the solar eclipse with your phone or a large telephoto lens, you need to practice before the big day.
While my personal solar eclipse photography experiences have been limited, I do have some practical advice to share for photographing the upcoming solar eclipse.
The most important advice is to never compromise on eye safety or equipment quality when photographing the Sun.
Here is a quick breakdown of how to photograph a solar eclipse, covered in more detail below.
- Research the date, time, and location of the solar eclipse, and look for an unobstructed view of the Sun
- Ensure you have the proper equipment, including a manual camera, tripod, telephoto lens, and certified eye protection/solar filters
- Attach your certified solar filter to your camera lens, put on your certified solar glasses, and find the Sun
- Choose your camera settings and find focus using live view mode only (not the camera’s viewfinder).
- Compose your shot using live view mode only (not the camera’s viewfinder)
- Take test shots before the eclipse begins to ensure your settings (particularly your exposure) are correct
- Start capturing the eclipse as soon as it starts. Include shots over and underexposed to capture all the details
- Review your images and adjust accordingly as the brightness will continue to change throughout the eclipse
- Take breaks to enjoy the eclipse visually with your solar glasses

Partial Solar Eclipse over Lake Ontario | Trevor Jones.
What is a Solar Eclipse?
A solar eclipse is a celestial event where the moon passes between the Sun and Earth, resulting in the moon blocking our view of the Sun (either totally or partially) from a particular point on Earth.
There are three different types of solar eclipses:
- Partial Solar Eclipse: a portion of the Sun is covered
- Annular Solar Eclipse: a ‘ring of fire’ shines around the moon, centered in front of the Sun
- Total Solar Eclipse: the Sun is fully covered by the moon
The type of eclipse depends on the alignment of the moon, Earth, and the Sun, and how far away the moon is from Earth.
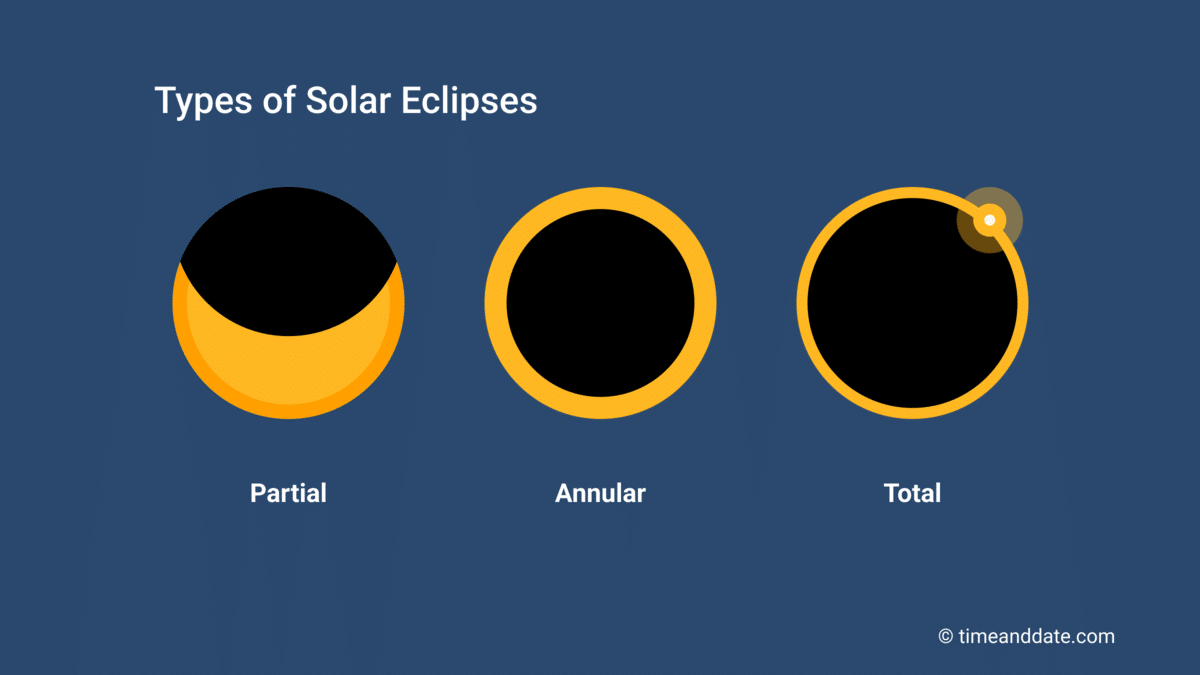
Types of Solar Eclipses. www.timeanddate.com.
When is the Next Solar Eclipse?
The frequency of solar eclipses varies due to the changing distances and angles between the Sun, Moon, and Earth over time. At this time, most people are gearing up for the ‘Great North American’ total solar eclipse happening April 8, 2024.
The alignment of the moon, Sun, and Earth takes place approximately every six months during a period of time known as eclipse season. This results in two to five solar eclipses each year, though they are not visible from every location on Earth.
Below is a table of the varying types of solar eclipses and their expected dates for the next few years. For more information and maps, visit Time and Date.
| Date | Solar Eclipse Type | Visibility Path |
|---|---|---|
| October 14, 2023 | Annular | The ‘ring of fire’ is visible along a narrow path that crosses the USA from Oregon to Texas. It passes over parts of Mexico, Belize, Guatemala, Honduras, Nicaragua, Costa Rica, Panama, Colombia, and Brazil. A partial eclipse will be visible in the Americas from Alaska to Argentina. |
| April 8, 2024 | Total | The narrow path of totality runs through Mexico, the USA (from Texas to Maine), and Canada (from Ontario to Newfoundland). A partial eclipse will be visible across nearly all of North America, and a small part of western Europe. |
| October 2, 2024 | Annular | Most of South America, Pacific, Atlantic, Antarctica. |
| March 29, 2025 | Partial | A partial eclipse will be visible in north western Europe, north in Asia, Africa, eastern North America, North in South America, Atlantic, Arctic. |
| September 21, 2025 | Partial | A partial eclipse will be visible in south-eastern Australia, Pacific, Atlantic, Antarctica. |
| February 17, 2026 | Annular | Partial eclipse will be visible in south Africa, Pacific, Atlantic, Indian Ocean, Antarctica. |
| August 12, 2026 | Total | Partial solar eclipse will be visible in most of Europe, northwestern Asia, northwestern Africa, Much of Canada and northeastern US, Pacific, Atlantic, Arctic. |
Eye Safety
The most important thing to remember is that it’s not safe to look directly at the Sun without eye protection made for solar viewing.
To prevent eye damage and to view/photograph a solar eclipse safely :
- All filters should be ISO 12312-2 standard certified. Purchase from a reputable astronomy dealer or company (i.e. Celestron, Lunt Solar Systems, Astrozap, Agena Astro, etc.).
- Never view the Sun through a camera lens, telescope, or other optics without a certified solar filter over the FRONT of the optics to avoid serious eye injury.
- Solar filters MUST be attached to the front of any telescope, camera lens or other optics. Do not use non-solar filter drop-in lens filters or place solar filters between your camera and lens.
- Do not use solar glasses as a filter for your camera or other optical devices.
- Inspect your solar glasses and filters for any damage before you use them. If there are holes (no matter how small) do not use them.
- Do not use the optical viewfinder on your camera (there is no solar protection there), opt for the live view mode on your screen.
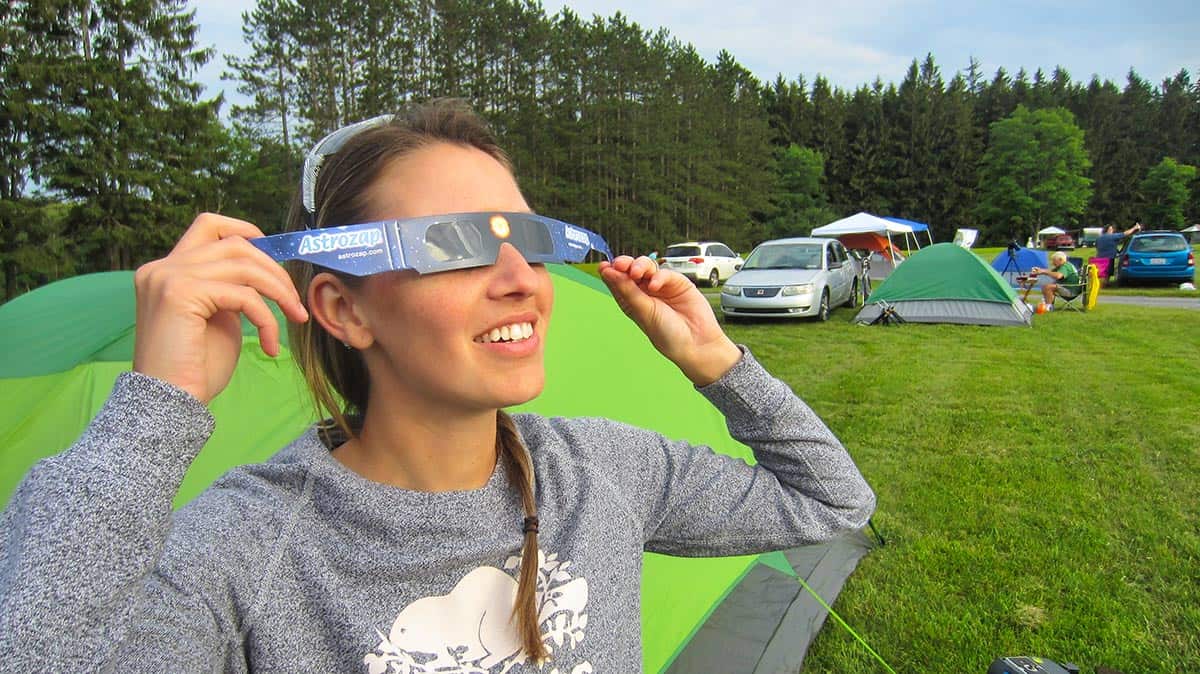 Viewing the sun through eclipse glasses
Equipment Needed
There are a few pieces of equipment you will need to photograph any type of solar eclipse.
You will want to practice setting up your equipment and taking test shots before the event to help you become familiar with your gear and settings.
While this checklist is geared toward those who own a camera for astrophotography, I have added a section for those who want to capture the solar eclipse with their phone below.

The Celestron Universal Solar Filter is an excellent option for most lenses.
- DSLR/Mirrorless Camera: you will need a camera with manual settings. DSLR and mirrorless cameras are popular choices because they allow for manual control of exposure settings.
- Camera Lens: a camera lens with at least 200mm focal length, though 400mm – 500mm will provide larger sun views while still including the Sun’s corona.
- Solar Filter: a certified ISO 12312-2 solar filter is needed to protect your eyes, camera, and lens from harmful UV rays. Select a filter that fits the size of your lens and never view or photograph the Sun without a proper solar filter.
- Tripod: a stable but lightweight tripod will keep your camera steady for bracketing your shots and setting up your camera with an intervalometer.
- Intervalometer: this cable gets plugged into your camera to capture images without having to touch your camera. This will help produce sharper images by eliminating camera shake.
- Certified Eclipse Glasses: you will want to safely observe the eclipse while your camera is running.
- Memory Cards: you will need plenty of storage space for the large number of photos you will capture. It’s also a good idea to bring a backup.
- Fully Charged Batteries: be sure to fully charge your batteries beforehand, and have fully charged backups just in case.
- Solar Eclipse App: use a solar eclipse app to help you predict the timing and duration of the eclipse from your location. Plan your location in advance, while considering the direction of the Sun, to ensure you have an unobstructed view.

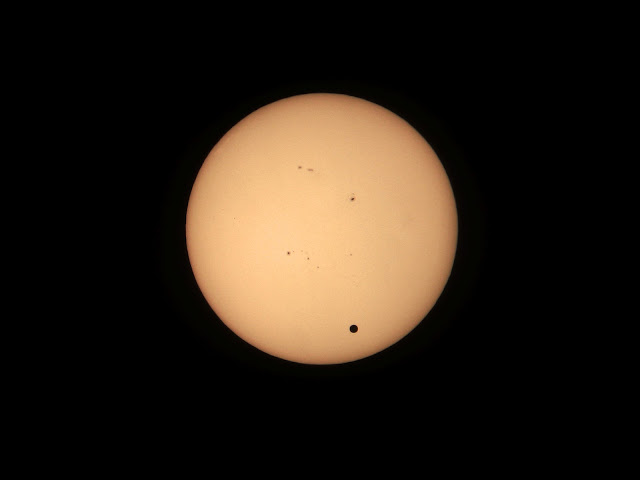
The equipment I used to photograph the Annular solar eclipse in June 2021. Canon EF 300mm F/4 lens + Certified Safe Solar Filter.
Capturing the Eclipse with Your Phone
It is possible to photograph the total solar eclipse with your smartphone, but you will need to use a certified solar filter. I do not recommend taking a picture of the solar eclipse in its partial phases using your phone camera, as you could permanently damage the sensor.
You can use a pair of solar eclipse glasses as a filter for your phone camera (see photo below), but you must not look at the sun without certified solar eclipse glasses on. So, if you only own one pair of eclipse glasses, don’t look at the sun while they are in use!

An easy way to take a photo of the solar eclipse with your phone and a pair of certified eclipse glasses.
While the ‘auto’ mode on your smartphone may work, it is best to use the manual camera settings on your phone for complete control. Most modern smartphones have a ‘manual’ mode for the camera, where you can adjust settings like shutter speed and ISO for the best possible shot.
The filter is necessary for the partial stages of the total solar eclipse as the moon slowly covers the disc of the sun. During totality, you can remove the filter to try and get a picture of the solar corona.
To capture an amazing photo during totality with your iPhone/smartphone, you will likely need to tap into the manual camera settings for a well-exposed image. During this time, the sky resembles dusk and a longer exposure (up to 1-2 seconds) may be needed to reveal the faint solar corona in the sky.

You can also buy filters specifically designed to cover your smartphone camera lens. (Agena Astro)
While an image at the 1X camera view mode on your phone can look great, a shot at 5X or 10X (or more) could be even better. To take photos of the solar eclipse with your phone using magnification, use a tripod or something to steady your phone to avoid camera shake.
Once again, a certified solar filter (or eclipse glasses) must be in front of the camera phone lens through the entire partial solar eclipse phase. Only during the brief (and incredible) moment of totality can the filter or glass be removed. When totality is over, the filter must go back on.
Do not use solar eclipse glasses in combination with binoculars or any type of optical device that magnifies the image. Solar eclipse glasses were not designed to filter an intensified amount of sunlight.
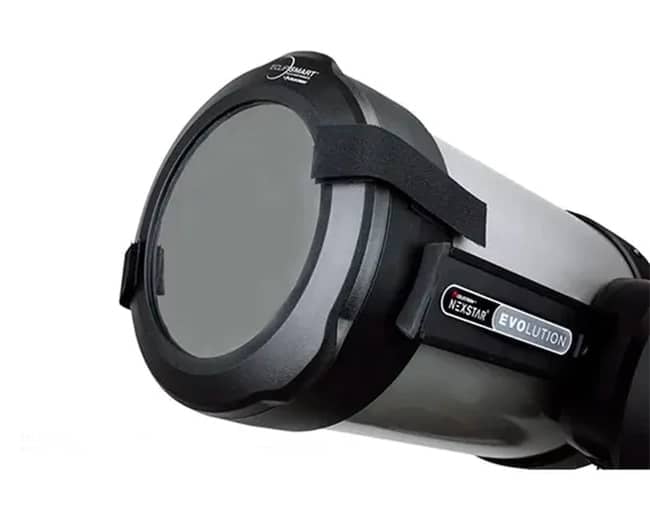
Using a Smart Telescope
Modern smart telescopes such as the ZWO SeeStar S50 and Vaonis Hestia have solar photography modes that can be used to capture the solar eclipse.
The SeeStar S50 includes a handy clip-on (ISO-certified) solar filter that is placed in front of the telescope lens. Then, you can use the dedicated smartphone app to find and focus the Sun automatically.
This method will provide a much larger image of the Sun than your phone because the device uses a telescope (250mm focal length) and a dedicated astronomy camera.

The SeeStar S50 Smart Telescope will be a popular way to capture the Solar Eclipse in 2024.
I have taken many test images of the Sun using the SeeStar S50, and the detail is quite impressive. The autofocus mode helps me capture sharp images of the Sun’s disk, including fascinating sunspots across its surface.
You could even use the timelapse mode to capture the entire solar eclipse event through each stage, as long as you have enough storage space.

Photographing the Sun through the SeeStar S50 smart telescope.
Choosing a Camera Lens for the Eclipse
For those capturing the solar eclipse with an interchangeable lens camera, the lens you choose is arguably the most important piece of gear when shooting a solar eclipse.
The focal length of your lens will determine how big or small the Sun will appear in your photo. A 200mm lens on a full-frame camera will only produce a tiny view of the Sun, with the extreme of 2000mm potentially cutting off parts of the corona.
A lens in the 500mm – 600mm range is ideal to get a close-up view and still capture all the details of the corona. If you don’t have a lens this long, a 200mm lens will work just fine. You can also utilize a crop sensor camera and/or a teleconverter for extra reach.

Examples of different focal lengths and the size of the Sun
It may surprise you to see how much focal length is needed to view the sun up close. In the graphic below, you can see that a whopping 2000mm is needed for the sun to fill the frame using a full-frame DSLR camera sensor.
If you are using an APS-C-sensor camera to photograph the eclipse, the Sun will be about 1.6X larger than it does in a full-frame camera, because it is ‘cropped’ in from the native focal length.

Fred Espenak has also put together an incredibly useful diagram to show how big the Sun will appear using a variety of different focal lengths, including using both a full-frame DSLR and a crop sensor DSLR.
Lenses come in two different formats, zoom or prime. Prime lenses have a fixed focal length, whereas zoom lenses have a focal range listed on the lens.
If you happen to be using a zoom lens at its maximum focal length (zoomed in all the way), beware of your lens falling or creeping back to the base. If you experience this during your practice session, make a plan to secure your lens (with tape) so this doesn’t happen while you’re shooting the eclipse.
Solar Filters
As mentioned above, you need a certified solar filter to photograph a solar eclipse.
The diameter of your lens/telescope will affect the size of the solar filter since it needs to be placed on the front of the objective lens. If you are unsure of your lens diameter, you can measure across the front, from one side to the other.

The Celestron Universal Solar Filter will fit most optics 75mm to 100mm in diameter.
Ensure that the filter you choose is ISO 12312-2 certified and purchased from a reputable source, such as astronomy equipment suppliers or certified dealers.
If you’re unsure, read reviews and seek recommendations from experienced photographers or astronomers who have successfully used solar filters for eclipse photography. They can often provide recommendations for quality filters.
Types of Solar Filters
You do not have to sacrifice safety if you are on a budget. Solar filters come in a range of different types and prices, with affordable options that meet safety standards.
First off, you will need to consider how the filter will attach to your lens or telescope. Filters can be made with or without the option to firmly mount them to your camera lens or telescope.
Depending on which filter you choose, you will want to make sure you know how to clean it properly.
Solar Film Sheets
The cheapest option for solar filters is the ‘do-it-yourself’ option. You can make your own solar filter for your camera or telescope using solar film sheets, a poster board, and a few other supplies.
For a detailed post about creating your own solar filter, click here.
 DIY Solar Filter | Agena Astro
The sheets are a flexible material that can be cut to size to create a custom filter to attach to camera lenses, telescopes etc. Designed specifically for solar viewing and photography.
Universal Solar Filters
Universal filters are made to fit a wide range of camera lenses and telescopes, regardless of their size or diameter. They are adaptable and can be used of many different optical instruments, making them a versatile, and often an affordable option for solar photography.
 Universal solar filter made from solar film | Celestron
Fitted Solar Filters
These types of filters are designed for a specific aperture using a combination of flexible solar film or glass and a bracket. They will include a secure method for mounting it to your lens/telescope objective (i.e. hook and loop straps, bracket etc.)
 EclipSmart Solar Filter – 6” SCT | Celestron
Threaded Solar Filters
Threaded solar filters match the filter threads on your camera lens and are designed to be mounted by screwing directly onto the front of a camera lens or telescope.
They are designed to maintain image clarity and quality and are typically more expensive than universal solar filters due to their glass design and optical performance.
The example shown below is the chromosphere model, which is suitable for photographing surface details and broad prominences.

Thousand Oaks Optical 77mm threaded camera lens filter. Available at Agena Astro.
Examples of threaded solar filters include:
- Solar Glass Filters: high-quality, coated glass that provides excellent quality, durability, and protection. They are usually manufactured professionally and come in threaded or custom-sized versions to fit camera lenses and telescope apertures.
- Hydrogen-Alpha Filters: specialized filters for observing the Sun’s chromosphere. They are commonly used to observe solar prominences and other features in the Sun’s outer atmosphere.
Keep in mind that thread on filters are going to be more difficult to take off of your camera lens when its time to remove your filters during totality. When you only have a few minutes to capture totality, fumbling with a thread on filter can waste precious time.
The DayStar Camera Quark Solar Filter with Canon EF Lens Mount. Available at Agena Astro.
Photographing a Partial or Annual Solar Eclipse
You’re ready to get photograph a partial or annular solar eclipse, here’s what you need to know.
- Plan your Location: research the date, time, and location. Pick a spot with an unobstructed view of the Sun and arrive with plenty of time to setup.
- Gather equipment: be sure to have the right equipment, including a DSLR/mirrorless camera, 200mm+ camera lens, tripod, certified solar filter and glasses.
- Attach your solar filter: attach your filter securely to your lens, the filter should cover the entire front of the lens
- Practice safety: wear certified solar filters and glasses at all times (except during the few minutes of totality). When framing/focusing, use live view on the camera’s screen not the viewfinder.
- Set up your equipment: mount your camera and set it to manual mode. Set your ISO, aperture, and shutter speed, and adjust focus. For tips on settings, see the section below.
- Find the sun: Use the live view screen to pan around the sky in the direction of the sun.
- Compose your shot: compose your shot using live view only. Plan your composition in advance, if possible.
- Test your settings: before the eclipse begins, take test shots to ensure your camera settings are correct.
- Start capturing the eclipse: start shooting the eclipse and adjust your shutter speed and exposure settings as the Sun goes through different phases.
- Review and adjust: review your exposures on your camera’s screen and adjust accordingly. Consider over and under-exposing (i.e. bracketing) a range of frames to capture the corona details.
- Enjoy the eclipse: Don’t forget to take a break from shooting to observe the event with your solar glasses.
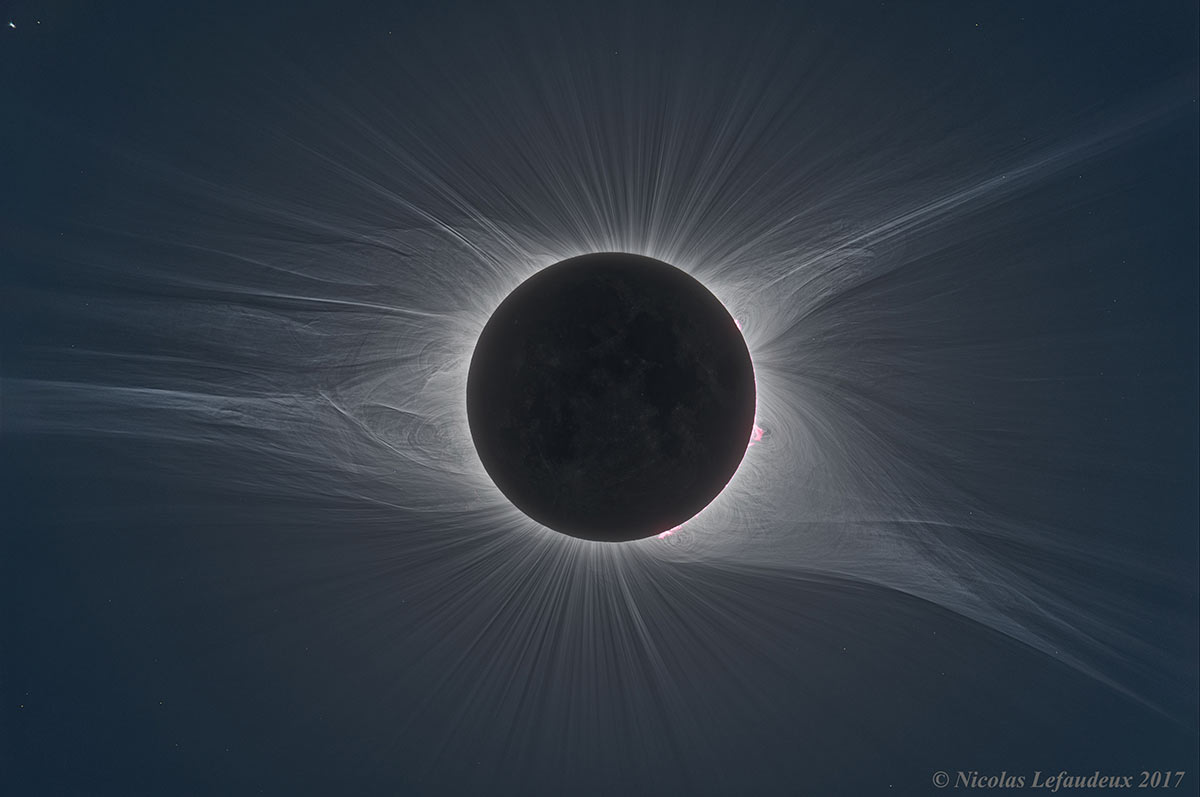
Total Solar Eclipse Corona in HDR. Astronomy Picture of the Day (APOD) Nicolas Lefaudeux.
Photographing a Total Solar Eclipse
Once completely covered by the moon, it is safe to look at the Sun without eye protection. This is during the total eclipse phase only, you will need to have your filter and glasses ready to put back on after totality is over.
The Baily’s beads effect, which happens immediately before and after totality, will let you know when to take your filters/glasses on and off.
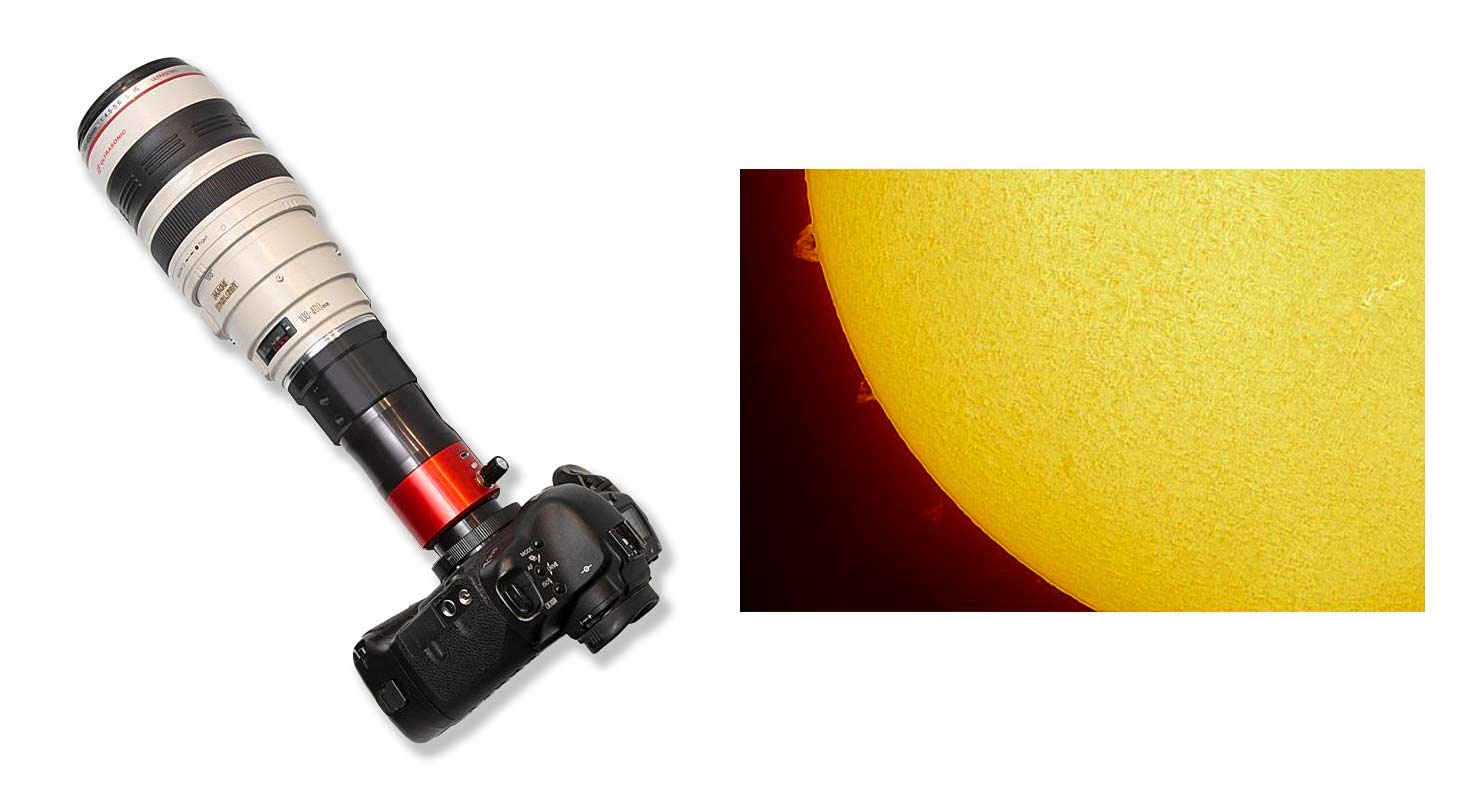
In order to capture the details of the Sun’s corona, the solar filter must be removed. Again, be sure to bracket the exposures over a range of shutter speeds (i.e. 1/1000 second to 1 second) to capture the details.
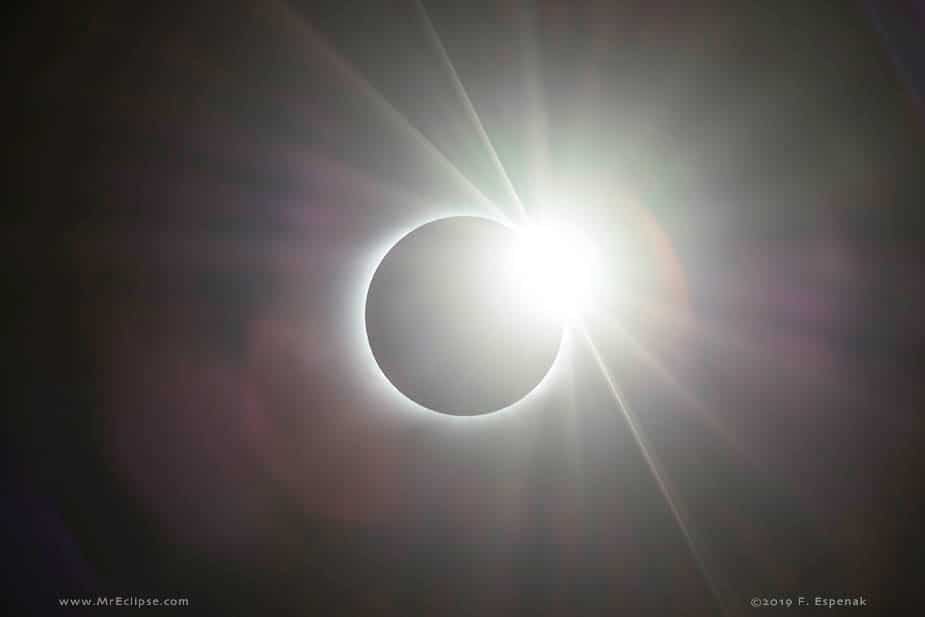
The Diamond Ring Effect during a Total Solar Eclipse | Fred Espenak
When photographing a total solar eclipse, you will want to look for the following effects:
- Baily’s beads effect: as the moon covers the Sun, you can see the rugged topography of the moon that allows only sparse amounts of sunlight to shine through in certain areas. Look for these irregularities on the edge of the moon just before totality and immediately afterward.
- Diamond ring effect: happens right before or after the moon covers the Sun during a total solar eclipse. With only a small portion of sunlight remaining, it creates the appearance of a shining ‘single diamond’ on the edge of a ring.
- Prominences: with only a small portion of sunlight showing during a total solar eclipse, there is the chance to see gaseous formations on the surface of the Sun. They start on the surface and extend out into the Sun’s outer atmosphere (i.e. corona).
Camera Settings
It’s important to get your settings right in order to capture the entirety of the event.
With your camera and lens setup on a tripod, with your certified solar filter in front, check that your camera is shooting in RAW image format so you have full control over your image processing afterward.
Set your camera to manual or bulb mode so that you are fully in control of every setting. You do not need a high ISO setting to photograph the extremely bright sun.
Use a nice low setting like ISO 100-400 for pretty well all phases of the eclipse and keep the white balance on daytime.
Your shutter speed is where you’ll really play around, depending on the phase. For example, you may shoot the early partial phases of the eclipse at 1/500th of second for a well exposed, sharp photo.
During totality, a longer exposure of ½ a second or longer may be needed to reveal the corona surrounding the sun. Keep in mind, If you’re using a setup without tracking, you’ll need to keep that exposure time rather short to avoid any amount of blur in the image – especially at longer focal lengths.
You can use your camera lenses lowest f-stop, maybe F/4 to start. But consider stopping down to F/8 for an even sharper shot.
Focus
Once the Sun is visible on the live view screen, you can start experimenting with different settings and see how they effect brightness of the sun in real time.
To focus your lens, use the 5 or 10X zoom on your live view screen on the edge of the sun. Adjust the focus ring on your lens until it’s as tight as possible.
If there are sunspots on the surface of the sun, these can be an even better focusing aid for your lens.
Once you have found a sharp focus you are happy with, you can pretty well keep it there for the entire event – but maybe check it again throughout the process, especially before totality.

Use the edges of the Sun and/or sunspots on the surface to help you achieve a sharp focus.
Framing
When you are happy with your exposure, focus, and framing of the sun, you can go ahead a take a few shots. For my example images, the settings were ISO 400, and a shutter speed of 1/250th of a second.
You settings will be somewhere around here depending on the f-stop of the lens you’re using. It’s totally normally to take a few shots and tweak your settings to find the sweet spot.
If you’re not using an intervalometer, make sure you use the delay timer to avoid any camera shake. 10-seconds is best. With the intervalometer, I can take a single or bracketed exposure or set a series of images to fire off.
It will retain the camera settings you have selected, and simply activate the shutter for a set number of shots.
Setting a series of images to run will help you enjoy the event without spending your entire time starring at the back of your camera screen.
Adjusting for Totality
The tricky part will be adjusting as the solar eclipse evolves – you’ll will need to stay on your toes.
The same camera settings that work for the early partial stages of the eclipse may not work well for the later stages. As the moon gradually covers the disc of the sun, the image will become darker, and may require more light to properly expose.
The diamond ring effect stages (right before and after totality), are where this is really pronounced, so you’ll need to act quickly to get it right.
I’m going to be honest with you here, there is no way to practice this exact moment without actually doing it.So take the time to understand your camera works, so you can feel comfortable adjusting settings on the fly to nail the shot.
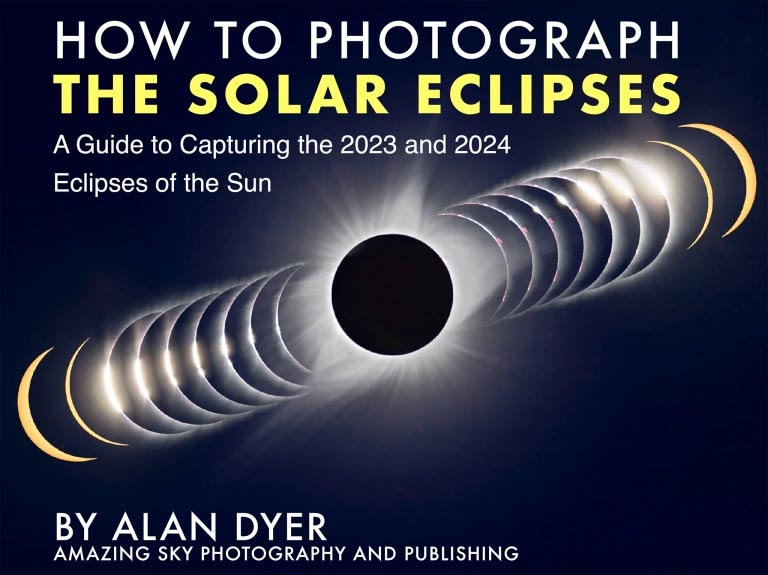
You can find more information about camera settings in this guide developed by Fred Espenak (also known as Mr. Eclipse). You can also see Alan Dyer’s book ‘How to Photograph Solar Eclipses‘ on his website.
Eclipse Apps
There are several mobile apps to assist you in photographing the solar eclipse.
Solar Eclipse Timer, available on Android and iOS, is a timing tool that uses GPS location to walk you through the contact times of the solar eclipse using audio.
After setting up the app to receive notifications, simply select the eclipse date you wish to time and activate the GPS data. You will receive 4 contact times for a total solar eclipse and the app will be armed to walk you through the solar eclipse.
It even provides an eclipse practice session, with the spoken contact times, so you can be ready for the big day.

Solar Eclipse Timer (SET) App
*This post was updated March 1, 2024.

Hi Trevor, do and of your tutorials discuss how to shoot with a dedicated astro camera like the ZWO series or are they only focused on DSLR’s ?
Thanks
Frank Serrao
Frankie5angels@mac.com
Cleveland OHIO
Hi Frank, I don’t have any solar photography tutorials using a dedicated astronomy camera up yet. I am working on it! Fingers crossed for clear skies on April 8th!
Hi Trevor
Wanted to let you know (and Frank) a special program has been created for generating a Sharpcap sequence , dedicated to imaging the solar eclipse with “standard” astro cameras.
Eclipse sequence generator
Information on this is on the Sharpcap forum. It does require a SC pro license, but well worth it.
Hello again.
Another question. I seem to remember you have the EOS Ra camera.
(I have one also)
I thought I might use the SETnC program to run a capture routine , but Robert (author) said the AEB would not work with his program.
Have you looked at using the EOS Ra for Totality, in the AEB (auto exposure bracketing) mode. I have been playing with the settings to shoot 7 bracketed shots with each button press, so I can try to capture more of the corona as well as the proms .
Take care
Steve