How to Photograph the Orion Nebula

This article was last updated on December 4th, 2024.
In this post, I’ll break down how to photograph the Orion Nebula, one of the most spectacular deep-sky objects in the night sky. While it may just look like a smudge to the naked eye, Orion is the nearest, large star-forming region to Earth at just 1,500 light years away.
When you take a picture of it using long exposures, you’ll see more color and detail in this star factory than you could ever imagine. While most of the astrophotography projects I take on involve a telescope, the Orion Nebula is a suitable subject to capture with an ordinary camera lens.
The Orion Nebula is a great beginner astrophotography target because it is very bright and easy to find in the night sky.
Capturing a successful image of the Orion Nebula will come down to your planning and approach. Last week, I captured the Orion Nebula using a DSLR camera and lens from my backyard, and I’ll show you exactly how I did it.
Quick Tips for Success
- Use a Star Tracker to Take Longer Exposures without Star Trailing
- Lower the F-Stop of Your Camera Lens for Better Star Quality
- Use a Light Pollution Filter for Better Contrast in the Image
- Take Several Sub-Exposures and Stack Them for a Better Image
- Process the Stacked Image in Adobe Photoshop to Stretch the Data
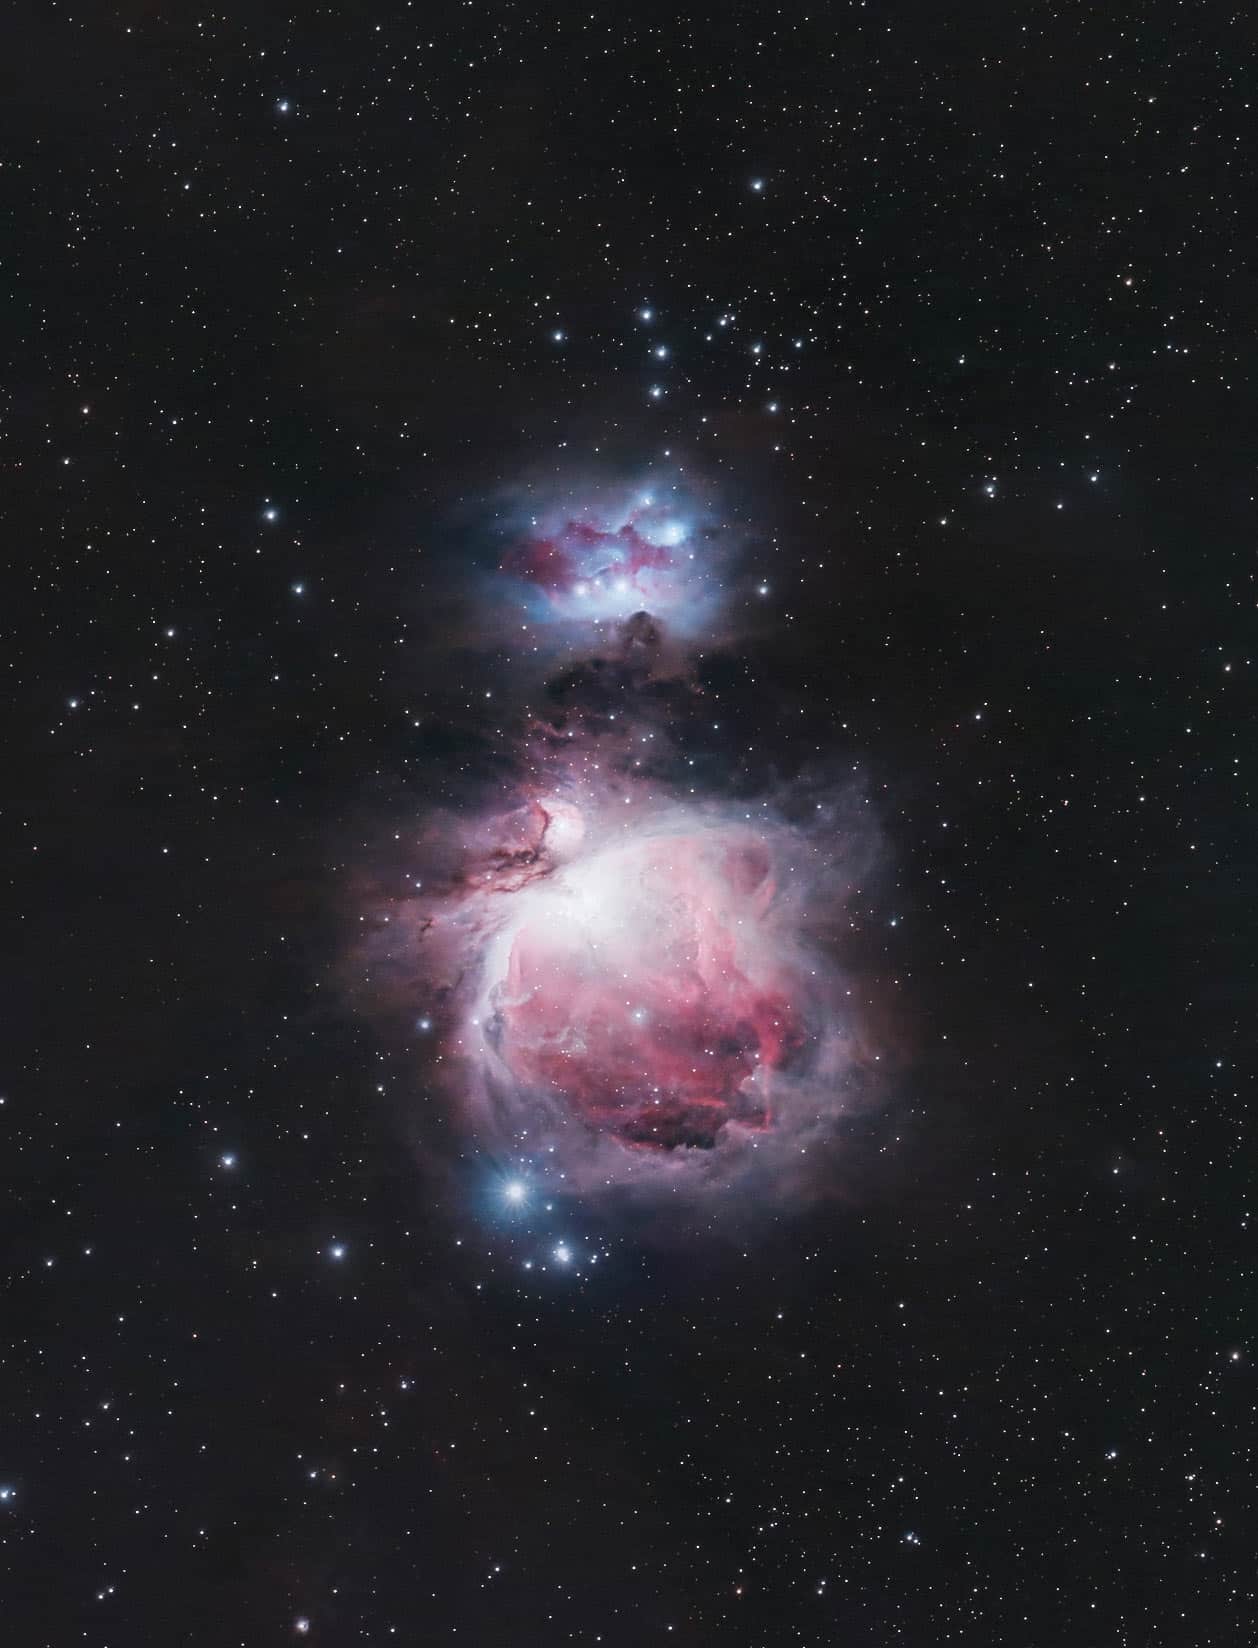
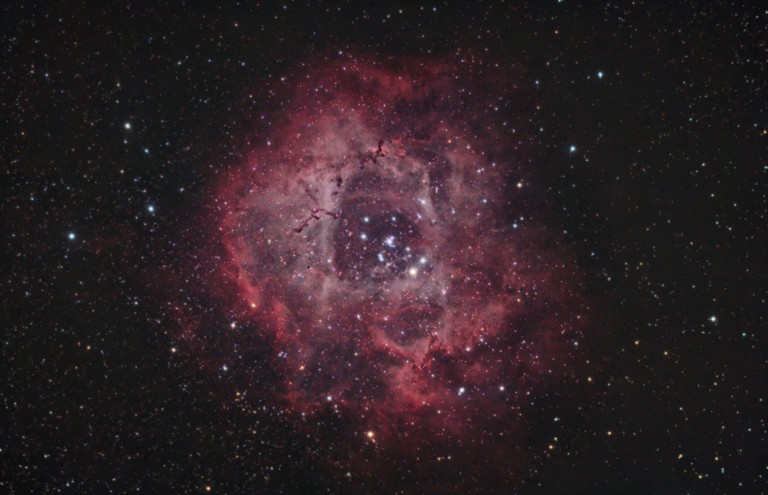
The Orion Nebula and Running Man Nebula using a 200mm Camera Lens.
Orion Nebula with a DSLR and Lens
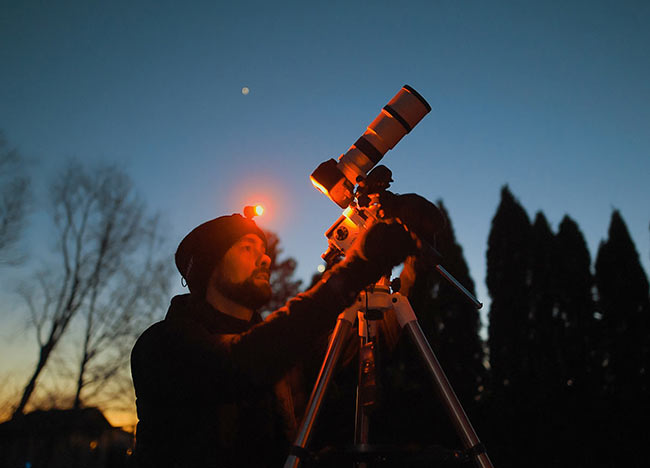
Projects like this are why I got into this crazy hobby in the first place. A simple photography kit pointed towards a clear night sky, gathering light on a distant, deep-sky object.
While automation tools like the ZWO ASIAIR and advanced software tools like N.I.N.A allow you to take full control over every aspect of your acquisition process, they also result in most of your night looking at a screen (or staying inside).
A DSLR camera is one of the best ways to enjoy astrophotography because its tactile, real-time user experience makes you feel a little more connected with the process. You can watch each picture arrive on the display screen, knowing that your photo will get better and better with each one.
The effect is the same, whether you are using a telescope or a camera lens. While astrophotography telescopes have a few advantages over a lens, a zoom lens is a more common choice for people just getting started in astrophotography.
Over the years, I have captured many bright deep-sky nebulae using camera lenses, including a cheap Canon EF 75-300mm zoom lens. This time, I took advantage of the light-gathering ability of the Canon RF 70-200mm F/2.8L.
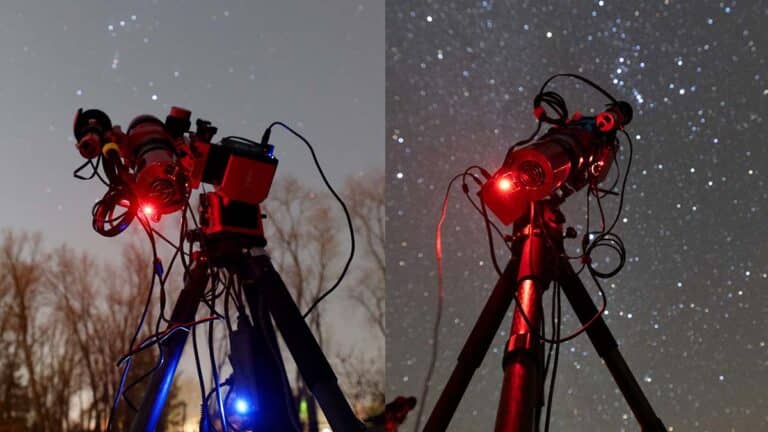
![]()
This was the first time I used the Canon RF 70-200mm F/2.8L for Astrophotography.
To take on a project like this, you will need an interchangeable lens camera with full manual control, capable of long-exposure images. This can be an ordinary DSLR camera like the Canon Rebel T7, or a more advanced mirrorless camera body like the Canon EOS Ra.
These cameras can take exposures of up to 30 seconds on their own, which is great for Nightscapes, Milky Way Photography, and even deep-sky imaging. For this project, I took 60-second exposures with my camera using a remote shutter release cable with a built-in intervalometer.
There are plenty of tools to automate an imaging session, but this is one of the easiest and most affordable ways to go about it. You choose your camera settings on the camera and set a sequence of images to run automatically on the remote shutter release cable.

Related Post: The Orion Nebula using the Seestar S50 Smart Telescope
The Equipment I Used
Here is a complete breakdown of the kit I used to photograph the Orion Nebula. Remember, the exact camera and lens you use doesn’t matter, but certain ones will make the process easier. In general, a ‘fast’ lens is best. Something in the F/2.8 range or lower is ideal.
For the best results, you should capture your nebula projects during the new moon phase, or at least when it’s below the horizon. However, sometimes you just need to take what you can get (especially in the winter). Here is a complete list of the equipment I used to capture the Orion Nebula.
- Carbon Fiber Tripod: to hold the star tracker (this is the closest one I could find to the one I use)
- Star Tracker: with a counterweight to balance the load
- Dovetail Bar (from a guide scope): to mount the camera and lens to the tracker
- DSLR/Mirrorless Camera: with a handy flip-out screen.
- Camera Lens: 70-200mm zoom lens that I’ll use at the longest focal length
- Light Pollution Filter: for the camera, I used a clip-in model
- Dew Heater Band: to stop frost from building up on the lens
- Remote Shutter Release Cable: with an intervalometer
Portability
This setup is lightweight and portable enough to pack up and bring to a dark sky site. If you’re utilizing the batteries in the Sky-Watcher GTi, this system does not require a portable power station to run (except for the dew heater band).
I ran this configuration from home in the backyard, so I plugged a power bar into an exterior AC outlet that included 3 powered USB 2.0 ports. If you’re lucky enough to live somewhere dark, you can skip the light pollution filter and capture beautiful, natural-looking images.

Attaching a dovetail bar to the lens collar allows for better balancing of the rig.
DSLR/Mirrorless Camera
The Canon EOS Ra is a Mirrorless camera body, that operates like a traditional DSLR in terms of user experience. It features a full-frame astro-modified CMOS sensor, and there were only a handful of them made in 2019/2020.
When this camera was announced, I immediately put my order in. The Canon EOS Ra is the successor to the Canon EOS 60Da, one of my favorite DSLR cameras for astrophotography of all time.
The standard EOS R version of this camera is almost identical but does not include the astro-modified CMOS sensor (sensitive to the h-alpha wavelength) or the 30X live-view function.
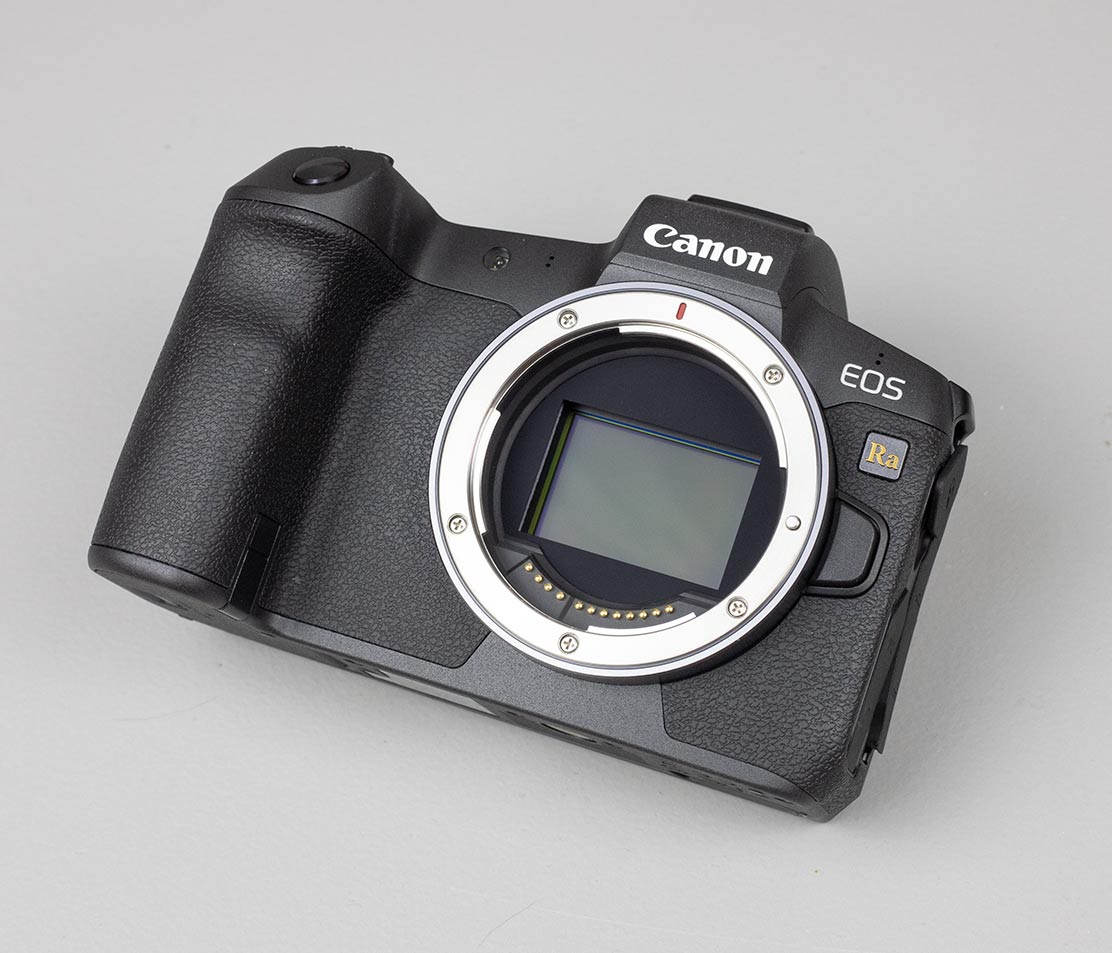
The Canon EOS Ra is Canon’s camera built specifically for astrophotography.
Telephoto Zoom Lens
Now, you might be thinking that a telescope is needed to capture a nebula up close, but that is not true. A camera lens, especially a long focal length one like the Canon RF 70-200 f/2.8 lens has more than enough reach to pull the Orion Nebula in for a closer look.
The 200mm maximum focal length is enough to reveal the nebula in detail, while the F/2.8 focal ratio allows plenty of light to be recorded in a single shot. If you are planning to capture a deep-sky object with a camera lens, remember that the longer the focal length is, the more challenging it will be to find your object without a GoTo tracker.
Even though the F/2.8 aperture setting lets the most light in, it’s usually not recommended to capture your images with this setting. For this lens, I found that an f-stop of F/4 resulted in the best-looking stars. I’ll share a few test images further down the post so you can see what I mean.

The Canon RF 70-200mm F/2.8L Lens
The RF lens mount replaces Canon’s EF lens mounts and was designed for the new Mirrorless camera bodies like the Canon EOS R, and EOS R6. To use the EF mount lenses on the new Mirrorless camera bodies, you must use the Canon R mount adapter.
Light Pollution Filter
The light pollution filter I used (Optolong L-Pro) is very ‘mild’ compared to a dual-bandpass filter like the Optolong L-eXtreme. This one is considered to be a broadband filter, suitable for galaxies, reflection nebulae, and star clusters.
I like this one because it retains a lot of the natural star color in the image while reducing unwanted signal from artificial light. When it comes to capturing broadband subjects from my Bortle Scale class 6 backyard, I either use the Optolong L-Pro or no filter at all.
It’s one of the few clip-in filters I own that fit this camera body, underneath the lens. This filter was designed specifically for the Canon EOS R camera body and allows you to safely attach an RF lens on top of it.
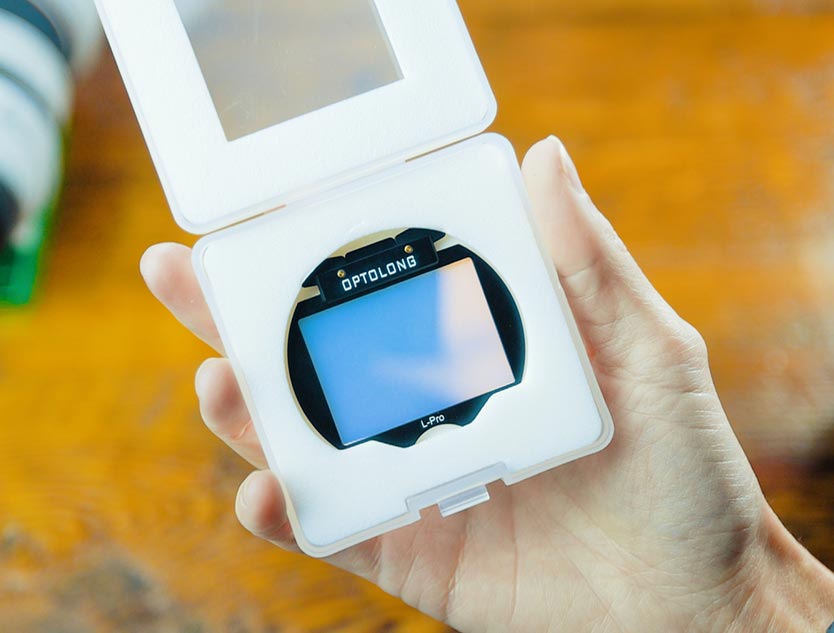
The Optolong L-Pro Filter, Canon EOS R Clip-In Model.

The light transmission graph of the Optolong L-Pro filter shows its selective bandpass design.
For certain projects, like emission nebulae, you may want to use a multi-bandpass or narrowband filter to capture impactful hydrogen-alpha image data. This can later be applied to your existing color data for an even more dynamic image.
Star Tracker
While it is possible to capture and stack an image of the Orion Nebula on a regular tripod, a star tracker will open the astrophotography floodgates. Even a 5-second exposure at 200mm on a stationary tripod will show star trails.
These devices move with the apparent motion of the sky and freeze deep-sky objects like the Orion Nebula in place. The Sky-Watcher Star Adventurer GTi is extra handy because it includes a mobile app to control it and point to objects in the night sky.
If you don’t need “GoTo” functionality, there are plenty of other models to choose from where you manually point your lens in the sky. The standard Sky-Watcher Star Adventurer 2i is a great option if you are comfortable with finding and framing targets yourself.
![]()
The Sky-Watcher Star Adventurer includes a mobile app to use its GoTo pointing functionality.
To utilize the full potential of this tracking camera mount you will need to download the SynScan Pro mobile app on your smartphone. This allows you to control the movement of the star tracker from your phone using a WiFi connection.
This model can handle up to 14 pounds of camera gear, which means it is suitable for telephoto lenses, and small refractor telescopes like the William Optics RedCat 61. For the best results, the camera gear must be well balanced in both the right ascension (RA) and declination (DEC) axes.
Setting Up Your Imaging Session
There are key areas of importance to remember when starting any astrophotography session. Without getting the basics right, the finest camera equipment in the world will not provide you with good results.
For the images to be sharp, with nice round stars in a long exposure, you need to make sure of two important things. Your star tracker is accurately polar aligned, and your camera equipment is well-balanced on the star tracker.
All polar alignment means is that the polar axis of your star tracker is aligned with the celestial pole of the Earth. Just use a simple, free app on your phone (I use Polar Finder) to tell you exactly where to place Polaris, the north star in the polar scope of the tracker, they all have these.
Use the Alt-Zz adjustment screws on the mount to position Polaris in the spot it appears on your mobile app. Once the polar alignment process is complete, you can not move the mount to a new position, or you will have to polar align all over again.
 Polar aligning the the Sky-Watcher Star Adventurer 2i
Balancing your camera equipment is very easy for smaller payloads. Adjust the counterweight in the RA axis, and/or the position of the camera and lens on the DEC axis. Do this until it stays in that position without falling to either side.
These two steps are dead simple once you get used to them, but I still see people getting it wrong.
Finding your Target
To point to the Orion Nebula using this start tracker, I can manually point the camera and lens toward it or utilize the GTI’s GoTo functionality. For the star tracker to better understand where it is pointed, I first need to do a 1-star alignment routine. Thankfully this process is quick and easy.
With the mount on, and the SynScan Pro mobile app connected via a WiFi connection, I navigated to the ‘1-star alignment’ feature on the app. This provides a list of potential bright stars and planets to use as an alignment star. Because Rigel is so bright, and within the Orion constellation itself, I choose this star to perform the alignment.

Using the arrow keys to center the alignment star (Rigel) in the SynScan Pro mobile app.
Because the mount already knows my location using GPS, it automatically slewed very close to the star. From here, I simply needed to use the arrow keys to fine-tune the position of the mount until Rigel was centered on the camera screen.
The live-view mode of the Canon EOS Ra using a high ISO setting and fast aperture allows me to see the stars in the sky in real-time. The image is brighter than I can see with the naked eye, and I can even see the brightest deep-sky objects in real time.
Framing your Target
Now that the star tracker understands where it is pointed in the night sky, I can select the ‘Orion Nebula’ from a list of deep-sky objects, and the mount will automatically point to it. You may need to fine-tune the position slightly to make sure that the object is centered.
The Orion Nebula is very bright and easy to spot at 200mm. With so many bright stars nearby (including Orion’s Belt), Messier 42 is one of the easy astrophotography targets to capture. The process is as simple as adjusting the position of the mount until the object is directly in the center of the camera screen.

Related Post: 3 Easy Astrophotography Targets for Beginners
As long as you have polar aligned the star tracker, and the 1-star alignment procedure has been completed, the tracker should now be moving at sidereal rate to match the motion of the night sky.
Focusing your Target
In general, manual focus is used when focusing your camera lens on the night sky. A rough, initial focus can be achieved by focusing the lens until the stars are as small as possible. From here, the zoom feature of the camera’s live view display comes into play.
Focusing a camera lens on a star can be tricky. Bright stars are handy because they are easy to find, yet they can often be difficult to dial in the critical focus. A Bahtinov mask (focusing aid) may help with the process if you have one that fits the objective of your camera lens.
The Orion Nebula has the added benefit of housing the Trapezium Cluster, a dense collection of four medium-brightness stars that make for a fantastic focusing aid. Using the 5x and/or 10x live view on the camera screen, you should be able to dial in your focus using the manual focuser on the lens.

Use the 5X and 10X zoom modes on your camera’s live view display screen to help dial in your focus manually.
Exact Camera Settings Used
I chose to capture 60-second exposures at ISO 800 for this project, and this seemed to be the sweet spot based on the histogram. If you’re using a similar setup, these settings are a good place to start but may change based on the brightness of your location (and the current moon phase).
The histogram displayed the bulk of the data near the center of the graph, which is a good indication that each frame was well-exposed, without clipping data in the shadow or highlight areas of the image. The core of the Orion Nebula was slightly clipped, but correcting this issue requires a dedicated tutorial (Orion HDR tutorial).
After some experimenting, I discovered the clear winner in terms of aperture for this lens was F/4. I would have loved to shoot at F/2.8 and capture twice as much light, but the stars were ‘unacceptable’ in my opinion. This scenario is nothing new. Lenses always perform better when you knock it down a stop or two.
Camera Settings used for Sub Exposures
- Mode: Bulb
- File Type: RAW
- White Balance: Daylight
- ISO: 800
- Aperture: F/4
- Shutter: 60 seconds

I set the intervalometer to take 120 x 60-second exposures with the above settings applied on the camera.
I centered the Orion Nebula in the frame rather than trying to also capture the nearby Horsehead Nebula and Flame Nebula, which was my original plan. Sometimes it’s best to make your primary target front-row center. It’s also where the stars will look best and usually where you’ll have the least amount of gradients to deal with.
After taking all of my tracked image exposures (light frames), I took 10 Dark Frames to help calibrate the final image. I did this by putting the lens cap back on the camera lens and taking 10 more shots at the same exposure length and ISO setting. Directly after the dark frames, I took 10 Bias Frames as well.
I also took Flat Frames in the morning by putting a white t-shirt over the lens and using the Av mode (aperture priority) on the camera. These exposures were about 1/500th of a second. These simple calibration frames can make a big difference to the final stack.

The star quality at F/3.2 was not great (F/2.8) was even worse. For long focal length projects, this lens performs best at F/4.
Importance of Image Stacking
Astrophotography of any kind can be improved by taking multiple exposures and stacking them together. This improves the image with each frame, by stacking the light (or signal) collected and reducing the amount of noise.
You can do this yourself in Photoshop or use one of the many free image stacking tools available, like DeepSkyStacker (DSS) or Siril. For a decent image, you’ll want to take at least 30 shots of the Orion Nebula, but even more is better.
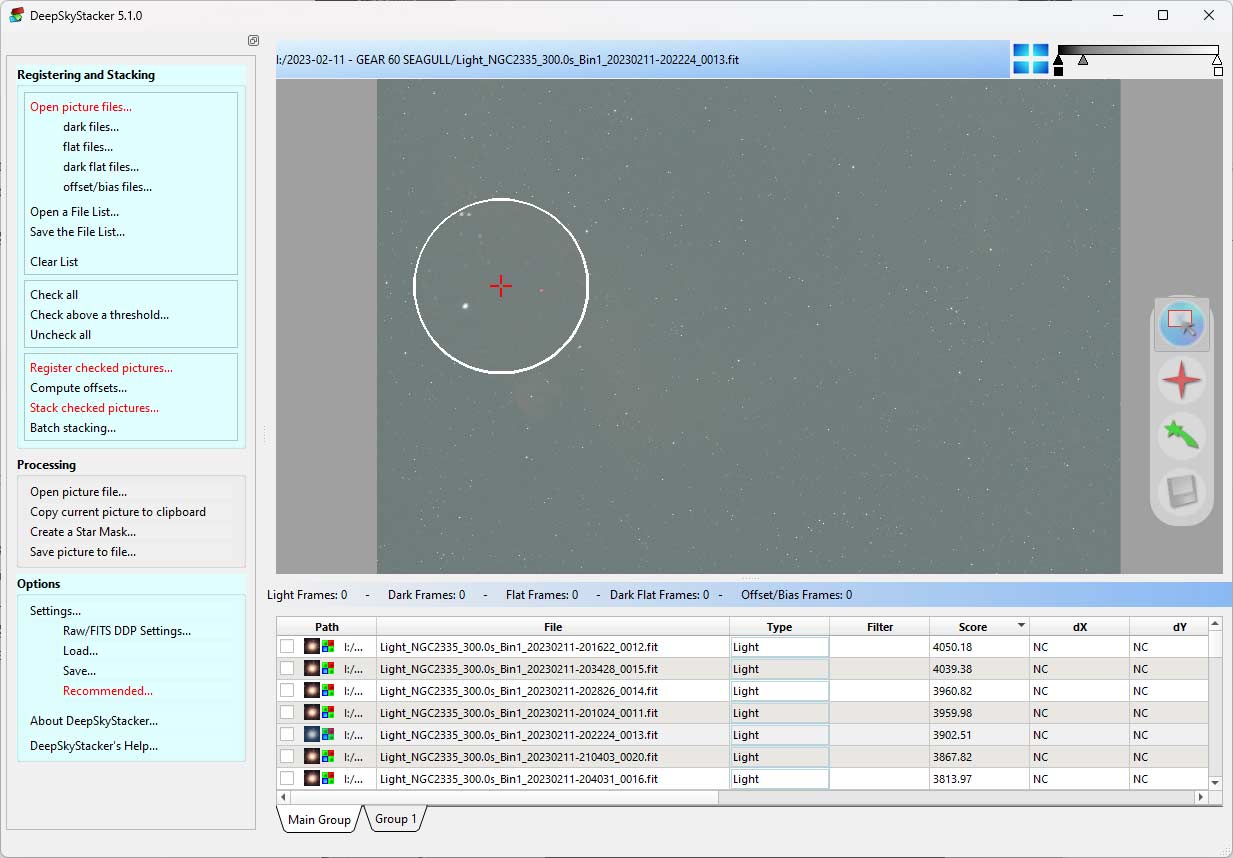
DSS is a free and easy-to-use image stacking software.
With my lights, darks, and flats captured, I loaded everything into DSS for registration, calibration, and stacking. DSS is an easy, free image-stacking tool I’ve been using for years that continues to deliver reliable results.
This is what the final, stacked image looked like in DeepSkyStacker. You can clearly see the Orion Nebula and a faint Horsehead Nebula in there as well. You may also notice a slight gradient in the image, which will need to be dealt with in post-processing.

The stacked image in its linear state is a little underwhelming.
Image Processing
The star tracker did a great job with this camera and lens. The stars are pretty sharp throughout each photo, not perfect, but good. I only had to dump about 5 frames, and 3 of them were due to passing clouds.
My final stacked image contained some walking noise, which, if you’re unfamiliar with it, looks like the image below. It appears as a streaky noise pattern that follows a particular direction—in my case, vertically.

Walking noise is a common symptom of DSLR astrophotography when each image shifts constantly, slightly, in a certain direction. To avoid this, you can shift the image frames in different directions (by only a few pixels) between each shot; this is called dithering.
On a full astrophotography rig with autoguiding, this is as easy as toggling on ‘dithering’. On a portable star tracker rig like this, you can just do it manually by moving the image frame a few pixels every few frames. It doesn’t always completely remove walking noise, but it should help substantially.
I did some simple image-processing techniques in Photoshop to this one to brighten up the nebulae and smooth out the image. My workflow was very minimal for this object, as there was not enough data to pull the really faint details and dust out.
The final image is a crop of the final framing, and I think it’s a nice, natural edit of the data. If you want to see my basic workflow and cool Photoshop techniques, you can check out my in-depth image processing guide.

The Result
In total, I collected 91 sub-exposures on the Orion Nebula with my camera and lens. This resulted in just over 1.5 hours of total exposure time, which is a rather short overall integration for an astrophotography project. If I had more clear sky time, 4-5 hours of data would make a world of difference in the quality of the photo.
If you couldn’t tell, the final presentation of my image is a substantial crop of the original frame. As with a lot of my astrophotography projects, the framing and presentation are tailored toward achieving the maximum impact at the end of a video in 3840 × 2160 pixel (4K) video format. I think it turned out quite nice!

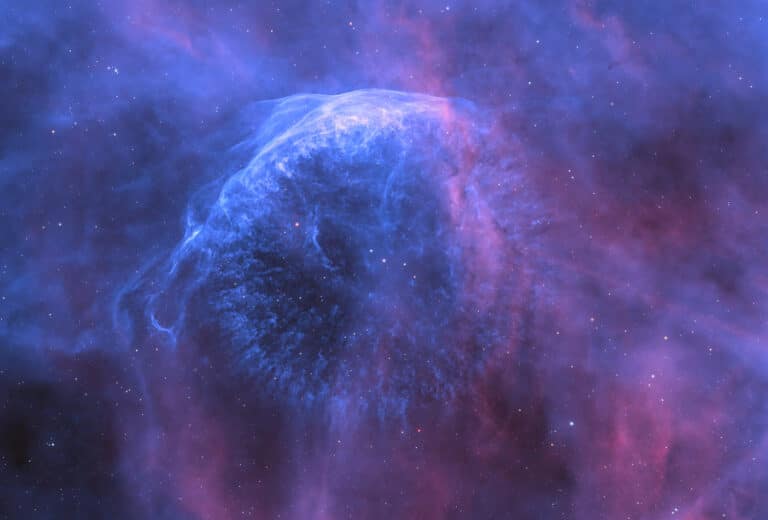
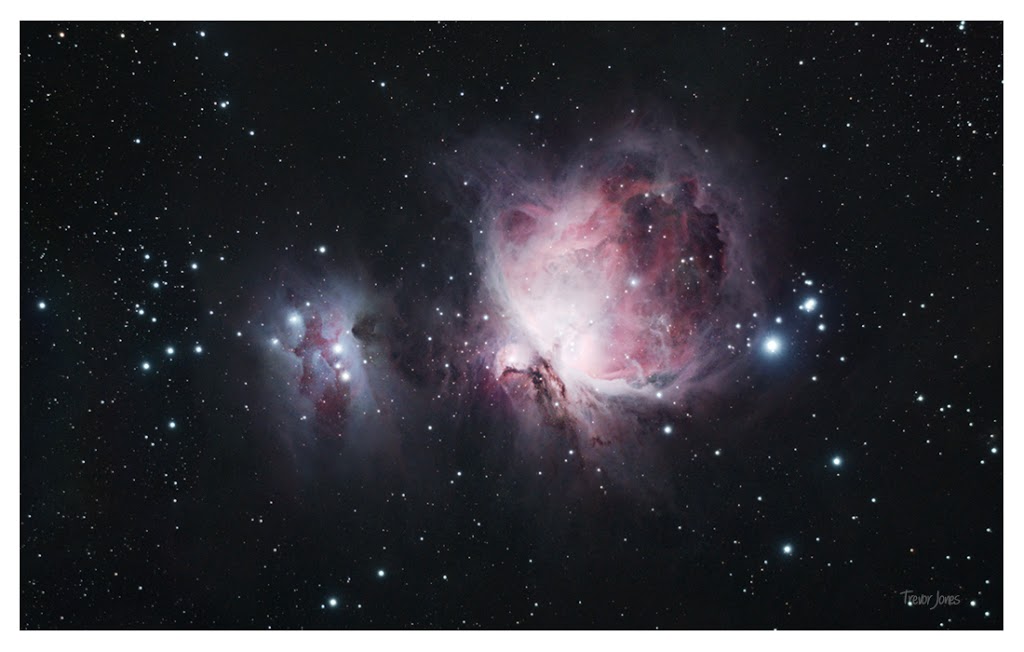
The Orion Nebula. 91 x 60 seconds at ISO 800 (1.5 hours total). Canon EOS Ra + Canon RF 70-200mm F/2.8L.
I hope that by sharing my process, you have learned at least one new technique to apply to your personal astrophotography projects. If you would like to stay up to date with my latest images, please follow me on Facebook and Instagram.
Trevor Jones is a deep-sky astrophotographer from Ontario, Canada. Trevor’s passion is to inspire others to start their astrophotography journey on his YouTube Channel, so they can appreciate the night sky as much as he does. His images have been featured in astronomy books, and online publications including the NASA Astronomy Picture of the Day (APOD).
Related Content:
- Results Using a $200 DSLR for Astrophotography
- Smartphone Astrophotography: A Beginner’s Guide
- Facts About Rigel: The Brightest Star in the Orion Constellation
I’m a beginner, and I don’t see a lot of writing about windy conditions.
What is the limit before I give up trying to catch pictures with my new Skywatcher Adventurer 2i ?
That’s a great point, Francois. If it’s too windy (40 kph+) I usually won’t set up any gear. A strong gust can ruin a sub-exposure. However, if you can find a spot where the wind is blocked, that can help a lot.
WOW, what a wonderful explanation of how you capture Orion nebula. I am an engineer by education and work, especially sensors of all kinds, image sensors. However, I am new into astro photography but got really interested in it and want to learn more (a lot more). What you did here suits me perfectly. In no way I plan to compete with NASA; I just want to make my own pics using a DSLR (Nikon though) and a 70-200mm lens f2.8… with other words the same as you explained in this article. Thank you for being so kind sharing it, and the way you did it. It was just brilliant. BR from Norway
Hello Trevor, thanks for the article about how you take these great pictures with this lightweight equipment. I have almost the same equipment and now I want to buy the Canon RF 24/200 F2.8 for wide field for my Canon EOS RP. Now you write that you stop it down to F4 to get clean stars. Wouldn’t the Canon 24/200 F4 lens be enough here? Because it’s lighter and cheaper. Or do you have to stop it down too? Or can you recommend the 24/200 F2.8 more? Thanks for your help.
Hey Trevor
Thanks for putting together this inspiring earlier tutorial. For me, it has brought what I thought to be the “unreachable” within reach, and by using relatively basic camera gear. I have a star tracker 2i pro pack, a sigma 40mm f1.4 DG lens and Nikon D3300 DSLR camera. I’m hoping this gear might be sufficient to capture a glimpse of the Orion nebula. I intend to stack for a better final image as suggested in your tutorial. I have watched some of your Youtube videos and find them to be helpful and inspiring also. I look forward to gaining more insight through the information you generously pass on to newbies like me.
Kind regards
Mark
Australia