Orion Nebula HDR Tutorial
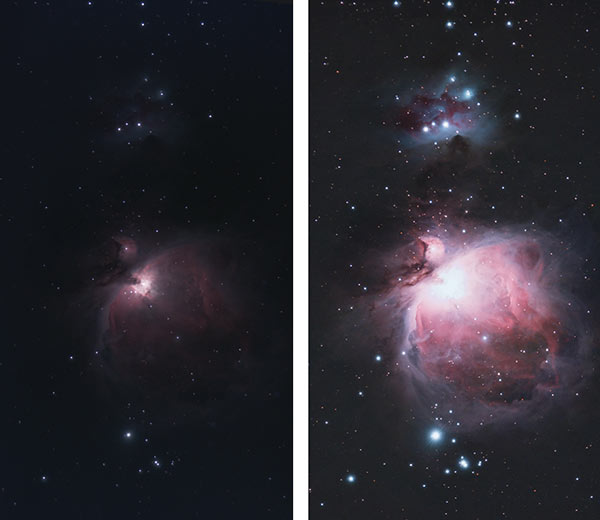
When you photograph a deep sky object that emits bright areas of light, it can be difficult to properly expose the entire subject evenly. Exposing the camera sensor for a long period of time is great for collecting the faint details of your target, but can often result in a loss of detail in the brightest areas of the image.
This phenomenon is most evident in bright nebulae and galaxies that feature an intensely bright area in the core of the object, such as the Orion Nebula or Andromeda Galaxy. Both of these deep sky astrophotography subjects can benefit from a layer mask that protects the bright details of the core.
An HDR (high dynamic range) photo of the Orion Nebula can be created in Adobe Photoshop in a number of ways. The idea is that you apply stretching (levels and curves) to the dim areas of your target, while leaving the bright core of the subject alone. This way, it is possible to create an astrophotography images with a high dynamic range. You are then able to enjoy the maximum amount of detail in your target without losing data to over-exposure.
Using a layer mask in Photoshop will help you blend varying exposure lengths.
Orion Nebula HDR in Photoshop
In this tutorial, I will use a layer mask technique in Adobe Photoshop to preserve the core of the Orion Nebula. The process involves using two sets of data to achieve a more balanced looking image of the Orion Nebula, yet still looks rather natural. I recommend using this technique sparingly, as this method can result in flat or “plastic” looking astronomy subject if taken to the extreme.
I believe that your final image should still showcase the intense areas of light glowing in the subject. The goal is to dial these areas back enough so that they have not clipped the highlights of your histogram. Although the photo will now have some creative editing applied, it is still possible to create an image that is both pleasing to the eye and represents the natural look of the Orion Nebula.
The example image used in this tutorial was captured using an astro-modified DSLR camera. The Canon EOS Rebel T3i was fitted to an Explore Scientific ED 102 refractor telescope and tracked the apparent movement of the night sky on an equatorial mount. All of the equipment I currently use is listed on the equipment page of this website.
Watch the video:
Capture 2 Sets of Data
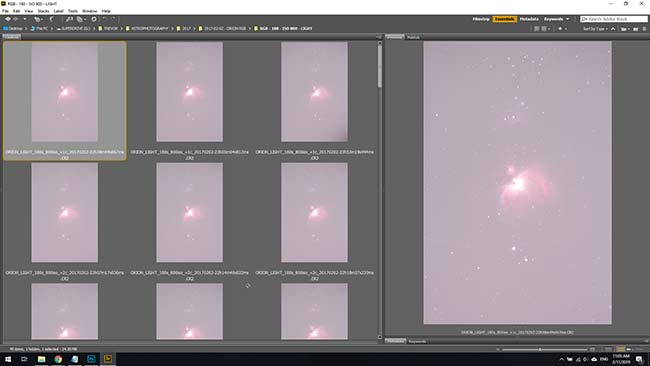
This process can be accomplished using just 2 images, but you will achieve better results if you use two complete sets of data. Essentially, you need one long exposure photo of the Orion Nebula, and one short exposure. We will then carefully merge the two photos together for the best of both worlds. The bright details in the core will be intact, while also showcasing the outer regions of the nebula that require more time to collect.
As an example, you could use 1 x 3-minute exposure of the Orion Nebula, and 1 x 15-second exposure and combine the two. However, for the best results it is recommended to use an integrated stack of each of the exposure lengths. By this, I mean 2 sets of stacked image exposures created using DeepSkyStacker (or similar stacking software). DeepSkyStacker will average the light frames and subtract dark frames to create a better signal-to-noise-ratio in each data set.
It is best to collect a fair amount of exposure time on the Orion Nebula for each set before processing. To be more specific, in this tutorial I will use the following number of exposures to create the final image:
Set 1 (long exposure)
- 24 x 3-minutes (light frames)
- 6 x 3-minutes (dark frames)
Details: Captured using ISO 800 with a Canon EOS Rebel T3i (Full Spectrum Modified)
Total: 1 Hour, 12 Minutes
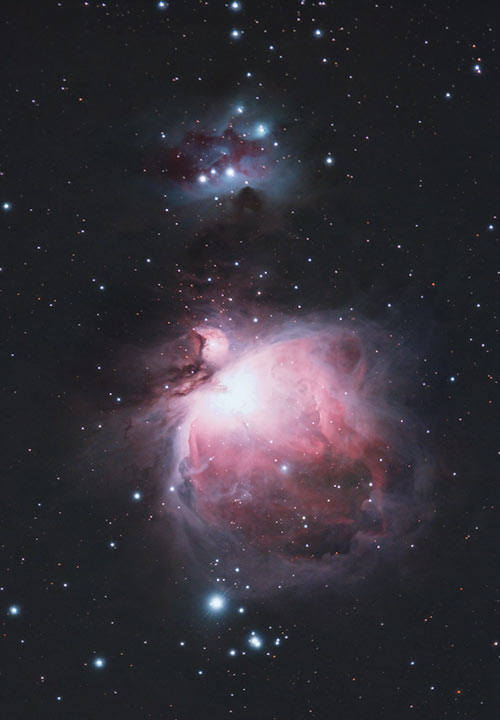
The 3-minute exposures at ISO 800 reveal the faint outer details of the Orion Nebula.
Set 2 (short exposure)
- 15 x 10-seconds (light frames)
- 10 x 10-seconds (dark frames)
Details: Captured using ISO 800 with a Canon EOS Rebel T3i (Full Spectrum Modified)
Total: 2 Minutes, 30 seconds

The 10-second exposures at ISO 800 reveal the details of the core without clipping the highlights.
With 2 data sets of long and short exposures, you’ll have some quality data to play with in Adobe Photoshop. Each of the images have an improved signal-to-noise-ratio thanks to the stacking process. Without this step, the final image would appear very noisy due to the nature of long exposure images using a high ISO setting on a DSLR camera sensor.
The images created during these integrations can now be processed independently before being merged together to create a high dynamic range photo.
Process the Long Exposure Image
The long exposure image that includes the 24 x 3-minute sub exposures will require the largest investment of processing time, as it includes the faintest details of the subject including subtle areas of interstellar dust. You should approach this image the way you would with any faint deep sky nebula or galaxy, with the goal of revealing as much detail as possible.
Your long exposure image will be the base, or background, of your final image. The shorter exposure integration will be applied on top of this layer. The blending process between these two images will have the biggest impact on the aesthetics of your final image, but I’ll get back to that in a minute.
Because we will later apply another exposure to the image in the bright core, you do not have to worry about maintaining the highlights in this portion of the long exposure image. However, try to avoid completely blowing out this area, as this will make blending the two exposures more difficult in the next stage.
I do not recommend making any changes to the image using DeepSkyStacker including levels or saturation. Simply open the created Autosave.tif file created in DSS in Photoshop. I have covered each stage of my image processing workflow in the following astrophotography tutorial.
Below, you’ll find a breakdown of all of the image processing steps I took to process the long exposure image of the Orion Nebula. I regularly use the Astronomy Tools Action Set plugin for Photoshop. You can find a download link to this software, along with all of the applications I use for astrophotography on the resources page.
- Image Crop (slight crop to remove stacking artifacts)
- Levels (Bring left slider to edge of histogram)
- Image > Mode > 16 Bits/Channel
- Change “Method” to “Exposure and Gamma”
- Levels Adjustment (Left and right sliders to edge of histogram)
- Create threshold adjustment layer (temporary)
- Color Balance (Set black and white points of image)
- Color Balance (Set grey point)
- Curves Stretch (S-Curve)
- Remove Gradients (Gradient Xterminator)
- Enhance DSO and reduce stars (Action Set)
- Select > Color Range > Saturation Boost (Use the Select and Mask Tool)
- Noise Reduction
- Star minimizer (Action Set)
- Sharpen (Adobe Camera Raw)
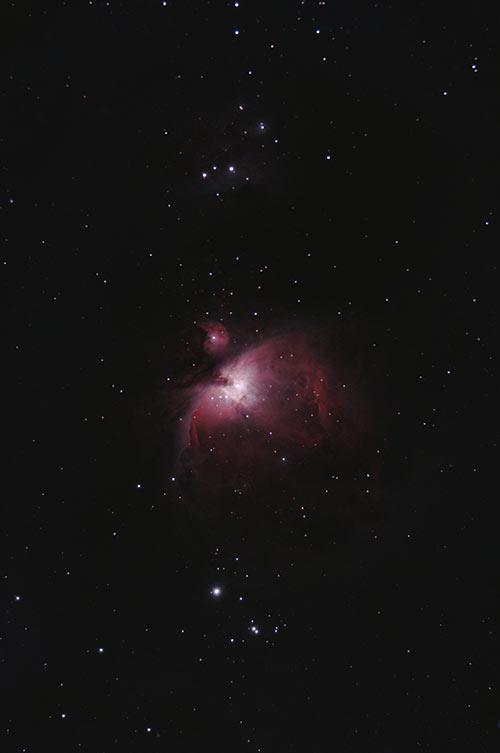
The long exposure portion of the image, with a “blown-out” core.
Process the Short Exposure Image
With phase one of the process complete, it’s time to process the shorter exposure integration in a way that allows it to seamlessly fit within the long exposure image. Naturally, the shorter exposure data set will show much less detail of the Orion Nebula as a whole, gradually showing less intensity the farther you get from the intense core.
For the Orion Nebula, a short exposure image will showcase the 4 visible stars in the core of the nebula known as the Trapezium. The composite image you can create using the varying exposure lengths will allow you to enjoy more details of the Orion Nebula, especially near the bright core.
Many amateur astrophotographers are faced with the challenge of trying to preserve the highlights of their image while stretching the faint details of the deep sky object (DSO) around it. It is certainly possible to create a high dynamic range photo using a single, long exposure image set, but capturing the fine details of the brightest objects is nearly impossible with this approach.
Instead, invest the time during your image acquisition stage to collect a few shorter exposures. The best part is, this portion of the image can be collected much faster and is not as involved in the post processing stages.
The short exposure image of the core (stack of 10-second exposures).
For my short exposure image stack, I collected 10-second exposures at ISO 800 with my Canon EOS Rebel T3i. The Orion Nebula is so incredible bright, that even a 10-second image records some impressive detail. This is one of the main reasons why this deep sky object is perfect for beginners.
As for processing this image, the same processing techniques that were used in your “base” layer can be used. You’ll likely find that you do not need to push this data nearly as far, because you are mainly interested in the inner details of the Orion Nebula core. In fact, it may be best to invest very little time stretching the short exposure data at all, and just correct any color balance issues.
Processing Tip:
Make sure that you do not change the scale of your original images when processing. You can perform this action after the two images have been merged if you wish. The reason it is best to leave the native resolution of your pre-merged images is so that they match up perfectly with each other during the alignment stage. Cropping is fine, but don’t reduce the size of your images until you have blended the files together.
Merging Multiple Images
To blend the two exposure sets together, you first need to align each of your images. If you have photographed Orion in a similar orientation and framing, this process will be much easier. To align the photos with each other, I like to place the short exposure image on top of the background layer with an opacity of 50%.
Use the bright stars in the field to match up each layer. You may need to rotate the image, but there should be no scaling needed if you used the original processed image files. Use the arrow keys on your keyboard to line the images up directly on top of each other.
There are several ways of creating a layer mask in Adobe Photoshop to isolate targeted areas of interest in your image. One such method is the Color Range tool found in the Select menu. This tool is useful for many astrophotography image processing tasks, especially when used with the Sampled Colors option.
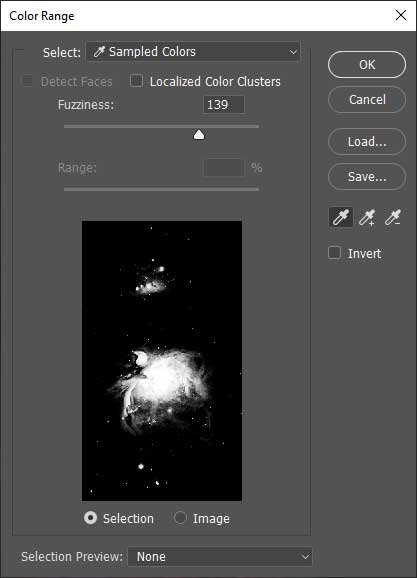
To help isolate the core of the Orion Nebula to blend multiple image exposures, I suggest placing the eyedropper into the white space near the Trapezium and adjusting the Fuzziness slider until you have successfully added the bulk of the blown highlights in your selection.
If you have also inadvertently included the brightest white stars of your image in the selection, you can easily remove these areas by holding down the alt key and using the lasso tool to draw around these areas. If you have not selected enough of the highlights in the core, you can either make another Color Range selection and increase the Fuzziness slider, or hold down the shift key and “draw-in” the areas you missed to add to the selection.
With the brightest region of the Orion Nebula selected, you can ensure that any adjustments made are only applied to this selection. For example, you could remove this pixel data from this selection entirely to reveal and underlying image with a well exposed core. Do you see where I am going with this?
Blending in the Core
With all of the handy selection tools and layer mask options available with Photoshop, I prefer the full manual control of the Eraser Tool for this job. I blame my background in art and design for this decision.
For a natural looking image, the core of the Orion Nebula should still be the brightest area of the photo. But to showcase the fine details and stars in this area, you’ll need to carefully strip away the top layer of clipped highlights. As seen in the video, I prefer to use the eraser tool with the softest brush available, and an extremely low opacity setting.
This technique means several clicks are necessary before you start to see any details of the layer underneath. For a non-destructive approach to your workflow, be sure to save your Photoshop file at each stage of the project. Also, leave an untouched version of each layer that you can quickly revert back to should you make a mistake.

Wrapping Up
I often use a copy of the untouched layer (before any blending was applied) to place on top of all layers and set it to have a very high level of transparency (10% opacity). This has a way of subtly bringing your image back its natural state, while benefiting from your new and improved core details.
I hope you have enjoyed this tutorial, and that you have a better understanding of the process of fixing the bright core of the Orion Nebula in Adobe Photoshop. For more tutorials, tips and gear reviews, please subscribe to the AstroBackyard Newsletter.